この記事は弁護士ドットコム Advent Calendar 2022の4日目の記事です。
モチベーション
普段フロントエンド領域の開発を主にしていますが、バックエンド領域の知識も深めたいと思いGoの勉強を最近始めました。
そこでGoを使ってフロントエンドのアプリケーションを作りたいと思い、WebAssemblyを使用し簡単なTodoアプリを作ってみることにしました。
とはいえ、まずは各技術に詳しくないので軽く調べてみました。
WebAssembly(以下 wasm)とは?
- wasmと略される
- ネイティブに近いパフォーマンスでWeb上で動作するバイナリ形式の低レベルのアセンブリ言語
- JavaScriptと並列して動作する
- C/C++/Rustなどからwasmにコンパイルできる
Goでwasmを使うにはどうすればいい?
方法
どうやらGoの環境変数を設定すればよさそうです
GOOS=js GOARCH=wasm
実際に手を動かしてみる
まずは動くものを作ってみる
Todoアプリを作る前にまずは簡単なdevtoolのコンソール上で”Hello World”とログ出力されるものを作りたいと思います。
アプリケーションの構成
sample_wasm/
    ┣ main.go
    ┣ wasm/
        ┣ main.go
        ┣ index.html
        ┣ wasm_exec.js
※wasm_exec.jsは、Goインストール時にすでに用意されており、go/misc/wasm配下にあるので、手元にコピーしておきます
各ソースコードはこんな感じです
sample_wasm/main.go
package main
// 簡易サーバー
import (
	"net/http"
)

func main() {
	http.Handle("/", http.FileServer(http.Dir("./wasm/")))
	http.ListenAndServe(":8080", nil)
}
sample_wasm/wasm/main.go
package main

// "Hello World"を表示するだけのもの
import "fmt"

func main(){
    fmt.Println("Hello World")
}
sample_wasm/wasm/index.html
<!DOCTYPE html>
<html>
    <head>
        <meta charset="utf-8"/>
        <title>Wasm Sample</title>
        <script src="wasm_exec.js"></script>
        <script>
            const go = new Go();
            WebAssembly.instantiateStreaming(fetch("main.wasm"), go.importObject).then((result) => {
                go.run(result.instance);
            }).catch(e => console.log(e));
        </script>
    </head>
    <body>
    </body>
</html>
上記のindex.htmlのスクリプト内で、WebAssemblyを使用しビルドしたmain.wasmを読み込んでいます
Goのソースコードをwasm用にビルド
GOOS=js GOARCH=wasm go build -o main.wasm
sample_wasm配下でサーバーを起動します
go run main.go
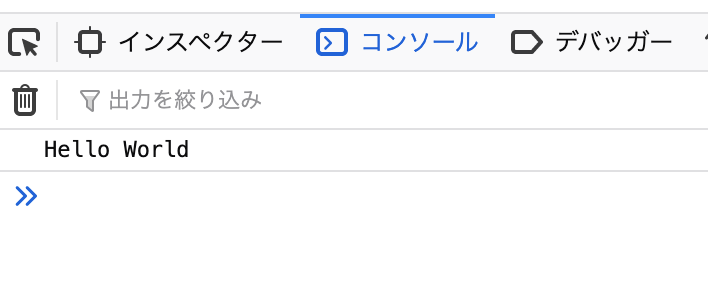
実際に http://localhost:8080/ にアクセスすると、
デベロッパーツール上のコンソール画面で"Hello World"が表示されることが確認できます。
実際にTodoアプリを作っていこうと思います〜
今回デザインとか気にしてないです。
使うもの
- syscall/js(GoでDomの操作をするもの)
作る機能
- Todoの追加
- Todoの削除
アプリケーションの構成
”まずは動くものを作ってみる”で用意したアプリケーションの構成と同じにし、
主に"sample_wasm/wasm/main.go"の中身を主に編集していく形で進めます。
実際に各機能を実装していく
UIの用意
<!DOCTYPE html>
<html>
    <head>
        <meta charset="utf-8"/>
        <title>Wasm Sample</title>
        <script src="wasm_exec.js"></script>
        <script>
            const go = new Go();
            WebAssembly.instantiateStreaming(fetch("main.wasm"), go.importObject).then((result) => {
                go.run(result.instance);
            }).catch(e => console.log(e));
        </script>
    </head>
    <body>
        <div>
            <h1>Todo App(Go and WebAssembly)</h1>
            <input id="todo-input">
            <button onClick="addTodo()">Add</button>
            <ul id="todo-list">
            </ul>
        </div>
    </body>
</html>
Todoの型の定義
type Todo struct {
	id    int
	title string
}
Todoの追加機能作成
// 関数add/deleteで扱う変数を定義
var todo []Todo
var target int
var id = 1

func add(this js.Value, value []js.Value) interface{} {
	todoInput := js.Global().Get("document").Call("getElementById", "todo-input")
	todoTitle := todoInput.Get("value").String()
	todo = append(todo, Todo{id: id, title: todoTitle})
	li := js.Global().Get("document").Call("createElement", "li")
	li.Set("id", "todo-list-"+strconv.Itoa(id))
	btn := js.Global().Get("document").Call("createElement", "button")
	btn.Set("textContent", "X")
	btn.Set("onclick", js.FuncOf(delete).Call("bind", btn, strconv.Itoa(id)))
	li.Set("textContent", todoTitle)
	js.Global().Get("document").Call("getElementById", "todo-list").Call("appendChild", li)
	li.Call("appendChild", btn)

	todoInput.Set("value", "")
    id += 1
	return nil
}
Todoの削除機能作成
func delete(this js.Value, value []js.Value) interface{} {
	targetId, _ := strconv.Atoi(value[0].String())
	for index, item := range todo {
		if item.id == targetId {
			target = index
		}
	}
	todo = append(todo[:target], todo[target+1:]...)
	ul := js.Global().Get("document").Call("getElementById", "todo-list")
	li := js.Global().Get("document").Call("getElementById", "todo-list-"+value[0].String())
	ul.Call("removeChild", li)
	return nil
}
関数addがButton要素から扱えるようにグローバル変数に登録します
func registerFunc() {
	js.Global().Set("addTodo", js.FuncOf(add))
}
最終的なコードはこちらです
wasm/main.go
package main

import (
	"strconv"
	"syscall/js"
)

type Todo struct {
	id    int
	title string
}

var todo []Todo
var target int
var id = 1

func add(this js.Value, value []js.Value) interface{} {
	todoInput := js.Global().Get("document").Call("getElementById", "todo-input")
	todoTitle := todoInput.Get("value").String()
	todo = append(todo, Todo{id: id, title: todoTitle})
	li := js.Global().Get("document").Call("createElement", "li")
	li.Set("id", "todo-list-"+strconv.Itoa(id))
	btn := js.Global().Get("document").Call("createElement", "button")
	btn.Set("textContent", "X")
	// delete関数をbuttonから実行できるよう設定
	// delete関数でTodoのidを取れるように設定
	btn.Set("onclick", js.FuncOf(delete).Call("bind", btn, strconv.Itoa(id)))
	li.Set("textContent", todoTitle)
	js.Global().Get("document").Call("getElementById", "todo-list").Call("appendChild", li)
	li.Call("appendChild", btn)
	//inputタグの中身を空にする
	todoInput.Set("value", "")
    id += 1
	return nil
}

func delete(this js.Value, value []js.Value) interface{} {
	targetId, _ := strconv.Atoi(value[0].String())
	for index, item := range todo {
		if item.id == targetId {
			target = index
		}
	}
	todo = append(todo[:target], todo[target+1:]...)
	ul := js.Global().Get("document").Call("getElementById", "todo-list")
	li := js.Global().Get("document").Call("getElementById", "todo-list-"+value[0].String())
	ul.Call("removeChild", li)
	return nil
}

func registerFunc() {
	js.Global().Set("addTodo", js.FuncOf(add))
}

func main() {
	c := make(chan struct{}, 0)
	registerFunc()
	<-c
}
所感
- 環境変数の設定だけでWASMに対応できるのは魅力的
- bindなどで値の受け渡しもできるので、VanilaJSに詳しければ学習ハードルは低そう
- JSとWASMの棲み分けの基準とか考えるのが難しそう
- 今回余裕がなかったので、Edit機能とか、スタイルとかも暇があれば整備したいな
明日は @datsukan さんです。お楽しみに。