使用したライブラリとその導入方法
今回使用したライブラリはusb-serial-for-android v2.2.1です。
早速ですが、これの使い方から躓きました。リファレンス(Readme.md)を読むと次のようにあります。
1. Add library to your project:
Add jitpack.io repository to your root build.gradle:
allprojects {
    repositories {
        ...
        maven { url 'https://jitpack.io' }
    }
}
Add library to dependencies
dependencies {
    implementation 'com.github.mik3y:usb-serial-for-android:Tag'
}
ここで一度整理しますと、build.gradleは実は2つあるということです。1つ目はファイル直下、もう1つはapp直下です(次の写真の通りです)。
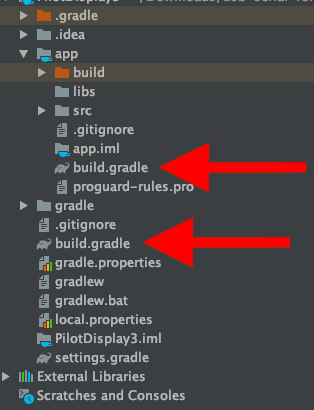
まずはrootの、つまり上の写真で言えば下の方のbuild.gradleのallprojects/repositoriesにリファレンスの最初の部分を書き込み、次にapp直下の、上の写真で言えば上の方のbuild.gradleのdependanciesにリファレンスの2番目のように書き込めばいいわけです。
ここでもう1つ注意点があります。2番目の操作について、implementation 'com.github.mik3y:usb-serial-for-android:Tag'とリファレンス通りに素直に書き込むと動作しません。'Tag'の部分は'master'や'2.1.0'などと置換しなくてはいけません1。おそらくgitのブランチの選択だと思われます(間違っていたらごめんなさい、指摘等お願い致します)。大抵の場合masterにしておけば間違いはなさそうです。
Intent filterとかDevice filterとか
Intent filterに関しては好みですので、とくに強制ではないと思います。1回1回きちんと接続許可を確認したいならば特に必要はありません。他のサイトでもこの部分は重点的に説明されているので、ここではソースのみ掲載しておきます。resにxml/device_filter.xmlを作成し、activity内の既存のIntent filterと並列して以下を書き込むのでした。
<intent-filter>
    <action android:name="android.hardware.usb.action.USB_DEVICE_ATTACHED" />
</intent-filter>
<meta-data
    android:name="android.hardware.usb.action.USB_DEVICE_ATTACHED" android:resource="@xml/device_filter" />
問題はDevice filterの問題です。ライブラリにあるdevice_filter.xmlを確認すると、現時点では以下のようになっています。
<?xml version="1.0" encoding="utf-8"?>
<resources>
    <!-- 0x0403 FTDI -->
    <usb-device vendor-id="1027" product-id="24577" /> <!-- 0x6001: FT232R -->
    <usb-device vendor-id="1027" product-id="24592" /> <!-- 0x6010: FT2232H -->
    <usb-device vendor-id="1027" product-id="24593" /> <!-- 0x6011: FT4232H -->
    <usb-device vendor-id="1027" product-id="24596" /> <!-- 0x6014: FT232H -->
    <usb-device vendor-id="1027" product-id="24597" /> <!-- 0x6015: FT231X -->

    <!-- 0x10C4 / 0xEAxx: Silabs CP210x -->
    <usb-device vendor-id="4292" product-id="60000" /> <!-- 0xea60: CP2102 -->
    <usb-device vendor-id="4292" product-id="60016" /> <!-- 0xea70: CP2105 -->
    <usb-device vendor-id="4292" product-id="60017" /> <!-- 0xea71: CP2108 -->
    <usb-device vendor-id="4292" product-id="60032" /> <!-- 0xea80: CP2110 -->

    <!-- 0x067B / 0x2303: Prolific PL2303 -->
    <usb-device vendor-id="1659" product-id="8963" />

    <!-- 0x1a86 / 0x7523: Qinheng CH340 -->
    <usb-device vendor-id="6790" product-id="29987" />

    <!-- CDC driver -->
    <usb-device vendor-id="9025" />                   <!-- 0x2341 / ......: Arduino -->
    <usb-device vendor-id="5824" product-id="1155" /> <!-- 0x16C0 / 0x0483: Teensyduino  -->
    <usb-device vendor-id="1003" product-id="8260" /> <!-- 0x03EB / 0x2044: Atmel Lufa -->
    <usb-device vendor-id="7855" product-id="4"    /> <!-- 0x1eaf / 0x0004: Leaflabs Maple -->
    <usb-device vendor-id="3368" product-id="516"  /> <!-- 0x0d28 / 0x0204: ARM mbed -->
</resources>
おそらくラズパイやArduinoといったメジャーなマイコンを使うなら問題は無さそうですが、mbedというマイナーなマイコンには対応していませんでした。*(確認したら対応していました。以下は超マイナーなマイコンを使ったことを想定してください。)*このまま使うと見事にエラーとなります。
そこで使用するのがUsbSerialProberクラスです。これを使えばvender-idとproduct-idさえわかっていればどんな機器も接続できます。mbedの使用例は下の通りです。
//ProbeTableで追加するデバイスの登録
//mbedは使用対象外なのでここでベンダーIDとプロダクトIDを登録する必要がある
ProbeTable customTable = new ProbeTable();
customTable.addProduct(0x0d28, 0x0204, CdcAcmSerialDriver.class);
UsbSerialProber prober = new UsbSerialProber(customTable);
通信方法
ここまできたらあともう一歩です。リファレンスには以下のようなコードが例として挙げられています。
// Find all available drivers from attached devices.
    UsbManager manager = (UsbManager) getSystemService(Context.USB_SERVICE);
    List<UsbSerialDriver> availableDrivers = UsbSerialProber.getDefaultProber().findAllDrivers(manager);
    if (availableDrivers.isEmpty()) {
        return;
    }

    // Open a connection to the first available driver.
    UsbSerialDriver driver = availableDrivers.get(0);
    UsbDeviceConnection connection = manager.openDevice(driver.getDevice());
    if (connection == null) {
        // add UsbManager.requestPermission(driver.getDevice(), ..) handling here
        return;
    }

    UsbSerialPort port = driver.getPorts().get(0); // Most devices have just one port (port 0)
    port.open(connection);
    port.setParameters(115200, 8, UsbSerialPort.STOPBITS_1, UsbSerialPort.PARITY_NONE);
上のコードで通信の窓口となるポートの準備を終えたことになります。
受信・送信のコードは以下の通りです。
port.write(request, WRITE_WAIT_MILLIS);
len = port.read(response, READ_WAIT_MILLIS);
ちなみにrequest,responseはそれぞれbyte型配列です。port.read()の返り値は受信したデータの長さですので、受信成功の有無をこれで確認することもできます。
通信時の注意点(?)
特にデータの読み込みを行う際ですが、別スレッドで行った方が良いことが多いです。スレッドの作成法はこちらを参照してください。
最後に
やっぱりライブラリは便利ですね。