認証基盤にAWS Cognitoを採用し、それらをバックエンドAPI(今回はNestJS)に実装してみました。
基本的なユースケースに対応したコードを紹介します。
(メールアドレスの変更は現在は問題があるためやりません)
前提
- Cognitoのユーザープールが作成されていること
- NestJS v9を使っています
使用するパッケージ
npm install amazon-cognito-identity-js aws-jwt-verify class-validator dotenv
class-validator(リクエストバリデーション時に使う)とdotenvはお好みで。
新規登録
ロジック部分はauth.service.tsに集約します。
Cognitoはメールアドレスが一意かどうかをチェックしてくれないので、他のユーザーと登録されるメールアドレスが重複することが可能となっています。
なので、他のユーザーと重複がないようにチェックするようにしています。
import { Injectable } from '@nestjs/common';
import { CognitoUserAttribute, CognitoUserPool } from 'amazon-cognito-identity-js';
import { ConfigService } from '@nestjs/config';
import { RegisterRequestDto } from '@/dto/register.request.dto';
import { fetchListUsers } from '@/helpers/utils.helper';

@Injectable()
export class AuthService {
  private userPool: CognitoUserPool;

  constructor(private configService: ConfigService) {
    this.userPool = new CognitoUserPool({
      UserPoolId: this.configService.get<string>('COGNITO_USER_POOL_ID'),
      ClientId: this.configService.get<string>('COGNITO_CLIENT_ID'),
    });
  }

  async register(authRegisterRequest: RegisterRequestDto) {
    const { name, email, password } = authRegisterRequest;
    // メールアドレスの重複がないかチェックする
    const existedUser = await fetchListUsers(email);
    if (existedUser.length > 0) throw new Error('The email is duplicated.');

    return new Promise((resolve, reject) => {
      return this.userPool.signUp(
        name,
        password,
        [new CognitoUserAttribute({ Name: 'email', Value: email })],
        null,
        (err, result) => {
          if (!result) {
            reject(err);
          } else {
            resolve(result.user);
          }
        },
      );
    });
  }
}
ちなみに、特定のEmailを持ったユーザーを取得する関数はこれ。
@aws-sdk/client-cognito-identity-provider を使うとユーザープールを操作できます。
import { CognitoIdentityProviderClient, ListUsersCommand } from '@aws-sdk/client-cognito-identity-provider';

const cognitoClient = new CognitoIdentityProviderClient({});

/** CognitoのUserPoolの特定のEmailを持ったユーザーを取得する */
export const fetchListUsers = async (email: string) => {
  const command = new ListUsersCommand({
    UserPoolId: process.env.COGNITO_USER_POOL_ID,
    Filter: `email = "${email}"`,
  });
  const { Users: users } = await cognitoClient.send(command);
  return users;
};
controllerは呼び出すのと、エラーハンドリングをするだけ。なので、次項から省略します。
import { RegisterRequestDto } from '@/dto/register.request.dto';
import { BadRequestException, Body, Controller, Post } from '@nestjs/common';
import { AuthService } from '@services/auth.service';

@Controller('auth')
export class AuthController {
  constructor(private readonly authService: AuthService) {}

  @Post('register')
  async register(@Body() registerRequest: RegisterRequestDto) {
    try {
      return await this.authService.register(registerRequest);
    } catch (e) {
      throw new BadRequestException(e.message);
    }
  }
}
e.g. 動作確認用リクエスト
curl --location --request POST 'http://localhost:3000/auth/register' \
--header 'Content-Type: application/json' \
--data-raw '{
    "name":"user_1",
    "email":"hogehoge@example.com",
    "password":"P@ssw0rd"
}'
確認コードの検証
メールアドレスを検証される際に必要になる確認コードを検証します。
import { Injectable } from '@nestjs/common';
import { CognitoUser, CognitoUserPool } from 'amazon-cognito-identity-js';
import { ConfigService } from '@nestjs/config';
import { VerifyCodeRequestDto } from '@/dto/verifyCode.request.dto';

@Injectable()
export class AuthService {
  private userPool: CognitoUserPool;

  constructor(private configService: ConfigService) {
    this.userPool = new CognitoUserPool({
      UserPoolId: this.configService.get<string>('COGNITO_USER_POOL_ID'),
      ClientId: this.configService.get<string>('COGNITO_CLIENT_ID'),
    });
  }

  async verifyEmail(user: VerifyCodeRequestDto) {
    const { name, code } = user;
    const userData = {
      Username: name,
      Pool: this.userPool,
    };
    const cognitoUser = new CognitoUser(userData);
    return new Promise((resolve, reject) => {
      return cognitoUser.confirmRegistration(
        code.toString(),
        true,
        function (error, result) {
          if (error) reject(error);
          resolve(result);
        },
      );
    });
  }
}
e.g. 動作確認用リクエスト
curl --location --request POST 'http://localhost:3000/auth/verify' \
--header 'Content-Type: application/json' \
--data-raw '{
    "name": "user_1",
    "code": "494769"
}'
ログイン
上記で作ったアカウント情報を使ってログインします。
import { Injectable } from '@nestjs/common';
import { AuthenticationDetails, CognitoUser, CognitoUserPool } from 'amazon-cognito-identity-js';
import { ConfigService } from '@nestjs/config';
import { AuthenticateRequestDto } from '@/dto/authenticate.request.dto';

@Injectable()
export class AuthService {
  private userPool: CognitoUserPool;

  constructor(private configService: ConfigService) {
    this.userPool = new CognitoUserPool({
      UserPoolId: this.configService.get<string>('COGNITO_USER_POOL_ID'),
      ClientId: this.configService.get<string>('COGNITO_CLIENT_ID'),
    });
  }

  async authenticate(user: AuthenticateRequestDto) {
    const { name, password } = user;
    const authenticationDetails = new AuthenticationDetails({
      Username: name,
      Password: password,
    });
    const userData = {
      Username: name,
      Pool: this.userPool,
    };
    const newUser = new CognitoUser(userData);
    return new Promise((resolve, reject) => {
      return newUser.authenticateUser(authenticationDetails, {
        onSuccess: (result) => {
          resolve(result);
        },
        onFailure: (err) => {
          reject(err);
        },
      });
    });
  }
}
e.g. 動作確認用リクエスト
curl --location --request POST 'http://localhost:3000/auth/authenticate' \
--header 'Content-Type: application/json' \
--data-raw '{
    "name":"user_1",
    "password":"P@ssw0rd"
}'
パスワードを変更する
パスワードを変更したいとき
import { Injectable } from '@nestjs/common';
import { AuthenticationDetails, CognitoUser, CognitoUserPool } from 'amazon-cognito-identity-js';
import { ConfigService } from '@nestjs/config';
import { ChangePasswordRequestDto } from '@/dto/changePassword.request.dto';
@Injectable()
export class AuthService {
  private userPool: CognitoUserPool;

  constructor(private configService: ConfigService) {
    this.userPool = new CognitoUserPool({
      UserPoolId: this.configService.get<string>('COGNITO_USER_POOL_ID'),
      ClientId: this.configService.get<string>('COGNITO_CLIENT_ID'),
    });
  }

  async changePassword(user: ChangePasswordRequestDto) {
    const { name, old_password, password } = user;
    const userData = {
      Username: name,
      Pool: this.userPool,
    };
    const cognitoUser = new CognitoUser(userData);
    const authenticationDetails = new AuthenticationDetails({
      Username: name,
      Password: old_password,
    });
    return new Promise((resolve, reject) => {
      cognitoUser.authenticateUser(authenticationDetails, {
        onSuccess: () => {
          cognitoUser.changePassword(
            old_password,
            password,
            function (error, result) {
              if (error) reject(error);
              resolve(result);
            },
          );
        },
        onFailure: (err) => {
          reject(err);
        },
      });
    });
  }
}
e.g. 動作確認用リクエスト
curl --location --request POST 'http://localhost:3000/auth/changePassword' \
--header 'Content-Type: application/json' \
--data-raw '{
    "name": "user_1",
    "old_password": "P@ssw0rd",
    "password": "new_P@ssw0rd"
}'
パスワードを忘れたとき(パスワードリセット)
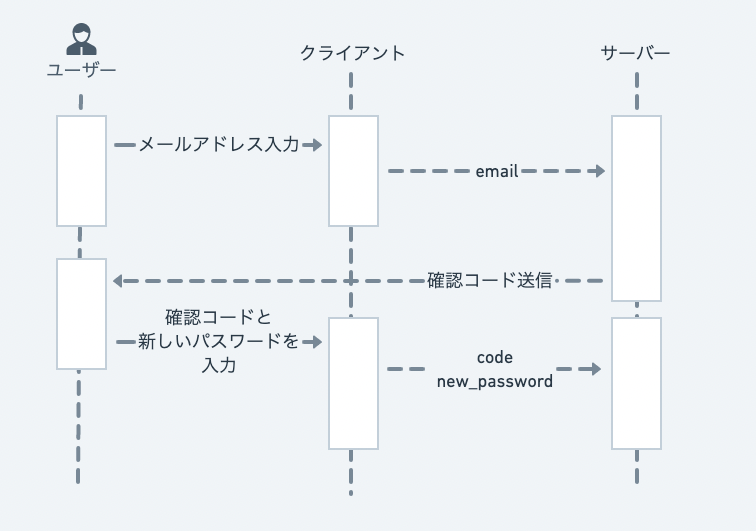
パスワードを忘れた際はこのようなフローになります(シーケンス図慣れてないので見づらかったらすみません)
forgotPasswordで確認コードを発行→resetPasswordでパスワードのリセットです。
import { Injectable } from '@nestjs/common';
import { CognitoUser, CognitoUserPool } from 'amazon-cognito-identity-js';
import { ConfigService } from '@nestjs/config';
import { ForgotPasswordRequestDto } from '@/dto/forgotPassword.dto';

@Injectable()
export class AuthService {
  private userPool: CognitoUserPool;

  constructor(private configService: ConfigService) {
    this.userPool = new CognitoUserPool({
      UserPoolId: this.configService.get<string>('COGNITO_USER_POOL_ID'),
      ClientId: this.configService.get<string>('COGNITO_CLIENT_ID'),
    });
  }

  async forgotPassword(user: ForgotPasswordRequestDto) {
    const { name } = user;
    const userData = {
      Username: name,
      Pool: this.userPool,
    };
    const cognitoUser = new CognitoUser(userData);
    return new Promise((resolve, reject) => {
      cognitoUser.forgotPassword({
        onSuccess: (result) => {
          resolve(result);
        },
        onFailure: (err) => {
          reject(err);
        },
      });
    });
  }

  async resetPassword(user: ForgotPasswordRequestDto) {
    const { name, code, password } = user;
    const userData = {
      Username: name,
      Pool: this.userPool,
    };
    const cognitoUser = new CognitoUser(userData);
    return new Promise((resolve, reject) => {
      cognitoUser.confirmPassword(code.toString(), password, {
        onSuccess: (result) => {
          resolve(result);
        },
        onFailure: (err) => {
          reject(err);
        },
      });
    });
  }
}
JWTを検証する(Guardを実装する)
Cognitoで作成されたユーザーがログインしたときに取得されるアクセストークン(=JWT)を検証することで、ユーザーからのリクエストを検証できます。
ここで使われるのがaws-jwt-verifyです。これのおかげで簡潔に書けます。
ここで作ったGuardを任意のControllerに使用するだけです。
import { CanActivate, ExecutionContext, Injectable } from '@nestjs/common';
import { CognitoJwtVerifier } from 'aws-jwt-verify';

@Injectable()
export class JwtAuthGuard implements CanActivate {
  private jwtVerifier = CognitoJwtVerifier.create({
    userPoolId: process.env.COGNITO_USER_POOL_ID,
    tokenUse: 'access',
    clientId: process.env.COGNITO_CLIENT_ID,
    scope: 'aws.cognito.signin.user.admin',
  });
  async canActivate(context: ExecutionContext) {
    const request = context.switchToHttp().getRequest();
    try {
      const result = await this.jwtVerifier.verify(
        request.header('authorization'),
      );
      return !!result;
    } catch (error) {
      return false;
    }
  }
}
以上で、
- ユーザープールへのユーザーの作成
- メールアドレスの検証
- ログイン
- パスワードの変更
- パスワードのリセット
- リクエストの検証
の要件は対応できるかと思います。
もっとこうした方がいいよ、などありましたら教えてください。
