概要
UEにおけるC++の学習として、PlayerをC++で作成し、内容を簡単に纏めました。
開発環境
Windows 11
Unreal Engine 5.3
言語 日本語
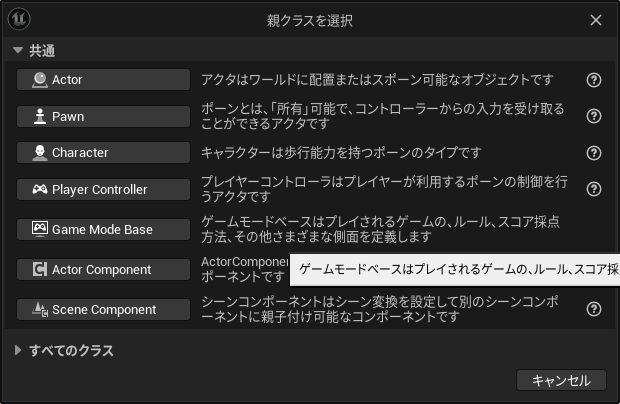
ステップ1:PlayerのCharacterクラス作成
CharacterクラスをベースにPlayerを作成します。
ツールメニュー> [新規 C++ クラス] をクリックして、新しい親クラスを選択します。

[親クラスを選択] メニューが開いたら、[ Character ] を選択し、[次へ] をクリックします。

適当に名前を付けたら、[クラスを作成] をクリックします。

Visual Studio を起動すると、Projectに今作成した.cppと.hがあることを確認します。

コンパイルし、コンテンツブラウザにも表示されていることを確認します。

ステップ2:移動の実装
軸マッピング設定
1.[編集] > [プロジェクト設定] を選択します。
2.タブの左側にある [エンジン] から [インプット] をクリックします。
3.[バインディング] の [軸マッピング] の隣にあるプラス記号をクリックします。
4.[軸マッピング] の左側にある矢印をクリックします。
5.テキスト欄に "MoveForward" と入力し、左側の矢印をクリックして軸のバインディングオプションを展開します。
6.ドロップダウン メニューでキーボードマークをクリックし、[W]キーを押します。
以下、前後左右の設定を同様に行います。
入力設定は以下のようになります。

C++での関数実装
MyCharacter.h で、以下の関数の宣言をSetupPlayerInputComponent の下に追加します。
UFUNCTION()
void MoveForward(float value);

UFUNCTION()
void MoveRight(float value);
MyCharacter.cppでは、以下の関数を追加します。
void AMyCharacter::SetupPlayerInputComponent(UInputComponent* PlayerInputComponent)
{
	Super::SetupPlayerInputComponent(PlayerInputComponent);
	PlayerInputComponent->BindAxis("MoveForward", this, &AMyCharacter::MoveForward);
	PlayerInputComponent->BindAxis("MoveRight", this, &AMyCharacter::MoveRight);
}

void AMyCharacter::MoveForward(float value)
{
	FVector Direction = FRotationMatrix(Controller->GetControlRotation()).GetScaledAxis(EAxis::X);
	AddMovementInput(Direction, value);
}

void AMyCharacter::MoveRight(float value)
{
	FVector Direction = FRotationMatrix(Controller->GetControlRotation()).GetScaledAxis(EAxis::Y);
	AddMovementInput(Direction, value);
}
ステップ3:PlayerControllerの実装

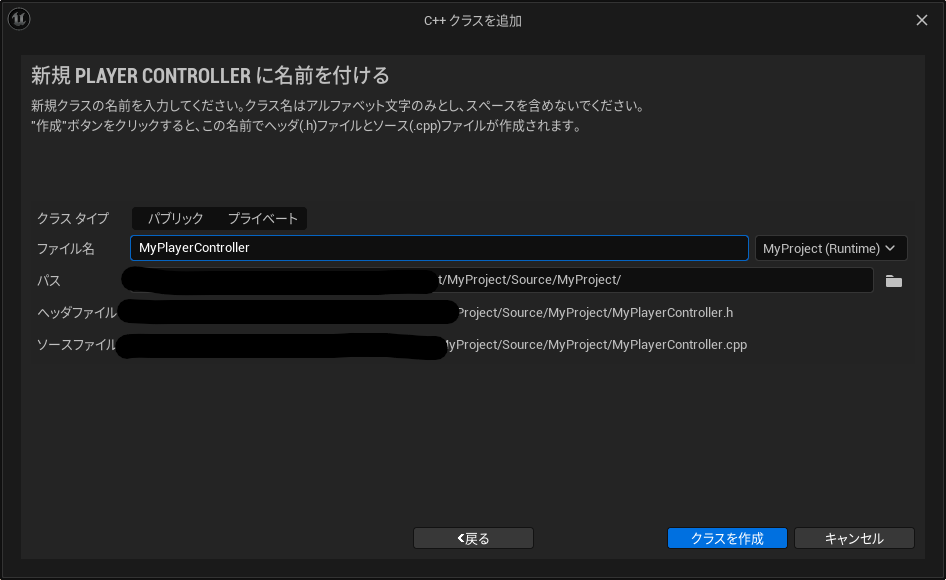
1.コンストラクタ を追加
2.操作する Character のポインタを保存する AMyCharacter* m_pAMyCharacter を追加
3.操作する Character を開始時に保存するため BeginPlay() を override
4.「MoveForward」の入力をバインドするために SetupInputComponent() を override
5.「MoveForward」の入力を処理をする void MoveForward_Axis(float axisValue) を追加
#include "CoreMinimal.h"
#include "GameFramework/PlayerController.h"
#include "MyPlayerController.generated.h"
#include "MyCharacter.h"
#include "MyCharacter.generated.h"

UCLASS()
class MYPROJECT_API AMyPlayerController : public APlayerController
{
	GENERATED_BODY()
public:
    AMyPlayerController();

protected:
    AMyCharacter* m_pAMyCharacter;

protected:
    virtual void BeginPlay() override;
    virtual void SetupInputComponent() override;

    void MoveForward_Axis(float axisValue);
    void MoveRight_Axis(float axisValue);
};
#include "MyPlayerController.h"

AMyPlayerController::AMyPlayerController()
    : APlayerController()
    , m_pAMyCharacter(nullptr)
{

}

void AMyPlayerController::BeginPlay()
{
    Super::BeginPlay();
    APawn* pPawn = GetPawn();
    ensure(pPawn != nullptr);
    m_pAMyCharacter = Cast<AMyCharacter>(pPawn);
    ensure(m_pAMyCharacter != nullptr);
}

void AMyPlayerController::SetupInputComponent()
{
    Super::SetupInputComponent();
    InputComponent->BindAxis("MoveForward", this, &AMyPlayerController::MoveForward_Axis);
}

void AMyPlayerController::MoveForward_Axis(float axisValue)
{
    check(m_pAMyCharacter != nullptr);
    m_pAMyCharacter->MoveForward(axisValue);
}

void AMyPlayerController::MoveRight_Axis(float axisValue)
{
    check(m_pAMyCharacter != nullptr);
    m_pAMyCharacter->MoveRight(axisValue);
}
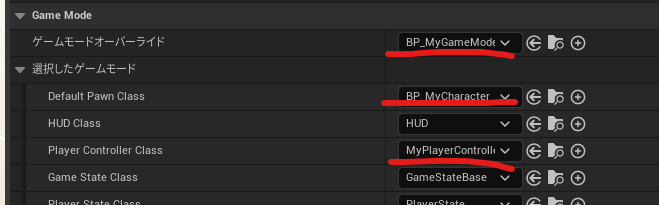
ゲームモードにCharacterとPlayerControllerをセットする
コンテンツ内で右クリックし、[ブループリントクラス]>[GameModeBase]を選択します

「ウィンドウ」メニューから「ワールドセッティング」にチェックを入れ、タブを開きます。
開かれたワールドセッティングで、「ゲームモードオーバーライド」の項目を先ほどのゲームモードに変更します。
以下、PawnとPlayerControllerにも先ほど作成したものを入れます。
ステップ4:メッシュの設定
自身のPlayerにメッシュを追加します。
まず、コンテンツブラウザの[C++クラス]から自身の作成したクラスを右クリックして、ブループリントを作成します。

名前を付けてブループリントを作成します。

[コンポーネント] タブで Mesh コンポーネントをクリックします。

[詳細]>[メッシュ]から、スケルタルメッシュを入れます。ない場合は、アセットなどを利用してください。

ステップ5:カメラの変更
カメラの位置をC++側で調整します。
MyCharacter.hに、カメラにアクセスするためのインクルードなどを行います。
#include "Camera/CameraComponent.h"
#include "Components/CapsuleComponent.h"

UPROPERTY(VisibleAnywhere)
UCameraComponent* CameraComponent;
MyCharacter.cpp では、次のコードをコンストラクタ内に追記します。
CameraComponent = CreateDefaultSubobject<UCameraComponent>(TEXT("Camera"));
check(CameraComponent != nullptr);

CameraComponent->SetupAttachment(CastChecked<USceneComponent, UCapsuleComponent>(GetCapsuleComponent()));

CameraComponent->SetRelativeLocation(FVector(0.0f, 0.0f, 50.0f + BaseEyeHeight));

CameraComponent->bUsePawnControlRotation = true;
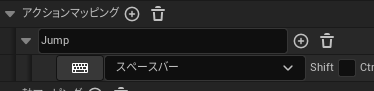
ステップ6:ジャンプを追加してみる
移動の復習として、ジャンプを作ります。
まずインプットを設定します
MyCharacterに以下の関数を追加します。
UFUNCTION()
void MoveForward(float value);

UFUNCTION()
void MoveRight(float value);
void AMyCharacter::SetupPlayerInputComponent(UInputComponent* PlayerInputComponent)
{
	Super::SetupPlayerInputComponent(PlayerInputComponent);
	PlayerInputComponent->BindAxis("MoveForward", this, &AMyCharacter::MoveForward);
	PlayerInputComponent->BindAxis("MoveRight", this, &AMyCharacter::MoveRight);
}

void AMyCharacter::MoveForward(float value)
{
	FVector Direction = FRotationMatrix(Controller->GetControlRotation()).GetScaledAxis(EAxis::X);
	AddMovementInput(Direction, value);
}

void AMyCharacter::MoveRight(float value)
{
	FVector Direction = FRotationMatrix(Controller->GetControlRotation()).GetScaledAxis(EAxis::Y);
	AddMovementInput(Direction, value);
}
PlayerControllerにも追記します。
    void StartJump_Input();
    void StopJump_Input();
void AMyPlayerController::SetupInputComponent()
{
    //Super::SetupInputComponent();
    InputComponent->BindAxis("MoveForward", this, &AMyPlayerController::MoveForward_Axis);
    InputComponent->BindAction("Jump", IE_Pressed, this, &AMyPlayerController::StartJump_Input);
    InputComponent->BindAction("Jump", IE_Released, this, &AMyPlayerController::StopJump_Input);
}

void AMyPlayerController::StartJump_Input()
{
    check(m_pAMyCharacter != nullptr);
    m_pAMyCharacter->StartJump();
}

void AMyPlayerController::StopJump_Input()
{
    check(m_pAMyCharacter != nullptr);
    m_pAMyCharacter->StopJump();
}
おわりに
以上が今回のまとめになります。閲覧ありがとうございました。
参考資料
▼Unreal Engine チュートリアル キャラクター実装
https://docs.unrealengine.com/4.27/ja/ProgrammingAndScripting/ProgrammingWithCPP/CPPTutorials/FirstPersonShooter/2/
▼Lyra Starter Game
https://www.youtube.com/watch?v=Fj1zCsYydD8&t=8s