はじめに
大勢が共有して利用するシートにおいて、人的ミスは避けられない。
よくある例として、利用者が指定した場所以外に誤って記載をしてしまうことが度々発生する。
また(VLOOKUPやQUERY関数などを利用している場合など)列の並び順が重要視される場合において、安易な考えでのシート形式の変更は阻止したい。
本稿では、指定範囲における編集権限を対象者へ付与させ、シート内のその他範囲は触れなくさせる設定をGoogle Apps Script(GAS)で記載する。
概要
・ プログラミングに不慣れな人でも簡単にできるよう、
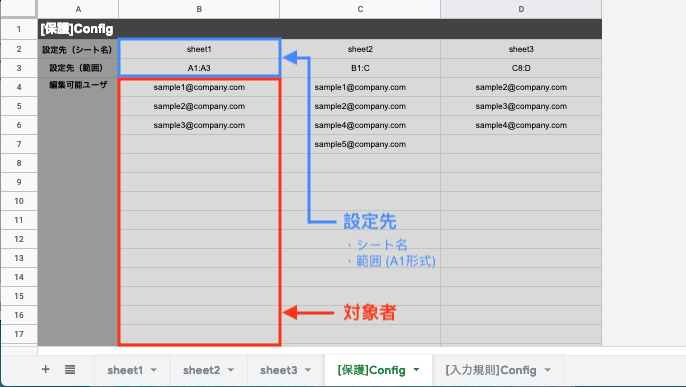
**保護設定用シート("[保護]Config")**を作成し、このシートをベースに保護範囲の設定を行う
・ 青色部分 のシート範囲を、赤色部分 のユーザのみが編集可能なように、権限の設定をする
・ (逆に)上記シートにおいて、権限を設定した範囲以外の部分は
シートオーナー と スクリプト実行者のみ が編集可能な状態にする

スクリプト
実行方法
function sheetProtection() {
  addProtect('B2:B'); // "[保護]Config"シートから読み込む範囲を指定
  addProtect('C2:C');
}
メインメソッド
// Configシートを読み込む
var protectconfig_sheet = SpreadsheetApp.getActiveSpreadsheet().getSheetByName('[保護]Config');


function addProtect(param_range){

  // Underscoreライブラリ(M3i7wmUA_5n0NSEaa6NnNqOBao7QLBR4j)の導入が必要
  var _ = Underscore.load();


  /* 1. configシートから、保護をかけるシート名・範囲情報とユーザ情報(メールアドレス)を読み取る */

  var protect_param     = protectconfig_sheet.getRange(param_range).getValues();

  var protect_sheetName = String(protect_param[0][0]);
  var protect_range     = String(protect_param[1][0]);

  var protect_sheet     = SpreadsheetApp.getActiveSpreadsheet().getSheetByName(protect_sheetName).getRange(protect_range);


  /* 2. 編集権限を与えるユーザ情報の配列を作成 (データ範囲を転置 → データ範囲の1列目2行目以降に値が入っているものを抽出して配列化) */

  var editorslist = [];
  var protect_paramTrans       = _.zip.apply(_, protect_param).filter(String);
  var protect_paramList        = protect_paramTrans[0]


  for (var i = 2; i < protect_paramList.length; i++){
    if(protect_paramList[i] != null && protect_paramList[i] != "") {
      editorslist.push(protect_paramList[i]);
    }
  }


  /* 3. 指定範囲に指定ユーザのみが編集できる保護をかけ、それ以外の範囲はシートオーナーとスクリプト実行者以外が触れないようにする */
  addRangeProtection(protect_sheetName, protect_range, editorslist);

}
サブメソッド
function removeRangeProtection(sheetName, removeRange) {

  /* 保護の説明欄に、削除したい保護範囲と同じ範囲が記載されていたら削除する */
  // https://webapps.stackexchange.com/questions/112147/how-to-remove-protection-on-a-range-using-scripts-in-google-spreadsheets

  var sheet = SpreadsheetApp.getActiveSpreadsheet().getSheetByName(sheetName);
  var protections = sheet.getProtections(SpreadsheetApp.ProtectionType.RANGE);
  for (var i = 0; i < protections.length; i++) {
    var protection = protections[i];
    if (protection.getDescription() == removeRange) {
      protection.remove();
    }
  }
}
function addRangeProtection(sheetName, protect_range, editorsList) {

  /* 1. 特定ユーザを編集可能にする一部範囲を除いて、シート全体に保護をかける */

  var sheet = SpreadsheetApp.getActiveSpreadsheet().getSheetByName(sheetName);
  var protection = sheet.protect();

  var me = Session.getEffectiveUser();
  protection.addEditor(me);
  protection.removeEditors(protection.getEditors());

  var unprotected = protection.getUnprotectedRanges();
  unprotected.push(sheet.getRange(protect_range));
  protection.setUnprotectedRanges(unprotected);


  /* 2. 特定ユーザを編集可能にする範囲に、既に設定されている保護を削除する */
  removeRangeProtection(sheetName, protect_range);


  /* 3. 特定ユーザを編集可能にする範囲に、自分(スクリプト実行者)と編集可能者リストのメンバーのみを編集可能にする保護を新しく作成する */
  var range = SpreadsheetApp.getActiveSpreadsheet().getSheetByName(sheetName).getRange(protect_range);
  var protection = range.protect();
  protection.setDescription(protect_range);

  var me = Session.getEffectiveUser();
  protection.addEditor(me);
  protection.removeEditors(protection.getEditors());

  protection.addEditors(editorsList);

}
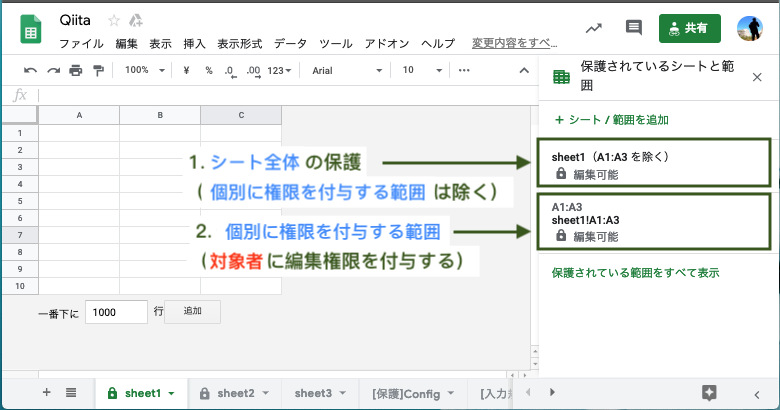
結果
補足(保護範囲の追加方法)
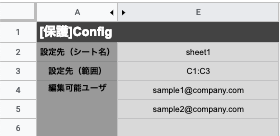
既に保護を設定しているシートに、下記のように保護範囲を追加しようと試みた場合も対応可能。

追記後スクリプト
GASにたった1行のみ追記する。
function sheetProtection() {
  addProtect('B2:B');
  addProtect('C2:C');
  addProtect('E2:E'); // 追加保護範囲の項目
}
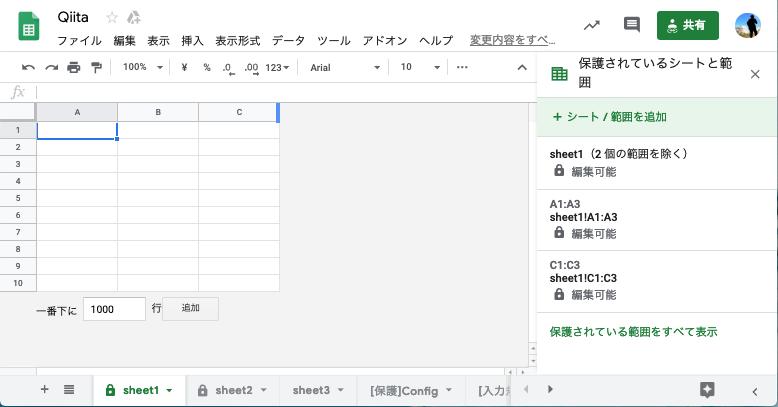
追記後の実行結果
保護範囲が追加され、正常に作動する。

