概要
私はGCPを積極的に利用していますが、安く簡単にサービスを作ろうと思うと、Cloud run+Firebaseが良いのかなと思い、まとめました。メンテナンス性についても、Cloud runとCloud Functionsを比べると、Cloud runの方が良いと思います。
開発環境一覧
- Source Repositry
- Cloud build
- Cloud run
- Firebase(hosting)
はじめに
始めに上記の環境においてはサービスを有効状態にしてください。
また、gcloudでは最低限必要なIAMは以下の通り。
- Firebase 管理者
- Cloud run 管理者
今回はCloud buildを使用するため、IAMにおける「~~@cloudbuild.gserviceaccount.com」に以下の権限を付与する。
- Cloud Run 管理者
- Cloud Run サービス エージェント
- Storage オブジェクト管理者
構成
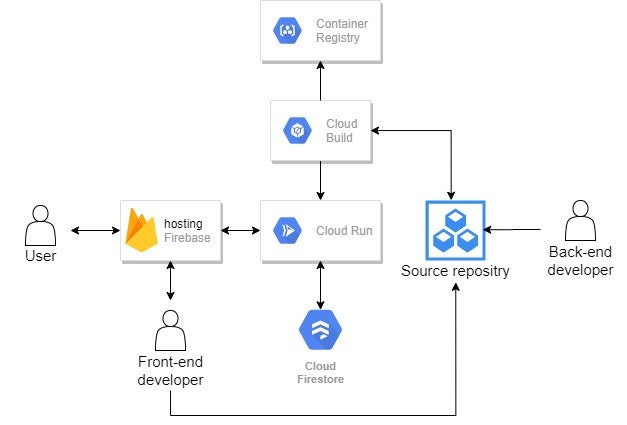
構成は以下を想定しています。Back-end開発者はリポジトリにプッシュすればいいし、Front-end開発者はBack-endを気にせず、APIサーバとしてCloud runを利用することを念頭に置いています。
ここで、Firestoreが構成に入っていますが、本記事では説明しません(別の記事で書くやもしれません)。
また、単純にFirestoreをベースにして処理を考えるならば「Cloud Functions」でも良いのですが、自作ライブラリの利用やソースコードのメンテナンス性を考えると、「Cloud Functions」であると不都合だったため、「Cloud run」を選択しています。
Back-end側
Bask-end開発側のディレクトリ構造
Back-end側のディレクトリ構造は最低限以下の通りにしておけば良いと思います。必要に応じてファイルを増やしてもいいですが、後述するdockerfileに処理を追加する必要があることに留意すること。
/root
  |-app.py
  |-requirements.txt
  |-cloudbuild.yaml
  '-dockerfile
Source Repositryの設定
以下の画像にあるように、「リポジトリを作成」があるので、それをクリックして作成されます。また、3点のマークを押下し、「Manage SSH Keys」を選択し、「SSH認証カギを登録」を選択すると、SSH認証カギが生成されます。これはリポジトリにプッシュする際に使用します。
Cloud Buildの設定
「Cloud Build」を有効にしていれば、「Cloud Build」タブ->「トリガー」タブを選択すると、トリガーを作成できます。設定は以下のような感じにします。
- イベント:ブランチにpushする
- ソース:作成したリポジトリ
- ブランチ:特に設定する必要はないですが、ブランチごとに「本番用」/「テスト」用といったように出来る
- ビルド構成:/cloudbuild.yaml
「cloudbuild.yaml」は以下のような感じとします。substitutionsを変更することで、設定を変えらえるようにしています。
- _PLATFORM:Cloud runのサービスタイプの設定
- _REGION:ロケーション設定
- _SERVICE_NAME:サービス名
- _AUTHENTICATION:アクセス権限設定
steps:
  - name: 'gcr.io/cloud-builders/docker'
    id: 'build-docker-image'
    args: ['build', '-t', 'gcr.io/$PROJECT_ID/${_SERVICE_NAME}', '.']
  - name: 'gcr.io/cloud-builders/docker'
    id: 'push-docker-image'
    args: ['push', 'gcr.io/$PROJECT_ID/${_SERVICE_NAME}']
  - name: 'gcr.io/cloud-builders/gcloud'
    id: 'deploy-cloud-run'
    args: ['beta', 'run', 'deploy', '${_SERVICE_NAME}', '--image', 'gcr.io/$PROJECT_ID/${_SERVICE_NAME}', '--platform=${_PLATFORM}', '--region', '${_REGION}']
  - name: 'gcr.io/cloud-builders/gcloud'
    id: 'apply-member-role-cloud-run'
    args: ['beta', 'run', 'services', 'add-iam-policy-binding', '${_SERVICE_NAME}', '--region', '${_REGION}', '--platform=${_PLATFORM}', '--member', '${_AUTHENTICATION}', '--role', 'roles/run.invoker']
substitutions:
  _PLATFORM: managed # full manage
  _REGION: asia-northeast1 # tokyo
  _SERVICE_NAME: <_SERVICE_NAME> # service name
  _AUTHENTICATION: allUsers # Google IAMドキュメント 概要を参照
images:
  - gcr.io/$PROJECT_ID/${_SERVICE_NAME}
Cloud run
Cloud runにデプロイするイメージファイルの内容は以下のようなdockerfileにて生成します。内容は適宜変更します。
# Use the official Python image.
# https://hub.docker.com/_/python
FROM python:3.7

# Copy local code to the container image.
ENV APP_HOME /app
WORKDIR $APP_HOME

# Install production dependencies.
COPY requirements.txt ./
COPY app.py ./
RUN pip install --no-cache-dir -r requirements.txt

# Service must listen to $PORT environment variable.
# This default value facilitates local development.
ENV PORT 8080

# Run the web service on container startup. Here we use the gunicorn
# webserver, with one worker process and 8 threads.
# For environments with multiple CPU cores, increase the number of workers
# to be equal to the cores available.
CMD exec gunicorn --bind :$PORT --workers 1 --threads 8 app:app
ここまでやっておくと、あとはリポジトリにプッシュすると勝手に「Cloud run」にディプロイされます。Build状態においては、Cloud consoleにて確認できます。
Front-end側
Firebase(hosting)
こちらはFront-end側の環境ですが、ディレクトリ構造については特に記述しません。基本的にはVue cliにて自動的にファイルが生成されます。一応Vueについての記事も書いていますが、何となく知りたい場合は以下の記事を参照してください。
- 出来る限り何も考えずにVue.jsを扱う:https://qiita.com/StrayDog/items/eceb96f14e5647428942
開発環境
Javascirptフレームワークは以下の通り。
- Vue.js
- Bootstrap-vue
ReactやAngular.jsも調べてみましたが、個人的にはVue.jsが一番とっつきやすかったです。
あまりデザインに拘りがない場合はBootstrapでCSSの記述を少なくした方が良いですね。
FirebaseからCloud runコンテナにリクエストを送信
「firebase.json」の「hosting」に「rewrites」を追加する。リクエストは「projectID.web.app/」「projectID.firebaseapp.com/」「カスタムドメイン/」から可能となる(例えば、get)。projectIDはGCPのプロジェクトホーム画面から確認できる。
"hosting": {
 // ...

 // Add the "rewrites" attribute within "hosting"
 "rewrites": [ {
   "source": "**", //クライアント側の全てのリクエストを許可
   "run": {
     "serviceId": "<service name>", //サービス名(Cloud runのコンテナ名)
     "region": "us-central1" //ロケーション設定
   }
 } ]
}
参考
- Cloud Run を使用した動的コンテンツの配信とマイクロサービスのホスティング:https://firebase.google.com/docs/hosting/cloud-run?hl=ja#direct_requests_to_container
- ホスティング動作を構成する:https://firebase.google.com/docs/hosting/full-config#direct_requests_to_a_cloud_run_container
- Google IAMドキュメント 概要:https://cloud.google.com/iam/docs/overview?hl=ja#concepts_related_identity
- 超簡単。GCPのサーバーレス環境Cloud RunにGoアプリを自動デプロイ!:https://www.apps-gcp.com/deploy-go-app-to-cloud-run-by-cloud-build/

