目的
Swift Storyboardなし での開発を行う際に使用する画面遷移の方法をまとめること
(Storyboardなし画面遷移についての記事は意外と少なかった)
2種類って何があるの?
Push遷移とPresent遷移
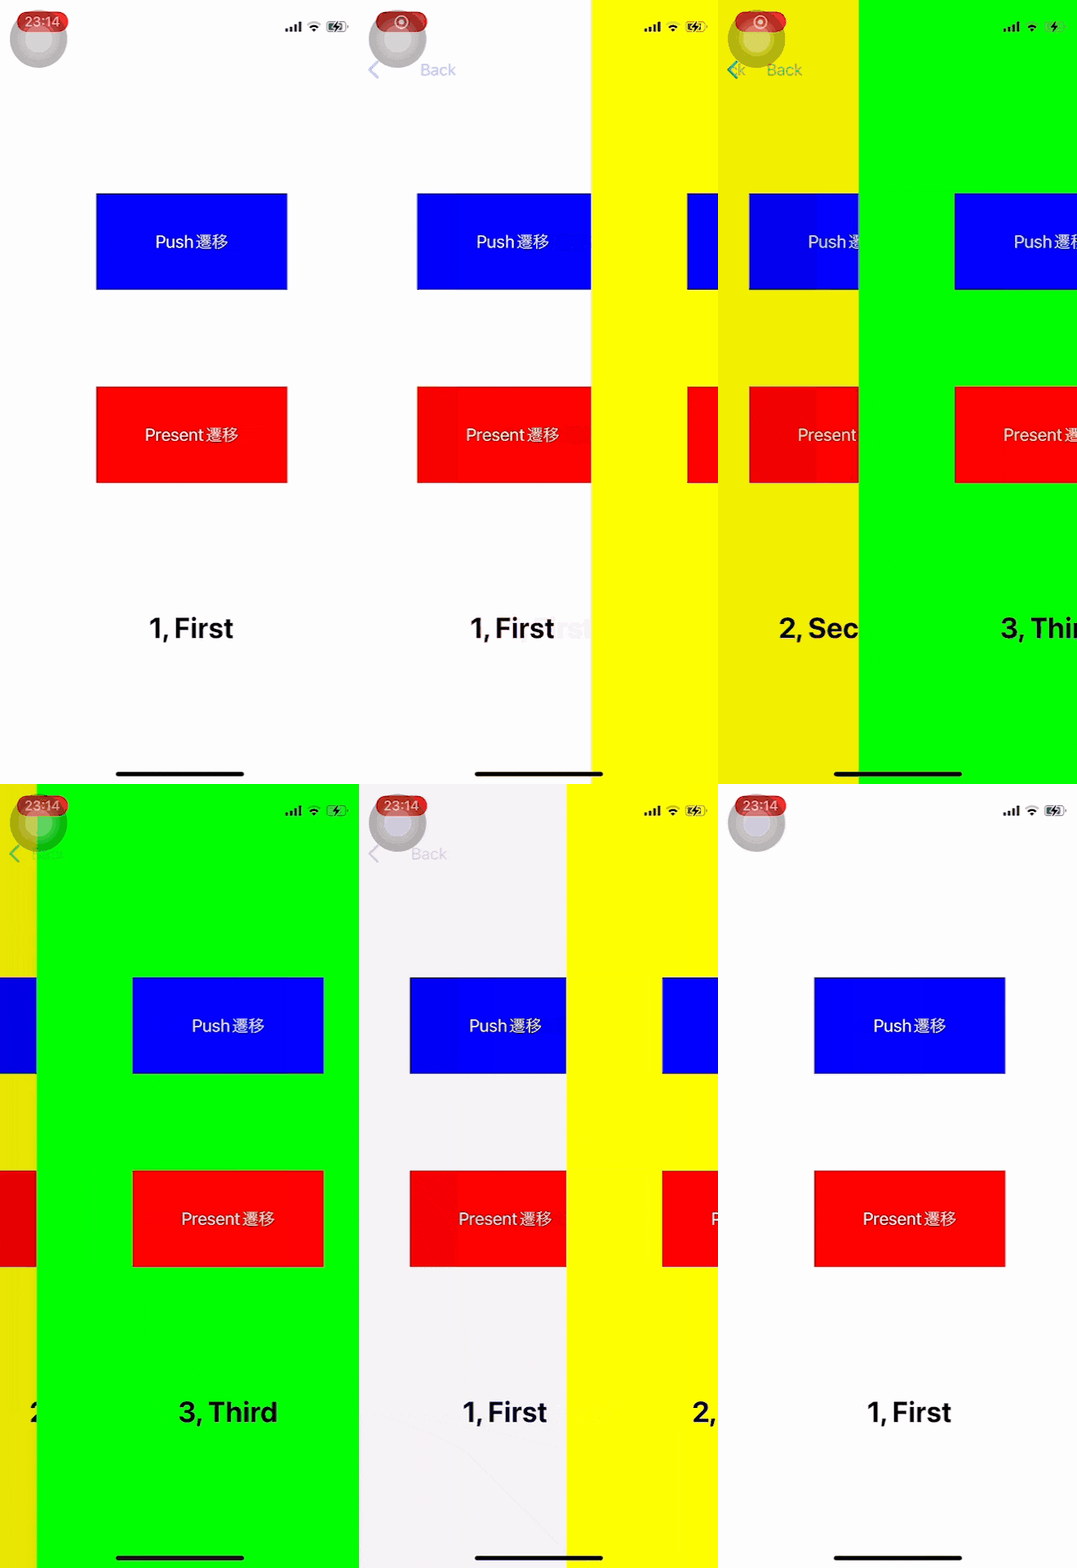
Push遷移
横から画面が出てくる
「Backボタン」がついている

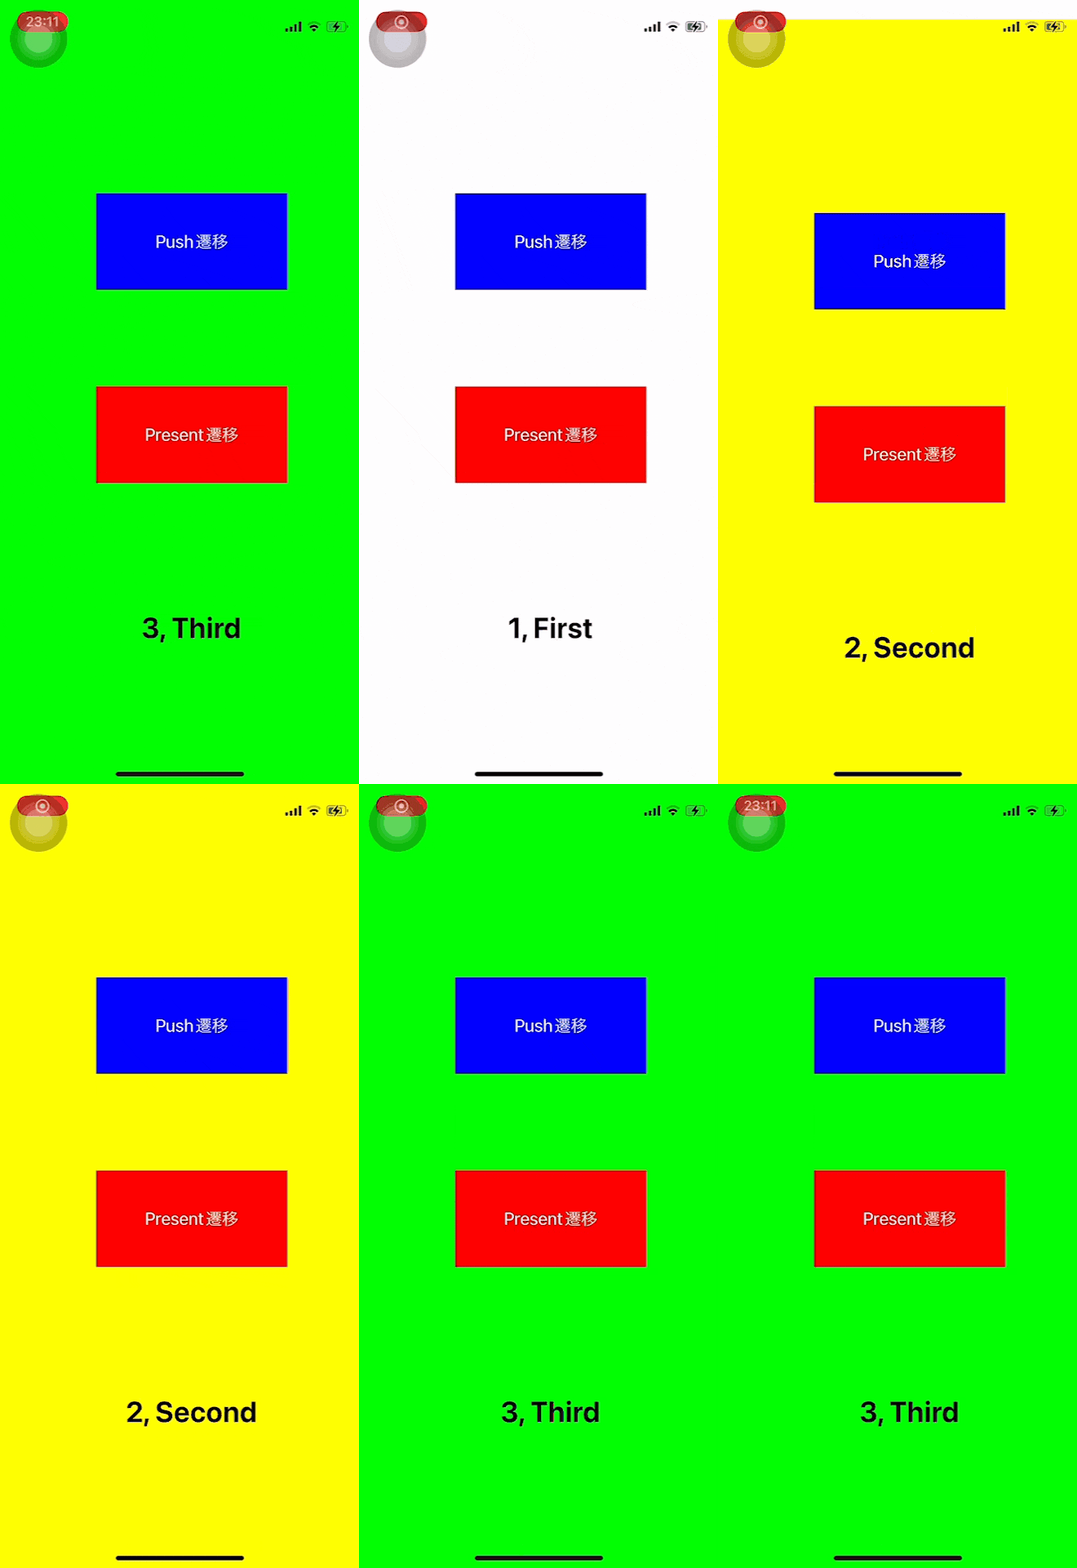
Present遷移
下から画面が出てくる
「Backボタン」がついていない

プログラム
解説は、プログラムの後に行います!
まずは、プログラム全体を見てください!
SceneDelegate.swift
import UIKit

class SceneDelegate: UIResponder, UIWindowSceneDelegate {

    var window: UIWindow?
    var navigationController: UIViewController?


    func scene(_ scene: UIScene, willConnectTo session: UISceneSession, options connectionOptions: UIScene.ConnectionOptions) {

        guard let windowScene = (scene as? UIWindowScene) else { return }

        // push遷移
        let firstViewController = FirstViewController()
        navigationController = UINavigationController(rootViewController: firstViewController)
        let window = UIWindow(windowScene: windowScene)
        self.window = window
        window.rootViewController = navigationController
        window.makeKeyAndVisible()

        // Present遷移
//        let window = UIWindow(windowScene: windowScene)
//        self.window = window
//        window.rootViewController = FirstViewController()
//        window.makeKeyAndVisible()


    }
}
FirstViewController.swift
import UIKit

class FirstViewController: UIViewController {

    // Push遷移用のボタン (青色)
    let pushButton: UIButton = {
        let button = UIButton()
        button.frame = CGRect(x: 100, y: 200, width: 200, height: 100)
        button.backgroundColor = .blue
        button.setTitle("Push遷移", for: .normal)
        button.addTarget(self, action: #selector(clickPushButton(_ :)), for: .touchUpInside)   // ボタンを押した時に実行する関数を指定
        return button
    }()

    // Present遷移用のボタン (赤色)
    let presentButton: UIButton = {
        let button = UIButton()
        button.frame = CGRect(x: 100, y: 400, width: 200, height: 100)
        button.backgroundColor = .red
        button.setTitle("Present遷移", for: .normal)
        button.addTarget(self, action: #selector(clickPresentButton(_ :)), for: .touchUpInside)   // ボタンを押した時に実行する関数を指定
        return button
    }()

    // 画面番号
    let screenNumberLabel: UILabel = {
        let label = UILabel()
        label.text = "1, First"
        label.frame = CGRect(x: 100, y: 600, width: 200, height: 100)
        label.font = .systemFont(ofSize: 30, weight: .bold)
        label.textAlignment = .center
        return label
    }()

    override func viewDidLoad() {
        super.viewDidLoad()

        // 画面の背景/ボタン/画面番号 を描画
        view.backgroundColor = .white
        view.addSubview(pushButton)
        view.addSubview(presentButton)
        view.addSubview(screenNumberLabel)
    }

    // pushButton が押されたときに実行
    // First → Second
    @objc func clickPushButton(_ sender: UIButton) {
        let secondViewController = SecondViewController()
        self.navigationController?.pushViewController(secondViewController, animated: true)
    }

    // presentButton が押されたときに実行
    // First → Second
    @objc func clickPresentButton(_ sender: UIButton) {
        let secondViewController = SecondViewController()
        secondViewController.modalPresentationStyle = .fullScreen
        self.present(secondViewController, animated: true, completion: nil)
    }


}
SecondViewController.swift
import UIKit

class SecondViewController: UIViewController {

    // Push遷移用のボタン (青色)
    let pushButton: UIButton = {
        let button = UIButton()
        button.frame = CGRect(x: 100, y: 200, width: 200, height: 100)
        button.backgroundColor = .blue
        button.setTitle("Push遷移", for: .normal)
        button.addTarget(self, action: #selector(clickPushButton(_ :)), for: .touchUpInside)   // ボタンを押した時に実行する関数を指定
        return button
    }()

    // Present遷移用のボタン (赤色)
    let presentButton: UIButton = {
        let button = UIButton()
        button.frame = CGRect(x: 100, y: 400, width: 200, height: 100)
        button.backgroundColor = .red
        button.setTitle("Present遷移", for: .normal)
        button.addTarget(self, action: #selector(clickPresentButton(_ :)), for: .touchUpInside)   // ボタンを押した時に実行する関数を指定
        return button
    }()

    // 画面番号
    let screenNumberLabel: UILabel = {
        let label = UILabel()
        label.text = "2, Second"
        label.frame = CGRect(x: 100, y: 600, width: 200, height: 100)
        label.font = .systemFont(ofSize: 30, weight: .bold)
        label.textAlignment = .center
        return label
    }()

    override func viewDidLoad() {
        super.viewDidLoad()

        // 画面の背景/ボタン/画面番号 を描画
        view.backgroundColor = .yellow
        view.addSubview(pushButton)
        view.addSubview(presentButton)
        view.addSubview(screenNumberLabel)
    }

    // pushButton が押されたときに実行
    // Second → Third
    @objc func clickPushButton(_ sender: UIButton) {
        let thirdViewController = ThirdViewController()
        self.navigationController?.pushViewController(thirdViewController, animated: true)
    }

    // presentButton が押されたときに実行
    // Second → Third
    @objc func clickPresentButton(_ sender: UIButton) {
        let thirdViewController = ThirdViewController()
        thirdViewController.modalPresentationStyle = .fullScreen
        self.present(thirdViewController, animated: true, completion: nil)
    }

}
ThirdViewController.swift
import UIKit

class ThirdViewController: UIViewController {

    // Push遷移用のボタン (青色)
    let pushButton: UIButton = {
        let button = UIButton()
        button.frame = CGRect(x: 100, y: 200, width: 200, height: 100)
        button.backgroundColor = .blue
        button.setTitle("Push遷移", for: .normal)
        button.addTarget(self, action: #selector(clickPushButton(_ :)), for: .touchUpInside)   // ボタンを押した時に実行する関数を指定
        return button
    }()

    // Present遷移用のボタン (赤色)
    let presentButton: UIButton = {
        let button = UIButton()
        button.frame = CGRect(x: 100, y: 400, width: 200, height: 100)
        button.backgroundColor = .red
        button.setTitle("Present遷移", for: .normal)
        button.addTarget(self, action: #selector(clickPresentButton(_ :)), for: .touchUpInside)   // ボタンを押した時に実行する関数を指定
        return button
    }()

    // 画面番号
    let screenNumberLabel: UILabel = {
        let label = UILabel()
        label.text = "3, Third"
        label.frame = CGRect(x: 100, y: 600, width: 200, height: 100)
        label.font = .systemFont(ofSize: 30, weight: .bold)
        label.textAlignment = .center
        return label
    }()

    override func viewDidLoad() {
        super.viewDidLoad()

        // 画面の背景/ボタン/画面番号 を描画
        view.backgroundColor = .green
        view.addSubview(pushButton)
        view.addSubview(presentButton)
        view.addSubview(screenNumberLabel)
    }

    // pushButton が押されたときに実行
    @objc func clickPushButton(_ sender: UIButton) {

    }

    // presentButton が押されたときに実行
    @objc func clickPresentButton(_ sender: UIButton) {

    }

}
解説
👇 画面遷移の種類を指定している
SceneDelegate.swift
~~~
        // Present遷移
//        let window = UIWindow(windowScene: windowScene)
//        self.window = window
//        window.rootViewController = FirstViewController()
//        window.makeKeyAndVisible()

        // push遷移
        let firstViewController = FirstViewController()
        navigationController = UINavigationController(rootViewController: firstViewController)
        let window = UIWindow(windowScene: windowScene)
        self.window = window
        window.rootViewController = navigationController
        window.makeKeyAndVisible()
~~~
👇 ボタンの作成と描画
FirstViewController.swift
~~~

// Push遷移用のボタン (青色)
    let pushButton: UIButton = {
        let button = UIButton()
        button.frame = CGRect(x: 100, y: 200, width: 200, height: 100)
        button.backgroundColor = .blue
        button.setTitle("Push遷移", for: .normal)
        button.addTarget(self, action: #selector(clickPushButton(_ :)), for: .touchUpInside)   // ボタンを押した時に実行する関数を指定
        return button
    }()
~~~

view.addSubview(pushButton)
~~~
👇 ボタンが押されたときに実行する処理 (画面遷移)
FirstViewController.swift
// pushButton が押されたときに実行
    // First → Second
    @objc func clickPushButton(_ sender: UIButton) {
        let secondViewController = SecondViewController()
        self.navigationController?.pushViewController(secondViewController, animated: true)
    }

    // presentButton が押されたときに実行
    // First → Second
    @objc func clickPresentButton(_ sender: UIButton) {
        let secondViewController = SecondViewController()
        secondViewController.modalPresentationStyle = .fullScreen
        self.present(secondViewController, animated: true, completion: nil)
    }
Push遷移
SceneDelegate.swift
        var navigationController: UIViewController?

        ~~~

        // push遷移
        let firstViewController = FirstViewController()
        navigationController = UINavigationController(rootViewController: firstViewController)
        let window = UIWindow(windowScene: windowScene)
        self.window = window
        window.rootViewController = navigationController
        window.makeKeyAndVisible()

        ~~~
FirstViewControleller.swift
        // First → Second
        let secondViewController = SecondViewController()
        self.navigationController?.pushViewController(secondViewController, animated: true)
Present遷移
SceneDelegate.swift
        // Present遷移
        let window = UIWindow(windowScene: windowScene)
        self.window = window
        window.rootViewController = FirstViewController()
        window.makeKeyAndVisible()
FirstViewControleller.swift
        // First → Second
        let secondViewController = SecondViewController()
        secondViewController.modalPresentationStyle = .fullScreen
        self.present(secondViewController, animated: true, completion: nil)
参考資料
PushViewControllerで横に画面遷移