SideMenu

シンプルなサイドメニューのライブラリで、
最近もメンテされていて、Cocoapods, Carthage等からのインストールが可能なライブラリです。
↓サンプルを実際に動かしてみた様子 ![]()
結構色々カスタマイズができそうな感じでした。 ![]()
 環境構築
環境構築
今回は Carthage を使ってライブラリを導入したいと思います。
Cartfile に以下を追加し carthage update --platform iOS を実行します。
github "jonkykong/SideMenu" "master"
Frameworks, Libraries, .. に SideMenu.framework を、Run ScriptのInputFileに
$(SRCROOT)/Carthage/Build/iOS/SideMenu.frameworkを追加してセットアップは完了です。
 実装
実装
まずは簡単なサンプルで動かしてみます
- SideMenu用のViewControllerとStoryBoardを作成する
- SideMenuを表示するViewControllerで以下実装を追加
    override func viewDidLoad() {
        super.viewDidLoad()

        if let sideMenuViewController = UIStoryboard.initialViewController(withClass: SideMenuViewController.self) {
            let leftMenuNavigationController = SideMenuNavigationController(rootViewController: sideMenuViewController)
            SideMenuManager.default.leftMenuNavigationController = leftMenuNavigationController
        }

        if let navigationController = self.navigationController {
            SideMenuManager.default.addPanGestureToPresent(toView: navigationController.navigationBar)
            SideMenuManager.default.addScreenEdgePanGesturesToPresent(toView: navigationController.view, forMenu: .left)
        }
    }
この時点で動作させたものがこちら ↓

設定は特に変更しておらずデフォルトの状態で、分かりやすい様にSideMenuの背景色を赤色にしています。
PresentationStyleを色々試してみる
デフォルトで PresentationStyle (SideMenuの動作Style) が 複数用意されているので、試して見たいと思います。
実際に試した際に使用したコードは以下になります。
import UIKit
import RxSwift
import SideMenu

class TopViewController: UIViewController {

    override func viewDidLoad() {
        super.viewDidLoad()
        if let sideMenuViewController = UIStoryboard.initialViewController(withClass: SideMenuViewController.self) {
            let leftMenuNavigationController = SideMenuNavigationController(rootViewController: sideMenuViewController)
            leftMenuNavigationController.settings = makeSettings()
            SideMenuManager.default.leftMenuNavigationController = leftMenuNavigationController
        }

        if let navigationController = self.navigationController {
            SideMenuManager.default.addPanGestureToPresent(toView: navigationController.navigationBar)
            SideMenuManager.default.addScreenEdgePanGesturesToPresent(toView: view, forMenu: .left)
        }
    }

    private func makeSettings() -> SideMenuSettings {
        let presentationStyle: SideMenuPresentationStyle = .menuSlideIn // ここを修正して試しました
        presentationStyle.onTopShadowOpacity = 1.0
        var settings = SideMenuSettings()
        settings.presentationStyle = presentationStyle
        settings.statusBarEndAlpha = 0
        return settings
    }
}
↓動作させてみて、動作的に違いのあったものを載せてみました。
| Style名 | 動作 |
|---|---|
| menuSideIn |  |
| menuDissolveIn |  |
| viewSlideOut |  |
| viewSlideOutMenuOut |  |
| viewSlideOutMenuZoom |  |
面白いアニメーションのStyleもありますね ![]()
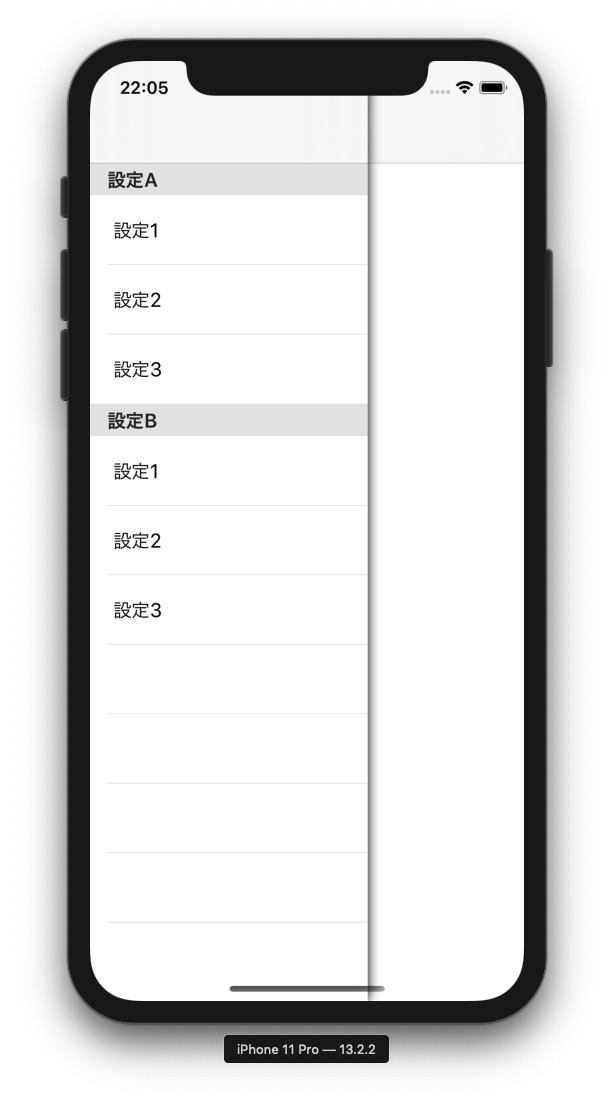
SideMenuっぽくTableViewを設置する
完成イメージとしては以下になります。
- 作成したSideMenu用のStoryBoardにTableViewを画面一杯に追加する

- Cellを別途xibで作成し、Identifierをクラス名と同じに設定する (Cell内にLabelを追加しとく)

SideMenuTableViewCell.swift
import UIKit

class SideMenuTableViewCell: UITableViewCell {

    @IBOutlet weak var title: UILabel!

    override func awakeFromNib() {
        super.awakeFromNib()
    }
}
- TableViewをViewController側に結びつけ、諸々実装する。
SideMenuViewController.swift
import UIKit
import SwifterSwift
import RxSwift
import RxCocoa
import RxDataSources

class SideMenuViewController: UIViewController {

    private let disposeBag = DisposeBag()

    @IBOutlet weak var tableView: UITableView! {
        didSet {
            tableView.register(nibWithCellClass: SideMenuTableViewCell.self, at: SideMenuTableViewCell.self)
        }
    }

    override func viewDidLoad() {
        super.viewDidLoad()

        tableView.rx.setDelegate(self).disposed(by: self.disposeBag)
        bindDataSources()
    }

    override func viewWillAppear(_ animated: Bool) {
        super.viewWillAppear(animated)

        if let indexPath = tableView.indexPathForSelectedRow {
            tableView.deselectRow(at: indexPath, animated: true)
        }
    }

    private func bindDataSources() {
        let dataSource = RxTableViewSectionedReloadDataSource<SectionModel<String, String>>(configureCell: { (_, tableView, indexPath, item) in

            let cell = tableView.dequeueReusableCell(withClass: SideMenuTableViewCell.self, for: indexPath)
            cell.title.text = item
            return cell
        })
        dataSource.titleForHeaderInSection = { ds, index in
            return ds.sectionModels[index].model
        }

        let sections = [
            SectionModel<String, String>(model: "設定A", items: ["設定1", "設定2", "設定3"]),
            SectionModel<String, String>(model: "設定B", items: ["設定1", "設定2", "設定3"])
        ]

        Observable.just(sections)
            .bind(to: tableView.rx.items(dataSource: dataSource))
            .disposed(by: disposeBag)
    }
}

extension SideMenuViewController: UITableViewDelegate {

    func tableView(_ tableView: UITableView, heightForRowAt indexPath: IndexPath) -> CGFloat {
        return 60
    }
}
以上になります。
 バッドノウハウ
以下のwarningが出る
SideMenu Warning: addScreenEdgePanGesturesToPresent(toView:forMenu:) was called before rightMenuNavigationController was set.
The gesture will not work without a menu. Use addScreenEdgePanGesturesToPresent(toView:forMenu:)) to add gestures for only one menu.
Left Menuしか追加していないのに
SideMenuManager.default.addScreenEdgePanGesturesToPresent(toView: navigationController.view)
上記を呼び出すと Left / Right 両方のGesturesを設定してしまう為
SideMenuManager.default.addScreenEdgePanGesturesToPresent(toView: navigationController.view, forMenu: .left)
forMenu 付きのメソッドを呼び出す。