はじめに
こんにちは、Watanabe Jin(@Sictu_study)です。
2025年に入ってReact界隈に衝撃が走りました。これまでメンテナンスが全然されていなかった状態管理ライブラリ『Recoil』のプロジェクトが凍結されました。
2023年にMeta社のレイオフをきっかけにメンテナンスが半年以上されなくなっていたところに、React19が登場して対応できなくなった結果完全にRecoilはなくなりました。
Recoilは使いやすくMeta社が開発していたこともあり多くのプロジェクトで採用されていたため、代替に乗り換える必要がでてきてしまったのです。
RecoilがReact19で動かないらしいからJotaiに移行しないと
前職のプロジェクトRecoilたくさん使ってたから大変だろうな…
このような声がSNSには多く上がっています。
そんな中、Recoilの代替として選ばれているのがJotaiです。
今回のチュートリアルでは最近注目されているJotaiを使って実用的なNotion風ノートアプリを開発していきます。
- Reactの基本機能の解説
- Jotaiを使った状態管理
- ConvexのDBを使ったデータの永続化
- コードブロック機能
- コード補完機能
などをアプリ開発を通して学べます。
アプリも実用的になっているのでデプロイすれば日常で活用できます。
動画教材も用意しています
こちらの教材にはより詳しく解説した動画もセットでご用意しています。
テキスト教材ではわからない細かい箇所があれば動画も活用ください
対象者
- 状態管理について学びたい
- Jotaiに乗り換えをしたい
- Reactがなんとなくわかる
- Convexを使って型安全にDBを使いたい
- 実用的なアプリを開発して学びたい
このチュートリアルはHTMLと基本的なJavaScriptがわかる方で2時間程度で行うことができます。
Jotaiって何?
ここでは状態管理ライブラリ「Jotai」を解説していきますが、その前にそもそも状態管理ライブラリの役割から解説していきます。

まずは状態管理ライブラリがない世界での例を考えていきます。
例えば親コンポーネント1が今回表示する情報(データ)をAPIを叩いて取得したとします。しかし、実際にデータを表示する処理が書かれているのはコンポーネント5です。
そこで、コンポーネント1 -> コンポーネント2 -> ... -> コンポーネント5とデータをバケツリレーのように渡していって最後にコンポーネント5でデータを使って画面表示を行います。
コンポーネント1からコンポーネント5に直接渡したいな…
そう思うはず。それを実現してくれるのが状態管理ライブラリなのです。

状態管理ライブラリを使うことによってグローバルステートというどこからでもアクセス可能なデータ保管庫を作ることができます。
こうすることで必要なコンポーネント(ここではコンポーネント5)からデータを直接保管庫から読み取って使うことができます。
この仕組みを実現するのが状態管理ライブラリであるJotaiです。
世の中に状態管理ライブラリは色々ありますし、Reactにも標準でuseContextという状態管理の仕組みが用意されています。
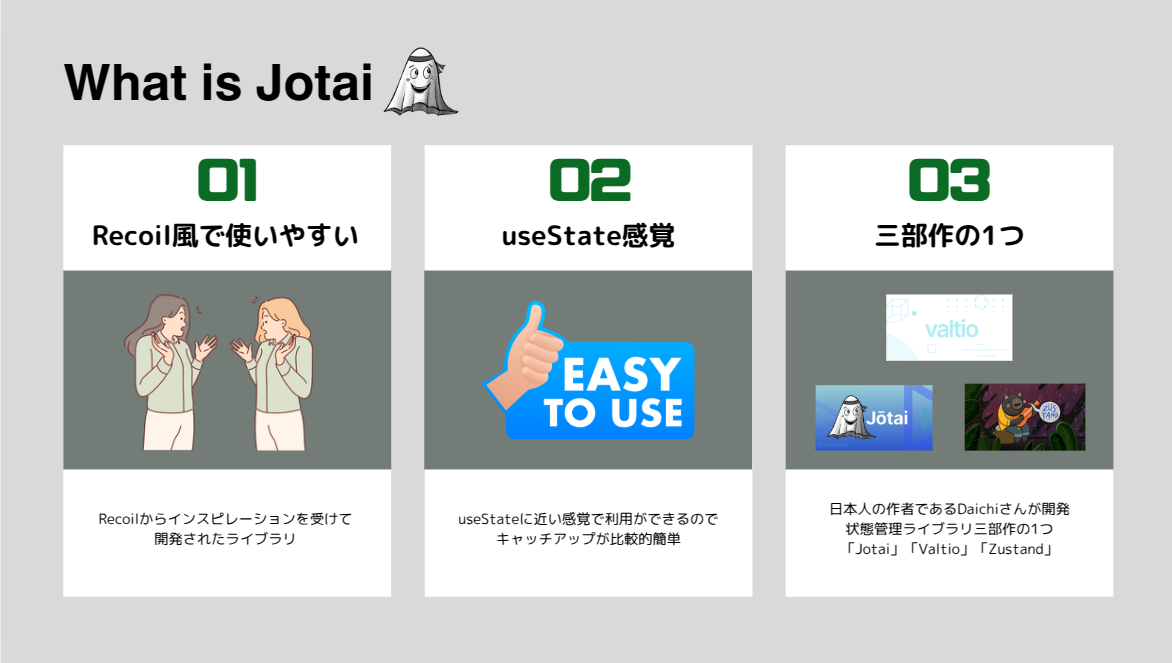
ここでJotaiが注目される3つの特徴を紹介します。
- Recoilにインスパイアされているので使用感が近い
- useState感覚で利用できるのでキャッチアップがしやすい
- 状態管理ライブラリ3部作の1つで作者は日本人
このような点からJotaiはRecoilの代替えとして選ばれています。
Jotaiの基本機能の解説
チュートリアルをする前にJotaiの基本的な使い方を解説します。
このようにストア(保管庫)を用意しておきます。
こうすることでどこからでもこのストアをインポートして中身を取り出し利用することができます。
export const countAtom = atom(0)
const [count, setCount] = useAtom(countAtom)
countが実際にcountAtomに保存されている値、setCountがcountAtomの値を変更する関数です。
<button onClick={() => setCount(c => c + 1)}>
更新の方法はuseStateと変わらないので同じ感覚で利用できます。
Jotaiには派生Atomという考え方があるのでこちらも紹介します。

const doubleAtom = atom(get => get(countAtom) * 2)

function Counter() {
  const [count, setCount] = useAtom(countAtom)
  const [double] = useAtom(doubleAtom)
読み取りAtomはdoubleのようなもので、doubleはcountを2倍にした値を常に返します。doubleAtomを使ってdoubleの更新(setDoubleAtomのようなもの)はできないので読み取り専用と言えます。
doubleを更新するにはcountを更新するしか方法がありません。
const doubleAtom = atom(
 get => get(countAtom) * 2,  // 読み取り
 (get, set, newDouble) => set(countAtom, newDouble / 2)  // 書き込み
)

function Counter() {
 const [count, setCount] = useAtom(countAtom)
 const [double, setDouble] = useAtom(doubleAtom)
それに対して読み書き可能AtomであればdoubleAtomを使って更新ができます。(setDoubleを使う)
Convexとは?
最後に今回DBとして利用するConvexについても紹介しておきます。
世の中にはsupabaseやFirebaseなどのBaaSがありますが、ConvexはそれらのBaaSとは違ったメリットがあります。
とくにTypeScriptとの相性が良いのがConvexが最近好まれている理由だと思います。私自身も最近はConvexを利用することが増えました。
それでは解説は終わりましたのでノートアプリを開発していきましょう!
1. 環境構築
ここではViteを利用してReactの環境を作りスタイルのためTailwindCSSを導入します。
まずはNode環境があるかを確認します。
$ node -v
v22.4.0
ここでNode環境がない方は以下のサイトからインストールしてください。Node.jsのインストールはたくさん記事がありますので困ったら調べてください。
Reactのプロジェクトを構築します。
今回はViteを利用していきます。Viteは次世代のビルドツールで早くて無駄のない環境を提供してくれます。
❯ npm create vite
Need to install the following packages:
  create-vite@5.5.2
Ok to proceed? (y) y
✔ Project name: … jotai-note-app
✔ Select a framework: › React
✔ Select a variant: › TypeScript

$ cd jotai-note-app/
$ npm i
$ npm run dev
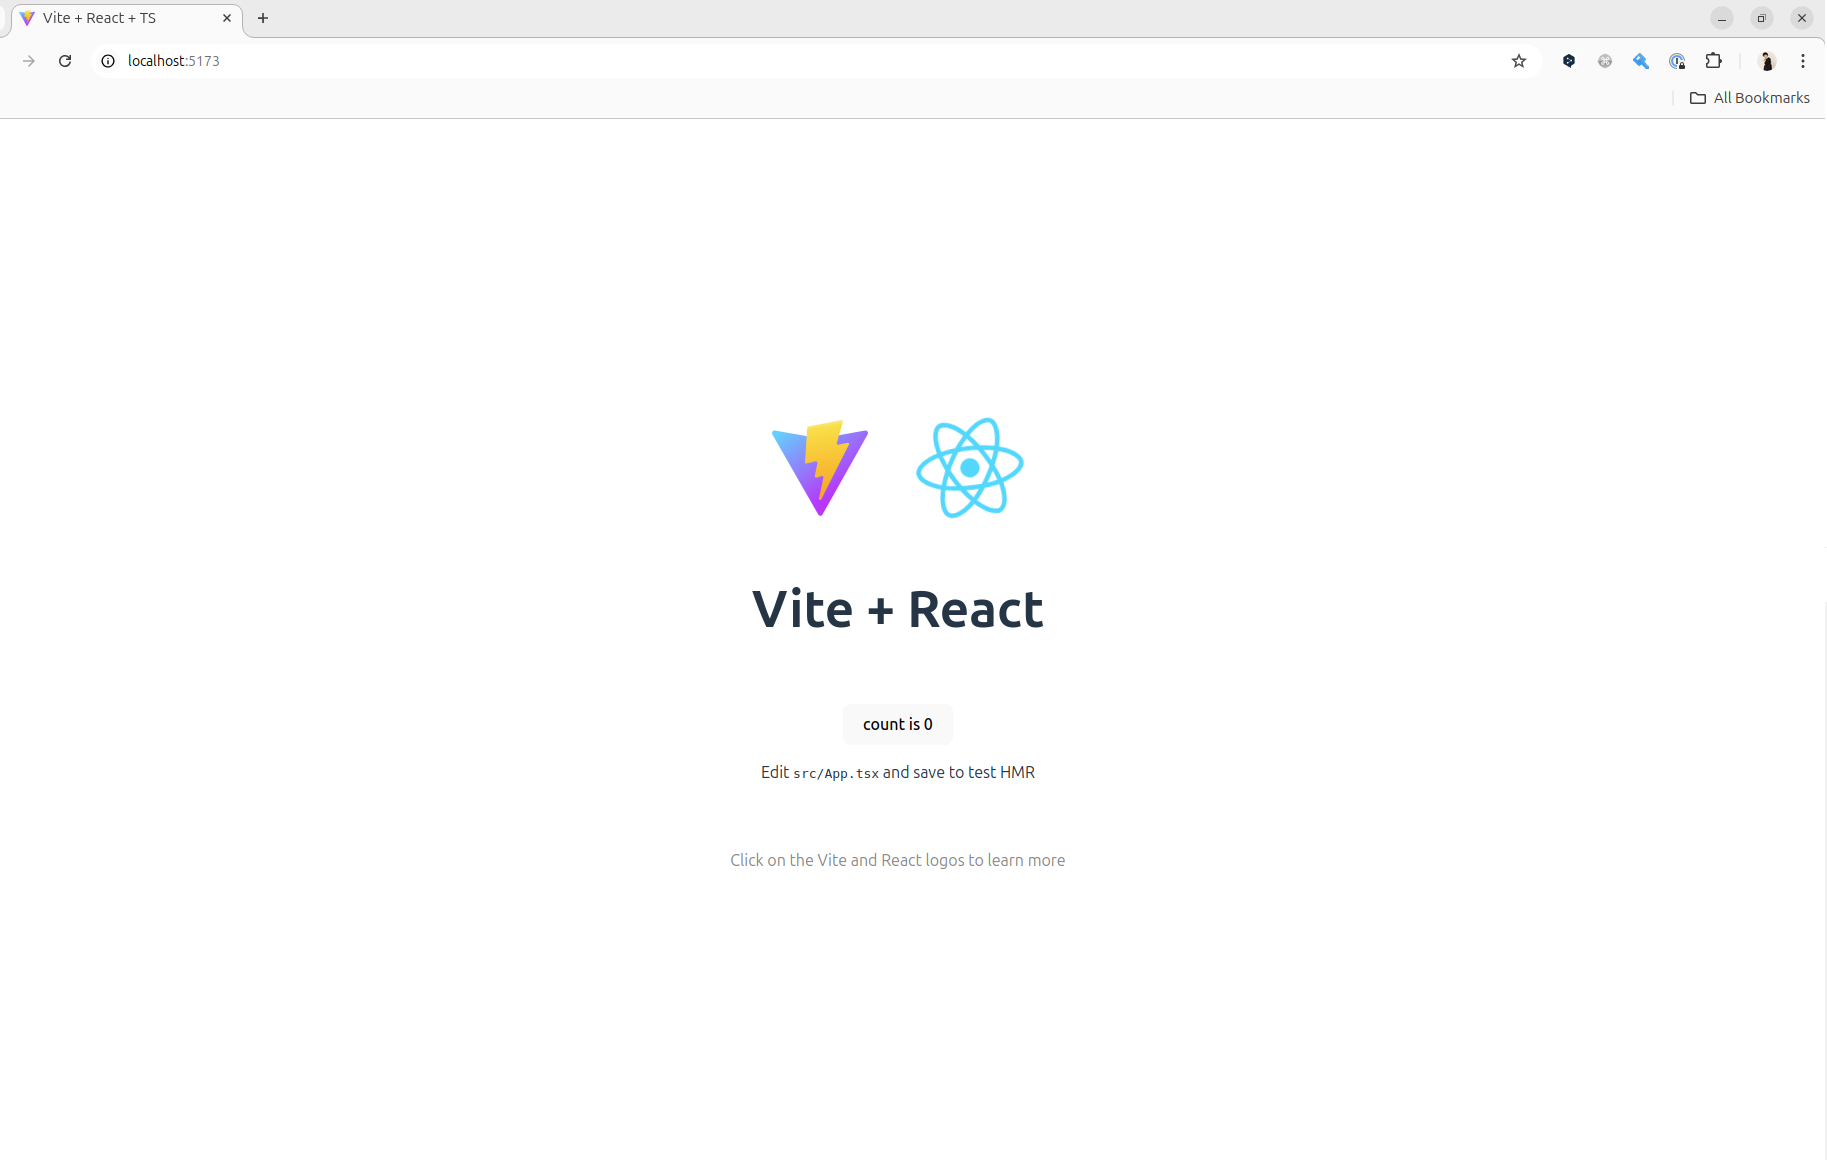
http://localhost:5173にアクセスして以下の画面が表示されればReact環境が無事できています。
次にTailwindCSSを導入していきます。
$ npm install -D tailwindcss@3.4.13 postcss autoprefixer
$ npx tailwindcss init -p
※ tailwindcssの最新4系をいれるとMDXEditorでスタイルが効かないので古いものを入れてください
プロジェクトをVSCodeで開いてtailwind.config.jsを以下に変えます
/** @type {import('tailwindcss').Config} */
module.exports = {
  content: [
    "./src/**/*.{js,jsx,ts,tsx}",
  ],
  theme: {
    extend: {},
  },
  plugins: [],
}
src/index.cssを変更します
@tailwind base;
@tailwind components;
@tailwind utilities;
src/App.tsxを変更してスタイルがあたるかをチェックします
function App() {
  return (
    <>
      <div>
        <button className="bg-blue-500 hover:bg-blue-700 text-white font-bold py-2 px-4 rounded">
          Button
        </button>
      </div>
    </>
  );
}

export default App;
一度サーバーを落としてnpm run devで起動したらボタンが表示されました
2. サイドメニューの開発
まずはサイドメニューの開発から始めていきます。
サイドメニューではそれぞれのノートの「タイトル」「更新日時」が表示されており、タイトルは変更することが可能です。
ノートの削除をすることも可能です。
まずはこのアプリで利用するドメインから作成していきましょう
$ mkdir src/domain
$ touch src/domain/note.ts
export class Note {
  constructor(
    public id: string,
    public title: string,
    public content: string,
    public lastEditTime: number
  ) {}
}
ノートクラスを定義しました。
次にノートのダミーデータを使ってサイドメニューを作成します。
$ mkdir src/components
$ touch src/components/SideMenu.tsx
$ touch src/components/Editor.tsx
function SideMenu() {
  return <div>SideMenu</div>;
}

export default SideMenu;
VSCodeであればrfcdと打ってTabキーを押すと簡単に作成してくれます。
function Editor() {
  return <div>Editor</div>;
}

export default Editor;
次にJotaiを使ってストアを用意してテストデータとを保存します。
$ npm i jotai
$ mkdir src/store
$ touch src/store/index.ts
import { atom } from "jotai";
import { Note } from "../domain/note";

export const notesAtom = atom<Note[]>([]);
ノートの一覧を保存するためのストアを用意しました。
それでは実際にApp.tsxでダミーデータをストアに保存してみましょう
import { useAtom } from "jotai";
import Editor from "./components/Editor";
import SideMenu from "./components/SideMenu";
import { notesAtom } from "./store";
import { useEffect } from "react";
import { Note } from "./domain/note";

function App() {
  const [notes, setNotes] = useAtom(notesAtom);

  useEffect(() => {
    const noteData = [
      new Note("1", "Note 1", "Content 1", new Date().getTime()),
      new Note("2", "Note 2", "Content 2", new Date().getTime()),
      new Note("3", "Note 3", "Content 3", new Date().getTime()),
    ];

    setNotes(noteData);
  }, [setNotes]);

  return (
    <>
      <div className="flex h-screen w-full bg-white">
        <SideMenu />
        <Editor />
      </div>
    </>
  );
}

export default App;
しかしこれだとnotesが利用されておらず怒られてしまいます。
ここではsetNotesだけ利用したいのでuseAtomではなくuseSetAtomを使うことができます。
import { useSetAtom } from "jotai";
import Editor from "./components/Editor";
import SideMenu from "./components/SideMenu";
import { notesAtom } from "./store";
import { useEffect } from "react";

function App() {
  const setNotes = useSetAtom(notesAtom);
  const noteData = [
    {
      id: "1",
      title: "Note 1",
      content: "Content 1",
      lastEditTime: new Date().getTime(),
    },
    {
      id: "2",
      title: "Note 2",
      content: "Content 2",
      lastEditTime: new Date().getTime(),
    },
    {
      id: "3",
      title: "Note 3",
      content: "Content 3",
      lastEditTime: new Date().getTime(),
    },
  ];

  useEffect(() => {
    setNotes(noteData);
  }, [noteData]);

  return (
    <>
      <div className="flex h-screen w-full bg-white">
        <SideMenu />
        <Editor />
      </div>
    </>
  );
}

export default App;
useEffect(初回に実行される)の中でダミーデータをNoteクラスで作成してストアに保存しています。
  useEffect(() => {
    setNotes(noteData);
  }, [noteData]
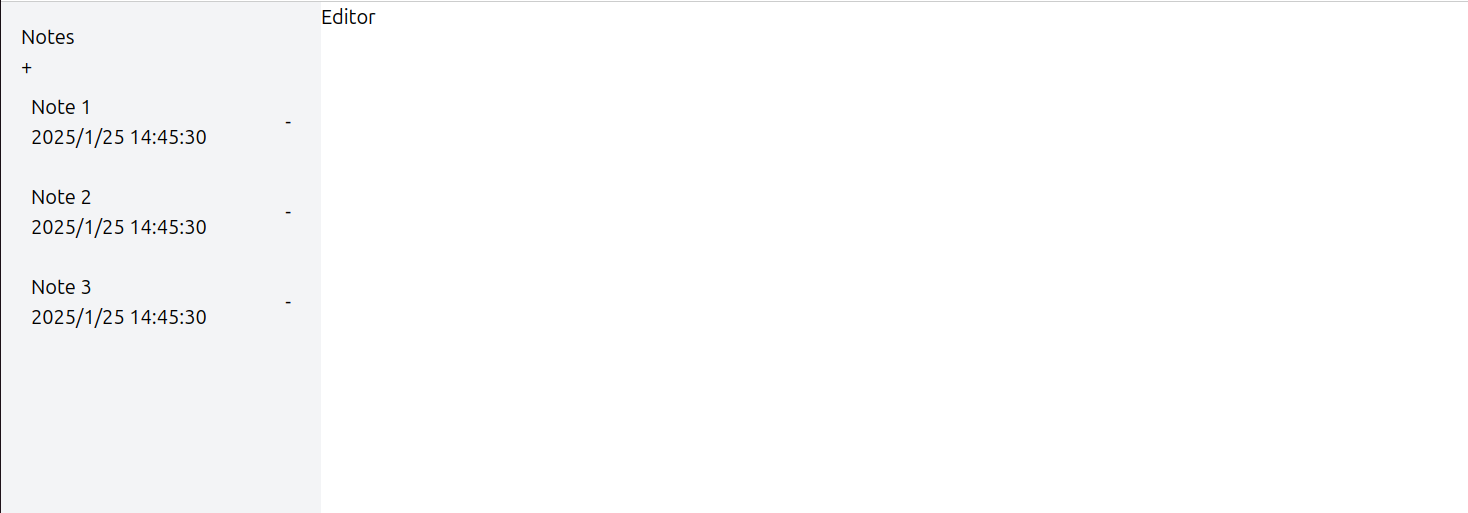
それでは次にサイドメニューで保存したノートを取得して表示してみましょう
import { useAtomValue } from "jotai";
import { notesAtom } from "../store";

function SideMenu() {
  const notes = useAtomValue(notesAtom);

  return (
    <div className="w-64 h-screen bg-gray-100 p-4 flex flex-col">
      <div>
        <h2>Notes</h2>
        <button>+</button>
      </div>
      <div>
        {notes?.map((note) => (
          <div
            key={note.id}
            className="p-2 mb-2 rounded cursor-pointer flex justify-between items-center group"
          >
            <div className="flex-1 min-w-0">
              <input type="text" className="bg-gray-100" value={note.title} />
              <p>
                {note.lastEditTime
                  ? new Date(note.lastEditTime).toLocaleString()
                  : "Never edited"}
              </p>
            </div>
            <button>-</button>
          </div>
        ))}
      </div>
    </div>
  );
}

export default SideMenu;
ノートの取得はuseVaueAtomを利用しています。これも先程と同じくセット関数(setNotes)を利用しないので値のみを取り出せる関数を使っています。
const notes = useAtomValue(notesAtom);
ノートはnotesをmap関数を使ってそれぞれ表示しています。
        {notes?.map((note) => (
          <div
            key={note.id}
            className="p-2 mb-2 rounded cursor-pointer flex justify-between items-center group"
          >
            <div className="flex-1 min-w-0">
              <input type="text" className="bg-gray-100" value={note.title} />
              <p>
                {note.lastEditTime
                  ? new Date(note.lastEditTime).toLocaleString()
                  : "Never edited"}
              </p>
            </div>
            <button>-</button>
          </div>
        ))}
ノートを1つ1つに書くとこのようになりますが、mapを使うことでスタイリッシュに書くことができます。
<div>
  <div className="p-2 mb-2 rounded cursor-pointer flex justify-between items-center group">
    <div className="flex-1 min-w-0">
      <input type="text" className="bg-gray-100" value={notes[0].title} />
      <p>{notes[0].lastEditTime ? new Date(notes[0].lastEditTime).toLocaleString() : "Never edited"}</p>
    </div>
    <button>-</button>
  </div>

  <div className="p-2 mb-2 rounded cursor-pointer flex justify-between items-center group">
    <div className="flex-1 min-w-0">
      <input type="text" className="bg-gray-100" value={notes[1].title} />
      <p>{notes[1].lastEditTime ? new Date(notes[1].lastEditTime).toLocaleString() : "Never edited"}</p>
    </div>
    <button>-</button>
  </div>

  ノートの数だけ書くので大変!
  またノートが何個あるかを意識しないといけないので微妙
</div>
3. Convexからのデータ取得
ダミーデータを実際のDBのデータを取得して表示するように直しましょう
それにはConvexというBaaSを利用します。
アカウント登録をしていない人はアカウント登録をしてから続きを進めてください
ConvexはTypeScriptで簡単に利用できるライブラリが提供されているのでインストールします。
$ npm i convex
プロジェクト作成も簡単にコマンドからできます
$ npx convex dev
? What would you like to configure? create a new project
? Project name: jotai-note-app
✔ Created project jotai-note-app, manage it at https://dashboard.convex.dev/t/watanabe-jin/jotai-note-app
✔ Provisioned a dev deployment and saved its:
    name as CONVEX_DEPLOYMENT to .env.local
    URL as VITE_CONVEX_URL to .env.local

Write your Convex functions in convex/
Give us feedback at https://convex.dev/community or support@convex.dev

✔ 14:54:23 Convex functions ready! (2.15s)
ここまで行えたらConvexをみるとjotai-note-appというプロジェクトができているのでクリックしてください
またDBの接続情報も勝手に.env.localで作成してくれています。
convexというディレクトリも作成してくれています。
続いて今回利用するDBのスキーマを作成していきます。
Convexの便利なところはconvex/schema.tsにテーブルスキーマを書くとnpx convex devが起動している間自動で変更を検知してDBに変更を反映してくれます(マイグレーションともいいます)
$ touch convex/schema.ts
import { defineSchema, defineTable } from "convex/server";
import { v } from "convex/values";

export default defineSchema({
  notes: defineTable({
    title: v.string(),
    content: v.string(),
    lastEditTime: v.number(),
  }),
});
ノートは名前、内容、最終編集日を持つようにしました。
またidに関してはConvexが自動で付与してくれるので書く必要はありません
ここでnpx convex devが実行されている状態であれば変更が反映されているのでDBをみてみます。
左メニューから「Data」をクリックするとnotesというテーブルができています。
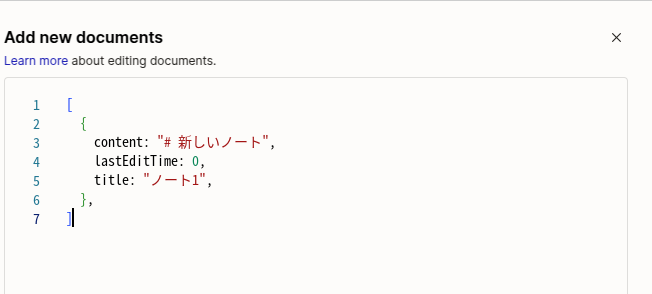
それではこちらにテストデータを3つ作りましょう
「Add Documents」をクリックして
content: # 新しいノート
title: ノート1
入力したら「Save」を押して保存します。
同じ要領で残りのデータも追加してください。
データ2: content: **Content** title: ノート2
データ3: content: hello title: ノート3
lastEditTimeは何も入れなくて大丈夫です。
ダミーデータが追加できたので、ReactにConvexの設定をしていきます。
基本的にはドキュメントどおりになっています。
main.tsxを修正します。
import { StrictMode } from "react";
import { createRoot } from "react-dom/client";
import "./index.css";
import App from "./App.tsx";
import { ConvexProvider, ConvexReactClient } from "convex/react";

const convex = new ConvexReactClient(import.meta.env.VITE_CONVEX_URL as string);

createRoot(document.getElementById("root")!).render(
  <StrictMode>
    <ConvexProvider client={convex}>
      <div className="flex h-screen w-screen">
        <App />
      </div>
    </ConvexProvider>
  </StrictMode>
);
これでConvexの必要な設定は完了したのでDBからノート一覧を取得する処理を書いていきます。
$ touch convex/notes.ts
このnotes.tsにノート一覧取得や新規ノート作成の処理を書いて、コンポーネントで呼び出すことになります。
import { query } from "./_generated/server";

export const get = query({
  args: {},
  handler: async (ctx) => {
    const notesJson = await ctx.db.query("notes").collect();
    return notesJson
  },
});
Convexではqueryとmutationという関数を利用します。
GETメソッドがquery、POST,PUT,PATCH,DELETEはmutationを使います。
最初にgetメソッドの引数をargsで書いています。今回は必要ないので空のオブジェクトですが、例えば特定のノートを取得する場合はidなどを受け取ります。
次にgetが呼び出されたときの挙動をhandlerに書きます。
handler: async (ctx) => {

    });
ctxはコンテキストと呼ばれるもので、Convexの初期設定でclientに追加したConvexのクライアント(Convexとやり取りするためもの)です。
    <ConvexProvider client={convex}>
      <div className="flex h-screen w-screen">
        <App />
      </div>
    </ConvexProvider>
ctxをつけているためにConvexProviderを先程設定しました。
Convexクライアント(ctx)を使うことで簡単にデータベースから情報を取得できます。
const notesJson = await ctx.db.query("notes").collect();
return notesJson
そしてJosnでデータを返しています。
getを呼び出すと最終的には
[
 {
   "_id": "xxx",
   "title": "title1",
   "content": "content1",
   "lastEditTime": "yyyy"
 },
 ....
 ,
 {
   "_id": "zzzz",
   "title": "title3",
   "content": "content3",
   "lastEditTime": "yyyyy"
 }
]
このようなjsonの配列が返ってきます。
それでは実際にアプリケーションが開くタイミングでデータを取得してストアに保存してみましょう
import { useSetAtom } from "jotai";
import Editor from "./components/Editor";
import SideMenu from "./components/SideMenu";
import { notesAtom } from "./store";
import { useEffect } from "react";
import { useQuery } from "convex/react";
import { api } from "../convex/_generated/api";
import { Note } from "./domain/note";

function App() {
  const setNotes = useSetAtom(notesAtom);
  const initializeNotes = useQuery(api.notes.get); // 追加

  useEffect(() => {
    const notes = initializeNotes?.map(
      (note) => new Note(note._id, note.title, note.content, note.lastEditTime)
    );
    setNotes(notes || []);
  }, [setNotes, initializeNotes]); // 修正

  return (
    <>
      <div className="flex h-screen w-full bg-white">
        <SideMenu />
        <Editor />
      </div>
    </>
  );
}

export default App;
まずはクライアント側でuseQueryを使って先程作成したgetを呼び出します。
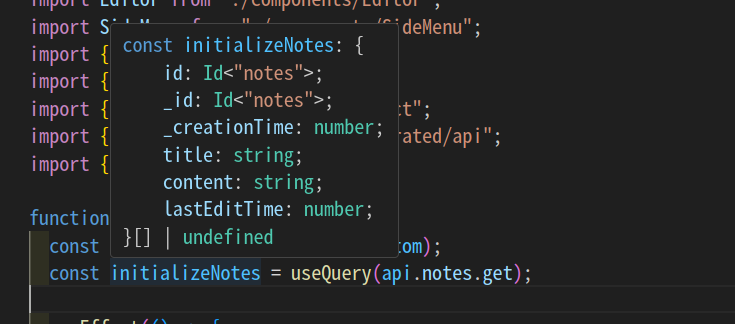
const initializeNotes = useQuery(api.notes.get);
npm convex devをしていると型情報が自動で生成されるためinitializeNotesにホバーをすると型情報が見れます。
useEffectでは取得したデータをNoteクラスに変換してNoteクラスの配列を保存しています。
  useEffect(() => {
    const notes = initializeNotes?.map(
      (note) => new Note(note._id, note.title, note.content, note.lastEditTime)
    );
    setNotes(notes || []);
  }, [setNotes, initializeNotes]);
NoteクラスにしないといけないのはnotesAtomの型をNote[]と定義したからです。
export const notesAtom = atom<Note[]>([]);
それでは実際にアプリを見てみましょう
convexの起動でnpm run devを消してしまった人は再度サーバー起動してください
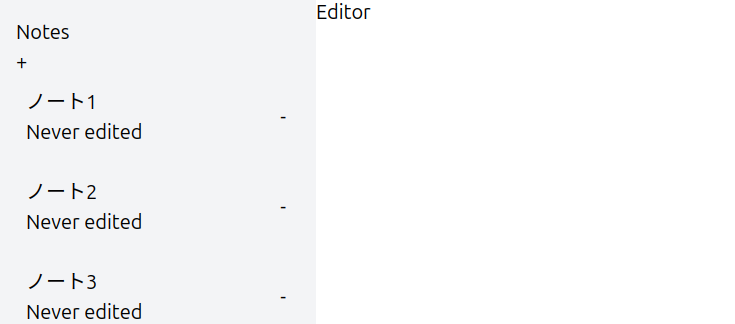
表示されました!
日付がNever editedになっているのはDBの日付を0で保存しているからです。
このあと修正すれば時間は表示されるので先に進みましょう
4. ノートの新規作成と削除
続いてサイドメニューの「+」なら新規作成、「-」ならノート削除する機能を実装しましょう
import { v } from "convex/values";
import { mutation, query } from "./_generated/server";

export const get = query({
  args: {},
  handler: async (ctx) => {
    const notesJson = await ctx.db.query("notes").collect();
    return notesJson

  },
});

// 追加
export const create = mutation({
  args: {
    title: v.string(),
    content: v.string(),
  },
  handler: async (ctx, args) => {
    const noteId = await ctx.db.insert("notes", {
      title: args.title,
      content: args.content,
      lastEditTime: Date.now(),
    });
    return noteId;
  },
});
まずはConvexにデータを追加するcreateを作成しました
  args: {
    title: v.string(),
    content: v.string(),
  },
タイトルと内容を受け取ってインサートをしています。
import { useAtom } from "jotai";
import { notesAtom } from "../store";
import { Note } from "../domain/note";
import { useMutation } from "convex/react";
import { api } from "../../convex/_generated/api";

function SideMenu() {
  const [notes, setNotes] = useAtom(notesAtom); // 修正
  const createNote = useMutation(api.notes.create); // 追加

  // 追加
  const handleCreateNote = async () => {
    const noteId = await createNote({
      title: "Untitled",
      content: "",
    });

    const newNote = new Note(noteId, "Untitled", "", Date.now());
    setNotes((prev) => [...prev, newNote]);
  };

  return (
    <div className="w-64 h-screen bg-gray-100 p-4 flex flex-col">
      <div>
        <h2>Notes</h2>
        {/* 修正 */}
        <button onClick={handleCreateNote}>+</button>
      </div>
      <div>
        {notes?.map((note) => (
          <div
            key={note.id}
            className="p-2 mb-2 rounded cursor-pointer flex justify-between items-center group"
          >
            <div className="flex-1 min-w-0">
              <input type="text" className="bg-gray-100" value={note.title} />
              <p>
                {note.lastEditTime
                  ? new Date(note.lastEditTime).toLocaleString()
                  : "Never edited"}
              </p>
            </div>
            <button>-</button>
          </div>
        ))}
      </div>
    </div>
  );
}

export default SideMenu;
まずはノートの新規作成からです。
+ボタンを押したらhandleCreateNoteが実行されるように設定します。
<button onClick={handleCreateNote}>+</button>
handleCreateNoteではまずConvexのcreateを呼び出してノートをDBにインサートしています。タイトルはUntitledで内容は空で追加します。
  const handleCreateNote = async () => {
    const noteId = await createNote({
      title: "Untitled",
      content: "",
    });
そのあとにnotesAtomに新しいノートを追加したnotesで更新をします。
    const newNote = new Note(noteId, "Untitled", "", Date.now());
    setNotes((prev) => [...prev, newNote]); // ...prevとすることで現在のnotesを展開してその後ろにnewNoteを追加
ここでnotesとsetNotesを使うことになったのでuseValueAtomからuseAtomに変更しました。
const [notes, setNotes] = useAtom(notesAtom);
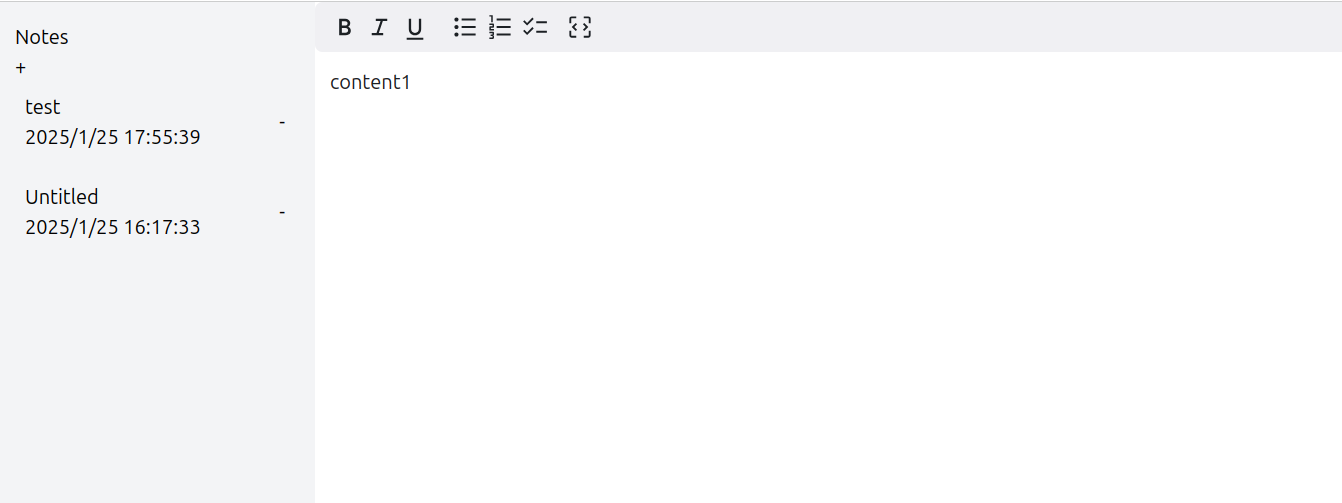
実際に画面で「+」を押すと新規ノートが追加されます。
リロードしても表示されるのでDBにも保存されていることがわかります。
新規追加はlastEditTimeにnew Date()を追加しているので最終編集日もちゃんと表示されていますね。
同じ要領で削除機能も実装しましょう。
import { v } from "convex/values";
import { mutation, query } from "./_generated/server";

export const get = query({
  args: {},
  handler: async (ctx) => {
    const notesJson = await ctx.db.query("notes").collect();
    return notesJson
  },
});

export const create = mutation({
  args: {
    title: v.string(),
    content: v.string(),
  },
  handler: async (ctx, args) => {
    const noteId = await ctx.db.insert("notes", {
      title: args.title,
      content: args.content,
      lastEditTime: Date.now(),
    });
    return noteId;
  },
});

// 追加
export const deleteNote = mutation({
  args: {
    noteId: v.id("notes"),
  },
  handler: async (ctx, args) => {
    await ctx.db.delete(args.noteId);
  },
});
deleteNoteはノートのidを受け取りますが、
  args: {
    noteId: v.id("notes"),
  },
としています。これはConvexが用意しているidの型であることを意味しています。
もしこれをv.string()にすると以下のようなエラーになります。
これはConvexがDBの型を把握しており、DBではIdはIdという特別な型になっているのでstringと違うのでエラーを出しています。
なので、v.id(notes)として受け取るようにしました。
import { useAtom } from "jotai";
import { notesAtom } from "../store";
import { Note } from "../domain/note";
import { useMutation } from "convex/react";
import { api } from "../../convex/_generated/api";
import { Id } from "../../convex/_generated/dataModel";

function SideMenu() {
  const [notes, setNotes] = useAtom(notesAtom);
  const createNote = useMutation(api.notes.create);
  const deleteNote = useMutation(api.notes.deleteNote); // 追加

  const handleCreateNote = async () => {
    const noteId = await createNote({
      title: "Untitled",
      content: "",
    });

    const newNote = new Note(noteId, "Untitled", "", Date.now());
    setNotes((prev) => [...prev, newNote]);
  };

  // 追加
  const handleDeleteNote = async (noteId: Id<"notes">) => {
    await deleteNote({ noteId });
    setNotes((prev) => prev.filter((n) => n.id !== noteId));
  };

  return (
    <div className="w-64 h-screen bg-gray-100 p-4 flex flex-col">
      <div>
        <h2>Notes</h2>
        <button onClick={handleCreateNote}>+</button>
      </div>
      <div>
        {notes?.map((note) => (
          <div
            key={note.id}
            className="p-2 mb-2 rounded cursor-pointer flex justify-between items-center group"
          >
            <div className="flex-1 min-w-0">
              <input type="text" className="bg-gray-100" value={note.title} />
              <p>
                {note.lastEditTime
                  ? new Date(note.lastEditTime).toLocaleString()
                  : "Never edited"}
              </p>
            </div>
            {/* 修正 */}
            <button onClick={() => handleDeleteNote(note.id)}>-</button>
          </div>
        ))}
      </div>
    </div>
  );
}

export default SideMenu;
新規作成とほとんど実装は変わらないのですが、これではエラーが出ます。
いまNoteクラスのidはstringになっているのでhanldeDeleteNoteでは受け取れないです。
const handleDeleteNote = async (noteId: Id<"notes">) => {
handleDeleteNoteで受け取るnoteIdはConvexのidの型であるId<"notes">としています。これはapi.notes.deleteを呼ぶためです。
export const deleteNote = mutation({
  args: {
    noteId: v.id("notes"),
  },
となるとNoteクラスの型を直す必要が出てきました。
import { Id } from "../../convex/_generated/dataModel";

export class Note {
  constructor(
    public id: Id<"notes">, // 修正
    public title: string,
    public content: string,
    public lastEditTime: number
  ) {}
}
最初に作成したダミーデータが削除できました!
5. 選択したノートの内容を表示する
次に選択したノートの内容をEditor.tsxで表示する実装をします。
ノートを選択したらストアに選択したノートを保存しておき、Editor.tsxでノートを取得して表示するように実装しましょう
import { atom } from "jotai";
import { Note } from "../domain/note";
import { Id } from "../../convex/_generated/dataModel";

export const notesAtom = atom<Note[]>([]);
export const selectedNoteIdAtom = atom<Id<"notes"> | null>(null); // 追加

export const selectedNoteAtom = atom((get) => {
  const notes = get(notesAtom);
  const id = get(selectedNoteIdAtom);
  if (id === null) return null;

  return notes.find((note) => note.id === id) || null;
}); // 追加
選択しているノートのIDを保存しておくAtom(selectedNoteIdAtom)を作成しました。
選択されているノートをIDから検索してくれるAtomがあると便利なので、派生AtomのselectedNoteAtomも作ります。これは読み込み専用Atomで、ストアのselectedNoteIdAtomの情報を使って選択されたノートを検索してくれます。
return notes.find((note) => note.id === id) || null;
次にSideMenuでノートを選択したらselectedNoteIdAtomを更新する処理を追加します。
import { useAtom, useSetAtom } from "jotai";
import { notesAtom, selectedNoteIdAtom } from "../store";
import { Note } from "../domain/note";
import { useMutation } from "convex/react";
import { api } from "../../convex/_generated/api";
import { Id } from "../../convex/_generated/dataModel";

function SideMenu() {
  const [notes, setNotes] = useAtom(notesAtom);
  const setSelectedNoteId = useSetAtom(selectedNoteIdAtom); // 追加
  const createNote = useMutation(api.notes.create);
  const deleteNote = useMutation(api.notes.deleteNote);

  const handleCreateNote = async () => {
    const noteId = await createNote({
      title: "Untitled",
      content: "",
    });

    const newNote = new Note(noteId, "Untitled", "", Date.now());
    setNotes((prev) => [...prev, newNote]);
  };

  const handleDeleteNote = async (noteId: Id<"notes">) => {
    await deleteNote({ noteId });
    setNotes((prev) => prev.filter((n) => n.id !== noteId));
  };

  // 追加
  const handleNoteClick = (note: Note) => {
    setSelectedNoteId(note.id);
  };

  return (
    <div className="w-64 h-screen bg-gray-100 p-4 flex flex-col">
      <div>
        <h2>Notes</h2>
        <button onClick={handleCreateNote}>+</button>
      </div>
      <div>
        {notes?.map((note) => (
          <div
            key={note.id}
            className="p-2 mb-2 rounded cursor-pointer flex justify-between items-center group"
            onClick={() => handleNoteClick(note)} // 追加
          >
            <div className="flex-1 min-w-0">
              <input type="text" className="bg-gray-100" value={note.title} />
              <p>
                {note.lastEditTime
                  ? new Date(note.lastEditTime).toLocaleString()
                  : "Never edited"}
              </p>
            </div>
            <button onClick={() => handleDeleteNote(note.id)}>-</button>
          </div>
        ))}
      </div>
    </div>
  );
}

export default SideMenu;
そしてEditor.tsxでは選択されているノートの内容を表示させます。
import { useAtomValue } from "jotai";
import { selectedNoteAtom } from "../store";

function Editor() {
  const selectedNote = useAtomValue(selectedNoteAtom);

  return <div>{selectedNote?.content || ""}</div>;
}

export default Editor;
確認するときはconvexでcontentのデータを直接入れてあげてからやります。
問題なく表示できました!
残りサイドメニューで必要な機能がタイトル変更なので、そちらも実装しちゃいます。
まずはDBのノートを更新するための関数を作成します。
import { v } from "convex/values";
import { mutation, query } from "./_generated/server";

export const get = query({
  args: {},
  handler: async (ctx) => {
    const notesJson = await ctx.db.query("notes").collect();
    return notesJson
  },
});

export const create = mutation({
  args: {
    title: v.string(),
    content: v.string(),
  },
  handler: async (ctx, args) => {
    const noteId = await ctx.db.insert("notes", {
      title: args.title,
      content: args.content,
      lastEditTime: Date.now(),
    });
    return noteId;
  },
});

export const deleteNote = mutation({
  args: {
    noteId: v.id("notes"),
  },
  handler: async (ctx, args) => {
    await ctx.db.delete(args.noteId);
  },
});

// 追加
export const updateNote = mutation({
  args: {
    noteId: v.id("notes"),
    title: v.string(),
    content: v.string(),
  },
  handler: async (ctx, args) => {
    await ctx.db.patch(args.noteId, {
      title: args.title,
      content: args.content,
      lastEditTime: Date.now(),
    });
  },
});
引数としてノートIDとタイトルと内容を受け取れるようにしています。
これはこのあとエディタで内容を編集したときにも同じ関数が使えるようにです。
しかし、今回はタイトルしか変わる箇所はありません。
またupdateをするときはlastEditTimeを現在の時刻に更新しています。
    await ctx.db.patch(args.noteId, {
      title: args.title,
      content: args.content,
      lastEditTime: Date.now(),
    });
サイドメニューはすこし複雑になっているので細かく解説していきます。
タイトルは変更1文字ごとにDBに更新をかけてしまうとフォーム入力が1文字ごとに固まってしまうのでデバウンスを使います。
デバウンスを使うことで入力が終わってからDBへの保存をすることができます。
ライブラリをインストールすれば簡単に実現できます。
$ npm i @uidotdev/usehooks
import { useAtom, useSetAtom } from "jotai";
import { notesAtom, selectedNoteIdAtom } from "../store";
import { Note } from "../domain/note";
import { useMutation } from "convex/react";
import { api } from "../../convex/_generated/api";
import { Id } from "../../convex/_generated/dataModel";
import { useEffect, useState } from "react";
import { useDebounce } from "@uidotdev/usehooks";

function SideMenu() {
  const [notes, setNotes] = useAtom(notesAtom);
  const setSelectedNoteId = useSetAtom(selectedNoteIdAtom);
  const createNote = useMutation(api.notes.create);
  const deleteNote = useMutation(api.notes.deleteNote);
  const updateNote = useMutation(api.notes.updateNote); // 追加
  const [editingTitle, setEditingTitle] = useState<{
    id: Id<"notes">;
    title: string;
  } | null>(null); // 追加

  const handleCreateNote = async () => {
    const noteId = await createNote({
      title: "Untitled",
      content: "",
    });

    const newNote = new Note(noteId, "Untitled", "", Date.now());
    setNotes((prev) => [...prev, newNote]);
  };

  const handleDeleteNote = async (noteId: Id<"notes">) => {
    await deleteNote({ noteId });
    setNotes((prev) => prev.filter((n) => n.id !== noteId));
  };

  const handleNoteClick = (note: Note) => {
    setSelectedNoteId(note.id);
  };

  // 追加
  const handleTitleChange = (noteId: Id<"notes">, newTitle: string) => {
    setEditingTitle({ id: noteId, title: newTitle });
    setNotes((prev) =>
      prev.map((n) => (n.id === noteId ? { ...n, title: newTitle } : n))
    );
  };

  // 追加
  const debouncedTitle = useDebounce(editingTitle?.title, 500);
  useEffect(() => {
    if (editingTitle && debouncedTitle) {
      handleUpdateTitle(editingTitle.id, debouncedTitle);
    }
  }, [debouncedTitle]);

 // 追加
  const handleUpdateTitle = async (noteId: Id<"notes">, newTitle: string) => {
    const note = notes.find((n) => n.id === noteId);
    if (!note) return;

    await updateNote({
      noteId,
      title: newTitle,
      content: note.content,
    });
  };

  return (
    <div className="w-64 h-screen bg-gray-100 p-4 flex flex-col">
      <div>
        <h2>Notes</h2>
        <button onClick={handleCreateNote}>+</button>
      </div>
      <div>
        {notes?.map((note) => (
          <div
            key={note.id}
            className="p-2 mb-2 rounded cursor-pointer flex justify-between items-center group"
            onClick={() => handleNoteClick(note)}
          >
            <div className="flex-1 min-w-0">
              <input
                type="text"
                className="bg-gray-100"
                onChange={(e) => handleTitleChange(note.id, e.target.value)} // 修正
                value={note.title}
              />
              <p>
                {note.lastEditTime
                  ? new Date(note.lastEditTime).toLocaleString()
                  : "Never edited"}
              </p>
            </div>
            <button onClick={() => handleDeleteNote(note.id)}>-</button>
          </div>
        ))}
      </div>
    </div>
  );
}

export default SideMenu;
まずはタイトルを入力するフォームのステートを保存しておくためuseStateを使います。
  const [editingTitle, setEditingTitle] = useState<{
    id: Id<"notes">;
    title: string;
  } | null>(null);
またデバウンスの設定もしておきます。
  const debouncedTitle = useDebounce(editingTitle?.title, 500);
  useEffect(() => {
    if (editingTitle && debouncedTitle) {
      handleUpdateTitle(editingTitle.id, debouncedTitle);
    }
  }, [debouncedTitle]);
文字を変更してから0.5秒間変更がなかったら(つまり手が止まったら)、useEffectを実行するという設定になっています。useEffectの中ではhandleUpdateTitleを実行しています。
  const handleUpdateTitle = async (noteId: Id<"notes">, newTitle: string) => {
    const note = notes.find((n) => n.id === noteId);
    if (!note) return;

    await updateNote({
      noteId,
      title: newTitle,
      content: note.content,
    });
  };
hanldeUpdateTitleではタイトル変更されたノートのIdと新しいタイトルを受け取っています。notesの中から編集しているノートをみつけてupdateNoteでDBを更新しています。
const updateNote = useMutation(api.notes.updateNote);

(省略)

  const note = notes.find((n) => n.id === noteId);
(省略)
  await updateNote({
      noteId,
      title: newTitle,
      content: note.content,
    });
タイトルを変更することができるようになりました。
6. エディタを実装する
次はエディタを実装して入力した内容を保存できるようにしましょう。
今回はMDXEditorというライブラリを利用して簡単にマークダウンが書けるエディタを実装しましょう
$ npm install --save @mdxeditor/editor
$ npm i -D @tailwindcss/typography
次にMDXEditorでh1を利用できるようにするために設定をしておきます。
/** @type {import('tailwindcss').Config} */
export default {
  content: ["./src/**/*.{js,jsx,ts,tsx}"],
  theme: {
    extend: {},
  },
  plugins: [require("@tailwindcss/typography")], // 修正
};
それではエディタを実装しましょう
import { useAtomValue } from "jotai";
import { selectedNoteAtom } from "../store";
import "@mdxeditor/editor/style.css";
import {
  MDXEditor,
  headingsPlugin,
  listsPlugin,
  markdownShortcutPlugin,
  type MDXEditorMethods,
  toolbarPlugin,
  BoldItalicUnderlineToggles,
  ListsToggle,
  codeBlockPlugin,
  codeMirrorPlugin,
  InsertCodeBlock,
} from "@mdxeditor/editor";
import { useRef } from "react";

const plugins = [
  headingsPlugin(),
  listsPlugin(),
  markdownShortcutPlugin(),
  codeBlockPlugin({
    defaultCodeBlockLanguage: "js",
  }),
  codeMirrorPlugin({
    codeBlockLanguages: {
      js: "JavaScript",
      jsx: "JavaScript JSX",
      ts: "TypeScript",
      tsx: "TypeScript JSX",
      python: "Python",
      css: "CSS",
      html: "HTML",
      json: "JSON",
    },
  }),
  toolbarPlugin({
    toolbarContents: () => (
      <>
        <div className="flex items-center gap-1">
          <div className="flex gap-1">
            <BoldItalicUnderlineToggles />
          </div>
          <div className="flex gap-1">
            <ListsToggle />
          </div>
          <InsertCodeBlock />
        </div>
      </>
    ),
  }),
];

export const Editor = () => {
  const selectedNote = useAtomValue(selectedNoteAtom);

  return (
    <div className="flex-1">
      {selectedNote ? (
        <MDXEditor
          key={selectedNote.id}
          markdown={selectedNote.content}
          plugins={plugins}
          contentEditableClassName="prose max-w-none focus:outline-none"
          className="h-full"
          placeholder="Markdownを入力してください"
        />
      ) : (
        <div className="h-screen flex items-center justify-center">
          <p className="text-gray-500">
            ノートを選択するか、新しいノートを作成してください
          </p>
        </div>
      )}
    </div>
  );
};

export default Editor;
ノートは選択されていないとselectedNoteがundefinedになるため選択されていない時(初回)は文言を出すようにしました
      {selectedNote ? (
        // エディターの実装
      ) : (
        <div className="h-screen flex items-center justify-center">
          <p className="text-gray-500">
            ノートを選択するか、新しいノートを作成してください
          </p>
        </div>
      )}
エディタは用意してくれているプラグインを利用することでリッチな機能を簡単に利用することができます。
const plugins = [
  headingsPlugin(),
  listsPlugin(),
  markdownShortcutPlugin(),
  codeBlockPlugin({
    defaultCodeBlockLanguage: "js",
  }),
  codeMirrorPlugin({
    codeBlockLanguages: {
      js: "JavaScript",
      jsx: "JavaScript JSX",
      ts: "TypeScript",
      tsx: "TypeScript JSX",
      python: "Python",
      css: "CSS",
      html: "HTML",
      json: "JSON",
    },
  }),
  toolbarPlugin({
    toolbarContents: () => (
      <>
        <div className="flex items-center gap-1">
          <div className="flex gap-1">
            <BoldItalicUnderlineToggles />
          </div>
          <div className="flex gap-1">
            <ListsToggle />
          </div>
          <InsertCodeBlock />
        </div>
      </>
    ),
  }),
];

(省略)

        <MDXEditor
          key={selectedNote.id}
          markdown={selectedNote.content}
          plugins={plugins}
          contentEditableClassName="prose max-w-none focus:outline-none"
          className="h-full"
          placeholder="Markdownを入力してください"
        />
プラグインの細かい解説は本質と外れるので公式ドキュメントをみてください。
それではノートを書いたらデバウンスを使ってノートを更新する処理を追加しましょう
import { atom } from "jotai";
import { Note } from "../domain/note";
import { Id } from "../../convex/_generated/dataModel";

export const notesAtom = atom<Note[]>([]);
export const selectedNoteIdAtom = atom<Id<"notes"> | null>(null);

export const selectedNoteAtom = atom((get) => {
  const notes = get(notesAtom);
  const id = get(selectedNoteIdAtom);
  if (id === null) return null;

  return notes.find((note) => note.id === id) || null;
});

// 追加
export const saveNoteAtom = atom(null, (get, set, newContent: string) => {
  const note = get(selectedNoteAtom);
  if (!note) return;

  const updatedNote = new Note(note.id, note.title, newContent, Date.now());
  const notes = get(notesAtom);
  const updatedNotes = notes.map((n) => {
    if (n.id !== note.id) return n;
    return updatedNote;
  });

  set(notesAtom, updatedNotes);
});
saveAtomという書き込可能な派生Atomを作りました。
最初に現在の選択されているノートを取得して、更新されたノートを作成します
const note = get(selectedNoteAtom);
if (!note) return;

const updatedNote = new Note(note.id, note.title, newContent, Date.now());
そのあと現在のnotesをストアから取り出してその中から該当のノートを見つけて内容を更新してあげています。
  const notes = get(notesAtom);
  const updatedNotes = notes.map((n) => {
    if (n.id !== note.id) return n;
    return updatedNote;
  });
setの第一引数に更新対象のAtom、第二引数に更新する値を渡して更新完了です。
set(notesAtom, updatedNotes);
saveNoteAtomを利用すればnotesを更新することができます。(実際に更新されるのはnotesの中の編集されたノートのみです)
import { useAtomValue, useSetAtom } from "jotai";
import { saveNoteAtom, selectedNoteAtom } from "../store";
import "@mdxeditor/editor/style.css";
import {
  MDXEditor,
  headingsPlugin,
  listsPlugin,
  markdownShortcutPlugin,
  toolbarPlugin,
  BoldItalicUnderlineToggles,
  ListsToggle,
  codeBlockPlugin,
  codeMirrorPlugin,
  InsertCodeBlock,
} from "@mdxeditor/editor";
import { useCallback, useEffect, useState } from "react";
import { useMutation } from "convex/react";
import { api } from "../../convex/_generated/api";
import { useDebounce } from "@uidotdev/usehooks";

const plugins = [
  headingsPlugin(),
  listsPlugin(),
  markdownShortcutPlugin(),
  codeBlockPlugin({
    defaultCodeBlockLanguage: "js",
  }),
  codeMirrorPlugin({
    codeBlockLanguages: {
      js: "JavaScript",
      jsx: "JavaScript JSX",
      ts: "TypeScript",
      tsx: "TypeScript JSX",
      python: "Python",
      css: "CSS",
      html: "HTML",
      json: "JSON",
    },
  }),
  toolbarPlugin({
    toolbarContents: () => (
      <>
        <div className="flex items-center gap-1">
          <div className="flex gap-1">
            <BoldItalicUnderlineToggles />
          </div>
          <div className="flex gap-1">
            <ListsToggle />
          </div>
          <InsertCodeBlock />
        </div>
      </>
    ),
  }),
];

export const Editor = () => {
  const selectedNote = useAtomValue(selectedNoteAtom);
  // 追加
  const updateNote = useMutation(api.notes.updateNote);
  // 追加
  const saveNote = useSetAtom(saveNoteAtom);
  // 追加
  const [content, setContent] = useState<string>("");

  const debouncedContent = useDebounce(content, 1000); // 追加
  useEffect(() => {
    if (!selectedNote || !debouncedContent) return;
    updateNote({
      noteId: selectedNote.id,
      content: debouncedContent,
      title: selectedNote.title,
    });
  }, [debouncedContent, selectedNote, updateNote]);

 // 追加
  const handleContentChange = useCallback(
    (newContent: string) => {
      setContent(newContent);
      saveNote(newContent);
    },
    [saveNote]
  );

  return (
    <div className="flex-1">
      {selectedNote ? (
        <MDXEditor
          key={selectedNote.id}
          markdown={selectedNote.content}
          onChange={handleContentChange} // 追加
          plugins={plugins}
          contentEditableClassName="prose max-w-none focus:outline-none"
          className="h-full"
          placeholder="Markdownを入力してください"
        />
      ) : (
        <div className="h-screen flex items-center justify-center">
          <p className="text-gray-500">
            ノートを選択するか、新しいノートを作成してください
          </p>
        </div>
      )}
    </div>
  );
};

export default Editor;
まずはエディタの入力内容を保存しておくステートを用意します。
ノートの内容を更新するとhandleContentChangeが実行されてステートの値とnotesが更新されます。
  const [content, setContent] = useState<string>("");

省略

  const handleContentChange = useCallback(
    (newContent: string) => {
      setContent(newContent);
      saveNote(newContent);
    },
    [saveNote]
  );

省略
        <MDXEditor
          key={selectedNote.id}
          markdown={selectedNote.content}
          onChange={handleContentChange} // 追加
          plugins={plugins}
          contentEditableClassName="prose max-w-none focus:outline-none"
          className="h-full"
          placeholder="Markdownを入力してください"
        />
ここでもデバウンスを利用しており、ノートの入力開始から1秒間入力が行われなかったらノートの内容をDBに更新しています。
  const debouncedContent = useDebounce(content, 1000); // 追加
  useEffect(() => {
    if (!selectedNote || !debouncedContent) return;
    updateNote({
      noteId: selectedNote.id,
      content: debouncedContent,
      title: selectedNote.title,
    });
  }, [debouncedContent, selectedNote, updateNote]);
ここでuseCallbackという普段あまりみかけないHookがでてきたので解説します。

useCallbackは関数をキャッシュするための関数です。
今回handleContentChangeをMDXEditorにPropsとして渡しています。
このようなときにuseCallbackは有効です。
もし何らかの理由でEditor.tsxの再レンダリングが走ったとしても、handleContentChangeはキャッシュされているためMDXEditorの再レンダリングを防ぐことが可能です。
Propsに関数を渡す場合はキャッシュしておくのがよいでしょう(ただしコンポーネント側でメモ化されている必要があります)
7. デザインを整える
ここまでで必要な機能はすべてできたのであとはデザインを整えていきます。
エディタはスタイルも一緒に行っているのでサイドメニューのスタイルをあてます。
まずはアイコンを使えるようにするライブラリをインストールします
$ npm i lucide-react
import { useAtom, useAtomValue, useSetAtom } from "jotai";
import { notesAtom, selectedNoteIdAtom } from "../store";
import { Note } from "../domain/note";
import { useMutation } from "convex/react";
import { api } from "../../convex/_generated/api";
import { Id } from "../../convex/_generated/dataModel";
import { useEffect, useState } from "react";
import { useDebounce } from "@uidotdev/usehooks";
import { Plus, Trash2 } from "lucide-react";

function SideMenu() {
  const [notes, setNotes] = useAtom(notesAtom);
  const setSelectedNoteId = useSetAtom(selectedNoteIdAtom);
  const createNote = useMutation(api.notes.create);
  const deleteNote = useMutation(api.notes.deleteNote);
  const updateNote = useMutation(api.notes.updateNote);
  const selectedNoteId = useAtomValue(selectedNoteIdAtom); // 追加
  const [editingTitle, setEditingTitle] = useState<{
    id: Id<"notes">;
    title: string;
  } | null>(null);

  const handleCreateNote = async () => {
    const noteId = await createNote({
      title: "Untitled",
      content: "",
    });

    const newNote = new Note(noteId, "Untitled", "", Date.now());
    setNotes((prev) => [...prev, newNote]);
  };

  const handleDeleteNote = async (noteId: Id<"notes">) => {
    await deleteNote({ noteId });
    setNotes((prev) => prev.filter((n) => n.id !== noteId));
  };

  const handleNoteClick = (note: Note) => {
    setSelectedNoteId(note.id);
  };

  const handleTitleChange = (noteId: Id<"notes">, newTitle: string) => {
    setEditingTitle({ id: noteId, title: newTitle });
    setNotes((prev) =>
      prev.map((n) => (n.id === noteId ? { ...n, title: newTitle } : n))
    );
  };

  const debouncedTitle = useDebounce(editingTitle?.title, 500);
  useEffect(() => {
    if (editingTitle && debouncedTitle) {
      handleUpdateTitle(editingTitle.id, debouncedTitle);
    }
  }, [debouncedTitle]);

  const handleUpdateTitle = async (noteId: Id<"notes">, newTitle: string) => {
    const note = notes.find((n) => n.id === noteId);
    if (!note) return;

    await updateNote({
      noteId,
      title: newTitle,
      content: note.content,
    });
  };

  return (
    <div className="w-64 h-screen bg-gray-100 p-4 flex flex-col">
      <div className="flex justify-between items-center mb-4">
        <h2 className="text-xl font-bold">Notes</h2>
        <button
          onClick={handleCreateNote}
          className="p-2 bg-white rounded hover:bg-gray-50"
        >
          <Plus className="h-4 w-4" />
        </button>
      </div>
      <div className="flex-grow overflow-y-auto">
        {notes?.map((note) => (
          <div
            key={note.id}
            className={`p-2 mb-2 rounded cursor-pointer flex justify-between items-center group ${
              selectedNoteId === note.id ? "bg-white" : "hover:bg-white"
            }`}
            onClick={() => handleNoteClick(note)}
          >
            <div className="flex-1 min-w-0">
              <input
                type="text"
                value={note.title}
                onChange={(e) => handleTitleChange(note.id, e.target.value)}
                onClick={(e) => e.stopPropagation()}
                className="font-medium bg-transparent outline-none w-full"
                placeholder="Untitled"
              />
              <p className="text-xs text-gray-500 truncate">
                {note.lastEditTime
                  ? new Date(note.lastEditTime).toLocaleString()
                  : "Never edited"}
              </p>
            </div>
            <button
              onClick={(e) => {
                e.stopPropagation();
                handleDeleteNote(note.id);
              }}
              className="text-gray-400 hover:text-red-500 p-1 rounded opacity-0 group-hover:opacity-100 transition-opacity ml-2"
            >
              <Trash2 className="h-4 w-4" />
            </button>
          </div>
        ))}
      </div>
    </div>
  );
}

export default SideMenu;
ノートアプリが完成しました!お疲れ様です!
おわりに
いかがでしたでしょうか?
今回はJotaiを活用してノートアプリを作りました!
状態管理ライブラリを使うことで簡単に機能が実現できるのでぜひ利用してください!
テキストでは細かく解説しましたが、一部説明しきれていない箇所もありますので動画教材で紹介しています。合わせてご利用ください!
JISOUのメンバー募集中!
プログラミングコーチングJISOUでは、新たなメンバーを募集しています。
日本一のアウトプットコミュニティでキャリアアップしませんか?
興味のある方は、ぜひホームページからお気軽にカウンセリングをお申し込みください!
▼▼▼
本記事のレビュアーの皆様
tokec様
吉田侑平様
ARISA様
上嶋晃太様
たけしよしき様
次回のハンズオンのレビュアーはXにて募集します。
図解ハンズオンたくさん投稿しています!


