はじめに
今回はReactとTypeScriptを使ってNotion風の共同編集ができるノートアプリを作成します。
ハンズオンを通してこのようなアプリを作成することが可能です。
- ノートの新規作成
- ノートのタイトル編集
- 共同編集
- マークダウン表示
ができるようになっています。
最後には追加の機能開発の課題を用意しております。
こちらに取り組むとより深く理解することが可能になっております。
動画で学びたい方へ
動画でもハンズオンの解説を行っております。
細かいことやReactの基本について知りたい方は参考にしてみてください。
ハンズオンの対象者
- Reactの基本的な機能(useState, useEffect, onChange, onClickがわかる)
- 実践的なアプリケーションを作りたい
- Supabaseを学びたい
- Realtimeを学びたい
1. 環境構築
まずはReact/TypeScriptの環境構築を行います
$ npm create vite@latest
✔ Project name: … notion-app
✔ Select a framework: › React
✔ Select a variant: › TypeScript

$ cd notion-app
$ npm i
$ npm run dev
http://localhost:5173を開いて以下の画面が表示されれば成功です

次にTailwindCSSを入れていきます
$ npm install -D tailwindcss postcss autoprefixer
$ npx tailwindcss init -p
VSCodeで開いてtailwind.config.jsを以下にします
/** @type {import('tailwindcss').Config} */
export default {
  content: ["./src/**/*.{js,jsx,ts,tsx}"],
  theme: {
    extend: {},
  },
  plugins: [],
};
次にsrc/index.cssを以下にします
@tailwind base;
@tailwind components;
@tailwind utilities;
これで準備が整いました
2. ノート一覧の取得
まずはSupabaseにテストデータを入れます。
アカウントがない方は作成して新規プロジェクトを作成してから進めてください
まずは左メニューの「Table Editor」から「Create a new table」をクリック
テーブル名 : note
Enable Row Level Secutrity : チェックを外す
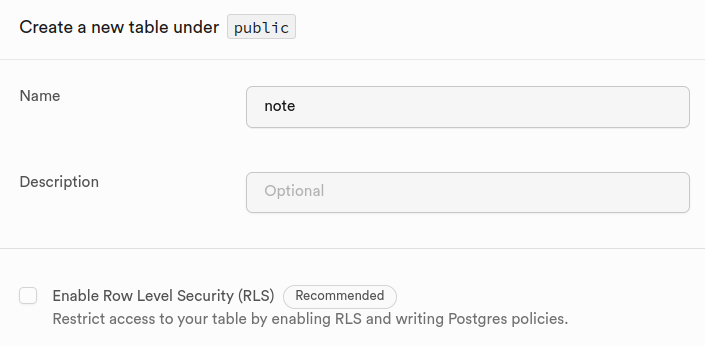
title : varchar (not null)
content : text

歯車マークからcontentはis Nullableのチェックを外しておきます
「Save」を押して完了です。
テストデータを1ついれておきましょう。「Insert」->「Insert Row」でタイトルと内容をいれておきます
title : テストノート
content : # これはテストです
あとでノートの内容はマークダウン表示できるようにするためテストデータもマークダウン基本で入れておきました

では実際にノート一覧を表示する実装をしていきます
まずはsupabaseのクライアントの設定をします
ディレクトリ配下に.envを作成して以下をいれます
VITE_SUPABASE_URL=your-url
VITE_SUPABASE_ANON_KEY=your-anon-key
supbaseの左メニューから「Project Setting」→「API」から
Project URLの値を「VITE_SUPABASE_URL」のyour-urlのところに
Project API keysのanonの値を「VITE_SUPABASE_ANON_KEY」のyour-anon-keyのところにいれます

githubにpushする予定があれば、.gitignoreに.envを追加しておきましょう
次にsupabseをjsで簡単に扱えるクライアントを用意します
$ npm i @supabase/supabase-js
$ mkdir src/supabase
$ touch src/supabase/client.ts
作ったファイルにクライアントを呼び出すコードを書きます
import { createClient } from "@supabase/supabase-js";

export const supabase = createClient(
  import.meta.env.VITE_SUPABASE_URL,
  import.meta.env.VITE_SUPABASE_ANON_KEY
);
次にsrc/App.tsxを以下にします
import { useEffect, useState } from "react";
import { supabase } from "./supabase/client";
import NoteList from "./NoteList";
import { Note } from "./Note";
import NoteEditor from "./NoteEditor";

function App() {
  const [notes, setNotes] = useState<Note[]>([]);

  useEffect(() => {
    fetchNotes();
  }, []);

  const fetchNotes = async () => {
    const { data, error } = await supabase
      .from("note")
      .select("*")
      .order("id", { ascending: false });
    if (error) console.error("Error fetching notes", error);
    else setNotes(data);
  };

  return (
    <div className="flex h-screen">
      <div className="w-[300px] bg-gray-100 p-4">
        <div className="mb-4">
          <button className="w-full p-2 bg-blue-500 text-white font-bold rounded">
            新規作成
          </button>
        </div>
        <NoteList notes={notes} />
      </div>
      <div className="flex-1 p-4">
        <div className="mb-4 flex justify-between">
          <h2 className="text-xl font-bold">Note Editor</h2>
          <button className="p-2 bg-green-500 text-white font-bold rounded">
            Preview
          </button>
        </div>
        <NoteEditor content={notes[0]?.content} />
      </div>
    </div>
  );
}

export default App;
ここではいくつかのコンポーネントを使っているので合わせて用意します
$ touch src/NoteList.tsx
$ touch src/NoteEditor.tsx
$ touch src/Note.ts
import { Note } from "./Note";

type Props = {
  notes: Note[];
};

const NoteList: React.FC<Props> = ({ notes }) => {
  return (
    <ul className="space-y-2">
      {notes.map((note) => (
        <li
          key={note.id}
          className={`cursor-pointer p-2 rounded flex justify-between`}
        >
          <span>{note.title}</span>
        </li>
      ))}
    </ul>
  );
};

export default NoteList;
import React from "react";

interface Props {
  content: string;
}

const NoteEditor: React.FC<Props> = ({ content }) => {
  return (
    <textarea
      className="w-full h-[500px] p-2 border border-gray-300 rounded"
      value={content}
    />
  );
};

export default NoteEditor;
export type Note = {
  id: number;
  title: string;
  content: string;
};
ここで雛形が完成したので画面を確認すると以下のようになっています
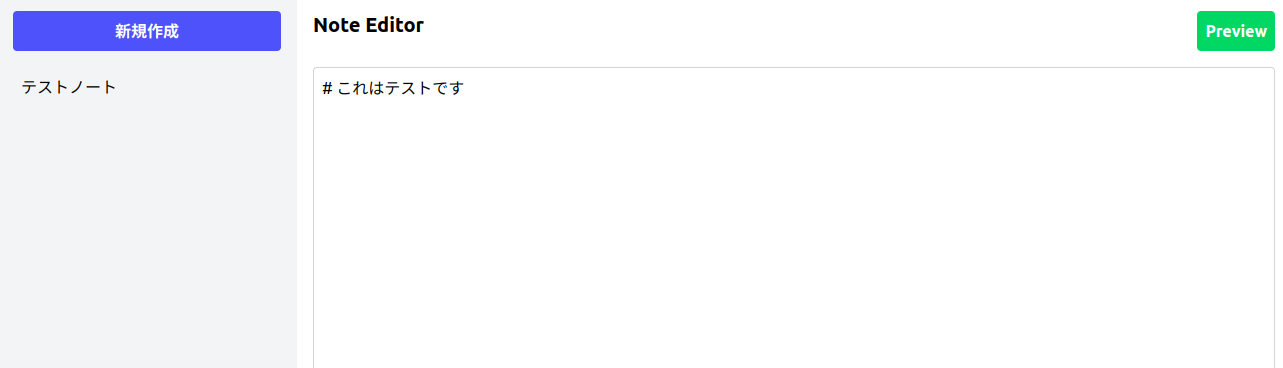
画面ロード時にsupabaseからノートの一覧を取得してステートにセットしています
  useEffect(() => {
    fetchNotes();
  }, []);

  const fetchNotes = async () => {
    const { data, error } = await supabase
      .from("note")
      .select("*")
      .order("id", { ascending: false });
    if (error) console.error("Error fetching notes", error);
    else setNotes(data);
  };
現段階ではノートに内容は1つめの要素の内容に固定しています
<NoteEditor content={notes[0]?.content} />
3. 新規ノート作成
新規ノート作成は新規作成ボタンを押したら、固定のタイトルで内容は空のレコードを作成してfetchNoteを実行するようにします
import { useEffect, useState } from "react";
import { supabase } from "./supabase/client";
import NoteList from "./NoteList";
import { Note } from "./Note";
import NoteEditor from "./NoteEditor";

function App() {
  const [notes, setNotes] = useState<Note[]>([]);

  useEffect(() => {
    fetchNotes();
  }, []);

  const fetchNotes = async () => {
    const { data, error } = await supabase
      .from("note")
      .select("*")
      .order("id", { ascending: false });
    if (error) console.error("Error fetching notes", error);
    else setNotes(data);
  };

  const handleNewNote = async () => {
    const { data, error } = await supabase
      .from("note")
      .insert({ title: "新規ノート", content: "" });
    if (error || data) {
      console.error(error);
      return;
    }

    fetchNotes();
  }; // 追加

  return (
    <div className="flex h-screen">
      <div className="w-[300px] bg-gray-100 p-4">
        <div className="mb-4">
          <button
            className="w-full p-2 bg-blue-500 text-white font-bold rounded"
            onClick={handleNewNote} // 変更
          >
            新規作成
          </button>
        </div>
        <NoteList notes={notes} />
      </div>
      <div className="flex-1 p-4">
        <div className="mb-4 flex justify-between">
          <h2 className="text-xl font-bold">Note Editor</h2>
          <button className="p-2 bg-green-500 text-white font-bold rounded">
            Preview
          </button>
        </div>
        <NoteEditor content={notes[0]?.content} />
      </div>
    </div>
  );
}

export default App;
新規のノートが作成できるようになりました

4. ノートの表示
ここではMarkdwonをプレビューできるようにする機能とノートの更新をしたらDBもう更新できるようにしていきます
まずはMarkdown表示をするためにreact-markdownを導入します
$ npm i react-mark-down
マークダウンのスタイルを定義していきます。
ここではh1のみスタイルを当てるようにします(あとはお好きにどうぞ)
@tailwind base;
@tailwind components;
@tailwind utilities;

.markdown h1 {
  @apply text-4xl;
}
次にMarkdown表示するところにmarkdownクラスを付与するのと、プレビューボタン、編集ボタンの機能を追加します
import { useEffect, useState } from "react";
import { supabase } from "./supabase/client";
import NoteList from "./NoteList";
import { Note } from "./Note";
import NoteEditor from "./NoteEditor";

function App() {
  const [notes, setNotes] = useState<Note[]>([]);
  const [previewMode, setPreviewMode] = useState(false);

  useEffect(() => {
    fetchNotes();
  }, []);

  const fetchNotes = async () => {
    const { data, error } = await supabase
      .from("note")
      .select("*")
      .order("id", { ascending: false });
    if (error) console.error("Error fetching notes", error);
    else setNotes(data);
  };

  const handleNewNote = async () => {
    const { data, error } = await supabase
      .from("note")
      .insert({ title: "新規ノート", content: "" });
    if (error || data) {
      console.error(error);
      return;
    }

    fetchNotes();
  };

  return (
    <div className="flex h-screen">
      <div className="w-[300px] bg-gray-100 p-4">
        <div className="mb-4">
          <button
            className="w-full p-2 bg-blue-500 text-white font-bold rounded"
            onClick={handleNewNote}
          >
            新規作成
          </button>
        </div>
        <NoteList notes={notes} />
      </div>
      <div className="flex-1 p-4">
        <div className="mb-4 flex justify-between">
          <h2 className="text-xl font-bold">Note Editor</h2>
          <button
            className="p-2 bg-green-500 text-white font-bold rounded"
            onClick={() => setPreviewMode(!previewMode)}
          >
            {previewMode ? "Edit" : "Preview"}
          </button> // プレビューと編集の切り替え
        </div>
        <NoteEditor content={notes[0]?.content} isPreviewMode={previewMode} />
      </div>
    </div>
  );
}

export default App;
import React from "react";
import ReactMarkdown from "react-markdown";

interface Props {
  content: string;
  isPreviewMode: boolean;
}

const NoteEditor: React.FC<Props> = ({ content, isPreviewMode }) => {
  return isPreviewMode ? (
    <div className="markdown">
      <ReactMarkdown>{content}</ReactMarkdown>
    </div>
  ) : (
    <textarea
      className="w-full h-[500px] p-2 border border-gray-300 rounded"
      value={content}
    />
  );
};

export default NoteEditor;
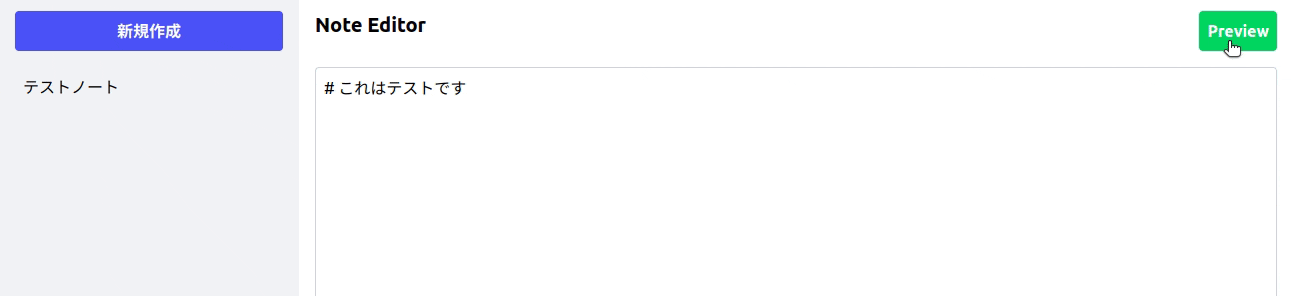
プレビューかどうかでマークダウン表示かを切り替えられるようにしました
ここで確認したいところなのですが、いまノートの切り替えができないのでノートの内容をテストデータの内容に切り替えることができません
今回は仕方ないのでsupabaseで新規追加したノートはすべて削除して確認をします
5. 共同編集機能
ここではsupabaseのRealtimeを利用してDBの更新があったら、他のユーザーのノートも更新をかけるようにしていきます
まずは内容を入力したらDBのcontentを更新するようにします
import { useEffect, useState } from "react";
import { supabase } from "./supabase/client";
import NoteList from "./NoteList";
import { Note } from "./Note";
import NoteEditor from "./NoteEditor";

function App() {
  const [notes, setNotes] = useState<Note[]>([]);
  const [previewMode, setPreviewMode] = useState(false);

  useEffect(() => {
    fetchNotes();
  }, []);

  const fetchNotes = async () => {
    const { data, error } = await supabase
      .from("note")
      .select("*")
      .order("id", { ascending: false });
    if (error) console.error("Error fetching notes", error);
    else setNotes(data);
  };

  const handleNewNote = async () => {
    const { data, error } = await supabase
      .from("note")
      .insert({ title: "新規ノート", content: "" });
    if (error || data) {
      console.error(error);
      return;
    }

    fetchNotes();
  };

  const handleContentChange = async (content: string) => {
    const { error } = await supabase
      .from("note")
      .update({ content })
      .eq("id", notes[0].id);
    if (error) console.error("Error updating note", error);

    fetchNotes();
  }; // 追加

  return (
    <div className="flex h-screen">
      <div className="w-[300px] bg-gray-100 p-4">
        <div className="mb-4">
          <button
            className="w-full p-2 bg-blue-500 text-white font-bold rounded"
            onClick={handleNewNote}
          >
            新規作成
          </button>
        </div>
        <NoteList notes={notes} />
      </div>
      <div className="flex-1 p-4">
        <div className="mb-4 flex justify-between">
          <h2 className="text-xl font-bold">Note Editor</h2>
          <button
            className="p-2 bg-green-500 text-white font-bold rounded"
            onClick={() => setPreviewMode(!previewMode)}
          >
            {previewMode ? "Edit" : "Preview"}
          </button>
        </div>
        <NoteEditor
          content={notes[0]?.content}
          isPreviewMode={previewMode}
          onContentChange={handleContentChange} // 追加
        />
      </div>
    </div>
  );
}

export default App;
import React from "react";
import ReactMarkdown from "react-markdown";

interface Props {
  content: string;
  isPreviewMode: boolean;
  onContentChange: (content: string) => void;
}

const NoteEditor: React.FC<Props> = ({
  content,
  isPreviewMode,
  onContentChange,
}) => {
  return isPreviewMode ? (
    <div className="markdown">
      <ReactMarkdown>{content}</ReactMarkdown>
    </div>
  ) : (
    <textarea
      className="w-full h-[500px] p-2 border border-gray-300 rounded"
      value={content}
      onChange={(e) => onContentChange(e.target.value)}
    />
  );
};

export default NoteEditor;
これで1文字ごとに更新があるたびにDBが変わります(遅いのですが、デバウンスなどを入れることで解決できます)
次にrealtimeを使って誰かがDBをUPDATEしたらそれを検知して手元のデータも更新をかけるようにします
  useEffect(() => {
    fetchNotes();
    const mySubscription = supabase
      .channel("note")
      .on(
        "postgres_changes",
        { event: "UPDATE", schema: "public", table: "note" },
        fetchNotes
      )
      .subscribe();

    return () => {
      supabase.removeChannel(mySubscription);
    };
  }, []);
このようにリスナーを登録しておくことで簡単にDB更新を検知してfetchNotesを実行することが可能です
supabaseのrealtimeをonにします
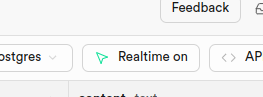
リアルタイムに同期するようになりました!

6. ノートの選択
次にノートを選択できるようにします
import { useEffect, useState } from "react";
import { supabase } from "./supabase/client";
import NoteList from "./NoteList";
import { Note } from "./Note";
import NoteEditor from "./NoteEditor";

function App() {
  const [notes, setNotes] = useState<Note[]>([]);
  const [previewMode, setPreviewMode] = useState(false);
  const [currentNoteId, setCurrentNoteId] = useState<number | null>(null); //追加

  useEffect(() => {
    fetchNotes();
    const mySubscription = supabase
      .channel("note")
      .on(
        "postgres_changes",
        { event: "UPDATE", schema: "public", table: "note" },
        fetchNotes
      )
      .subscribe();

    return () => {
      supabase.removeChannel(mySubscription);
    };
  }, []);

  const fetchNotes = async () => {
    const { data, error } = await supabase
      .from("note")
      .select("*")
      .order("id", { ascending: false });
    if (error) console.error("Error fetching notes", error);
    else setNotes(data);
  };

  const handleNewNote = async () => {
    const { data, error } = await supabase
      .from("note")
      .insert({ title: "新規ノート", content: "" });
    if (error || data) {
      console.error(error);
      return;
    }

    fetchNotes();
  };

  const handleContentChange = async (content: string) => {
    const { error } = await supabase
      .from("note")
      .update({ content })
      .eq("id", notes[0].id);
    if (error) console.error("Error updating note", error);

    fetchNotes();
  };

  return (
    <div className="flex h-screen">
      <div className="w-[300px] bg-gray-100 p-4">
        <div className="mb-4">
          <button
            className="w-full p-2 bg-blue-500 text-white font-bold rounded"
            onClick={handleNewNote}
          >
            新規作成
          </button>
        </div>
        <NoteList
          notes={notes}
          selectNoteId={currentNoteId} // 現在の選択されたノートのID
          onSelect={(note) => setCurrentNoteId(note.id)} // 選択を変更

        />
      </div>
      <div className="flex-1 p-4">
        <div className="mb-4 flex justify-between">
          <h2 className="text-xl font-bold">Note Editor</h2>
          <button
            className="p-2 bg-green-500 text-white font-bold rounded"
            onClick={() => setPreviewMode(!previewMode)}
          >
            {previewMode ? "Edit" : "Preview"}
          </button>
        </div>
        <NoteEditor
          content={
            notes.find((note) => note.id === currentNoteId)?.content || ""
          } // 選択したノートを表示
          isPreviewMode={previewMode}
          onContentChange={handleContentChange}
        />
      </div>
    </div>
  );
}

export default App;
import { Note } from "./Note";

type Props = {
  notes: Note[];
  selectNoteId: number | null;
  onSelect: (note: Note) => void;
};

const NoteList: React.FC<Props> = ({ notes, selectNoteId, onSelect }) => {
  return (
    <ul className="space-y-2">
      {notes.map((note) => (
        <li
          key={note.id}
          onClick={() => onSelect(note)} // クリックしたら選択を変更
          className={`cursor-pointer p-2 rounded flex justify-between ${
            selectNoteId === note.id ? "bg-blue-200" : "bg-white"
          }`} //選択されたことがわかるようにスタイルをあてる
        >
          <span>{note.title}</span>
        </li>
      ))}
    </ul>
  );
};

export default NoteList;
切り替えができるようになりました

7. タイトル編集
最後にさくっとタイトル編集機能を実装します
ここではfont-awesomeでペンのアイコンを使います
$ npm install @fortawesome/react-fontawesome
$ npm install @fortawesome/fontawesome-svg-core
import React, { useState } from "react";
import { FontAwesomeIcon } from "@fortawesome/react-fontawesome";
import { faPen } from "@fortawesome/free-solid-svg-icons";
import { Note } from "./Note";

type Props = {
  notes: Note[];
  selectNoteId: number | null;
  onSelect: (note: Note) => void;
  handleChangeTitle: (title: string) => void;
};

const NoteList: React.FC<Props> = ({
  notes,
  selectNoteId,
  onSelect,
  handleChangeTitle,
}) => {
  const [editingTitle, setEditingTitle] = useState("");
  const [selectEditTitleNoteId, setSelectEditTitleNoteId] = useState<
    number | null
  >(null);
  return (
    <ul className="space-y-2">
      {notes.map((note) => (
        <li
          key={note.id}
          onClick={() => onSelect(note)}
          className={`cursor-pointer p-2 rounded flex justify-between ${
            selectNoteId === note.id ? "bg-blue-200" : "bg-white"
          }`}
        >
          {selectEditTitleNoteId === note.id ? (
            <input
              name="title"
              value={editingTitle}
              onChange={(e) => setEditingTitle(e.target.value)}
              className="ml-2 p-1 border border-gray-300 rounded w-[200px]"
              onClick={(e) => e.stopPropagation()}
              onKeyDown={(e) => {
                if (e.key === "Enter") {
                  handleChangeTitle(editingTitle);
                  setSelectEditTitleNoteId(null);
                }
              }}
            />
          ) : (
            <span>{note.title}</span>
          )}
          <button
            className="ml-2 text-blue-500"
            onClick={() => {
              setEditingTitle(note.title);
              setSelectEditTitleNoteId(note.id);
            }}
          >
            <FontAwesomeIcon icon={faPen} />
          </button>
        </li>
      ))}
    </ul>
  );
};

export default NoteList;
ここでは編集を押したらインプット属性に変更してエンターをおすとDBの更新がかかるようにしました
import { useEffect, useState } from "react";
import { supabase } from "./supabase/client";
import NoteList from "./NoteList";
import { Note } from "./Note";
import NoteEditor from "./NoteEditor";

function App() {
  const [notes, setNotes] = useState<Note[]>([]);
  const [previewMode, setPreviewMode] = useState(false);
  const [currentNoteId, setCurrentNoteId] = useState<number | null>(null);

  useEffect(() => {
    fetchNotes();
    const mySubscription = supabase
      .channel("note")
      .on(
        "postgres_changes",
        { event: "UPDATE", schema: "public", table: "note" },
        fetchNotes
      )
      .subscribe();

    return () => {
      supabase.removeChannel(mySubscription);
    };
  }, []);

  const fetchNotes = async () => {
    const { data, error } = await supabase
      .from("note")
      .select("*")
      .order("id", { ascending: false });
    if (error) console.error("Error fetching notes", error);
    else setNotes(data);
  };

  const handleNewNote = async () => {
    const { data, error } = await supabase
      .from("note")
      .insert({ title: "新規ノート", content: "" });
    if (error || data) {
      console.error(error);
      return;
    }

    fetchNotes();
  };

  const handleContentChange = async (content: string) => {
    const { error } = await supabase
      .from("note")
      .update({ content })
      .eq("id", notes[0].id);
    if (error) console.error("Error updating note", error);

    fetchNotes();
  };

  const handleChangeTitle = async (title: string) => {
    const { error } = await supabase
      .from("note")
      .update({ title })
      .eq("id", currentNoteId);

    if (error) {
      console.error("Error updating note", error);
    }
  }; //DBを更新

  return (
    <div className="flex h-screen">
      <div className="w-[300px] bg-gray-100 p-4">
        <div className="mb-4">
          <button
            className="w-full p-2 bg-blue-500 text-white font-bold rounded"
            onClick={handleNewNote}
          >
            新規作成
          </button>
        </div>
        <NoteList
          notes={notes}
          selectNoteId={currentNoteId}
          onSelect={(note) => setCurrentNoteId(note.id)}
          handleChangeTitle={handleChangeTitle} // 追加
        />
      </div>
      <div className="flex-1 p-4">
        <div className="mb-4 flex justify-between">
          <h2 className="text-xl font-bold">Note Editor</h2>
          <button
            className="p-2 bg-green-500 text-white font-bold rounded"
            onClick={() => setPreviewMode(!previewMode)}
          >
            {previewMode ? "Edit" : "Preview"}
          </button>
        </div>
        <NoteEditor
          content={
            notes.find((note) => note.id === currentNoteId)?.content || ""
          }
          isPreviewMode={previewMode}
          onContentChange={handleContentChange}
        />
      </div>
    </div>
  );
}

export default App;
タイトルが更新できるようになりました

追加課題
ハンズオンはあくまでもインプットです。
ぜひとも実力をつけたい方は以下の課題に取り組んでみてください
以下の機能を実装してください
- ユーザーはノートを削除することができる
- ユーザーはタイトル変更も同期してみることができる
- ユーザーはノートの編集をデバウンスを用いて行うことができる
おわりに
今回はSupabaseのRealtimeを使ってNotion風のアプリを作りました
Socket通信などを意識せずに簡単にできるのはとてもいいですね
こちらのハンズオンは動画でも解説していますので、わからないところは復習してみてください
ここまで読んでいただけた方はいいねとストックよろしくお願いします。
@Sicut_study をフォローいただけるととてもうれしく思います。
また明日の記事でお会いしましょう!
JISOUのメンバー募集中!
プログラミングコーチングJISOUでは、新たなメンバーを募集しています。
実践的なカリキュラムで、あなたのエンジニアとしてのキャリアを最短で飛躍させましょう!
興味のある方は、ぜひホームページからお気軽にカウンセリングをお申し込みください!
▼▼▼