はじめに
みなさんこんにちは、Watanabe Jin(@Sicut_study)です。
今回もハンズオンをやっていきますが、テーマは「爆速」です。
JavaScriptのフレームワークで話題になっているHonoとNext.jsを利用してAPIを開発します。
爆速が活かせそうなアプリケーションを考えていたのですが、爆速といえばタイピングゲームが真っ先に浮かびました。みなさんも「寿司打」はおそらく1度プレイしたことがあると思います。
しかし、今回のハンズオンの教材として作るゲームのイメージは少し違います。
「タイピングオブザデッド」というゲームを参考にハンズオンを作成しております。
HonoとRedisを利用することで爆速なリアルタイムランキングを実装していきます。
このハンズオンを通してこれらを学ぶことができます。
- Reactの基本的機能
- Next.jsとHonoを利用したAPIの作成
- Redis Sorted Setの使い方
最後までハンズオンを行うとこのようなアプリが完成します。
(BGMや効果音もついています)
次のハンズオンはNext.jsとHonoとRedisで爆速のAPIを作ってタイピングゲームを作る!!
— 渡邉 臣@プログラミング戦略家 | JISOU (@Sicut_study) December 25, 2024
クリスマスにサンプルアプリ完成👻👻 pic.twitter.com/OycJQs0Xm5
動画教材も用意しています
こちらの教材にはより詳しく解説した動画もセットでご用意しています。
テキスト教材ではわからない細かい箇所があれば動画も活用ください。
対象者
- Reactの基本を勉強したい人
- Next.jsを初めたい人
- JavaScriptを触ったことがある人
- 話題の技術を体験したい人
- アプリを作って実践的に勉強したい人
HTMLと基本的なJavaScriptがわかる方で2時間程度で行うことができます。
使用技術の解説
まず最初に利用する技術の解説をしてから実際に開発を行っていきます。
ここで全体像を理解しておくことでスムーズにハンズオンが可能です。
今回利用するコアなスキルは4つになります。
Next.jsのAPI RouteにHonoを組み合わせることで高速なAPIを実現します。
またデータ取得部分がボトルネックになることも多いのでインメモリデータベースであるRedisを使用します。
インメモリのデータベースはメモリにデータを用意しているので、簡単にデータを返すことができます。イメージは通常のDBだとデータを取りに倉庫へ行くけど、インメモリなら机の上にもう用意してあるみたいな感じです。
ランタイムとしてBunを利用することでなるべく早く動くように技術選定をしています。
今回はUpstashを利用して複数リージョンでRedisを配置します。
このように世界中にDB(Redis)を配置することでユーザーに最も近いDBにアクセスできるようになるためより高速にデータへのアクセスができるようになります。Upstashを利用すると簡単にRedisの用意ができます。
Redisにはいくつかのデータ構造があるのですが、今回作成するランキング機能はSorted Setというデータ構造を利用してデータを保存します。
Sorted Setにすることでランキングにデータを追加したり、ランキングトップ10位までを簡単に取得できたりします。
今回はゲームを終えたあとに「ユーザー名 (Member)」と「ゲームのスコア (Score)」をRedisに追加します。
最後にトップ10位までの記録をRedisから取得して表示します。
1. 環境構築
今回はBunを利用してNext.jsの環境を構築します。
Bunがない方は以下のサイトからインストールをして進めてください。
$ bun create next-app
✔ What is your project named? … typing-game
// すべてYes
✔ Would you like to use TypeScript? … No / Yes
✔ Would you like to use ESLint? … No / Yes
✔ Would you like to use Tailwind CSS? … No / Yes
✔ Would you like your code inside a `src/` directory? … No / Yes
✔ Would you like to use App Router? (recommended) … No / Yes
✔ Would you like to use Turbopack for `next dev`? … No / Yes
✔ Would you like to customize the import alias (`@/*` by default)? … No / Yes
$ cd typing-game
$ bun run dev
サーバーが起動したらhttp://localhost:3000にアクセスします。
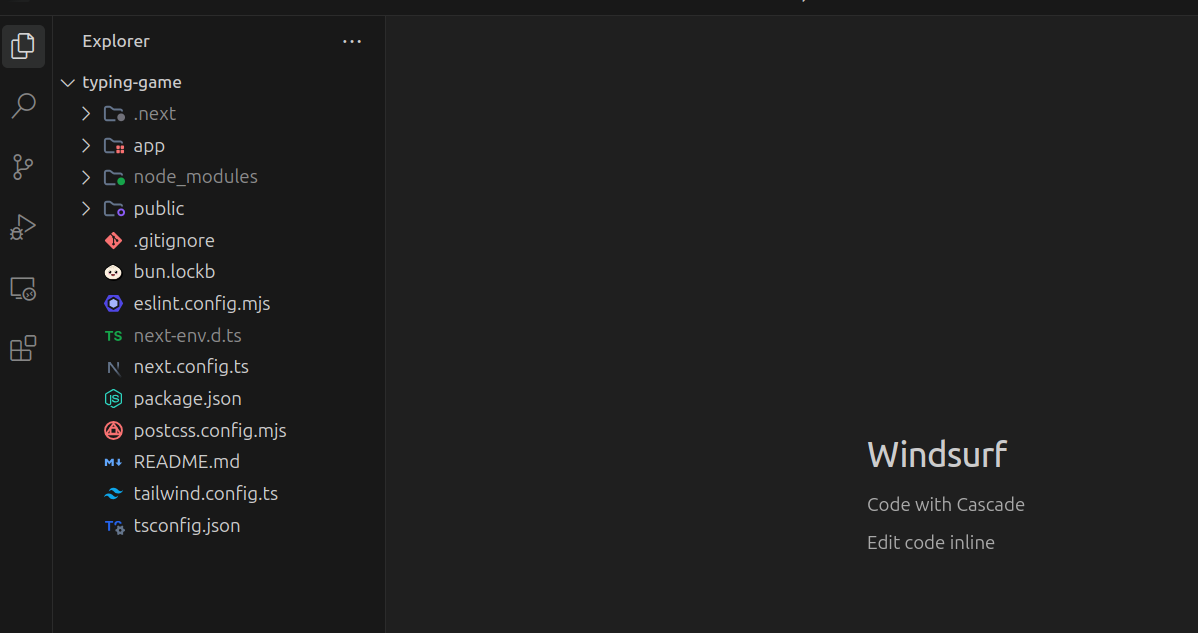
Next.jsの環境が構築できました。typing-gameのディレクトリをVSCodeで開きます。
Tailwind.config.tsがあることからTailWindCSSの環境も一緒にできたことがわかります。
2. タイピングゲームの実装
タイピングゲームのロジック部分を実装していきます。
最初は単語が表示されて1文字ずつ入力を判定して全部正しく入力できたら次の問題に進みます。
app/page.tsxを以下に変更します。
"use client";
import { useEffect, useState } from "react";

export default function Home() {
  const questions = [
    { question: "React", image: "/monster1.jpg" },
    { question: "TypeScript", image: "/monster2.jpg" },
    { question: "JISOU", image: "/monster3.jpg" },
    { question: "GitHub", image: "/monster4.jpg" },
    { question: "Next.js", image: "/monster5.jpg" },
  ];

  const [currentQuestionIndex, setCurrentQuestionIndex] = useState(0);
  const [currentPosition, setCurrentPosition] = useState(0);
  const [isCompleted, setIsCompleted] = useState(false);

  useEffect(() => {
    const handleKeyDown = async (e: KeyboardEvent) => {
      const currentQuestion = questions[currentQuestionIndex];
      if (
        e.key.toLowerCase() ===
        currentQuestion.question[currentPosition].toLowerCase()
      ) {
        setCurrentPosition((prev) => prev + 1);
      }

      if (currentPosition === currentQuestion.question.length - 1) {
        if (currentQuestionIndex === questions.length - 1) {
          setIsCompleted(true);
        } else {
          setCurrentQuestionIndex((prev) => prev + 1);
          setCurrentPosition(0);
        }
      }
    };

    window.addEventListener("keydown", handleKeyDown);
    return () => window.removeEventListener("keydown", handleKeyDown);
  }, [currentPosition, currentQuestionIndex]);

  if (isCompleted) {
    return <div>ゲーム終了</div>;
  }

  return (
    <main className="flex min-h-screen flex-col items-center justify-between">
      <div
        className="text-center w-full h-screen bg-cover bg-center flex flex-col items-center justify-center"
        style={{
          backgroundImage: `url(${questions[currentQuestionIndex].image})`,
          backgroundColor: "rgba(0, 0, 0, 0.7)",
          backgroundBlendMode: "overlay",
        }}
      >
        <div>
          {questions[currentQuestionIndex].question
            .split("")
            .map((char, index) => (
              <span
                key={index}
                style={{
                  color: index < currentPosition ? "#ff0000" : "white",
                }}
              >
                {char}
              </span>
            ))}
        </div>
      </div>
    </main>
  );
}
画像は以下のリポジトリからすべてダウンロードしてpublicにいれてください。
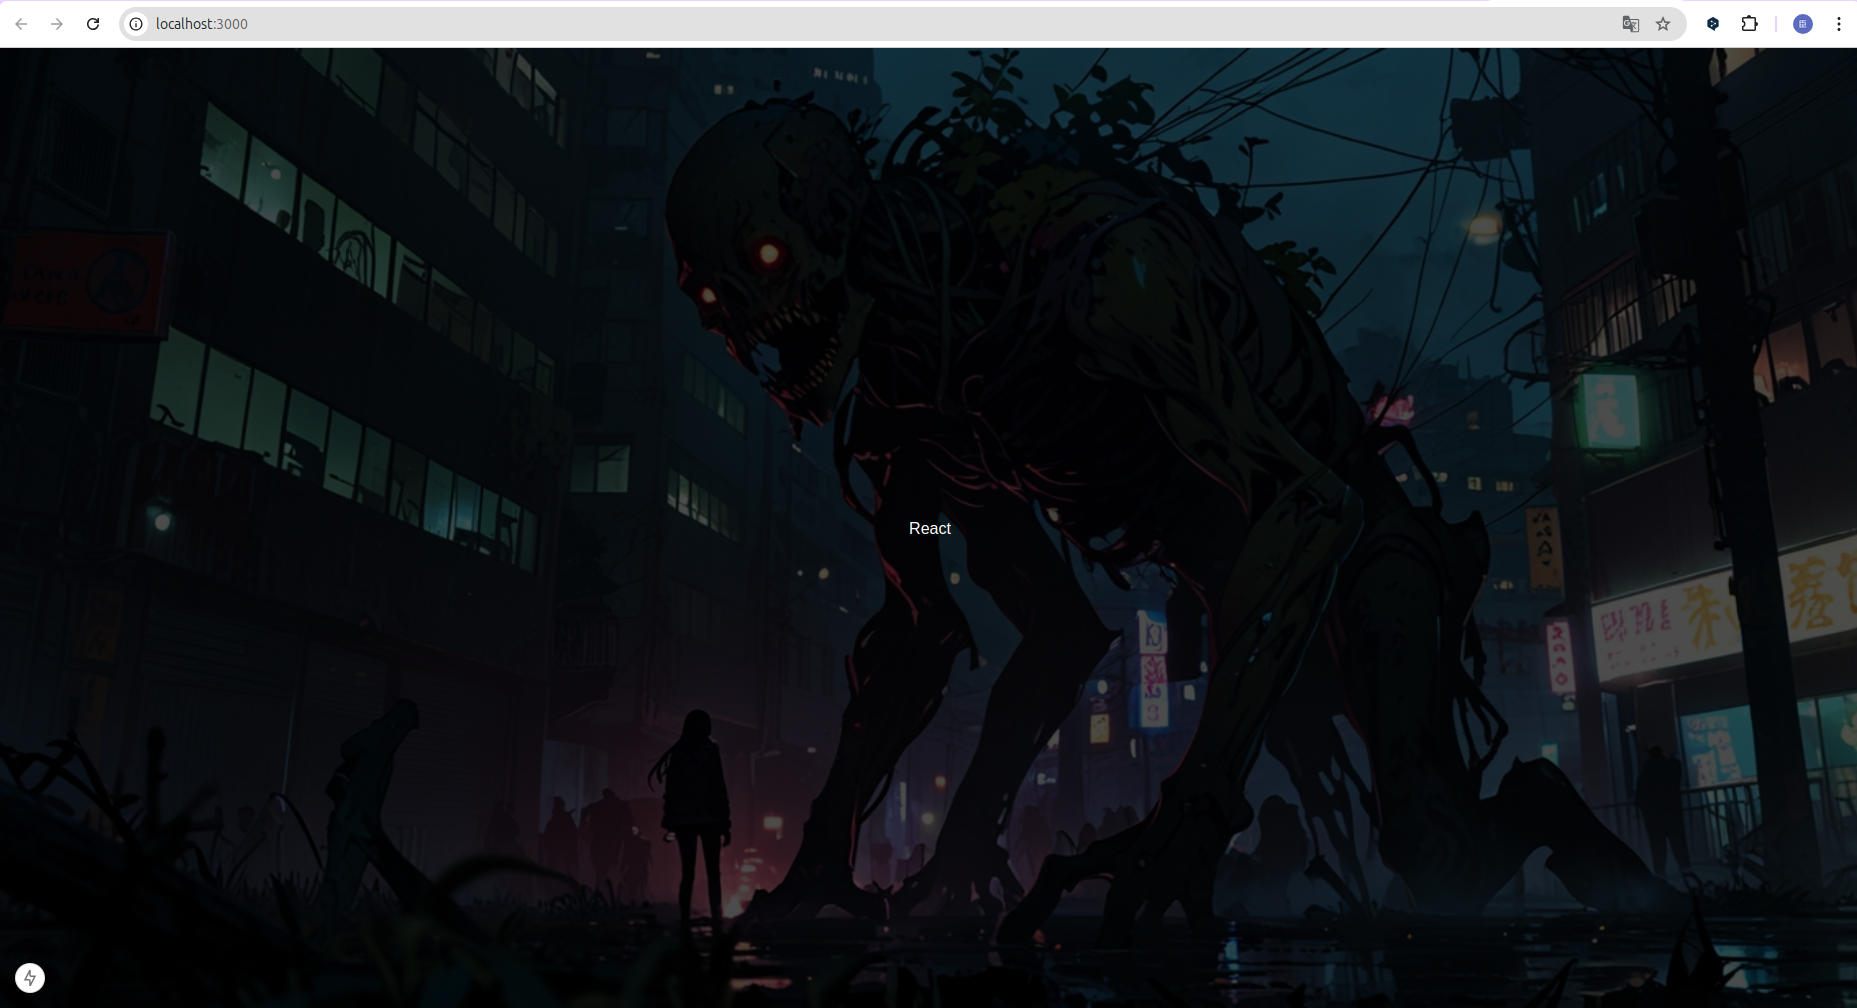
サーバーを起動してhttp://localhost:3000にアクセスすると最低限ゲームが遊べるようになりました。
ものすごく文字は小さいですが、タイピングすると打てた文字が赤くなりすべて打ち終わると次の問題へ移動します。
それでは細かく解説をしていきます。
まず最初に今回のタイピングゲームの問題とその背景画像をペアにしたオブジェクトを定義しておきます。
  const questions = [
    { question: "React", image: "/monster1.jpg" },
    { question: "TypeScript", image: "/monster2.jpg" },
    { question: "JISOU", image: "/monster3.jpg" },
    { question: "GitHub", image: "/monster4.jpg" },
    { question: "Next.js", image: "/monster5.jpg" },
  ];
背景画像と問題はcurrentQuestionIndexで決めています。
  const [currentQuestionIndex, setCurrentQuestionIndex] = useState(0);
  (省略)
      <div
        className="text-center w-full h-screen bg-cover bg-center flex flex-col items-center justify-center"
        style={{
          backgroundImage: `url(${questions[currentQuestionIndex].image})`,
          backgroundColor: "rgba(0, 0, 0, 0.7)",
          backgroundBlendMode: "overlay",
        }}
      >
          (省略)
      </div>
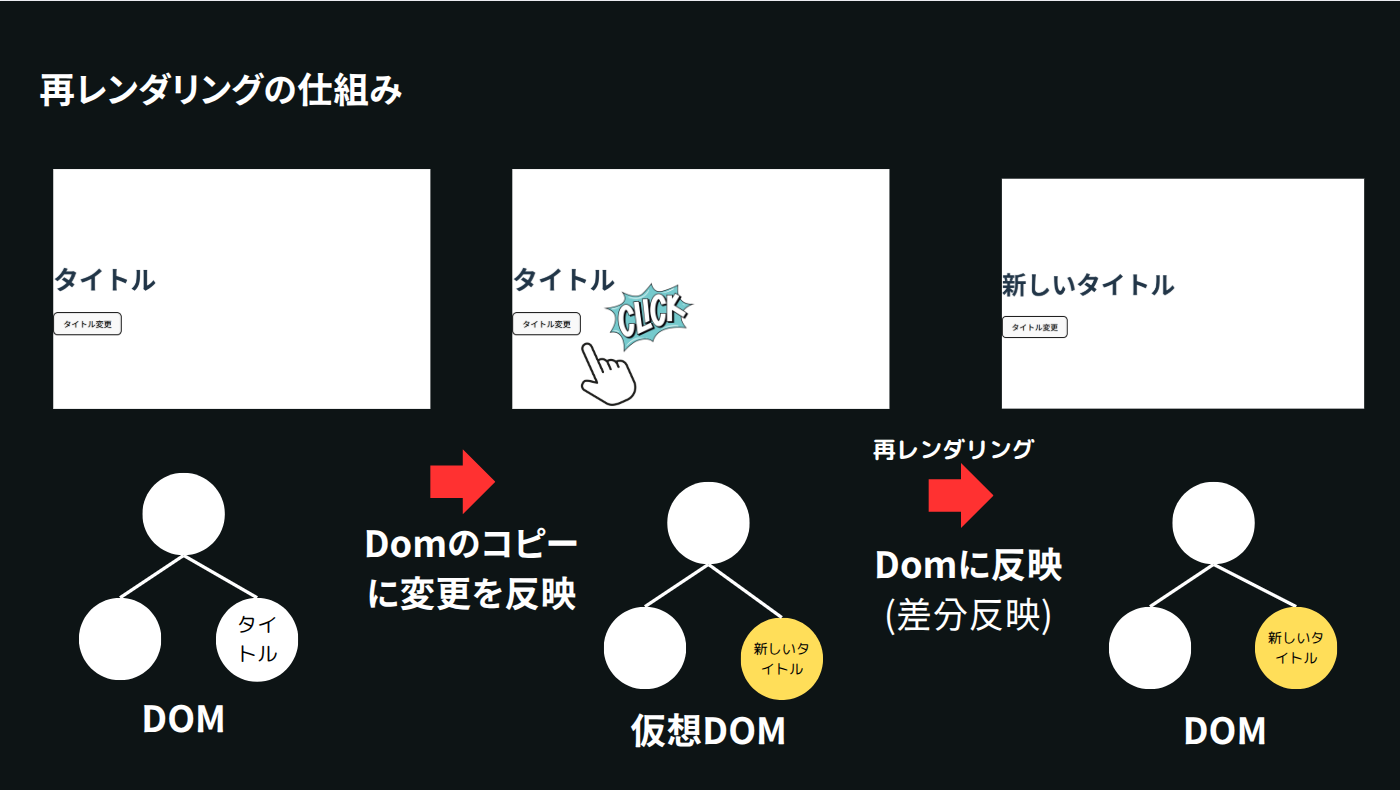
useStateを使うことでステートの変化に伴って画面の再レンダリングをすることが可能です。currentQuestionIndexをより理解するためにまずはuseStateの基礎から解説します。
例えば「タイトル変更ボタン」を押したら「タイトル」という表示が「新しいタイトル」という表示に変わる実装をしたいと思います。
buttonタグにあるonClickはクリックしたときに実行される関数を書くことができます。
function App() {
  let title = "タイトル";

  return (
    <>
      <h1>{title}</h1>
      <button onClick={() => (title = "新しいタイトル")}>タイトルを更新</button>
    </>
  );
}

export default App;
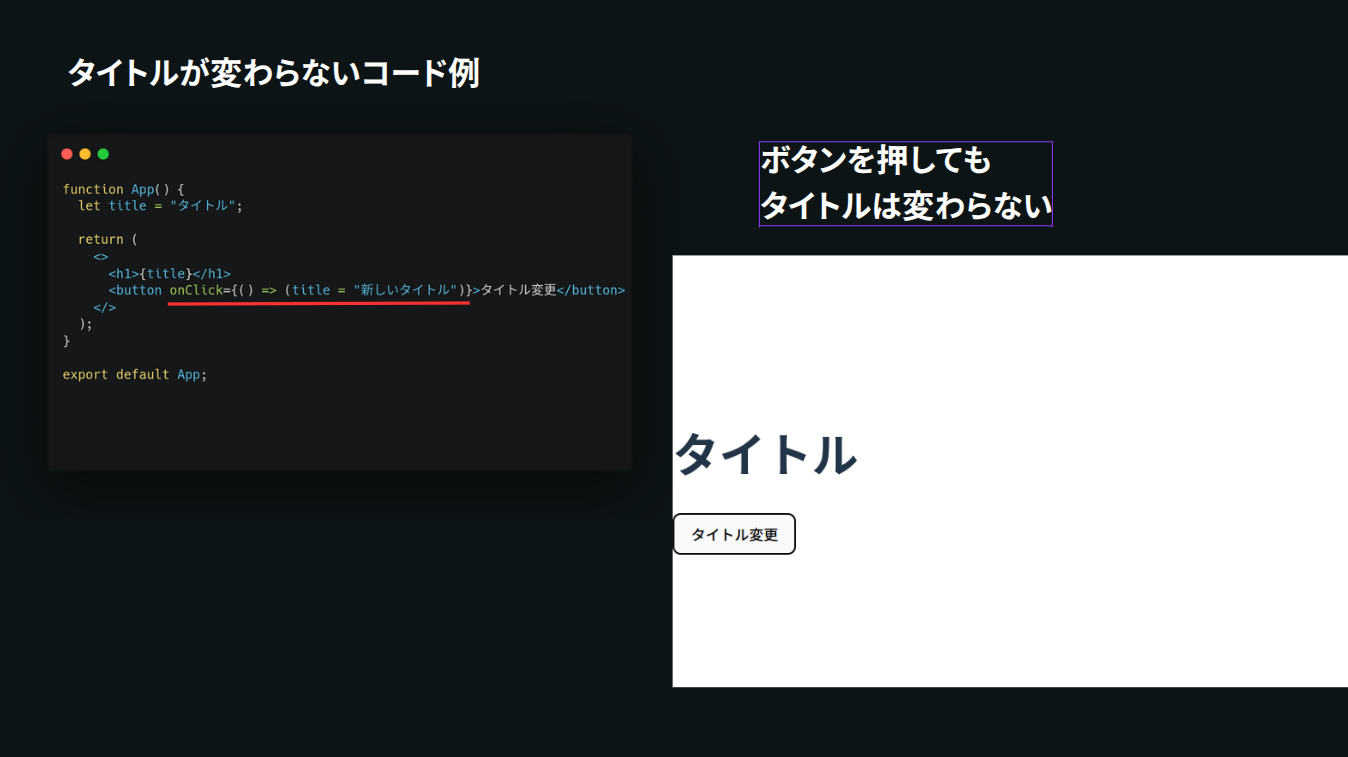
実はこのコードではボタンをクリックしてもタイトルは変わりません
変数の中身を変えただけでは画面の再描画(レンダリング)が起こらないのです。
ここで利用できるのがuseStateによるステート管理です。
import { useState } from "react";

function App() {
  const [title, setTitle] = useState("タイトル");

  return (
    <>
      <h1>{title}</h1>
      <button onClick={() => setTitle("新しいタイトル")}>タイトルを更新</button>
    </>
  );
}

export default App;
setTitleを使うことでtitleを更新することができます。
titleが更新されると再レンダリングが走り画面が更新されます。
それでは実装に戻りましょう
  const [currentQuestionIndex, setCurrentQuestionIndex] = useState(0);
 const [currentPosition, setCurrentPosition] = useState(0);
  (省略)
      <div
        className="text-center w-full h-screen bg-cover bg-center flex flex-col items-center justify-center"
        style={{
          backgroundImage: `url(${questions[currentQuestionIndex].image})`,
          backgroundColor: "rgba(0, 0, 0, 0.7)",
          backgroundBlendMode: "overlay",
        }}
      >
          (省略)
      </div>
useState(0)で最初の段階でcurrentQuestionIndexは0(1番目のReact)になっています。
背景はquestions[currentQuestionIndex].imageとすることで、
{ question: "React", image: "/monster1.jpg" },
/monster1.jpgが背景になっています。
ステートにしたことで問題が変わるたび(currentQuestionIndexが変わるたびに)ステート変更が検知されて再レンダリングが走り背景画像が変わるようになります。
        <div>
          {questions[currentQuestionIndex].question
            .split("")
            .map((char, index) => (
              <span
                key={index}
                style={{
                  color: index < currentPosition ? "#ff0000" : "white",
                }}
              >
                {char}
              </span>
            ))}
        </div>
問題はquestionを取り出し(最初はReact)、split("")とすることで1文字ずつの配列(["R", "e", "a", "c", "t"])にします。
そのあとmapをしてスタイルをそれぞれに対して当てています。ここで重要なのはcurrentPositionです。
現在タイピングが終えているもの(例えばReactのReまで打てているならcurrentPositionは1)はすべて赤文字のスタイルを当てています。これでどこまで正解しているかがわかります。
次にuseEffectを解説していきます。
useEffectは実際に画面が表示される前に裏側で実行される処理だと考えてください。
大枠としてやっていることは、タイピングでキーを押したときの処理をイベントとして登録しています。
こうすることでアプリケーション実行中に
  useEffect(() => {
    const handleKeyDown = async (e: KeyboardEvent) => {
      const currentQuestion = questions[currentQuestionIndex];
      if (
        e.key.toLowerCase() ===
        currentQuestion.question[currentPosition].toLowerCase()
      ) {
        setCurrentPosition((prev) => prev + 1);
      }

      if (currentPosition === currentQuestion.question.length - 1) {
        if (currentQuestionIndex === questions.length - 1) {
          setIsCompleted(true);
        } else {
          setCurrentQuestionIndex((prev) => prev + 1);
          setCurrentPosition(0);
        }
      }
    };

    window.addEventListener("keydown", handleKeyDown);
    return () => window.removeEventListener("keydown", handleKeyDown);
  }, [currentPosition, currentQuestionIndex]);
任意のキーを押すとhanldeKeyDownが実行されるようにイベント登録をします。
アプリケーションが終了したらイベントは削除するようにしています
    window.addEventListener("keydown", handleKeyDown);
    return () => window.removeEventListener("keydown", handleKeyDown);
handleKeyDownでは最初に現在の問題を取得してから、もし押したキーを小文字にしたものと現在の問題の位置の小文字が一致していたら位置を1つずらすようにします。
例えばReactという問題で、Reまでタイピングしていたとして、「a」を入力していたらe.key(a)とcurrentQuestion.quesiton[2](a)が一致するので、次の位置は3になります。(Reactでいうとcの位置)
      const currentQuestion = questions[currentQuestionIndex];
      if (
        e.key.toLowerCase() ===
        currentQuestion.question[currentPosition].toLowerCase()
      ) {
        setCurrentPosition((prev) => prev + 1);
      }
もしタイピングがすべて終わっていたら(1問目であればReactと打てていたら)次の問題に移動するようにします。
currentQuestionIndexを+1して、currentPositionは0にしてあげます。
      if (currentPosition === currentQuestion.question.length - 1) {
        if (currentQuestionIndex === questions.length - 1) {
          setIsCompleted(true);
        } else {
          setCurrentQuestionIndex((prev) => prev + 1);
          setCurrentPosition(0);
        }
      }
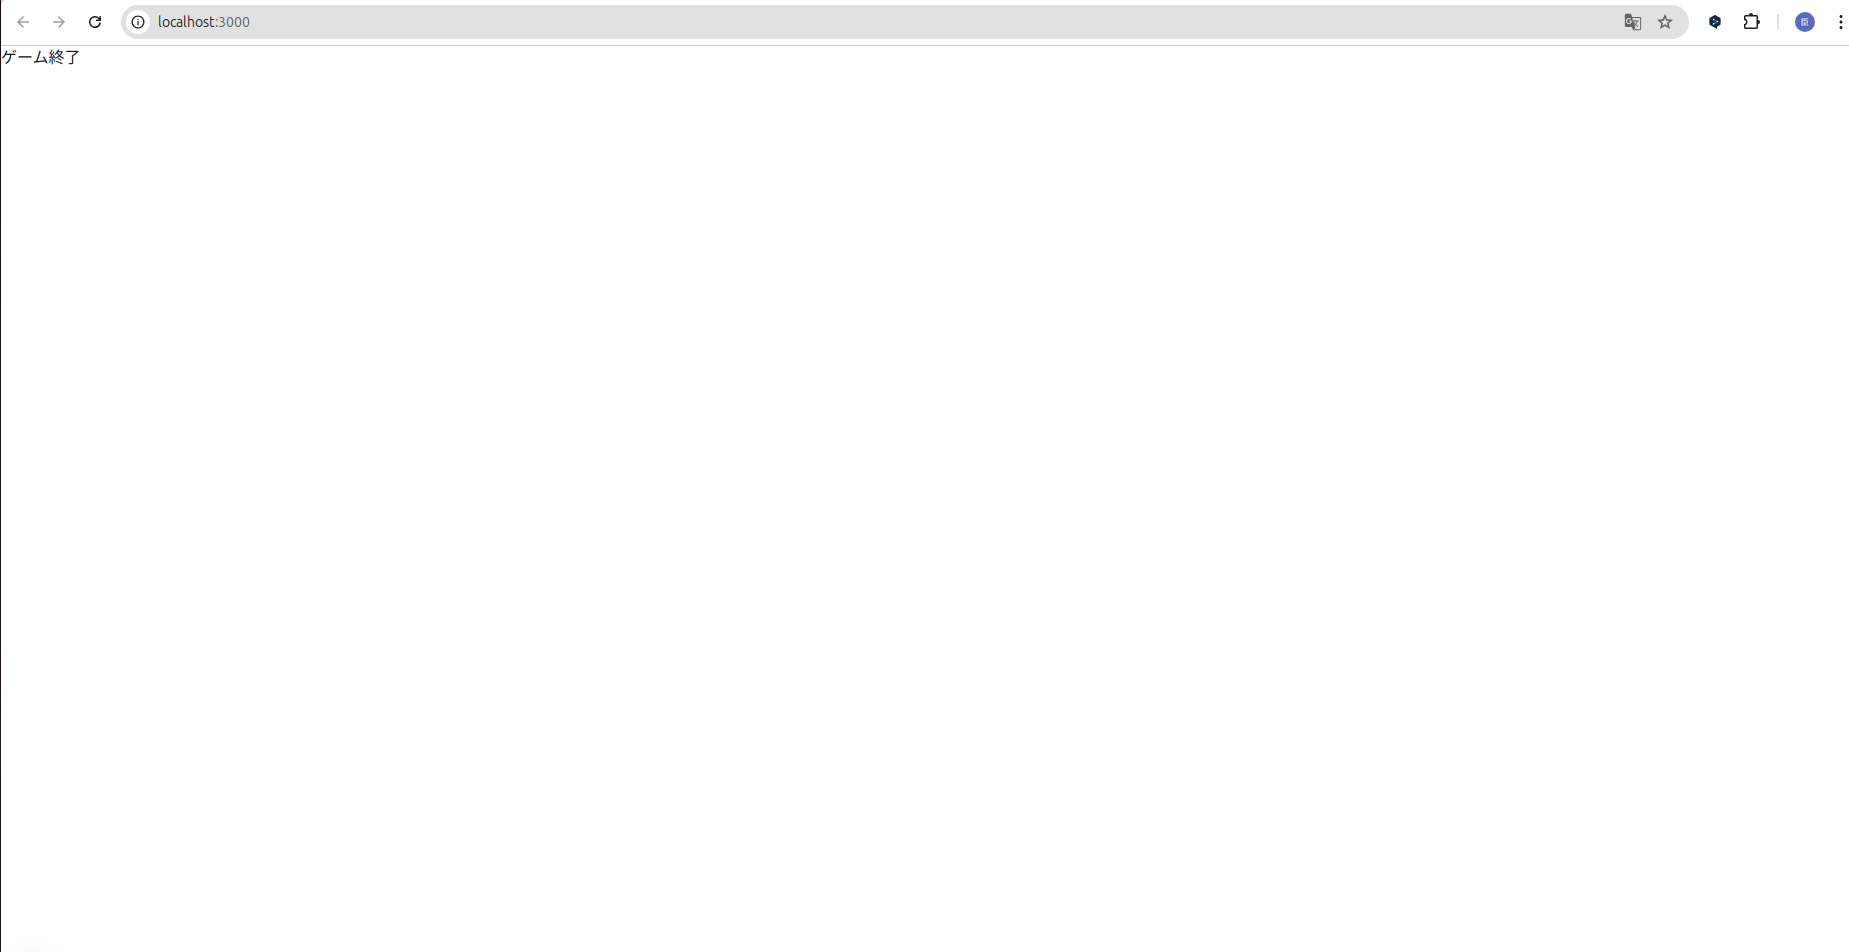
もし最後の問題(5問目)であれば次の問題はないのでiSCompletedをtrueに変えています。
  if (isCompleted) {
    return <div>ゲーム終了</div>;
  }
最後の問題が終わってisCompletedがtrueになったらゲーム終了と画面に表示するようにしています
3. ユーザー登録とスコア
次はゲーム開始前にユーザー名を入力する画面を作ります。
"use client";
import { useEffect, useState } from "react";

export default function Home() {
  const questions = [
    { question: "React", image: "/monster1.jpg" },
    { question: "TypeScript", image: "/monster2.jpg" },
    { question: "JISOU", image: "/monster3.jpg" },
    { question: "GitHub", image: "/monster4.jpg" },
    { question: "Next.js", image: "/monster5.jpg" },
  ];

  const [currentQuestionIndex, setCurrentQuestionIndex] = useState(0);
  const [currentPosition, setCurrentPosition] = useState(0);
  const [isCompleted, setIsCompleted] = useState(false);
  // 追加
  const [isStarted, setIsStarted] = useState(false);
  const [userName, setUserName] = useState("");

  useEffect(() => {
    const handleKeyDown = async (e: KeyboardEvent) => {
      const currentQuestion = questions[currentQuestionIndex];
      if (
        e.key.toLowerCase() ===
        currentQuestion.question[currentPosition].toLowerCase()
      ) {
        setCurrentPosition((prev) => prev + 1);
      }

      if (currentPosition === currentQuestion.question.length - 1) {
        if (currentQuestionIndex === questions.length - 1) {
          setIsCompleted(true);
        } else {
          setCurrentQuestionIndex((prev) => prev + 1);
          setCurrentPosition(0);
        }
      }
    };

    window.addEventListener("keydown", handleKeyDown);
    return () => window.removeEventListener("keydown", handleKeyDown);
  }, [currentPosition, currentQuestionIndex]);

  // 追加
  const handleStart = () => {
    if (!userName) {
      alert("名前を入力してください");
      return;
    }

    setIsStarted(true);
  };

  // 追加
  if (!isStarted) {
    return (
      <main className="flex min-h-screen flex-col items-center justify-center bg-black">
        <div className="text-center p-8">
          <input
            type="text"
            value={userName}
            onChange={(e) => setUserName(e.target.value)}
            placeholder="Enter your name..."
            className="w-64 p-3 text-lg"
          />
        </div>
        <div>
          <button
            onClick={handleStart}
            className="px-8 py-3 text-xl bg-red-900"
          >
            Start Game
          </button>
        </div>
      </main>
    );
  }

  if (isCompleted) {
    return <div>ゲーム終了</div>;
  }

  return (
    <main className="flex min-h-screen flex-col items-center justify-between">
      <div
        className="text-center w-full h-screen bg-cover bg-center flex flex-col items-center justify-center"
        style={{
          backgroundImage: `url(${questions[currentQuestionIndex].image})`,
          backgroundColor: "rgba(0, 0, 0, 0.7)",
          backgroundBlendMode: "overlay",
        }}
      >
        <div>
          {questions[currentQuestionIndex].question
            .split("")
            .map((char, index) => (
              <span
                key={index}
                style={{
                  color: index < currentPosition ? "#ff0000" : "white",
                }}
              >
                {char}
              </span>
            ))}
        </div>
      </div>
    </main>
  );
}
考え方はisCompletedと同じです。
ユーザー名はあとでスコアを保存する際に必要なのでステート管理しておきます。
  const [isStarted, setIsStarted] = useState(false);
  const [userName, setUserName] = useState("");
ユーザー名もステートで管理しており、インプットフォームの入力が変わるたびにインプットフォームの内容(e.target.value)でステートを更新しています。
          <input
            type="text"
            value={userName}
            onChange={(e) => setUserName(e.target.value)}
            placeholder="Enter your name..."
            className="w-64 p-3 text-lg"
          />
ボタンをクリックするとhandleStartを実行します。
  const handleStart = () => {
    if (!userName) {
      alert("名前を入力してください");
      return;
    }

    setIsStarted(true);
  };

  (省略)
          <button
            onClick={handleStart}
            className="px-8 py-3 text-xl bg-red-900"
          >
            Start Game
          </button>
ユーザー名がなければアラートを表示します。
ユーザー名が入力されていればIsStartedがtrueになり、タイピングゲーム画面が表示されるようになります。
スコアの計算はゲーム開始から終了までに経過した時間を使って行います。
点数の最大は10000点で1秒経過するごとに100点減点する方式で実装していきます。
"use client";
import { useEffect, useState } from "react";

export default function Home() {
  const questions = [
    { question: "React", image: "/monster1.jpg" },
    { question: "TypeScript", image: "/monster2.jpg" },
    { question: "JISOU", image: "/monster3.jpg" },
    { question: "GitHub", image: "/monster4.jpg" },
    { question: "Next.js", image: "/monster5.jpg" },
  ];

  const [currentQuestionIndex, setCurrentQuestionIndex] = useState(0);
  const [currentPosition, setCurrentPosition] = useState(0);
  const [isCompleted, setIsCompleted] = useState(false);
  const [isStarted, setIsStarted] = useState(false);
  const [userName, setUserName] = useState("");
  // 追加
  const [startTime, setStartTime] = useState(0);
  const [totalTime, setTotalTime] = useState(0);
  const [score, setScore] = useState(0);

  // 追加
  const addResult = (userName: string, startTime: number) => {
    const endTime = Date.now();
    const totalTime = endTime - startTime;
    const timeInSeconds = totalTime / 1000;
    const baseScore = 10000;
    const timeDeduction = Math.floor(timeInSeconds * 100);
    const score = Math.max(1000, baseScore - timeDeduction);

    return { totalTime, score };
  };

  useEffect(() => {
    const handleKeyDown = async (e: KeyboardEvent) => {
      const currentQuestion = questions[currentQuestionIndex];
      if (
        e.key.toLowerCase() ===
        currentQuestion.question[currentPosition].toLowerCase()
      ) {
        setCurrentPosition((prev) => prev + 1);
      }

      if (currentPosition === currentQuestion.question.length - 1) {
        if (currentQuestionIndex === questions.length - 1) {
          // 追加
          const { totalTime, score } = addResult(userName, startTime);
          setTotalTime(totalTime);
          setScore(score);

          setIsCompleted(true);
        } else {
          setCurrentQuestionIndex((prev) => prev + 1);
          setCurrentPosition(0);
        }
      }
    };

    window.addEventListener("keydown", handleKeyDown);
    return () => window.removeEventListener("keydown", handleKeyDown);
  }, [currentPosition, currentQuestionIndex]);

  const handleStart = () => {
    if (!userName) {
      alert("名前を入力してください");
      return;
    }

    setIsStarted(true);

    // 追加
    setStartTime(Date.now());
  };

  if (!isStarted) {
    return (
      <main className="flex min-h-screen flex-col items-center justify-center bg-black">
        <div className="text-center p-8">
          <input
            type="text"
            value={userName}
            onChange={(e) => setUserName(e.target.value)}
            placeholder="Enter your name..."
            className="w-64 p-3 text-lg"
          />
        </div>
        <div>
          <button
            onClick={handleStart}
            className="px-8 py-3 text-xl bg-red-900"
          >
            Start Game
          </button>
        </div>
      </main>
    );
  }


  // 修正
  if (isCompleted) {
    return (
      <main className="flex min-h-screen flex-col items-center justify-center bg-black text-white">
        <div className="text-center p-8">
          <h2>Result</h2>
          <div className="mb-8 space-y-2">
            <p>Player: {userName}</p>
            <p>
              Time
              <span>{(totalTime / 1000).toFixed(2)}</span>
              seconds
            </p>
            <p>Score: {score}</p>
          </div>
        </div>
      </main>
    );
  }

  return (
    <main className="flex min-h-screen flex-col items-center justify-between">
      <div
        className="text-center w-full h-screen bg-cover bg-center flex flex-col items-center justify-center"
        style={{
          backgroundImage: `url(${questions[currentQuestionIndex].image})`,
          backgroundColor: "rgba(0, 0, 0, 0.7)",
          backgroundBlendMode: "overlay",
        }}
      >
        <div>
          {questions[currentQuestionIndex].question
            .split("")
            .map((char, index) => (
              <span
                key={index}
                style={{
                  color: index < currentPosition ? "#ff0000" : "white",
                }}
              >
                {char}
              </span>
            ))}
        </div>
      </div>
    </main>
  );
}
ゲームスタートボタンを押したら開始時刻をステートに保存しておきます。
  const [startTime, setStartTime] = useState(0);

(省略)

  const handleStart = () => {
    if (!userName) {
      alert("名前を入力してください");
      return;
    }

    setIsStarted(true);

    // 追加
    setStartTime(Date.now());
  };
最後の問題を終えてisCompletedをtrueにするタイミングでスコア計算を行います
  const addResult = (userName: string, startTime: number) => {
    const endTime = Date.now(); // 終了時刻
    const totalTime = endTime - startTime; // 経過時間の計算
    const timeInSeconds = totalTime / 1000; // 秒に変換
    const baseScore = 10000;
    const timeDeduction = Math.floor(timeInSeconds * 100); // 1秒経過で100点減点
    const score = Math.max(1000, baseScore - timeDeduction); // スコア計算

    return { totalTime, score };
  };

(省略)
       if (currentQuestionIndex === questions.length - 1) {
          // 追加
          const { totalTime, score } = addResult(userName, startTime);
          setTotalTime(totalTime);
          setScore(score);

          setIsCompleted(true);
スコアとトータルタイムはステートに保存しておきます。
  const [totalTime, setTotalTime] = useState(0);
  const [score, setScore] = useState(0);
AddResultという関数名になっているのはこのあとRedisに結果を保存する処理も行うためです。
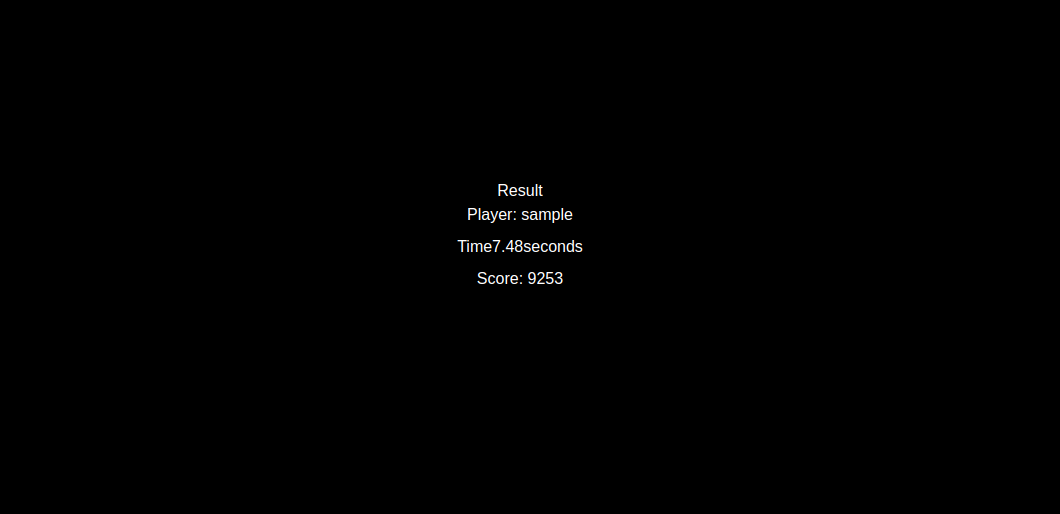
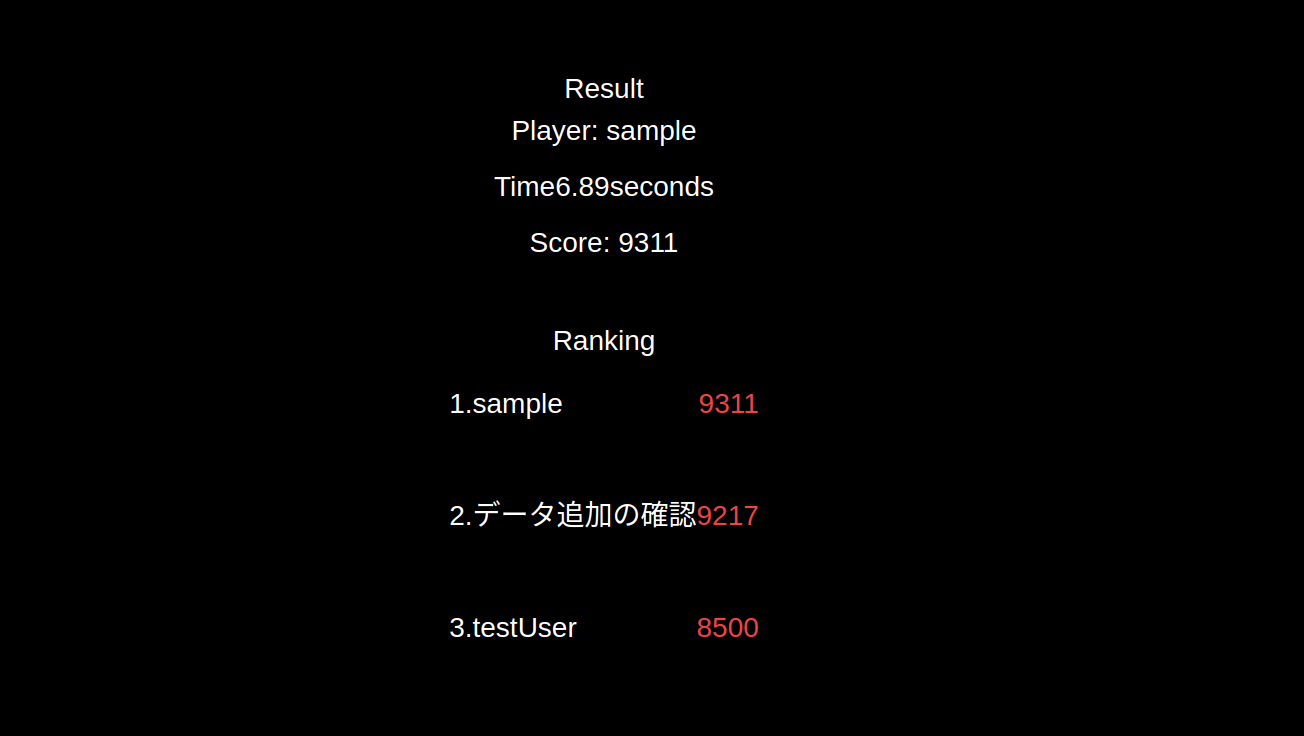
最後にリザルト画面でスコアとトータルタイムを表示します。
  if (isCompleted) {
    return (
      <main className="flex min-h-screen flex-col items-center justify-center bg-black text-white">
        <div className="text-center p-8">
          <h2>Result</h2>
          <div className="mb-8 space-y-2">
            <p>Player: {userName}</p>
            <p>
              Time
              <span>{(totalTime / 1000).toFixed(2)}</span>
              seconds
            </p>
            <p>Score: {score}</p>
          </div>
        </div>
      </main>
    );
  }
ここまででゲームの必要な機能が揃いましたので、API構築をしていきましょう。
4. スコアを保存するAPIを作る
まずはUpstashの設定をしていきます。
アカウントは簡単に作れますので作ってから先に進んでください。
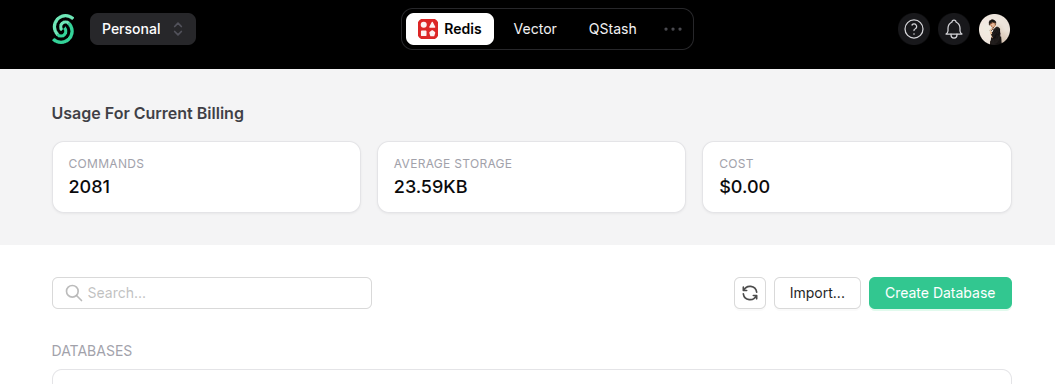
「Redis」を選択して「Create Database」をクリック
- Name : typing-game
- Primary Region : Japan
にしたら「Next」をクリックして「Create」をクリックします。
次にUpstashに接続するための機密情報を.envに追加します。
$ touch .env
UPSTASH_REDIS_REST_URL=https://あなたのURL
UPSTASH_REDIS_REST_TOKEN=あなたのトークン
あなたのURLにUpstash画面からEndpointをコピーして貼り付ける
あなたのトークンにUpstash画面からPasswordをコピーして貼り付ける
ではAPIを開発していきます
$ mkdir app/api/\[\[...route\]\]/
$ touch app/api/\[\[...route\]\]//route.ts
Next.jsはディレクトリ構造がそのままURLになるのはやったことがある方であれば馴染み深いかもしれません。[[...route]]というディレクトリを作ると任意のパスにマッチするエンドポイントを作れます。
- /api
- /api/result
- /api/hoge/fuga
このようなディレクトリ構造にすることで1つのファイルに複数のエンドポイントを書くことができます
それでは実際に動作確認のためのエンドポイントを作成していきます。
まずは今回の大切なフレームワークであるHonoをいれます。
$ bun install hono
import { Hono } from "hono";
import { handle } from "hono/vercel";

const app = new Hono().basePath("/api");

app.get("/ping", (c) => {
  return c.text("pong");
});

export const GET = handle(app);
まずエンドポイントのbasePathを/apiにします。
APIは/apiから必ず始まるようになっています。
app.get("/ping", (c) => {
  return c.text("pong");
});
appに対して/pingを生やすとapi/pingを叩くとpongが返却されるようになります。
$ curl localhost:3000/api/ping
pong
handleはHonoとNext.jsを接続しているものだと考えてください。
いまはGETリクエストだけですがこのあとPOSTも追加します。
export const GET = handle(app);
それではRedisにスコアを追加するAPIを実装します。
まずはUpstashクライアントをインストールします。
$ bun install @upstash/redis
import { Redis } from "@upstash/redis";
import { Hono } from "hono";
import { env } from "hono/adapter";
import { handle } from "hono/vercel";

type EnvConfig = {
  UPSTASH_REDIS_REST_URL: string;
  UPSTASH_REDIS_REST_TOKEN: string;
};

const app = new Hono().basePath("/api");

app.get("/ping", (c) => {
  return c.text("pong");
});

app.post("/result", async (c) => {
  try {
    const { score, userName } = await c.req.json();

    if (!score || !userName) {
      return c.json({ error: "Missing score or userName" }, 400);
    }

    const { UPSTASH_REDIS_REST_URL, UPSTASH_REDIS_REST_TOKEN } =
      env<EnvConfig>(c);

    const redis = new Redis({
      url: UPSTASH_REDIS_REST_URL,
      token: UPSTASH_REDIS_REST_TOKEN,
    });

    const result = {
      score: score,
      member: userName,
    };

    await redis.zadd("typing-score-rank", result);

    return c.json({
      message: "Score submitted successfully",
    });
  } catch (e) {
    return c.json({ error: `Error: ${e}` }, 500);
  }
});

export const GET = handle(app);
export const POST = handle(app);
$ curl -X POST http://localhost:3000/api/result -H 'Content-Type: application/json' -d '{"score": 8500, "userName": "testUser"}'

{"message":"Score submitted successfully"}
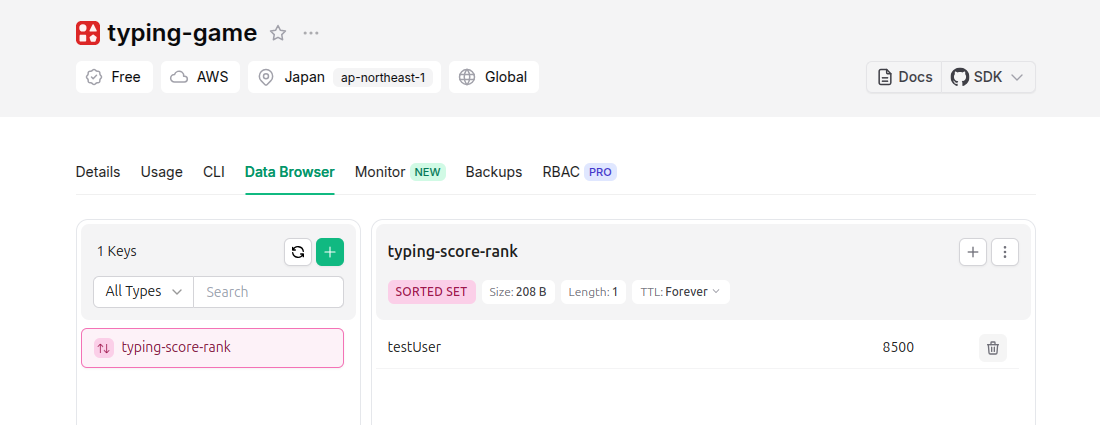
実際にUpstashの「Data Browser」で「typing-score-rank」を確認すると追加されていることがわかります。
今回はPOSTリクエストなので以下を追加しました
export const POST = handle(app);
リクエストから送られてきたボディからスコアとユーザー名を取得します。
どちらかが存在しない場合はスコアを記録できないので400エラーを返しています
    const { score, userName } = await c.req.json();

    if (!score || !userName) {
      return c.json({ error: "Missing score or userName" }, 400);
    }
まずはRedisの設定です。honoをNext.jsで使う場合環境変数は以下のように取ることができます。
type EnvConfig = {
  UPSTASH_REDIS_REST_URL: string;
  UPSTASH_REDIS_REST_TOKEN: string;
};

(省略)

    const { UPSTASH_REDIS_REST_URL, UPSTASH_REDIS_REST_TOKEN } =
      env<EnvConfig>(c);
Redisクライアントを初期化してzaddにスコアとユーザー名のオブジェクトをいれることでデータ追加が可能です。第一引数のtyping-score-rankはDBでいうテーブル名のようなものだと考えてください。
    const redis = new Redis({
      url: UPSTASH_REDIS_REST_URL,
      token: UPSTASH_REDIS_REST_TOKEN,
    });

    const result = {
      score: score,
      member: userName,
    };

    await redis.zadd("typing-score-rank", result);
データ追加がうまくいったらステータスコード200と成功したことを伝えるメッセージを返します。
    return c.json({
      message: "Score submitted successfully",
    });
それでは実際にゲームを遊び終わってaddResultが呼ばれるタイミングでAPIを叩くように修正しましょう
  const addResult = async (userName: string, startTime: number) => {
    const endTime = Date.now();
    const totalTime = endTime - startTime;
    const timeInSeconds = totalTime / 1000;
    const baseScore = 10000;
    const timeDeduction = Math.floor(timeInSeconds * 100);
    const score = Math.max(1000, baseScore - timeDeduction);

    await fetch("/api/result", {
      method: "POST",
      headers: {
        "Content-Type": "application/json",
      },
      body: JSON.stringify({
        score: score,
        userName: userName,
      }),
    });

    return { totalTime, score };
  };

(省略)

      if (currentPosition === currentQuestion.question.length - 1) {
        if (currentQuestionIndex === questions.length - 1) {
          const { totalTime, score } = await addResult(userName, startTime); // 非同期を待つ
APIを叩くのでasync関数に変更しました。これで非同期関数を中で実行することができます。
fetchでAPIを叩きますが、先程Curlで叩いたものとほとんど同じです。
無事データが追加されていることが確認できました。
5. スコア一覧を表示する
スコアの上位10個を返すAPIも追加しましょう
import { Redis } from "@upstash/redis";
import { Hono } from "hono";
import { env } from "hono/adapter";
import { handle } from "hono/vercel";

type EnvConfig = {
  UPSTASH_REDIS_REST_URL: string;
  UPSTASH_REDIS_REST_TOKEN: string;
};

const app = new Hono().basePath("/api");

app.get("/ping", (c) => {
  return c.text("pong");
});

app.post("/result", async (c) => {
  try {
    const { score, userName } = await c.req.json();

    if (!score || !userName) {
      return c.json({ error: "Missing score or userName" }, 400);
    }

    const { UPSTASH_REDIS_REST_URL, UPSTASH_REDIS_REST_TOKEN } =
      env<EnvConfig>(c);

    const redis = new Redis({
      url: UPSTASH_REDIS_REST_URL,
      token: UPSTASH_REDIS_REST_TOKEN,
    });

    const result = {
      score: score,
      member: userName,
    };

    await redis.zadd("typing-score-rank", result);

    return c.json({
      message: "Score submitted successfully",
    });
  } catch (e) {
    return c.json({ error: `Error: ${e}` }, 500);
  }
});

app.get("/result", async (c) => {
  try {
    const { UPSTASH_REDIS_REST_TOKEN, UPSTASH_REDIS_REST_URL } =
      env<EnvConfig>(c);

    const redis = new Redis({
      token: UPSTASH_REDIS_REST_TOKEN,
      url: UPSTASH_REDIS_REST_URL,
    });

    // redisからスコアとユーザー名を取得(トップ10)
    const results = await redis.zrange("typing-score-rank", 0, 9, {
      rev: true,
      withScores: true,
    });

    const scores = [];
    for (let i = 0; i < results.length; i += 2) {
      scores.push({
        userName: results[i],
        score: results[i + 1],
      });
    }
    return c.json({
      results: scores,
    });
  } catch (e) {
    return c.json({
      message: `Error: ${e}`,
    });
  }
});

export const GET = handle(app);
export const POST = handle(app);
取得は0-9の合計10個でrev: trueで降順(スコアが高いものからとる)、withScores: trueでユーザー名だけでなくスコアも一緒に返してくれます。
    const results = await redis.zrange("typing-score-rank", 0, 9, {
      rev: true,
      withScores: true,
    });
resultsはスコアとユーザー名の配列になっており、
["user1", 9999, "user2", 6000, ...]
のような形をしてRedisから返却されます。
[
  { userName: "user1", score: 9999 },
  {  userName: "user2", score: 6000 }
]
このようなJSONの形で返すために処理を行っています。
for文をiを+2ずつして進めていきます。+2なのはユーザー名とスコア2つで1つのオブジェクトを作るためです。
    const scores = [];
    for (let i = 0; i < results.length; i += 2) {
      scores.push({
        userName: results[i],
        score: results[i + 1],
      });
    }
それでは実際に叩いてみたいと思います。
$ curl http://localhost:3000/api/result

{"results":[{"userName":"データ追加の確認","score":9217},{"userName":"testUser","score":8500}]}
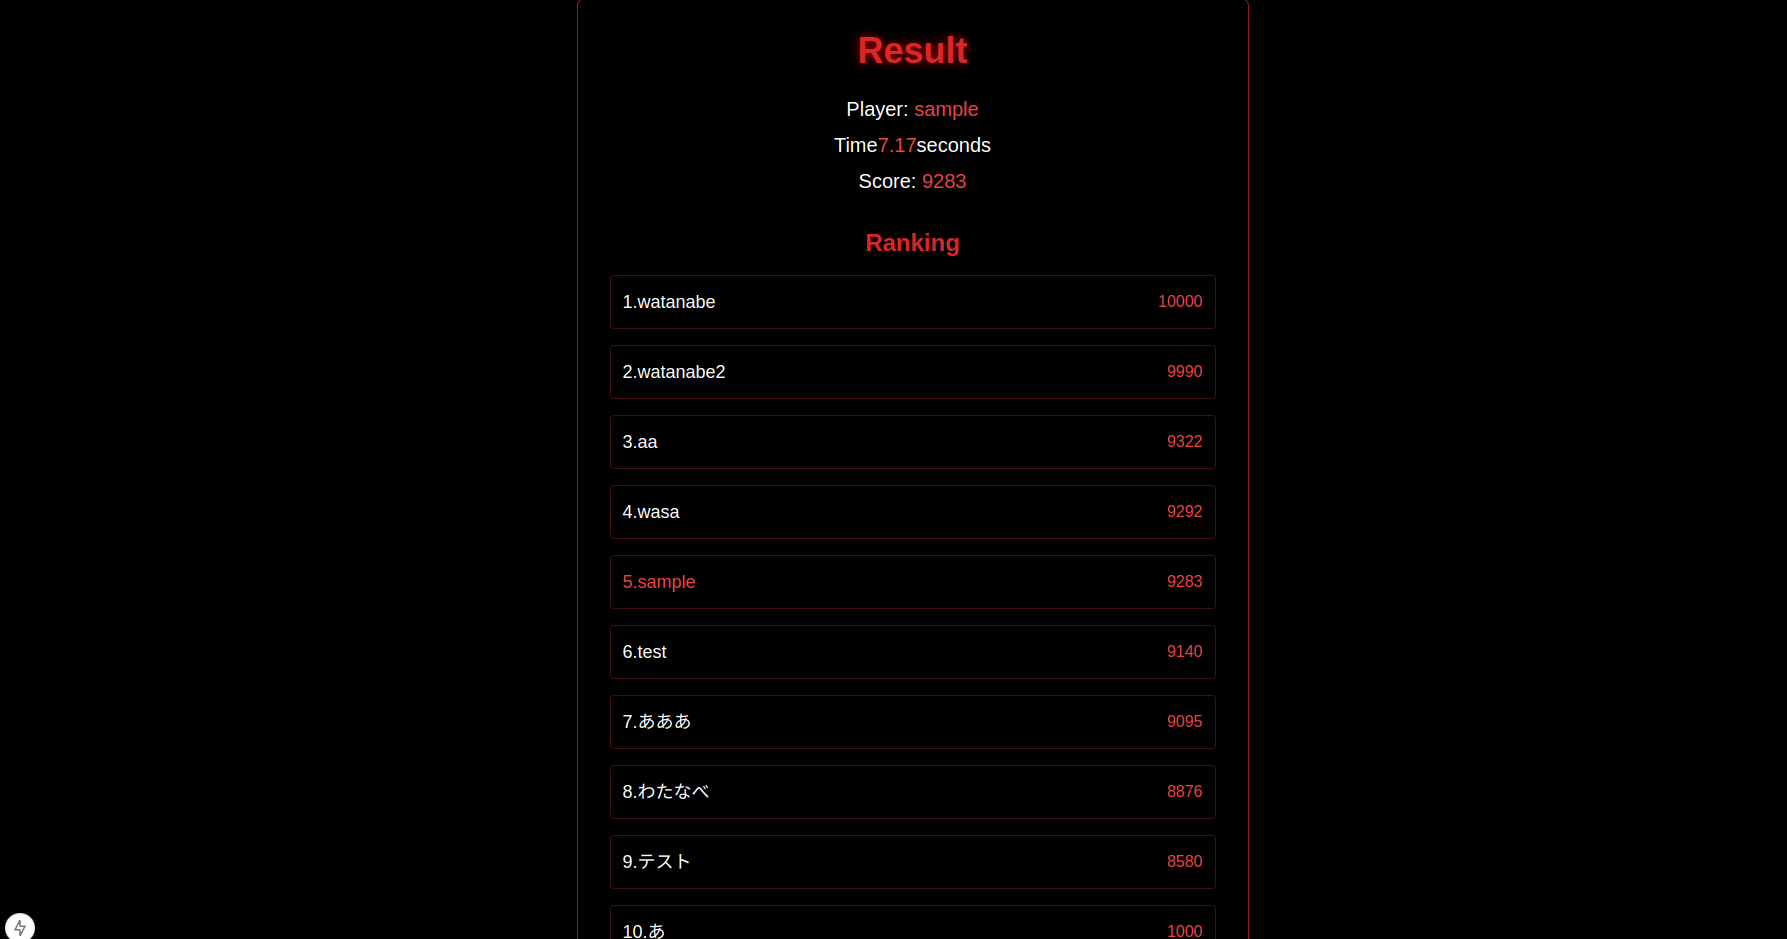
実際にリザルト画面に表示してみましょう
"use client";
import { useEffect, useState } from "react";

// 追加
type Score = {
  userName: string;
  score: number;
};

export default function Home() {
  const questions = [
    { question: "React", image: "/monster1.jpg" },
    { question: "TypeScript", image: "/monster2.jpg" },
    { question: "JISOU", image: "/monster3.jpg" },
    { question: "GitHub", image: "/monster4.jpg" },
    { question: "Next.js", image: "/monster5.jpg" },
  ];

  const [currentQuestionIndex, setCurrentQuestionIndex] = useState(0);
  const [currentPosition, setCurrentPosition] = useState(0);
  const [isCompleted, setIsCompleted] = useState(false);
  const [isStarted, setIsStarted] = useState(false);
  const [userName, setUserName] = useState("");
  const [startTime, setStartTime] = useState(0);
  const [totalTime, setTotalTime] = useState(0);
  const [score, setScore] = useState(0);
  // 追加
  const [scores, setScores] = useState<Score[]>([]);

  const addResult = async (userName: string, startTime: number) => {
    const endTime = Date.now();
    const totalTime = endTime - startTime;
    const timeInSeconds = totalTime / 1000;
    const baseScore = 10000;
    const timeDeduction = Math.floor(timeInSeconds * 100);
    const score = Math.max(1000, baseScore - timeDeduction);

    await fetch("/api/result", {
      method: "POST",
      headers: {
        "Content-Type": "application/json",
      },
      body: JSON.stringify({
        score: score,
        userName: userName,
      }),
    });

    return { totalTime, score };
  };

  // 追加
  const fetchScores = async () => {
    const res = await fetch("/api/result");
    const data = await res.json();
    return data.results;
  };

  useEffect(() => {
    const handleKeyDown = async (e: KeyboardEvent) => {
      const currentQuestion = questions[currentQuestionIndex];
      if (
        e.key.toLowerCase() ===
        currentQuestion.question[currentPosition].toLowerCase()
      ) {
        setCurrentPosition((prev) => prev + 1);
      }

      if (currentPosition === currentQuestion.question.length - 1) {
        if (currentQuestionIndex === questions.length - 1) {
          const { totalTime, score } = await addResult(userName, startTime);

          setTotalTime(totalTime);
          setScore(score);
          setIsCompleted(true);

          // 追加
          const scores = await fetchScores();
          setScores(scores);
        } else {
          setCurrentQuestionIndex((prev) => prev + 1);
          setCurrentPosition(0);
        }
      }
    };

    window.addEventListener("keydown", handleKeyDown);
    return () => window.removeEventListener("keydown", handleKeyDown);
  }, [currentPosition, currentQuestionIndex]);

  const handleStart = () => {
    if (!userName) {
      alert("名前を入力してください");
      return;
    }

    setIsStarted(true);
    setStartTime(Date.now());
  };

  if (!isStarted) {
    return (
      <main className="flex min-h-screen flex-col items-center justify-center bg-black">
        <div className="text-center p-8">
          <input
            type="text"
            value={userName}
            onChange={(e) => setUserName(e.target.value)}
            placeholder="Enter your name..."
            className="w-64 p-3 text-lg"
          />
        </div>
        <div>
          <button
            onClick={handleStart}
            className="px-8 py-3 text-xl bg-red-900"
          >
            Start Game
          </button>
        </div>
      </main>
    );
  }

  if (isCompleted) {
    return (
      <main className="flex min-h-screen flex-col items-center justify-center bg-black text-white">
        <div className="text-center p-8">
          <h2>Result</h2>
          <div className="mb-8 space-y-2">
            <p>Player: {userName}</p>
            <p>
              Time
              <span>{(totalTime / 1000).toFixed(2)}</span>
              seconds
            </p>
            <p>Score: {score}</p>
          </div>
          {/* 追加 */}
          <div className="mt-8">
            <h3>Ranking</h3>
            {scores.length === 0 ? (
              <div className="flex flex-col items-center justify-center py-8">
                <p>Loading scores...</p>
              </div>
            ) : (
              <div className="space-y-4">
                {scores.map((score, index) => (
                  <div
                    key={index}
                    className="flex justify-between items-center p-3"
                  >
                    <span>
                      {index + 1}.{score.userName}
                    </span>
                    <span className="text-red-500">{score.score}</span>
                  </div>
                ))}
              </div>
            )}
          </div>
        </div>
      </main>
    );
  }

  return (
    <main className="flex min-h-screen flex-col items-center justify-between">
      <div
        className="text-center w-full h-screen bg-cover bg-center flex flex-col items-center justify-center"
        style={{
          backgroundImage: `url(${questions[currentQuestionIndex].image})`,
          backgroundColor: "rgba(0, 0, 0, 0.7)",
          backgroundBlendMode: "overlay",
        }}
      >
        <div>
          {questions[currentQuestionIndex].question
            .split("")
            .map((char, index) => (
              <span
                key={index}
                style={{
                  color: index < currentPosition ? "#ff0000" : "white",
                }}
              >
                {char}
              </span>
            ))}
        </div>
      </div>
    </main>
  );
}
まずはスコアを保存するためのステートを作成しました。
配列の中の型を定義するためにScore型も用意しています。
type Score = {
  userName: string;
  score: number;
};

(省略)

  const [scores, setScores] = useState<Score[]>([]);
ゲームが終わって記録を登録したあとにすべてのデータを取得しています
  const fetchScores = async () => {
    const res = await fetch("/api/result");
    const data = await res.json();
    return data.results;
  };

(省略)

if (currentQuestionIndex === questions.length - 1) {
          const { totalTime, score } = await addResult(userName, startTime);

          setTotalTime(totalTime);
          setScore(score);
          setIsCompleted(true);

          const scores = await fetchScores();
          setScores(scores);
スコアの配列に何もデータがないときにmapをするとエラーになるため配列が空の状態のときはローディングという表示をだして、結果が取得できたらスコアをそれぞれ表示します。
            {scores.length === 0 ? (
              <div className="flex flex-col items-center justify-center py-8">
                <p>Loading scores...</p>
              </div>
            ) : (
              <div className="space-y-4">
                {scores.map((score, index) => (
                  <div
                    key={index}
                    className="flex justify-between items-center p-3"
                  >
                    <span>
                      {index + 1}.{score.userName}
                    </span>
                    <span className="text-red-500">{score.score}</span>
                  </div>
                ))}
              </div>
            )}
mapを使うことで以下のようなHTMLを動的に作り出すことができます
                {scores.map((score, index) => (
                  <div
                    key={index}
                    className="flex justify-between items-center p-3"
                  >
                    <span>
                      {index + 1}.{score.userName}
                    </span>
                    <span className="text-red-500">{score.score}</span>
                  </div>
                ))}

                                      ▼▼▼

                  <div
                    key={0}
                    className="flex justify-between items-center p-3"
                  >
                    <span>
                      1.User1
                    </span>
                    <span className="text-red-500">10000</span>
                  </div>
                                    <div
                    key={1}
                    className="flex justify-between items-center p-3"
                  >
                    <span>
                      2.User2
                    </span>
                    <span className="text-red-500">6000</span>
                  </div>
6. BGMをつけて本格的にする
今回は1問クリアするたびに銃声の効果音、タイピングゲーム中はBGMをかけます。
実際のイメージは以下の動画になります。
次のハンズオンはNext.jsとHonoとRedisで爆速のAPIを作ってタイピングゲームを作る!!
— 渡邉 臣@プログラミング戦略家 | JISOU (@Sicut_study) December 25, 2024
クリスマスにサンプルアプリ完成👻👻 pic.twitter.com/OycJQs0Xm5
まずはMP3のデータを以下のリポジトリからダウンロードして/publicに入れてください
"use client";
import { useEffect, useRef, useState } from "react";

type Score = {
  userName: string;
  score: number;
};

export default function Home() {
  const questions = [
    { question: "React", image: "/monster1.jpg" },
    { question: "TypeScript", image: "/monster2.jpg" },
    { question: "JISOU", image: "/monster3.jpg" },
    { question: "GitHub", image: "/monster4.jpg" },
    { question: "Next.js", image: "/monster5.jpg" },
  ];

  const [currentQuestionIndex, setCurrentQuestionIndex] = useState(0);
  const [currentPosition, setCurrentPosition] = useState(0);
  const [isCompleted, setIsCompleted] = useState(false);
  const [isStarted, setIsStarted] = useState(false);
  const [userName, setUserName] = useState("");
  const [startTime, setStartTime] = useState(0);
  const [totalTime, setTotalTime] = useState(0);
  const [score, setScore] = useState(0);
  const [scores, setScores] = useState<Score[]>([]);

  // 追加
  const bgmRef = useRef<HTMLAudioElement | null>(null);
  const shotSoundRef = useRef<HTMLAudioElement | null>(null);

  // 追加
  useEffect(() => {
    bgmRef.current = new Audio("/bgm.mp3");
    bgmRef.current.loop = true;
    shotSoundRef.current = new Audio("/shot.mp3");
  }, []);

  // 追加
  useEffect(() => {
    if (isStarted && bgmRef.current) {
      bgmRef.current.play();
    }
    if (isCompleted && bgmRef.current) {
      bgmRef.current.pause();
    }
  }, [isStarted, isCompleted]);

  const addResult = async (userName: string, startTime: number) => {
    const endTime = Date.now();
    const totalTime = endTime - startTime;
    const timeInSeconds = totalTime / 1000;
    const baseScore = 10000;
    const timeDeduction = Math.floor(timeInSeconds * 100);
    const score = Math.max(1000, baseScore - timeDeduction);

    await fetch("/api/result", {
      method: "POST",
      headers: {
        "Content-Type": "application/json",
      },
      body: JSON.stringify({
        score: score,
        userName: userName,
      }),
    });

    return { totalTime, score };
  };

  const fetchScores = async () => {
    const res = await fetch("/api/result");
    const data = await res.json();
    return data.results;
  };

  useEffect(() => {
    const handleKeyDown = async (e: KeyboardEvent) => {
      const currentQuestion = questions[currentQuestionIndex];
      if (
        e.key.toLowerCase() ===
        currentQuestion.question[currentPosition].toLowerCase()
      ) {
        setCurrentPosition((prev) => prev + 1);
      }

      if (currentPosition === currentQuestion.question.length - 1) {
        if (currentQuestionIndex === questions.length - 1) {
          // 追加
          if (shotSoundRef.current) {
            shotSoundRef.current.currentTime = 0;
            shotSoundRef.current.play();
          }
          const { totalTime, score } = await addResult(userName, startTime);

          setTotalTime(totalTime);
          setScore(score);
          setIsCompleted(true);

          const scores = await fetchScores();
          setScores(scores);
        } else {
          // 追加
          if (shotSoundRef.current) {
            shotSoundRef.current.currentTime = 0;
            shotSoundRef.current.play();
          }
          setCurrentQuestionIndex((prev) => prev + 1);
          setCurrentPosition(0);
        }
      }
    };

    window.addEventListener("keydown", handleKeyDown);
    return () => window.removeEventListener("keydown", handleKeyDown);
  }, [currentPosition, currentQuestionIndex]);

  const handleStart = () => {
    if (!userName) {
      alert("名前を入力してください");
      return;
    }

    setIsStarted(true);
    setStartTime(Date.now());
  };

  if (!isStarted) {
    return (
      <main className="flex min-h-screen flex-col items-center justify-center bg-black">
        <div className="text-center p-8">
          <input
            type="text"
            value={userName}
            onChange={(e) => setUserName(e.target.value)}
            placeholder="Enter your name..."
            className="w-64 p-3 text-lg"
          />
        </div>
        <div>
          <button
            onClick={handleStart}
            className="px-8 py-3 text-xl bg-red-900"
          >
            Start Game
          </button>
        </div>
      </main>
    );
  }

  if (isCompleted) {
    return (
      <main className="flex min-h-screen flex-col items-center justify-center bg-black text-white">
        <div className="text-center p-8">
          {/* <h2>Result</h2> */}
          <div className="mb-8 space-y-2">
            <p>Player: {userName}</p>
            <p>
              Time
              <span>{(totalTime / 1000).toFixed(2)}</span>
              seconds
            </p>
            <p>Score: {score}</p>
          </div>
          <div className="mt-8">
            <h3>Ranking</h3>
            {scores.length === 0 ? (
              <div className="flex flex-col items-center justify-center py-8">
                <p>Loading scores...</p>
              </div>
            ) : (
              <div className="space-y-4">
                {scores.map((score, index) => (
                  <div
                    key={index}
                    className="flex justify-between items-center p-3"
                  >
                    <span>
                      {index + 1}.{score.userName}
                    </span>
                    <span className="text-red-500">{score.score}</span>
                  </div>
                ))}
              </div>
            )}
          </div>
        </div>
      </main>
    );
  }

  return (
    <main className="flex min-h-screen flex-col items-center justify-between">
      <div
        className="text-center w-full h-screen bg-cover bg-center flex flex-col items-center justify-center"
        style={{
          backgroundImage: `url(${questions[currentQuestionIndex].image})`,
          backgroundColor: "rgba(0, 0, 0, 0.7)",
          backgroundBlendMode: "overlay",
        }}
      >
        <div>
          {questions[currentQuestionIndex].question
            .split("")
            .map((char, index) => (
              <span
                key={index}
                style={{
                  color: index < currentPosition ? "#ff0000" : "white",
                }}
              >
                {char}
              </span>
            ))}
        </div>
      </div>
    </main>
  );
}
これでBGM付きでより臨場感のある本格的なゲームになりました。
  const bgmRef = useRef<HTMLAudioElement | null>(null);
  const shotSoundRef = useRef<HTMLAudioElement | null>(null);
音楽を再生するときにはuseRefを利用します。
ここでuseRefについて紹介します。
通常Reactの場合仮想DOMというのを利用して変更を加えてから、実DOMへ反映していました
しかしuseRefを利用することでReactでも直接DOMを触ることが可能です。
これらの理由から音楽再生はuseRefを使って実装していきます。
  useEffect(() => {
    bgmRef.current = new Audio("/bgm.mp3");
    bgmRef.current.loop = true;
    shotSoundRef.current = new Audio("/shot.mp3");
  }, []);
画面描画前にBGMをDOMに設定しています。こうすることでDOM APIを使って音楽を再生することができます。
  useEffect(() => {
    if (isStarted && bgmRef.current) {
      bgmRef.current.play();
    }
    if (isCompleted && bgmRef.current) {
      bgmRef.current.pause();
    }
  }, [isStarted, isCompleted]);
タイピングゲームが始まったら(isStartedがfalse)でBGMを再生します。
タイピングゲームが終了したら(isCompletedがtrue)でBGMを停止します。
 } else {
          // 追加
          if (shotSoundRef.current) {
            shotSoundRef.current.currentTime = 0;
            shotSoundRef.current.play();
          }
          setCurrentQuestionIndex((prev) => prev + 1);
          setCurrentPosition(0);
        }
効果音は次の問題に変わるのときに再生します。
最後の問題が終わると分岐が変わってしまうので、最後に1度追加で再生しています。
      if (currentPosition === currentQuestion.question.length - 1) {
        if (currentQuestionIndex === questions.length - 1) {
          // 追加
          if (shotSoundRef.current) {
            shotSoundRef.current.currentTime = 0;
            shotSoundRef.current.play();
          }
7. デザインを整える
最後にデザインを整えて終了です。詳しい内容は各自調べてみてください!
"use client";
import { useEffect, useRef, useState } from "react";

type Score = {
  userName: string;
  score: number;
};

export default function Home() {
  const questions = [
    { question: "React", image: "/monster1.jpg" },
    { question: "TypeScript", image: "/monster2.jpg" },
    { question: "JISOU", image: "/monster3.jpg" },
    { question: "GitHub", image: "/monster4.jpg" },
    { question: "Next.js", image: "/monster5.jpg" },
  ];

  const [currentQuestionIndex, setCurrentQuestionIndex] = useState(0);
  const [currentPosition, setCurrentPosition] = useState(0);
  const [isCompleted, setIsCompleted] = useState(false);
  const [isStarted, setIsStarted] = useState(false);
  const [userName, setUserName] = useState("");
  const [startTime, setStartTime] = useState(0);
  const [totalTime, setTotalTime] = useState(0);
  const [score, setScore] = useState(0);
  const [scores, setScores] = useState<Score[]>([]);
  const bgmRef = useRef<HTMLAudioElement | null>(null);
  const shotSoundRef = useRef<HTMLAudioElement | null>(null);

  useEffect(() => {
    bgmRef.current = new Audio("/bgm.mp3");
    bgmRef.current.loop = true;
    shotSoundRef.current = new Audio("/shot.mp3");
  }, []);

  useEffect(() => {
    if (isStarted && bgmRef.current) {
      bgmRef.current.play();
    }
    if (isCompleted && bgmRef.current) {
      bgmRef.current.pause();
    }
  }, [isStarted, isCompleted]);

  const addResult = async (userName: string, startTime: number) => {
    const endTime = Date.now();
    const totalTime = endTime - startTime;
    const timeInSeconds = totalTime / 1000;
    const baseScore = 10000;
    const timeDeduction = Math.floor(timeInSeconds * 100);
    const score = Math.max(1000, baseScore - timeDeduction);

    await fetch("/api/result", {
      method: "POST",
      headers: {
        "Content-Type": "application/json",
      },
      body: JSON.stringify({
        score: score,
        userName: userName,
      }),
    });

    return { totalTime, score };
  };

  const fetchScores = async () => {
    const res = await fetch("/api/result");
    const data = await res.json();
    return data.results;
  };

  useEffect(() => {
    const handleKeyDown = async (e: KeyboardEvent) => {
      const currentQuestion = questions[currentQuestionIndex];
      if (
        e.key.toLowerCase() ===
        currentQuestion.question[currentPosition].toLowerCase()
      ) {
        setCurrentPosition((prev) => prev + 1);
      }

      if (currentPosition === currentQuestion.question.length - 1) {
        if (currentQuestionIndex === questions.length - 1) {
          if (shotSoundRef.current) {
            shotSoundRef.current.currentTime = 0;
            shotSoundRef.current.play();
          }
          const { totalTime, score } = await addResult(userName, startTime);

          setTotalTime(totalTime);
          setScore(score);
          setIsCompleted(true);

          const scores = await fetchScores();
          setScores(scores);
        } else {
          if (shotSoundRef.current) {
            shotSoundRef.current.currentTime = 0;
            shotSoundRef.current.play();
          }
          setCurrentQuestionIndex((prev) => prev + 1);
          setCurrentPosition(0);
        }
      }
    };

    window.addEventListener("keydown", handleKeyDown);
    return () => window.removeEventListener("keydown", handleKeyDown);
  }, [currentPosition, currentQuestionIndex]);

  const handleStart = () => {
    if (!userName) {
      alert("名前を入力してください");
      return;
    }

    setIsStarted(true);
    setStartTime(Date.now());
  };

  if (!isStarted) {
    return (
      <main className="flex min-h-screen flex-col items-center justify-center bg-black">
        <div className="text-center p-8 bg-black/50 rounded-lg border border-red-800 shadow-2xl">
          <h1
            className="text-5xl font-bold mb-8 text-red-600 tracking-wider"
            style={{ textShadow: "0 0 10px rgba(255, 0, 0, 0.7)" }}
          >
            Typing Game
          </h1>
          <div className="mb-6">
            <input
              type="text"
              value={userName}
              onChange={(e) => setUserName(e.target.value)}
              placeholder="Enter your name..."
              className="w-64 p-3 text-lg bg-black/70 text-red-500 border-2 border-red-800 rounded-md
                       placeholder:text-red-700 focus:outline-none focus:border-red-500 focus:ring-1 focus:ring-red-500"
              style={{ textShadow: "0 0 5px rgba(255, 0, 0, 0.5)" }}
            />
          </div>
          <div>
            <button
              onClick={handleStart}
              className="px-8 py-3 text-xl bg-red-900 text-white rounded-md hover:bg-red-700
                       transition-colors duration-300 border border-red-600"
              style={{ textShadow: "2px 2px 4px rgba(0, 0, 0, 0.5)" }}
            >
              Start Game
            </button>
          </div>
        </div>
      </main>
    );
  }

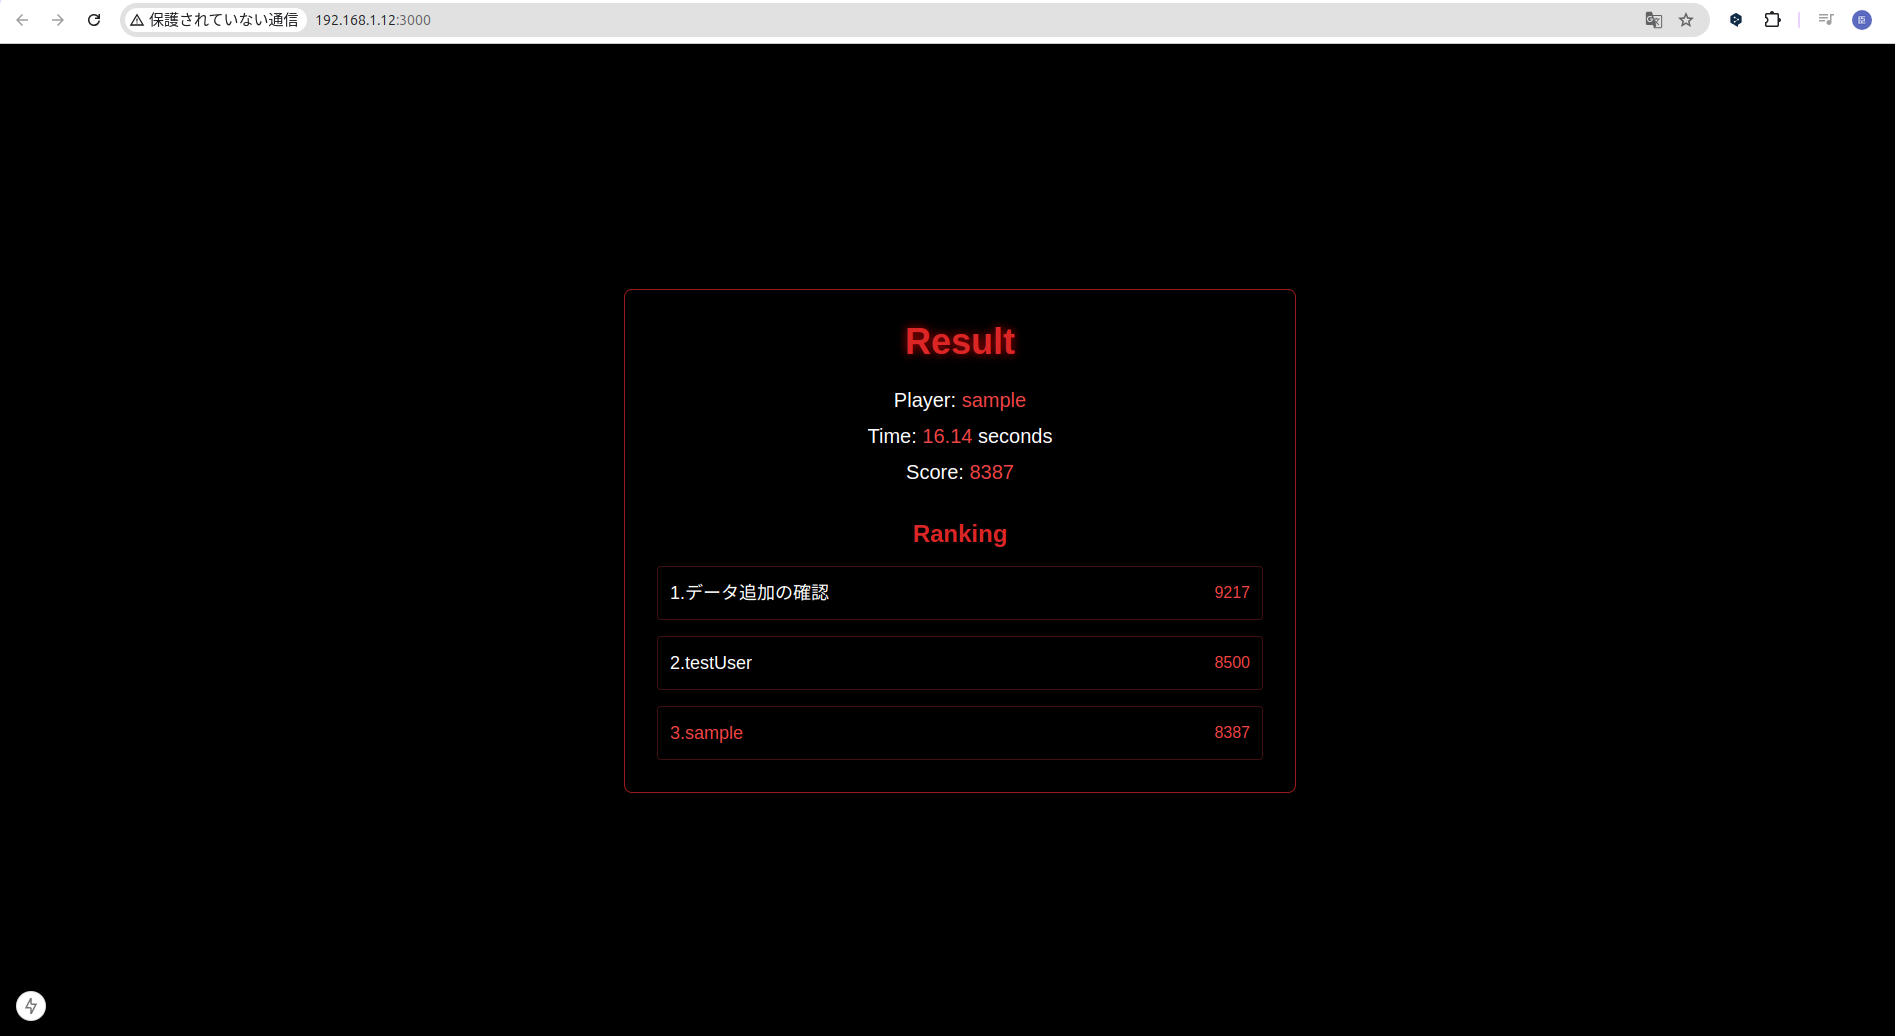
  if (isCompleted) {
    return (
      <main className="flex min-h-screen flex-col items-center justify-center bg-black text-white">
        <div className="text-center p-8 bg-black/50 rounded-lg border border-red-800 shadow-2xl max-w-2xl w-full">
          <h2
            className="text-4xl font-bold mb-6 text-red-600"
            style={{ textShadow: "0 0 10px rgba(255, 0, 0, 0.7)" }}
          >
            Result
          </h2>
          <div className="mb-8 space-y-2">
            <p className="text-xl">
              Player: <span className="text-red-500">{userName}</span>
            </p>
            <p className="text-xl">
              Time:{" "}
              <span className="text-red-500">
                {(totalTime / 1000).toFixed(2)}
              </span>{" "}
              seconds
            </p>
            <p className="text-xl">
              Score: <span className="text-red-500">{score}</span>
            </p>
          </div>

          <div className="mt-8">
            <h3 className="text-2xl font-bold mb-4 text-red-600">Ranking</h3>
            {scores.length === 0 ? (
              <div className="flex flex-col items-center justify-center py-8">
                <div className="w-12 h-12 border-4 border-red-600 border-t-transparent rounded-full animate-spin"></div>
                <p className="mt-4 text-red-500 animate-pulse">
                  Loading scores...
                </p>
              </div>
            ) : (
              <div className="space-y-4">
                {scores.map((score, index) => (
                  <div
                    key={index}
                    className="flex justify-between items-center p-3 bg-black/30 border border-red-900/50 rounded"
                  >
                    <span
                      className={`text-lg ${
                        score.userName === userName ? "text-red-500" : ""
                      }`}
                    >
                      {index + 1}.{score.userName}
                    </span>
                    <span className="text-red-500">{score.score}</span>
                  </div>
                ))}
              </div>
            )}
          </div>
        </div>
      </main>
    );
  }

  return (
    <main className="flex min-h-screen flex-col items-center justify-between">
      <div
        className="text-center w-full h-screen bg-cover bg-center flex flex-col items-center justify-center"
        style={{
          backgroundImage: `url(${questions[currentQuestionIndex].image})`,
          backgroundColor: "rgba(0, 0, 0, 0.7)",
          backgroundBlendMode: "overlay",
        }}
      >
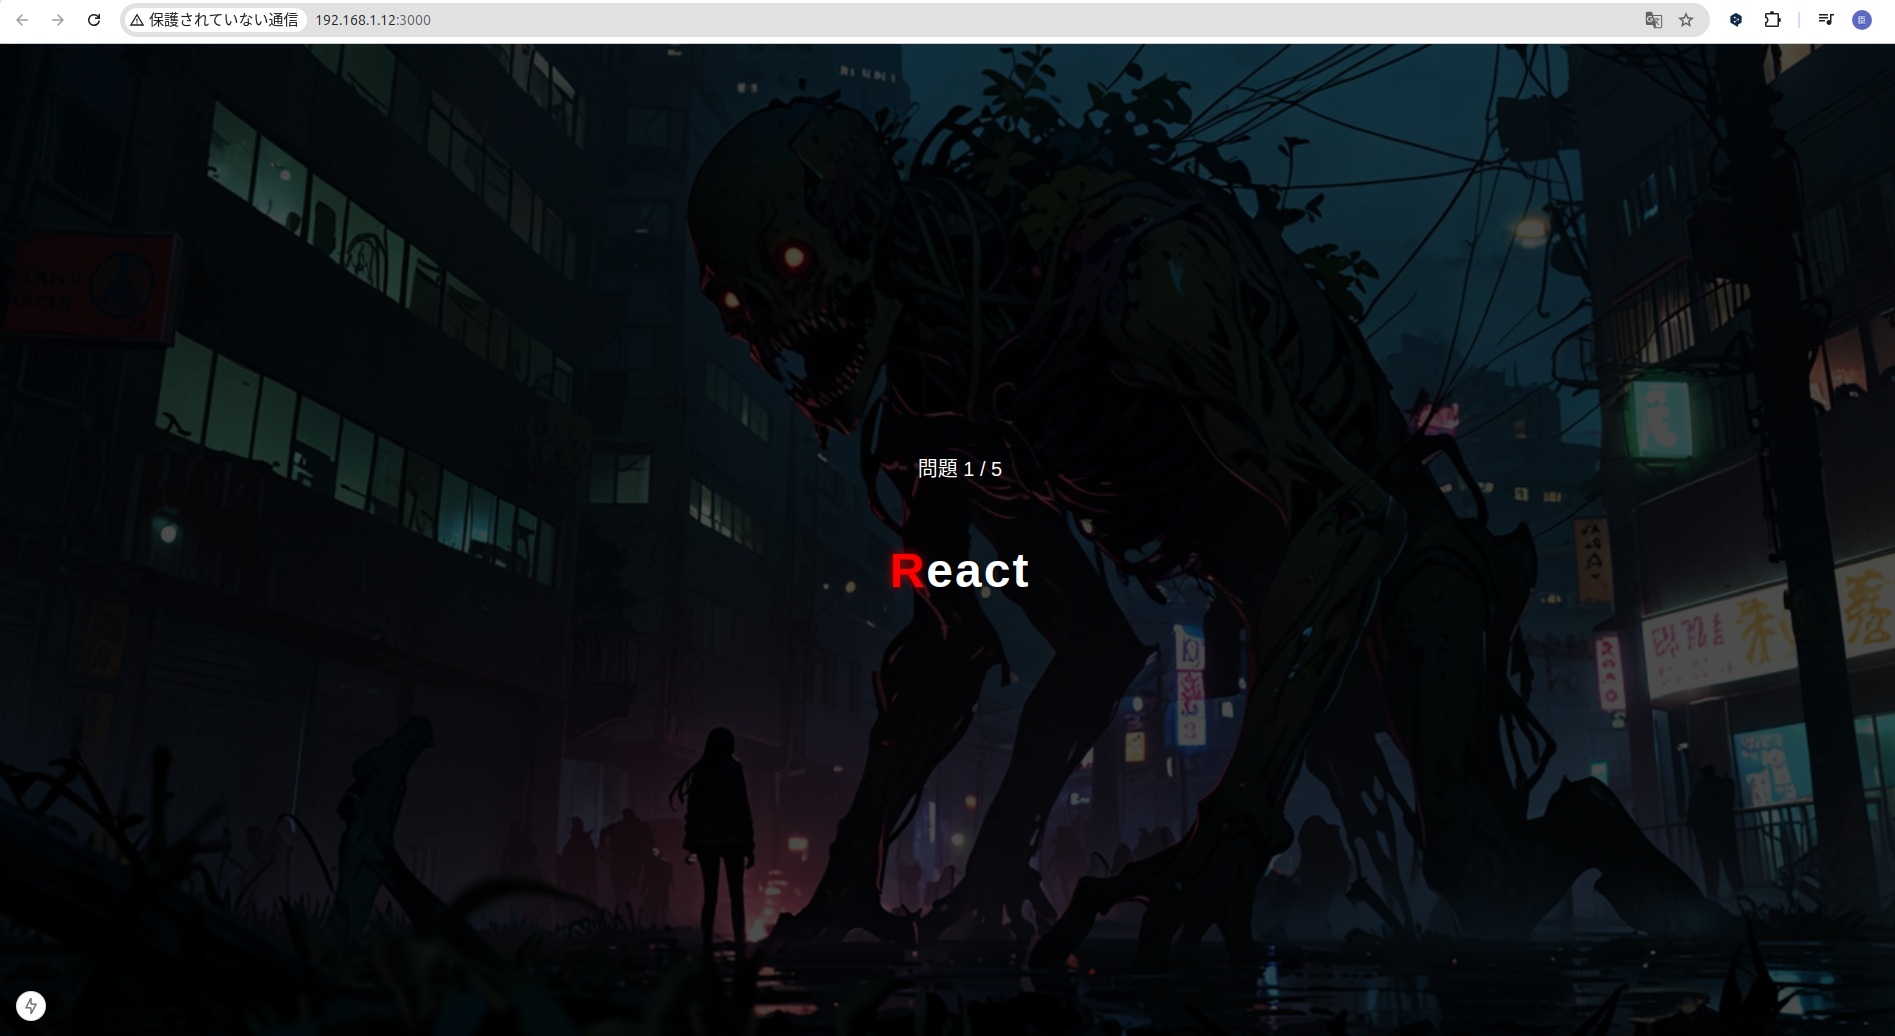
        <div className="text-white mb-8 text-xl">
          問題 {currentQuestionIndex + 1} / {questions.length}
        </div>
        <div
          style={{
            fontSize: "48px",
            margin: "20px 0",
            textShadow: "2px 2px 4px rgba(0, 0, 0, 0.5)",
            fontWeight: "bold",
            letterSpacing: "2px",
          }}
          className="text-white"
        >
          {questions[currentQuestionIndex].question
            .split("")
            .map((char, index) => (
              <span
                key={index}
                style={{
                  color: index < currentPosition ? "#ff0000" : "white",
                  textShadow:
                    index < currentPosition
                      ? "0 0 10px rgba(255, 0, 0, 0.7)"
                      : "2px 2px 4px rgba(0, 0, 0, 0.5)",
                }}
              >
                {char}
              </span>
            ))}
        </div>
      </div>
    </main>
  );
}
課題
ここまではインプットに過ぎません。スキルをさらに定着させるために以下を行ってみてください!
- APIをCloudflare Workersにデプロイする
- リザルト画面でタイプミス回数を表示する
- ランキング機能で最下位5名も表示
- 結果取得と結果の追加の関数を分ける
おわりに
いかがでしたでしょうか?
今回はHonoとRedisを使ってAPIを作成してみました。
実用的なスキルを詰め込んだので、ぜひとも今回学んだことを生かしてアプリを開発してください!
テキストでは細かく解説しましたが、一部説明しきれていない箇所もありますので動画教材で紹介しています。合わせてご利用ください!
JISOUのメンバー募集中!
プログラミングコーチングJISOUでは、新たなメンバーを募集しています。
日本一のアウトプットコミュニティでキャリアアップしませんか?
興味のある方は、ぜひホームページからお気軽にカウンセリングをお申し込みください!
▼▼▼
本記事のレビュアーの皆様
- tokec様
- 吉田侑平様
- ARISAs
- 上嶋晃太様
- たけしよしき様
次回のハンズオンのレビュアーはXにて募集します。
図解ハンズオンたくさん投稿しています!


