0.Prologue
暇つぶしに、興味を引いた DNNアプリを *Interpに移植して遊んでいる。
本稿はその雑記&記録。
人体のポーズを推定する DNNがあるそうだ。ぱっと思いつく応用はモーションキャプチャかな。他に見つかる応用は、インタラクティブなアート系が多そうだ。腕の姿勢を認識してロボット・アームを制御するなんてことも出来るかも知れないな。
1.Original Work
TensorFlow Lite サンプルアプリの「ポーズ推定/MoveNet」を移植する。
MoveNetの論文を探してみたが、IEEEにしかなく閲覧できなかった。代わりに、Googleの記事「Next-Generation Pose Detection with MoveNet and TensorFlow.js」でモデルの大まかなアーキテクチャは知ることが出来た。特徴抽出ブロックに"MobileNetV2 with FPN"を配し、ヒートマップ等を利用した Headが4つ付いているようだ。
※メモ: 文中にある "CenterNet"が Headに関する基本技術のようだ。あとで調べること。

(抜粋:「Next-Generation Pose Detection with MoveNet and TensorFlow.js」より)
2.準備
tfliteの Pre-Trainedモデルは、↓ここから8-bit量子化モデルを入手した。モデルの入出力仕様が記載されているので確認のこと。
onnxモデルは、Saved Model(注:32bit整数入力)を tf2onnxでコンバートして得た。
python -m tf2onnx.convert --saved-model \<saved model\> --output movenet-singlepose.onnx
モデルへの入力は、↓ここからダウンロードしたフリー・ビデオを、ffmpegでフレームに切り出した画像を用いた。
ビデオの先頭から 8秒間のフレームを切り出すと、200~240枚の jpg画像になるようだ。画像のファイル名は3桁の通し番号とする: "001.jpg","002.jpg",...
ffmpeg -t 8 -i \<ビデオ.mp4\> young-people-dancing/%03d.jpg
young-people-dancing/
├── 001.jpg
├── 002.jpg
├── 003.jpg
├── 004.jpg
├── 005.jpg
├── 006.jpg
├── 007.jpg
├── 008.jpg
├── 009.jpg
├── 010.jpg
3.TflInterp用のLivebookノート
画像ファイル名"001.jpg",..の組み立てに"ExPrintf"モジュールを使うので、Mix.installの依存リストに追加する。その他の依存モジュールは、CVアプリではお馴染みのもの。尚、このアプリでは NMS, meshgrid等は不要。
File.cd!(__DIR__)
# for windows JP
System.shell("chcp 65001")

Mix.install([
  {:tfl_interp, path: ".."},
  {:nx, "~> 0.4.0"},
  {:cimg, "~> 0.1.15"},
  {:exprintf, "~> 0.2.1"},
  {:kino, "~> 0.7.0"}
])
入力画像が 200枚に及ぶため、前処理の画像加工では CImgをスクリプト・モード(CImg.builder)で使用する。resize~to_binary間で無駄な作業画像が発生しないようにしたいのだ。また、このスクリプトはプログラムの動作中を通して変わらないので、コンパイル時に組み立てることにした(@prepro)。
入力画像のresizeは、モデルの要求仕様に基づき aspect比保存で行う(:ulオプション)。そのため後処理において、推論結果の座標値を入力画像の座標系に戻すスケール変換が必要となる。スケール係数の計算は inv_aspect/1にまとめる。
apply/1の出力は、隣り合う2つの関節の座標(bone)と描画色を括ったタプルのリストとする。下請け関数 to_bones/2で作成する。関節ペアとその描画色は、@bonesを参照してピックアップする。推論結果のフィルタリングと出力タプルの加工を同時に行いたいので、Enum.flat_mapの常套句を用いた。
apply/1の出力:
[{x1,y1,x2,y2,:fuchsia}, {x1,y1,x3,y3,:aqua},...]
defmodule Movenet do
  @width 192
  @height 192

  alias TflInterp, as: NNInterp

  use NNInterp,
    model: "./model/lite-model_movenet_singlepose_lightning_tflite_int8_4.tflite",
    url: "https://tfhub.dev/google/lite-model/movenet/singlepose/lightning/tflite/int8/4?lite-format=tflite",
    inputs: [u8: {1, @height, @width, 3}],
    outputs: [f32: {1, 1, 17, 3}]

  @prepro CImg.builder()
          |> CImg.resize({@width, @height}, :ul, 0)
          |> CImg.to_binary(dtype: "<u1")

  def apply(img) do
    # preprocess
    input0 = CImg.run(@prepro, img)

    # prediction
    output0 = session()
      |> NNInterp.set_input_tensor(0, input0)
      |> NNInterp.invoke()
      |> NNInterp.get_output_tensor(0)
      |> Nx.from_binary(:f32) |> Nx.reshape({17, 3})

    # postprocess
    {inv_w, inv_h} = inv_aspect(img)
    joints = Nx.multiply(output0, Nx.tensor([inv_h, inv_w, 1.0]))

    {:ok, to_bones(joints)}
  end

  @bones [
    {0, 1, :fuchsia},
    {0, 2, :aqua},
    {1, 3, :fuchsia},
    {2, 4, :aqua},
    {0, 5, :fuchsia},
    {0, 6, :aqua},
    {5, 7, :fuchsia},
    {7, 9, :fuchsia},
    {6, 8, :aqua},
    {8, 10, :aqua},
    {5, 6, :yellow},
    {5, 11, :fuchsia},
    {6, 12, :aqua},
    {11, 12, :yellow},
    {11, 13, :fuchsia},
    {13, 15, :fuchsia},
    {12, 14, :aqua},
    {14, 16, :aqua}
  ]

  def to_bones(t, threshold \\ 0.11) do
    Enum.flat_map(@bones, fn {p1, p2, color} ->
      [y1, x1, score1] = Nx.to_flat_list(t[p1])
      [y2, x2, score2] = Nx.to_flat_list(t[p2])

      if score1 > threshold && score2 > threshold do
        [{x1, y1, x2, y2, color}]
      else
        []
      end
    end)
  end

  defp inv_aspect(img) do
    {w, h, _, _} = CImg.shape(img)
    if w > h, do: {1.0, w / h}, else: {h / w, 1.0}
  end
end
デモ・モジュール LiveMovenetには、run/1, img_list/2, animate/1の3つのUI関数を用意する。
- run/1は動作確認用。引数に与えた一枚の画像に推論を掛け、その結果を表示する。
- img_list/2とanimate/1は、2つ合わせて使用する。img_list/2は、指定したディレクトリ内の画像を読み込み、画像データのリストを作る。animate/1は、画像データのリストを受け取り、リストの先頭から順に画像データに推論を掛け、その結果を表示する。推論結果のアニメーションをスムーズに見せたいので、処理が重い画像読み込みは分離して img_list/2とした。
推論の実行とその結果の描画は、下請け関数 draw_movenet/1で行っている。Enum.reduceで1枚の画像に複数の結果を書き加えていくコードはいつもの通り。
defmodule LiveMovenet do
  def run(path) do
    CImg.load(path)
    |> draw_movenet()
    |> CImg.display_kino(:jpeg)
  end

  def img_list(src, range) do
    Enum.map(range, fn i ->
      name = ExPrintf.sprintf("%03d.jpg", [i])
      path = Path.join(src, name)
      CImg.load(path)
    end)
  end

  def animate(img_list) do
    Kino.animate(img_list, fn img ->
      draw_movenet(img)
      |> CImg.display_kino(:jpeg)
    end)
  end

  defp draw_movenet(img) do
    with {:ok, res} <- Movenet.apply(img) do
      Enum.reduce(res, CImg.builder(img), fn {x1, y1, x2, y2, color}, canvas ->
        CImg.draw_line(canvas, x1, y1, x2, y2, color, thick: 5)
      end)
    end
  end
end
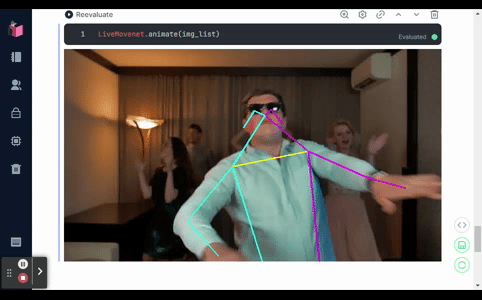
4.デモンストレーション(その1)
Movenetを起動する。
Movenet.start_link([])
サブ・ディレクトリ"young-people-dancing"内の画像を読み込む。
img_list = LiveMovenet.img_list("young-people-dancing", 1..200)
推論結果をアニメーション表示する。
LiveMovenet.animate(img_list)

5.OnnxInterp用のLivebookノート
TflInterpのノートに下記の修正を加えれば OnnxInterp用のノートとなる。
- ライブラリを :tfl_interp/TflInterpから :onnx_interp/OnnxInterpに変更する
- モデル・ファイルを ONNX用のものに差し替える
- モデルの入力仕様の変更に伴い "<u1" を "<i4" に修正する
デモ・モジュール LiveMovenetは修正不用。
*** ML_projects/tfl_interp/demo_movenet/MoveNet.livemd Wed Dec 21 18:44:52 2022
--- ML_projects/onnx_interp/demo_movenet/MoveNet.livemd Wed Dec 21 18:44:52 2022
***************
*** 6,12 ****
System.shell("chcp 65001")
Mix.install([
! {:tfl_interp, path: ".."},
{:nx, "~> 0.4.0"},
{:cimg, "~> 0.1.15"},
{:exprintf, "~> 0.2.1"},
--- 6,12 ----
System.shell("chcp 65001")
Mix.install([
! {:onnx_interp, path: ".."},
{:nx, "~> 0.4.0"},
{:cimg, "~> 0.1.15"},
{:exprintf, "~> 0.2.1"},
***************
*** 41,57 ****
@width 192
@height 192
! alias TflInterp, as: NNInterp
use NNInterp,
! model: "./model/lite-model_movenet_singlepose_lightning_tflite_int8_4.tflite",
! url: "https://tfhub.dev/google/lite-model/movenet/singlepose/lightning/tflite/int8/4?lite-format=tflite",
! inputs: [u8: {1, @height, @width, 3}],
outputs: [f32: {1, 1, 17, 3}]
@prepro CImg.builder()
|> CImg.resize({@width, @height}, :ul, 0)
! |> CImg.to_binary(dtype: "<u1")
def apply(img) do
# preprocess
--- 41,57 ----
@width 192
@height 192
! alias OnnxInterp, as: NNInterp
use NNInterp,
! model: "./model/movenet_singlepose.onnx",
! url: "https://github.com/shoz-f/onnx_interp/releases/download/models/movenet_singlepose.onnx",
! inputs: [i32: {1, @height, @width, 3}],
outputs: [f32: {1, 1, 17, 3}]
@prepro CImg.builder()
|> CImg.resize({@width, @height}, :ul, 0)
! |> CImg.to_binary(dtype: "<i4")
def apply(img) do
# preprocess
6.デモンストレーション(その2)
Movenetを起動する。
Movenet.start_link([])
サブ・ディレクトリ"girl-dancing"内の画像を読み込む。
img_list = LiveMovenet.img_list("girl-dancing", 1..200)
推論結果をアニメーション表示する。
LiveMovenet.animate(img_list)

7.Epilogue
MoveNet以外に、PoseNet, BlazePose, KAPAOと言うのがあるようだ。
なかでも、KAPAO(Keypoints and Poses as Objects)は少し毛色が違うメソッドらしい。隙間時間を使ってもう少し調べてみよう。
(END)