前回は複数のコンポネートを作成しました!
今回はPropsを使って、コンポネント間のデータの渡し方を紹介します。
Propsとは?
PropsはReactのコンポネントとコンポネントの間の橋渡し役です!
どういうことですか??
前章で作った下記二つのコンポネントを使って説明して参ります!
![]()
/src/components/Content.js
![]()
/src/components/ContentChild.js
① 関係性
Propsを説明する前に上記の二つのコンポネントの関係性を紹介いたします。
![]()
![]() 子コンポネント
子コンポネント
import React, { Component } from 'react'

class ContentChild extends Component {
    render() {
        return (
            <p>僕はコンテンツの子だよ!</p>
        )
    }
}

export default ContentChild;
![]()
![]() 親コンポネント
親コンポネント
import React, { Component } from 'react'
import ContentChild from './ContentChild'

class Content extends Component {
    render() {
        return (
            <div>
                <h1>Content</h1>
                <ContentChild />
            </div>
        )
    }
}

export default Content;
コンポネントの関係性:
子ContentChild.js
親Content.js
②データを持たせる
親子間のデータ渡しはPropsを使いますので、
こちらは一度親コンポネントにデータを持たせます!
import React, { Component } from 'react'
import ContentChild from './ContentChild'

class Content extends Component {
    render() {

    const user = {
        name: "Arya Stark",
        hobbies: ["Fighting", "Killing"]
        }


        return (
            <div>
                <h1>Content</h1>
                <ContentChild />
                <ContentChild name= { "Jon Snow" } age={ 31 } user={ user } >
                    <h1>I am children</h1>
                </ContentChild>
            </div>
        )
    }
}

export default Content;
お渡しする物は今回一番基本の4種類を設定します。
①ContentChildrenタグ内で記述する文字列(String)
name= { "Jon Snow" }
②ContentChildrenタグ内で記述する数字(int)
age={ 31 }
③ContentChildrenタグ内で記述する対象(Object)
user={ user }
対象定義
const user = {
name: "Arya Stark",
hobbies: ["Fight", "Kill"]
}
④ContentChildrenタグ配下、その他のタグ(element)
<h1>I am children</h1>
上記の4種類のデータを子コンポネントContentChild.jsに渡します。
③渡し方について
上記にも書きましたが、
親子の間の橋渡しはPropsになりますので、
実際に書いて参りましょー
基本的の書き方は
this.propsの後ろに引数のをかきます。
こちらでは一度this.propsの中身を見て見ましょー
子コンポネントの中の***props***を出力します!
import React, { Component } from 'react'

class ContentChild extends Component {
    render() {
        return (
            // console.logでpropsを出力して、親コンポネントから渡された中身を確認しましょう
            console.log("props:", this.props),
            <p>僕はコンテンツの子だよ!</p>
        )
    }
}

export default ContentChild;
出力した***props***は下記の通りになります!
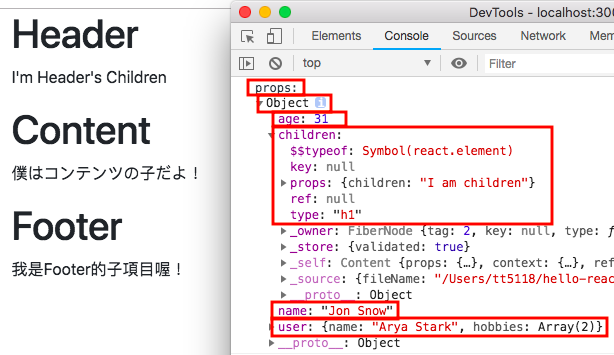
***props***のObjectの中に、
確実にContentChild.jsからデータを受け取っております。
①name: "Jon Snow"
②age: 31
③▶︎user: {name: "Arya Stark", hobbies:Array(2) }
④children:(こちらはh1のelement)
type:"h1"
props: {children: "I am children"}
④渡されたデータを使おう
import React, { Component } from 'react'

class ContentChild extends Component {
    render() {
        return (
            <div>
                <p>僕はコンテンツの子だよ!</p>
                {/* 親コンポネントから渡されるデータ */}
                <div className="border border-primary">
                    <p>My name is <span className="text-danger">{ this.props.name }</span>.</p>
                    <p>I am <span className="text-danger">{ this.props.age }</span> years old.</p>

                    <p> <span className="text-danger">{ this.props.user.name }</span> </p>
                    <ul>
                        { this.props.user.hobbies.map(( hobby, i ) =>
                        <li className="text-danger"  key={i}> {hobby}  </li>
                        ) }
                    </ul>
                </div>
            </div>
        )
    }
}

export default ContentChild;
基本的には波括弧で***this.props.変数名***を囲む
という書き方で情報を渡しています。
実際にpropsを出力された画面はこちらになります。
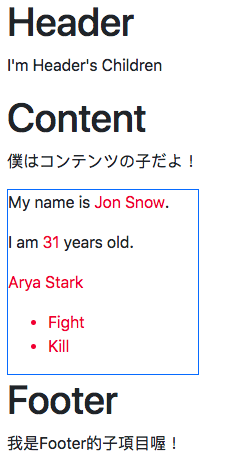
青枠内の赤文字は渡されたデータになります。
①文字列のname: "Jon Snow"
②数字のage: 31
③Objectの▶︎user: {name: "Arya Stark", hobbies:Array(2) }
④childrenのchildren:
type:"h1"
props: {children: "I am children"}
こちら唯一注意して頂きたいのはObject内の配列に使うkeyです。
ReactではListにkeyを付けないと下記のエラーが表示されます。
Warning: Each child in an array or iterator should have a unique "key" prop.
公式ではこのような記述がありました。
Keys help React identify which items have changed, are added, or are removed.
Keys should be given to the elements inside the array to give the elements a
stable identity
簡潔にいうと、KeyはReactの分類の手助けで使われています。
React 公式Keys
上記のように一つのページに対して複数種類のデータを渡すのことはよくありますので、
渡されたデータの正確性を保つ必要があります。
⑤Propsに認証を加える
こちらではprop-typesというパッケージを使って、
propsに対して認証をかけます。
npm install -s prop-types
prpo-typesをインストールして、ContentChild.jsにimportします
import React, { Component } from 'react'
import PropTypes from 'prop-types'

class ContentChild extends Component {
    render() {
        return (
            <div>
                <p>僕はコンテンツの子だよ!</p>
                {/* 親コンポネントから渡されるデータ */}
                <div className="border border-primary">
                    <p>My name is <span className="text-danger">{ this.props.name }</span>.</p>
                    <p>I am <span className="text-danger">{ this.props.age }</span> years old.</p>

                    <p> <span className="text-danger">{ this.props.user.name }</span> </p>
                    <ul>
                        { this.props.user.hobbies.map(( hobby, i ) =>
                        <li className="text-danger"  key={i}> {hobby}  </li>
                        ) }
                    </ul>
                </div>
            </div>
        )
    }
}

ContentChild.propTypes ={
    name: PropTypes.string.isRequired,
    age: PropTypes.number.isRequired,
    user: PropTypes.object.isRequired,
    children: PropTypes.element.isRequired
}

export default ContentChild;
こちらで認証をかけています。
ContentChild.propTypes ={
name: PropTypes.string.isRequired,
age: PropTypes.number.isRequired,
user: PropTypes.object.isRequired,
children: PropTypes.element.isRequired
}
①文字列のname: "Jon Snow"に対して
name: PropTypes.string.isRequired,
②数字のage: 31に対して
age: PropTypes.number.isRequired,
③Objectの▶︎user: {name: "Arya Stark", hobbies:Array(2) }に対して
user: PropTypes.object.isRequired,
④直下の子elementに対して
children:
type:"h1"
props: {children: "I am children"}
children: PropTypes.element.isRequired
上記ように種類によって認証をかけます。
試して渡されたデータを違う種類を書き換えて見たら、
/src/components/Content.jsの中の
数字age={ 31 }を文字列age={ "31" }に調整して見たら、
画面は無事に表示できましたが、Consoleでは下記の様なエラーが出ました。

最後に
いかがでしょうか?
Reactのコンポネントはこのような形でデータを渡しています。
少し規模大きめのプロジェクトはReduxというパッケージを使ってデータを管理します。
また機会があればReduxについて書いて参ります。
次回ではReactのeventとstateについて話ししたいと思います!
また興味がございましたら是非読んでください!