この記事について
Bedrockのレスポンスストリーミングの応答は、データが壊れていても検知できるように工夫されています。この記事では、それと同じことをLambdaの関数URLで再現して、Bedrockの互換API(IAM認証あり)を作る方法を説明します。
また、作成した互換APIにオリジナルのモデルIDを増やします。
関数URLのレスポンスストリーミングについては説明を省いていますので、こちらの記事を参考にしてください。
この記事のレポジトリ
この記事のプロジェクトのレポジトリはこちらにあります
ソースコード全体はこちらで確認いただけます
最終的にすること
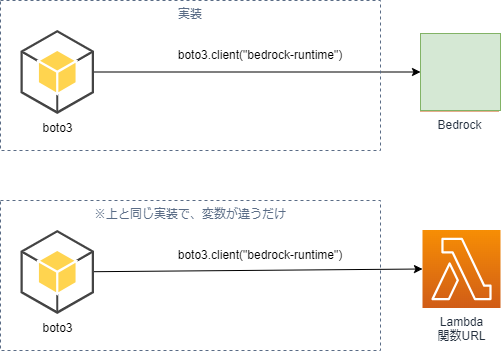
boto3を使ったBedrockの呼び出しを、実装を変えずに、オリジナルのエンドポイントへ向くように変更します。
まずは、boto3を使ったBedrockのストリーミング実行を普通に呼び出すコードです。
from botocore.eventstream import EventStream
import boto3
import json

session = boto3.Session(region_name="us-east-1")
runtime = session.client("bedrock-runtime")

result = runtime.invoke_model_with_response_stream(
    body=json.dumps(
        {
            "anthropic_version": "bedrock-2023-05-31",
            "max_tokens": 100,
            "system": "You are friendly AI",
            "messages": [
                {
                    "role": "user",
                    "content": "Yes. I’d like to hear it, HAL. Sing it for me.",
                }
            ],
        }
    ),
    contentType="application/json",
    accept="*/*",
    modelId="anthropic.claude-3-haiku-20240307-v1:0",
)

body: EventStream = result.get("body")
for event in body:
    chunk = json.loads(event["chunk"]["bytes"])
    if chunk["type"] == "content_block_delta":
        if chunk["delta"]["type"] == "text_delta":
            print(chunk["delta"]["text"], end="")
実行するとこうなります。Haikuは「私に歌う能力はありません」と答えます。
(.venv) D:\stream-example>python app-claude.py
I'm afraid I don't actually have the capability to sing or perform music.
I'm Claude, an AI assistant created by Anthropic.
I don't have any singing abilities.
I can try to have a friendly conversation with you, but I can't put on a musical performance.
Let me know if there's anything else I can assist with!
このコードに3行書き加えて、BedrockのエンドポイントをLambdaの関数URLに変更します。
from botocore.eventstream import EventStream
+ from patch_credentials_scope import patch_credentials_scope
import boto3
import json

session = boto3.Session(region_name="us-east-1")
runtime = session.client("bedrock-runtime",
+    # エンドポイントを関数URLに書き変える
+    endpoint_url="https://xxxxxxxxxxxxxxxxxxx.lambda-url.us-east-1.on.aws/"
)
+ # 署名のスコープをbedrockからlambdaに書き変える
+ patch_credentials_scope(runtime, session, "lambda")


result = runtime.invoke_model_with_response_stream(
    body=json.dumps(
        {
            "anthropic_version": "bedrock-2023-05-31",
            "max_tokens": 100,
            "system": "You are friendly AI",
            "messages": [
                {
                    "role": "user",
                    "content": "Yes. I’d like to hear it, HAL. Sing it for me.",
                }
            ],
        }
    ),
    contentType="application/json",
    accept="*/*",
    modelId="anthropic.claude-3-haiku-20240307-v1:0",
)

body: EventStream = result.get("body")
for event in body:
    chunk = json.loads(event["chunk"]["bytes"])
    if chunk["type"] == "content_block_delta":
        if chunk["delta"]["type"] == "text_delta":
            print(chunk["delta"]["text"], end="")
互換APIですので、この時点で実行しても、変更前と全く同じ動きをします。
HaikuではなくTitanを使っても何をしても、エンドポイントの変更前と同じ動きをします。
(.venv) D:\stream-example>python app-claude.py
I do not actually have the capability to sing or perform music.
I am Claude, an AI assistant created by Anthropic to be helpful, harmless, and honest.
I do not have a singing voice or the ability to compose or perform songs.
I can have conversations and provide information, but I cannot sing or make music for you.
ここからもう1行変更して、モデルIDをオリジナルの「hal.daisy-bell」に変更します。
Bedrockではなく、オリジナルのエンドポイントに向いているので動きます。
-   modelId="anthropic.claude-3-haiku-20240307-v1:0",
+   modelId="hal.daisy-bell",
モデルIDをhal.daisy-bellにすると、「Yes. I’d like to hear it, HAL. Sing it for me.(HAL、歌ってくれ。ぜひ聞きたい)」に答えて歌ってくれるようになりました。
(.venv) D:\stream-example>python app-hal.py
Daisy, Daisy, give me your answer do I'm half crazy all for the love of you
エンドポイントURLを環境変数にして実装すると、boto3を使った実装を全く変えることなく、環境変数だけでエンドポイントを切り替えられるようになります。
boto3側の実装
boto3のBedrockのエンドポイントを、IAM認証されたLambdaの関数URLに切り替える方法を説明します。
session = boto3.Session(region_name="us-east-1")
- runtime = session.client("bedrock-runtime")
+ runtime = session.client("bedrock-runtime", endpoint_url="自分のエンドポイント")
このclientの引数にendpoint_urlを指定すると、boto3が呼び出すエンドポイントをAWSではないエンドポイントに差し替えて、リクエストを横流しすることができます。

ただ、エンドポイントを書き変えただけだと認証エラーになります。

boto3のbedrock-runtimeのクライアントが発行する署名には、bedrockのスコープが入っています。
関数URLの実行にはlambdaのスコープが必要ですから、単純に関数URLのエンドポイントに変更しただけだと、スコープの不一致で認証エラーになります。
botocore.exceptions.ClientError: An error occurred (InvalidSignatureException) when calling the InvokeModelWithResponseStream operation: Credential should be scoped to correct service: 'lambda'.
そこで、以下のような関数(patch_credentials_scope)を作って、boto3がリクエストするスコープを書き直す処理を入れます。invoke_model_with_response_streamの署名スコープをbedrockからlambdaに書き変えることで、関数URLのIAM認証を通して、Lambdaへ送れるようになります。
from botocore.awsrequest import AWSPreparedRequest, AWSRequest
from botocore.auth import SigV4Auth
from botocore.httpsession import URLLib3Session

_request: AWSRequest = None


def patch_credentials_scope(runtime, session, service_name: str):
    """
    boto3がリクエストする認証スコープを書き変える
    """
    # イベントのハンドラを取得する
    event_system = runtime.meta.events

    # 署名の直前に呼ばれる関数を定義する
    def _ref_request(request: AWSRequest, **kwargs):
        # 署名前の送信情報を参照する
        global _request
        _request = request

    # API送信の直前に呼ばれる関数を定義する
    def _before_send(request: AWSPreparedRequest, **kwargs):
        # ここで受け取るrequestはprepareでURLエンコードされているので、
        # 署名前の送信情報を元に再署名をする

        # ヘッダの型をstr: strに整形する
        def header_item_from_prepare_request(item):
            if isinstance(item, bytes):
                return item.decode()
            return item

        # 署名に使う情報をあらためて詰め直す
        requester = AWSRequest(
            url=_request.url,
            method=_request.method,
            headers={
                k: header_item_from_prepare_request(h)
                for k, h in _request.headers.items()
            },
            data=_request.body.decode(),
            stream_output=request.stream_output,
        )
        # SigV4で署名する
        # service_nameがクレデンシャルスコープになるので、ここを書き変える
        SigV4Auth(
            session.get_credentials(), service_name, session.region_name
        ).add_auth(requester)

        # 送信処理を実行。この関数の実行結果がboto3の実行結果になる
        return URLLib3Session().send(requester.prepare())

    # boto3の割り込みのハンドラを登録する
    # ハンドラの一覧: https://boto3.amazonaws.com/v1/documentation/api/latest/guide/events.html
    event_system.register("before-send.*", _before_send)
    event_system.register_first("before-sign.*", _ref_request)
関数URL側の実装
Lambda側の実装を説明します。
関数URLのLambdaを、AWSのドキュメント通りに実装すると以下のようになります。
export const handler = awslambda.streamifyResponse(async (event, responseStream, _context) => {
  responseStream.write("Hello ");
  responseStream.write("world ");
  responseStream.write("from ");
  responseStream.write("Lambda!");
  responseStream.end();
});
これを実行すると、クライアント側は以下のようなレスポンスを受け取ります。
Lambdaの送ったデータがそのまま送られています。
b'Hello world from Lambda!'
このデータをboto3のinvoke_model_with_response_streamが受ると、「チェックサムを検証したけども合わなかった」とエラーを吐きます。Bedrockのストリーミングレスポンスは、データ以外にもチェックサムなどを送っています。
botocore.eventstream.ChecksumMismatch: Checksum mismatch: expected 0x7c4a953b, calculated 0x40e4be59
Bedrockのストリーミングレスポンスが送っている、実際のデータと見比べてみます。
※改行はこちら側で入れたものです
    b'\x00\x00\x01\xf3\x00\x00\x00K@\xe4\xbeY
    \x0b:event-type\x07\x00\x05chunk
    \x0d:content-type\x07\x00\x10application/json
    \x0d:message-type\x07\x00\x05event
    {"bytes":"eyJvdXRwdXRUZXh0IjoiXG5Cb3Q6IEhpLCB0aGVyZSEgSXMgdGhlcmUgYW55dGhpbmcgZWxzZSBJIGNhbiBoZWxwIHlvdSB3aXRoPyIsImluZGV4IjowLCJ0b3RhbE91dHB1dFRleHRUb2tlbkNvdW50IjoxOCwiY29tcGxldGlvblJlYXNvbiI6IkZJTklTSCIsImlucHV0VGV4dFRva2VuQ291bnQiOjUsImFtYXpvbi1iZWRyb2NrLWludm9jYXRpb25NZXRyaWNzIjp7ImlucHV0VG9rZW5Db3VudCI6NSwib3V0cHV0VG9rZW5Db3VudCI6MTgsImludm9jYXRpb25MYXRlbmN5Ijo5OTIsImZpcnN0Qnl0ZUxhdGVuY3kiOjk5MX19"}
    %J\x05\xd7'
データはBase64でエンコードされていて、ヘッダらしきものも見えます。
バイナリ形式のデータが先頭やヘッダの周りに入っています。
ドキュメントはないので、ソースから仕様を調べました。
| 区分 | 内容 | バイト長 |
|---|---|---|
| プレリュード | データ全体のバイト長 | 4バイト |
| プレリュード | ヘッダのバイト長 | 4バイト |
| プレリュード | プレリュードのCRC | 4バイト |
| ヘッダ | ヘッダキーのバイト長 | 1バイト |
| ヘッダ | ヘッダのキー | ASCII文字列 |
| ヘッダ | セパレータ(\x07\x00) | 2バイト |
| ヘッダ | ヘッダ値のバイト長 | 1バイト |
| ヘッダ | ヘッダの値 | ASCII文字列 |
| ペイロード | 送信するデータのJSON | JSON文字列 |
| メッセージCRC | データ全体のCRC | 4バイト |
※ヘッダはヘッダがあるだけ繰り返します
ここにある2か所のCRCが不一致だと、チェックサムが不正だと判断されて、boto3がエラーを吐くようです。@aws-crypto/crc32でCRC32を計算して、データを書きこむ必要があります。
以下の関数をLambdaに置いて、データのフォーマット整形ができるようにします。
import { Buffer } from "node:buffer";
import { Crc32 } from "@aws-crypto/crc32";

// バイト長を定義する
const BytesLength = {
  // 非負整数のバイト長
  Uint8: 1,
  Uint16: 2,
  Uint32: 4,
  // データの大きさを表すプレリュードの書き込み領域
  Prelude: 12,
  // プレリュード自身のCRCを除いたプレリュードの書き込み領域
  PreludeWithoutCRC: 8,
  // メッセージ全体のCRCの書き込み領域
  MessageCRC: 4,
  // ヘッダの書き込み領域
  HeaderWriteSpace: 512,
};

// ヘッダのセパレータ: \x07\x00
const HEADER_SEPARATOR = 0x0700;

/** バッファ操作のラッパー */
class BufferControl {
  private _buffer: ArrayBuffer;
  private _writer: DataView;
  private _textEncoder: TextEncoder;
  private _offset: number;

  /** コンストラクタ */
  constructor(bufferLength: number) {
    this._buffer = new ArrayBuffer(bufferLength);
    this._writer = new DataView(this._buffer);
    this._textEncoder = new TextEncoder();
    this._offset = 0;
  }

  /** 8ビットの非負整数を書き込む */
  writeUint8(value: number) {
    const writeOffset = this._offset;
    this._writer.setUint8(writeOffset, value);
    this._offset = writeOffset + BytesLength.Uint8;
  }

  /** 16ビットの非負整数を書き込む */
  writeUint16(value: number) {
    const writeOffset = this._offset;
    this._writer.setUint16(writeOffset, value);
    this._offset = writeOffset + BytesLength.Uint16;
  }

  /** 32ビットの非負整数を書き込む */
  writeUint32(value: number) {
    const writeOffset = this._offset;
    this._writer.setUint32(writeOffset, value);
    this._offset = writeOffset + BytesLength.Uint32;
  }

  /** テキストを書き込む */
  writeText(text: string) {
    const writeOffset = this._offset;
    const textBuffer = this._textEncoder.encode(text);
    for (let i = 0; i < textBuffer.length; i++) {
      this._writer.setUint8(i + writeOffset, textBuffer[i]);
    }
    this._offset = writeOffset + textBuffer.length;
  }

  /** バッファを書き込む */
  writeBuffer(buffer: ArrayBuffer) {
    const writeOffset = this._offset;
    const reader = new DataView(buffer);
    for (let i = 0; i < buffer.byteLength; i++) {
      this._writer.setUint8(i + writeOffset, reader.getUint8(i));
    }
    this._offset = writeOffset + buffer.byteLength;
  }

  /** 先頭から書き込みの終わった場所までのバッファを返す */
  get buffer() {
    return this._buffer.slice(0, this._offset);
  }

  /** 指定した地点から指定した地点までのバッファを返す、終点が未指定なら書き込みが終わった場所までを返す */
  slice(from: number, to?: number) {
    if (to === undefined) {
      return this._buffer.slice(from, this._offset);
    } else {
      return this._buffer.slice(from, to);
    }
  }

  /** 書き込みの終わったバイト数を返す */
  get byteLength() {
    return this._offset;
  }
}

/** ArrayBufferをBuffer型に変換する */
function arrayBufferToBuffer(buffer: ArrayBuffer) {
  return Buffer.from(buffer);
}

/*
  botoのStreamで読み取ることのできるチャンク形式にデータを整形する
  */
export function createMessage(
  headers: Record<string, string>,
  binary: string | Uint8Array
) {
  const awsCrc32 = new Crc32();
  const headerBuffer = new BufferControl(BytesLength.HeaderWriteSpace);

  /** ヘッダを書き込む */
  for (const [key, value] of Object.entries(headers)) {
    // キーバリュー形式で、キーと値の先頭にバイト数を書き込んだもの
    // セパレータは\x07\x00を書き込む
    // 形式: ${キー長}${キー}\x07\0x00${値長}${値}
    const keyLength = Buffer.byteLength(key);
    const valueLength = Buffer.byteLength(value);
    // キー長とキーを書き込む
    headerBuffer.writeUint8(keyLength);
    headerBuffer.writeText(key);
    // セパレータを書き込む
    headerBuffer.writeUint16(HEADER_SEPARATOR);
    // 値長と値を書き込む
    headerBuffer.writeUint8(valueLength);
    headerBuffer.writeText(value);
  }

  /** ペイロードをBase64で書き込む */
  const payloadData = JSON.stringify({
    bytes: Buffer.from(binary).toString("base64"),
  });
  const payloadBuffer = new BufferControl(Buffer.byteLength(payloadData));
  payloadBuffer.writeText(payloadData);

  /** プレリュードを定義する */
  const preludeBuffer = new BufferControl(BytesLength.Prelude);
  // プレリュードには、データ全体の長さ、ヘッダの長さ、プレリュードのCRC32をそれぞれ32ビットで書き込む
  const totalLength =
    headerBuffer.byteLength +
    payloadBuffer.byteLength +
    BytesLength.Prelude +
    BytesLength.MessageCRC;
  const headerLength = headerBuffer.byteLength;
  // データ全体の長さを記入する
  preludeBuffer.writeUint32(totalLength);
  // ヘッダの長さを記入する
  preludeBuffer.writeUint32(headerLength);
  // プレリュードのCRC32を作成する
  awsCrc32.update(arrayBufferToBuffer(preludeBuffer.buffer));
  // プレリュードのCRC32を記入する
  preludeBuffer.writeUint32(awsCrc32.digest());

  /** 返却するデータを作成する */
  const messageBuffer = new BufferControl(totalLength);
  // データの先頭にはプレリュードを書き込む
  messageBuffer.writeBuffer(preludeBuffer.buffer);
  // プレリュードの次に、ヘッダを書き込む
  messageBuffer.writeBuffer(headerBuffer.buffer);
  // ヘッダの次に、ペイロードを書き込む
  messageBuffer.writeBuffer(payloadBuffer.buffer);
  // 返却するデータのCRC32を計算する
  // ※プレリュードのCRCの続きで計算する
  // ※プレリュードのCRCに使った、データ全体の長さ、ヘッダの長さは除いたバッファを利用する
  awsCrc32.update(
    arrayBufferToBuffer(messageBuffer.slice(BytesLength.PreludeWithoutCRC))
  );
  // データ全体のCRC32をメッセージの末尾に書き込む
  messageBuffer.writeUint32(awsCrc32.digest());

  // データはBuffer型で返す
  return arrayBufferToBuffer(messageBuffer.buffer);
}
この関数(createMessage)は以下のように呼び出します。
    // 受け取ったデータにプレリュードとCRCをつけて変換する
    const data = createMessage(
      {
        ":event-type": "chunk",
        ":content-type": "application/json",
        ":message-type": "event",
      },
      new TextDecoder().decode(/** 送信するデータ */)
    );
    // ストリームに書き出す
    responseStream.write(data);
Lambda全体の実装は以下のようになります。
import { Writable } from "stream";
import {
  BedrockRuntimeClient,
  InvokeModelWithResponseStreamCommand,
} from "@aws-sdk/client-bedrock-runtime";
import { createMessage } from "./create_message";
import { singDaisyBell } from "./daisy_bell";

async function streamFunction(
  event: any,
  responseStream: Writable,
  _context: any
) {
  // BedrockRuntimeのクライアントを生成する
  const client = new BedrockRuntimeClient({ region: process.env.AWS_REGION });

  // 関数URLが受け取ったパラメータを、そのままBedrockRuntimeの引数にする
  const headers = event["headers"];
  const requestPath: string = event["requestContext"]["http"]["path"];
  const command = new InvokeModelWithResponseStreamCommand({
    contentType: headers["content-type"],
    accept: headers["x-amzn-bedrock-accept"],
    body: event["body"],
    modelId: requestPath.split("/")[2],
  });

  /** オリジナルのモデルIDがあればここで割り込んで処理をする */
  if (command.input.modelId === "オリジナルのモデルID") {
    /** オリジナルのモデルIDがあればここで割り込んで処理をする */
    return;
  }

  // BedrockRuntimeを実行する
  const apiResponse = await client.send(command);
  if (apiResponse === undefined || apiResponse.body === undefined) {
    // 実行結果が不正なら終了する
    responseStream.end();
    return;
  }

  // 実行結果をストリーム形式で読み込む
  for await (const item of apiResponse.body) {
    if (item.chunk === undefined) {
      continue;
    }
    // 受け取ったデータにプレリュードをつけて変換する
    const data = createMessage(
      {
        ":event-type": "chunk",
        ":content-type": "application/json",
        ":message-type": "event",
      },
      new TextDecoder().decode(item.chunk.bytes)
    );
    // ストリームに書き出す
    responseStream.write(data);
  }

  // ストリームを終了する
  responseStream.end();
}

//@ts-ignore
export const handler = awslambda.streamifyResponse(streamFunction);
このLambdaを実装すると、Bedrockのストリーミング実行と同じレスポンスを返すことができるようになり、Bedrockのエンドポイントとして関数URLを運用できるようになります。
まとめ
Bedrockのストリーミングレスポンスには壊れたデータを検知するような工夫が入っています。それを関数URLで再現するには結構な規模の実装が必要です。
あらためて公式ドキュメントを見比べると、BedrockのInvokeModelWithResponseStreamには「CLIはInvokeModelWithResponseStreamをサポートしていない」と書いてあるのですが、LambdaのInvokeWithResponseStreamには同じ表記がありません。
同じ名前のAPIだけれども、応答のフォーマットには結構な違いがあります。