初めに
以前の投稿では,Windows 10でPython環境を構築する過程を記録した(Windows 11を使っている友人にも試してもらったが,同じ方法で環境構築できたらしい).
今回は,Ubuntu 16.04にPython環境を整備する必要に迫られたので,その記録とする.
本稿のコマンドのメモの取り方として,
$ 入力
# 出力
とする(一般的ではないかもしれないが,取り敢えず,こういうルールにしておく).また,適当な入力や長い出力を省略するときに...という記号を使う.
注意
どのUbuntu(或いはUbuntu 16.04)でも適用可能である保証は無い.本稿に記載の手順に従う場合は,飽くまでも自己責任で慎重に作業されたい.
また,記述の内容は,2024年2月時点での情報である.
状況確認
手元のPythonの確認
Ubuntuでは,lsb_release -aでバージョン情報が確認できる(オプション一覧).
$ lsb_release -a
# LSB Version:    core-9.20160110ubuntu0.2-amd64:core-9.20160110ubuntu0.2-noarch:printing-9.20160110ubuntu0.2-amd64:printing-9.20160110ubuntu0.2-noarch:security-9.20160110ubuntu0.2-amd64:security-9.20160110ubuntu0.2-noarch
# Distributor ID: Ubuntu
# Description:    Ubuntu 16.04.7 LTS
# Release:        16.04
# Codename:       xenial
デフォルトでPythonが入っている.
$ python
# Python 2.7.12 (default, Mar  1 2021, 11:38:31)
# [GCC 5.4.0 20160609] on linux2
# Type "help", "copyright", "credits" or "license" for more information
# >>>
Python3も入っている.
$ python3
# Python 3.5.2 (default, Jan 26 2021, 13:30:48)
# [GCC 5.4.0 20160609] on linux
# Type "help", "copyright", "credits" or "license" for more information.
# >>>
このまま使っても良いのかもしれないが,このPythonは触るべきではないらしいので(参考),別途Python環境を用意する.
個人的にも,その方が環境の管理がし易いし,機械学習に使いたいので,TensorFlowやPyTorchはPython 3.8以降を推奨していることを受けると,Python 3.5.2は古すぎる.例えば,Python 3.8.xとかPython 3.9.xとかを使えるようになると嬉しい.
複数のPythonバージョンを混在させるので,
- pyenv
- update-alternatives
など,複数の選択肢が浮かぶが,今回はpyenvを使うことにした1.update-alternativesを使う場合には,以下のサイトなどが参考になりそうだ.
- How to Install and Switch Python Versions on Ubuntu 22.04
- Ubuntu 22.04にPython3.xを複数インストールして切り替える方法(PPA・apt)
- Ubuntuでpythonのバージョンを切り換える
Python環境の構築
pyenv: Pythonバージョンの管理
pyenvのインストール
以前はpip経由だったが,今回はgit経由とする.
$ git clone https://github.com/pyenv/pyenv.git ~/.pyenv
$ cd ~/.pyenv && src/configure && make -C src
documentationによると,1行目が実行できれば一応問題ないらしい(2行目は高速化のためだけであり,もしこれが失敗してもpyenvは正しく動くとされている).
シェルを確認すると,
$ echo $SHELL
# bin/bash
だったので,documentationの「For bash:」のセクションに従い,以下を実行する.
$ echo 'export PYENV_ROOT="$HOME/.pyenv"' >> ~/.bashrc
$ echo 'command -v pyenv >/dev/null || export PATH="$PYENV_ROOT/bin:$PATH"' >> ~/.bashrc
$ echo 'eval "$(pyenv init -)"' >> ~/.bashrc
現環境では,これらを実行してみるとPermission deniedと怒られたので,
$ sudo sh -c "echo 'export PYENV_ROOT="$HOME/.pyenv"' >> ~/.bashrc"
などとした.また,3行目は何故かechoで書き込めなかったので,直接~/.bashrcに書き込んだ.
続いて,~/.profileと,~/.bash_profileへの書き込みを済ませた.
最後に,
$ exec $SHELL
でシェルを再起動してから,pyenvを呼ぶと,
$ pyenv
# pyenv 2.3.36-4-g02e1d4a
# Usage: pyenv <command> [<args>]

# Some useful pyenv commands are:
#    commands    List all available pyenv commands
#    exec        Run an executable with the selected Python version
#    ...
と,コマンドが表示されるので,pyenvが正しくインストールされたのだと思う3.
Pythonのインストール
参考にしたこちらの記事やこちらの記事とは若干順序が前後するが,documentationでは,このタイミングで以下を実行する.
$ sudo apt update
$ sudo apt install build-essential libbz2-dev libdb-dev \
  libreadline-dev libffi-dev libgdbm-dev liblzma-dev \
  libncursesw5-dev libsqlite3-dev libssl-dev \
  zlib1g-dev uuid-dev tk-dev
恐らく,Pythonをインストールする前ならどのタイミングでも良いのだろう.
続いて,pyenvにPythonをインストールする.使い方は,以前紹介したpyenv-winに似ている4.
$ pyenv install -l
を実行すれば,インストール可能なPythonが列挙される5.やはり縦に長いので,
$ pyenv install -l | grep 3.8
などとすれば,もう少し見やすい.
インストールの前に,再度,手元のPythonたちのバージョンを確認しておく.
$ python -V
# Python 2.7.12

$ python3 -V
# Python 3.5.2
続いて,まずは3.8.10をインストールしてみる.
$ pyenv install 3.8.10
# Downloading Python-3.8.10.tar.xz...
# -> https://www.python.org/ftp/python/3.8.10/Python-3.8.10.tar.xz
# Installing Python-3.8.10...
# Traceback (most recent call last):
#   File "<string>", line 1, in <module>
#   File "/home/USERNAME/.pyenv/versions/3.8.10/lib/python3.8/ssl.py", line 98, in <module>
#     import _ssl             # if we can't import it, let the error propagate
# ModuleNotFoundError: No module named '_ssl'
# ERROR: The Python ssl extension was not compiled. Missing the OpenSSL lib?

# Please consult to the Wiki page to fix the problem.
# https://github.com/pyenv/pyenv/wiki/Common-build-problems

# BUILD FAILED (Ubuntu 16.04 using python-build 2.3.36-4-g02e1d4a)

# Inspect or clean up the working tree at /tmp/python-build.20240227160253.15316
# Results logged to /tmp/python-build.20240227160253.15316.log

# ...
エラーERROR: The Python ssl extension was not compiled. Missing the OpenSSL lib?は,documentationでCommon Build Problemsにあるので,これに従って対処する.
ERROR: The Python ssl extension was not compiled. Missing the OpenSSL lib?の対処
Step 0
現環境はUbuntuなので,以下を実行する.
$ sudo apt install libssl-dev
続いて,pyenvをupdateする.pyenvのupdateに際して,今回はgit経由で持ってきているので,git pullを使う(参考).
Step 1
OpenSSLのディレクトリを確認する.
$ openssl version -d
# OPENSSLDIR: "/usr/local/etc/ssl"
次に,実行するコマンドには,幾つかの選択肢が提示されている.
1つ目は,
$ CPPFLAGS="-I<openssl install prefix>/include" \
$ LDFLAGS="-L<openssl install prefix>/lib" \
$ pyenv install -v <python version>
2つ目は,
$ CONFIGURE_OPTS="-with-openssl=<openssl install prefix>" \
$ pyenv install -v <python version>
3つ目は,
$ LDFLAGS="-Wl,-rpath,<openssl install prefix>/lib" \
$ CONFIGURE_OPTS="-with-openssl=<openssl install prefix>" \
$ pyenv install -v <python version>
この中で,1つ目のコマンドでかなり沼った.試行錯誤の後,ここに提示されている以下のコマンドを実行すると,Python 3.5.3はインストールできた.
$ CFLAGS=-I/usr/include/openssl LDFLAGS=-L/usr/lib pyenv install -v 3.5.3
しかし,お尻の数字を変えるとうまくいかなかった(今回は3.8.x系とかが欲しいのだが,3.8.x系ではうまくいかなかった).
2つ目のコマンド
$ CONFIGURE_OPTS="-with-openssl=<openssl install prefix>" \
$ pyenv install -v <python version>
を実行するとうまくいった.
今回は,以下を実行してPython 3.8.10をインストールした.
$ CONFIGURE_OPTS="-with-openssl=/usr/" pyenv install -v 3.8.10
また,Python 3.9.10もインストールした(切り替えの動作確認のため).
$ CONFIGURE_OPTS="-with-openssl=/usr/" pyenv install -v 3.9.10
Step 2
此処は実行する必要があるか良く分からないので,取り敢えず置いておいて進む.もし問題が起きたら戻ってくることにした.
Pythonのバージョン管理
以下を実行してpyenvにインストールされたPythonバージョンを確認する.
$ pyenv versions
# * system (set by /home/USERNAME/.pyenv/version)
#   3.5.3
#   3.8.10
#   3.9.10
このタイミングで,python -Vやpython3 -Vを呼んでみる.
$ python -V
# Python 2.7.12

$ python3 -V
# Python 3.5.2
先程と変わっていない.pyenv global 3.8.10でglobalなバージョンを定めれば,python -Vが3.8.10に固定される.
$ pyenv global 3.8.10

$ pyenv versions
#   system
#   3.5.3
# * 3.8.10 (set by /home/USERNAME/.pyenv/version)
#   3.9.10

$ python -V
# Python 3.8.10
また,sys.executableを見ると,
$ python -c "import sys; print(sys.executable)"
# /home/USERNAME/.pyenv/versions/3.8.10/bin/python
より,pythonがpyenv由来のPythonを見ていることが確認できる.
同様に,pyenv global VERSIONでglobalなバージョンは切り替えられる.
$ pyenv global 3.9.10

$ pyenv versions
#   system
#   3.5.3
#   3.8.10
# * 3.9.10 (set by /home/USERNAME/.pyenv/version)

$ python -V
# Python 3.9.10

$ python -c "import sys; print(sys.executable)"
# /home/USERNAME/.pyenv/versions/3.9.10/bin/python
以前の投稿と同様に,localな環境も作ることができる.
以降は,global環境を3.8.10に固定する.
venv: 仮想環境の管理
比較的最近のPythonにはvenvが標準搭載されていることと,venvが仮想環境の構築に便利なことは,既に記した.
もう殆ど過去の投稿の嵩上げなのだが,現環境でのvenvの動作を確認する意味で,丁寧に進む.
仮想環境は,以下のコマンドで作成,アクティベート,ディアクティベートできる.
$ python -m venv .venv_test
$ . .venv_test/bin/activate
(.venv_test) $
(.venv_test) $ ...
(.venv_test) $ deactivate
$
アクティベート中は,仮想環境の名前が表示される.
(.venv_test)の中で色々触ってみる.
(.venv_test) $ python
# Python 3.8.10 (default, Feb 27 2024, 21:45:08)
# [GCC 5.4.0 20160609] on linux
# Type "help", "copyright", "credits" or "license" for more information.

$ >>> import sys
$ >>> print(sys.executable)
# /home/USERNAME/DIR/.venv_test/bin/python

$ >>> import numpy as np
# Traceback (most recent call last):
# File "<stdin>", line 1, in <module>
# ModuleNotFoundError: No module named 'numpy'

$ >>> exit()
(.venv_test) $
仮想環境を作るときに使ったpythonは,pyenvでglobalに設定した3.8.10だったので,この仮想環境にも3.8.10が引き継がれている.
再度sys.executableを見ると,仮想環境から呼ばれている.サードパーティ製のnumpyは未インストールなのでimportしようとすると怒られる.
仮想環境内部でpip installすれば良い.
(.venv_test) $ pip install numpy
# Collecting numpy
#   Downloading numpy-1.24.4-cp38-cp38-manylinux_2_17_x86_64.manylinux2014_x86_64.whl (17.3 MB)
#     |████████████████████████████████| 17.3 MB 36 kB/s
# Installing collected packages: numpy
# Successfully installed numpy-1.24.4

(.venv_test) $ python
# Python 3.8.10 (default, Feb 27 2024, 21:45:08)
# [GCC 5.4.0 20160609] on linux
# Type "help", "copyright", "credits" or "license" for more information.

$ >>> import numpy as np
$ >>> a = np.array([1., 2.])
$ >>> b = np.array([3., 4.])
$ >>> np.dot(a, b)
# 11.0
機械学習環境の構築
此処からが本題.
機械学習に使いたいので,cudaバージョンなどを気にしながら管理する必要がある.
目標は,
.
├─00_tf   // Projects with TensorFlow
|   ├─(.venv_tf)
|   ├─Dir00
|   └─Dir01
└─01_torch   // Projects with PyTorch
    ├─(.venv_torch)
    ├─Dir00
    └─Dir01
を作るイメージ.
各種バージョン確認
NVIDIA Driverのバージョンの確認
cat /proc/driver/nvidia/versionで,driverの確認ができる.
$ cat /proc/driver/nvidia/version
# NVRM version: NVIDIA UNIX x86_64 Kernel Module  450.36.06  Mon Jun  1 23:19:54 UTC 2020
# GCC version:  gcc version 5.4.0 20160609 (Ubuntu 5.4.0-6ubuntu1~16.04.12)
NVIDIA Driverのバージョンは450.36.06.
gcc compilerのバージョンの確認
gcc --version,或いはgcc -vで確認できる.
$ gcc --version
# gcc (Ubuntu 5.4.0-6ubuntu1~16.04.12) 5.4.0 20160609
# Copyright (C) 2015 Free Software Foundation, Inc.
# ...
gcc compilerのバージョンは5.4.0(実は先程も出ていた).
GPUとCompute Capabilityの確認
nvidia-smi --query-gpu=name --format=csvで,GPUの型番が確認できる.
$ nvidia-smi --query-gpu=name --format=csv
# name
# Tesla V100-DGXS-16GB
# Tesla V100-DGXS-16GB
# Tesla V100-DGXS-16GB
# Tesla V100-DGXS-16GB
Compute Capabilityより,Compute Capability=7.0.
cudaのバージョンの確認
/usr/local/cuda/bin/nvcc -Vで確認できる.
$ /usr/local/cuda/bin/nvcc -V
# nvcc: NVIDIA (R) Cuda compiler driver
# Copyright (c) 2005-2020 NVIDIA Corporation
# Built on Wed_May__6_19:09:25_PDT_2020
# Cuda compilation tools, release 11.0, V11.0.167
# Build cuda_11.0_bu.TC445_37.28358933_0
或いは,cat /usr/local/cuda/version.txtで確認できる(場合により,拡張子が.jsonのこともあるらしい,参考).
$ cat /usr/local/cuda/version.txt
# CUDA Version 11.0.182
両者のアウトプットより,CUDA Version=11.0.
なお,/usr/lib/cuda/version.txtにもcudaバージョンが書かれている場合があり(現環境にはこのような階層,ファイルは無かったが),/usr/local/cuda/version.txtとの食い違いから混乱を引き起こすこともあるらしい(参考).
cudnnのバージョンの確認
cat /usr/include/cudnn.h | grep CUDNN_MAJOR -A 2で確認できる.
$ cat /usr/include/cudnn.h | grep CUDNN_MAJOR -A 2
# #define CUDNN_MAJOR 7
# #define CUDNN_MINOR 4
# #define CUDNN_PATCHLEVEL 2
# --
# #define CUDNN_VERSION (CUDNN_MAJOR * 1000 + CUDNN_MINOR * 100 + CUDNN_PATCHLEVEL)
# #include "driver_types.h"
Major - Minor - PatchLevelの順に並べると,7.4.2.
現環境では利かなかったが,cat /usr/local/cuda/include/cudnn.h | grep CUDNN_MAJOR -A 2,或いはcat /usr/include/x86_64-linux-gnu/cudnn_v*.h | grep CUDNN_MAJOR -A 2の場合もある.
情報の確認
まずは,前節までに得た情報をテーブル状に纏めておく.
| item | # |
|---|---|
| nvidia driver | 450.36.06 |
| gcc compiler | 5.4.0 |
| compute capability | 7.0 |
| cuda | 11.0 |
| cudnn | 7.4.2 |
TensorFlowの仮想環境
TensorFlowの環境を作る.
仮想環境.venv_tfを作り,pipを最新のものにアップグレードしておく.
$ python -m venv .venv_tf
$ . .venv_tf/bin/activate
(.venv_tf) $ ls
(.venv_tf) $ pip -V
# pip 21.1.1 from /home/USERNAME/DIR/00_tf/.venv_tf/lib/python3.8/site-packages/pip (python 3.8)
(.venv_tf) $ pip install --upgrade pip
# ...
(.venv_tf) $ pip -V
# pip 24.0 from /home/USERNAME/DIR/00_tf/.venv_tf/lib/python3.8/site-packages/pip (python 3.8)
まず,Install TensorFlow with pipに従って作業してみる.
Hardware requirementsとSystem requirementsは満たしている.Software requirements6に記述の,NVIDIA driver,CUDA Toolkit,cuDNN,TensorRT辺りが気になるが,一旦無視してえいやでstep-by-step_instructionsに従ってみる.
Step 1. System requirements
Ubuntu 16.04 or higher (64-bit): OK
Step 2. GPU setup
nvidia-smiが実行できるので次へ.
Step 3. Install TensorFlow
pipをアップグレードしてからtfをインストール.
(.venv_tf) $ pip install --upgrade pip
(.venv_tf) $ pip install tensorflow[and-cuda]
Step 4. Verify the installation
CPUセットアップの確認:
(.venv_tf) $ python
# Python 3.9.10 (main, Feb 27 2024, 21:50:24)
# [GCC 5.4.0 20160609] on linux
# Type "help", "copyright", "credits" or "license" for more information.

$ >>> import tensorflow as tf
# 2024-02-28 19:17:01.728441: E external/local_xla/xla/stream_executor/cuda/cuda_dnn.cc:9261] Unable to register cuDNN factory: Attempting to register factory for plugin cuDNN when one has already been registered
# 2024-02-28 19:17:01.728480: E external/local_xla/xla/stream_executor/cuda/cuda_fft.cc:607] Unable to register cuFFT factory: Attempting to register factory for plugin cuFFT when one has already been registered
# 2024-02-28 19:17:01.729892: E external/local_xla/xla/stream_executor/cuda/cuda_blas.cc:1515] Unable to register cuBLAS factory: Attempting to register factory for plugin cuBLAS when one has already been registered
# 2024-02-28 19:17:01.739346: I tensorflow/core/platform/cpu_feature_guard.cc:182] This TensorFlow binary is optimized to use available CPU instructions in performance-critical operations.
# To enable the following instructions: AVX2 FMA, in other operations, rebuild TensorFlow with the appropriate compiler flags.
# 2024-02-28 19:17:02.846237: W tensorflow/compiler/tf2tensorrt/utils/py_utils.cc:38] TF-TRT Warning: Could not find TensorRT
# Traceback (most recent call last):
#   File "<stdin>", line 1, in <module>
#   File "/home/USERNAME/DIR/00_tf/.venv_tf/lib/python3.9/site-packages/tensorflow/__init__.py", line 54, in <module>                  from tensorflow._api.v2 import compat
#   File "/home/USERNAME/DIR/00_tf/.venv_tf/lib/python3.9/site-packages/tensorflow/_api/v2/compat/__init__.py", line 8, in <module>    from tensorflow._api.v2.compat import v1
#   File "/home/USERNAME/DIR/00_tf/.venv_tf/lib/python3.9/site-packages/tensorflow/_api/v2/compat/v1/__init__.py", line 32, in <module>
#     from tensorflow._api.v2.compat.v1 import compat
#   File "/home/USERNAME/DIR/00_tf/.venv_tf/lib/python3.9/site-packages/tensorflow/_api/v2/compat/v1/compat/__init__.py", line 9, in <module>
#     from tensorflow._api.v2.compat.v1.compat import v2
#   File "/home/USERNAME/DIR/00_tf/.venv_tf/lib/python3.9/site-packages/tensorflow/_api/v2/compat/v1/compat/v2/__init__.py", line 28, in <module>
#     from tensorflow._api.v2.compat.v2 import __internal__
#   File "/home/USERNAME/DIR/00_tf/.venv_tf/lib/python3.9/site-packages/tensorflow/_api/v2/compat/v2/__init__.py", line 34, in <module>
#     from tensorflow._api.v2.compat.v2 import compat
#   File "/home/USERNAME/DIR/00_tf/.venv_tf/lib/python3.9/site-packages/tensorflow/_api/v2/compat/v2/compat/__init__.py", line 9, in <module>
#     from tensorflow._api.v2.compat.v2.compat import v2
#   File "/home/USERNAME/DIR/00_tf/.venv_tf/lib/python3.9/site-packages/tensorflow/_api/v2/compat/v2/compat/v2/__init__.py", line 38, in <module>
#     from tensorflow._api.v2.compat.v2 import distribute
#   File "/home/USERNAME/DIR/00_tf/.venv_tf/lib/python3.9/site-packages/tensorflow/_api/v2/compat/v2/distribute/__init__.py", line 10, in <module>
#     from tensorflow._api.v2.compat.v2.distribute import experimental
#   File "/home/USERNAME/DIR/00_tf/.venv_tf/lib/python3.9/site-packages/tensorflow/_api/v2/compat/v2/distribute/experimental/__init__.py", line 18, in <module>
#     from tensorflow.python.distribute.failure_handling.failure_handling import PreemptionCheckpointHandler # line: 336
#   File "/home/USERNAME/DIR/00_tf/.venv_tf/lib/python3.9/site-packages/tensorflow/python/distribute/failure_handling/failure_handling.py", line 36, in <module>
#     from tensorflow.python.distribute.failure_handling import failure_handling_util
#   File "/home/USERNAME/DIR/00_tf/.venv_tf/lib/python3.9/site-packages/tensorflow/python/distribute/failure_handling/failure_handling_util.py", line 19, in <module>
#     import requests
#   File "/home/USERNAME/DIR/00_tf/.venv_tf/lib/python3.9/site-packages/requests/__init__.py", line 43, in <module>
#     import urllib3
#   File "/home/USERNAME/DIR/00_tf/.venv_tf/lib/python3.9/site-packages/urllib3/__init__.py", line 42, in <module>
#     raise ImportError(
# ImportError: urllib3 v2 only supports OpenSSL 1.1.1+, currently the 'ssl' module is compiled with 'OpenSSL 1.0.2g  1 Mar 2016'. See: https://github.com/urllib3/urllib3/issues/2168
E: Errorが初めから出ている(WはWarning,IはInfo).既出のERROR: The Python ssl extension was not compiled. Missing the OpenSSL lib?と関係してssl周りに問題がありそうということで暫く格闘したが,解決できなかった.
(ここら辺は記憶が曖昧なので書こうか迷うが,書かないより書いた方が良いと思う,,)暫くして,日本語でのみ到達可能?な場所に記してあった以下のコマンドを実行した.
# Add NVIDIA package repositories
# Add HTTPS support for apt-key
$ sudo apt-get install gnupg-curl
$ wget https://developer.download.nvidia.com/compute/cuda/repos/ubuntu1604/x86_64/cuda-ubuntu1604.pin
$ sudo mv cuda-ubuntu1604.pin /etc/apt/preferences.d/cuda-repository-pin-600
$ sudo apt-key adv --fetch-keys https://developer.download.nvidia.com/compute/cuda/repos/ubuntu1604/x86_64/7fa2af80.pub
$ sudo add-apt-repository "deb https://developer.download.nvidia.com/compute/cuda/repos/ubuntu1604/x86_64/ /"
$ sudo apt-get update
$ wget https://developer.download.nvidia.com/compute/machine-learning/repos/ubuntu1604/x86_64/nvidia-machine-learning-repo-ubuntu1604_1.0.0-1_amd64.deb
$ sudo apt install ./nvidia-machine-learning-repo-ubuntu1604_1.0.0-1_amd64.deb
$ sudo apt-get update
$ wget https://developer.download.nvidia.com/compute/machine-learning/repos/ubuntu1604/x86_64/libnvinfer7_7.1.3-1+cuda11.0_amd64.deb
$ sudo apt install ./libnvinfer7_7.1.3-1+cuda11.0_amd64.deb
$ sudo apt-get update

# Install development and runtime libraries (~4GB)
$ sudo apt-get install --no-install-recommends \
    cuda-11-0 \
    libcudnn8=8.0.4.30-1+cuda11.0  \
    libcudnn8-dev=8.0.4.30-1+cuda11.0


# Reboot. Check that GPUs are visible using the command: nvidia-smi

# Install TensorRT. Requires that libcudnn7 is installed above.
$ sudo apt-get install -y --no-install-recommends \
    libnvinfer7=7.1.3-1+cuda11.0 \
    libnvinfer-dev=7.1.3-1+cuda11.0 \
    libnvinfer-plugin7=7.1.3-1+cuda11.0 \
    libnvinfer-plugin-dev=7.1.3-1+cuda11.0
また,~/.bashrcに以下を書き込んだ.
export PATH="/usr/local/cuda/bin:$PATH"
export LD_LIBRARY_PATH="/usr/local/cuda/lib64:$LD_LIBRARY_PATH"
ところで,pip install tensorflow[and-cuda]は最新~新しめのtensorflowをインストールするようだ(2024年2月時点でtensorflow 2.15.0まであるようだが,現環境ではtensorflow 2.13.1がインストールされる).同時に,公式の確認済み環境のテーブルを思い出す.
2024年2月時点でのテーブル(Linux版の箇所の一部) ↓
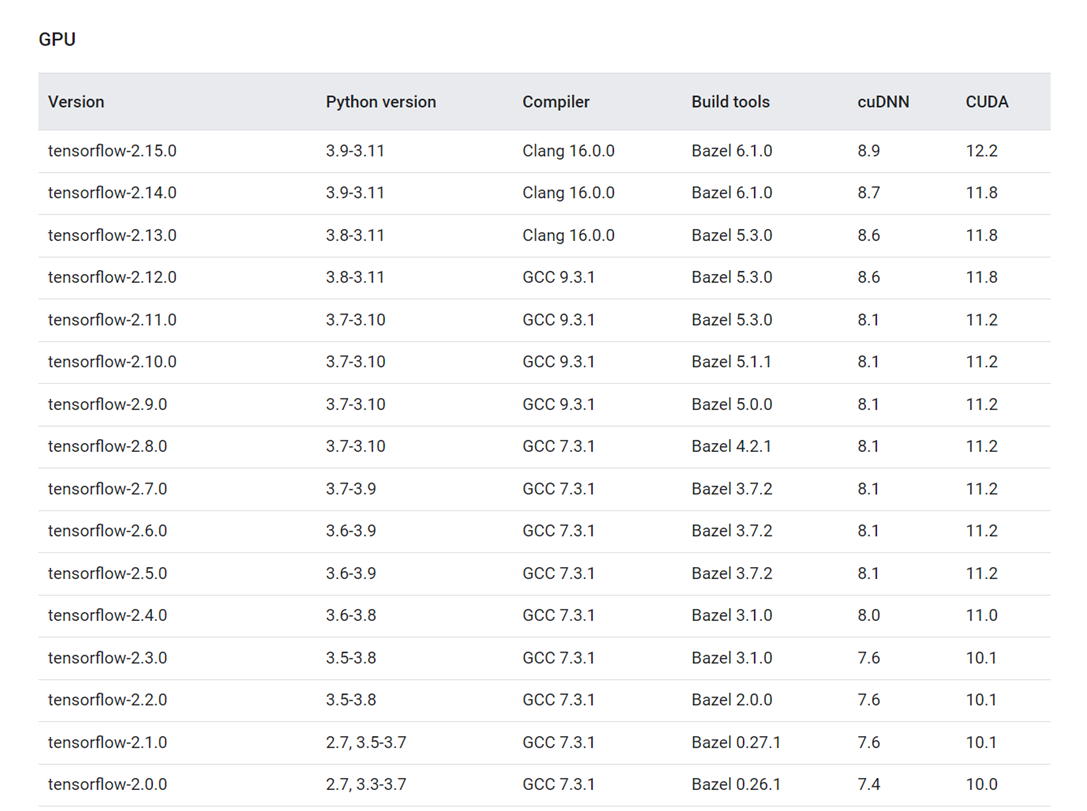
cudaが11.0の現環境では,tensorflow 2.4.0がお似合いか?GCC,cudnnの不一致,Bazelのインストールなど,諸々の問題に目を瞑り,再度えいやで以下を実行してみた(先程の環境は一旦破棄し,同じ名前で真っ新な仮想環境を用意した).
(.venv_tf) $ pip install tensorflow[and-cuda]==2.4.0
再度,テスト:
(.venv_tf) $ python
# Python 3.8.10 (default, Feb 27 2024, 21:45:08)
# [GCC 5.4.0 20160609] on linux
# Type "help", "copyright", "credits" or "license" for more information.
# >>> import tensorflow as tf
# 2024-02-29 01:33:52.307610: I tensorflow/stream_executor/platform/default/dso_loader.cc:49] Successfully opened dynamic library libcudart.so.11.0
おや,,,うまくいった?
CPUのチェック
$ >>> print(tf.reduce_sum(tf.random.normal([1000, 1000])))
# 2024-02-29 01:37:49.379795: I tensorflow/compiler/jit/xla_cpu_device.cc:41] Not creating XLA devices, tf_xla_enable_xla_devices not set
# 2024-02-29 01:37:49.381468: I tensorflow/stream_executor/platform/default/dso_loader.cc:49] Successfully opened dynamic library libcuda.so.1
# 2024-02-29 01:37:49.578791: I tensorflow/core/common_runtime/gpu/gpu_device.cc:1720] Found device 0 with properties:
# pciBusID: 0000:07:00.0 name: Tesla V100-DGXS-16GB computeCapability: 7.0
# coreClock: 1.53GHz coreCount: 80 deviceMemorySize: 15.78GiB deviceMemoryBandwidth: 836.37GiB/s
# 2024-02-29 01:37:49.580297: I tensorflow/core/common_runtime/gpu/gpu_device.cc:1720] Found device 1 with properties:
# pciBusID: 0000:08:00.0 name: Tesla V100-DGXS-16GB computeCapability: 7.0
# coreClock: 1.53GHz coreCount: 80 deviceMemorySize: 15.78GiB deviceMemoryBandwidth: 836.37GiB/s
# ...
# 2024-02-29 01:37:49.583208: I tensorflow/stream_executor/platform/default/dso_loader.cc:49] Successfully opened dynamic library libcudart.so.11.0
# ...
# 2024-02-29 01:37:52.121083: I tensorflow/core/common_runtime/gpu/gpu_device.cc:1267]      0 1 2 3
# 2024-02-29 01:37:52.121095: I tensorflow/core/common_runtime/gpu/gpu_device.cc:1280] 0:   N Y Y Y
# 2024-02-29 01:37:52.121104: I tensorflow/core/common_runtime/gpu/gpu_device.cc:1280] 1:   Y N Y Y
# 2024-02-29 01:37:52.121112: I tensorflow/core/common_runtime/gpu/gpu_device.cc:1280] 2:   Y Y N Y
# 2024-02-29 01:37:52.121120: I tensorflow/core/common_runtime/gpu/gpu_device.cc:1280] 3:   Y Y Y N
# 2024-02-29 01:37:52.128439: I tensorflow/core/common_runtime/gpu/gpu_device.cc:1406] Created TensorFlow device (/job:localhost/replica:0/task:0/device:GPU:0 with 14756 MB memory) -> physical GPU (device: 0, name: Tesla V100-DGXS-16GB, pci bus id: 0000:07:00.0, compute capability: 7.0)
# 2024-02-29 01:37:52.131101: I tensorflow/core/common_runtime/gpu/gpu_device.cc:1406] Created TensorFlow device (/job:localhost/replica:0/task:0/device:GPU:1 with 14756 MB memory) -> physical GPU (device: 1, name: Tesla V100-DGXS-16GB, pci bus id: 0000:08:00.0, compute capability: 7.0)
# 2024-02-29 01:37:52.133646: I tensorflow/core/common_runtime/gpu/gpu_device.cc:1406] Created TensorFlow device (/job:localhost/replica:0/task:0/device:GPU:2 with 14756 MB memory) -> physical GPU (device: 2, name: Tesla V100-DGXS-16GB, pci bus id: 0000:0e:00.0, compute capability: 7.0)
# 2024-02-29 01:37:52.136191: I tensorflow/core/common_runtime/gpu/gpu_device.cc:1406] Created TensorFlow device (/job:localhost/replica:0/task:0/device:GPU:3 with 14756 MB memory) -> physical GPU (device: 3, name: Tesla V100-DGXS-16GB, pci bus id: 0000:0f:00.0, compute capability: 7.0)
# tf.Tensor(-1545.6006, shape=(), dtype=float32)
tf.Tensorが返ってきている.
GPUのチェック.
$ >>> tf.test.is_built_with_cuda()
# True

$ >>> print(tf.config.list_physical_devices('GPU'))
# [
#     PhysicalDevice(name='/physical_device:GPU:0', device_type='GPU'),
#     PhysicalDevice(name='/physical_device:GPU:1', device_type='GPU'),
#     PhysicalDevice(name='/physical_device:GPU:2', device_type='GPU'),
#     PhysicalDevice(name='/physical_device:GPU:3', device_type='GPU')
# ]
tfはCUDA (GPU) support付きでビルドされている.tfから4つのGPUが見えている.できたらしい.
その後,うまくいった例,うまくいかなかった例
tensorflow[and-cuda]==2.4.0というブラケットが気になったので,
$ pip install tensorflow==2.4.0
を実行すると,うまくいった(tensorflow[and-cuda]==2.4.0で作った環境と同じ挙動).
再度,
$ pip install tensorflow[and-cuda]
を実行したが,うまくいかなかった(自動的にtensorflow 2.13.1が選択され,import tensorflowの時点で上記と同様のエラー).
2.4.0に近い世代で,新しいもの
$ pip install tensorflow==2.5.0
は,CPUチェックで
# ...
# 2024-02-29 02:31:34.726382: W tensorflow/stream_executor/platform/default/dso_loader.cc:64] Could not load dynamic library 'libcusolver.so.11'; dlerror: libcusolver.so.11: cannot open shared object file: No such file or directory; LD_LIBRARY_PATH: :/usr/local/lib/
# 2024-02-29 02:31:34.727176: I tensorflow/stream_executor/platform/default/dso_loader.cc:53] Successfully opened dynamic library libcusparse.so.11
# 2024-02-29 02:31:34.727382: I tensorflow/stream_executor/platform/default/dso_loader.cc:53] Successfully opened dynamic library libcudnn.so.8
# 2024-02-29 02:31:34.727406: W tensorflow/core/common_runtime/gpu/gpu_device.cc:1766] Cannot dlopen some GPU libraries. Please make sure the missing libraries mentioned above are installed properly if you would like to use GPU. Follow the guide at https://www.tensorflow.org/install/gpu for how to download and setup the required libraries for your platform.
# Skipping registering GPU devices...
# ...
のWarningを返し,GPUチェックで
# []
の空のリストを返したので,何らかの形でうまくいっていない(パスの問題?).
以上より,cudaのバージョンを合わせている限りはうまくいった.ただ,公式のテーブルに載っていないので,必ずうまくいく訳でもないのだろうと思う.
PyTorchの仮想環境
PyTorchの環境を作る.
仮想環境.venv_torchを作り,pipを最新のものにアップグレードしておく.
$ python -m venv .venv_torch
$ . .venv_torch/bin/activate
(.venv_torch) $ ls
(.venv_torch) $ pip -V
# pip 21.1.1 from /home/USERNAME/DIR/01_torch/.venv_torch/lib/python3.8/site-packages/pip (python 3.8)
(.venv_torch) $ pip install --upgrade pip
# ...
(.venv_tf) $ pip -V
# pip 24.0 from /home/USERNAME/DIR/01_torch/.venv_torch/lib/python3.8/site-packages/pip (python 3.8)
ここに列挙されているものの中から,現環境(Ubuntu,cuda 11.0)に合致するものを探し,実行.
(.venv_torch) $ pip install torch==1.7.1+cu110 torchvision==0.8.2+cu110 torchaudio==0.7.2 -f https://download.pytorch.org/whl/torch_stable.html
# Looking in links: https://download.pytorch.org/whl/torch_stable.html
# Collecting torch==1.7.1+cu110
# ...
# Successfully installed numpy-1.24.4 pillow-10.2.0 torch-1.7.1+cu110 torchaudio-0.7.2 torchvision-0.8.2+cu110 typing-extensions-4.10.0
動作確認.
(.venv_torch) $ python
# Python 3.8.10 (default, Feb 27 2024, 21:45:08)
# [GCC 5.4.0 20160609] on linux
# Type "help", "copyright", "credits" or "license" for more information.

$ >>> import torch
$ >>> torch.__version__
# '1.7.1+cu110'

$ >>> x = torch.rand(5, 3)
$ >>> print(x)
# tensor([[0.7316, 0.3559, 0.1172],
          [0.5672, 0.4826, 0.7578],
          [0.1010, 0.6044, 0.1409],
          [0.4331, 0.9504, 0.3599],
          [0.0063, 0.3409, 0.9293]])

$ >>> torch.cuda.is_available()
# True

$ >>> torch.cuda.device_count()
# 4

$ >>> torch.cuda.get_device_name(0)
# 'Tesla V100-DGXS-16GB'
$ >>> torch.cuda.get_device_name(1)
# 'Tesla V100-DGXS-16GB'
$ >>> torch.cuda.get_device_name(2)
# 'Tesla V100-DGXS-16GB'
$ >>> torch.cuda.get_device_name(3)
# 'Tesla V100-DGXS-16GB'
torchからcudaが見えている.torchから4つのcuda deviceが見えている.torchから4つのGPUの名前が見えている.
終わりに
pyenvにpythonをインストールするときに少し沼ったが,提示されている複数のコードの中から,もう一つを実行するとすんなり通った.
tensorflowの環境を作るのは経験的にも苦労が多い.pytorchは何だかんだすんなり終わる.これも経験的に.
Appendix
本題とは少し離れているが,知っておきたい情報をメモしておく.
nvcc -Vの罠
nvcc -Vでcudaバージョンの確認ができる.
$ nvcc -V
# nvcc: NVIDIA (R) Cuda compiler driver
# Copyright (c) 2005-2015 NVIDIA Corporation
# Built on Tue_Aug_11_14:27:32_CDT_2015
# Cuda compilation tools, release 7.5, V7.5.17
出力から,7.5らしいことが窺える.
nvidia-smiの罠
nvidia-smiにも,CUDA Versionという欄がある
$ nvidia-smi
# +-----------------------------------------------------------------------------+
# | Processes:                                                                  |
# |  GPU   GI   CI        PID   Type   Process name                  GPU Memory |
# |        ID   ID                                                   Usage      |
# |=============================================================================|
# |  No running processes found                                                 |
# +-----------------------------------------------------------------------------+
# Mon Feb 19 18:19:09 2024
# +-----------------------------------------------------------------------------+
# | NVIDIA-SMI 450.36.06    Driver Version: 450.36.06    CUDA Version: 11.0     |
# |-------------------------------+----------------------+----------------------+
# | GPU  Name        Persistence-M| Bus-Id        Disp.A | Volatile Uncorr. ECC |
# | Fan  Temp  Perf  Pwr:Usage/Cap|         Memory-Usage | GPU-Util  Compute M. |
# |                               |                      |               MIG M. |
# |===============================+======================+======================|
# |   0  Tesla V100-DGXS...  On   | 00000000:07:00.0 Off |                    0 |
# | N/A   39C    P0    37W / 300W |      0MiB / 16158MiB |      0%      Default |
# |                               |                      |                  N/A |
# +-------------------------------+----------------------+----------------------+
# |   1  Tesla V100-DGXS...  On   | 00000000:08:00.0 Off |                    0 |
# | N/A   40C    P0    37W / 300W |      0MiB / 16158MiB |      0%      Default |
# |                               |                      |                  N/A |
# +-------------------------------+----------------------+----------------------+
# |   2  Tesla V100-DGXS...  On   | 00000000:0E:00.0 Off |                    0 |
# | N/A   40C    P0    37W / 300W |      0MiB / 16158MiB |      0%      Default |
# |                               |                      |                  N/A |
# +-------------------------------+----------------------+----------------------+
# |   3  Tesla V100-DGXS...  On   | 00000000:0F:00.0 Off |                    0 |
# | N/A   40C    P0    38W / 300W |      0MiB / 16158MiB |      0%      Default |
# |                               |                      |                  N/A |
# +-------------------------------+----------------------+----------------------+

# +-----------------------------------------------------------------------------+
# | Processes:                                                                  |
# |  GPU   GI   CI        PID   Type   Process name                  GPU Memory |
# |        ID   ID                                                   Usage      |
# |=============================================================================|
# |  No running processes found                                                 |
# +-----------------------------------------------------------------------------+
右上にCUDA Version: 11.0とあるから,cudaバージョンが11.0なのだと感じてしまうが,これは間違いである.
ここに表示されているのは,インストールされているドライバがサポートする,最高のCUDA Versionに過ぎず,現在のPCにインストールされているCUDA Versionとは異なる(今回は偶々一致しているが).
nvidia-smiの使い方
nvidia-smi -H,或いはnvidia-smi --helpで利用可能なコマンド一覧を確認できる.
例えば,上述のように,nvidia-smi --query-gpu=name --format=csvで,GPUの型番が確認できる.
$ nvidia-smi --query-gpu=name --format=csv
# name
# Tesla V100-DGXS-16GB
# Tesla V100-DGXS-16GB
# Tesla V100-DGXS-16GB
# Tesla V100-DGXS-16GB
或いは,nvidia-smi -Lでも良い(勿論,nvidia-smiでも良い).
$ nvidia-smi -L
# GPU 0: Tesla V100-DGXS-16GB (UUID: GPU-a86e0cb6-83a0-e8f7-ad61-ffb881b31a50)
# GPU 1: Tesla V100-DGXS-16GB (UUID: GPU-42898d4b-e15c-f559-2718-3048111c49a4)
# GPU 2: Tesla V100-DGXS-16GB (UUID: GPU-53a6cf80-7cf0-5533-14e7-57e8e0448b7a)
# GPU 3: Tesla V100-DGXS-16GB (UUID: GPU-552c129c-c679-1d72-3201-f56b4c80a41b)
-
現環境とは別に,Ubuntu 18.04も使っているが,そちらではupdate-alternativesを使っている.自分の中でも両者に優劣は付けられていないが,pyenvでハマったことが無かったからこちらを選んでみた(ら,見事にハマった). ↩
-
pyenv --versionの返事がpyenv 2.3.36-4-g02e1d4aであり,尻尾が仰々しいのが気になるが,, ↩ -
pyenv-winはpyenvを基に作られたのだから当然か. ↩ -
Anacondaやminicondaも表示される.すごい. ↩
-
ここにはPython 3.8-3.11と書いてあるのに,ここには3.9-3.11と書いてあり,困惑.取り敢えず,pyenvでlocalを3.9.10にして作業することにした(結局,3.8.10で動いたが). ↩