使い道
この記事は順番に実行したいタスクがあるときに役立ちます。
例えば、以下のような場面です。
- 開発環境にSFTPで接続してWordpressの子テーマを開発
- 区切りがいいところでZip化して「Zip削除→Zip圧縮→本番Wordpressにアップロード」のループが面倒
-
npm run buildして、firebase deployする2段コマンドが面倒 - AWS Lambda function にソースをアップロードしたい
- serverless frameworkを使えば
serverless deployで終わりだが、使うほどのコード量でもない - zip圧縮が面倒だが、連番圧縮しても容量の無駄なので、過去バージョンは自動で消したい
- serverless frameworkを使えば
上記の中には、jenkins や Github actions で対応したほうがいい内容もあります。
やること
-
tasks.jsonの基本 -
tasks.jsonで順次実行 -
7zと連携してみる -
npmとか連携してみる
tasks.jsonの基本
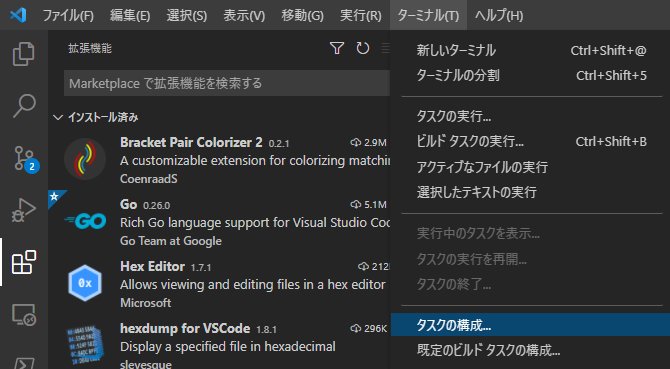
初めての人はメニュー→Terminal(ターミナル)→Configure Tasks(タスクの構成)→Otherするとtasks.jsonが作成されます。
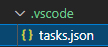
プロジェクトフォルダ直下に.vscodeというフォルダが自動作成され、その下にtasks.jsonが確認できると思います。
そうしたら、そのtasks.jsonの中身を編集していきます。
{
    // See https://go.microsoft.com/fwlink/?LinkId=733558
    // for the documentation about the tasks.json format
    "version": "2.0.0",
    "tasks": [
        {
            "label": "task Hello",
            "type": "shell",
            "command": "echo Hello Task Json!",
        }
    ]
}
これでtask Helloが作成できました。
今さっき作成したtask Helloを実行してみましょう。
メニュー→Terminal(ターミナル)→Run Tasks(タスクの実行)でtask Helloを選択してみましょう。
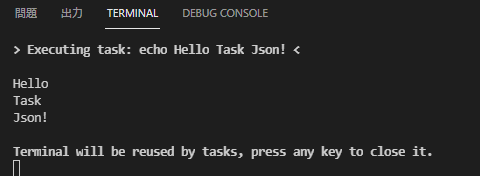
echoコマンドが実行されて、Hello Task Json!が表示されていることが確認できました。
tasks.jsonで順次実行
それでは次に、複数のタスクを順番に実行する方法を見ていきましょう。
まずは、先ほど作ったtasks.jsonにタスクを3つ追加します。
{
    // See https://go.microsoft.com/fwlink/?LinkId=733558
    // for the documentation about the tasks.json format
    "version": "2.0.0",
    "tasks": [
        {
            "label": "task Hello",
            "type": "shell",
            "command": "echo Hello Task Json!",
        },
        {
            "label": "task one",
            "type": "shell",
            "command": "echo One!",
        },
        {
            "label": "task two",
            "type": "shell",
            "command": "echo Two!",
        },
        {
            "label": "Task Sequence",
            "type": "shell",
            "command": "echo Three!",
            "dependsOrder": "sequence",
            "dependsOn": [
                "task one",
                "task two"
            ]
        }
    ]
}
task oneでは、One!がechoされ、task twoでは、Two!がechoされます。これらを順番に実行した後に、Three!とechoしたいので、そのためのTask Sequenceを作成しました。
Task Sequenceを実行すると、One!→Two!→Three!の順にecho表示されます。
試しに実行してみましょう。
先ほどと同じように、メニュー→Terminal(ターミナル)→Run Tasks(タスクの実行)でTask Sequenceを選択してみましょう。
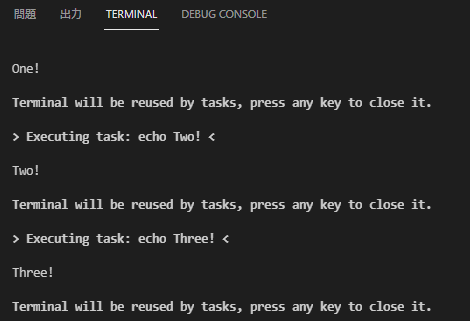
キレイに順番通りに表示できています。
より実践的な見た目に近づけるのであれば、こんな感じになるでしょう。
{
    // See https://go.microsoft.com/fwlink/?LinkId=733558
    // for the documentation about the tasks.json format
    "version": "2.0.0",
    "tasks": [
        {
            "label": "first prosess",
            "type": "shell",
            "command": "echo finish first process!",
        },
        {
            "label": "second prosess",
            "type": "shell",
            "command": "echo finish second process!",
        },
        {
            "label": "run all tasks",
            "type": "shell",
            "command": "echo finish All tasks!",
            "dependsOrder": "sequence",
            "dependsOn": [
                "first process",
                "second process"
            ]
        }
    ]
}
7z と連携してみる
さらに実践的にするために、今度はzipツールを利用してましょう。
7z は OSS界では最強の圧縮解凍ツールです。
簡単なインストール方法はこうです。ChocolateyやHomebrewを事前に導入しておくと早いです。
choco install 7zip
brew install p7zip
7zの公式ドキュメントを見ながら、コマンドを使ってみましょう。
7z a deploy.zip *.php *.css
出来ました。これを実行すると、フォルダ内のphpファイルとcssファイルの全てをdeploy.zipに圧縮できます。
圧縮はこれで良いとして、2回目からは古いdeploy.zipを消してから作らなければいけません。
rm -f ./deploy.zip
こんな感じのコマンドで良いでしょう。このコマンドを実行すればdeploy.zipを削除できます。
Powershell において、rm は Remove-Item の Alias です。
それでは、zipの削除と作成を合わせてタスクを作ってみましょう。
{
    // See https://go.microsoft.com/fwlink/?LinkId=733558
    // for the documentation about the tasks.json format
    "version": "2.0.0",
    "tasks": [
        {
            "label": "delete zip",
            "type": "shell",
            "command": "rm",
            "args": [
                "-f",
                "./deploy.zip",
            ],
        },
        {
            "label": "make zip",
            "type": "shell",
            "command": "7z",
            "args": [
                "a",
                "./deploy.zip",
                "*.php",
                "*.css",
            ],
        },
        {
            "label": "run all tasks",
            "type": "shell",
            "command": "echo update zip file!",
            "dependsOrder": "sequence",
            "dependsOn": [
                "delete zip",
                "make zip"
            ],
        },
    ]
}
前回はcommandにコマンド1行で設定していましたが、今回は、commmandはあくまでコマンドの名前を、argsに引数を別途書いています。なんというか、見やすくなった気がします。
これで、タスクの作成は完了しました。試しに、phpファイルやcssファイルをプロジェクトフォルダ直下に置いてタスクを動かしてみてください。
npm とか連携してみる
先ほどの7z連携でも、そうだったのですが、実は、順次実行のタスクの場合は、&&でも実行できたりします。
echo Alpha && echo Bravo && echo Charlie
このように、echo の連撃が可能です。
そのため、npmでbuildしてから、firebaseでdeployするときなんかは、
npm run build && firebase deploy
現実問題として、こうするか?というと、github-actionsを使い始めれば、ローカル環境ではやらなくなると思います。
npm run build && firebase deployは短いし、上記の7zと比べれば、変数が無く、打ち間違いのリスクもありません。そのため、tasks.jsonに書き込む価値は低いかもしれません。強いて言えば、ビルドタスクに登録すればショートカットキーが効くので便利なくらいですね。
{
    // See https://go.microsoft.com/fwlink/?LinkId=733558
    // for the documentation about the tasks.json format
    "version": "2.0.0",
    "tasks": [
        {
            "label": "build and deploy",
            "type": "shell",
            "command": "npm run build && firebase deploy",
        },
    ]
}
{
    // See https://go.microsoft.com/fwlink/?LinkId=733558
    // for the documentation about the tasks.json format
    "version": "2.0.0",
    "tasks": [
        {
            "label": "build",
            "type": "shell",
            "command": "npm run build",
        },
        {
            "label": "deploy",
            "type": "shell",
            "command": "firebase deploy",
        },
        {
            "label": "build and deploy",
            "type": "shell",
            "command": "build and deploy finish!",
            "dependsOrder": "sequence",
            "dependsOn": [
                "build",
                "deploy"
            ]
        },
    ]
}
デフォルトビルドタスク
このように、デフォルトビルドタスクに設定すると、ショートカットキーが効くようになります。
Windowsの場合は、Ctrl+Shift+Bで、Macの場合は、⌘+Shift+Bですね。
{
    // See https://go.microsoft.com/fwlink/?LinkId=733558
    // for the documentation about the tasks.json format
    "version": "2.0.0",
    "tasks": [
        {
            "label": "deploy",
            "type": "shell",
            "command": "firebase deploy",
+            "problemMatcher": [],
+            "group": {
+                "kind": "build",
+                "isDefault": true
+            }
        },
    ]
}
原典
Excelsior!