秋月で売ってる。ADT7410、温度センサ
せっかく4ch分アドレスがあるというのに( ^ω^)・・・
4ch同時にサンプリングしてる人はいないなぁと思い、Arduinoスケッチを書いてみることにした。
Arduinoやってるひとは、所詮コピペプログラマが多く、再現性が大事で
昼間から炭酸麦茶キメてる人でも、コピペしたら動くものじゃないと発狂してしまうので。
尊敬する藤原 麻里菜 (@togenkyoo) on Twitter メソッドによって解決することにした。
回路は、ArduinoにI2Cデイジーチェーンで接続。
アドレスを4つはんだジャンパーして出来上がり
wsnakさんのブログからソースをお借りする。
4ch分コピペして出来上がり。
ソース
Wire.hライブラリのみインポートすれば使えるようになる。
ADT7410_16bit_4Ch.c
//温度センサADT7410 16bit 4Chサンプリング
//温度精度は±0.5℃。-40℃~+105℃(2.7V~3.6V)の範囲。-40℃~+105℃の範囲で計測可能。16ビットの値を取得可能。分解能は0.0078℃。

# include <Wire.h>
int I2CAdrs0;
int I2CAdrs1;
int I2CAdrs2;
int I2CAdrs3;


// 初期化
void setup(void) {
  I2CAdrs0 = 0x48;
  I2CAdrs1 = 0x49;
  I2CAdrs2 = 0x4A;
  I2CAdrs3 = 0x4B;

  Serial.begin(19200);
  Wire.begin();       // マスタ初期化

  Wire.beginTransmission(I2CAdrs0);  // S.C発行,CB送信
  Wire.write(0x03);                 // Configuration register 選択
  Wire.write(0x00 | 0x80);          // SLEEP mode 設定 0110 0000
  Wire.endTransmission();           // ストップ・コンディション

  Wire.beginTransmission(I2CAdrs1);  // S.C発行,CB送信
  Wire.write(0x03);                 // Configuration register 選択
  Wire.write(0x00 | 0x80);          // SLEEP mode 設定 0110 0000
  Wire.endTransmission();           // ストップ・コンディション

  Wire.beginTransmission(I2CAdrs2);  // S.C発行,CB送信
  Wire.write(0x03);                 // Configuration register 選択
  Wire.write(0x00 | 0x80);          // SLEEP mode 設定 0110 0000
  Wire.endTransmission();           // ストップ・コンディション

  Wire.beginTransmission(I2CAdrs3);  // S.C発行,CB送信
  Wire.write(0x03);                 // Configuration register 選択
  Wire.write(0x00 | 0x80);          // SLEEP mode 設定 0110 0000
  Wire.endTransmission();           // ストップ・コンディション
}

// メインループ
void loop(void) {
  uint16_t val0;
  uint16_t val1;
  uint16_t val2;
  uint16_t val3;

  float tmp0;
  float tmp1;
  float tmp2;
  float tmp3;

  long int ival0;
  long int ival1;
  long int ival2;
  long int ival3;

//CH0----------------------------------------------------------------------
  Wire.requestFrom(I2CAdrs0, 2);       // S.C発行,CB送信
  val0 = (uint16_t)Wire.read() << 8;   // データの読み出し(上位)
  val0 |= Wire.read();                 // データの読み出し(下位)

  ival0 = (long int)val0;
  if(val0 & 0x8000) {         // 符号判定
    // 負数
    ival0 = ival0 - 65536;
  }
  tmp0 = (float)ival0 / 128.0;
//CH1----------------------------------------------------------------------
  Wire.requestFrom(I2CAdrs1, 2);       // S.C発行,CB送信
  val1 = (uint16_t)Wire.read() << 8;   // データの読み出し(上位)
  val1 |= Wire.read();                 // データの読み出し(下位)

  ival1 = (long int)val1;
  if(val1 & 0x8000) {         // 符号判定
    // 負数
    ival1 = ival1 - 65536;
  }
  tmp1 = (float)ival1 / 128.0;
//CH2----------------------------------------------------------------------
  Wire.requestFrom(I2CAdrs2, 2);       // S.C発行,CB送信
  val2 = (uint16_t)Wire.read() << 8;   // データの読み出し(上位)
  val2 |= Wire.read();                 // データの読み出し(下位)

  ival2 = (long int)val2;
  if(val2 & 0x8000) {         // 符号判定
    // 負数
    ival2 = ival2 - 65536;
  }
  tmp2 = (float)ival2 / 128.0;
//CH3----------------------------------------------------------------------
  Wire.requestFrom(I2CAdrs3, 2);       // S.C発行,CB送信
  val3 = (uint16_t)Wire.read() << 8;   // データの読み出し(上位)
  val3 |= Wire.read();                 // データの読み出し(下位)

  ival3 = (long int)val3;
  if(val3 & 0x8000) {         // 符号判定
    // 負数
    ival3 = ival3 - 65536;
  }
  tmp3 = (float)ival3 / 128.0;
//----------------------------------------------------------------------


  Serial.print(tmp0, 5);
  Serial.print(",");
  Serial.print(tmp1, 5);
  Serial.print(",");
  Serial.print(tmp2, 5);
  Serial.print(",");
  Serial.println(tmp3, 5);
  delay(250);
}
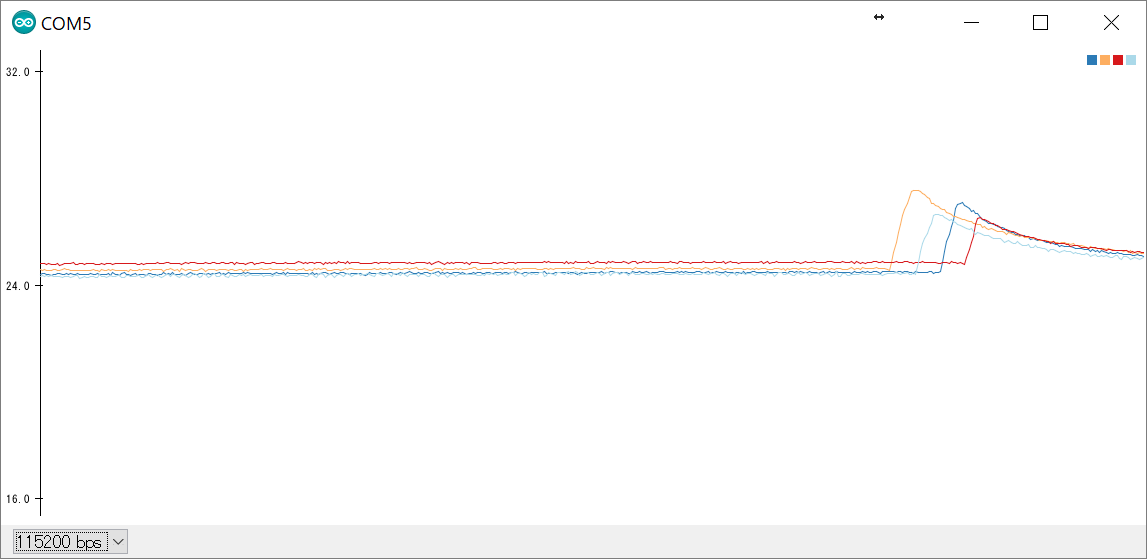
シリアルプロッター機能で確認すれば、こんな感じに表示される。
実にお手軽で、高精度が得られる。アナデバ素晴らしい。
