目的
所属部署の取り組みで何か作ってみようということで、Teams等の音声から文字起こしをして議事録作成を楽にする目的で試してみました。
VOSKとは
オープンソースの音声認識ツールです。
20言語以上をサポートし、モデルデータも50MB程でビックデータの1GB版もあります。
対応言語はAndroid、ios、C、C#、GO、Java、NodeJs、Python、Ruby、Rustに対応。さらにDockerでサーバーとしても使用できます。
前提
PythonがローカルPCにインストール済みであること。
WSL等のLinux環境が準備できていること。
PC上の音を取り込む
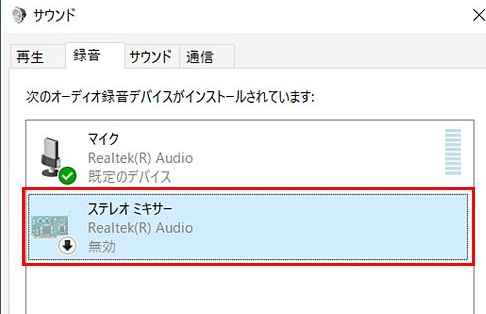
ステレオミキサーの確認
ステレオミキサー機能(PCから流れている音楽を録音する機能)の使用を想定していましたが、全てのパソコンに備わってはいないみたいです。
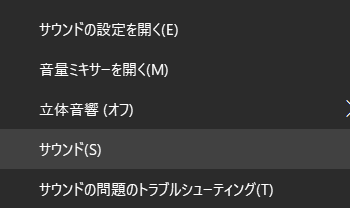
確認方法ですが、右下のアイコンから右クリックしてサウンドを選択します。

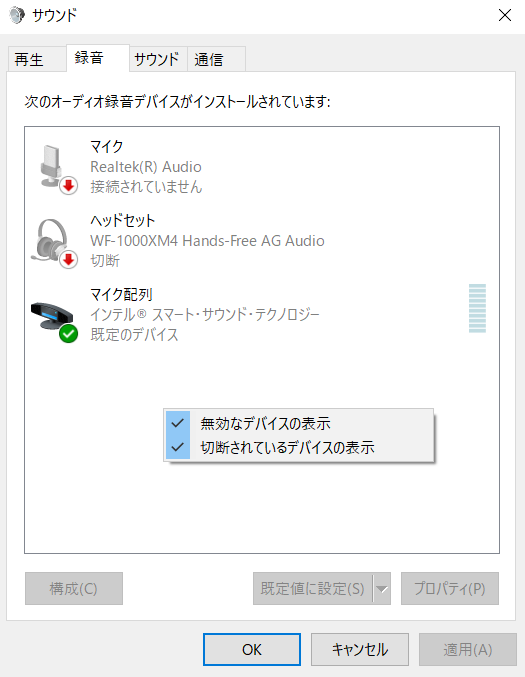
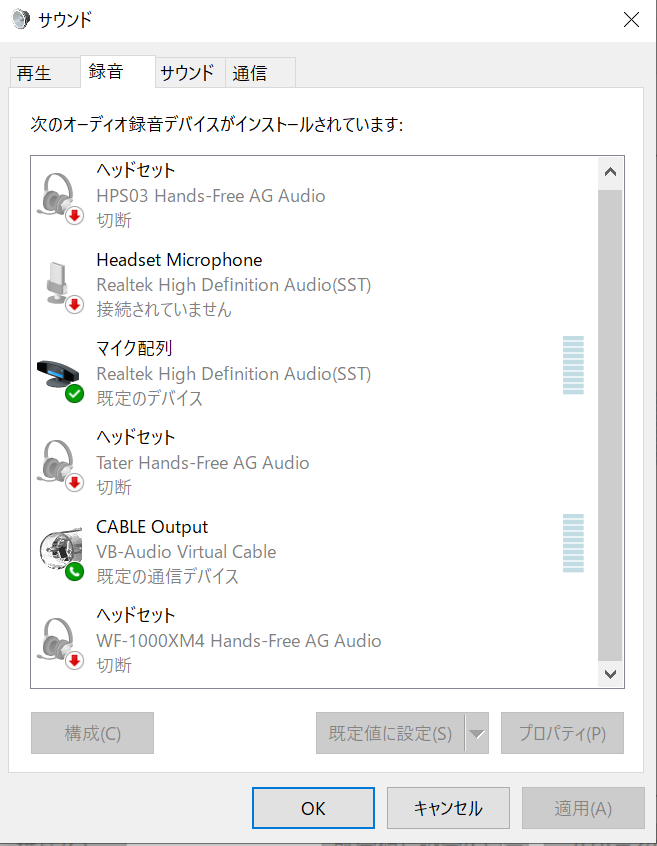
録音タブを選択して、右クリックから無効なデバイスの表示をチェックします。
私の環境には存在を確認出来ませんでした。
そのため仮想ドライバーをインストールしてステレオミキサーと同じようにしたいと思います。
ある方は飛ばしてください。
仮想デバイスの確認
※ドライバーのインストールは自己責任でお願い致します。
仮想ドライバーを提供している所があるので、下記画像の部分からダウンロードを行います。

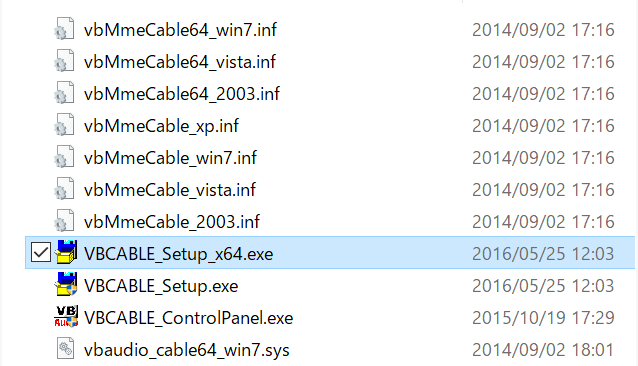
ダウンロード後解凍すると下記フォルダが展開するので、環境に合わせてファイルを起動してインストールを行います。
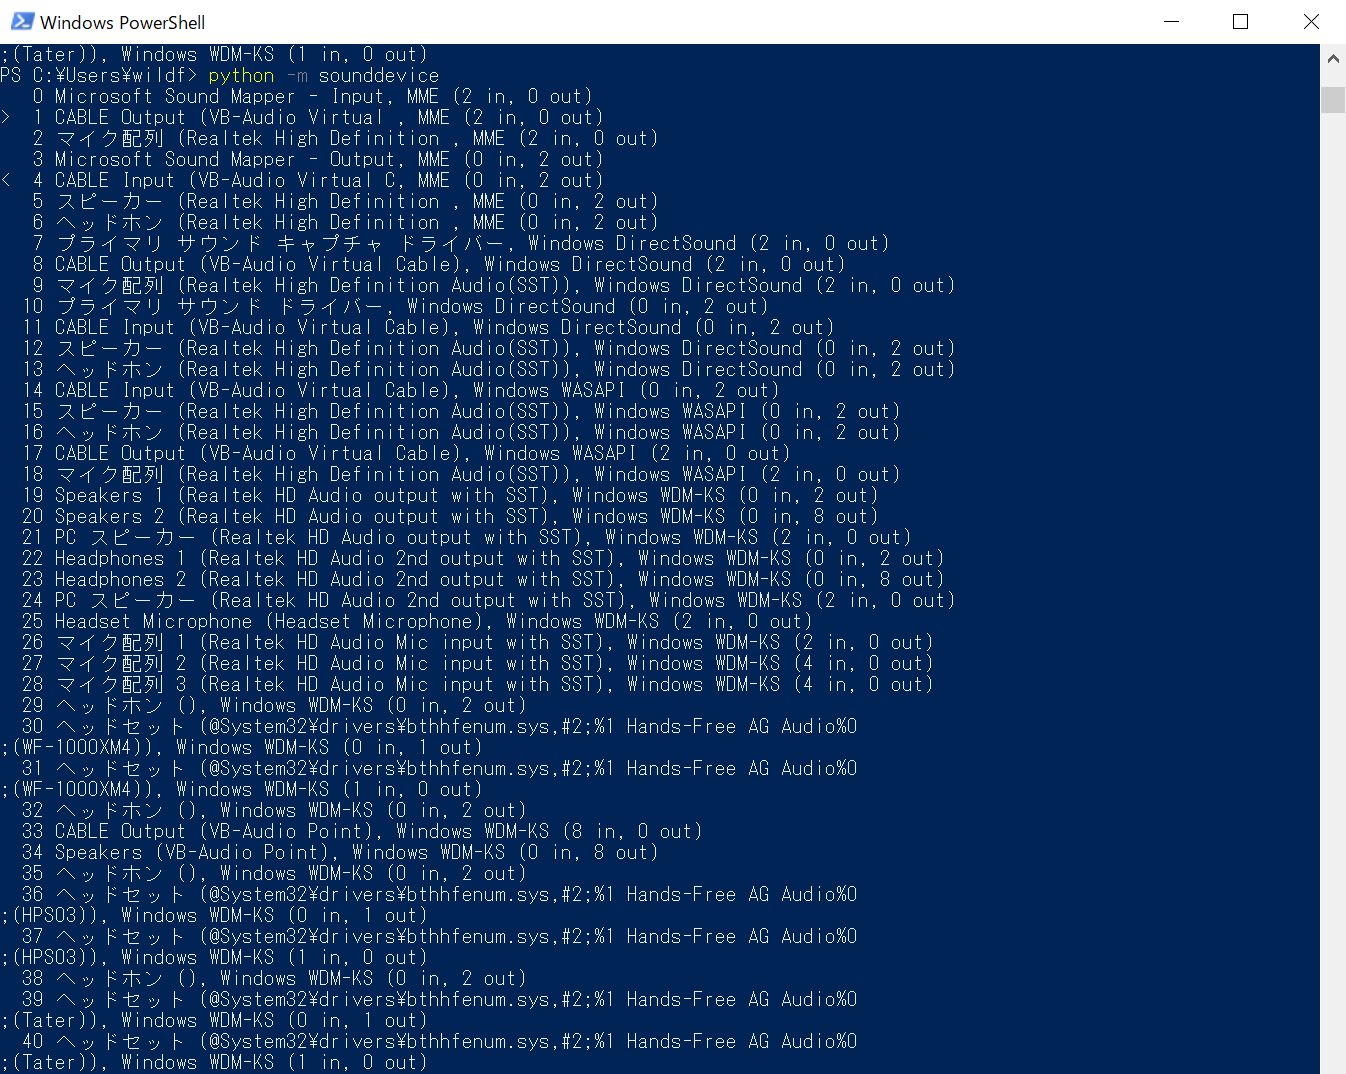
下記コードを実行することによって使用できるデバイスが表示出来ます。
python -m sounddevice
インストール後のCABLE outputとCABLE outinutのデバイス表示と、「>、<」が現在デフォルトになっているものを確認出来ます。
既定の設定
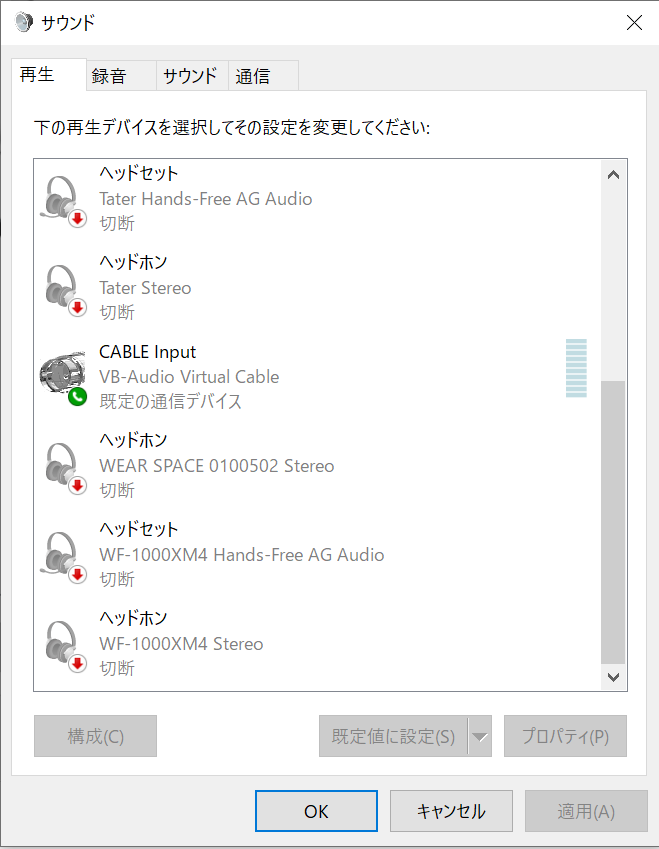
次にインストールした再生と録音のデバイスを選択し、右クリックから「既定のデバイスとして設定」をクリックします。
ステレオミキサーがある場合は有効化して既定デバイスとして指定します。
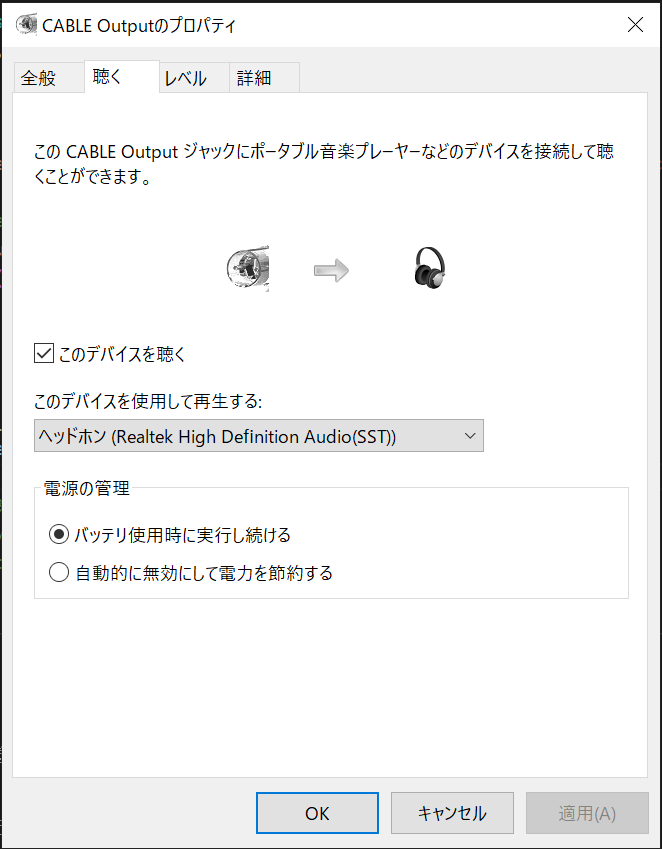
録音タブの「CABLE Output」を選択して、プロパティボタンをクリックします。
すると下記画面が出るので、「このデバイスを聴く」をチェックし、パソコンのスピーカー又はヘッドフォンを選択してOKボタンをクリックします。これで録音されている音の内容が聞けるようになります。
データモデルの準備
以下からコード実行でモデルデータが必要になります。
スモールモデルとビッグデータモデルがありますが、ここではビックデータモデルを使います。
解凍後のフォルダをtest_microphone.py内で指定します。
コード実行
ローカルPCのPythonにライブラリをインストールします。
pip install vosk
pip install sounddevice
下記コードをローカルPC内で実行します(モデルデータのパスを書き換えて下さい)
実行中にPC内で音を再生すると出力します。
処理を中断したい場合は「Ctrl+C」で終了します。
#!/usr/bin/env python3

import queue
import sounddevice as sd
from vosk import Model, KaldiRecognizer
import sys
import json

'''This script processes audio input from the microphone and displays the transcribed text.'''

# list all audio devices known to your system
print("Display input/output devices")
print(sd.query_devices())


# get the samplerate - this is needed by the Kaldi recognizer

device_info = sd.query_devices(sd.default.device[0], 'input')
samplerate = int(device_info['default_samplerate'])

# display the default input device
print("===> Initial Default Device Number:{} Description: {}".format(sd.default.device[0], device_info))

# setup queue and callback function
q = queue.Queue()

def recordCallback(indata, frames, time, status):
    if status:
        print(status, file=sys.stderr)
    q.put(bytes(indata))

# build the model and recognizer objects.
print("===> Build the model and recognizer objects.  This will take a few minutes.")
model = Model(r"モデルデータの配置パス")
recognizer = KaldiRecognizer(model, samplerate)
recognizer.SetWords(False)

print("===> Begin recording. Press Ctrl+C to stop the recording ")
try:
    with sd.RawInputStream(dtype='int16',
                           channels=1,
                           callback=recordCallback):
        while True:
            data = q.get()
            if recognizer.AcceptWaveform(data):
                recognizerResult = recognizer.Result()

                # convert the recognizerResult string into a dictionary
                resultDict = json.loads(recognizerResult)
                if not resultDict.get("text", "") == "":
                    print(recognizerResult)
                else:
                    print("no input sound")

except KeyboardInterrupt:
    print('===> Finished Recording')
except Exception as e:
    print(str(e))
下記サイトからファイルを再生します。
「本日はご来場いただきまして、誠にありがとうございます。開演に先立ちまして、お客様にお願い申し上げます。携帯電話など、音の出るものの電源はお切りください。また許可のない録音・撮影はご遠慮ください。皆様のご協力をよろしくお願いいたします」
素晴らしい認識精度です。
Docker上のサーバーを使った音声認識
次にDockerを使用したサーバーでリアルタイムの文字起こしをします。
Dockerビルド・実行
下記コマンドをWSLやLinux環境で実行してきます
git clone https://github.com/alphacep/vosk-server.git
cd vosk-server\docker
docker build -f Dockerfile.kaldi-ja -t vosk
docker run -d -p 2700:2700 vosk:latest
コード実行
ローカルのPCに戻りPythonライブラリをインストールします。
pip install websockets
下記コードをローカルPC内で実行します。
実行中にPC内で音を再生すると出力します。
処理を中断したい場合は「Ctrl+C」で終了します。
#!/usr/bin/env python3

import json
import os
import sys
import asyncio
import websockets
import logging
import sounddevice as sd
import sounddevice as sd
import sounddevice as sd
import argparse

def int_or_str(text):
    """Helper function for argument parsing."""
    try:
        return int(text)
    except ValueError:
        return text

def callback(indata, frames, time, status):
    """This is called (from a separate thread) for each audio block."""
    loop.call_soon_threadsafe(audio_queue.put_nowait, bytes(indata))

async def run_test():
    try:
        with sd.RawInputStream(samplerate=args.samplerate, blocksize = 4000, device=args.device, dtype='int16',
                            channels=1, callback=callback) as device:

            async with websockets.connect(args.uri) as websocket:
                await websocket.send('{ "config" : { "sample_rate" : %d } }' % (device.samplerate))

                while True:
                    data = await audio_queue.get()
                    await websocket.send(data)
                    resultDict = json.loads(await websocket.recv())
                    if not resultDict.get("text", "") == "":
                      print(resultDict['text'])

    except KeyboardInterrupt:
        print('===> Finished Recording')
    except Exception as e:
        print(str(e))

async def main():

    global args
    global loop
    global audio_queue

    parser = argparse.ArgumentParser(add_help=False)
    parser.add_argument('-l', '--list-devices', action='store_true',
                        help='show list of audio devices and exit')
    args, remaining = parser.parse_known_args()
    if args.list_devices:
        print(sd.query_devices())
        parser.exit(0)
    parser = argparse.ArgumentParser(description="ASR Server",
                                     formatter_class=argparse.RawDescriptionHelpFormatter,
                                     parents=[parser])
    parser.add_argument('-u', '--uri', type=str, metavar='URL',
                        help='Server URL', default='ws://localhost:2700')
    parser.add_argument('-d', '--device', type=int_or_str,
                        help='input device (numeric ID or substring)')
    parser.add_argument('-r', '--samplerate', type=int, help='sampling rate', default=16000)
    args = parser.parse_args(remaining)
    loop = asyncio.get_running_loop()
    audio_queue = asyncio.Queue()

    logging.basicConfig(level=logging.INFO)
    await run_test()

if __name__ == '__main__':
    asyncio.run(main())
「本日はご来場いただきまして、誠にありがとうございます。開演に先立ちまして、お客様にお願い申し上げます。携帯電話など、音の出るものの電源はお切りください。また許可のない録音・撮影はご遠慮ください。皆様のご協力をよろしくお願いいたします」
オープンソースでスマホアプリにも組み込めたり、色々出来そうです。
参考にしたサイト様
https://alphacephei.com/vosk/
https://hidesanpo.com/onsei-data-textka-vb-cable
https://www.wizard-notes.com/entry/python/sounddevice
https://soundeffect-lab.info/sound/voice/info-lady1.html
https://singerlinks.com/2022/03/how-to-convert-microphone-speech-to-text-using-python-and-vosk/
これで以上となります。
見て下さりありがとうございました。
