子ネコでもデキル!初心者向け!Laravel9とCloud9で作る顧客管理システム(超長文) 2.0版 後編
説明
注意:先に以下の記事で環境を作って置く必要があります。子ネコでも出来る!Laravel9とCloud9で作る顧客管理システム 前編 Ver2.0
この記事で説明するLaravelの機能
- Migrate
- Eloquent -- hasMany(), belongsTo(), hasOne()
- Policy
- Controller
- Middleware
- @csrf
- Validation
- FormRequest
- Blade -- layout include
- Event & Listener
- Provider
この記事で説明されていないLaravelの機能や概念
- TDD
- Test
- SOLID
- Method DELETE の処理
- Controller での EDITの処理
- Eloquent JOIN
- Cache
対象となる方
- PHPの基本を分かっている
- オブジェクト指向の基本を分かっている
- データベースの基本を分かっている
- MySQLの基本操作が出来る
- PHP7.xの実行環境が有る
- composerコマンドが使える環境を持っている
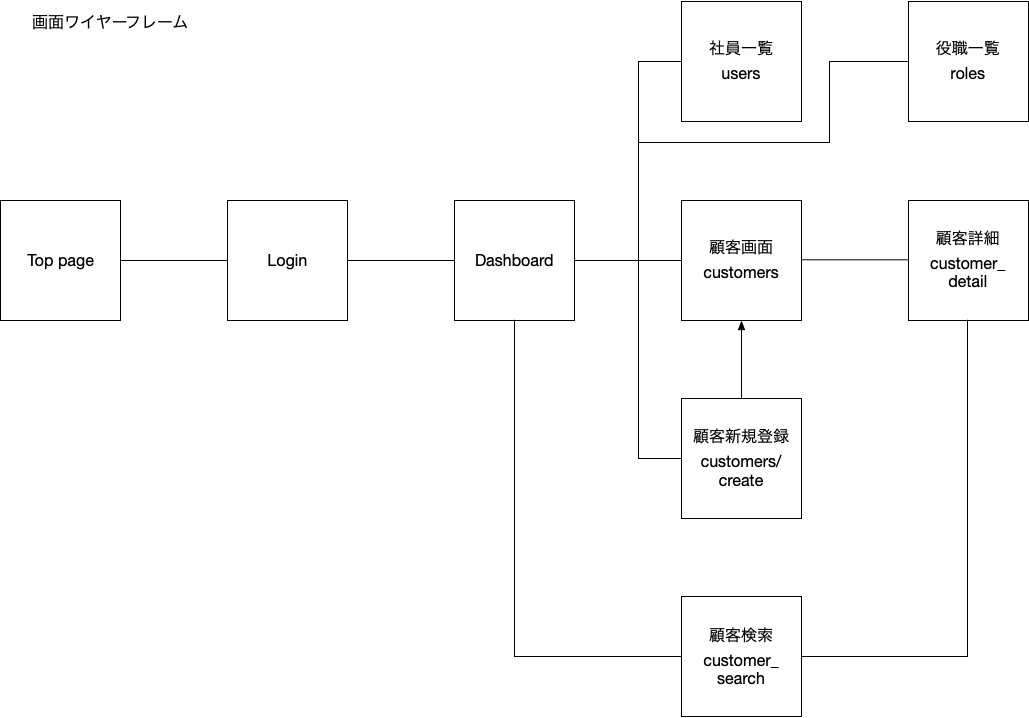
こんなシステムを作ります
簡単な顧客管理システム
- 社員がログインをする
- 社員は役職を持ち、役職にはスーパーバイザーと店員の2つがある
- 社員は顧客を登録・検索して顧客詳細情報を見ることが出来る
- 顧客の履歴を入力・一覧表示できる
- クレーマー顧客が登録されたらスーパーバイザーに通知メールを送る
- 社員は店舗に所属する
- 店舗は東京本社、名古屋支店、大阪支店の3つがある
今回作成しない機能
- 社員の登録編集画面
- 店舗の登録編集画面
画面ワイヤーフレーム
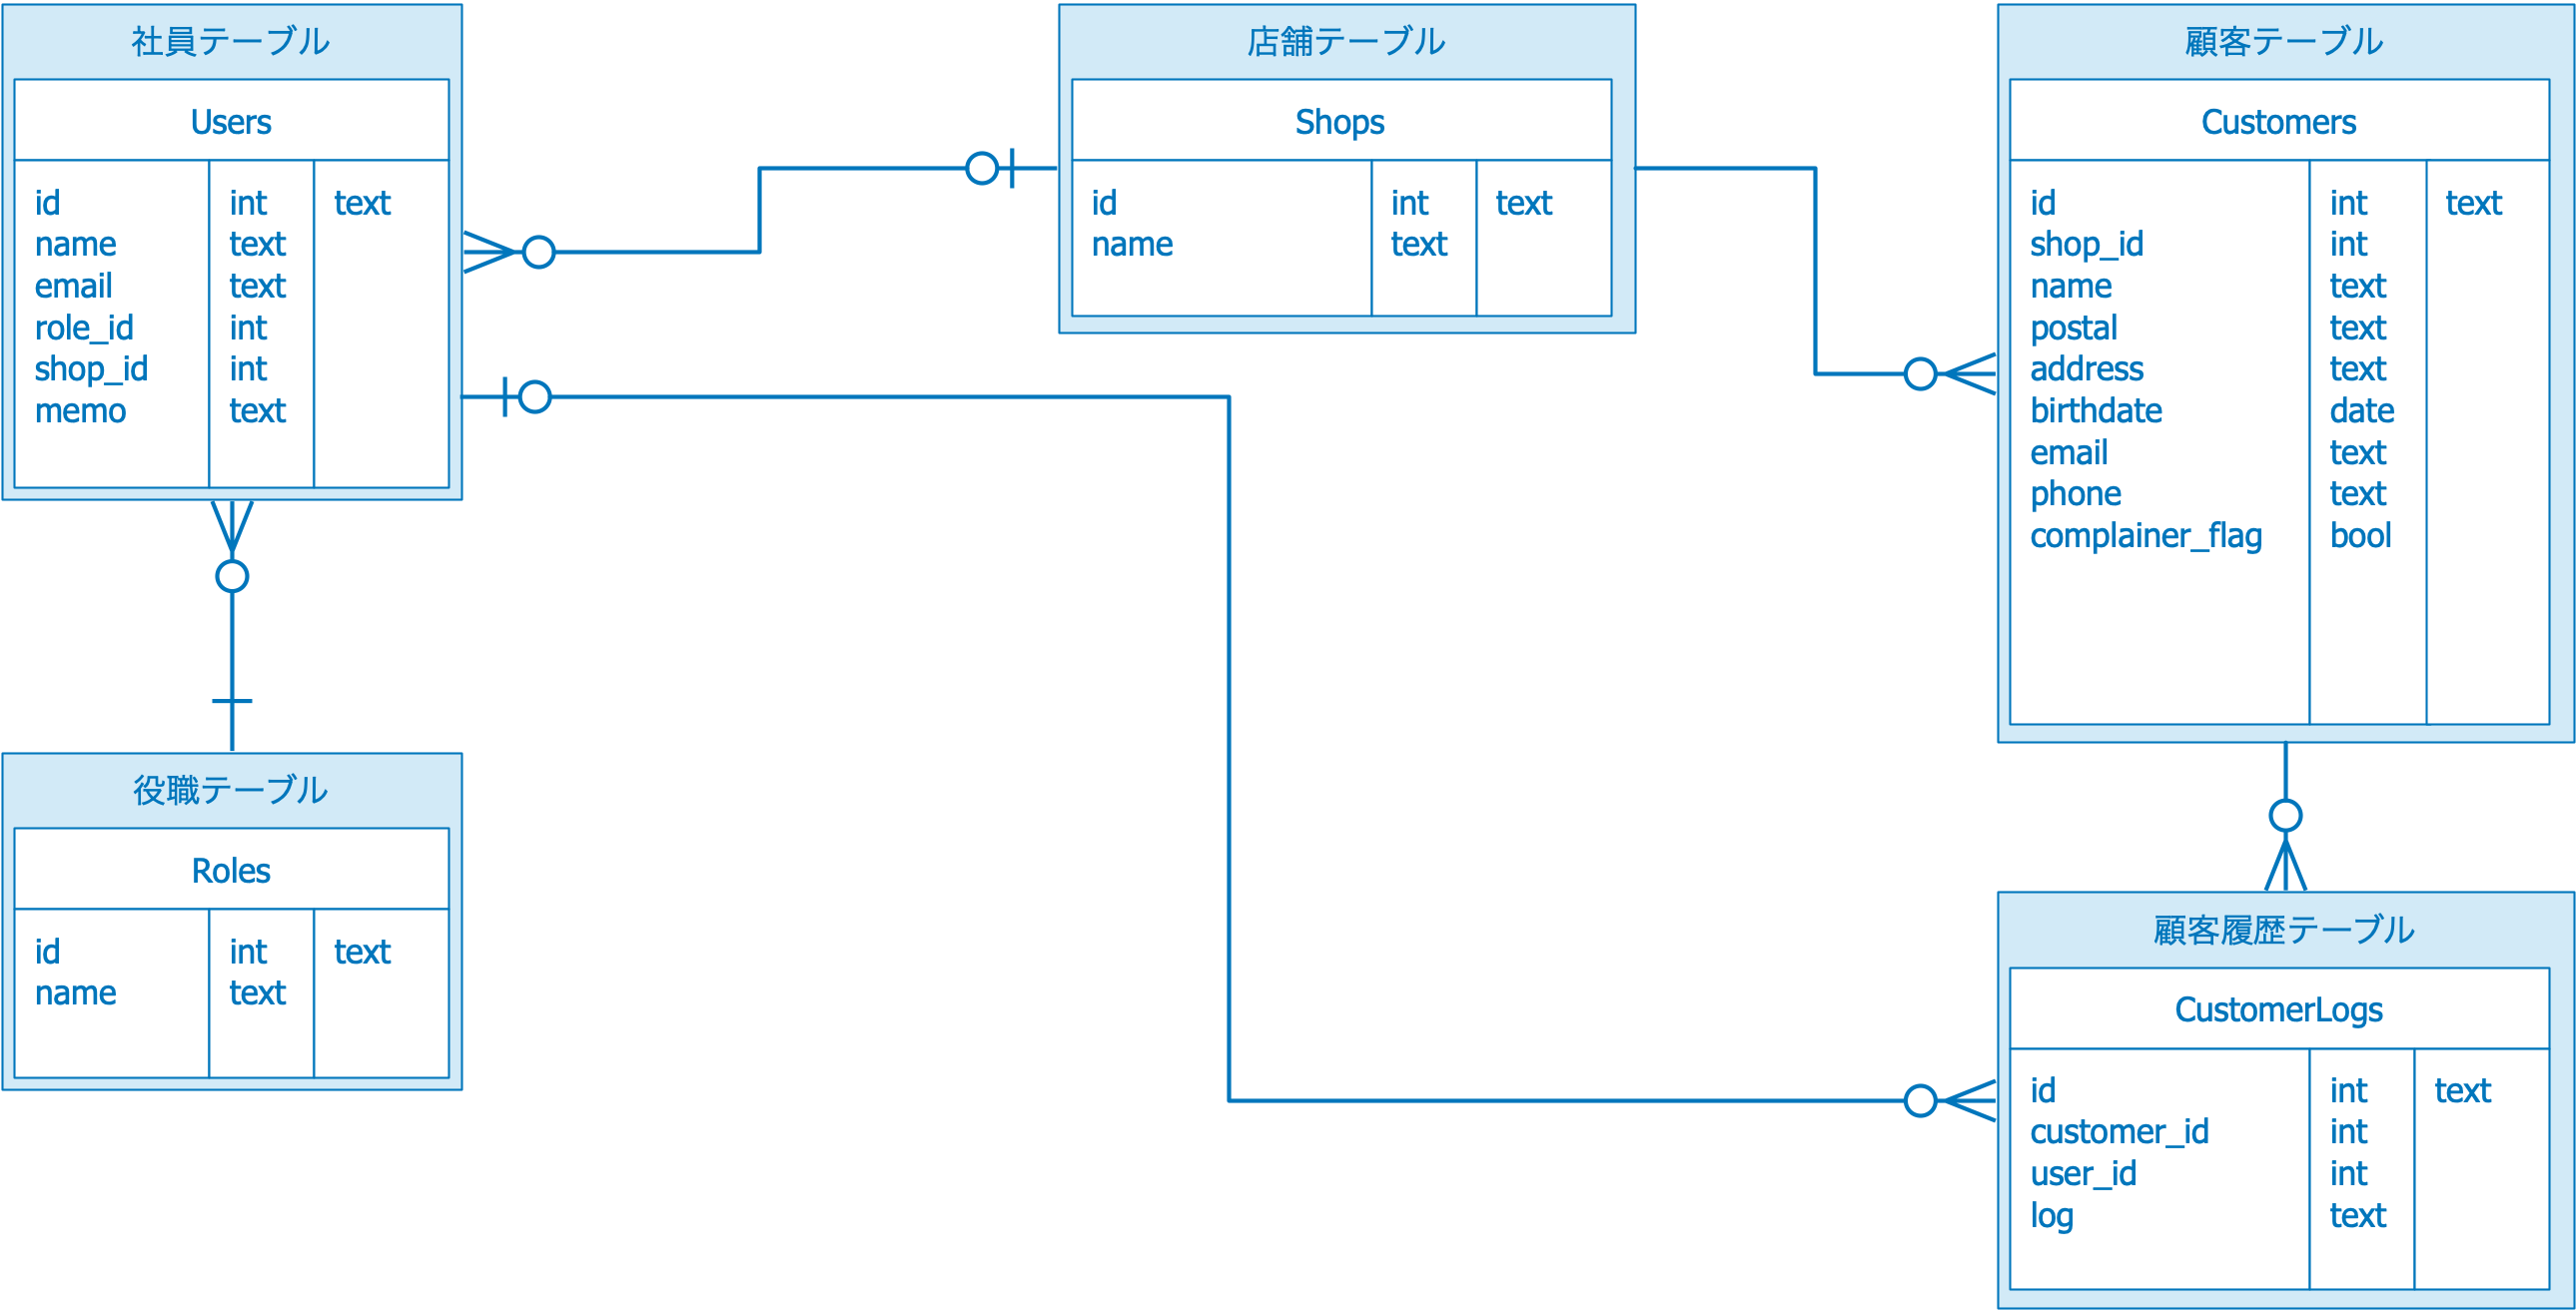
ER図
準備
子ネコでもデキル!初心者向け!Laravel9とCloud9で作る顧客管理システム(超長文) 2.0版 前編で環境構築の説明をしています。 こちらを参照してください。Cloud9の画面を開く
前編で説明したAWS Cloud9の画面を開きます。ロケールをJPにする
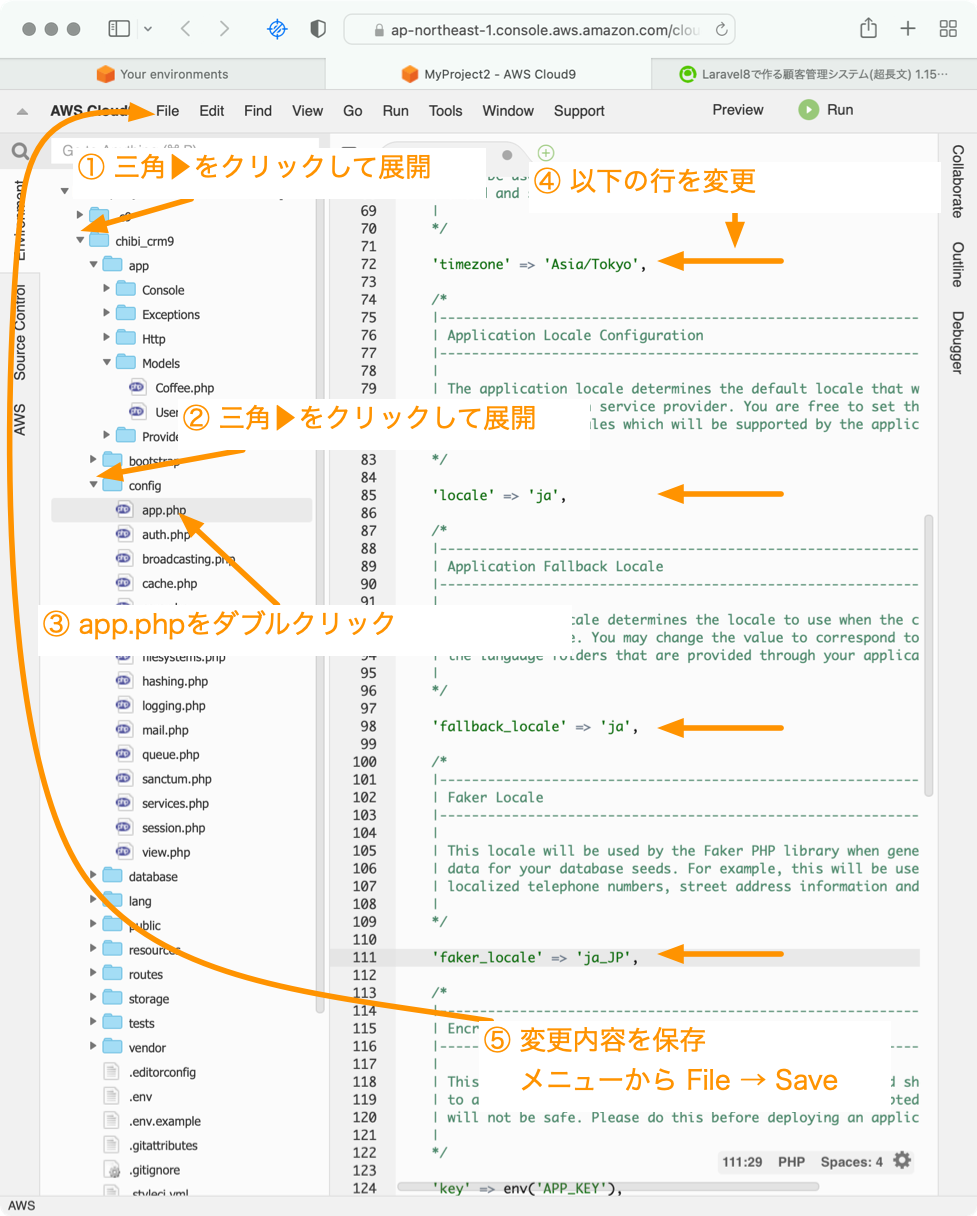
デフォルトだとLaravelの言語設定は英語なので日本語に切り替えます。
config/app.phpファイルを変更します。
72行目近辺
'timezone' => 'Asia/Tokyo',
85行目と98行目近辺
'locale' => 'ja',
↑この設定をすることでエラーメッセージなどが日本語に切り替わります。日本語のメッセージファイルを用意する必要がありますが。
編集が終わったら、編集内容を保存してエディタを終了します。
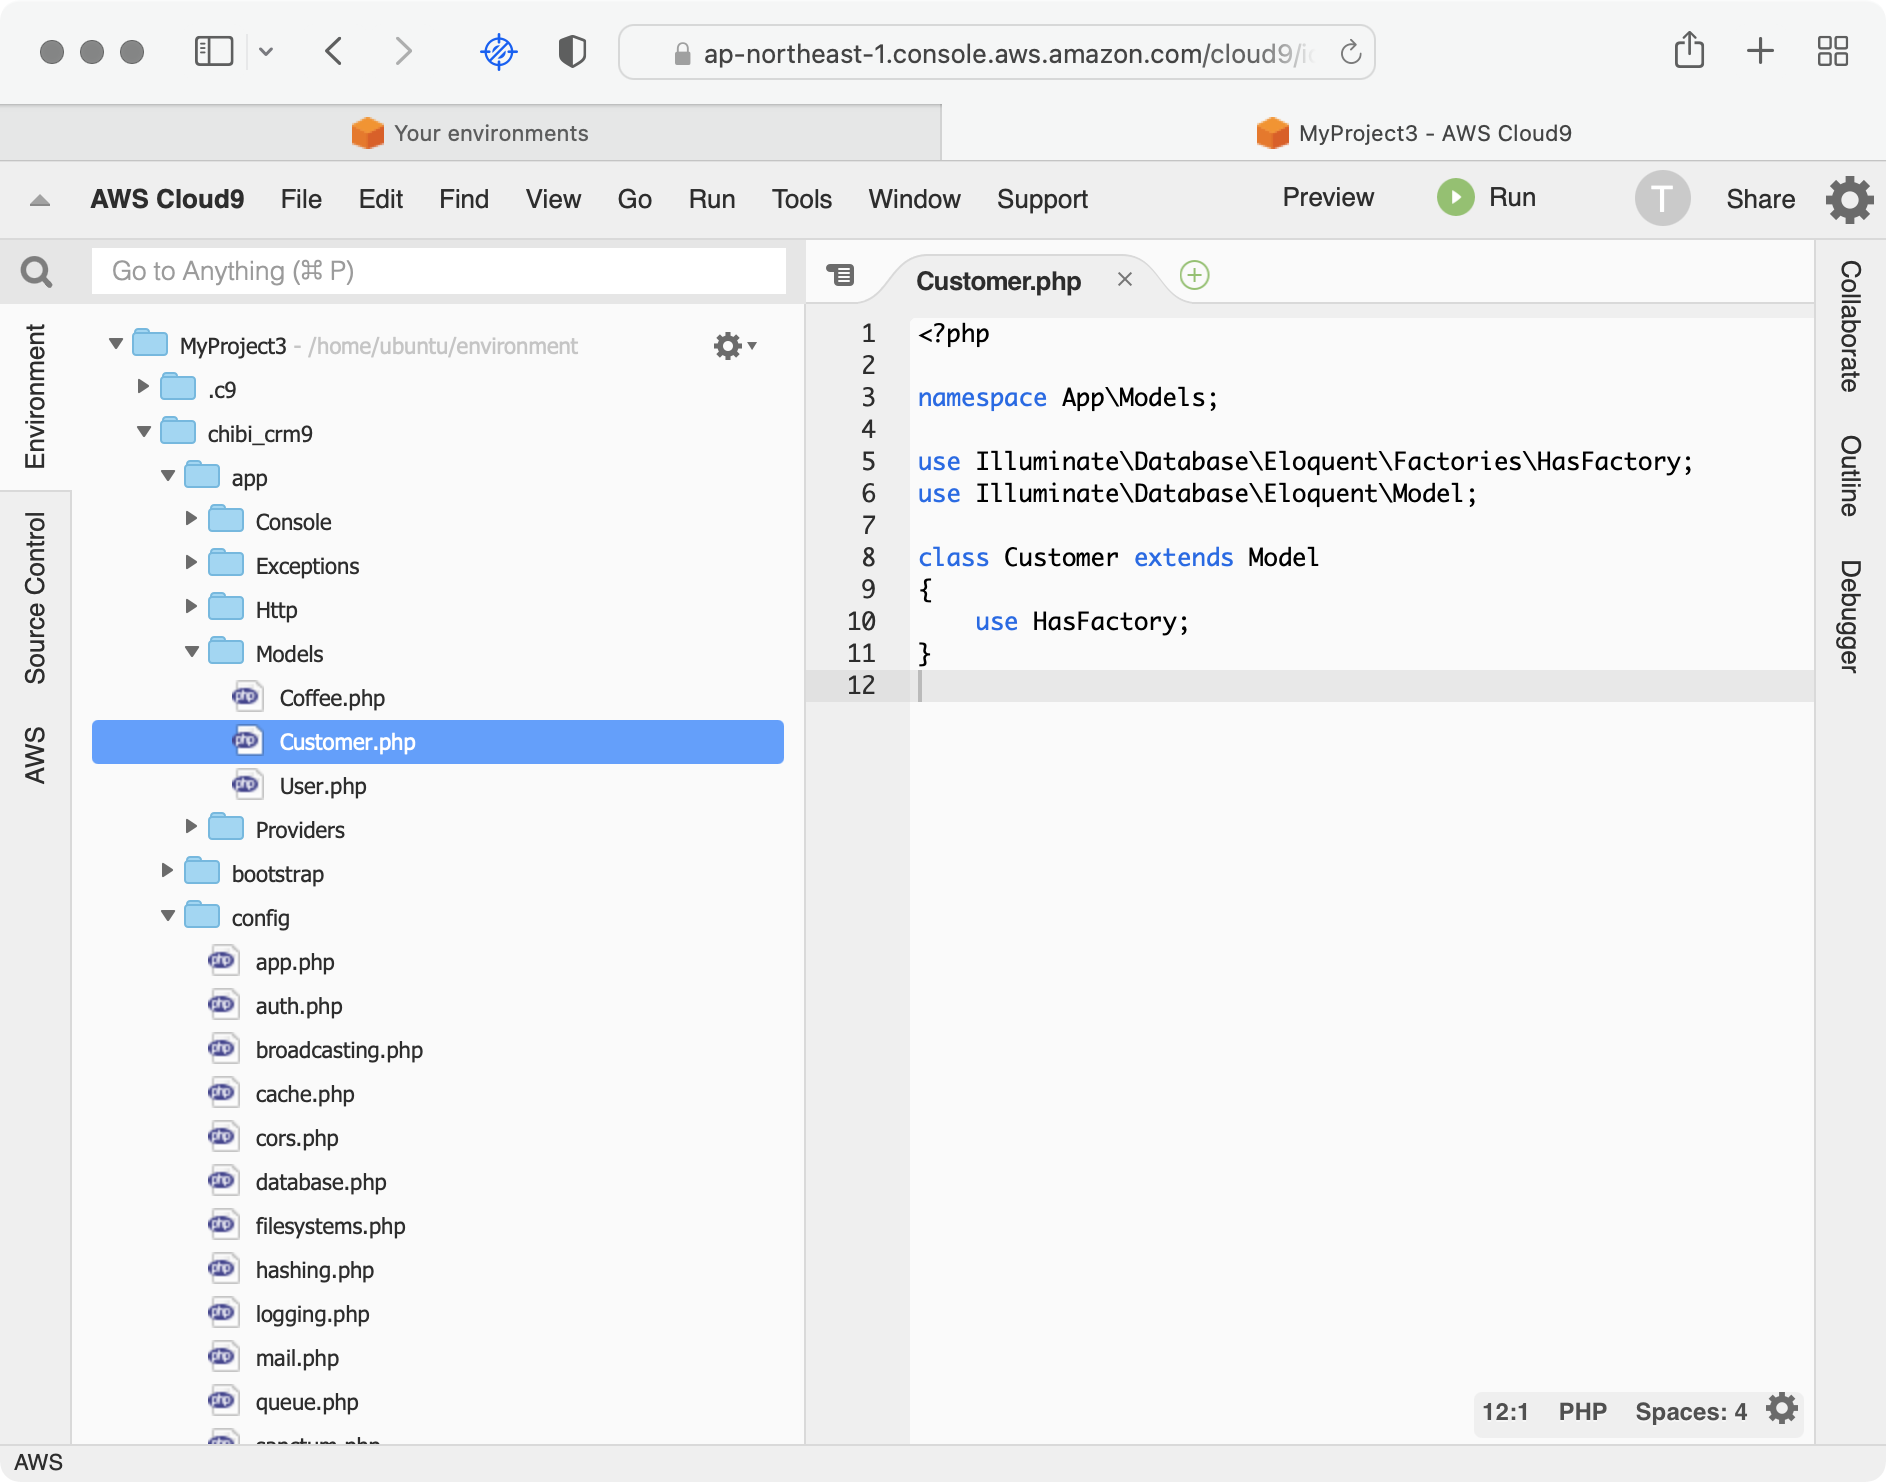
model
Laravelではデータベース操作をするためにEloquentという仕組みがあります。
customersを操作するクラスを作成します。
ターミナルで以下のコマンドを実行します。
php artisan make:model Customer
shopテーブルを作ってみる
.envの確認
.envファイルが存在することを確認します。存在しない場合は.env.exampleをコピーして.envを作成してください。
APP_NAMEをちびCRMに変更します。
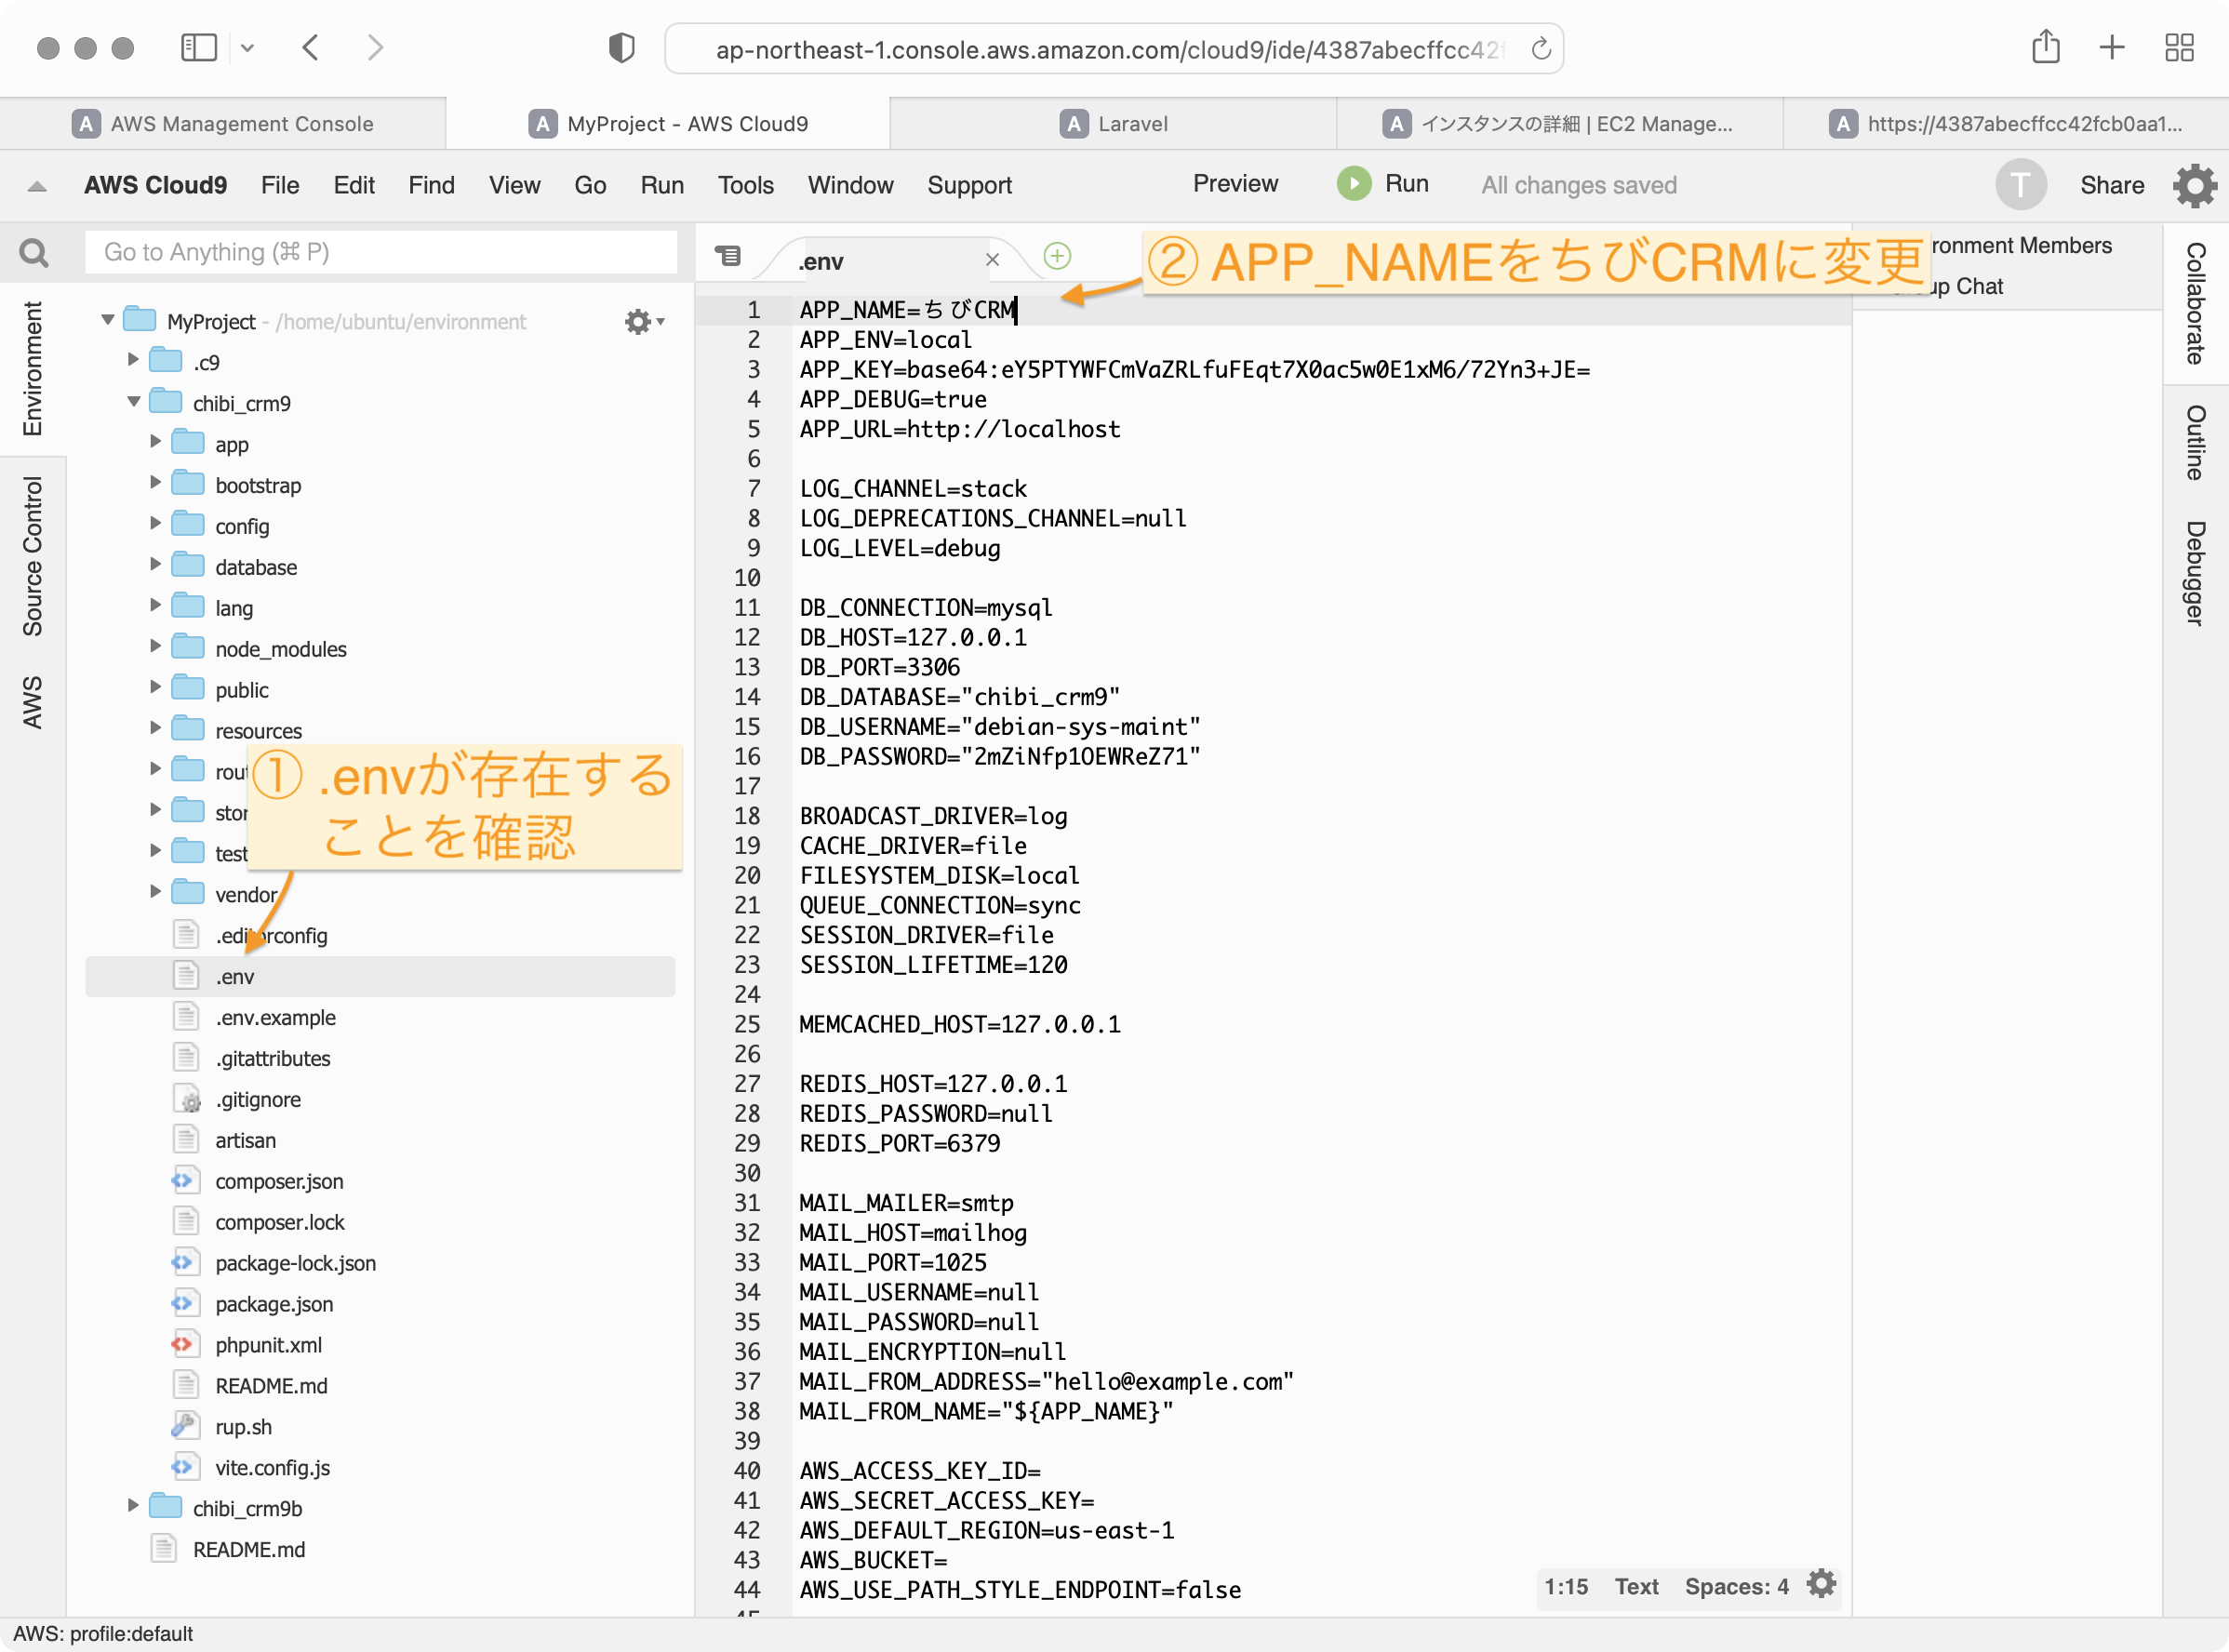
Cloud9のターミナルから以下のコマンドを実行します。
php artisan make:migration create_shops_table
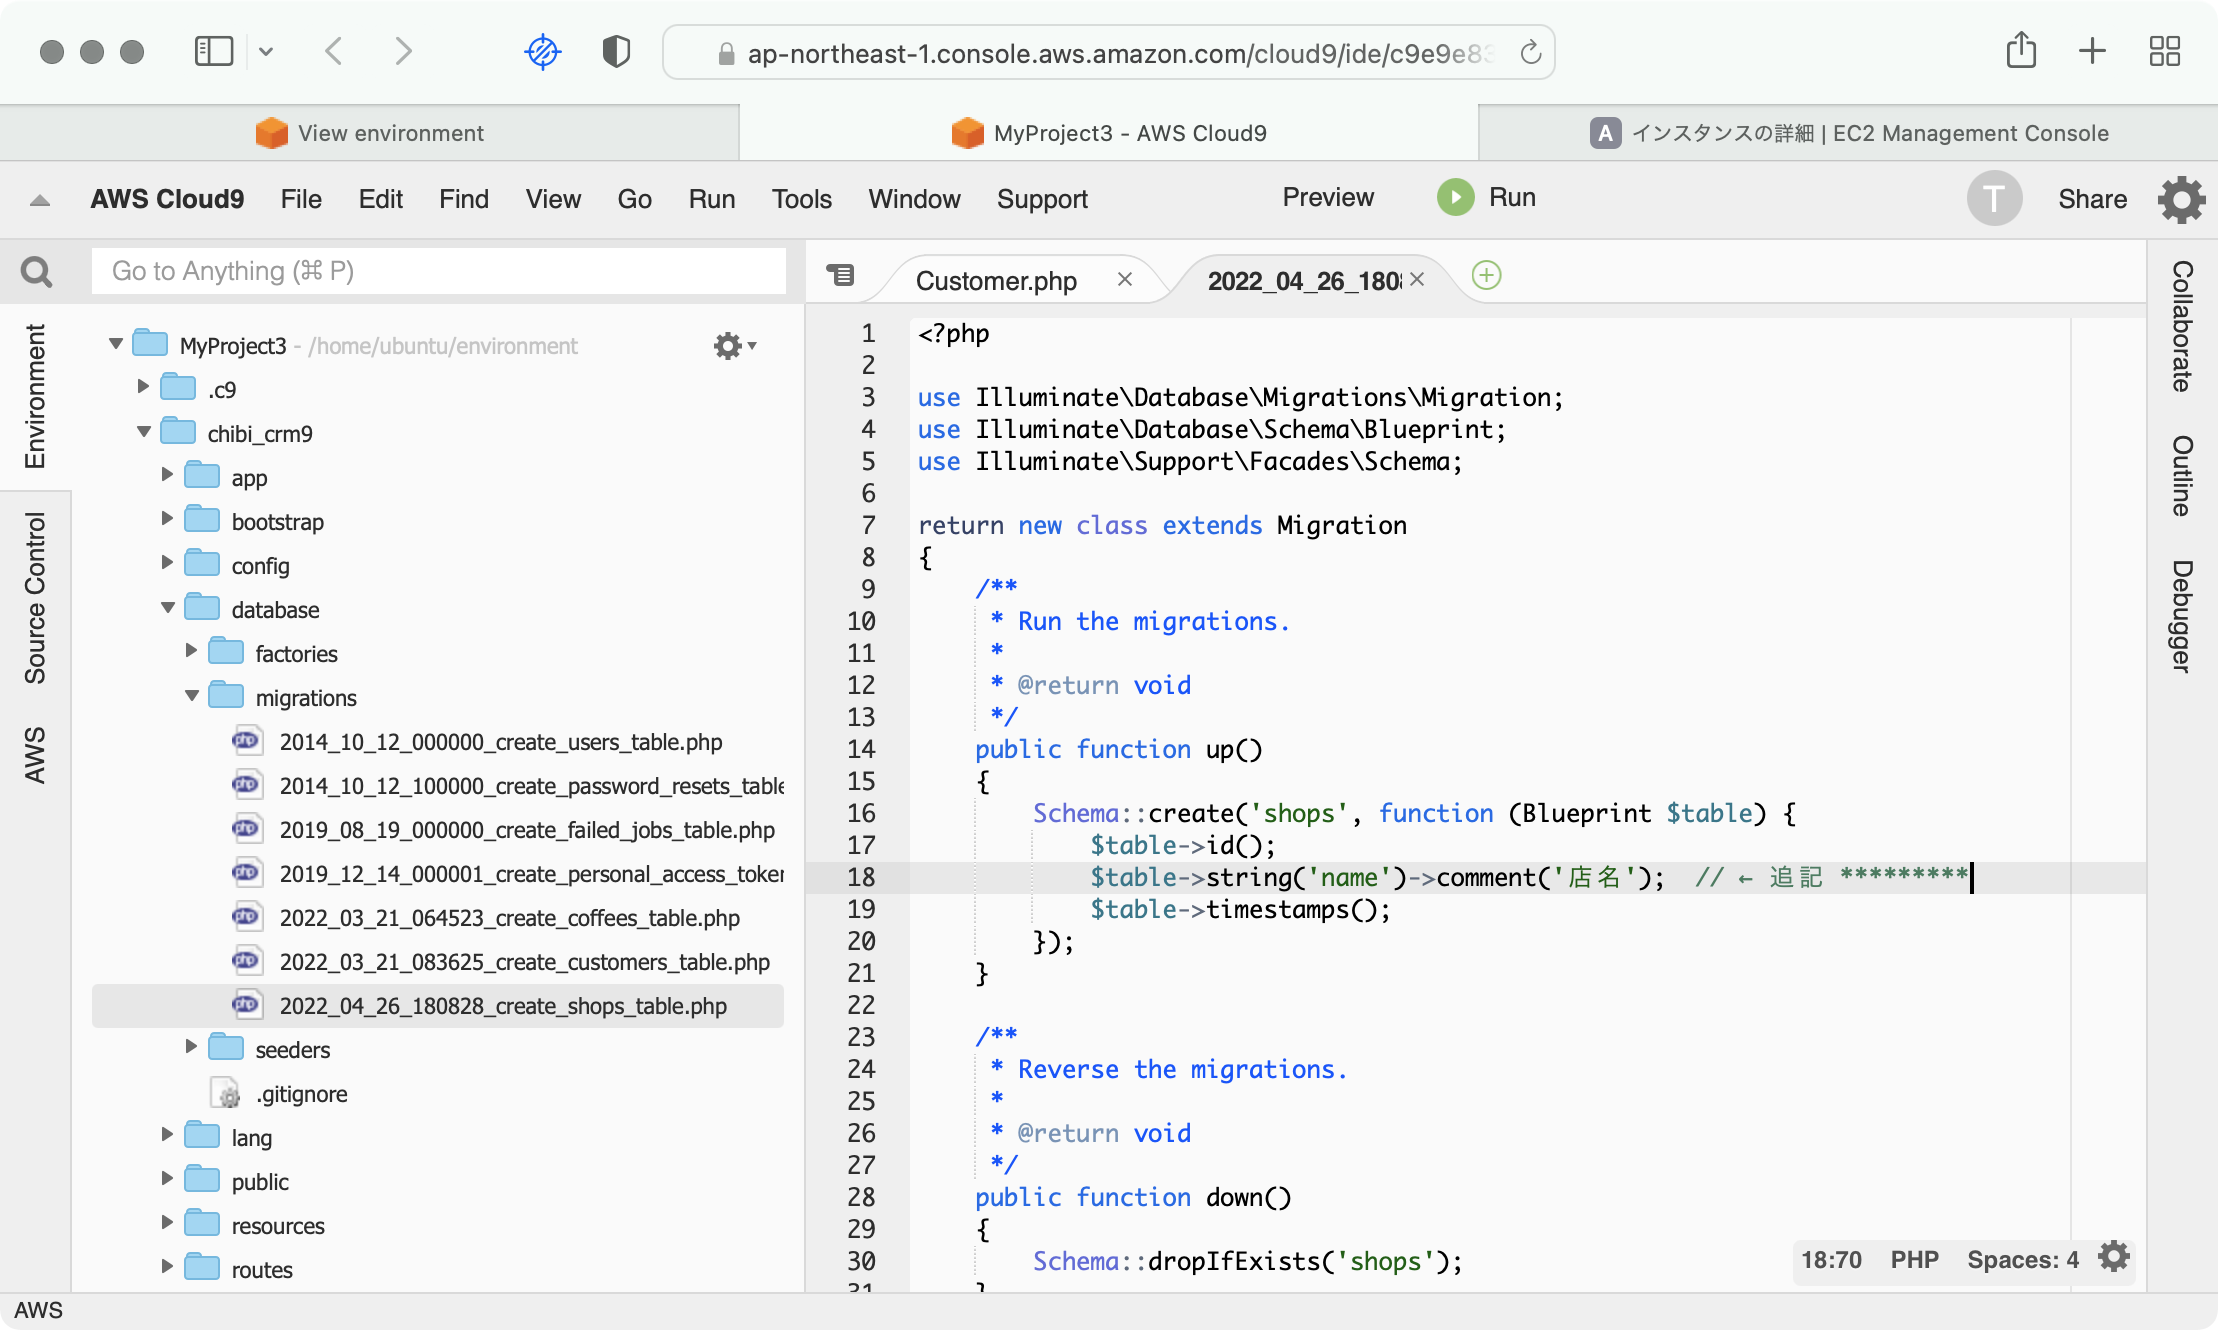
database/migrations/ディレクトリに 2022_04_26_180828_create_shops_table.php という名前のファイルが作られます。
Cloud9のエディタでこのファイルを編集します。
shopsテーブルは店舗の情報をいれます。東京本店、大阪支店のような。
ショップ名を格納するnameカラムを持ちます。nameカラムを追加します。
エディタでnameカラムを追加しましょう。
$table->string('name')->comment('店名'); // ← 追記 *********
データベース定義を変更したので、migrationを実行します。
ターミナルから以下のコマンドを実行。
php artisan migrate:fresh
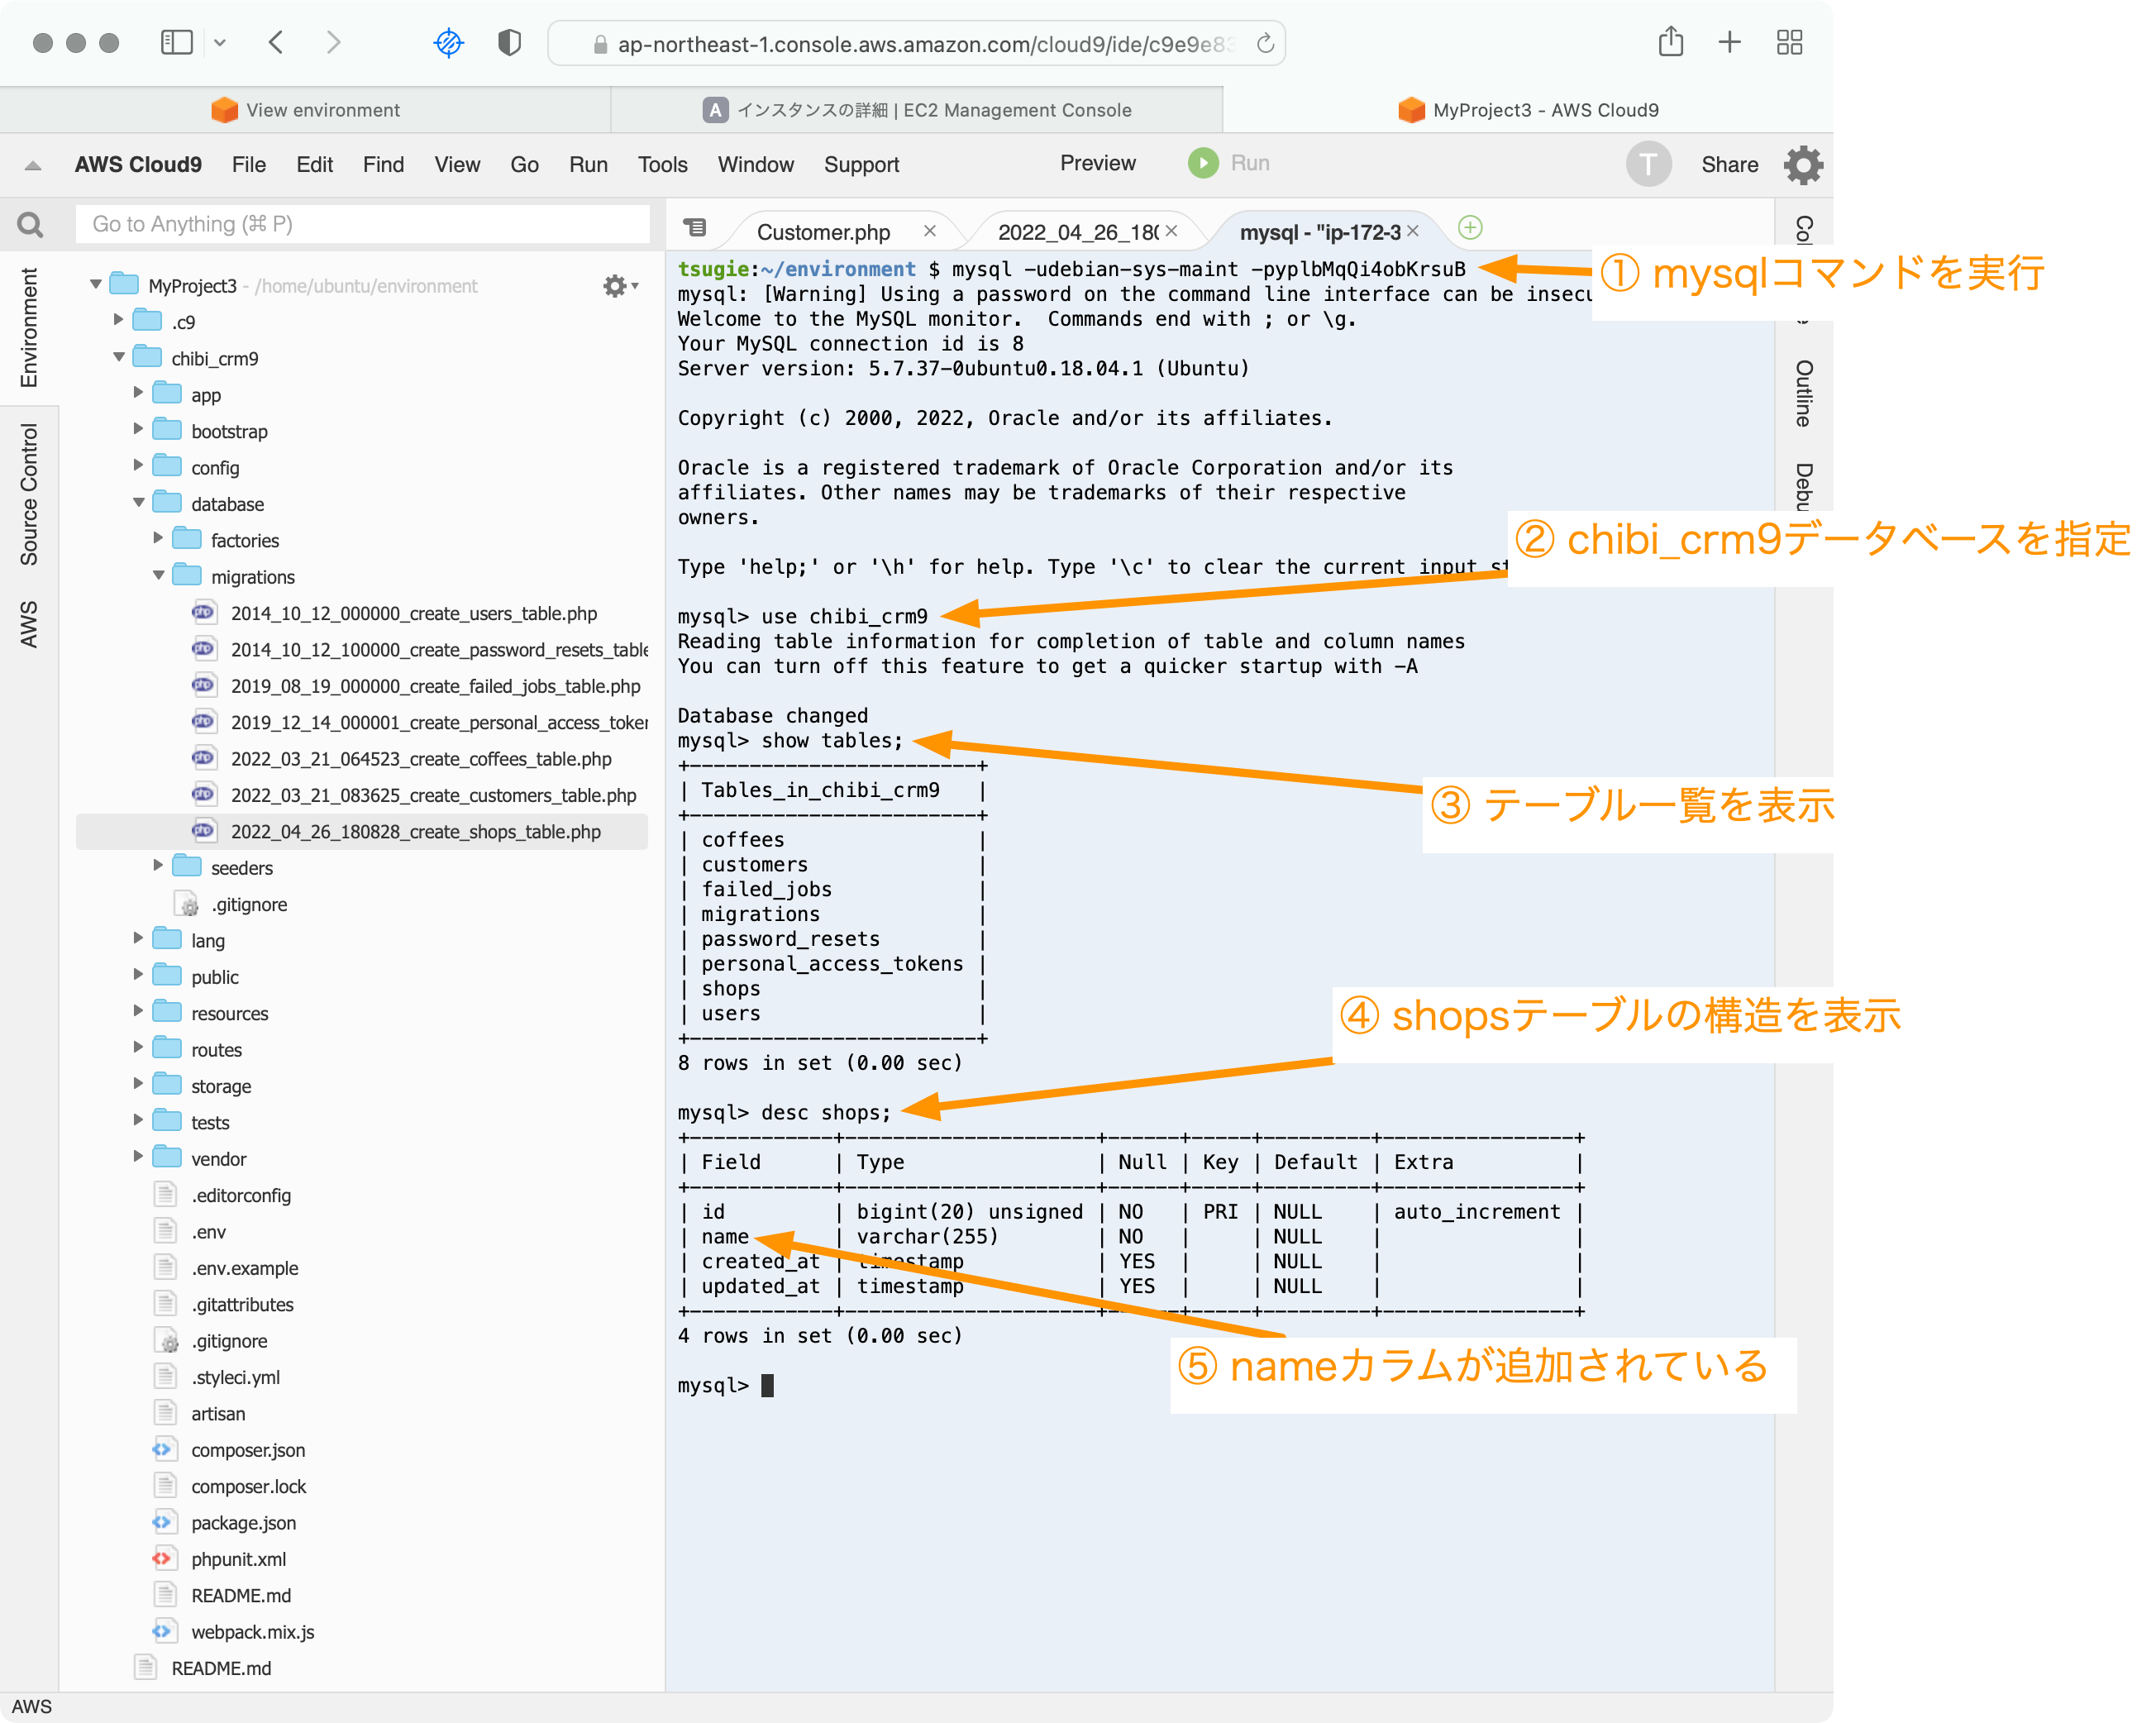
データベースにアクセスして実際に変更されたか確認します。
ターミナルでmysqlコマンドを実行してデータベースに接続。
mysql -udebian-sys-maint -p##あなたのパスワード##
mysqlコマンドのプロンプから以下のコマンドを実行。
use chibi_crm9
show tables;
desc shops;
mysqlコマンドのプロンプトから
select * from shops;
を実行します。
Empty set (0.00 sec)
と表示されます。
モデルをつくる
まだshopsテーブルにはデータが入っていません。
それではshopsテーブルにアクセスするクラスを作って、Laravelからshopsテーブルにアクセスしてみましょう。
Cloud9のIDEから新しくターミナルを開いて以下のコマンドを実行します。
cd chibi_crm9
php artisan make:model Shop
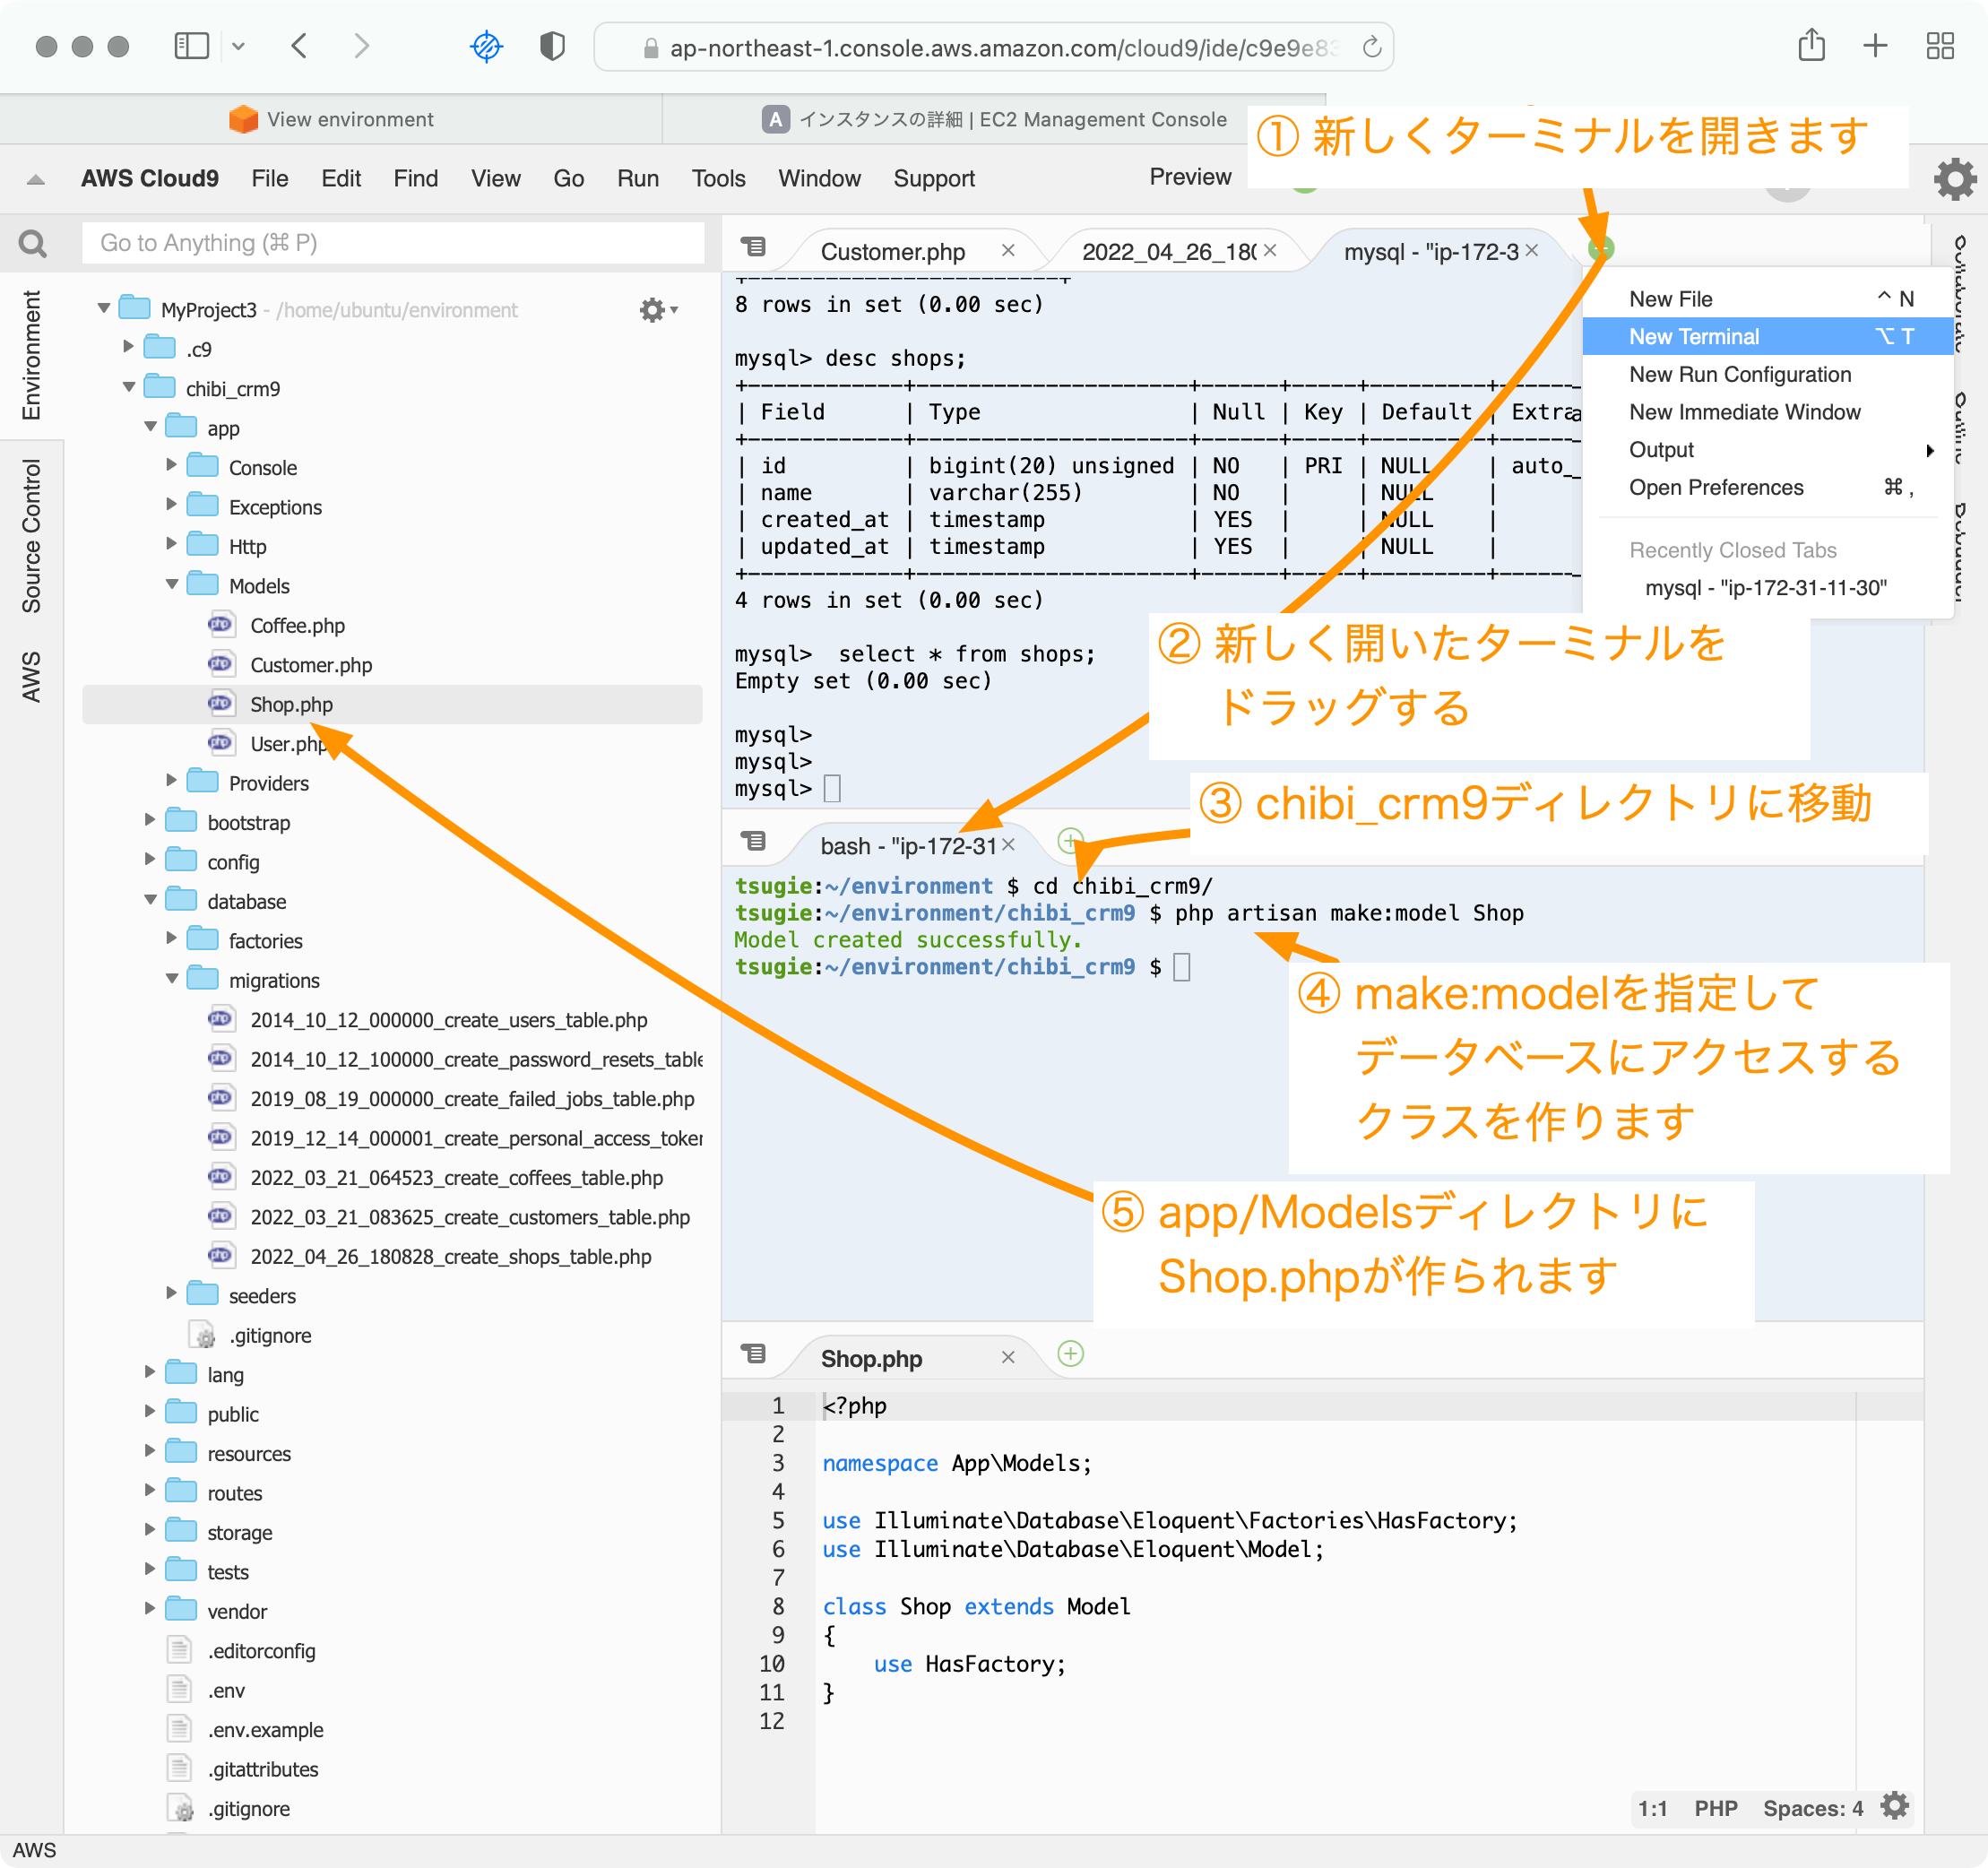
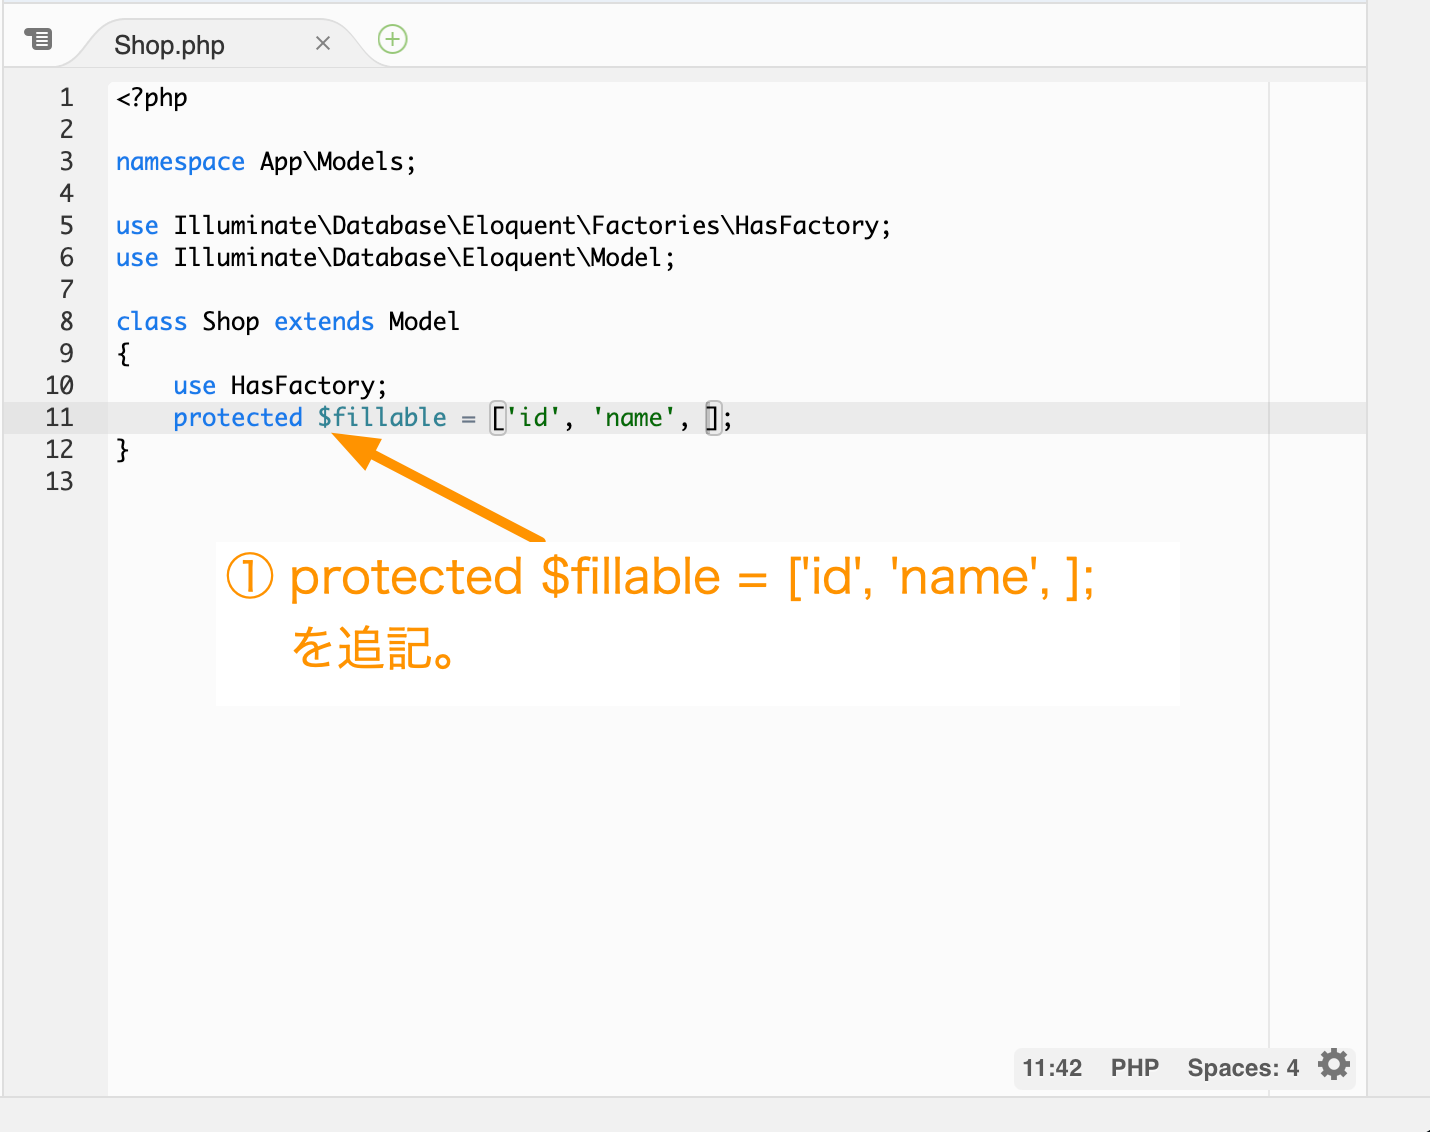
Cloud9のIDEを使ってShop.phpファイルを開いて以下の定義を追記します。
protected $fillable = ['id', 'name', ];
Laravelでこの項目を使いますよ。という定義になります。
次にCloud9のターミナルを開いて以下のコマンドを実行して、tinkerを実行します。tinkerはLaravelのいろいろな機能をコマンドラインで実行することのできる機能です。
php artisan tinker
備考:CRUDのC CRUDはデータベース機能基本的な考え方です。Create 作成、Read 読込、Update 更新、Delete削除の頭文字をとってCRUDと書きます。
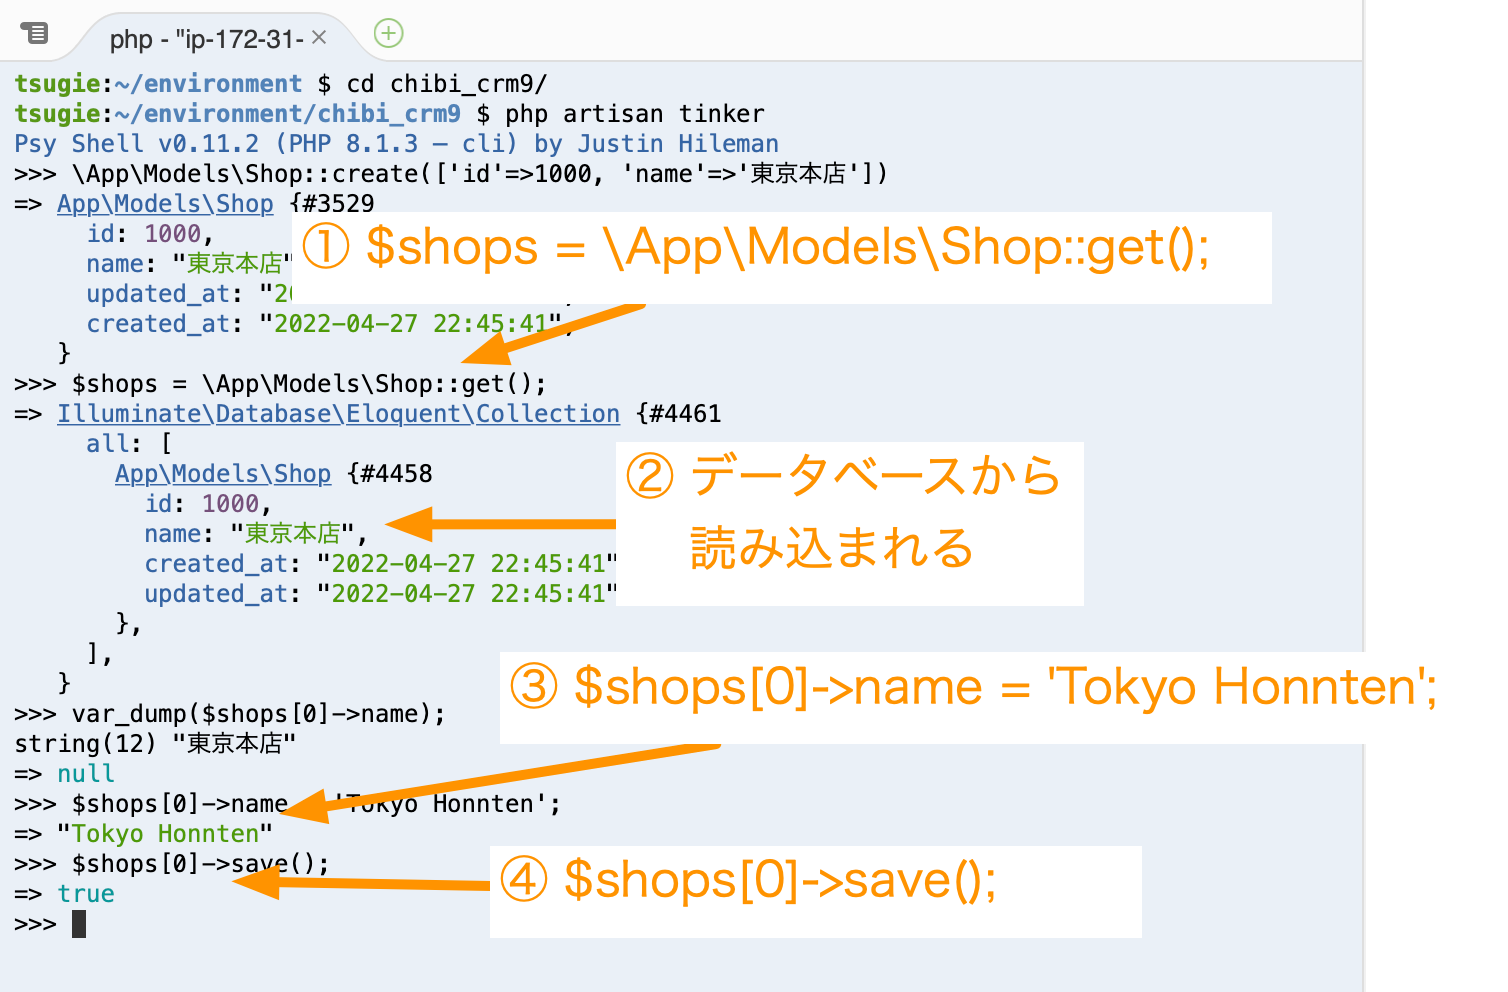
tinkerのプロンプトが表示されたら以下のコマンドを実行してデータベースのshopテーブルに東京本店の情報を設定します。
\App\Models\Shop::create(['id'=>1000, 'name'=>'東京本店'])

データベースに東京本店情報が登録されました。
備考:CRUDのR
次にshopsテーブルから上法を取得してみましょう。
tinkerで以下のコマンドを実行します。
$shops = \App\Models\Shop::get();

dd($shops[0]->name);
ddはLaravelで変数やオブジェクトの内容を確認する機能です。
データベースからshopsテーブルの情報が読み込まれてPHPの$shops変数に配列情報として登録されました。
店舗は東京本店だけ登録されていません。
$shops配列の0番目に東京本店情報が登録されています。
dd($shops[0]->name);
で、配列0番目のnameの値を表示しています。
東京本店と表示されます。
備考:CRUDのU
この東京本店を'Tokyo Honnten'に変更します。
tinkerで以下を実行します。
$shops[0]->name = 'Tokyo Honnten';
PHP上の変数の値が変更されます。これをデータベースに反映させます。
tinkerで以下を実行します。
$shops[0]->save();
データベースを確認します。
Cloud9のターミナルを新しく開いてmysqlコマンドを実行します。
mysql -udebian-sys-maint -pyplbMqQi4obKrsuB
mysqlコマンドが開いたら以下のクエリを実行します。
use chibi_crm9
select * from shops;
データベースの内容が変更されていることを確認できます。
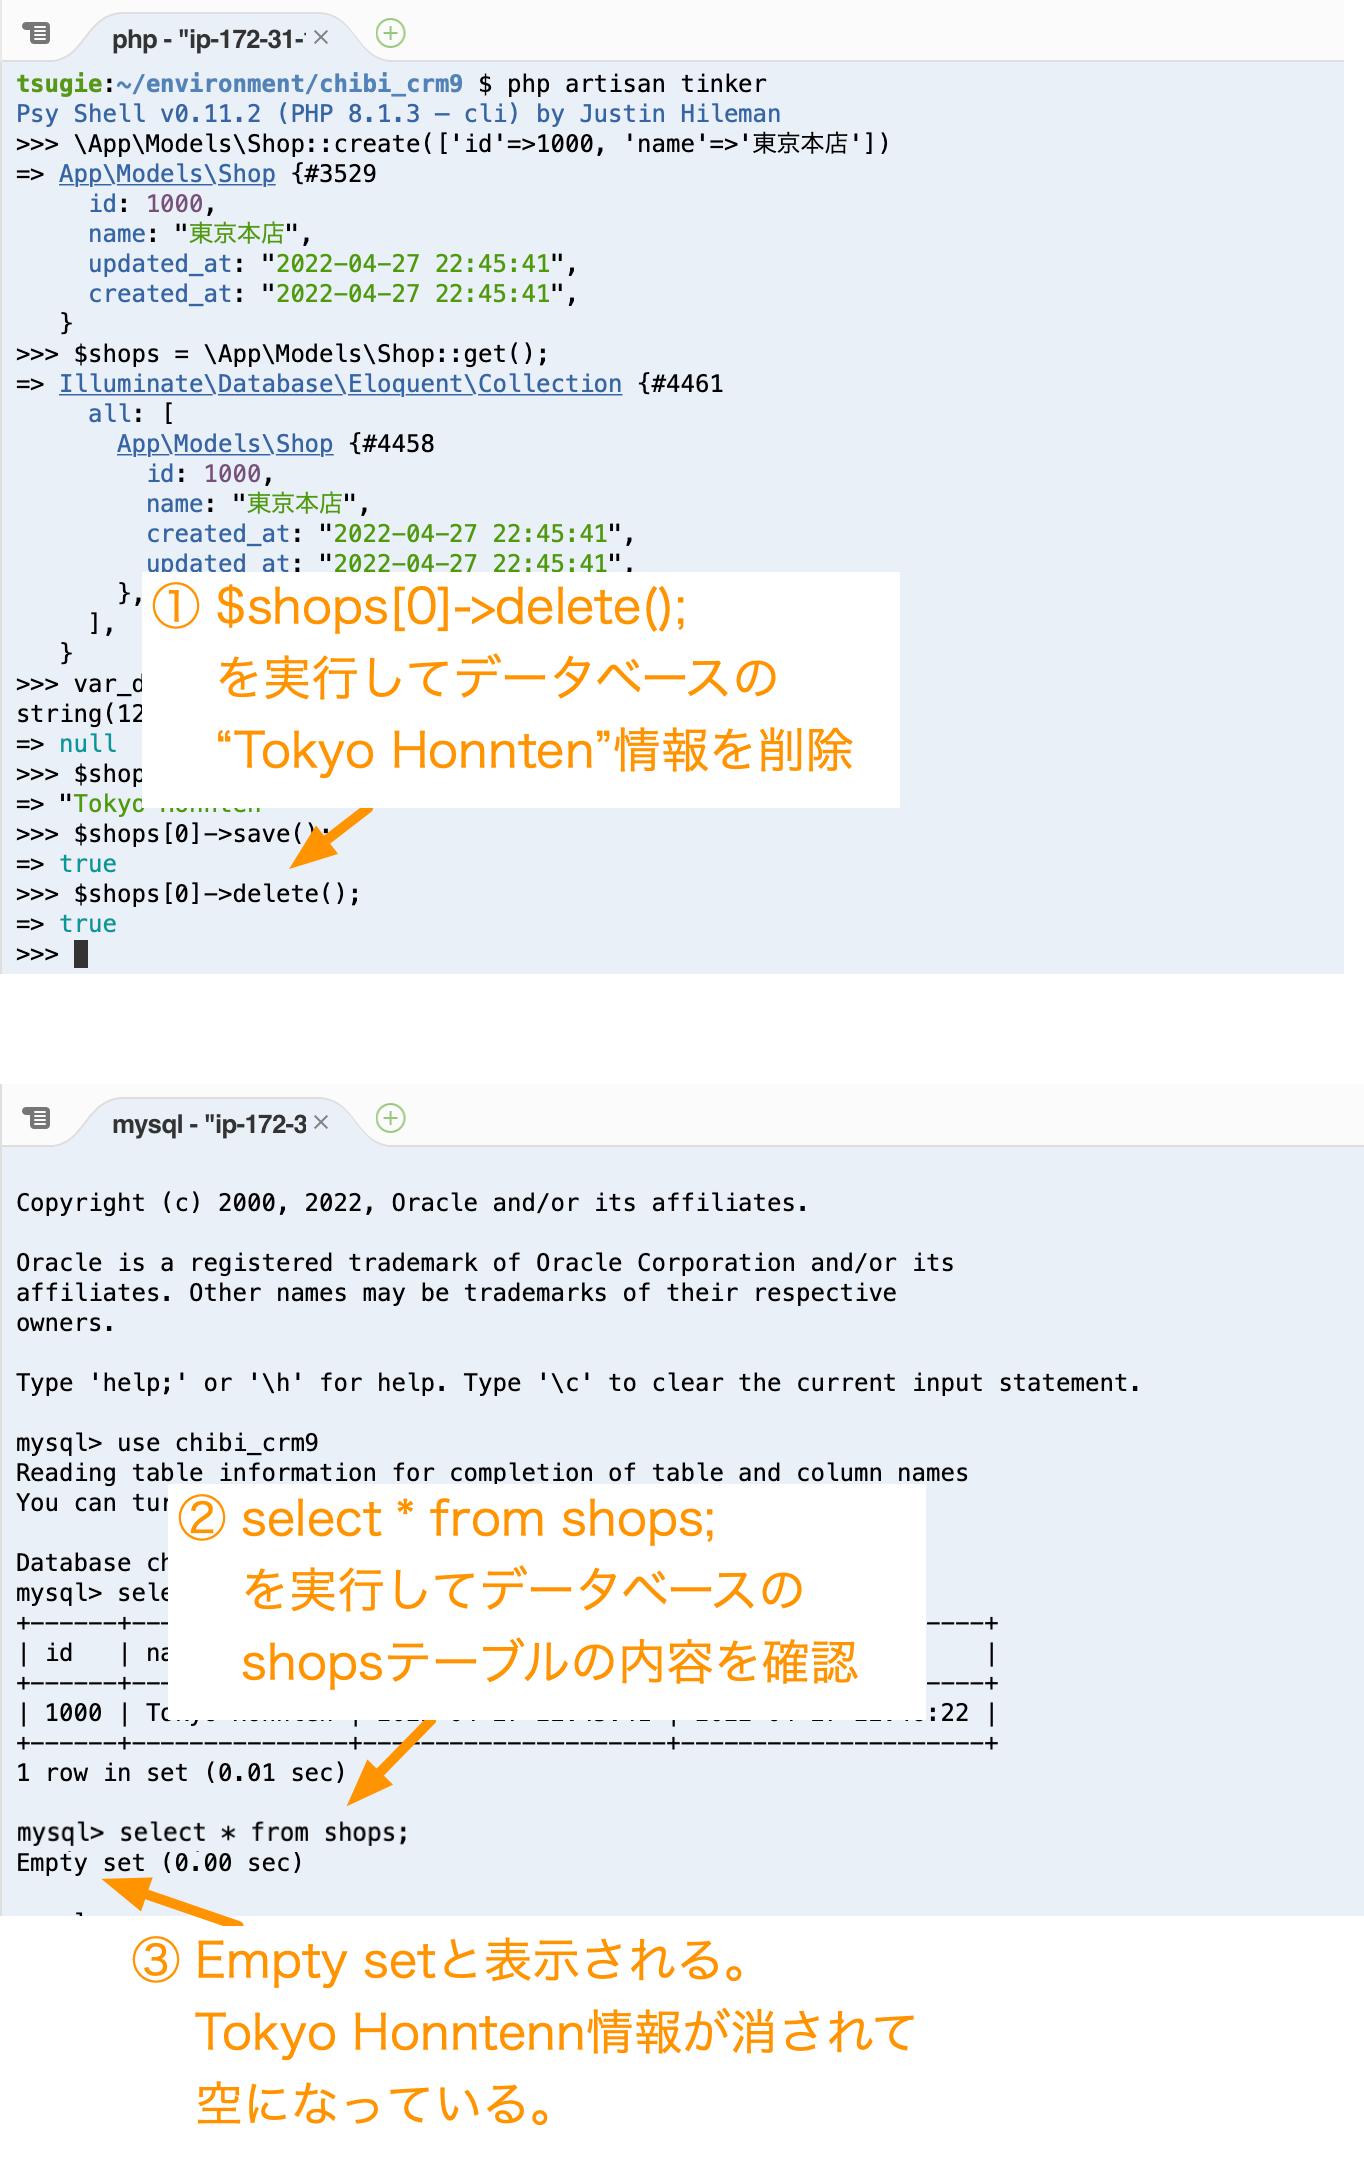
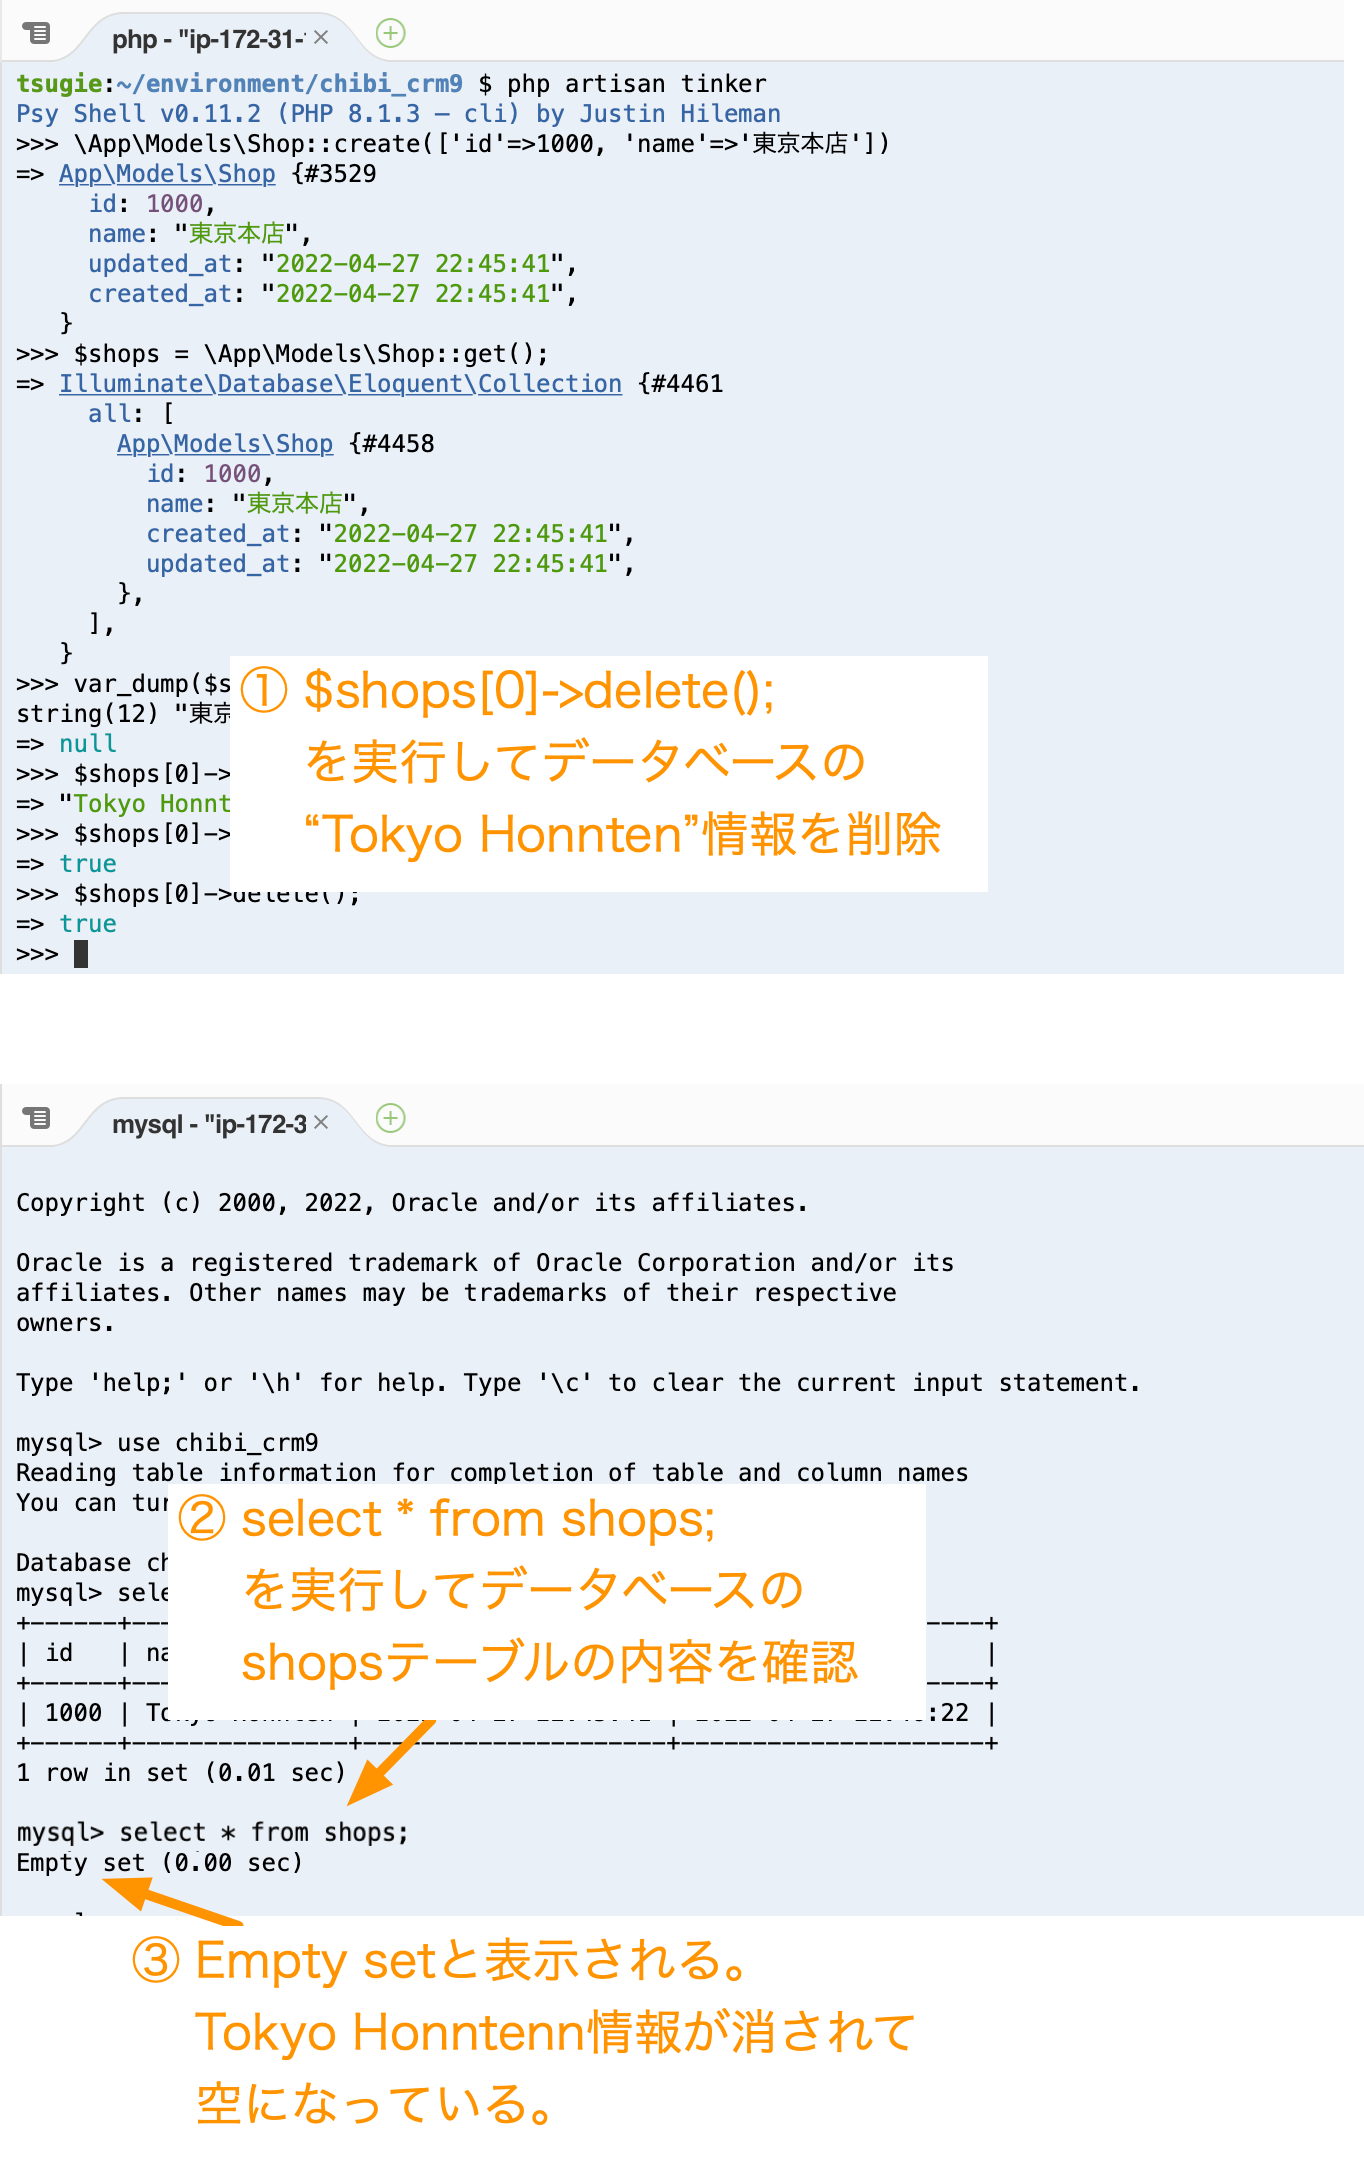
備考:CRUDのD
削除方法を学びます。
tinkerのターミナルで
$shops[0]->delete();
を実行します。
データベース上の”Tokyo Honnten”情報が削除されます。
mysqlのプロンプトで
select * from shops;
を実行して”Empty set”と表示されることを確認します。
次の説明で使用するデータを作成しておく
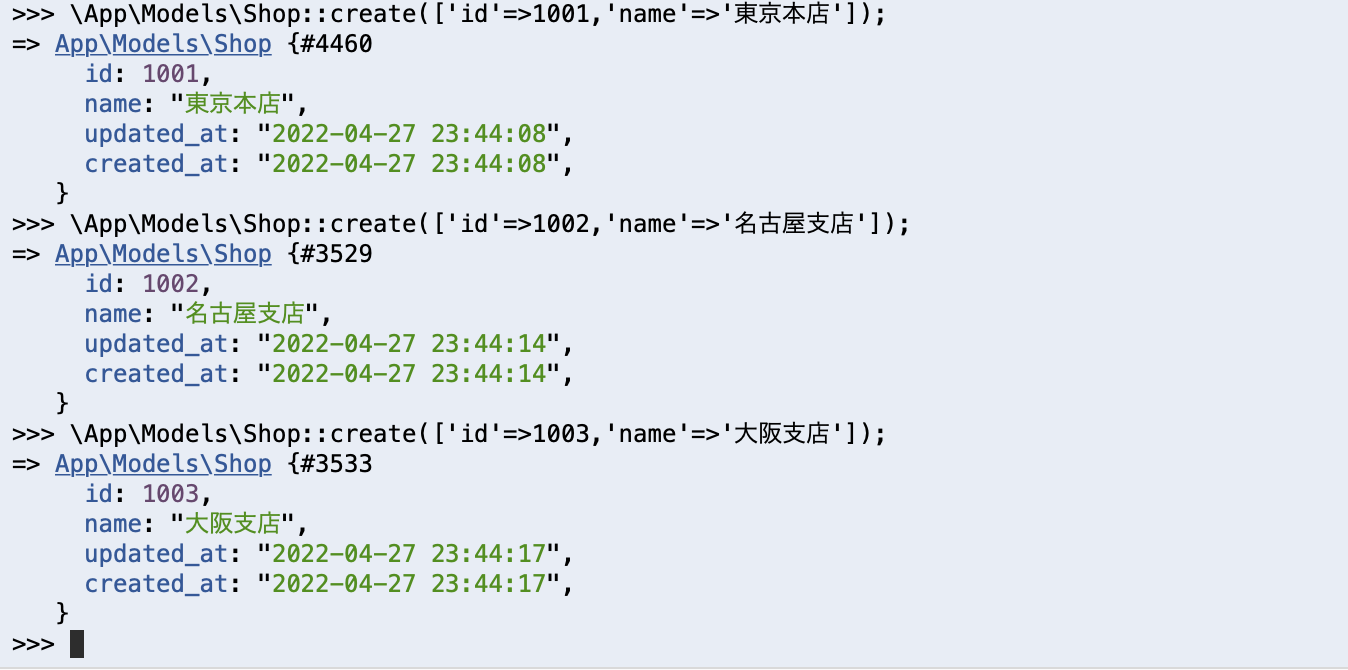
tinkerで以下のコマンドを実行してデータを登録します。
\App\Models\Shop::create(['id'=>1001,'name'=>'東京本店']);
\App\Models\Shop::create(['id'=>1002,'name'=>'名古屋支店']);
\App\Models\Shop::create(['id'=>1003,'name'=>'大阪支店']);
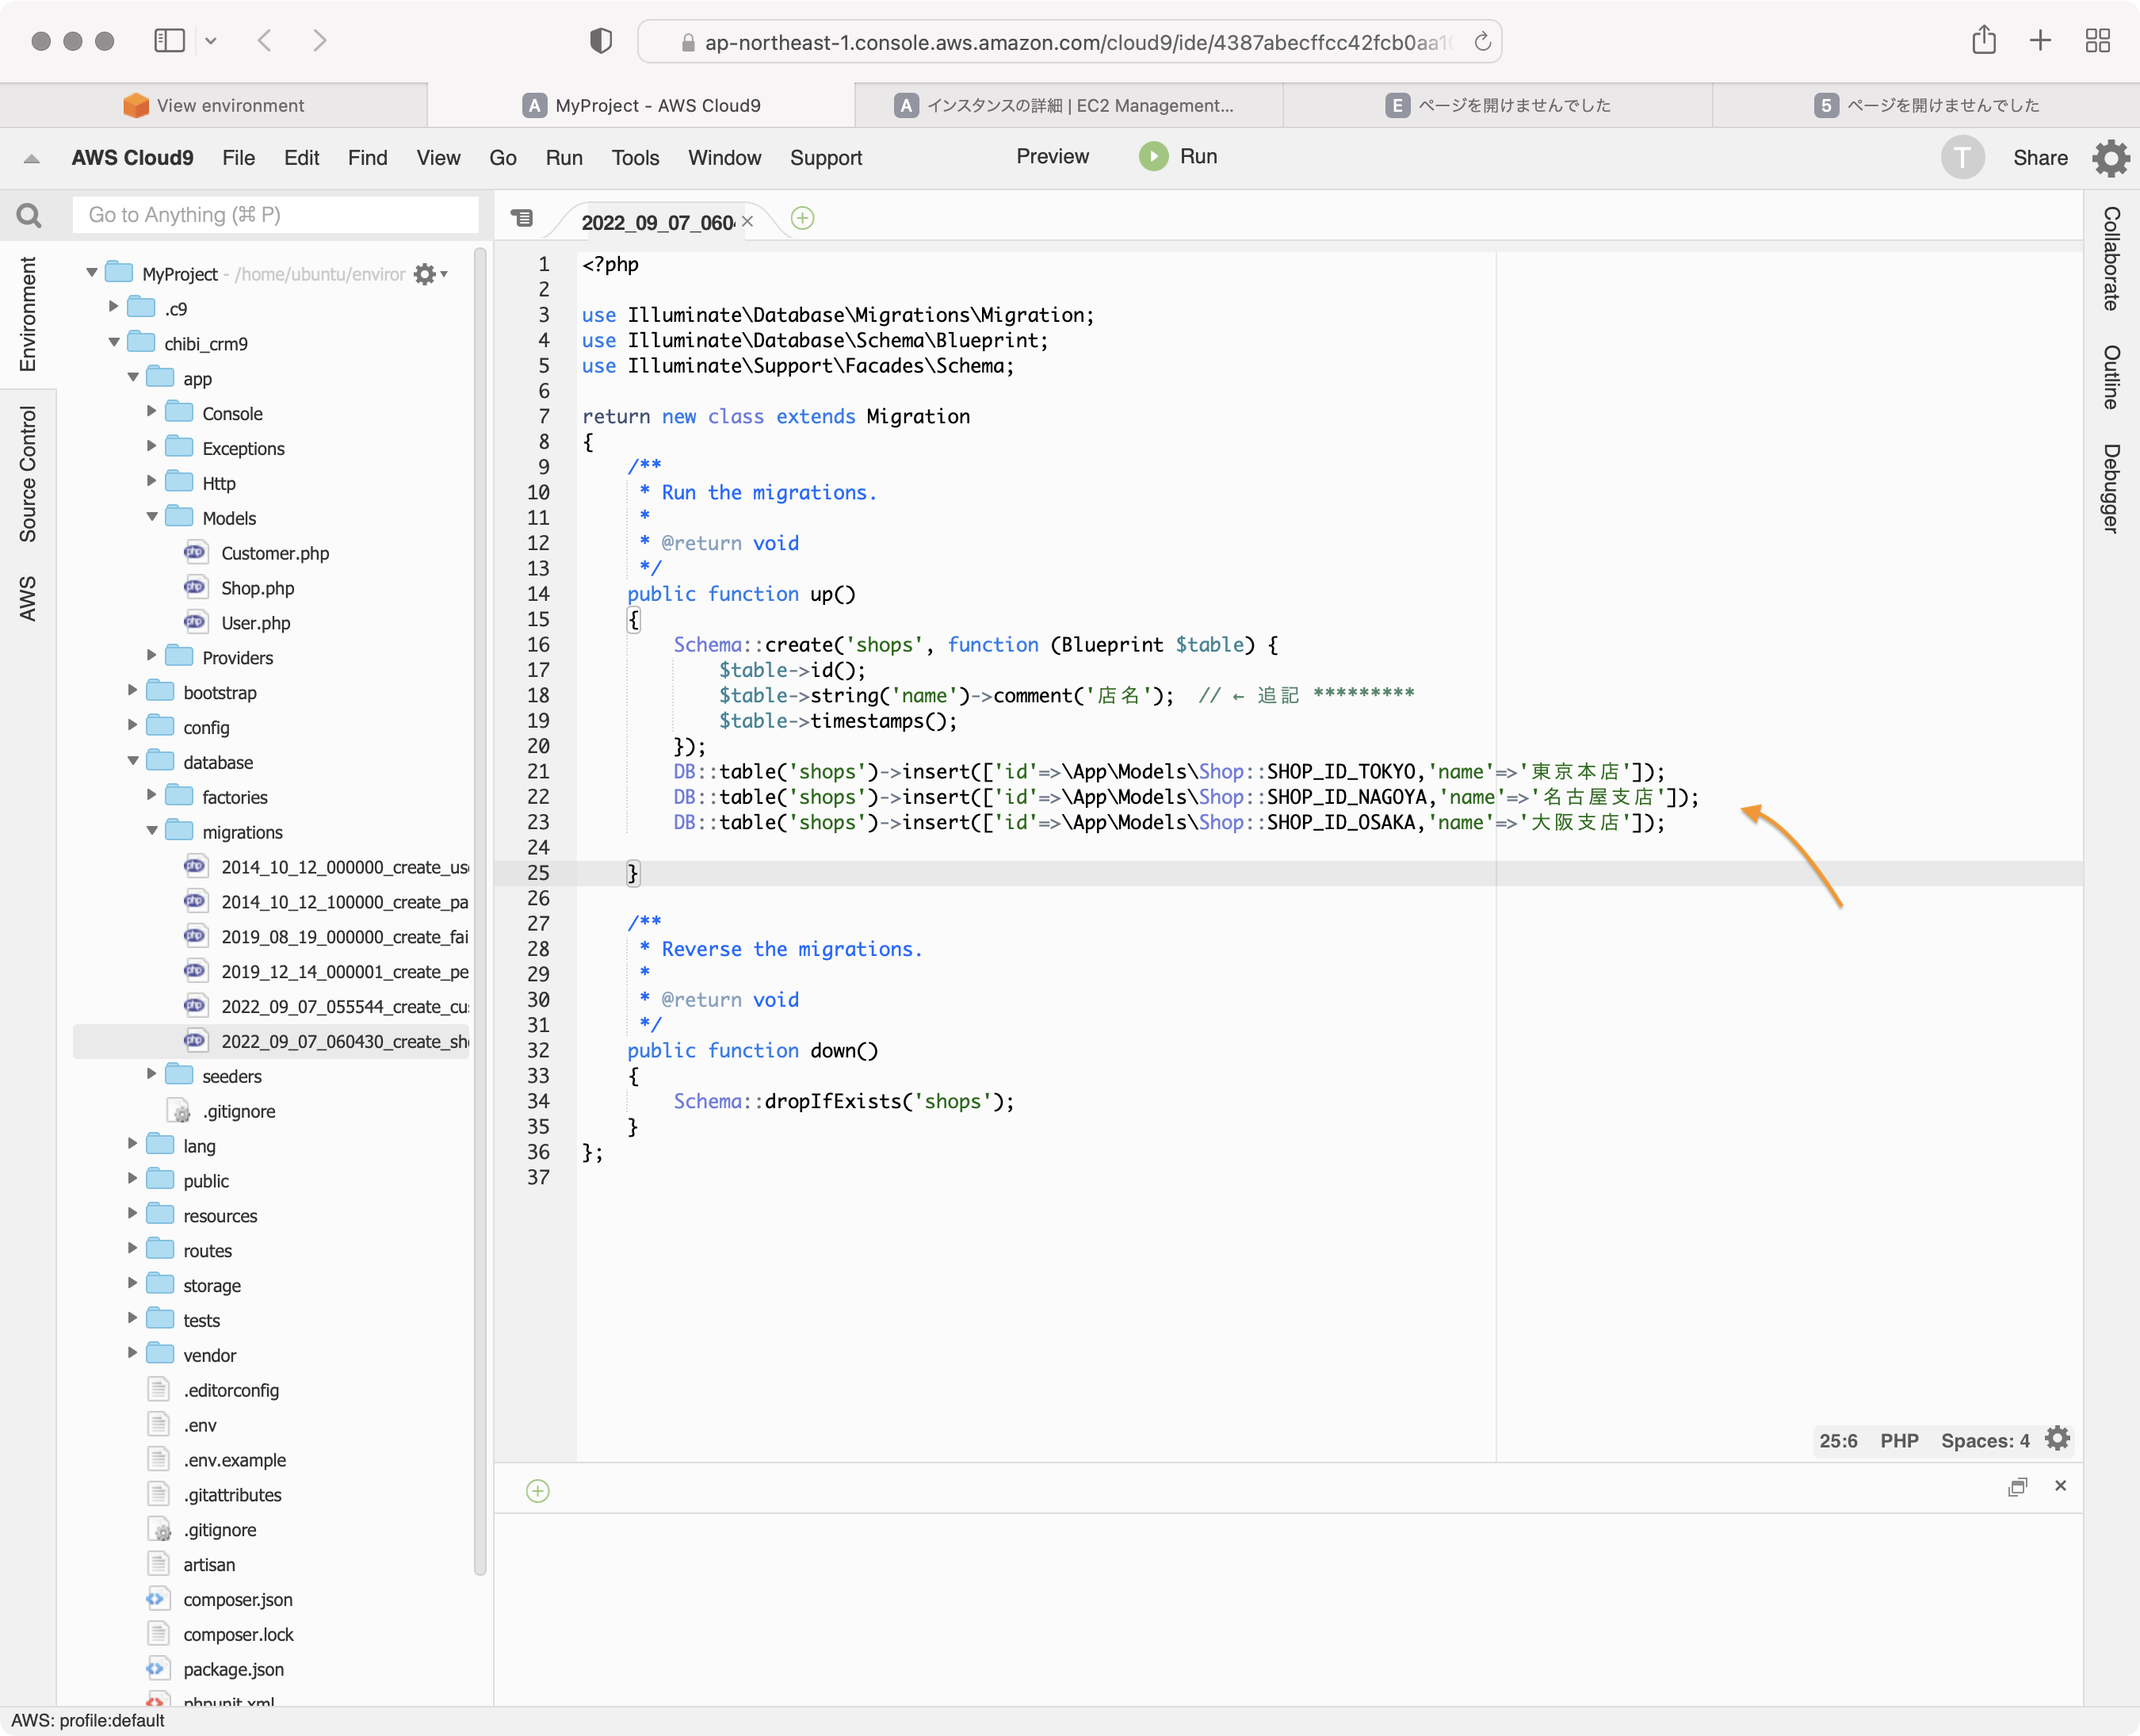
マイグレーション時に自動的に店舗情報が記録されるように。2022_04_26_180828_create_shops_table.phpにデータ作成の記述を追加します。
DB::table('shops')->insert(['id'=>1,'name'=>'東京本店']);
DB::table('shops')->insert(['id'=>2,'name'=>'名古屋支店']);
DB::table('shops')->insert(['id'=>3,'name'=>'大阪支店']);
customerテーブルを作ってみる
顧客管理システムを作っていくわけですが、ここで顧客情報を管理する仕組みを説明します。
顧客は英語でcustomerになります。
php artisan make:model コマンドを使って顧客情報を管理する仕組みを用意していきます。
make:migration
顧客情報はデータベースに格納します。今回このシステムではMySQLデータベースを使います。
テーブル定義の作成は以下のコマンドを使って行います。
php artisan make:migration create_#テーブル名#_table
テーブルを作る前に、どんなオプションを指定できるか確認します。Cloud9のターミナルを開いてプロジェクトルートに移動して以下のコマンドを実行します。
php artisan help make:migration
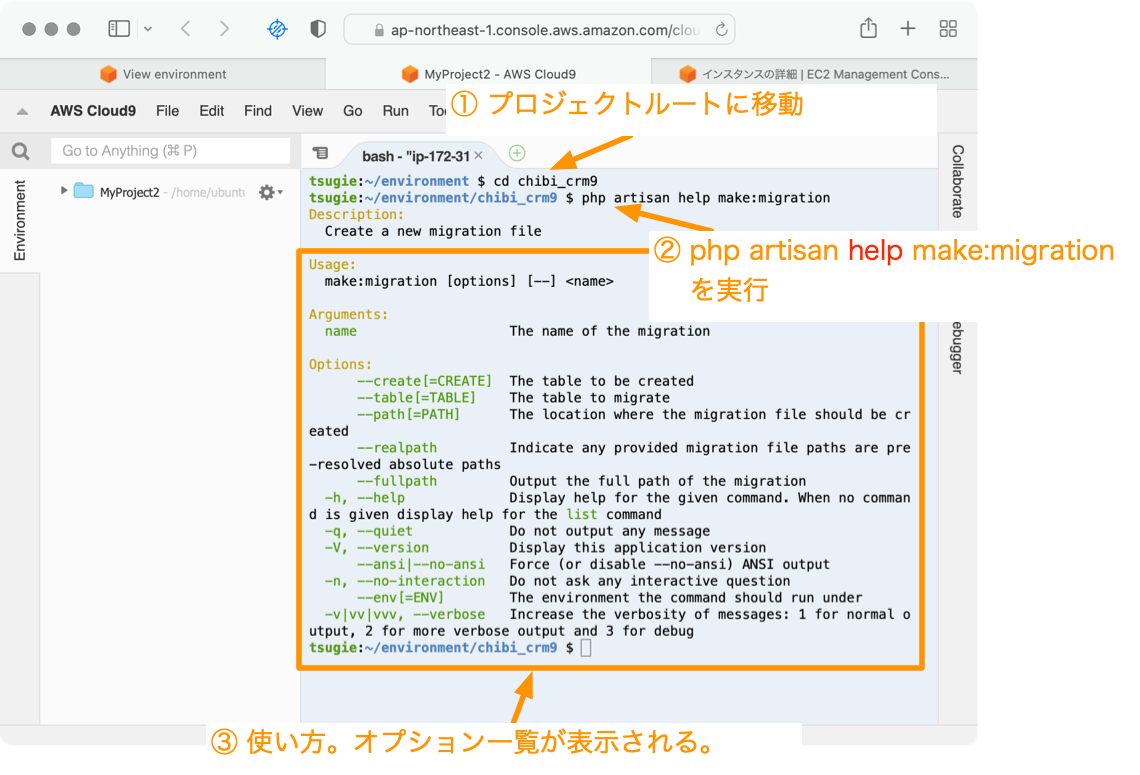
helpを指定することでコマンドの情報が表示されることを覚えておきましょう。
では実際にデータベース定義を作成していきます。
ターミナルから以下のコマンドを実行します。
php artisan make:migration create_customers_table
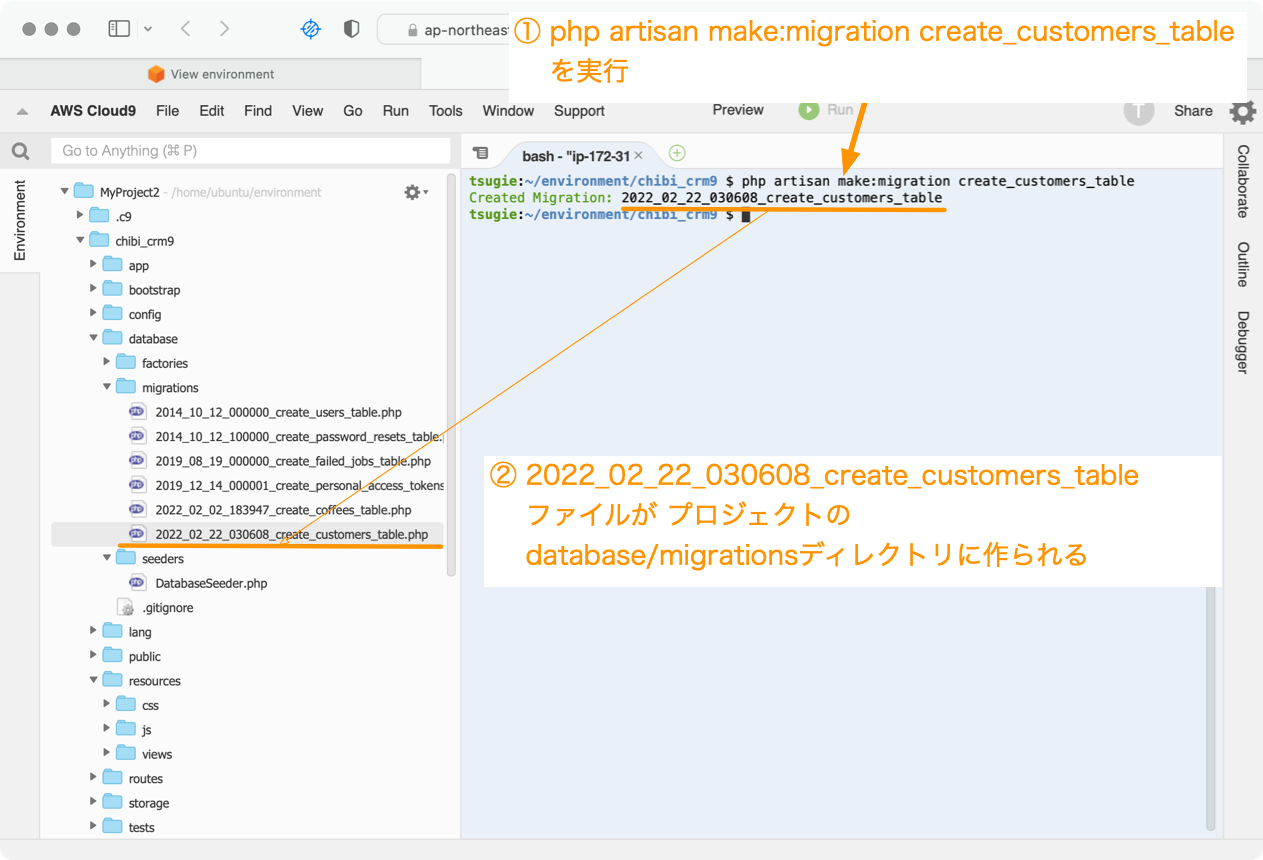
2022_02_22_030608_create_customers_tableファイルが プロジェクトの database/migrationsディレクトリに作られます。
Cloud9のIDEで2022_02_22_030608_create_customers_table.phpファイルをダブルクリックして、ファイルを開きます。
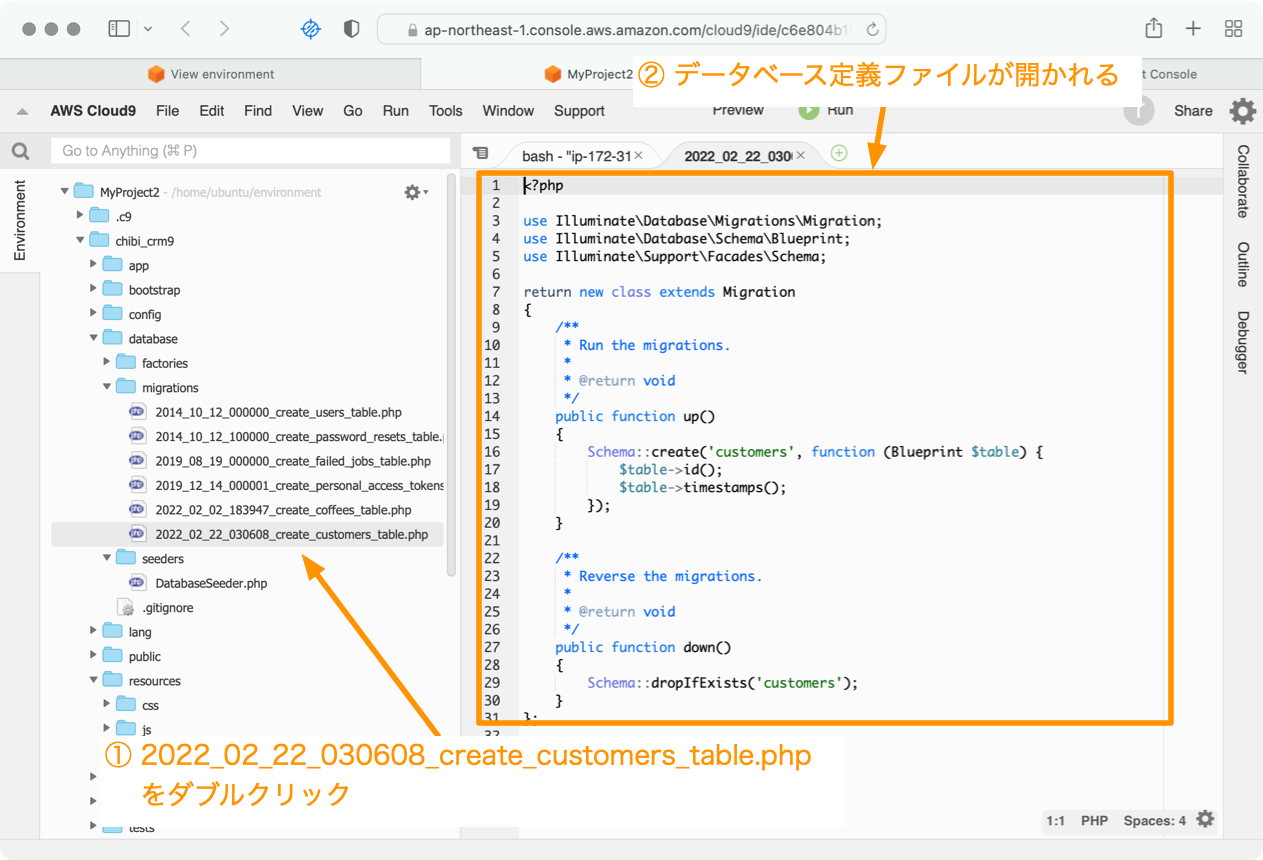
        Schema::create('customers', function (Blueprint $table) {
            $table->id();
            $table->timestamps();
        });
この部分がテーブルにどんなカラムを作るかの定義になっています。デフォルトではidカラムとタイムスタンプカラムだけの定義が存在しています。カスタマーテーブルは以下のようになっていますので、shop_id, name, postal, address, birthdate, email, phone, complainer_flagカラムを追加していきます。
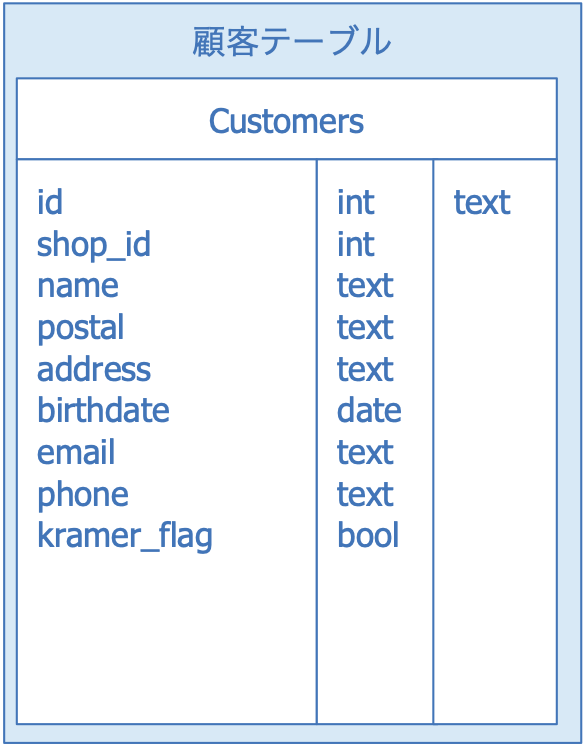
Cloud9のIDEを開いて以下の定義を入力します。
            $table->unsignedInteger('shop_id');  // ← 追記 *********
            $table->string('name');  // ← 追記 *********
            $table->string('postal');  // ← 追記 *********
            $table->string('address');  // ← 追記 *********
            $table->string('email');  // ← 追記 *********
            $table->date('birthdate');  // ← 追記 *********
            $table->string('phone');  // ← 追記 *********
            $table->boolean('kramer_flag')->default(false)->comment('クレーマーフラグ');  // ← 追記 *********
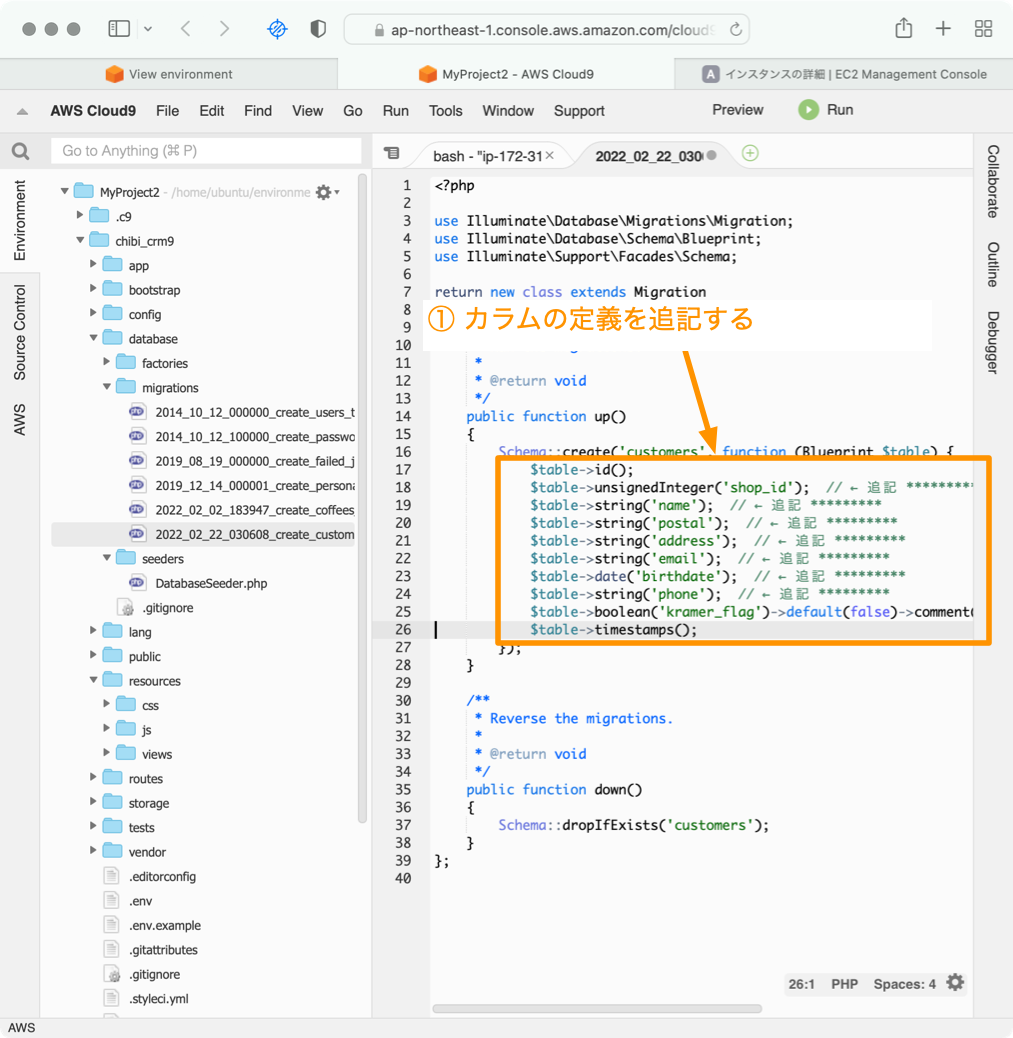
追記したら、ファイルを保存します。
artisan migrate:fresh
Cloud9のターミナルを開いて、プロジェクトルートに移動して、データベース定義をデータベースに反映させます。
cd chibi_crm9
php artisan migrate:fresh
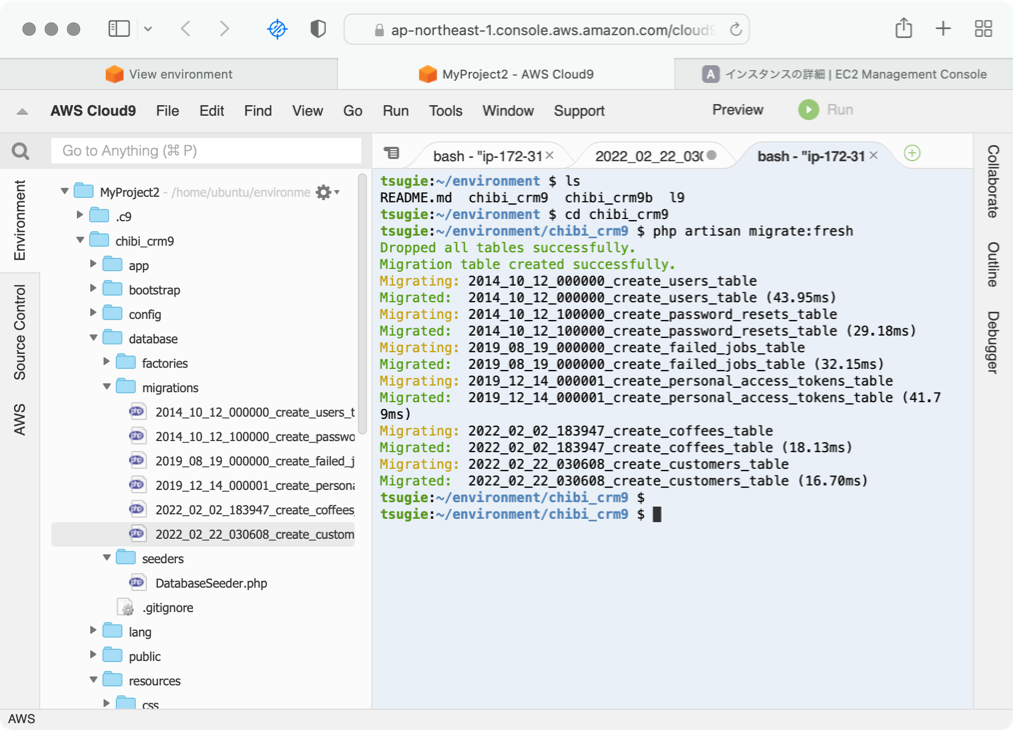
データベース定義がMySQLに反映されます。
データベース構造を確認してみましょう。
Cloud9のターミナルから
mysql -udebian-sys-maint -p##あなたのパスワード##
を入力してmysqlコマンドを立ち上げます。
use chibi_crm9
を実行して使用するデータベースを指定します。
show tables;
を実行してデータベースに存在するテーブル一覧を表示します。
desc customers;
を実行してcustomersテーブルの構成を表示します。
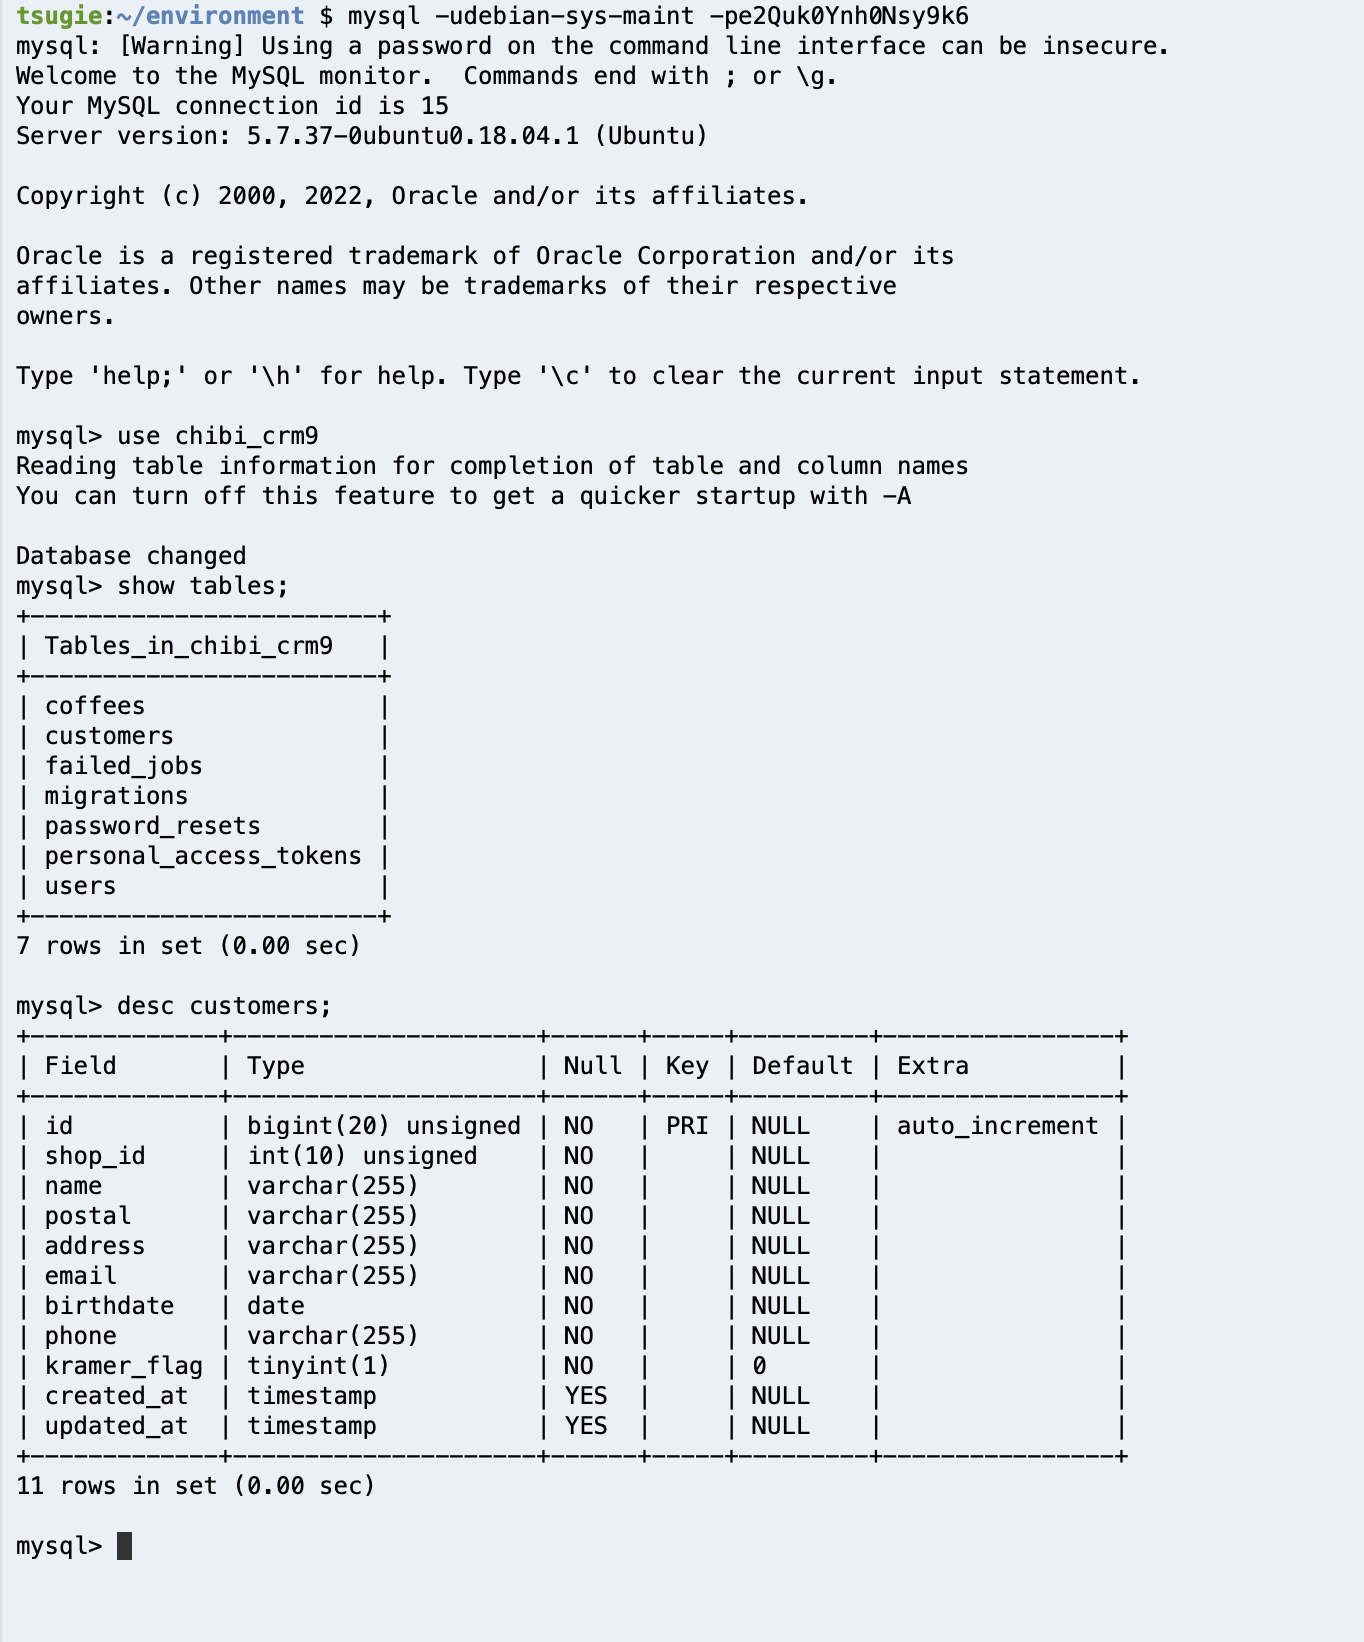
さきほど追加したカラムがデータベースのcustomersに反映されていることを確認できます。
一覧表示
それではデータベースの内容をブラウザに表示してみましょう。
web.phpに記入
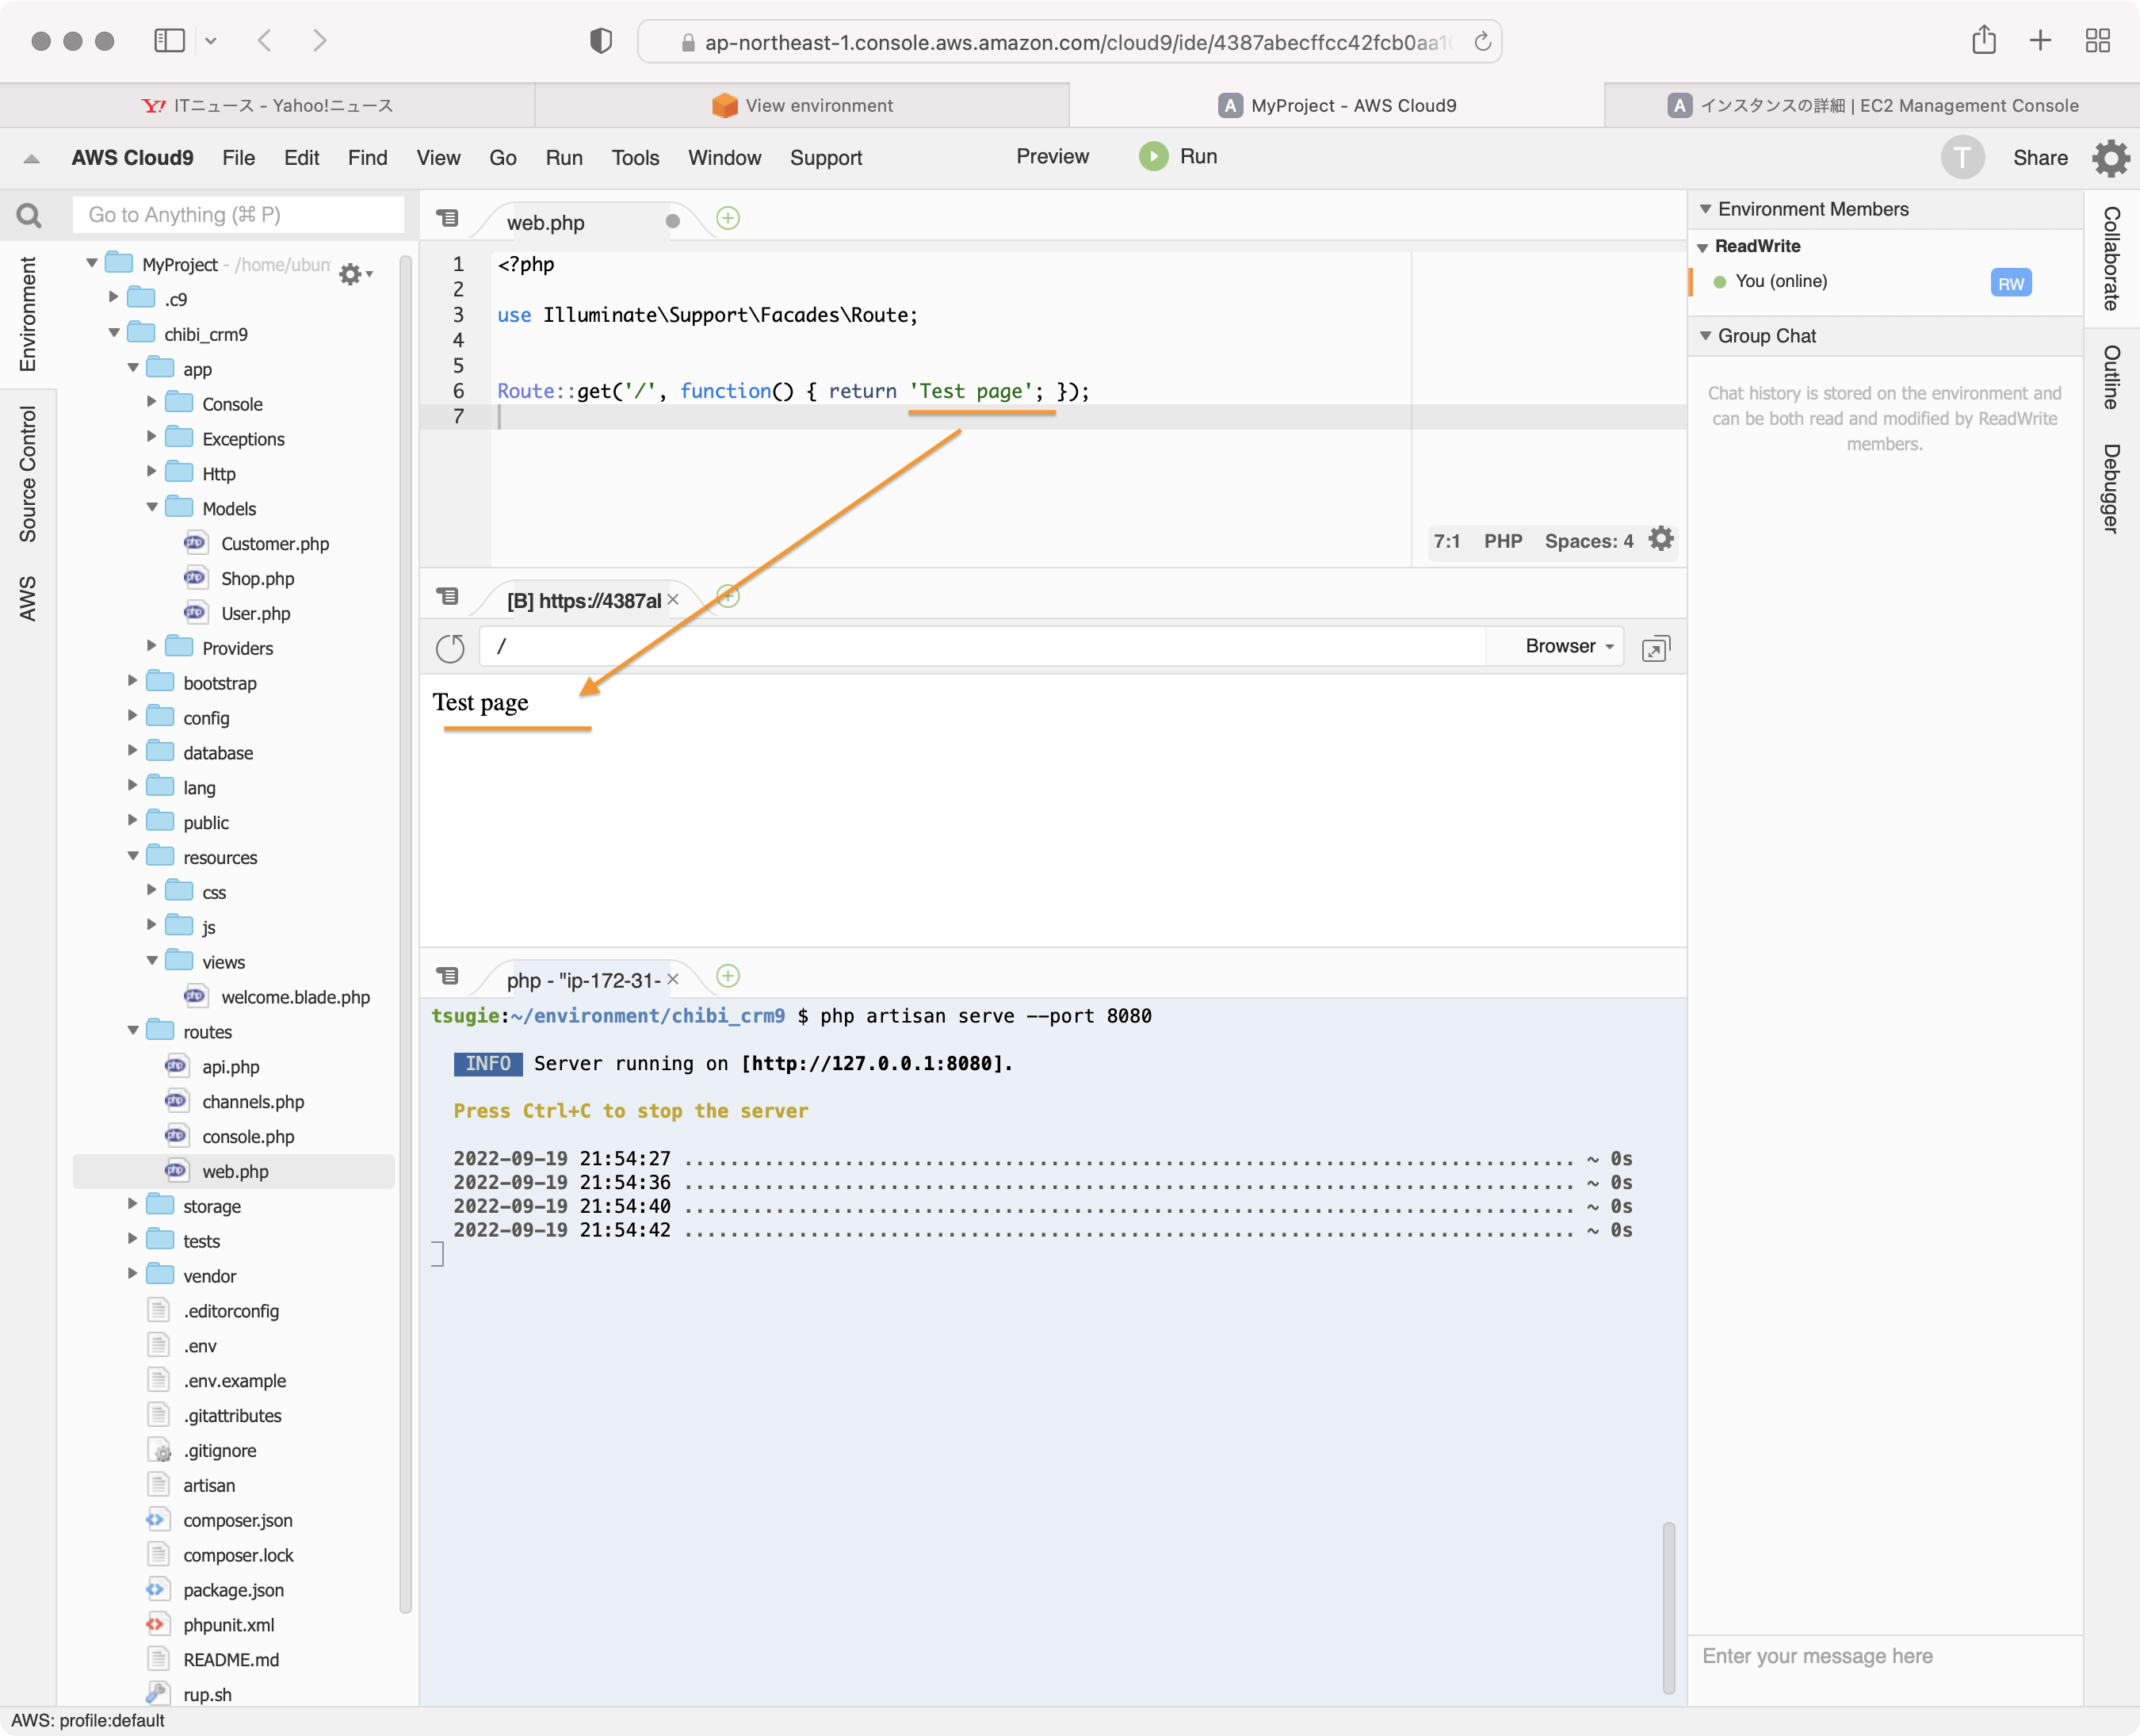
routes/web.phpに以下の行を追加します。
Route::get('/', function() { return 'Test page'; });
artisan serveコマンドを実行して、webサーバーを起動しておきます。このときポート番号を8080にするのを忘れないようにします。cloud9のプレビューで確認するには8080ポートを使う必要があるためです。
php artisan serve --port 8080
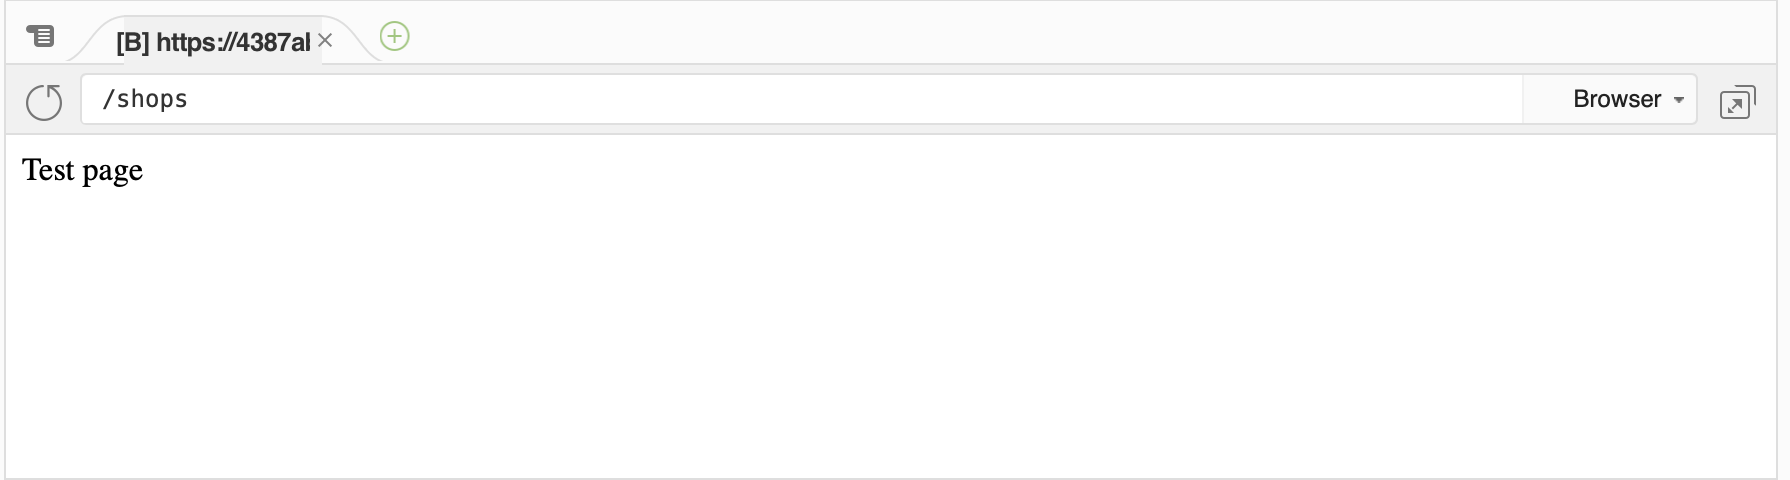
cloud9のプレビューで画面を見てみます。

Test pageが表示されます。
web.phpをの定義で'/'を'/shops'に変更します。

Route::get('/shops', function() { return 'Todo Shop list';});
プレビュー画面を再読込します。
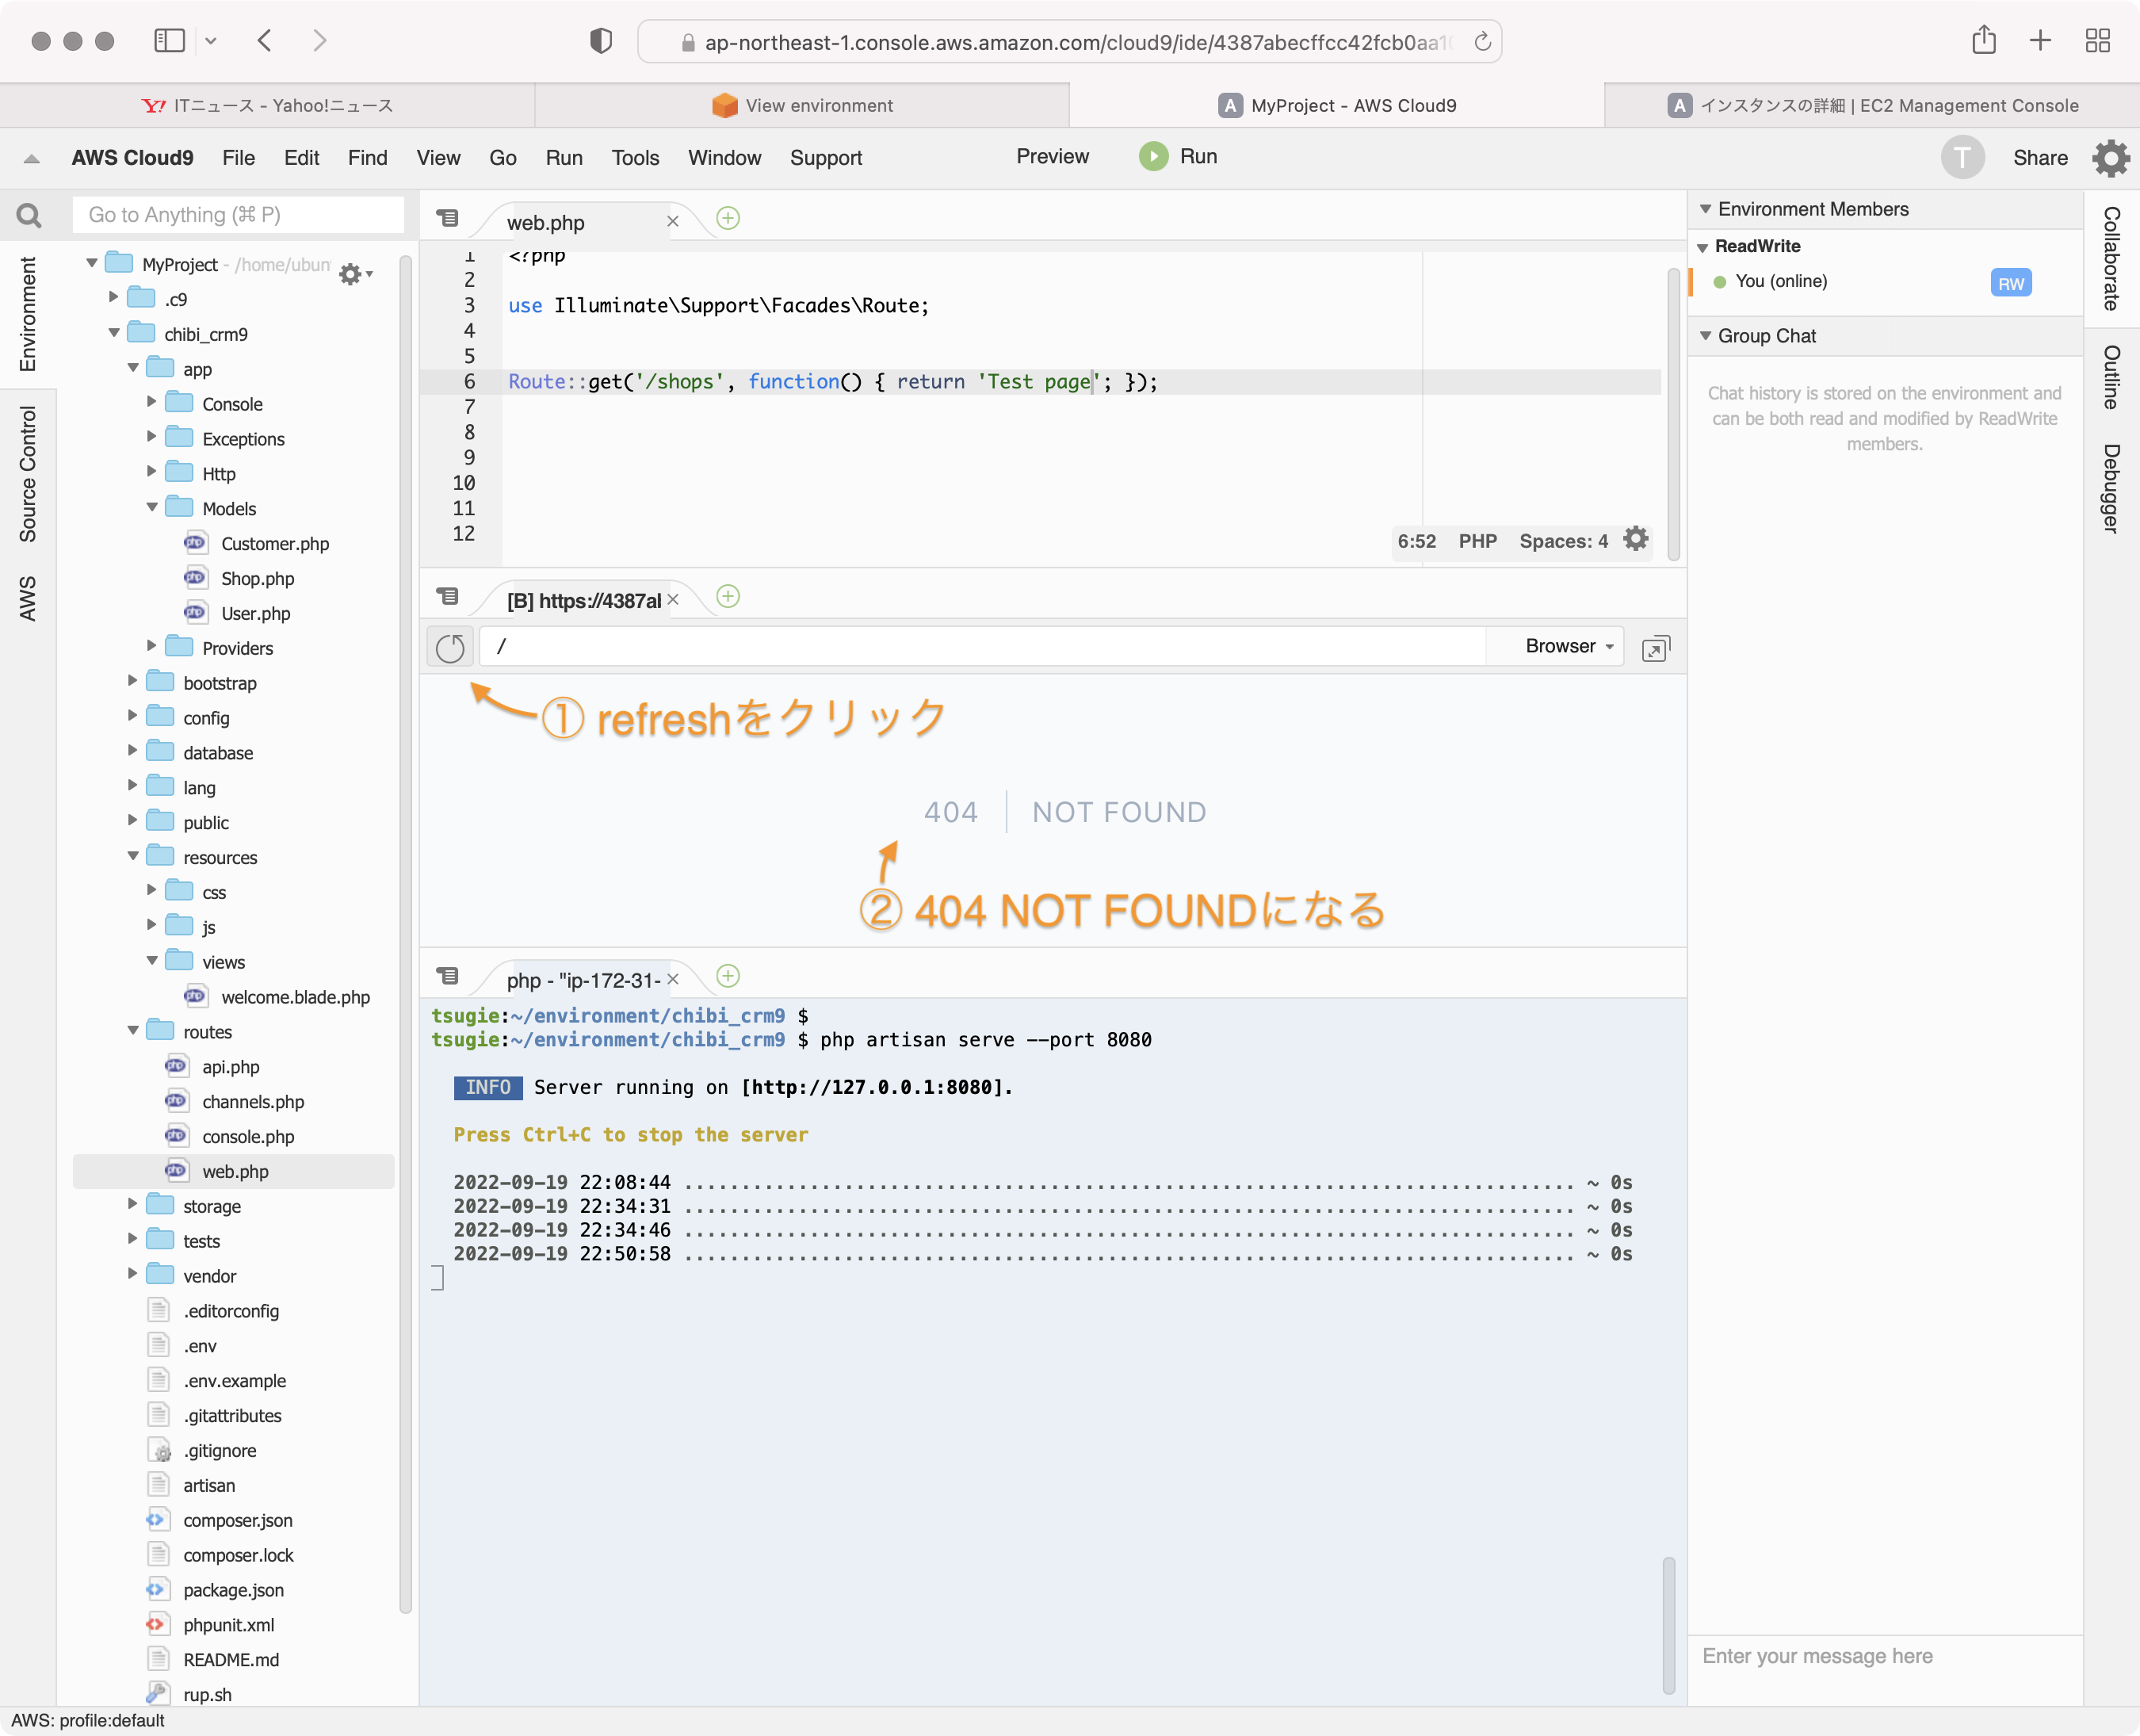
404 NOT FOUNDになります。これは '/' の定義がweb.phpから無くなったためです。
プレビュー画面のアドレス欄にshops を入力して、Enterキーを入力して再読込します。
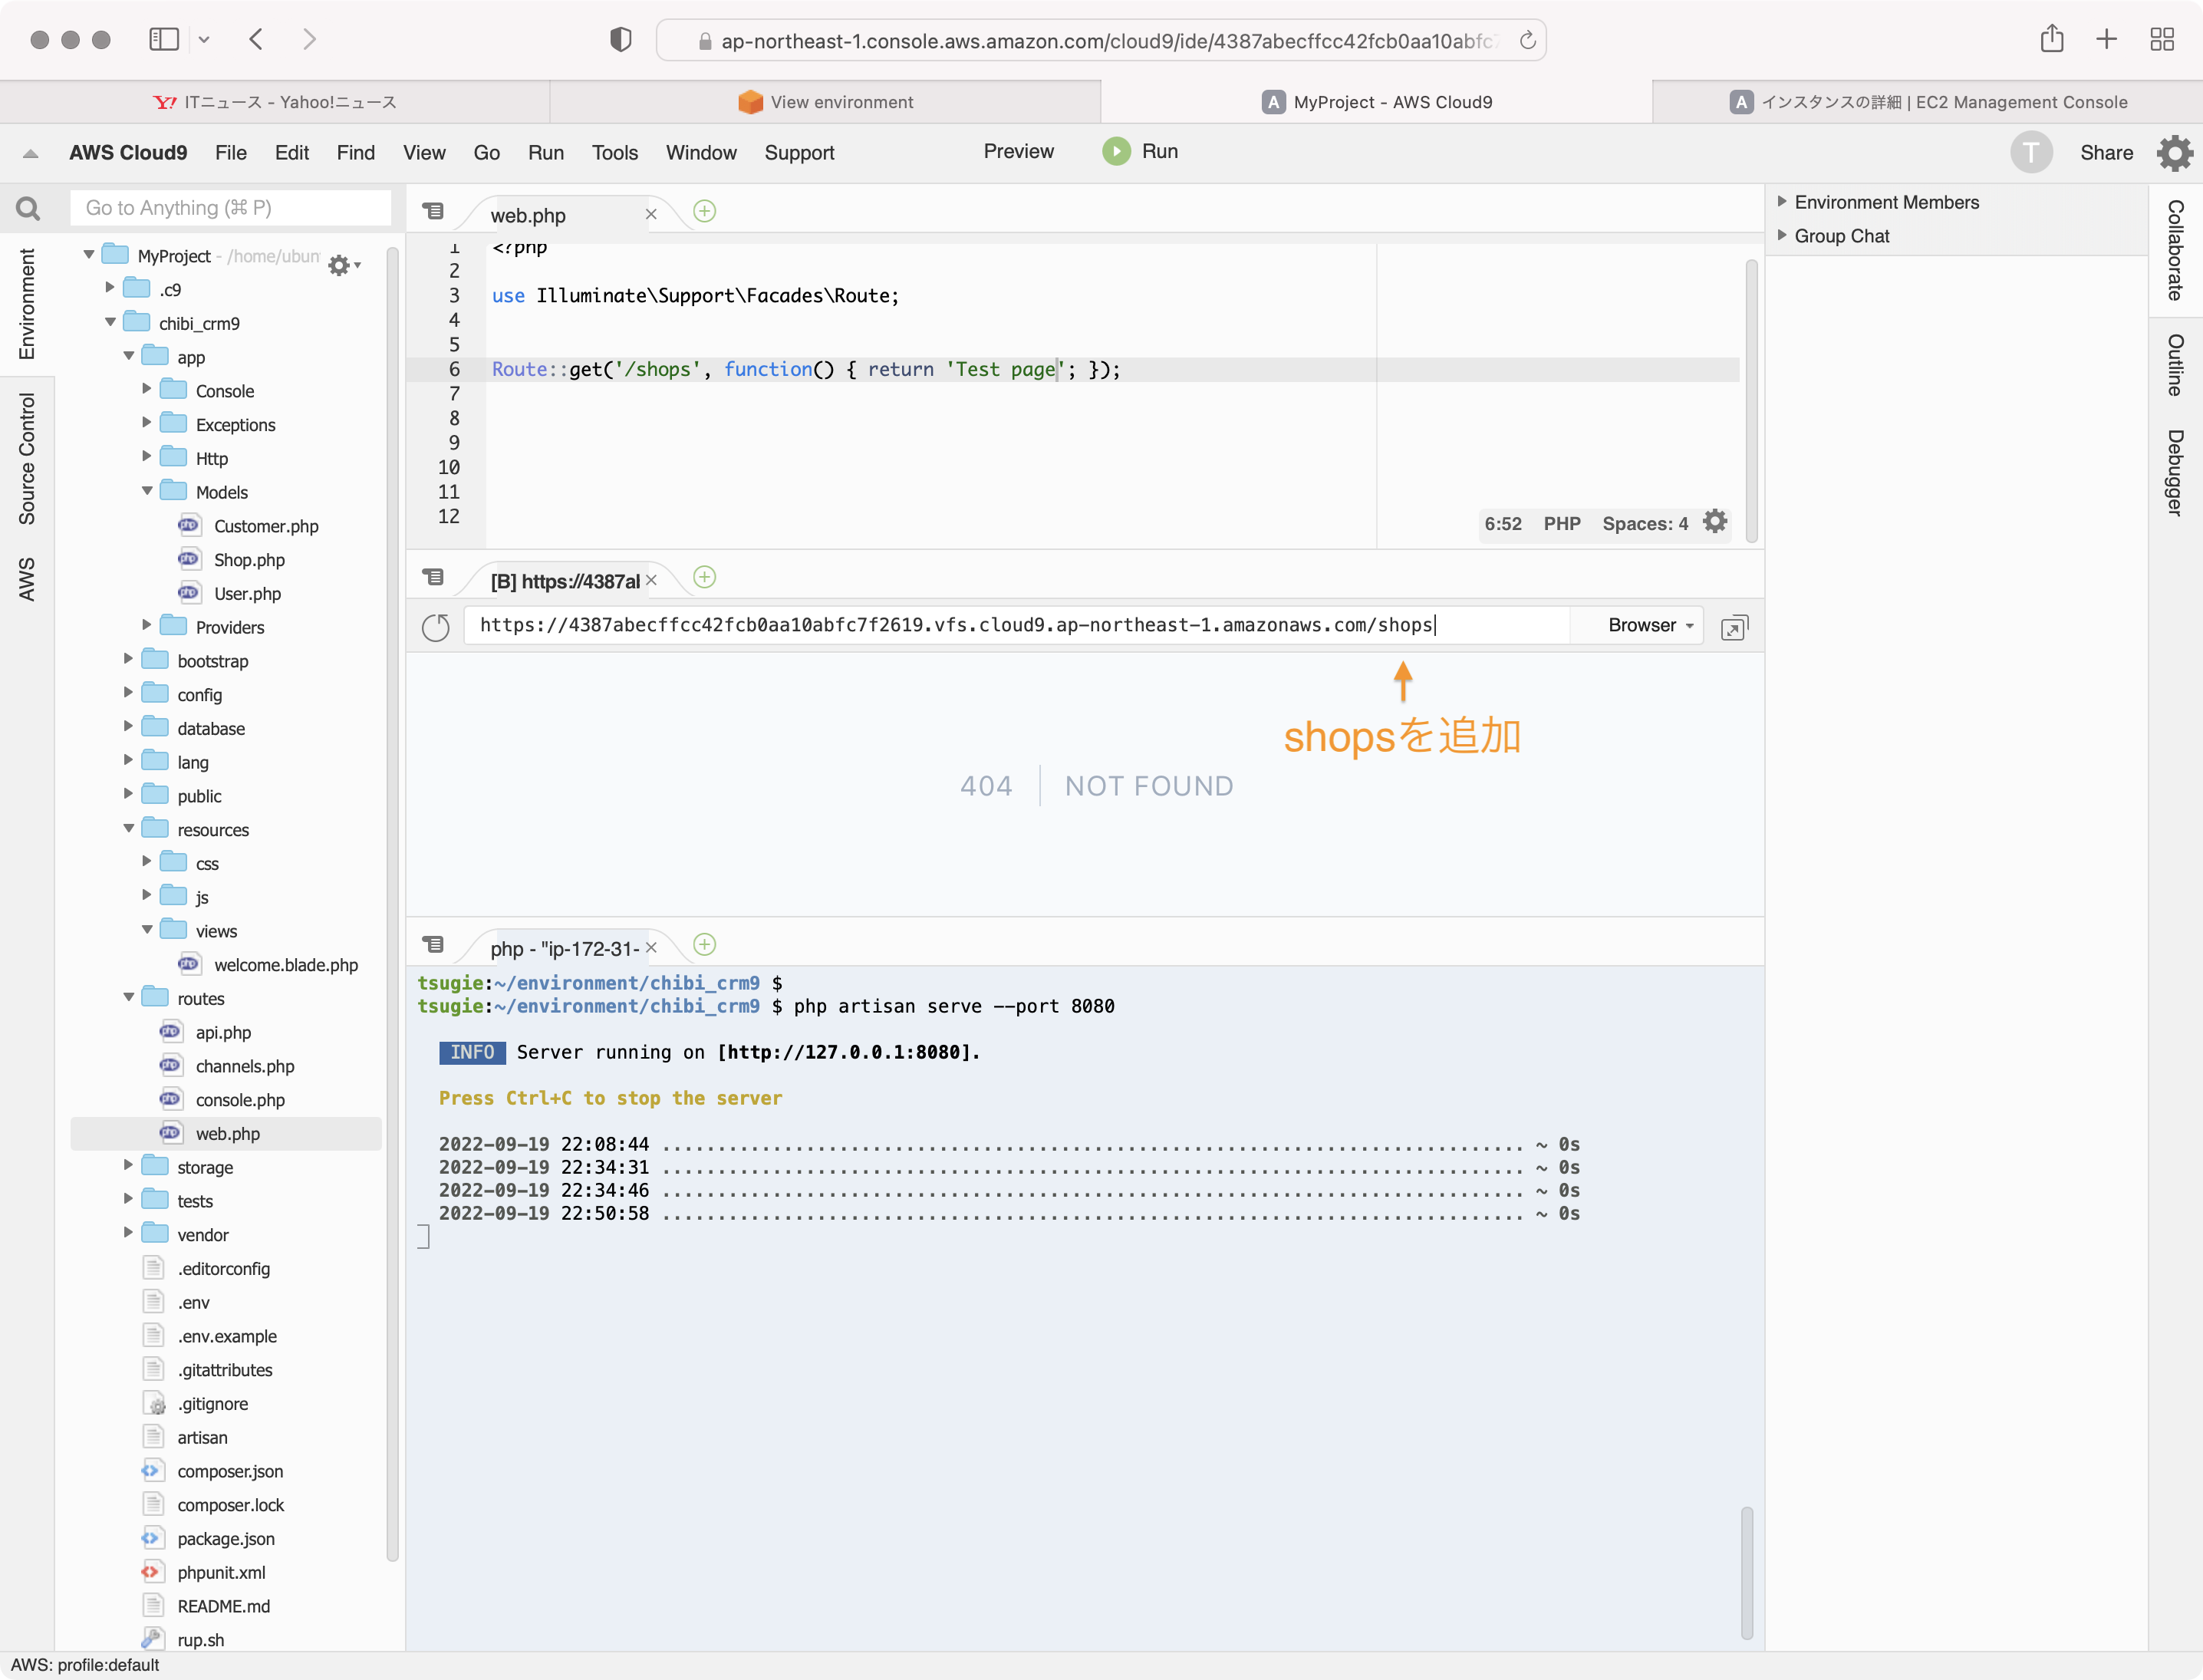
Test pageが表示されます。
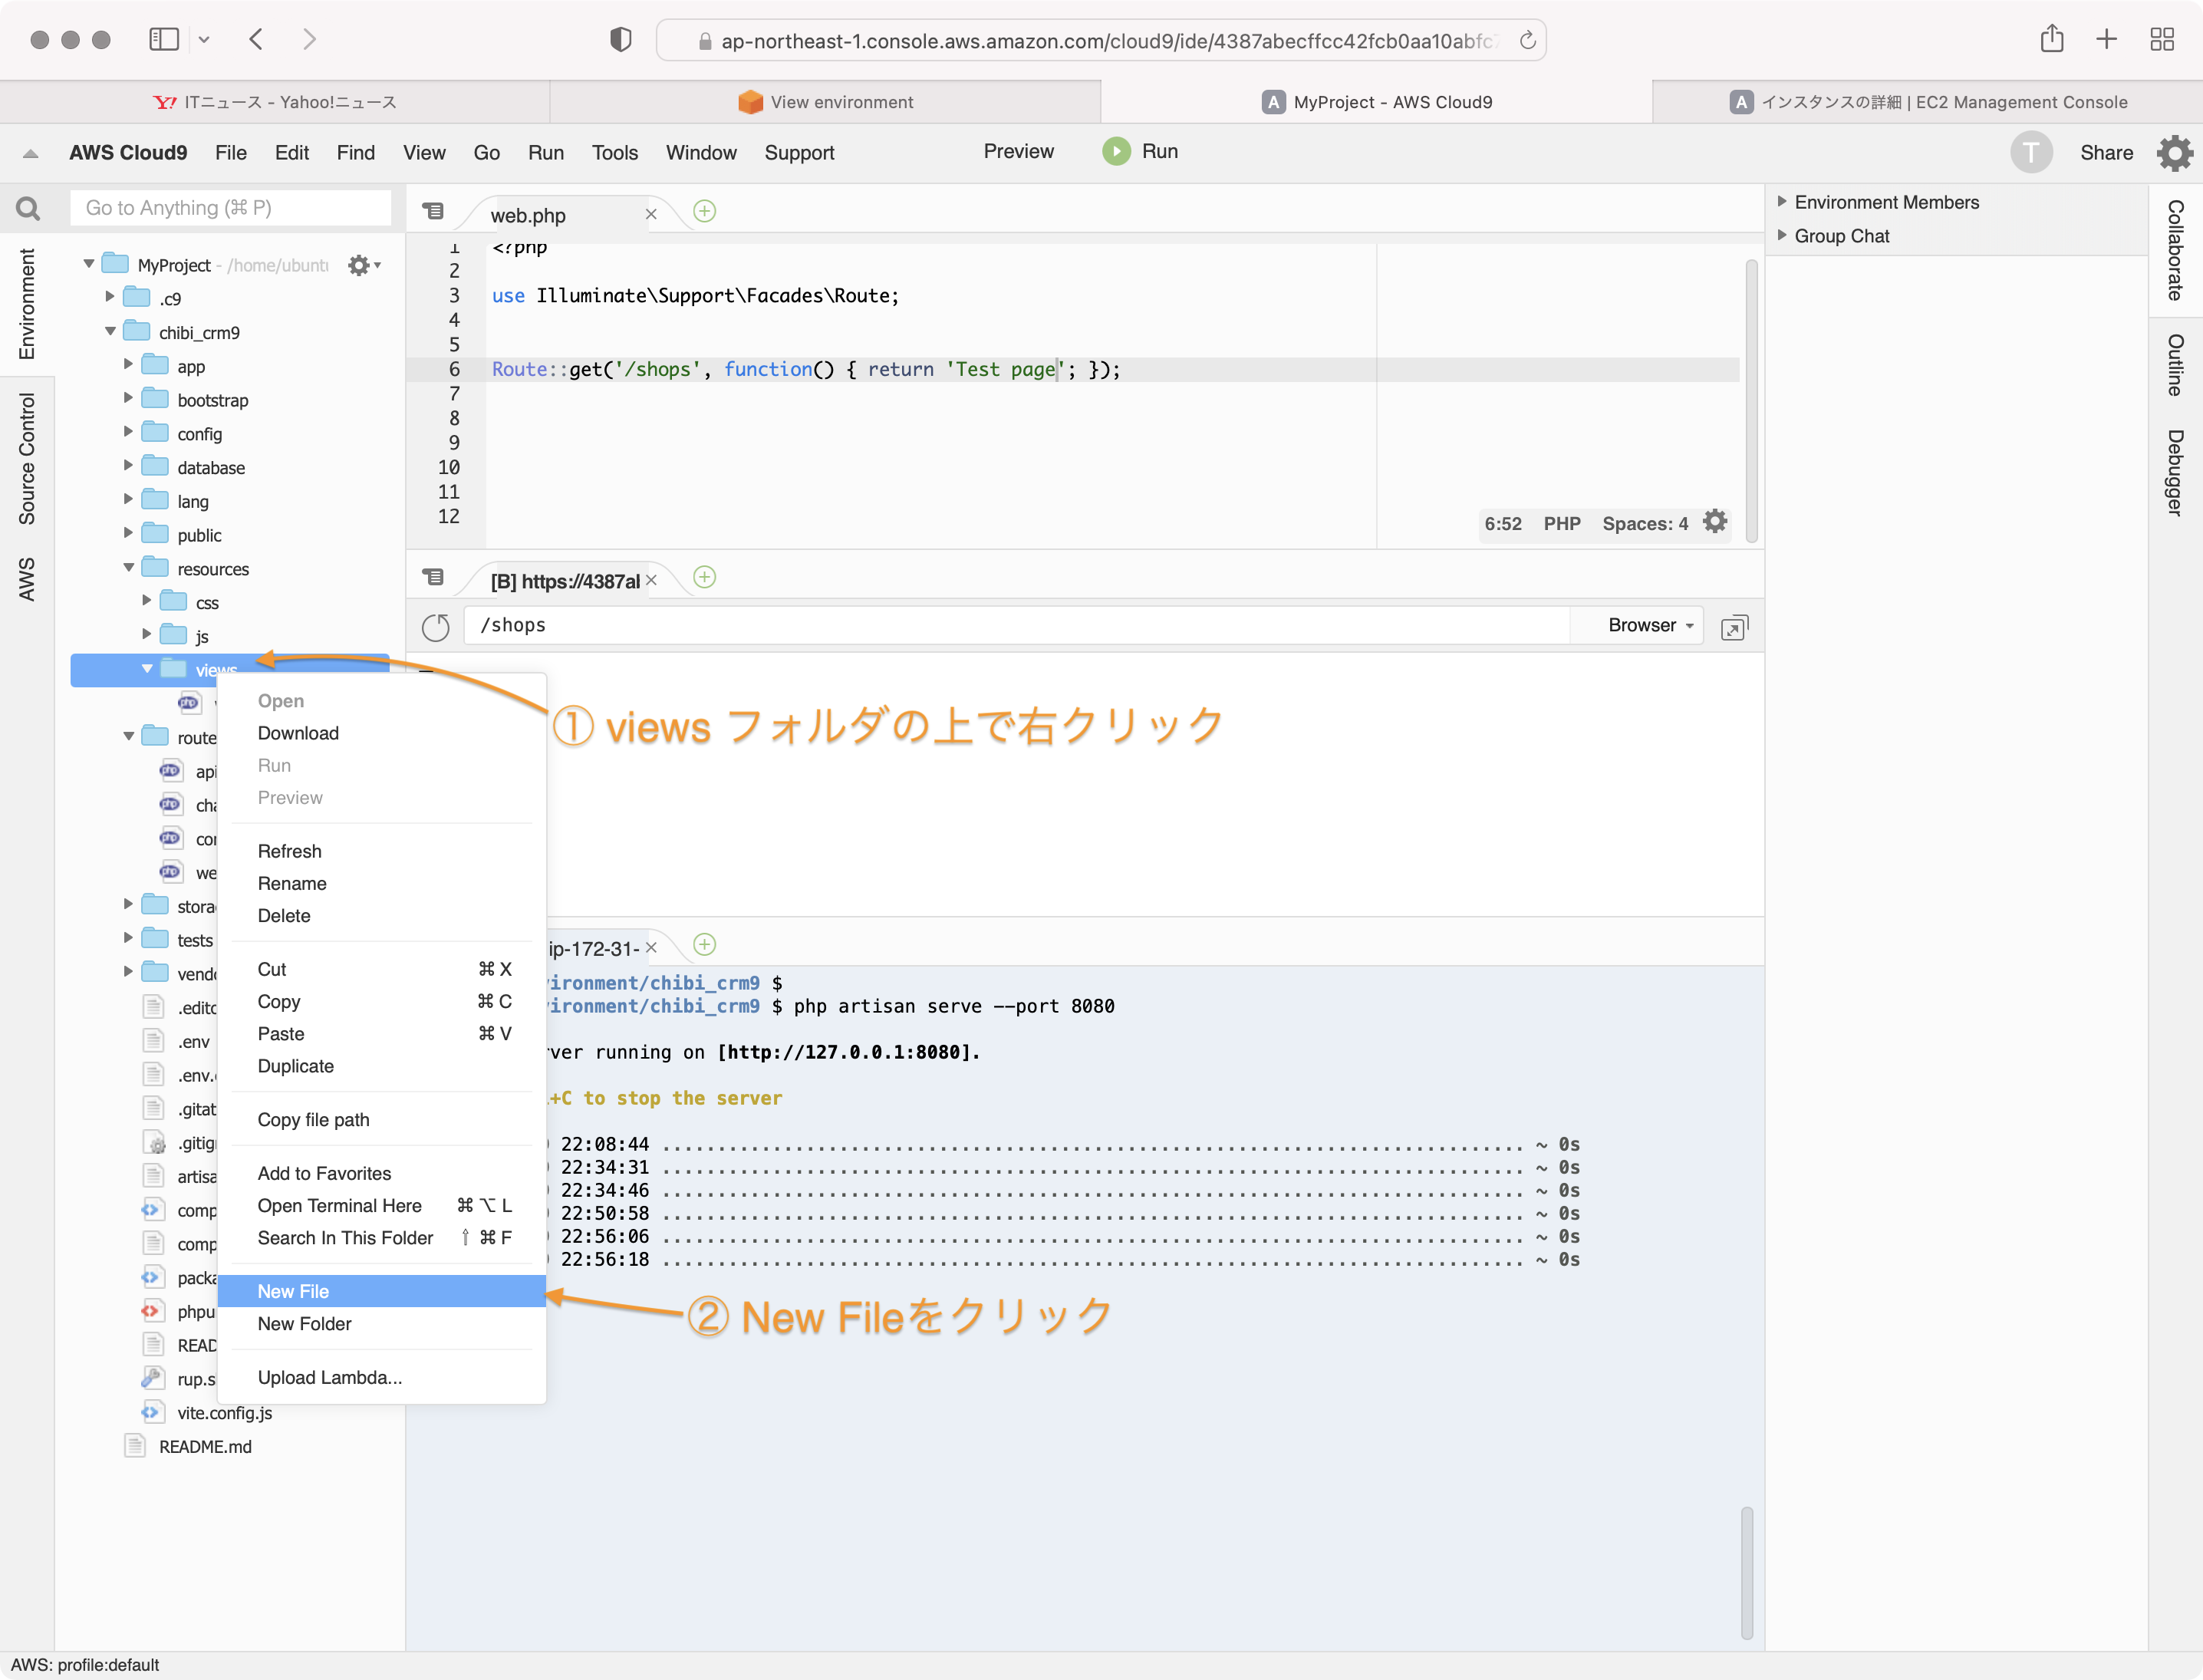
view bladeを作る
Cloud9のIDEでMyProject/chibi_crm9/resources/views ディレクトリの上で右クリックして、New Fileを選択して新しいファイルをviewsディレクトリに作成します。
ファイル名に shops.blade.php を入力します。

bladeとはLaravelに内蔵されているWebのページを表示する仕組みです。
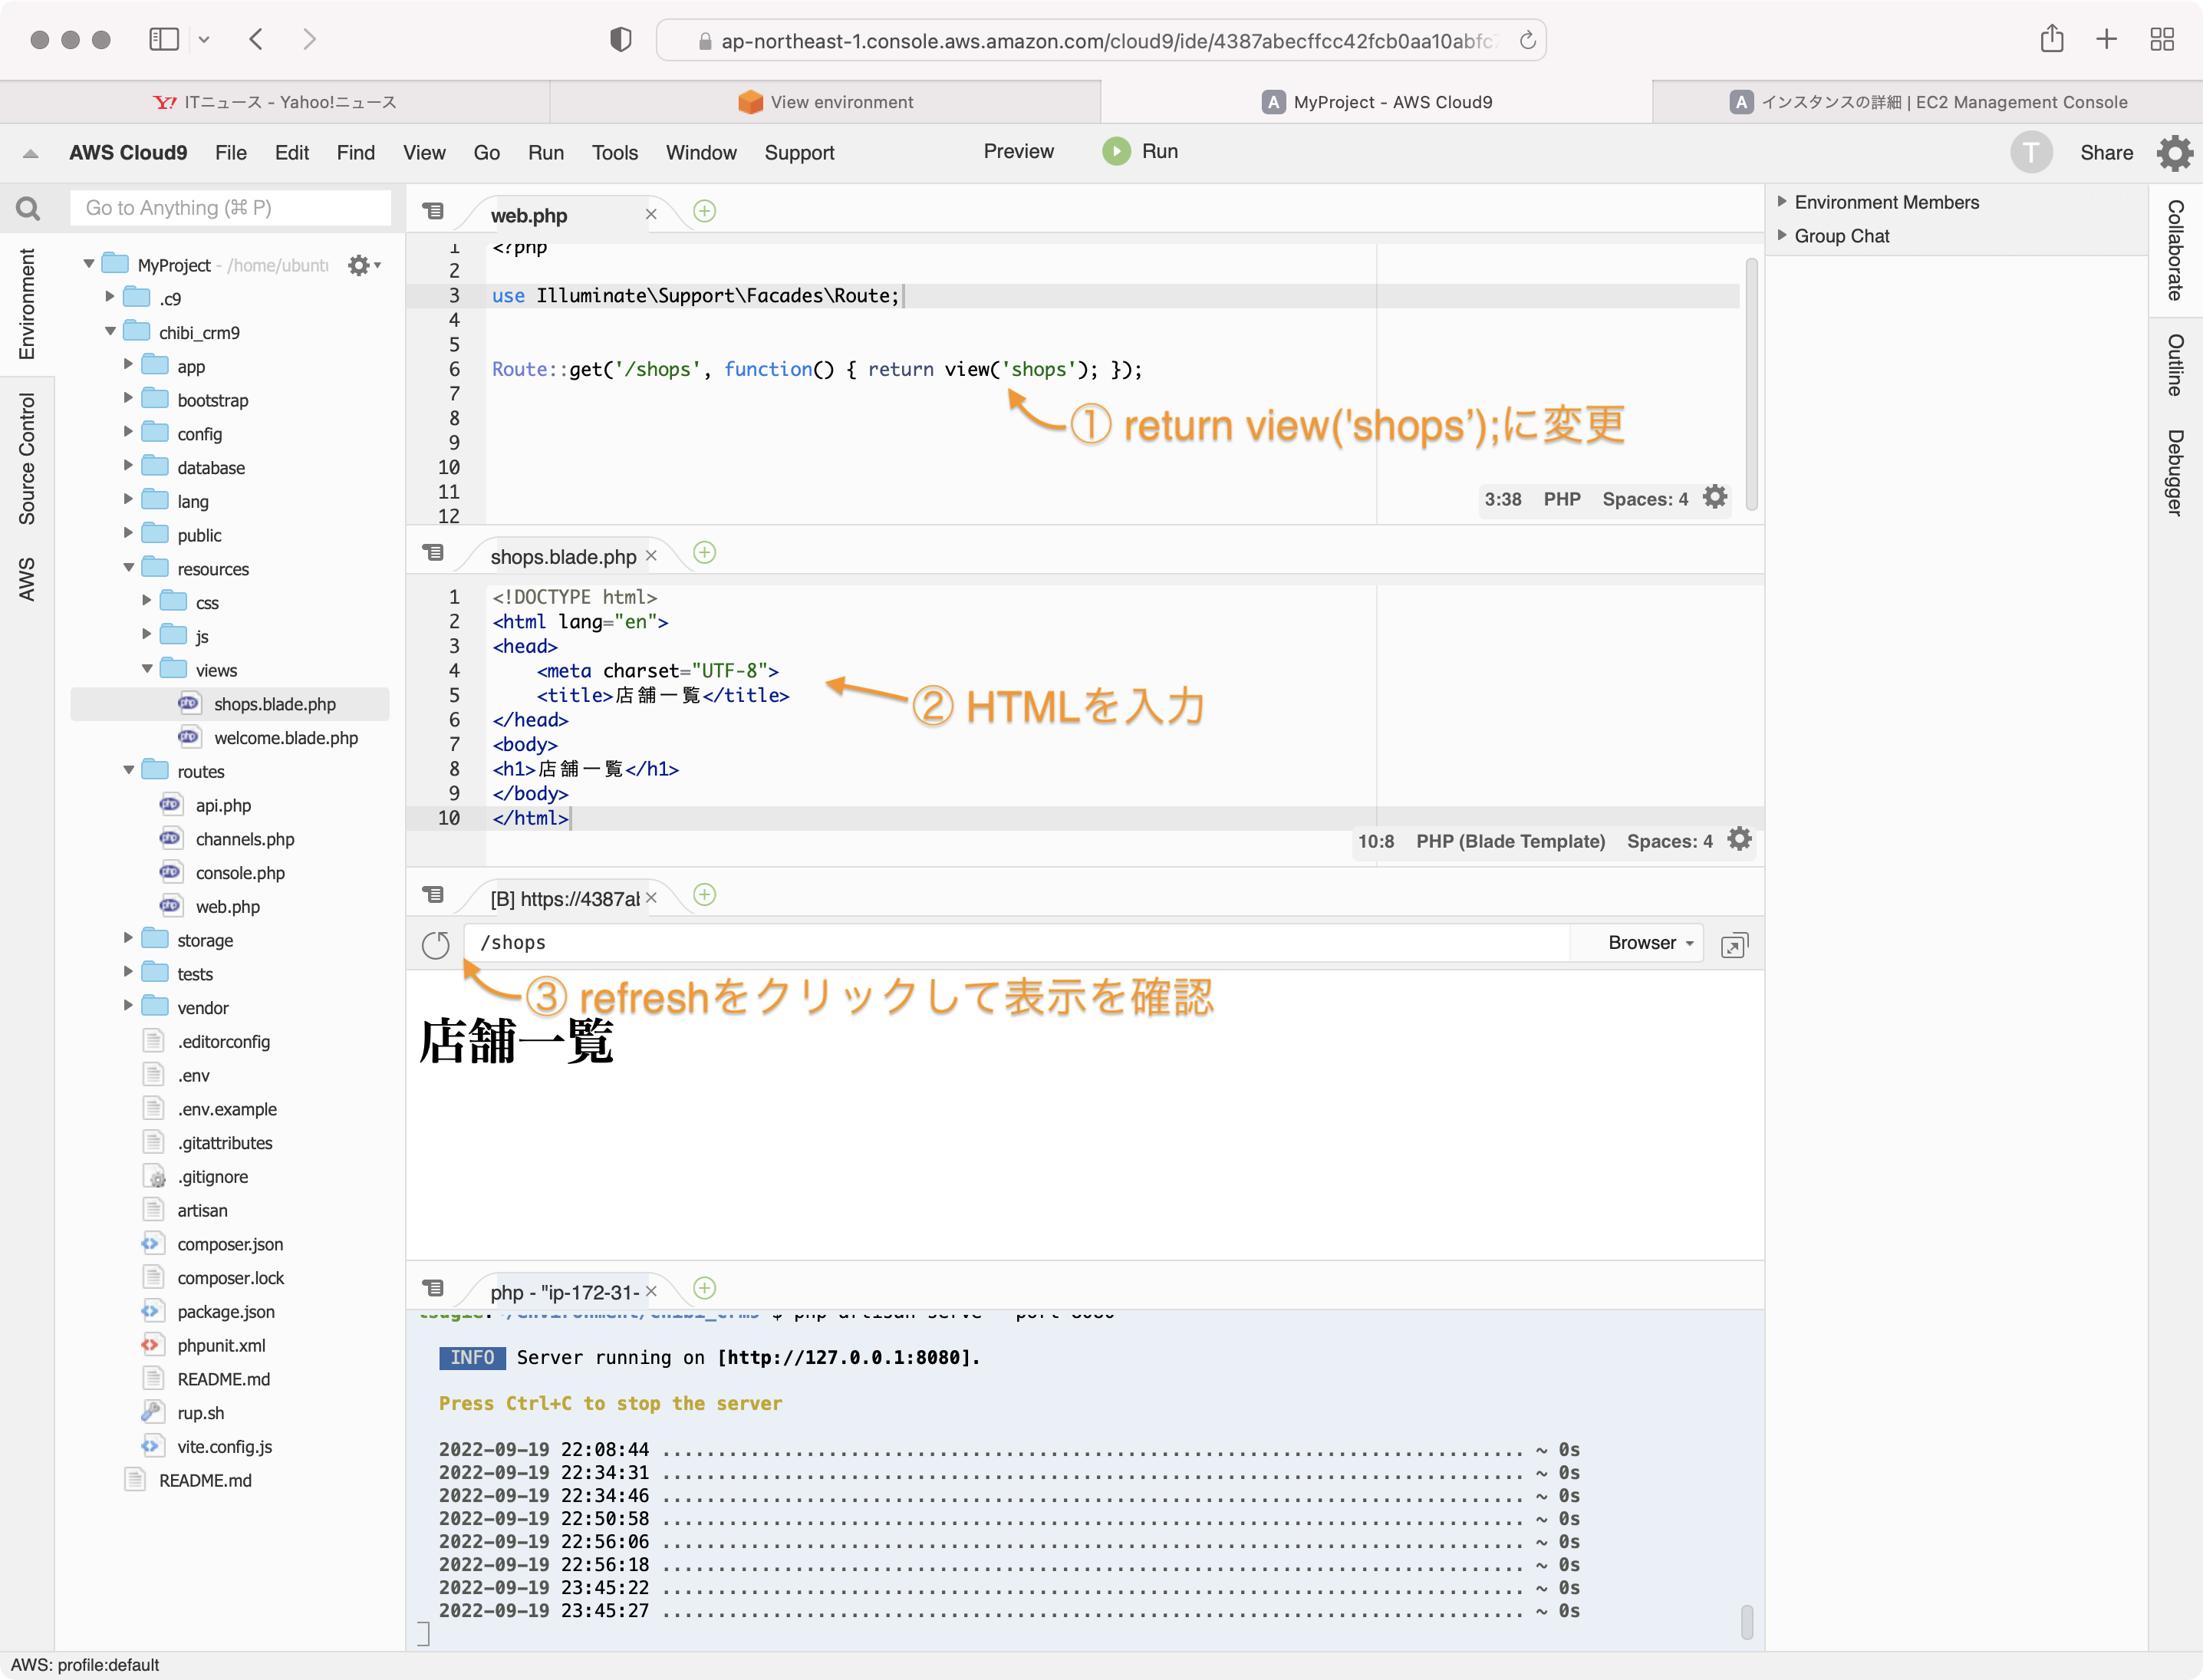
web.phpを以下のように変更します。
Route::get('/shops', function() { return view('shops'); });
shops.blade.phpにHTMLを入力します。
<!DOCTYPE html>
<html lang="en">
<head>
    <meta charset="UTF-8">
    <title>店舗一覧</title>
</head>
<body>
<h1>店舗一覧</h1>
</body>
</html>
previewウィンドウをrefreshして、表示を確認します。
shops.blade.phpの内容が表示されていると思います。
web.phpに表示する内容を書くことも出来ますが、ページ数が増えるとweb.phpが大きくなりすぎてしまいます。このため1ページの表示内容をbladeファイルに書いて管理します。
return view('shops'); はshops.bladeをレスポンスとして返す事を意味します。
Controllerを作成
MVCとは
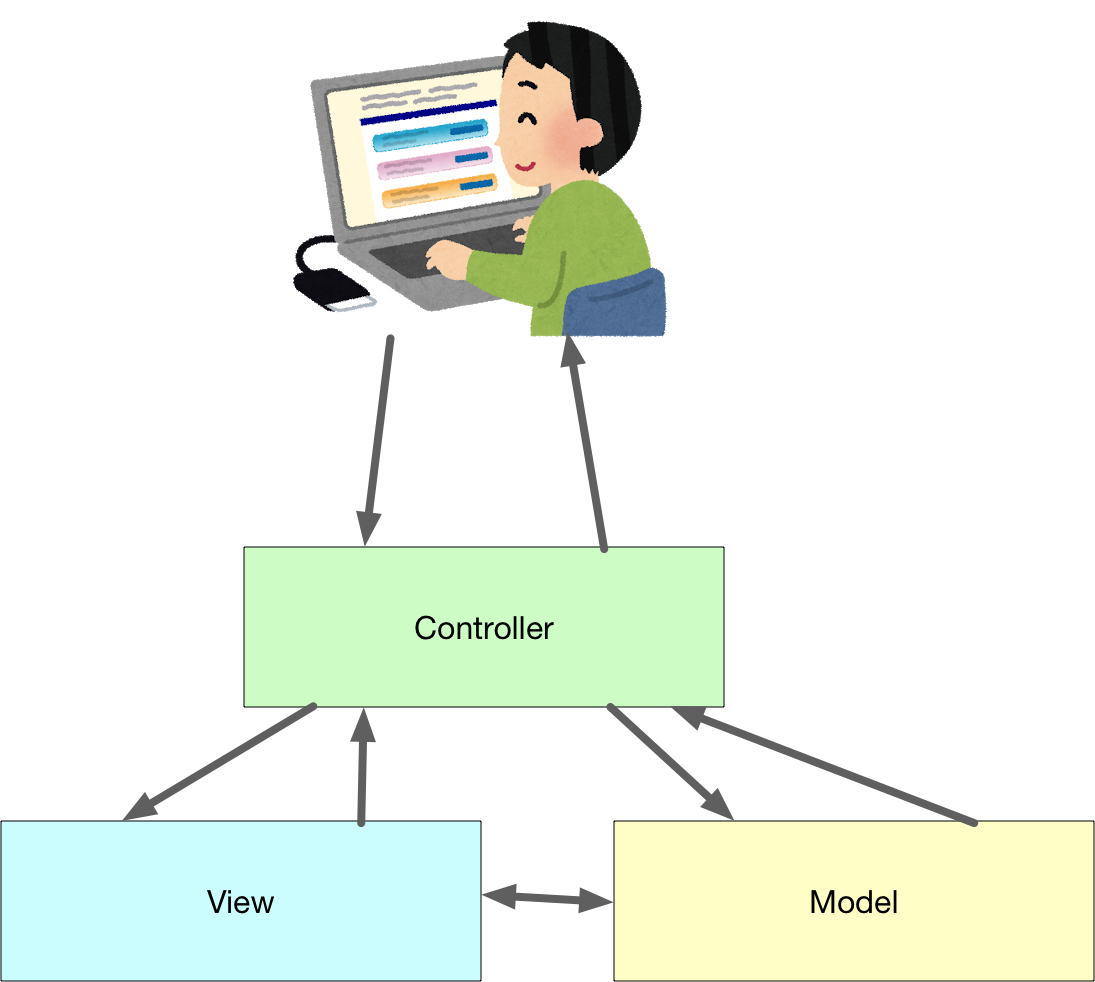
ソフトウェアの役割をきちんと分けましょう。という考え方で、Model、View、Controllerという役割があります。これらの頭文字を取ってMVCと呼びます。
| 役割 | 意味 |
|---|---|
 |
ブラウザからのリクエストを受けて、レスポンスを返します。 |
 |
画面表示をどのように表示するかを管理します。page_a.blade.php, page_b.blade.phpがviewにあたります。 |
 |
いろいろな計算や、システム全体で使う機能を書きます。ビジネスロジックを書きます。金融機関であれば金利計算などの処理をModelに書きます。 |
参考URL https://ja.wikipedia.org/wiki/Model_View_Controller
今までの例ではコントローラーとモデルを使わずに、ページの表示を行っていました。
しかしプログラムが小さいうちは大丈夫ですが、プログラムの規模が大きくなっていくうちに役割の違う機能が色んな所に散らかっていき、収集が着かなくなってしまいます。
これからはキチンとコントローラーを作ってページの表示を行っていきましょう。
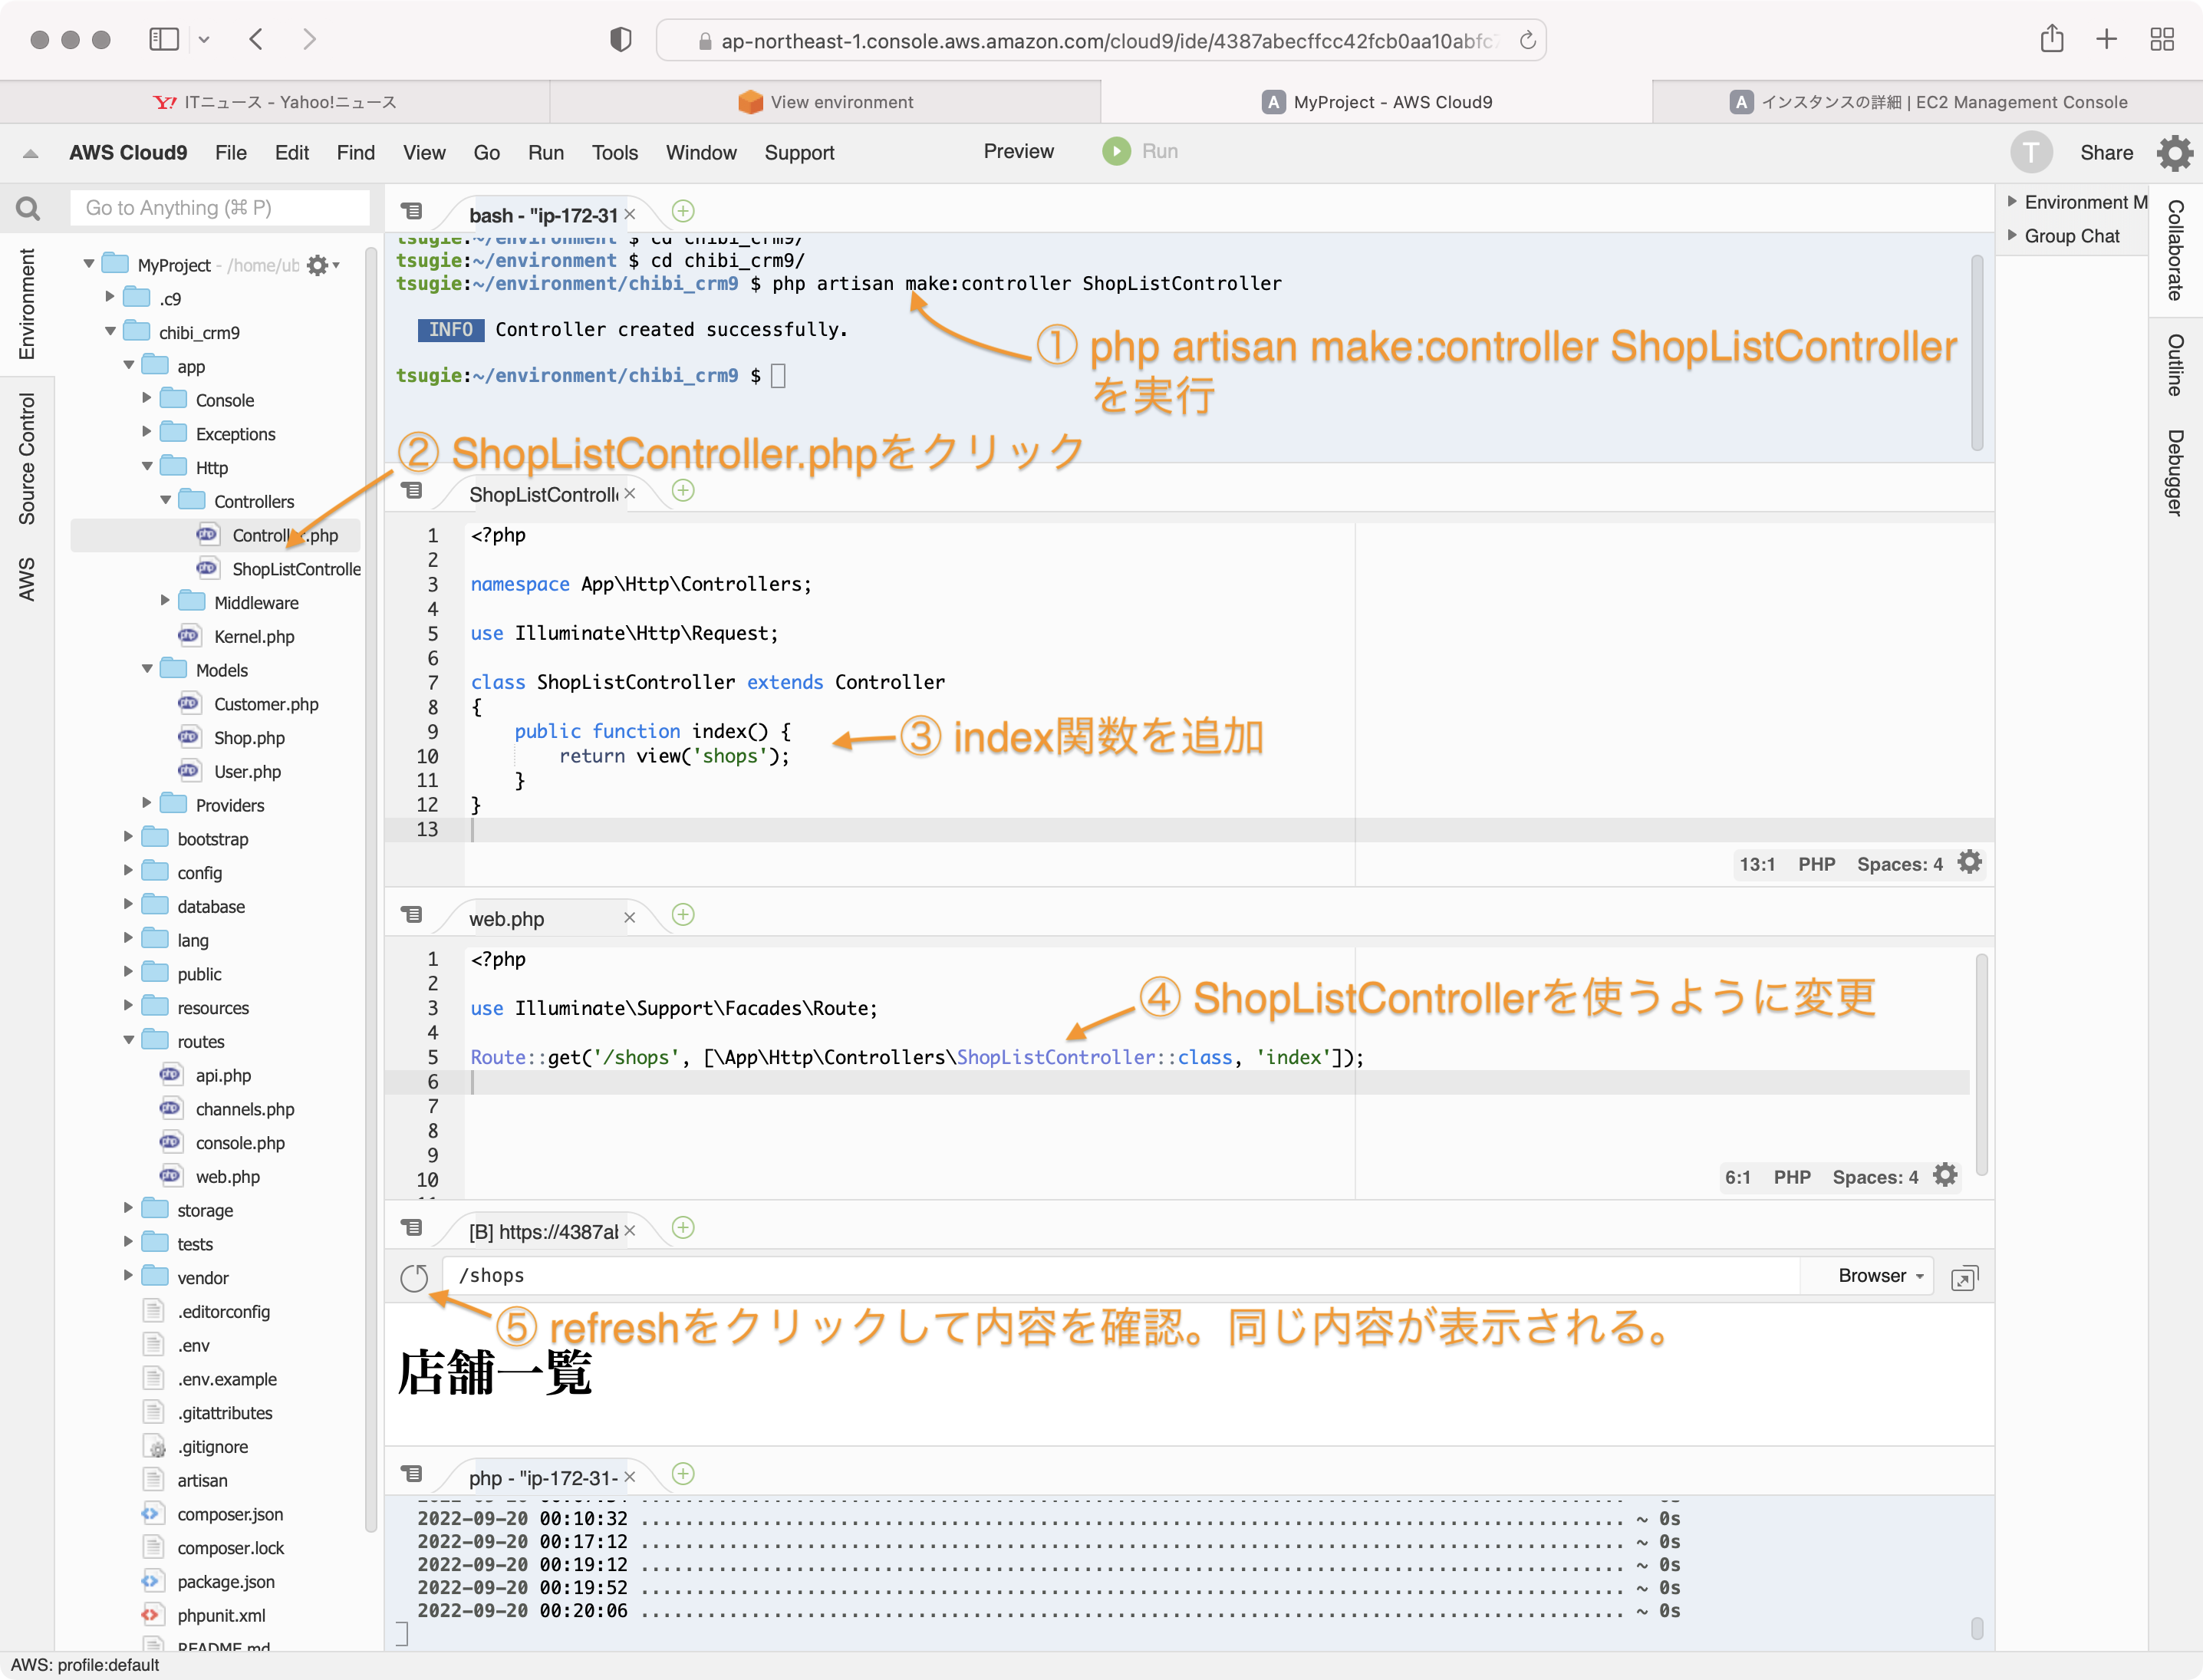
ターミナルから以下のコマンドを実行してコントローラーを作成します。
php artisan make:controller ShopListController
ShopController.phpを開いてindex関数を追加します。
class ShopListController extends Controller
{
    public function index() {
        return view('shops');
    }
}
web.phpを編集して、ShopListControllerを参照するようにします。
Route::get('/shops', [\App\Http\Controllers\ShopListController::class, 'index']);
プレビューウィンドウをrefreshして、表示を確認します。
コントローラーでデータベースにアクセス
ShopListController.phpのindex関数を以下のように変更します。
    public function index() {
        $shops = \App\Models\Shop::get();
        dd($shops);
        return view('shops',['shops'=>$shops]);
    }
プレビューウィンドウをrefreshして、表示を確認します。
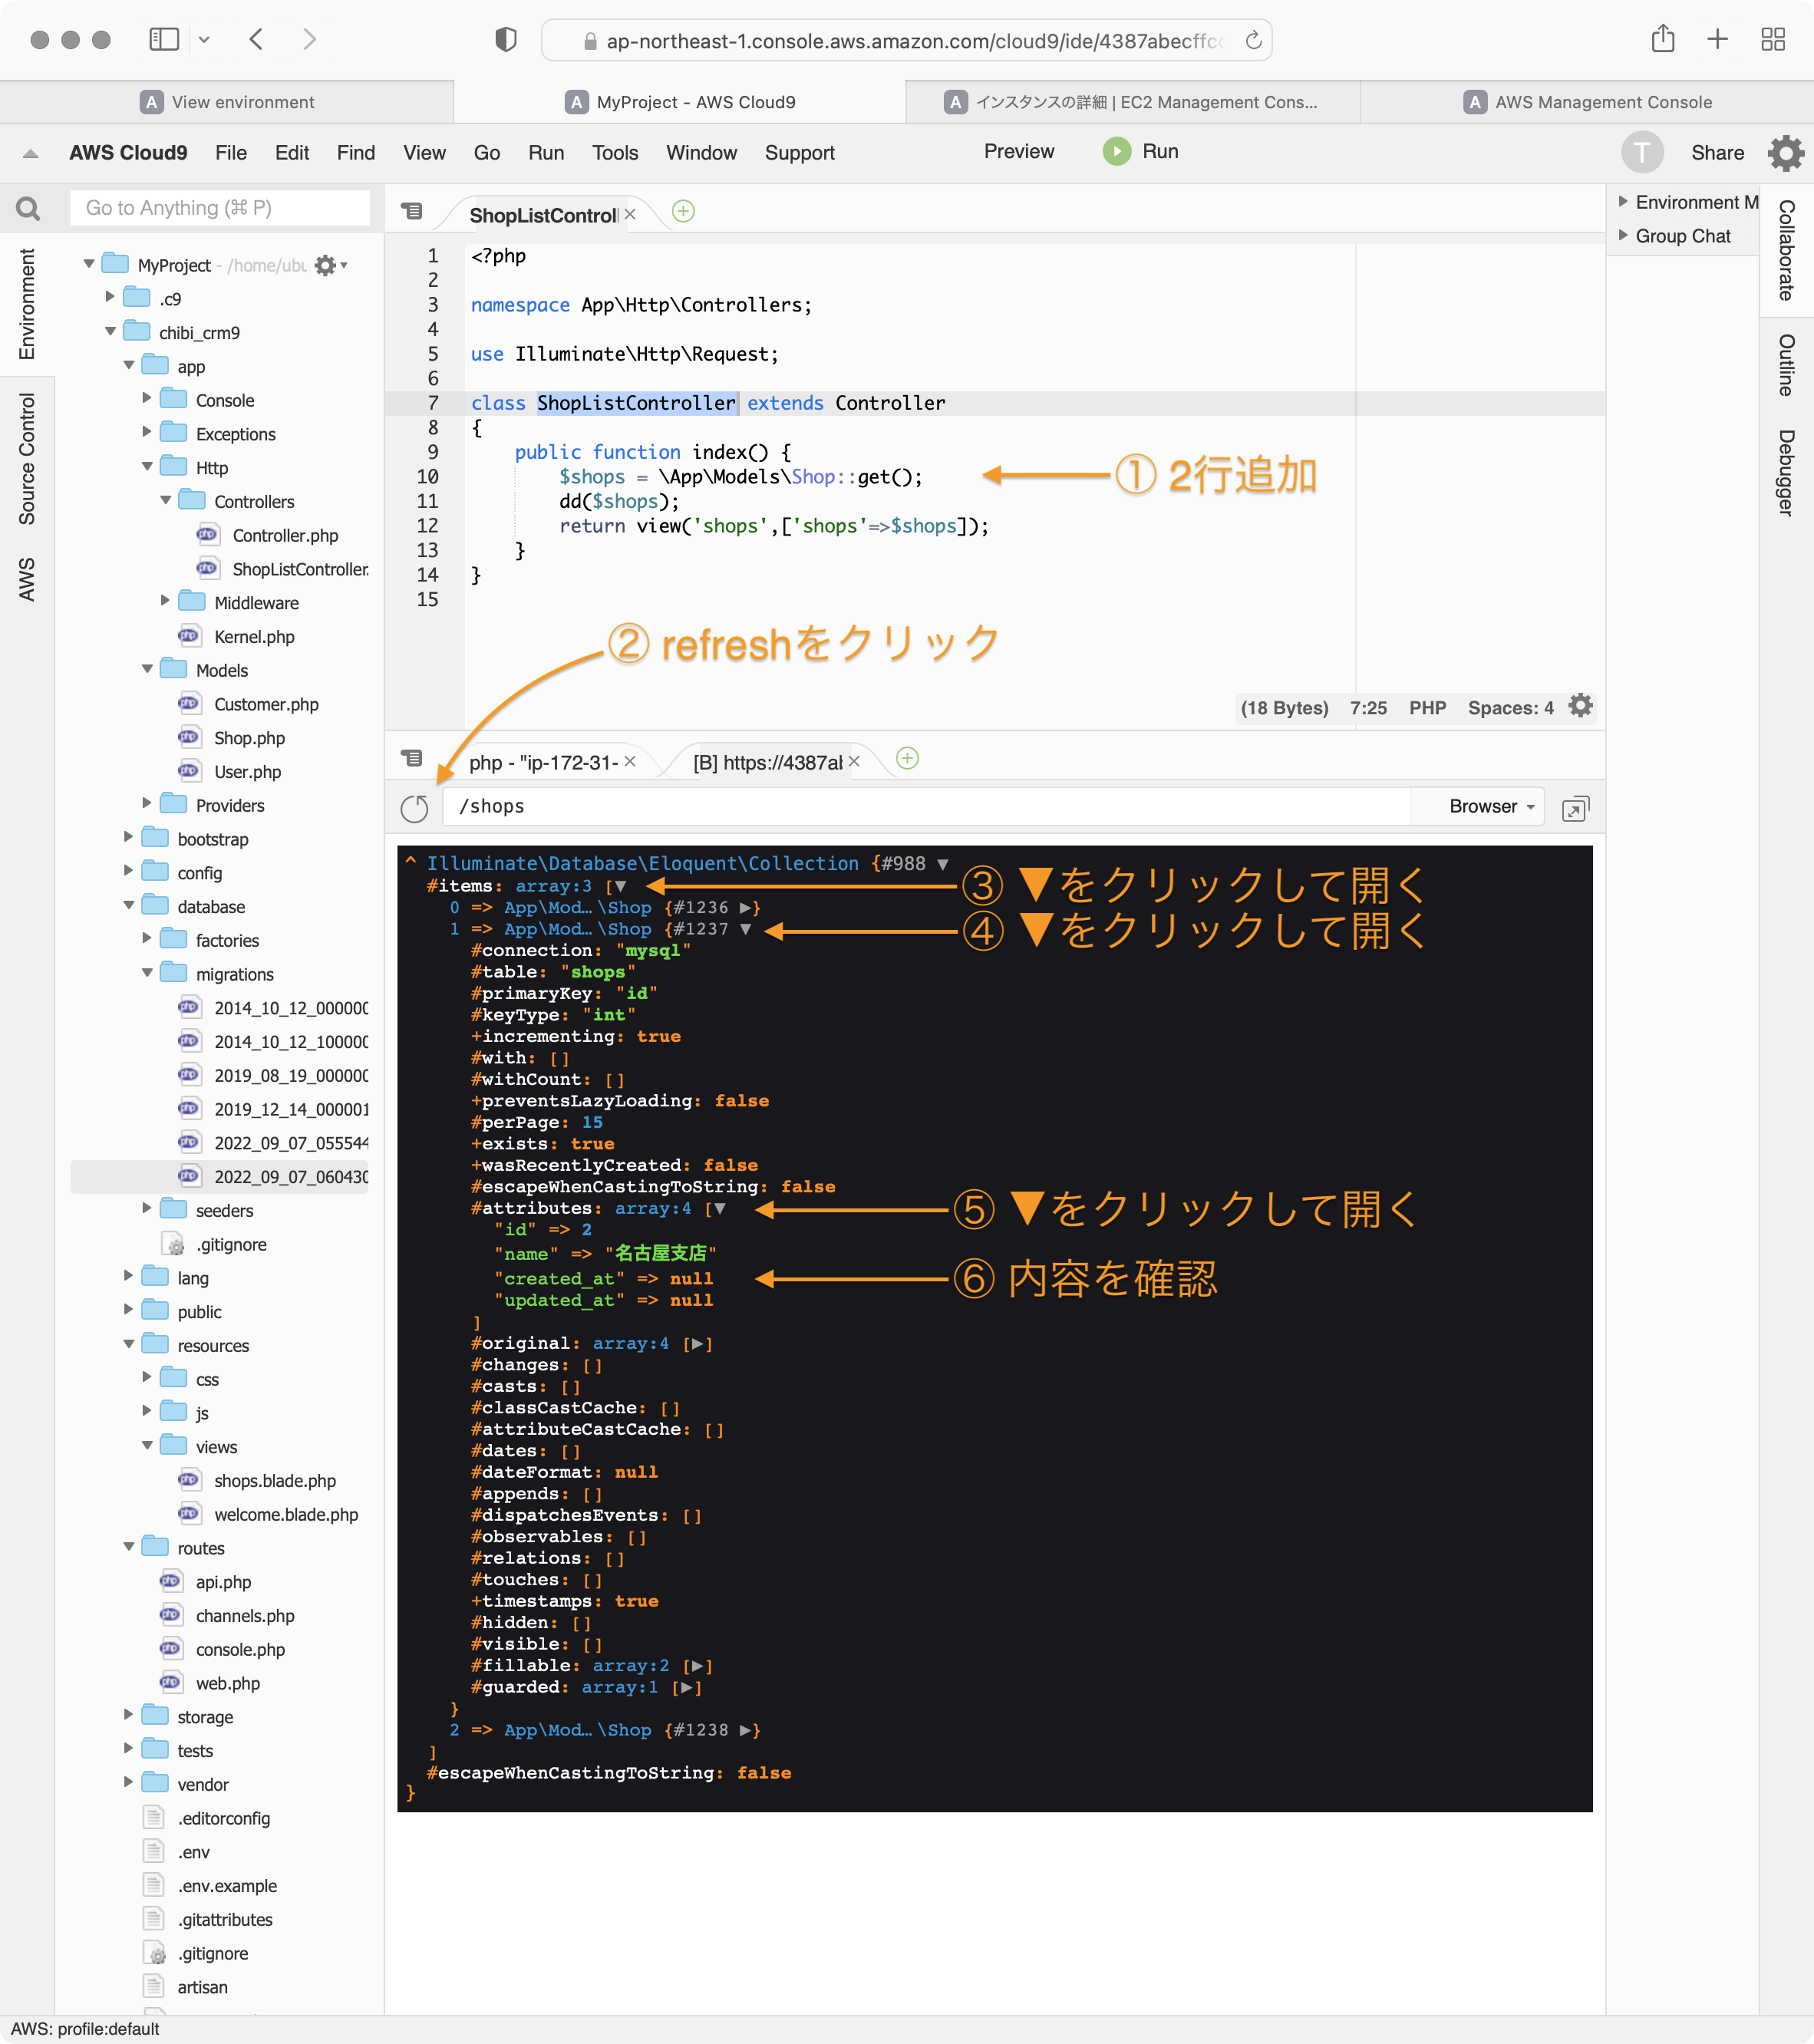
\App\Models\Shop::get();の \App\Models\Shop は app\ModelsフォルダにあるShopを利用するという意味です。
::get()はデータベースからshopsテーブルの内容を全部取ってくるという意味です。
取得したデータは$shops変数に格納されます。
dd()はLaravelのでデバッグ用関数で変数の内容を表示してくれます。
$shops変数に、データベースのshopsテーブルの中身が入っていることがわかります。
ShopListController.phpのindex関数を以下のように変更します。
    public function index() {
        $shops = \App\Models\Shop::get();
        return view('shops',['shops'=>$shops]);
    }
view('shops',['shops'=>$shops]);の'shops'=>$shopsの部分はshops.bladeに変数$shopsを渡す設定になります。
次にshops.blade.phpを変更します。
<!DOCTYPE html>
<html lang="en">
<head>
    <meta charset="UTF-8">
    <title>店舗一覧</title>
</head>
<body>
<h1>店舗一覧</h1>

{{dd($shops)}}

</body>
</html>
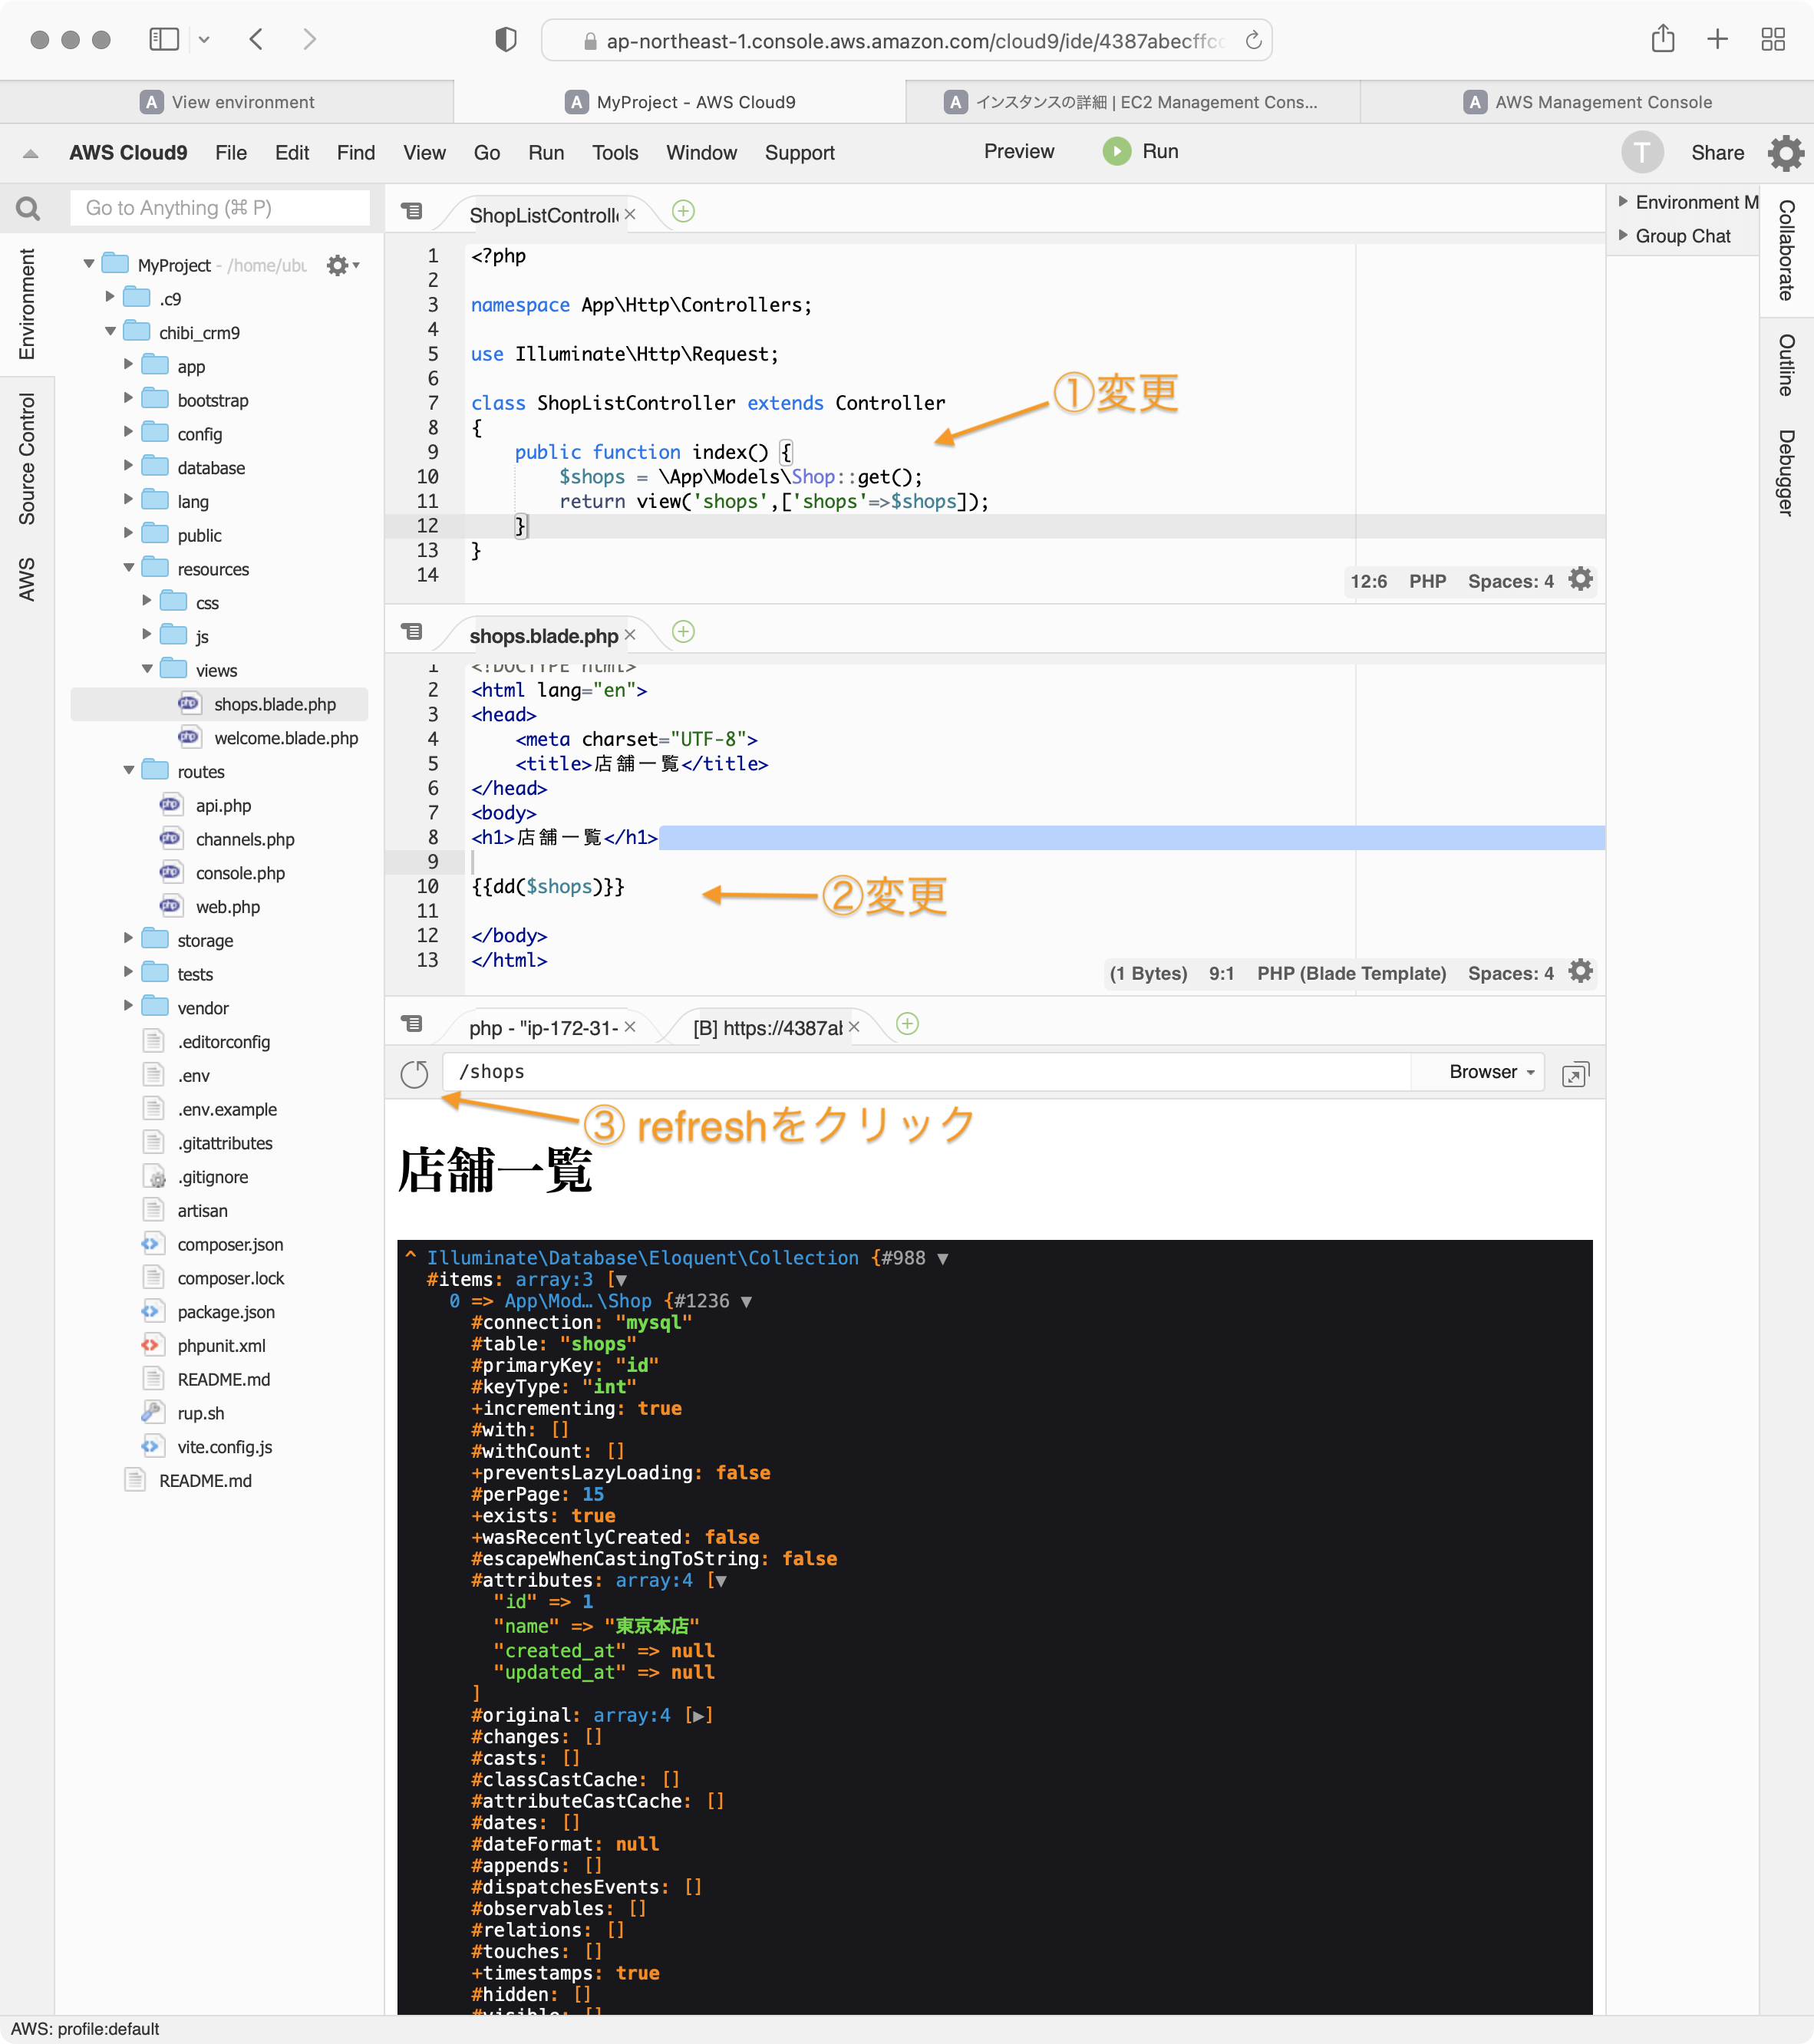
blade側にshopsの情報が伝わっていることが確認できます。
変数の内容を少し詳しく追っていきましょう。
{{dd($shops)}}
の部分を
{{print_r($shops[0])}}
にしてプレビューをrefreshしてみます。
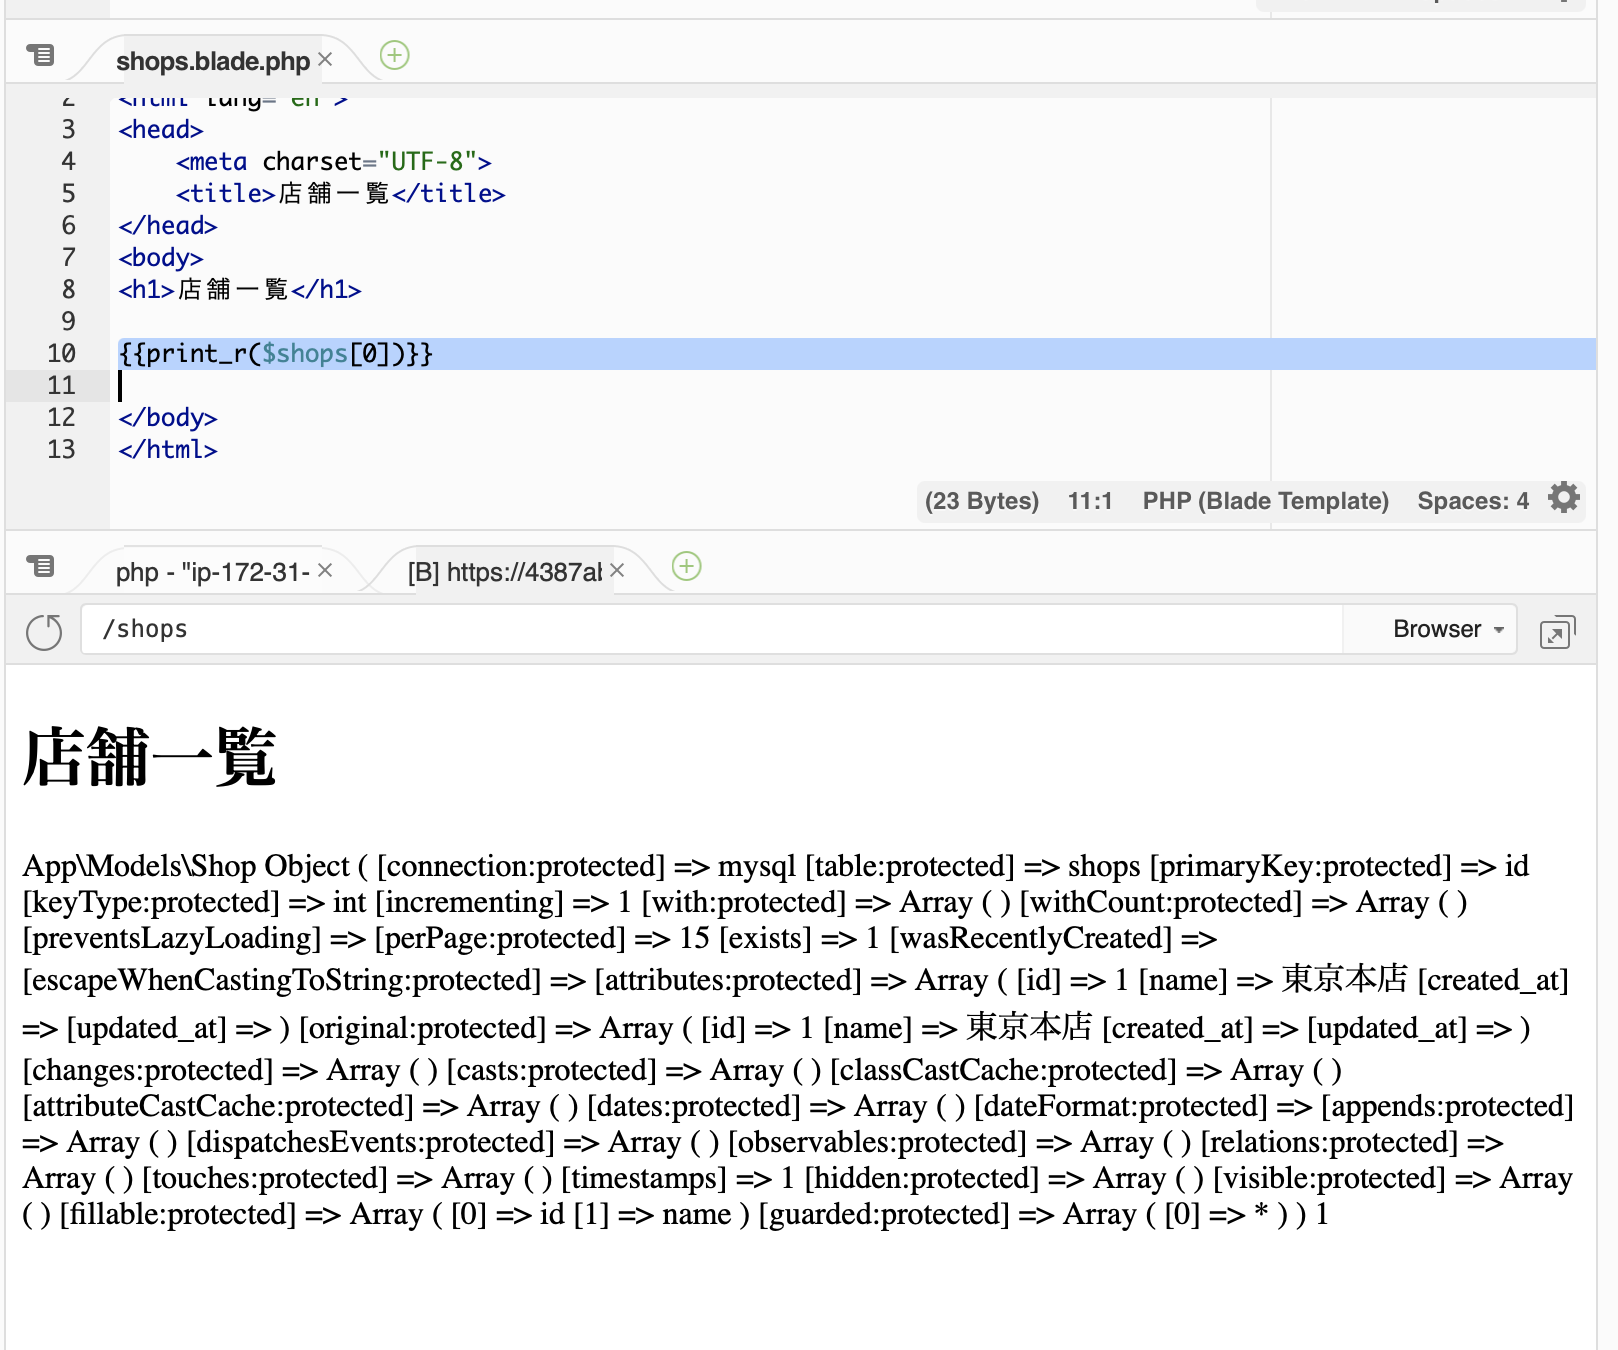
$shops配列の最初の要素が表示されます。見やすいようにテキストエディタで整形してみます。
Array (
    [id] => 1
    [name] => 東京本店
    [created_at] =>
    [updated_at] =>
)
データベースshopsテーブルの東京本店の内容入っていることがわかります。
次にshops.blade.phpを@foreachを使って店舗情報一覧を表示していきます。
shops.blade.phpを以下のように変更します。
<!DOCTYPE html>
<html lang="en">
<head>
    <meta charset="UTF-8">
    <title>店舗一覧</title>
</head>
<body>
<h1>店舗一覧</h1>
<ol>
    @foreach($shops as $shop)
        <li>{{$shop->name}}</li>
    @endforeach
</ol>
</body>
</html>
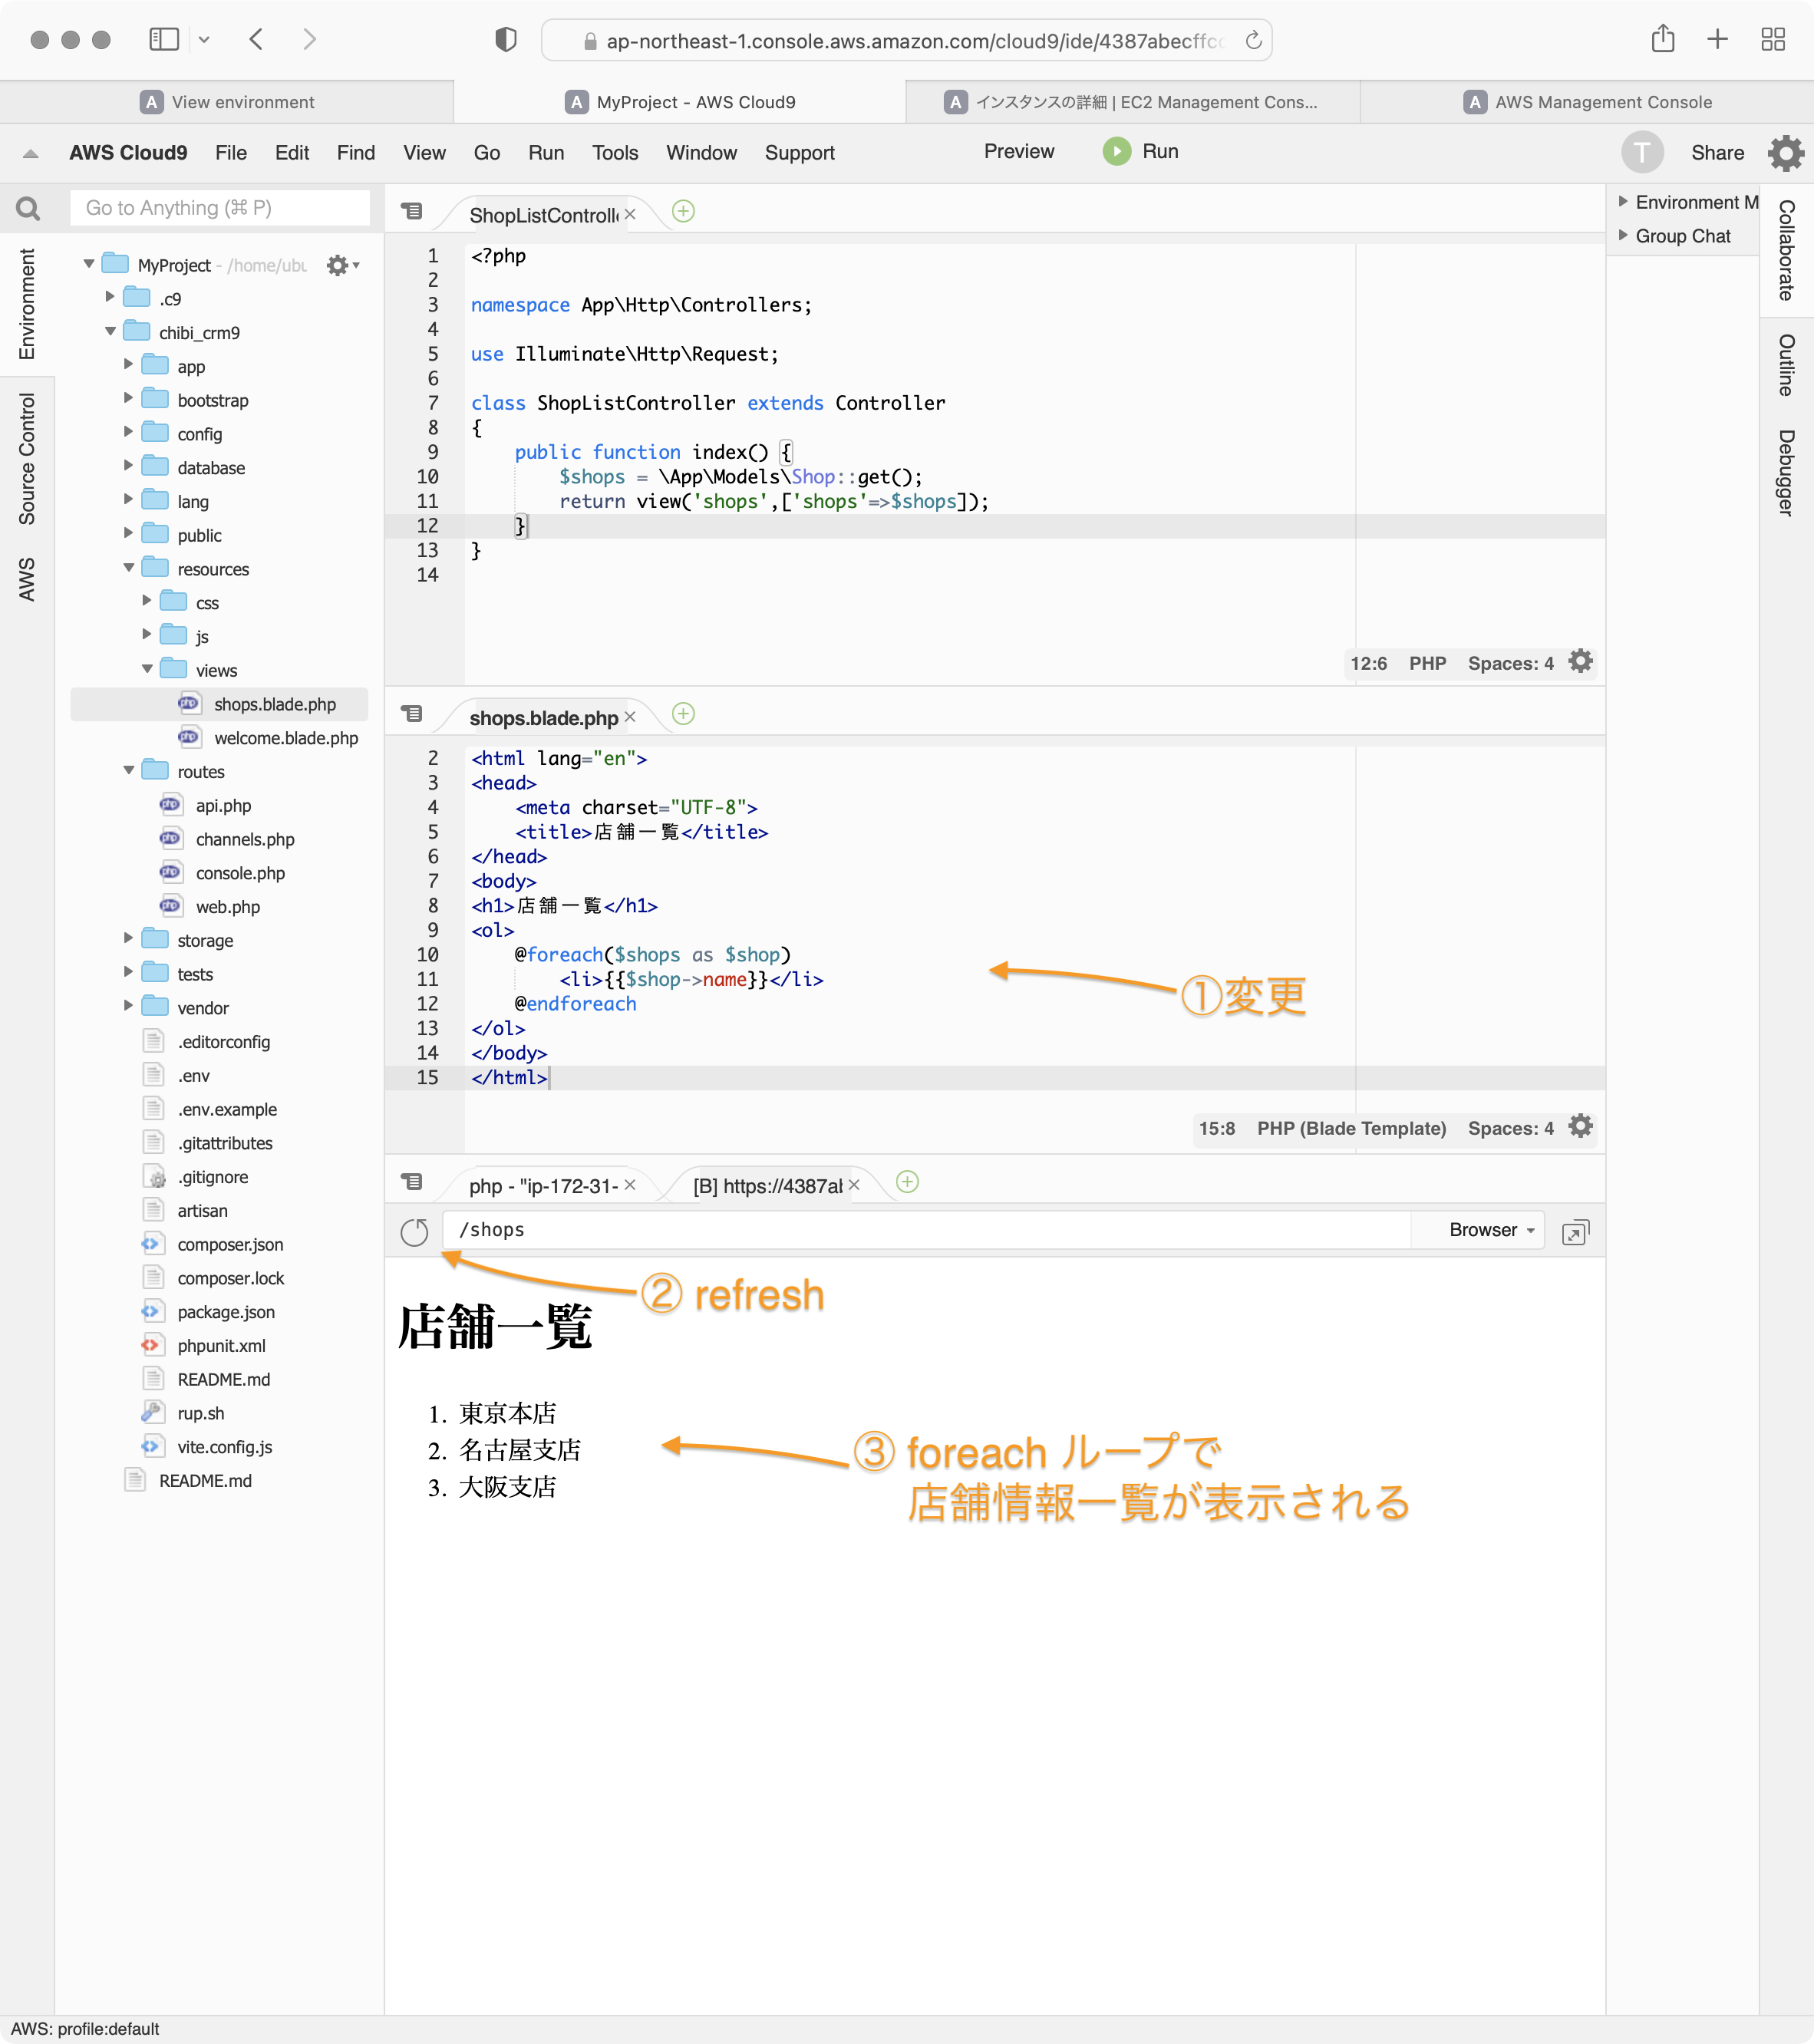
店舗一覧が表示されるていることを確認できます。
画面の作成
それでは、顧客管理システムの画面を作っていきます。
ターミナルで以下のコマンドを実行します。
composer require laravel/ui
composer install
php artisan ui vue --auth
データベース構造が変わったのでマイグレーションを再実行します。このときfreshオプションを指定して、データを破棄して最初からテーブルを作り直します。
php artisan migrate:fresh
マイグレーションがエラーなく実行出来ることを確認します。
Laravelが作ったUserテーブルを編集
Laravelはログイン処理などを行うユーザー情報を格納するテーブルとして usersテーブルを使います。このusersテーブルにアクセスするためのクラスがUser.phpになります。
今回作成するchibi_crmにはユーザーはどの役職(=Role)を持つかの情報を持たせるため users テーブルにrole_id カラムと、どの店舗に所属するのかのshop_idカラムを追加します。
テキストエディタでデータベース定義ファイルを編集してroleカラムを追加します。
以下のファイルをエディタで編集します。
2014_10_12_000000_create_users_table.phpをテキストエディタを使って編集します。
以下の「 // ← 追記 *********」 になっている行をそれぞれ追加します。
<?php
use Illuminate\Database\Migrations\Migration;
use Illuminate\Database\Schema\Blueprint;
use Illuminate\Support\Facades\Schema;
use Illuminate\Support\Facades\DB;// ← 追記 *
return new class extends Migration {
/**
* Run the migrations.
*
* @return void
*/
public function up()
{
Schema::create('users', function (Blueprint $table) {
$table->id();
$table->string('name');
$table->string('email')->unique();
$table->timestamp('email_verified_at')->nullable();
$table->string('password');
$table->unsignedInteger('role_id')->default(2); // ← 追記 *********
$table->unsignedInteger('shop_id')->default(1); // ← 追記 *********
$table->string('memo')->nullable(); // ← 追記 *********
$table->rememberToken();
$table->timestamps();
});
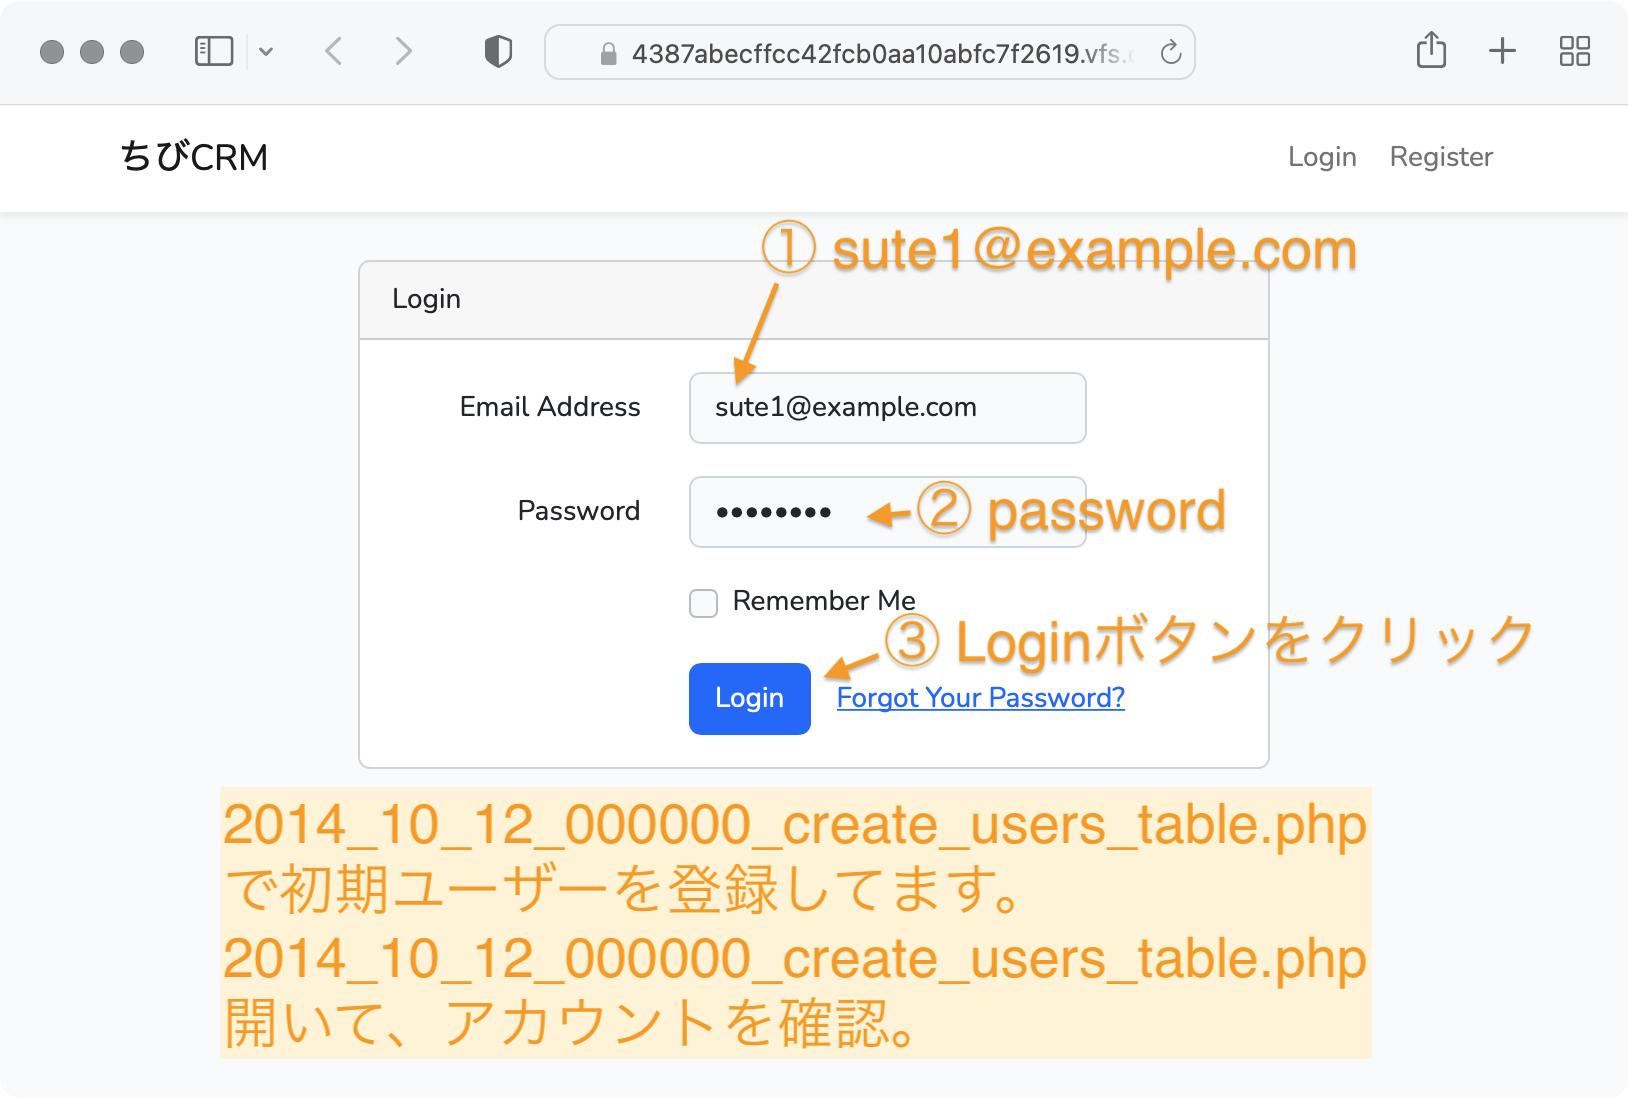
DB::table('users')->insert(['id' => 1, 'name' => '山田太郎', 'email' => 'sute1@example.com', 'password' => bcrypt('password'), 'role_id' => 1, 'shop_id' => 1, 'memo' => '総括主任']);
DB::table('users')->insert(['id' => 2, 'name' => '畠山俊二', 'email' => 'sute2@example.com', 'password' => bcrypt('password'), 'role_id' => 2, 'shop_id' => 2, 'memo' => '東京本店店員']);
DB::table('users')->insert(['id' => 3, 'name' => '伊藤あきら', 'email' => 'sute3@example.com', 'password' => bcrypt('password'), 'role_id' => 2, 'shop_id' => 2, 'memo' => '名古屋支店店員']);
DB::table('users')->insert(['id' => 4, 'name' => '財条浩二', 'email' => 'sute4@example.com', 'password' => bcrypt('password'), 'role_id' => 2, 'shop_id' => 3, 'memo' => '大阪支店店員']);
}
/**
* Reverse the migrations.
*
* @return void
*/
public function down()
{
Schema::dropIfExists('users');
}
};
php artisan migrate:fresh を実行して。
データベース再構築します。
php artisan migrate:fresh
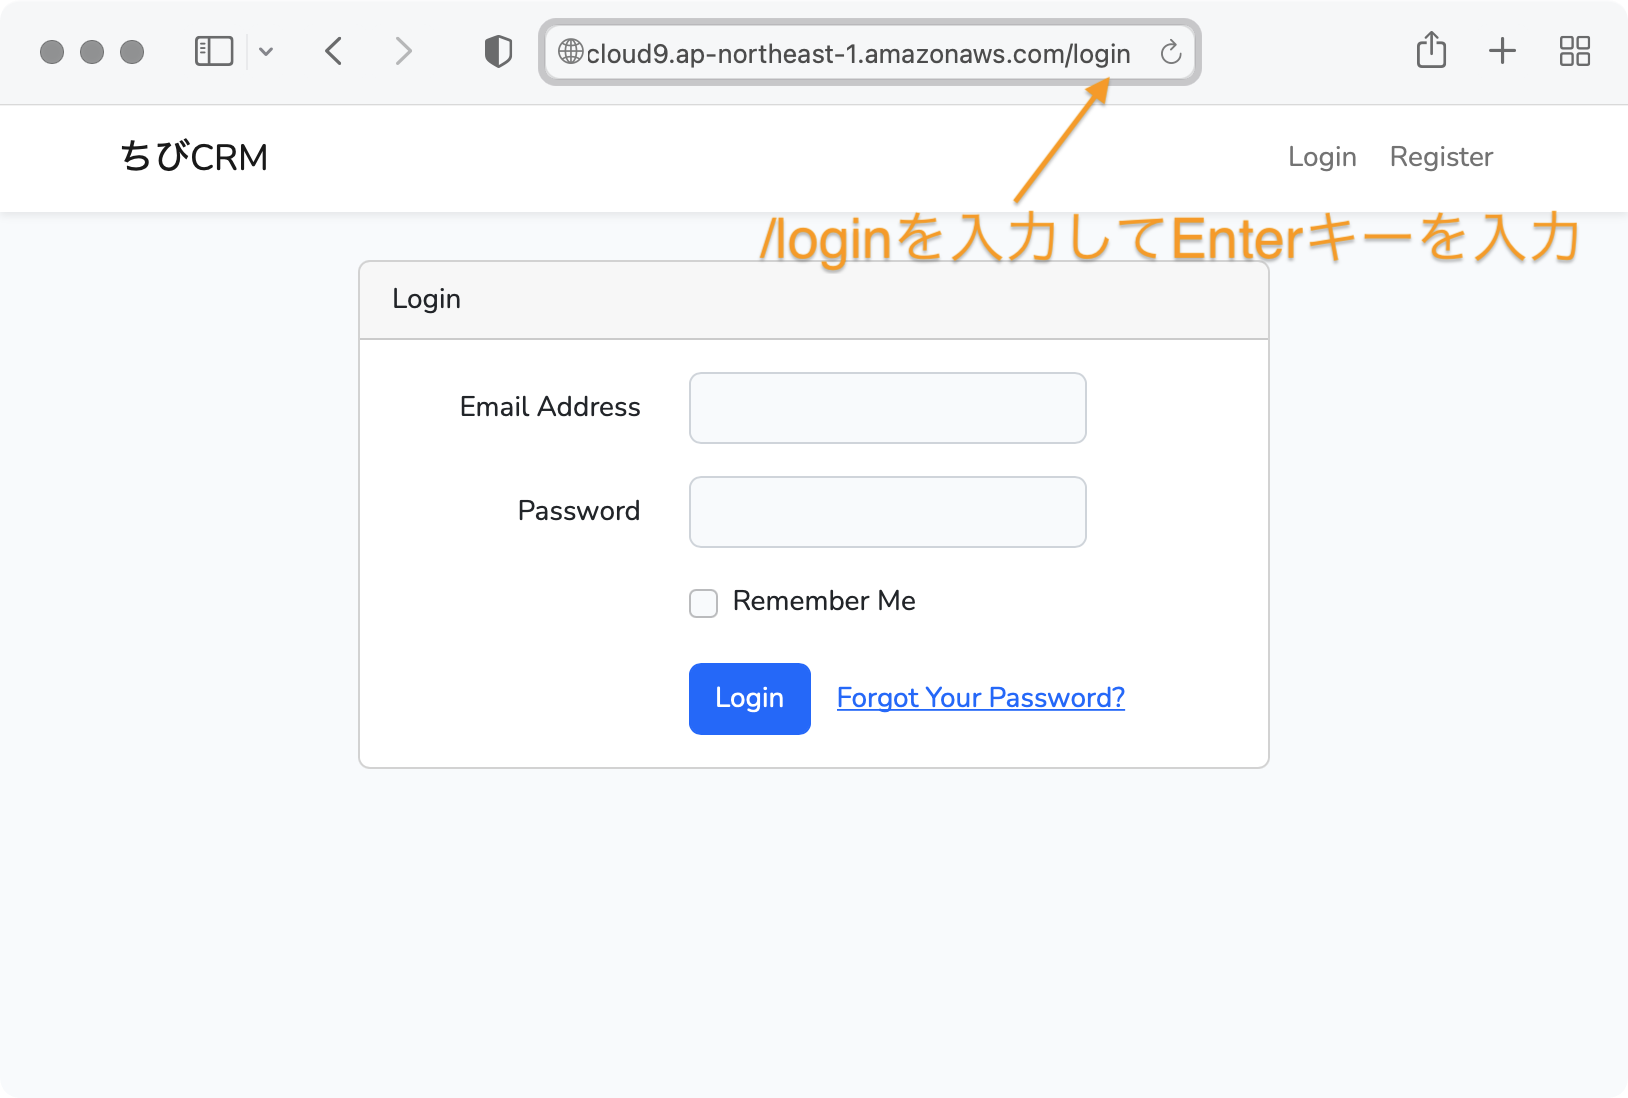
プレビュー画面で /loginを開きます。
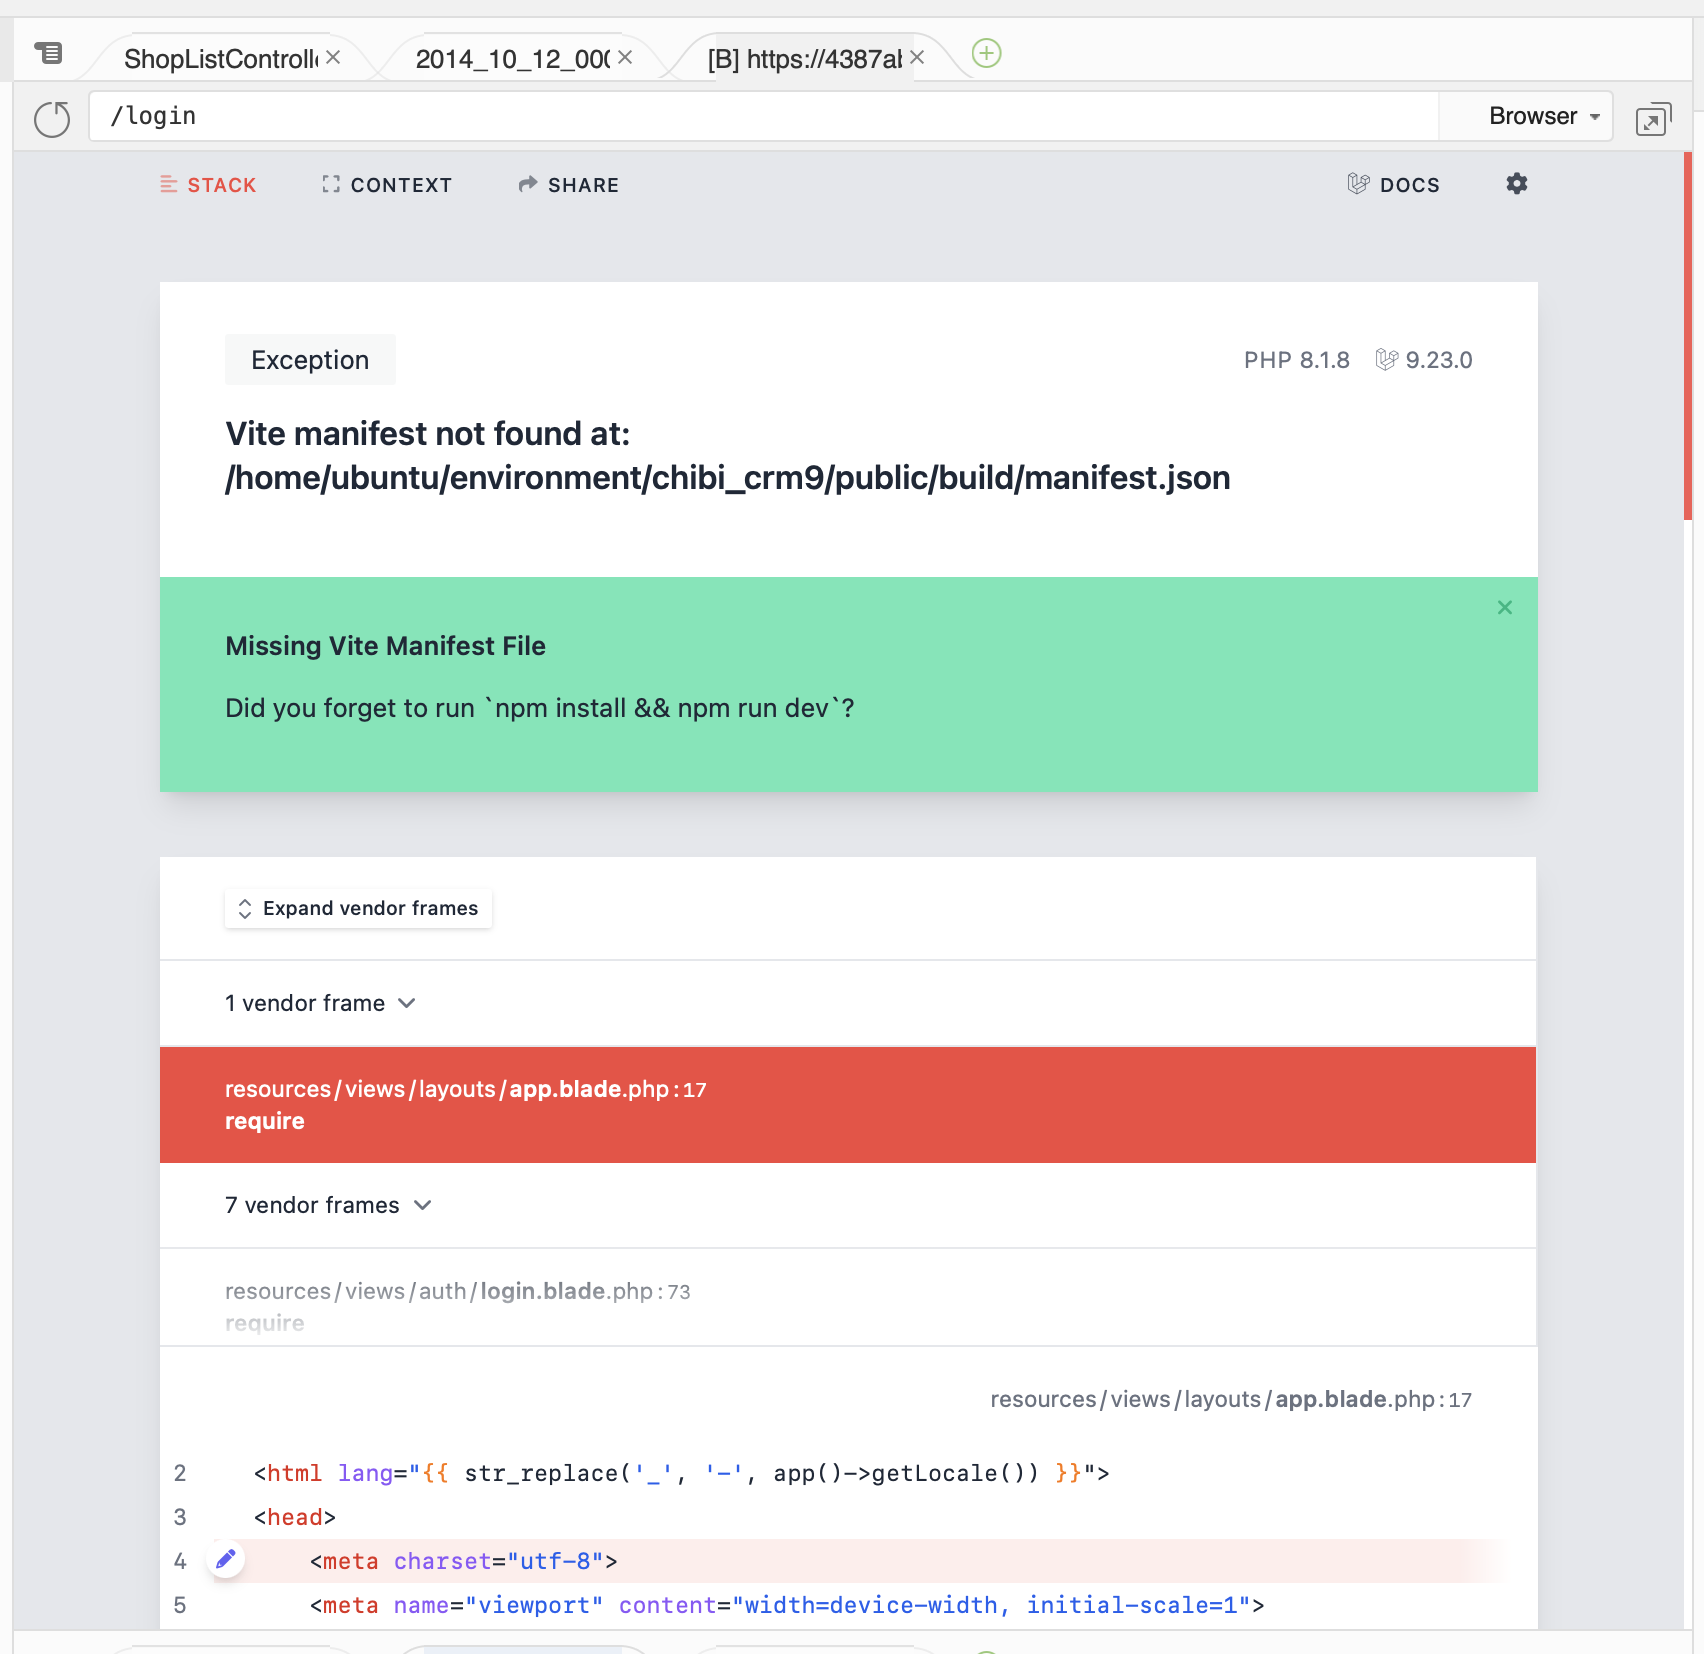
Vite manifest not found エラーが表示されます。
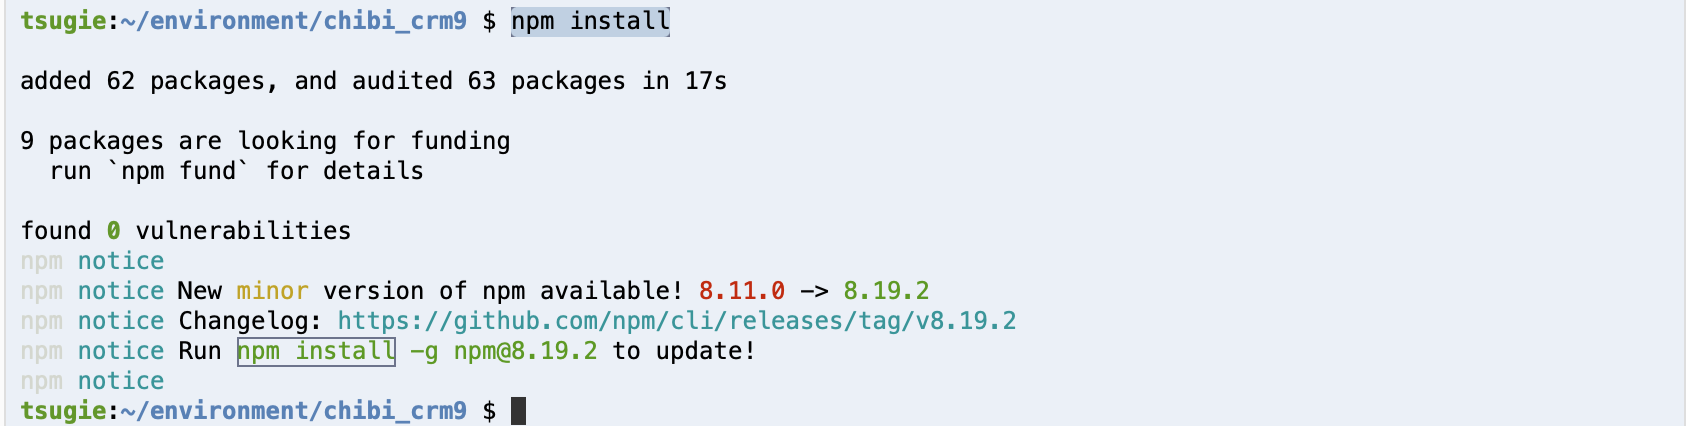
ターミナルからnpm installを実行します。
npm install
次に npm run build 実行。
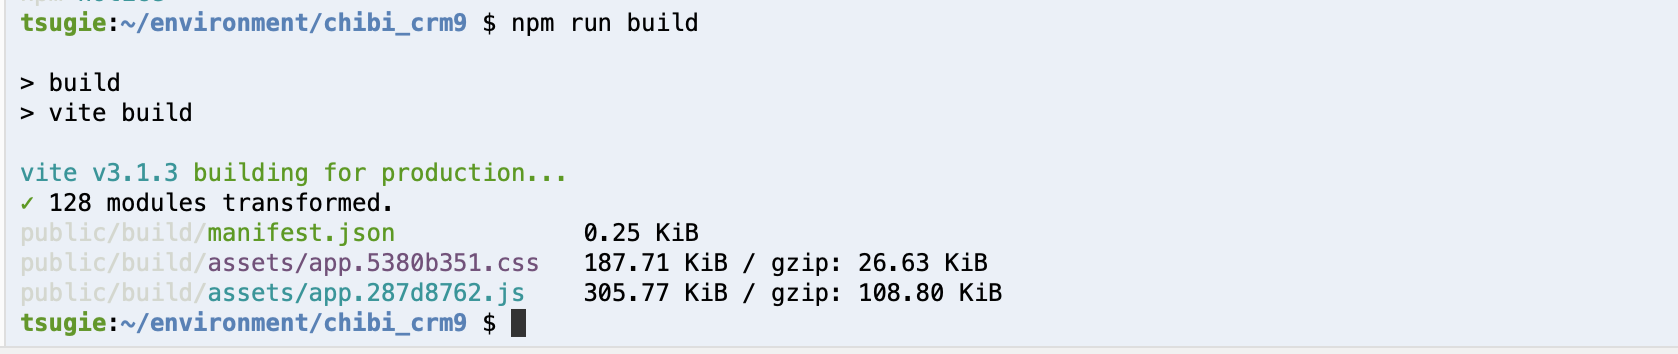
ログイン画面が表示されるようになりました。
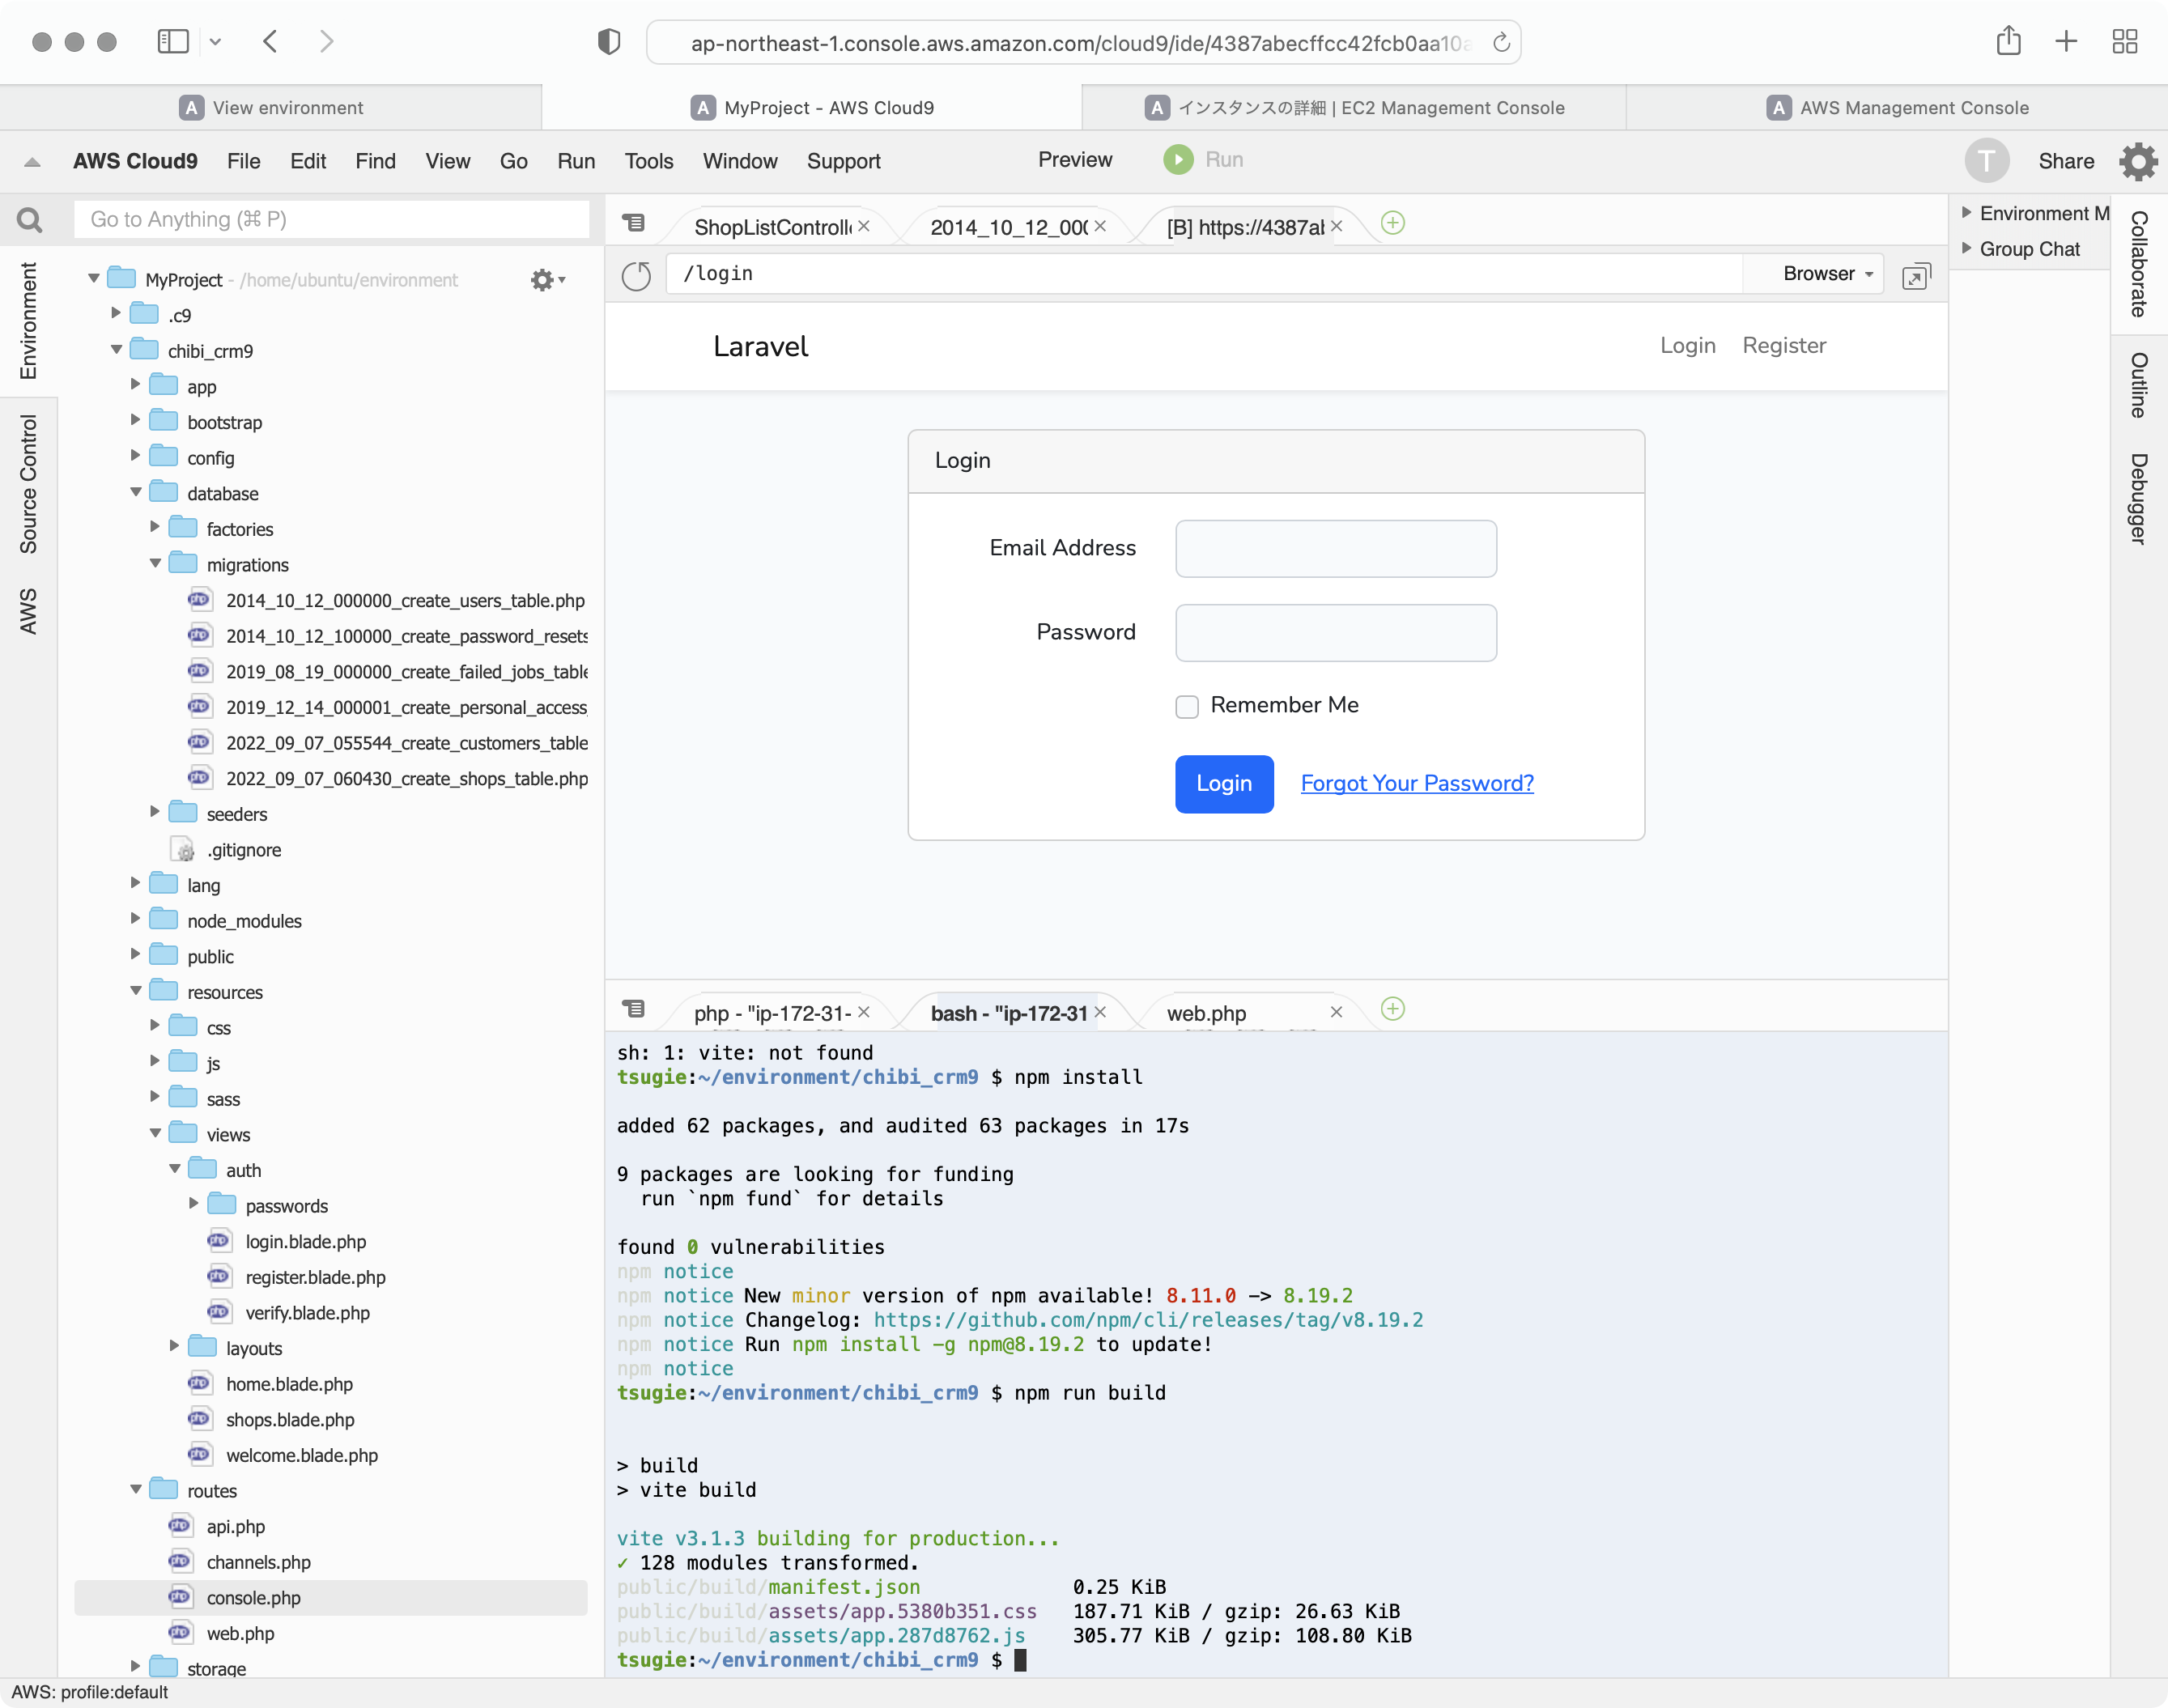
プレビュー画面が小さいので、ブラウザ全体で表示するようにします。
Pop Up into New Windowsをクリックします。
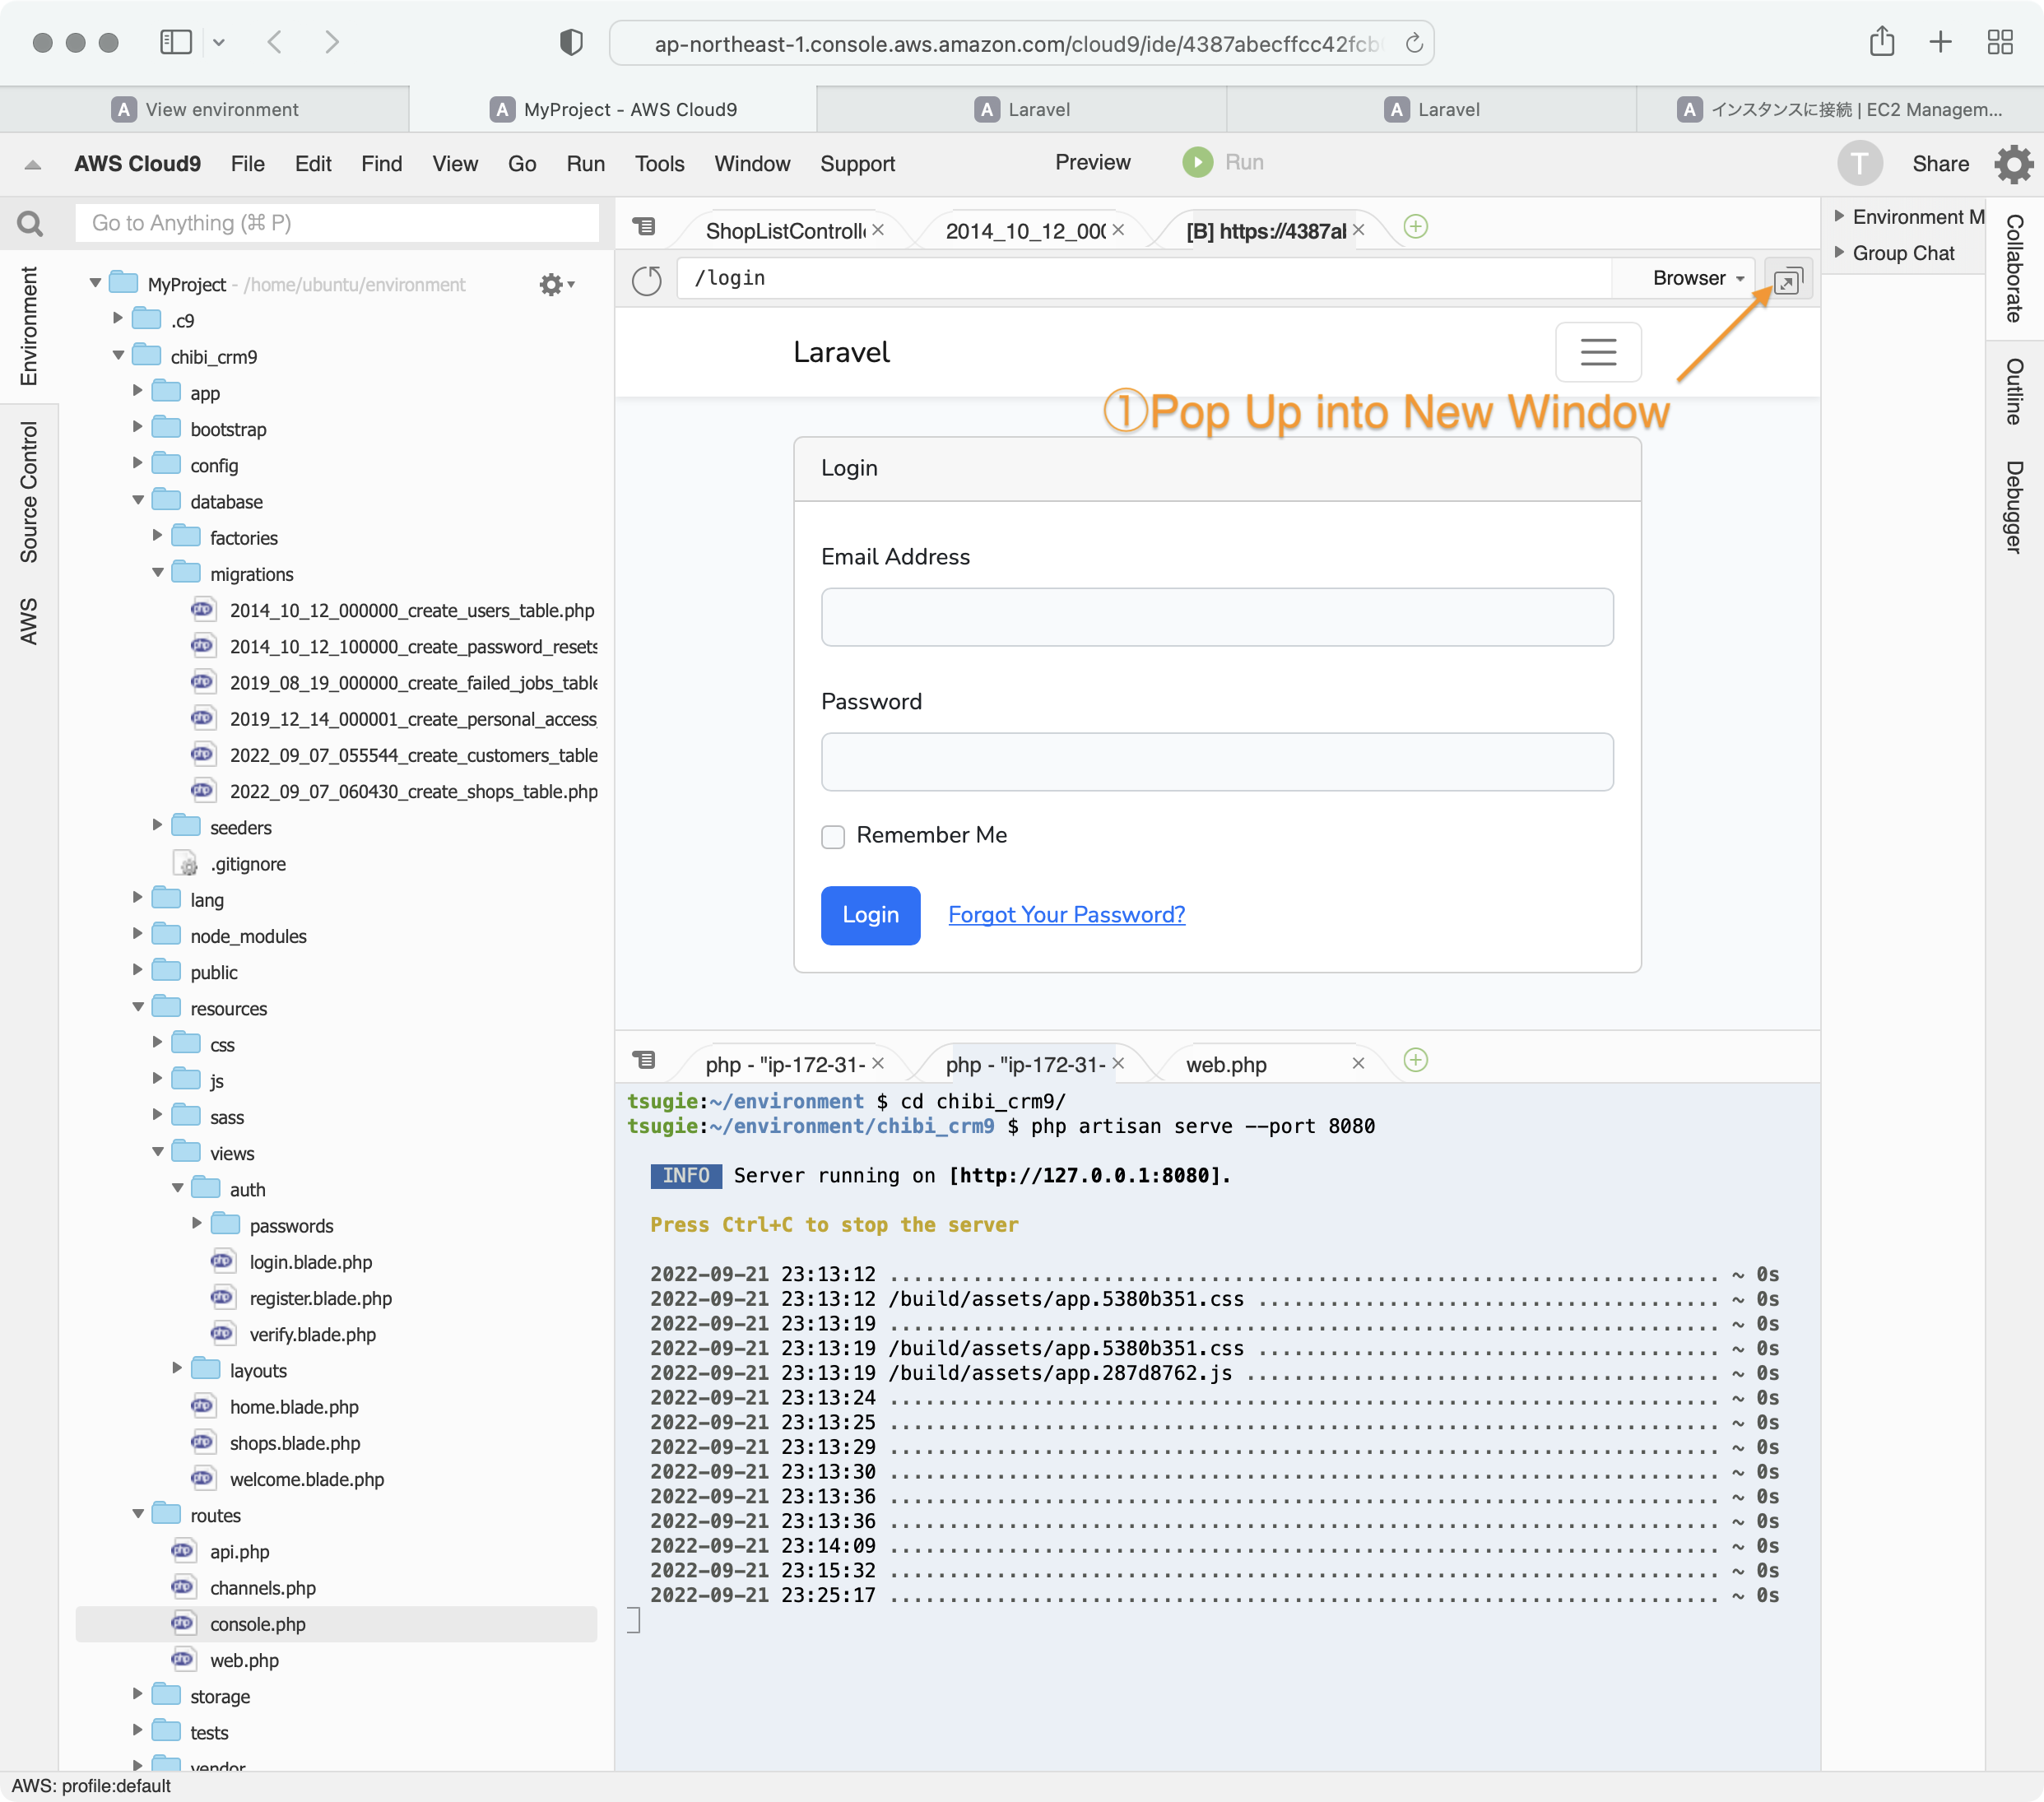
デザインが崩れました。
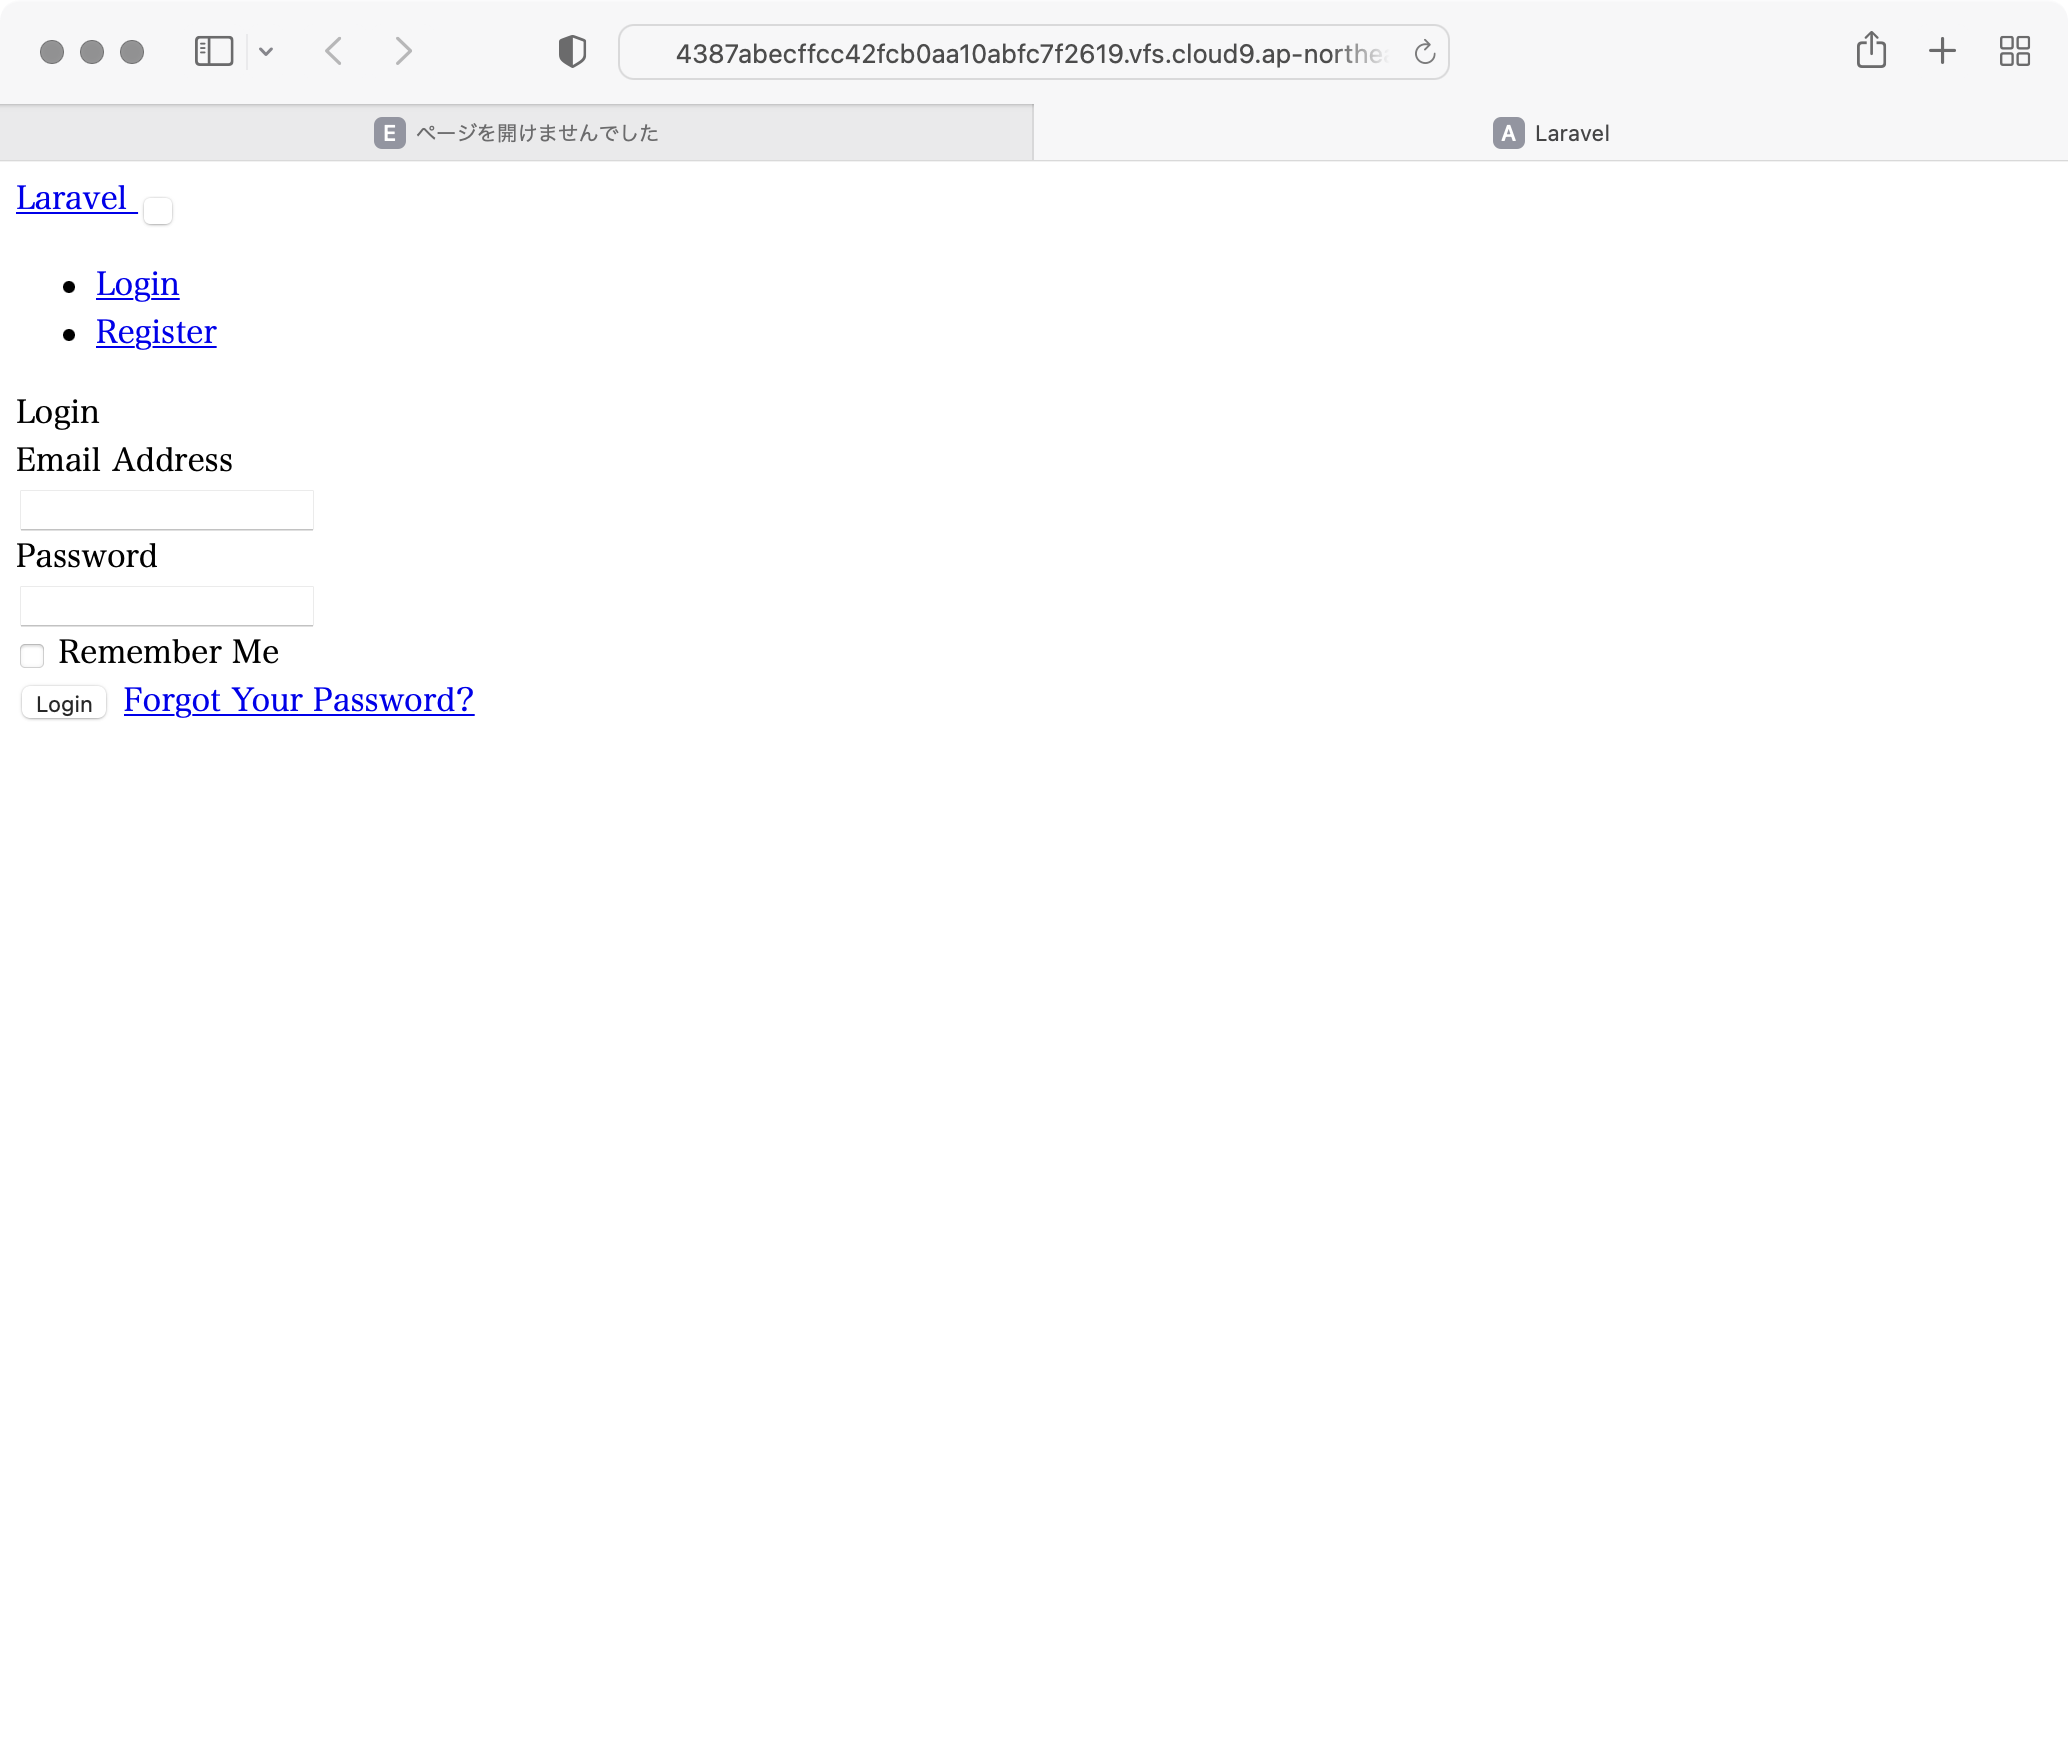
SafariがCSSの読込をブロックしているようです。
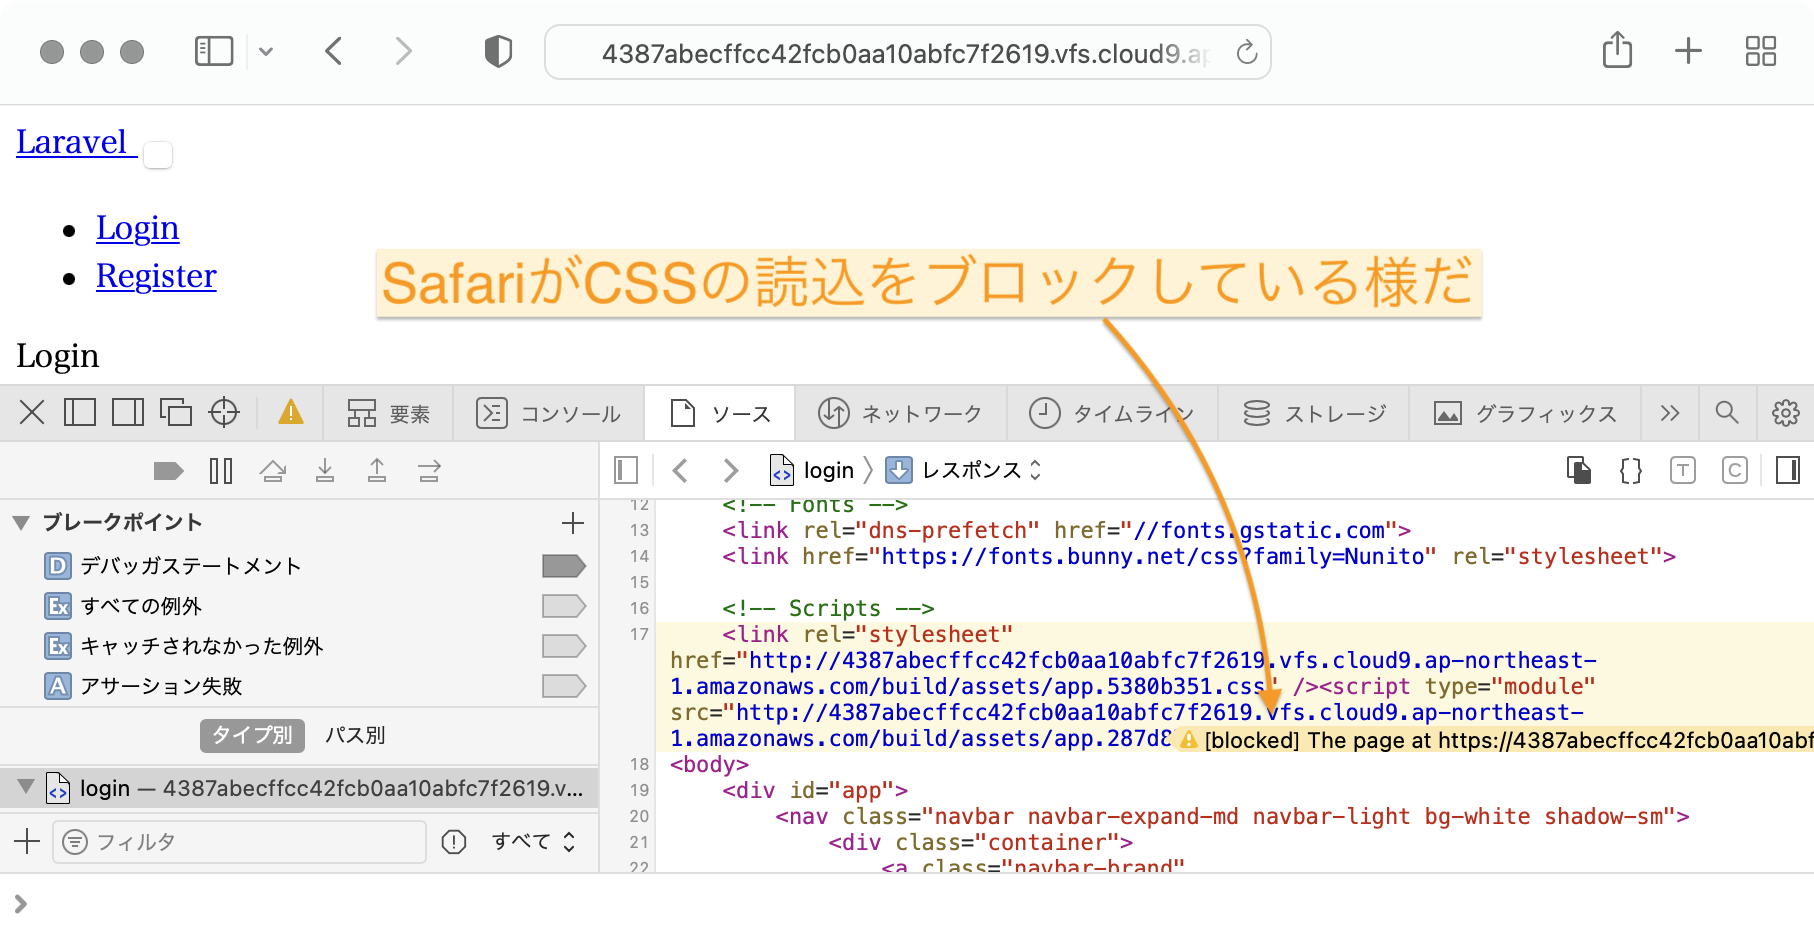
web.phpに以下の行を追加。https通信を強制する。
URL::forceScheme('https');
この変更を実装したら。Laravelのキャッシュをクリアする。でないと、https通信を強制が有効にならない。
php artisan cache:clear
php artisan config:clear
php artisan route:clear
php artisan view:clear
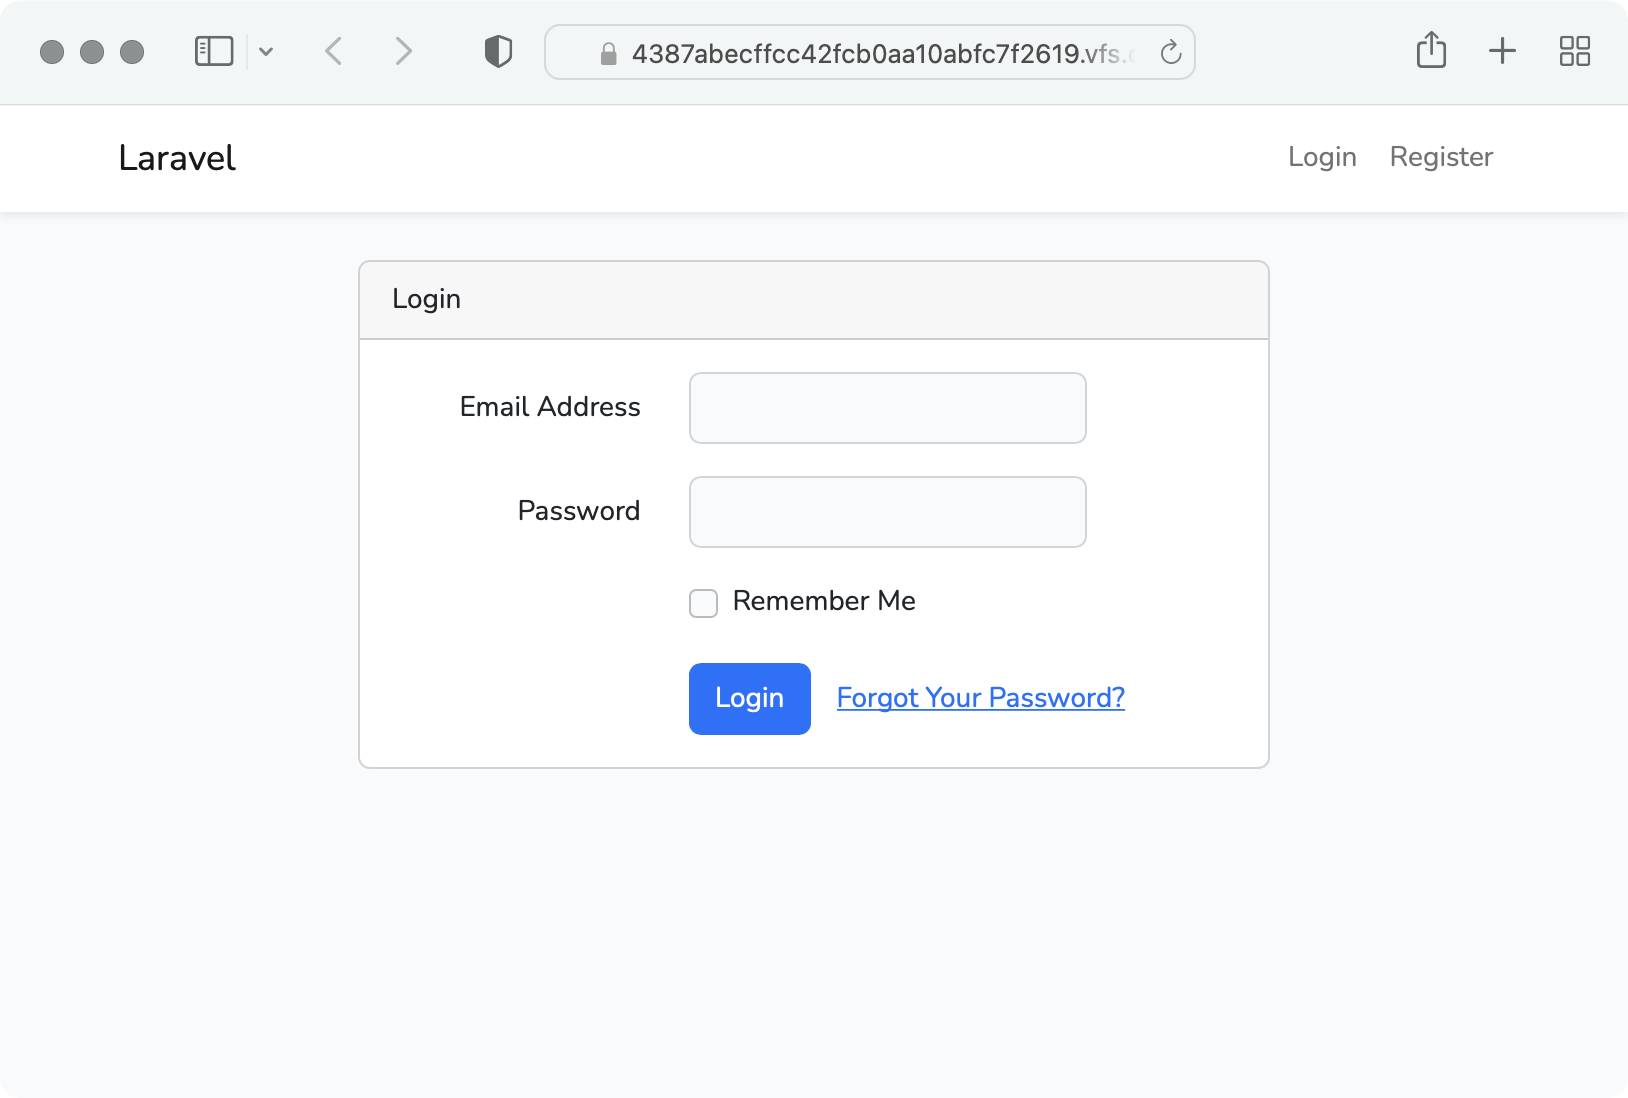
ログイン画面
ログイン画面を表示して、ログインしてみます。
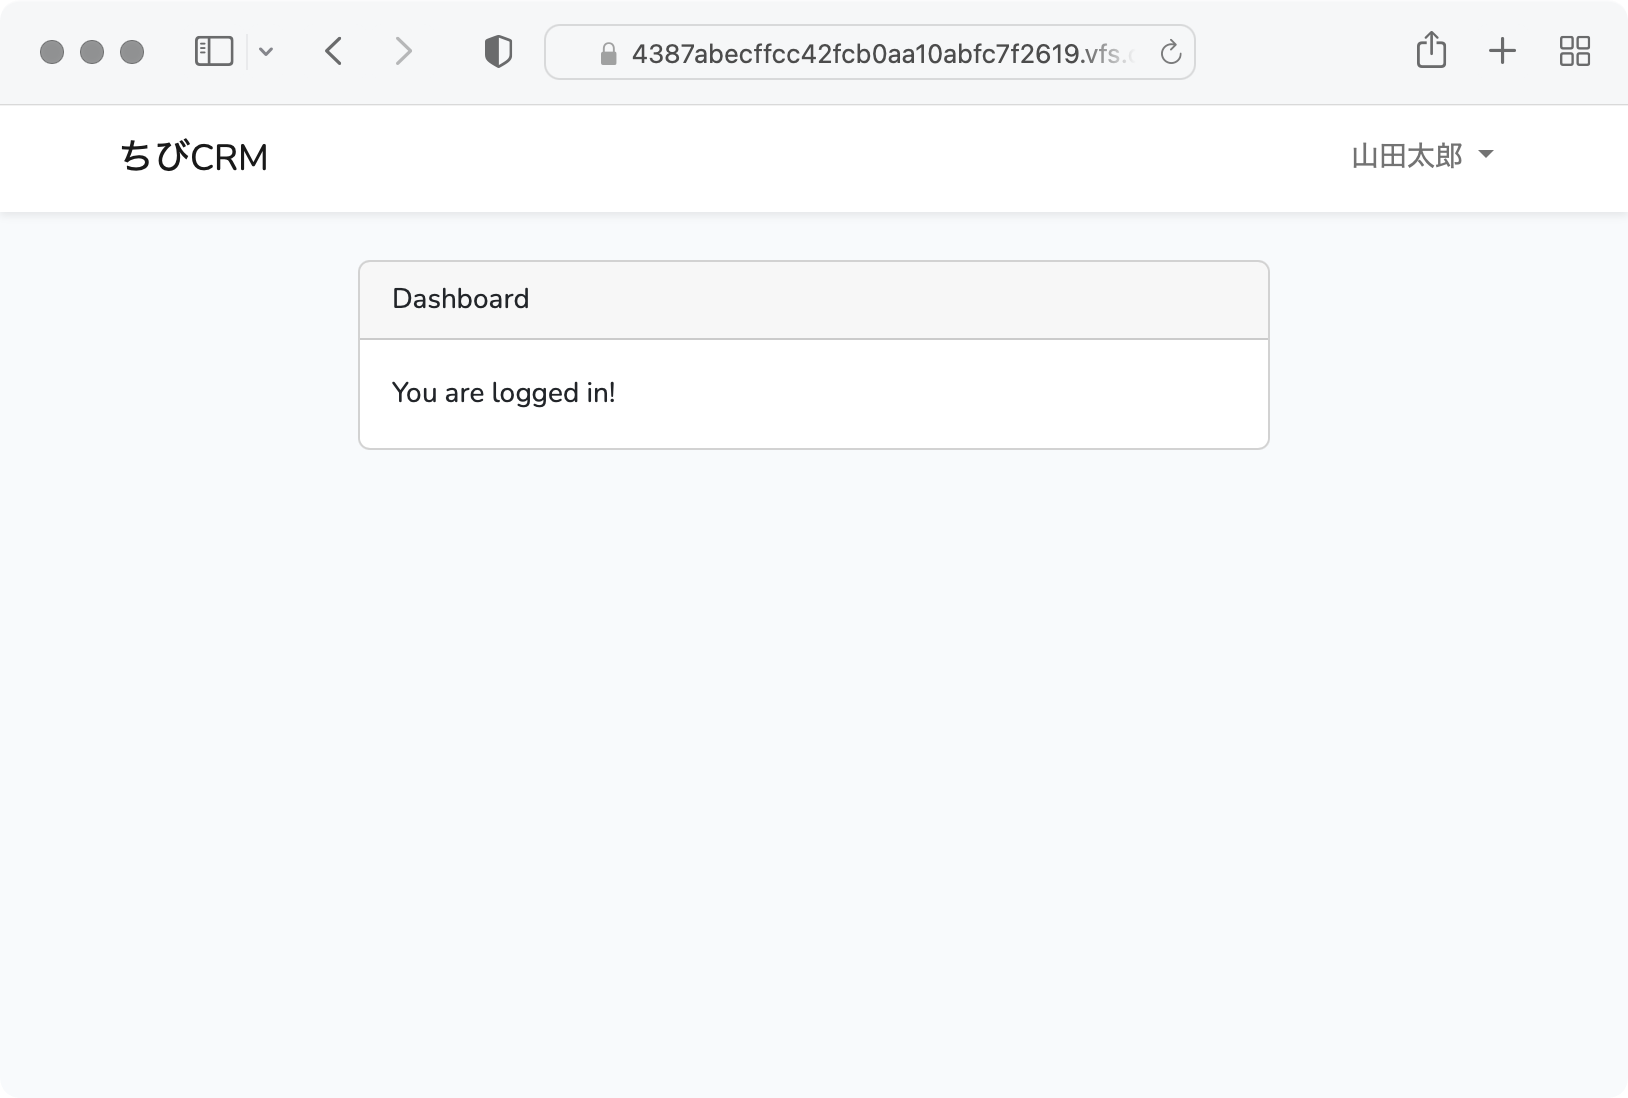
デフォルトのダッシュボード画面が表示されます。
ログイン画面のviewである blade ファイル resources/views/auth/login.blade.php にあります。
ログイン画面の表示内容を変更する場合は login.blade.php を編集します。
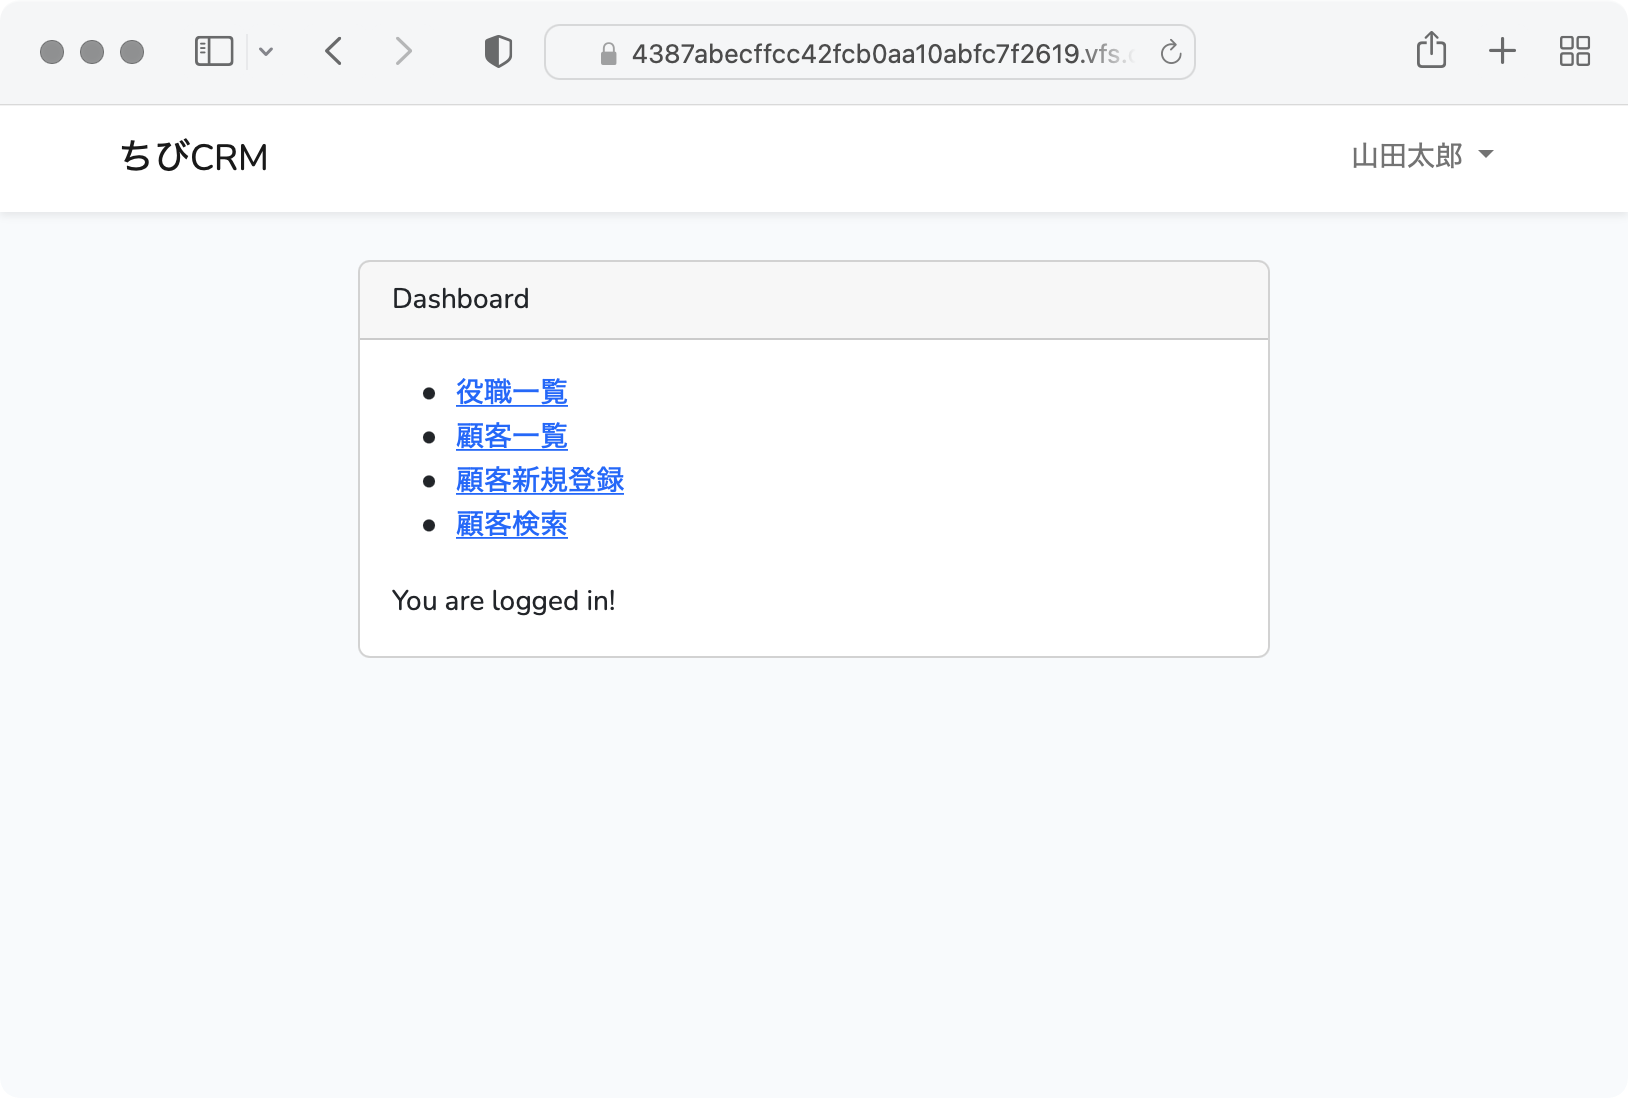
ダッシュボード画面
ダッシュボード画面はWebアプリケーションでよく使う機能へのリンクなどが置いてあるログイン後のトップページの事です。
ログインをすると /home に遷移します。
それでは顧客管理システムのダッシュボードを作っていきます。
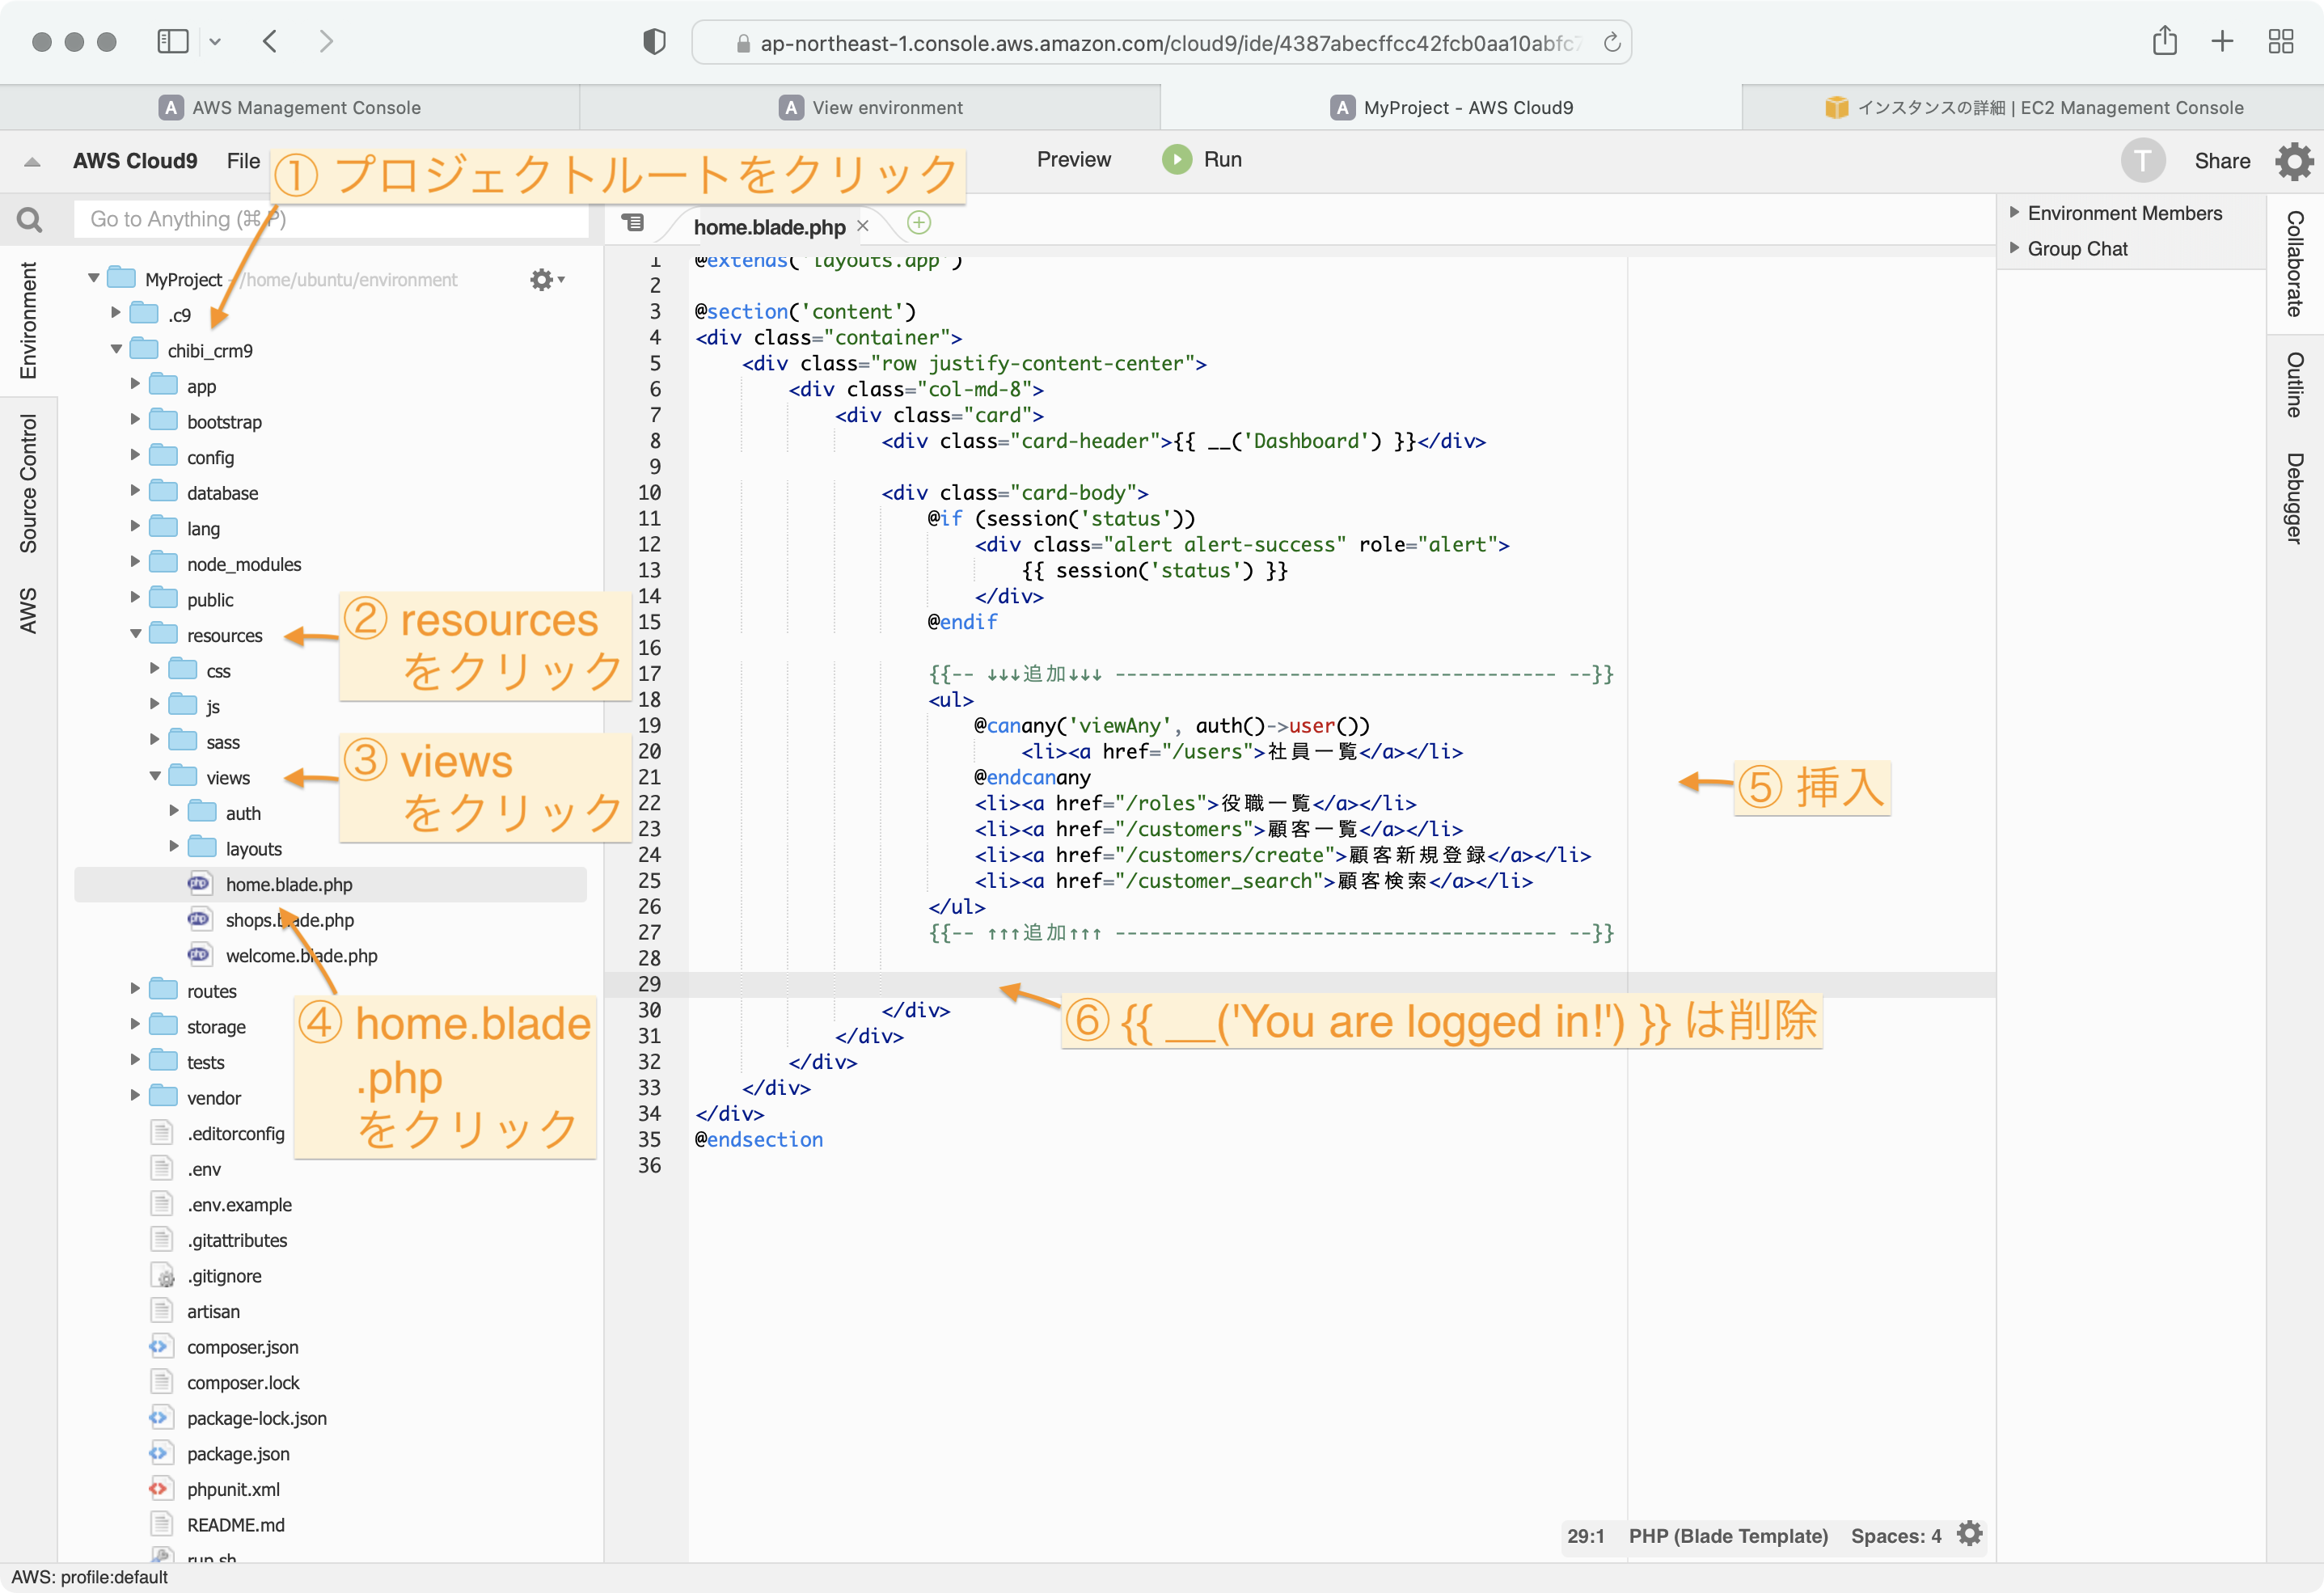
Laravelにデフォルトで入っている home.bladeを変更して使います。
resources/views/home.blade.php
ダッシュボードには各画面へのリンクを一覧表示します
テキストエディタを開いて home.blade.php を編集します。
@extends('layouts.app')

@section('content')
<div class="container">
    <div class="row justify-content-center">
        <div class="col-md-8">
            <div class="card">
                <div class="card-header">{{ __('Dashboard') }}</div>

                <div class="card-body">
                    @if (session('status'))
                        <div class="alert alert-success" role="alert">
                            {{ session('status') }}
                        </div>
                    @endif

                    {{-- ↓↓↓追加↓↓↓ -------------------------------------- --}}
                    <ul>
                        @canany('viewAny', auth()->user())
                            <li><a href="/users">社員一覧</a></li>
                        @endcanany
                        <li><a href="/roles">役職一覧</a></li>
                        <li><a href="/customers">顧客一覧</a></li>
                        <li><a href="/customers/create">顧客新規登録</a></li>
                        <li><a href="/customer_search">顧客検索</a></li>
                    </ul>
                    {{-- ↑↑追加↑↑↑ -------------------------------------- --}}


                    {{ __('You are logged in!') }}  <!-- ←この行は削除する -->
                </div>
            </div>
        </div>
    </div>
</div>
@endsection
@canany
@cananyは ポリシーを確認して true であれば内容を表示します。
今回のケースでは 先に編集したUserPolicy.phpのviewAny関数を呼んで true になれば社員一覧
のリンクを表示します。スーパーバイザーの社員一覧
を表示します。
ブラウザでダッシュボードを表示
ブラウザで開いて、ダッシュボードが表示されることを確認しましょう。
社員一覧画面
登録されている社員一覧が表示されるページを作成します。
以下のイメージのページを作成します。

コントローラーで usersテーブルから社員一覧を取得し、users変数に格納して viewである index.blade.php にusers変数を渡し、
index.blade.phpでusers変数をループ処理して 一人一行で表示を行います。
社員一覧画面定義をweb.phpに記述
routes/web.phpに以下の記述を追加します。
Route::get('/users', [App\Http\Controllers\UserController::class, 'index'])->name('社員一覧')->middleware('auth');
社員一覧画面コントローラの作成
以下のコマンドを実行してコントローラーを作成します。
php artisan make:controller UserController
app/Http/Controllers/UserController.phpが作成されます。
<?php

namespace App\Http\Controllers;

use Illuminate\Http\Request;

class UserController extends Controller
{
    //
}
メソッドを追加します。
<?php

namespace App\Http\Controllers;

use Illuminate\Http\Request;

class UserController extends Controller
{
    public function index()
    {
        $users = \App\Models\User::get(); // 社員一覧を取得
        return view('users.index', compact(['users'])); // users.index.bldae を呼出し、 usersを渡す
    }

}
社員一覧画面のusers.blade.php
resources/views/users ディレクトリを作成して
この中に index.blade.php ファイルを作ります。
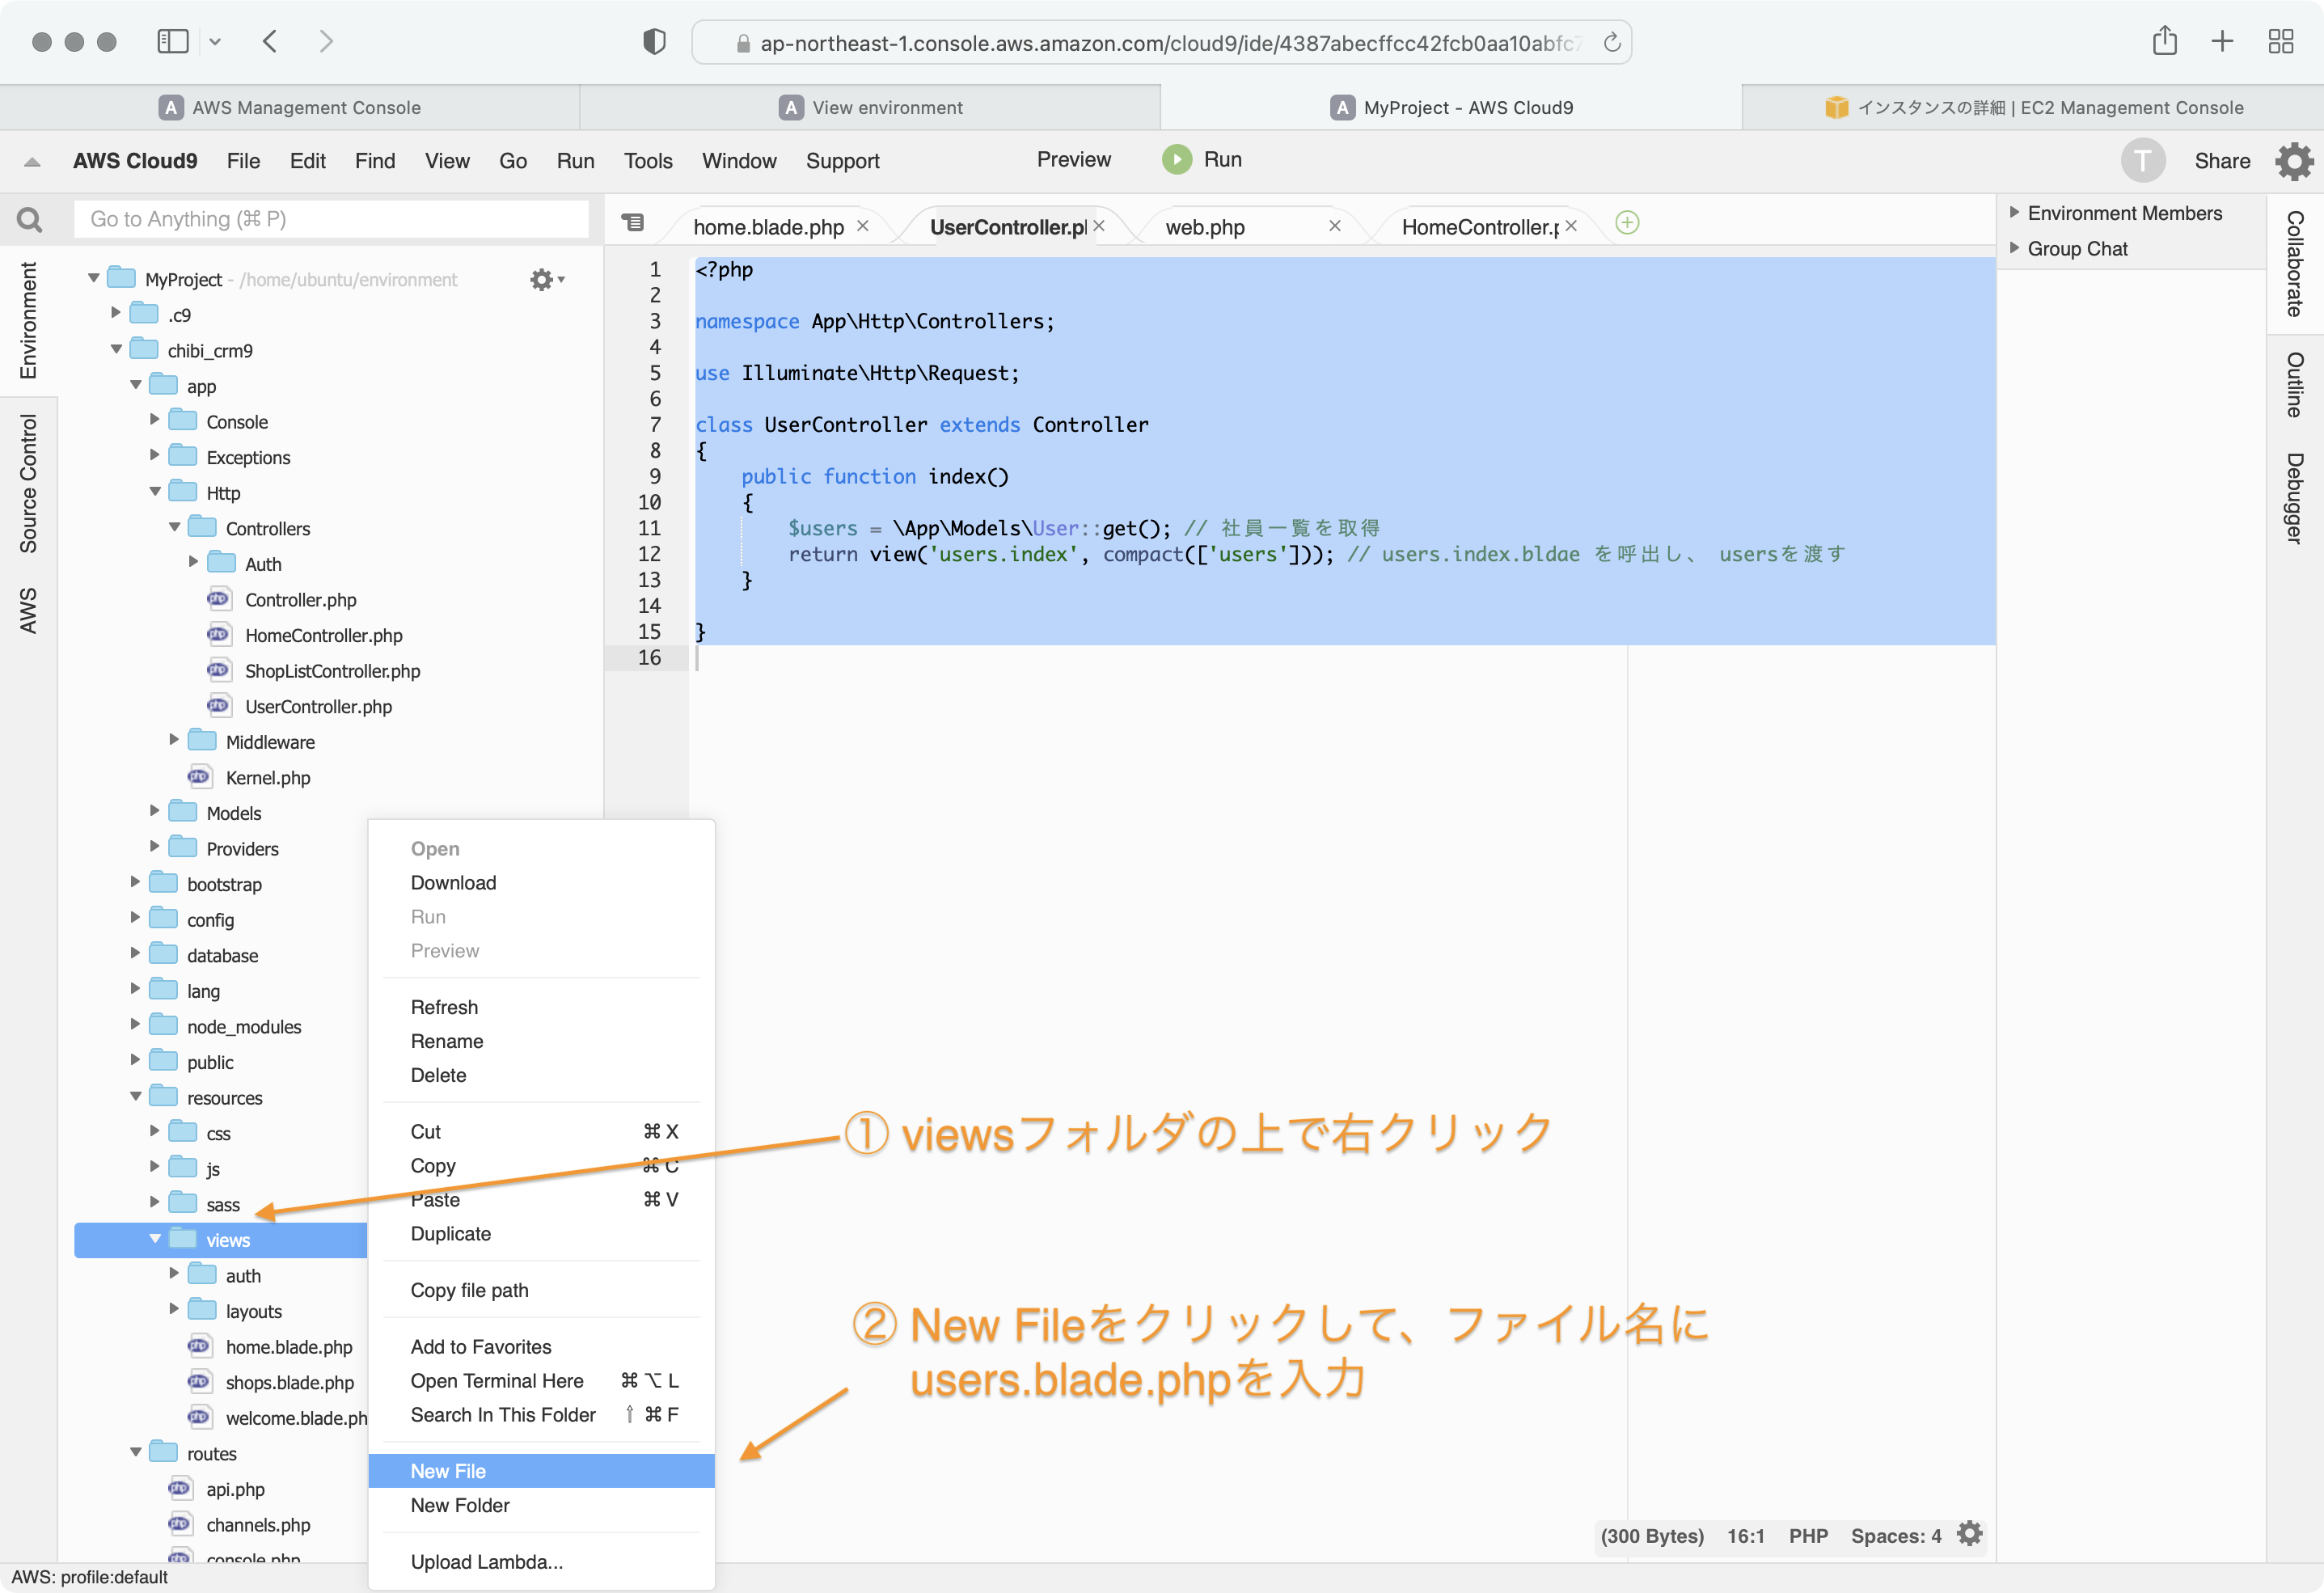
index.blade.phpにユーザー一覧を表示する様に以下のように記述します。
<!DOCTYPE html>
<html lang="en">
<head>
<meta charset="UTF-8">
<title>ユーザー一覧</title>
</head>
<body>
<h1>ユーザー一覧</h1>

<table width="100%" border="1">
    <thead>
    <tr style="background-color: lightgray">
        <td>氏名</td>
        <td>所属店舗</td>
    </tr>
    </thead>
    <tbody>
    @foreach($users as $user)  {{-- Controllerから渡された users を foreach で回す --}}
        <tr>
            <td>{{ $user->name }}</td> {{-- 各要素を表示 --}}
            <td>{{ $user->email }}</td>
        </tr>
    @endforeach
    </tbody>
</table>
</div>

</body>
</html>
ブラウザで社員一覧が表示されることを確認します。
ブラウザで開きます。
プレビュー画面でURLの最後の部分をusersに変更して開きます。
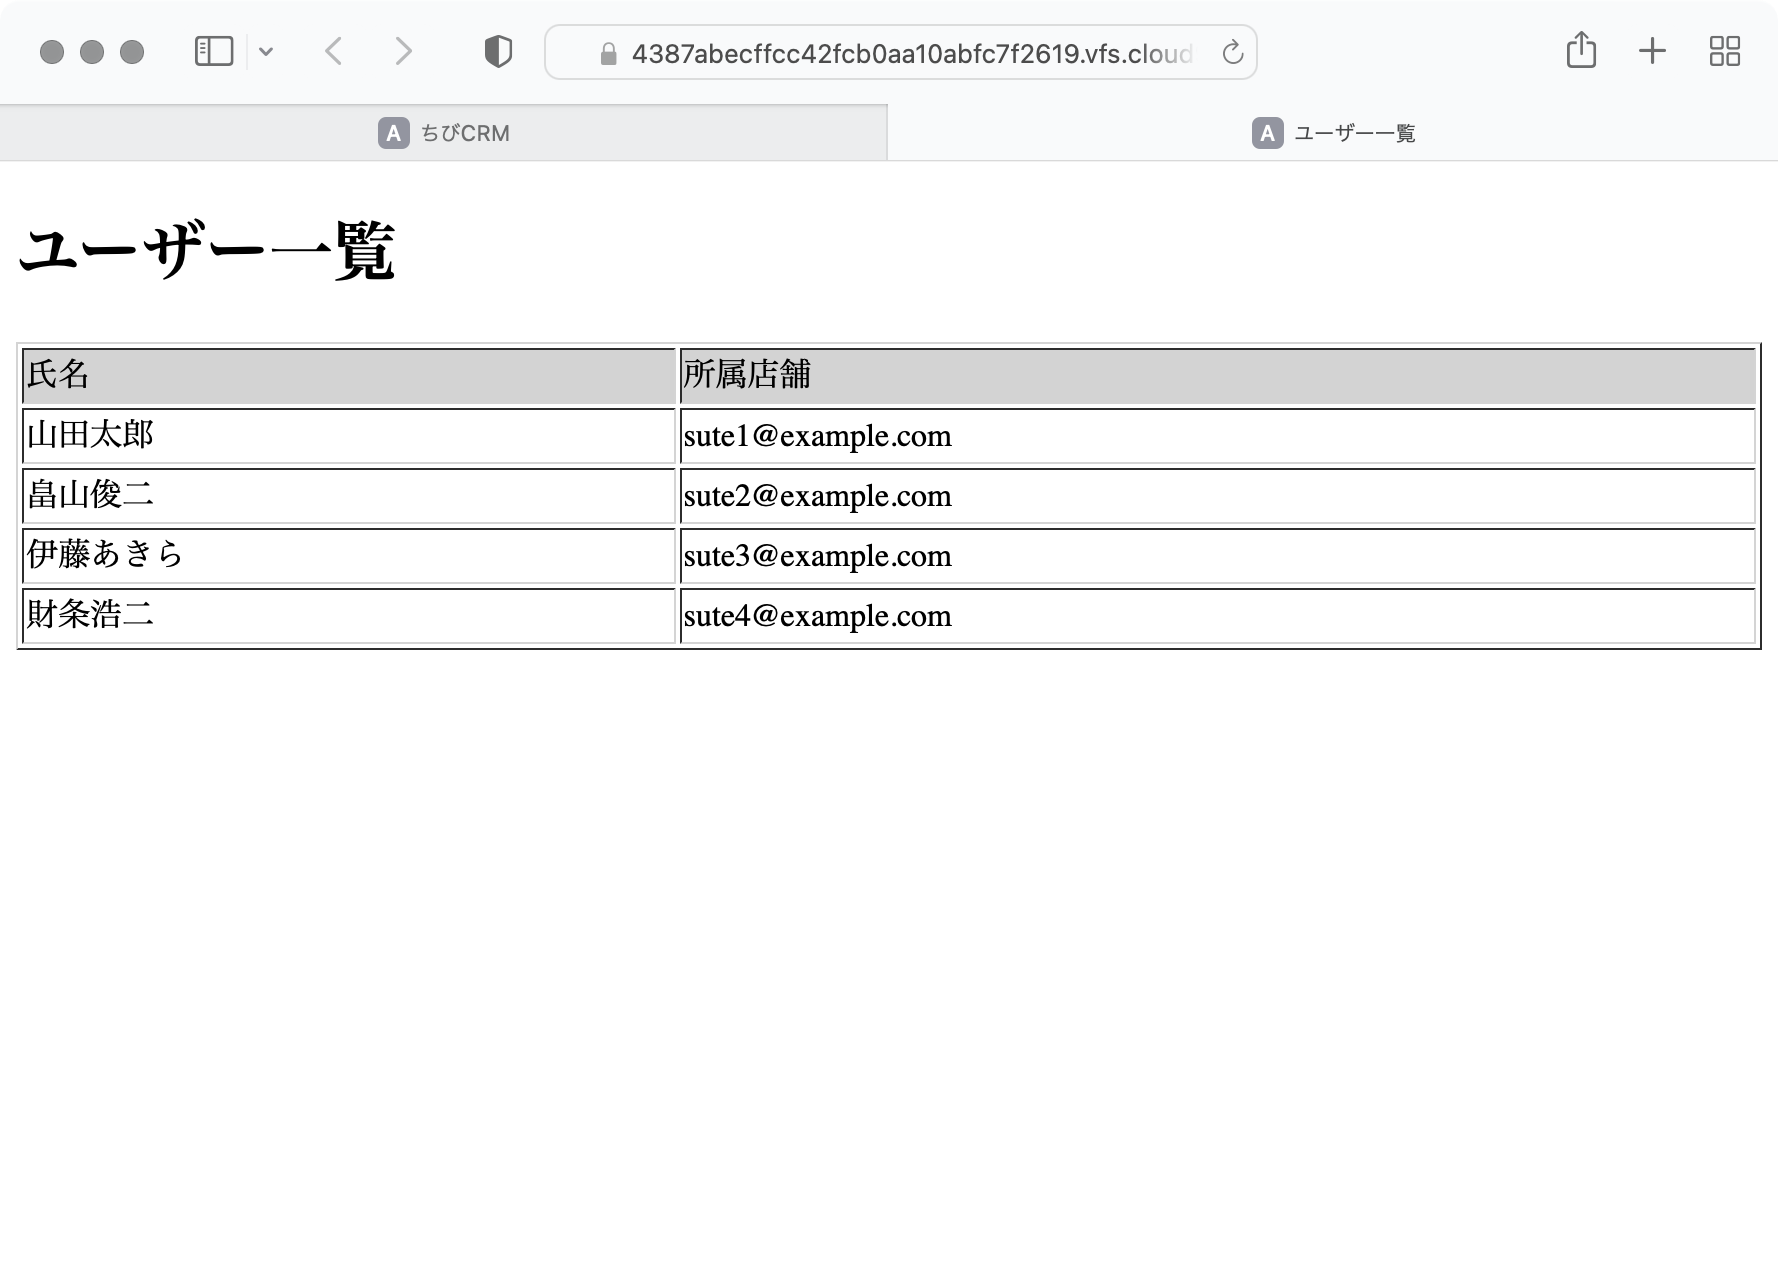
なんだか古臭いデザインですね。
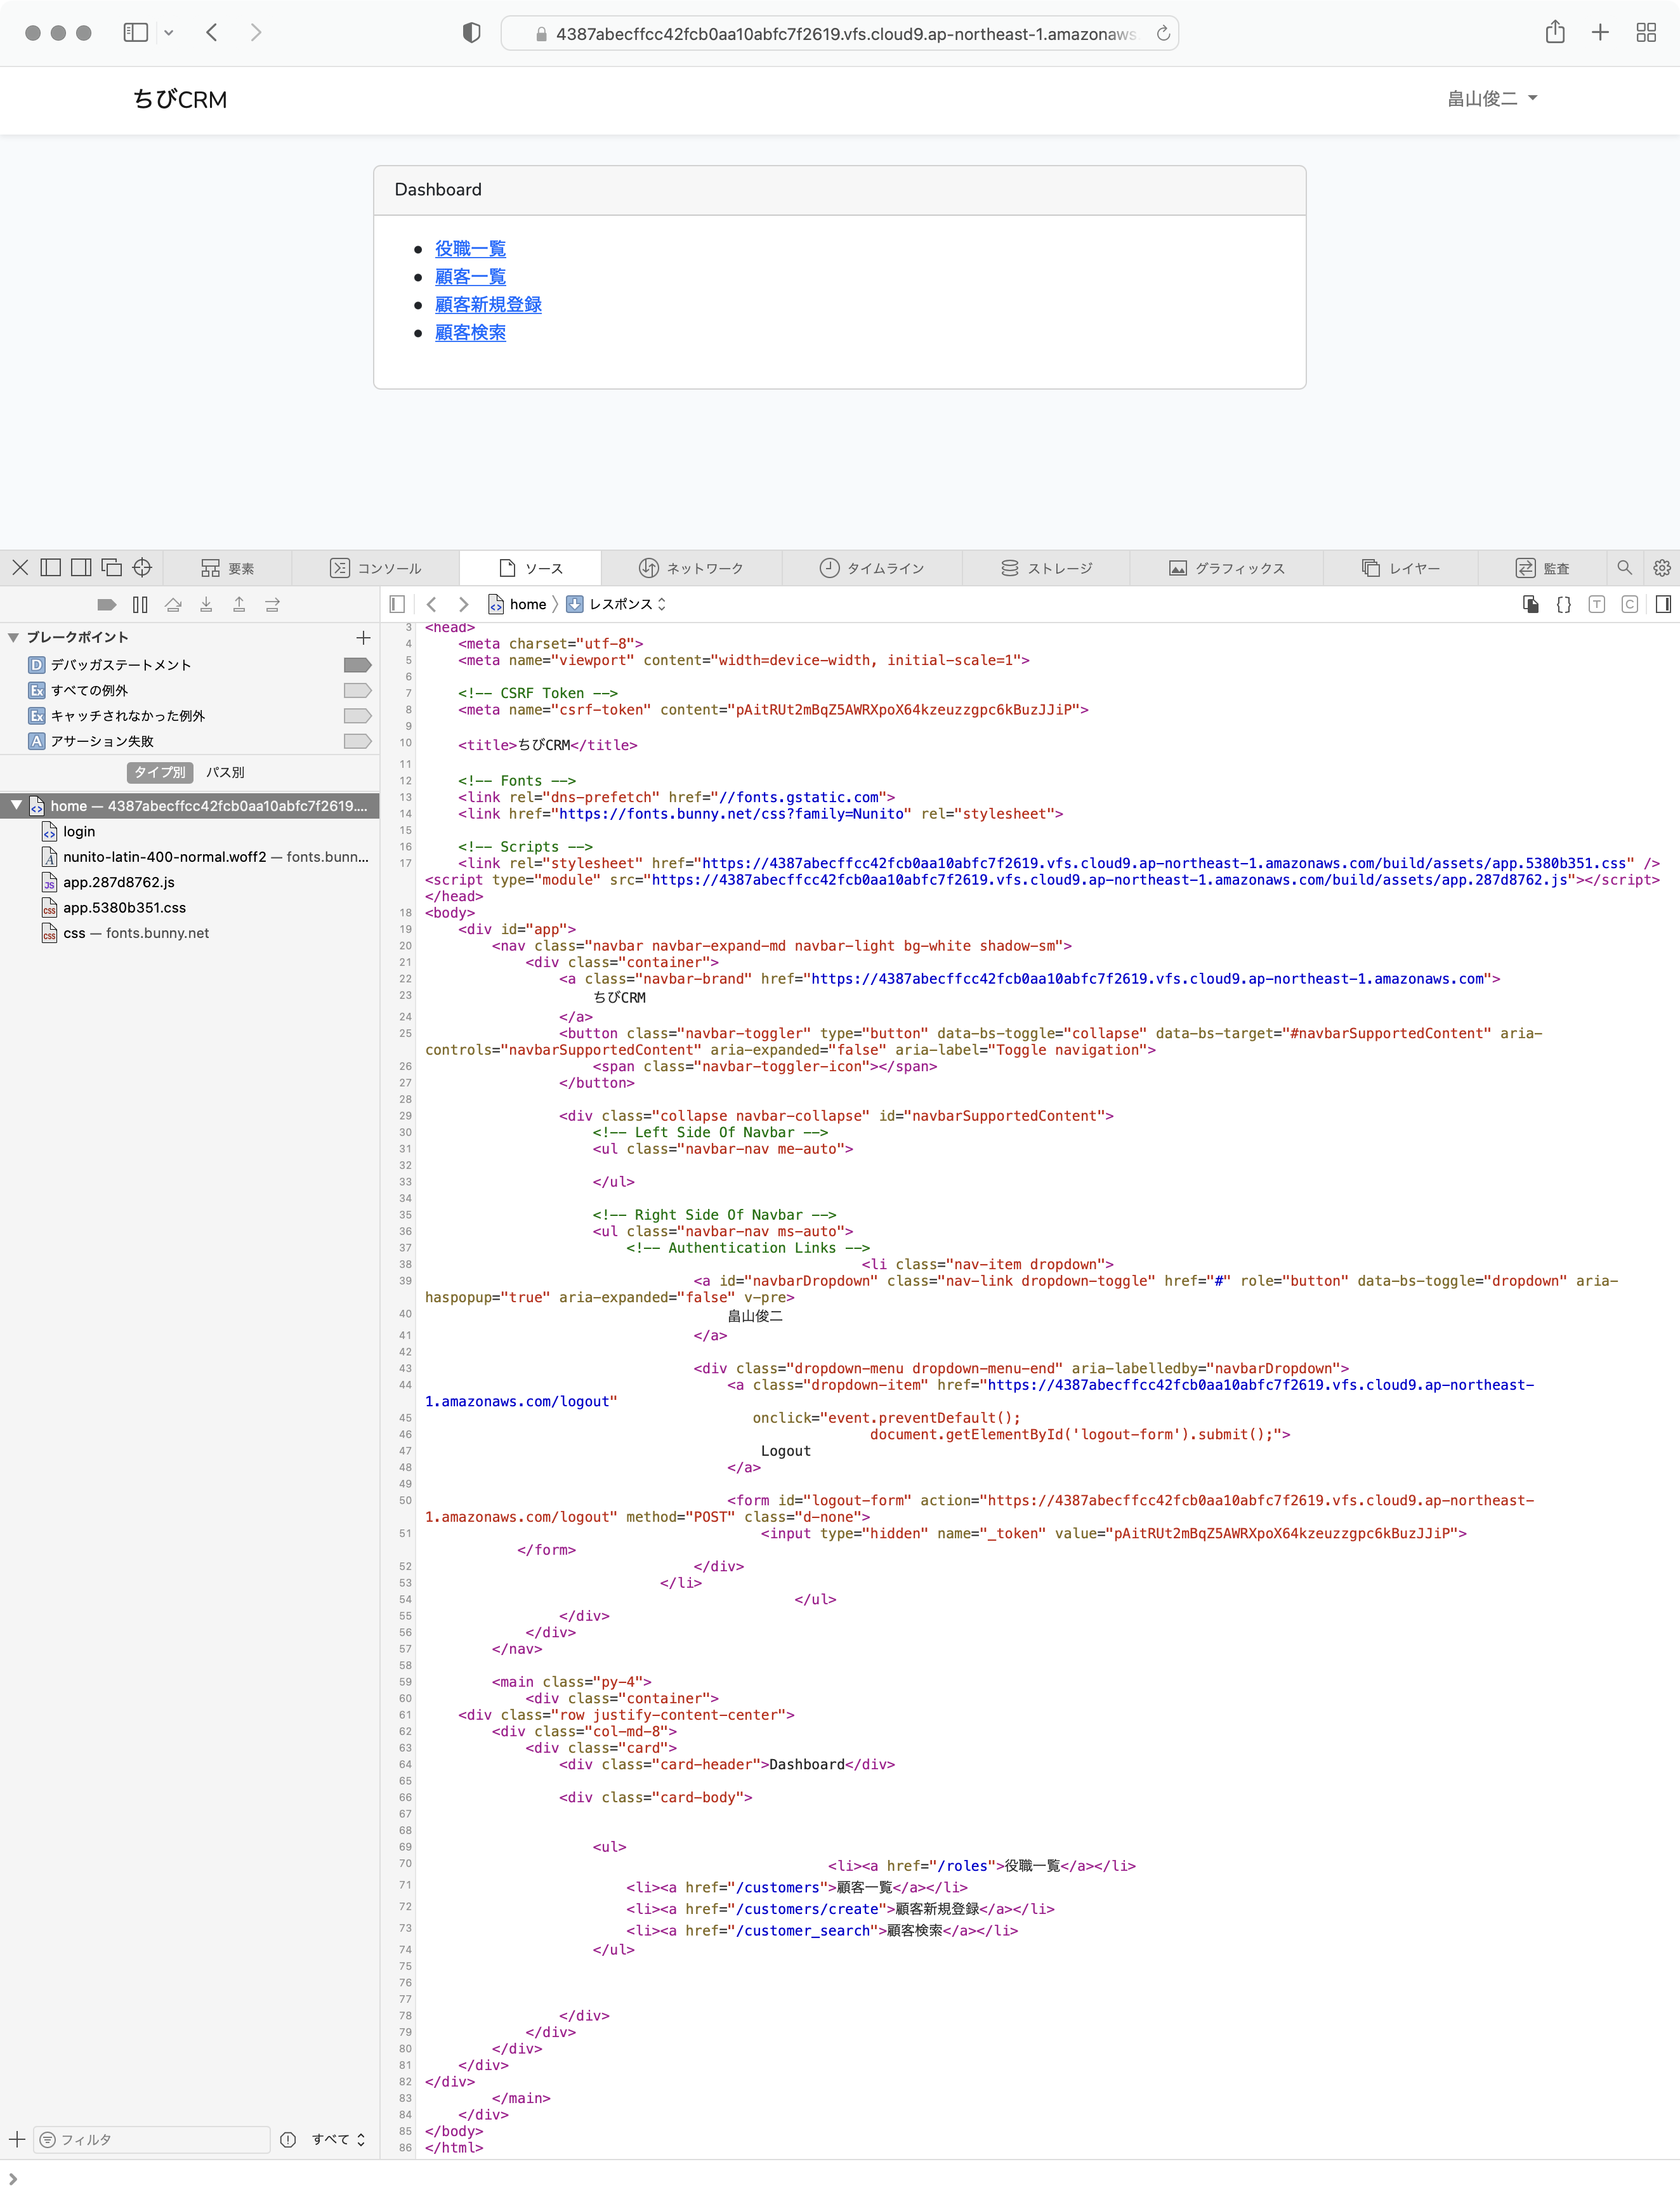
ブラウザでソースを確認してみます。
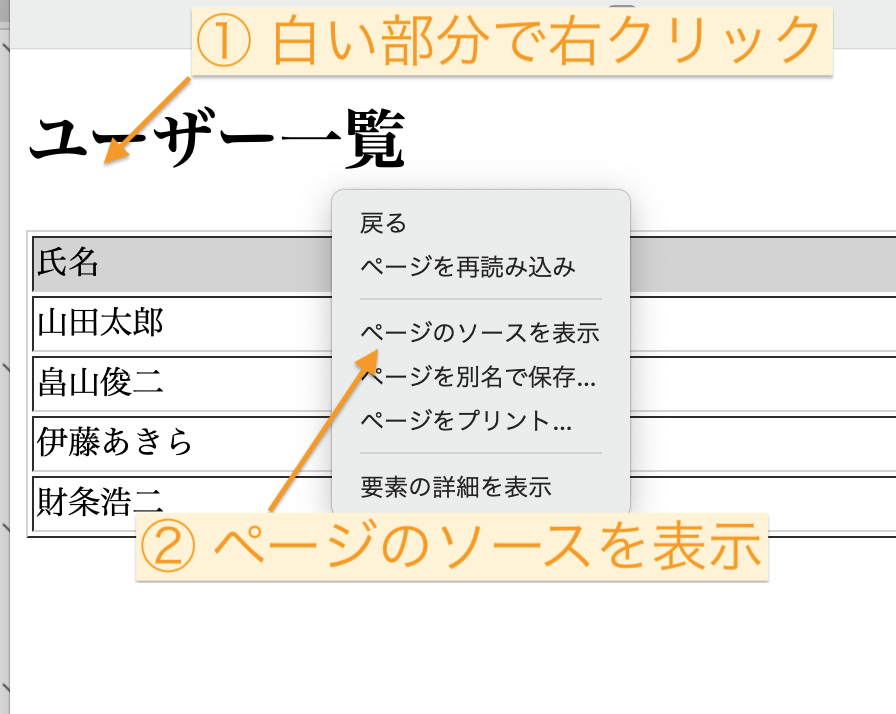
ダッシュボードのソース
ユーザー一覧のソース
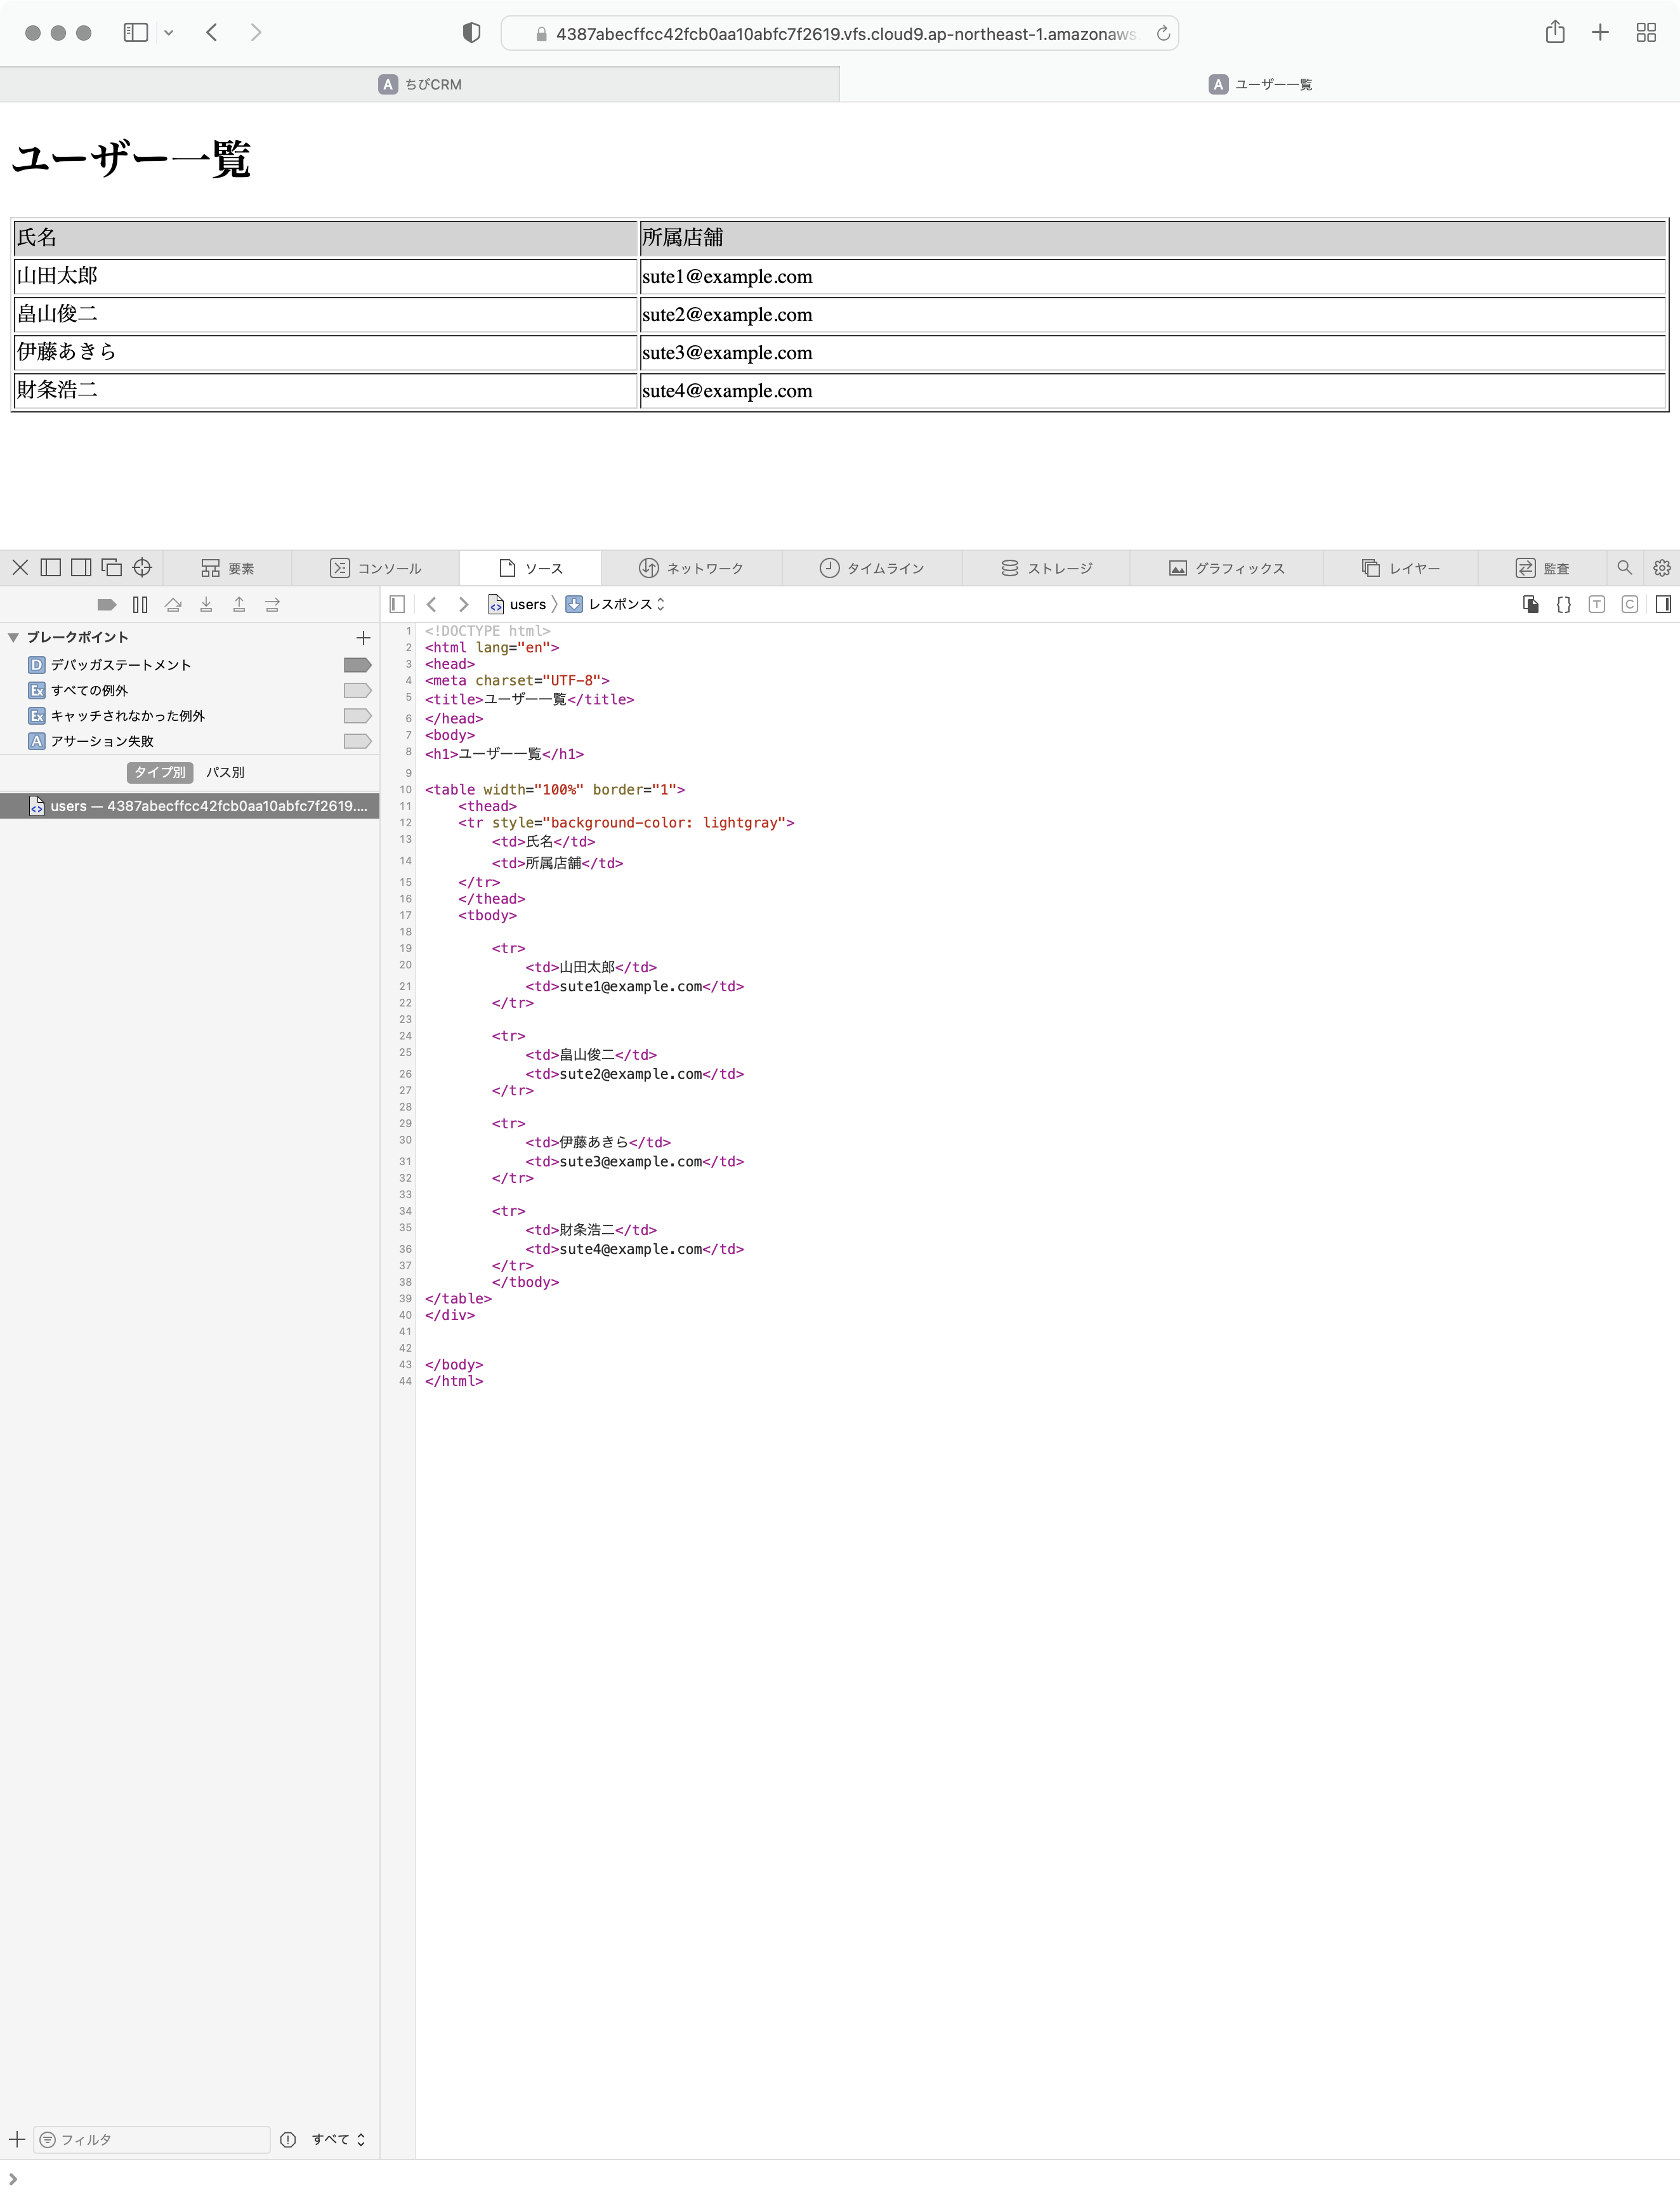
ユーザー一覧のソースにはCSS読み込みの定義がありません。
home.blade.phpを確認します。
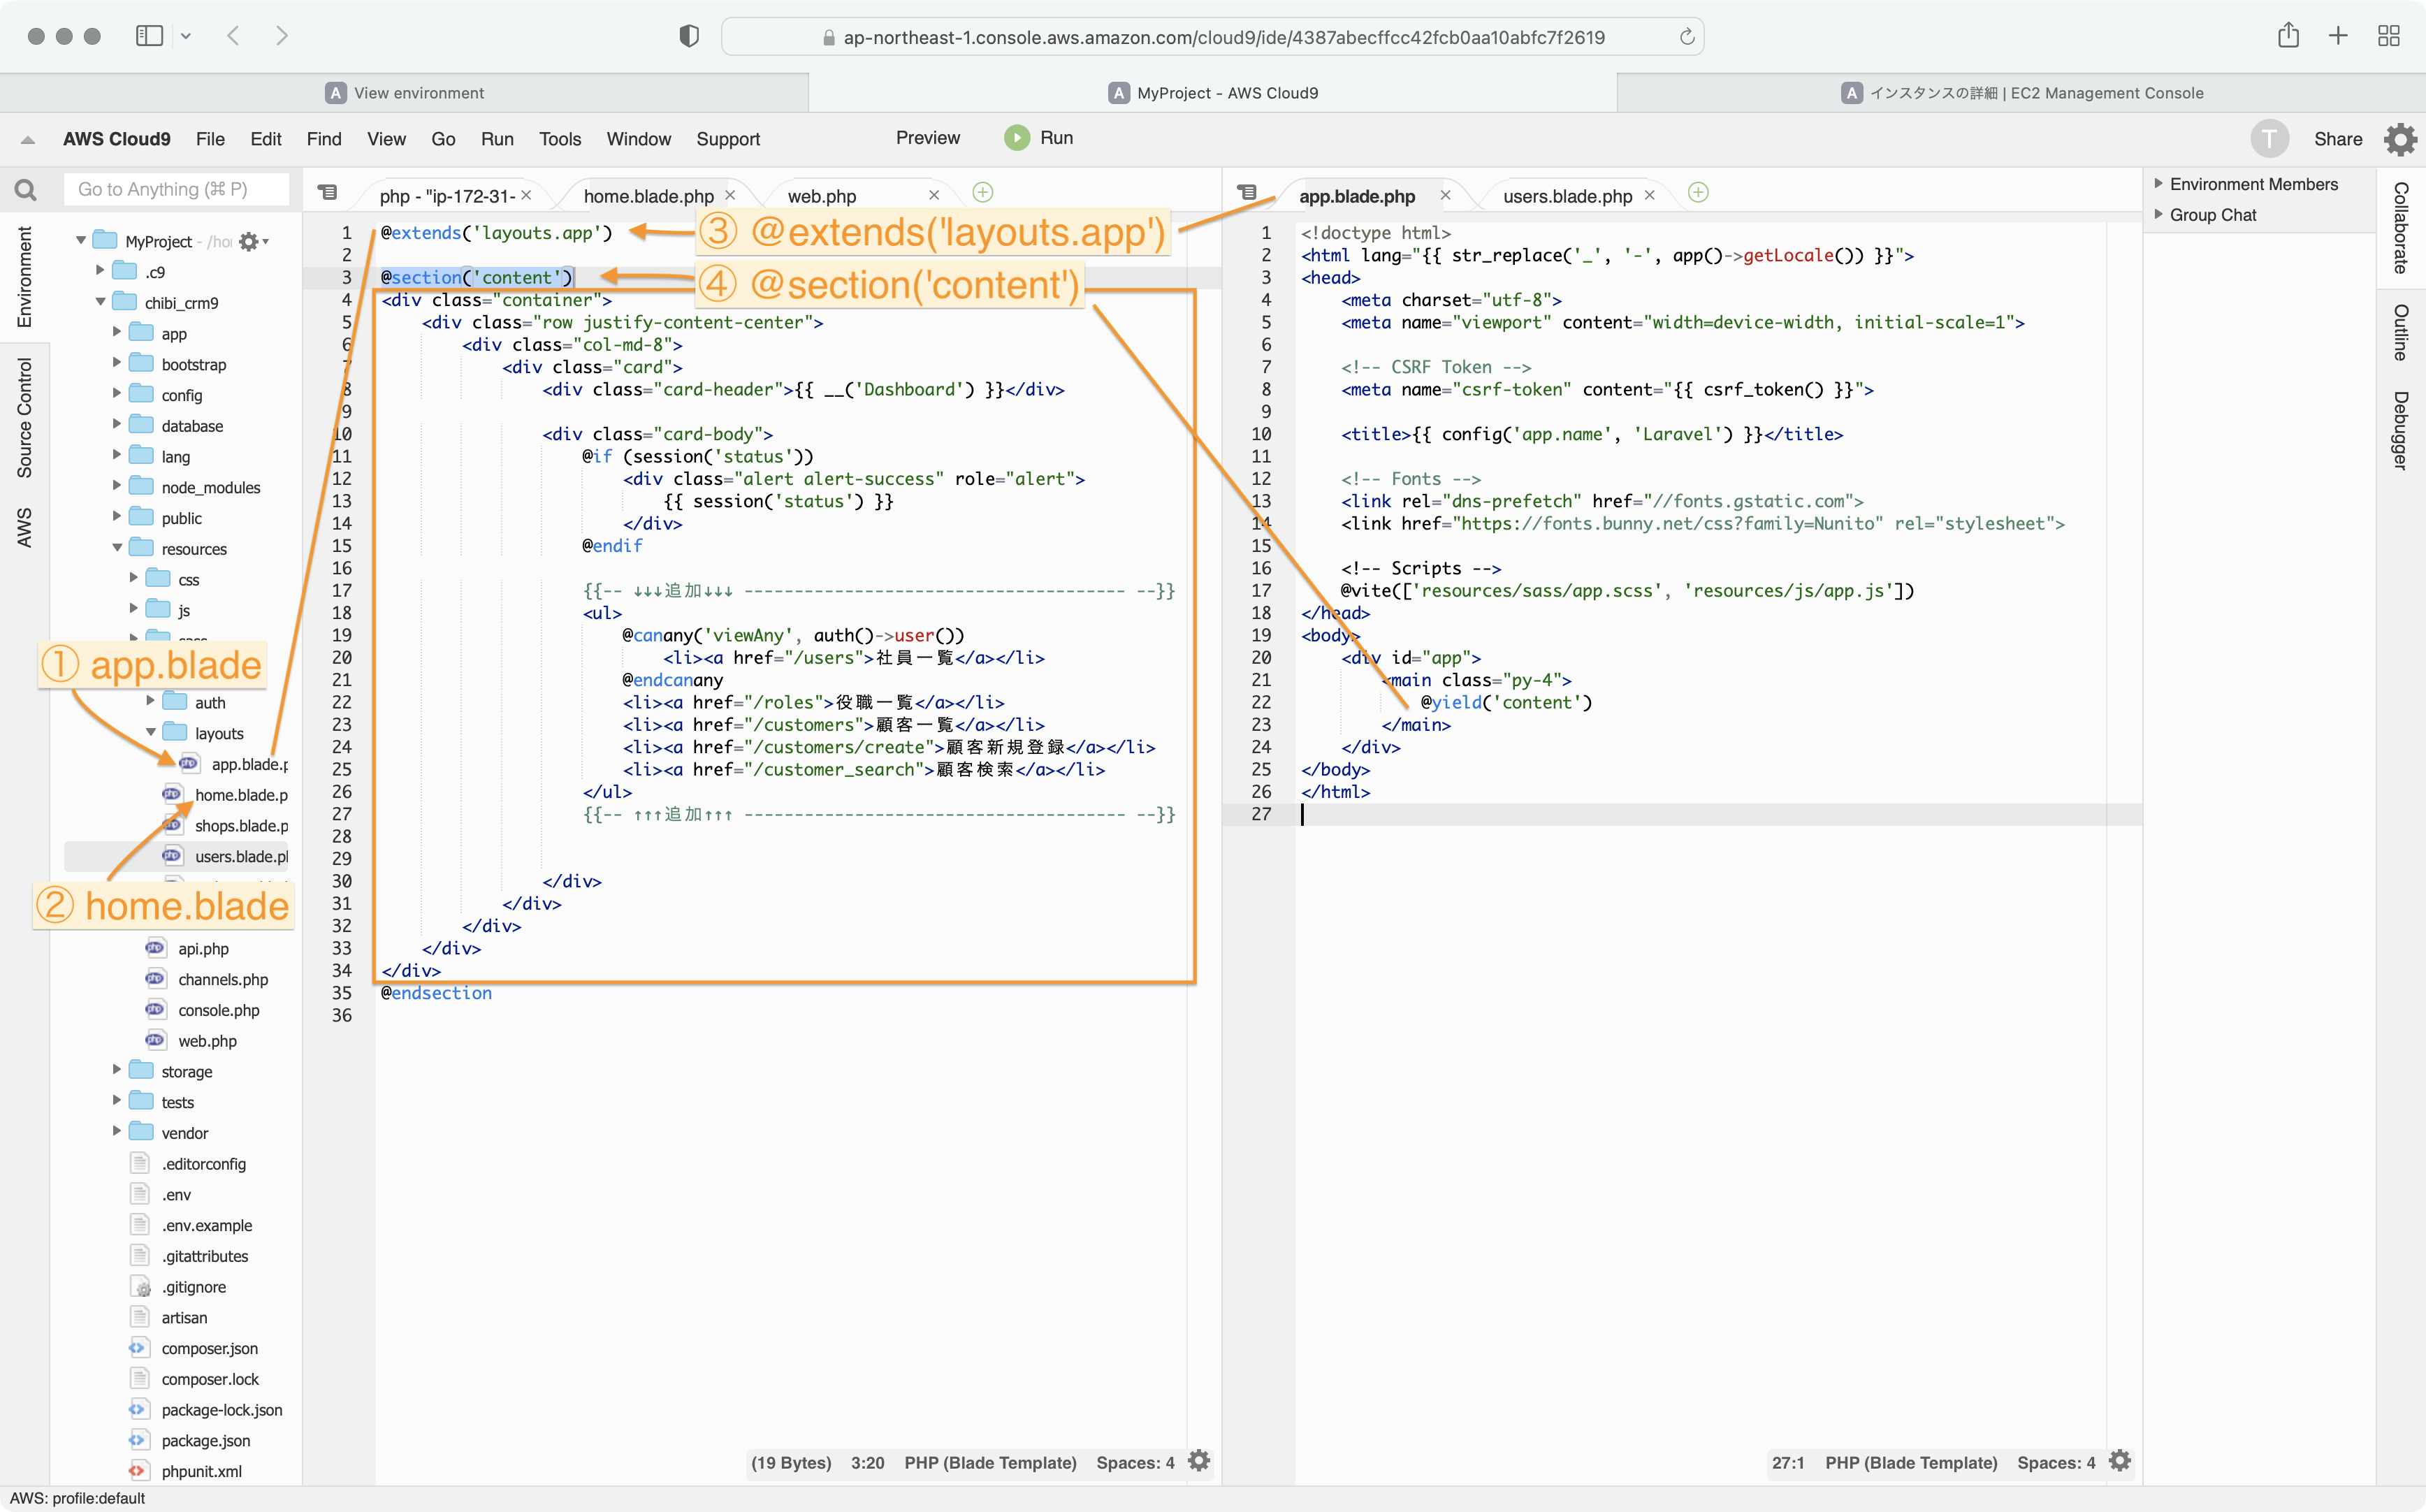
home.blade.phpの1行目は ページの元になるファイルを指定する文になります。
@extends('layouts.app')
layoutsディレクトリに有るapp.blade.phpをテンプレートとして使用するという意味になります。
@section('content')から @endsectionまでが app.blade.phpの @yield('content)の部分に読み込まれます。
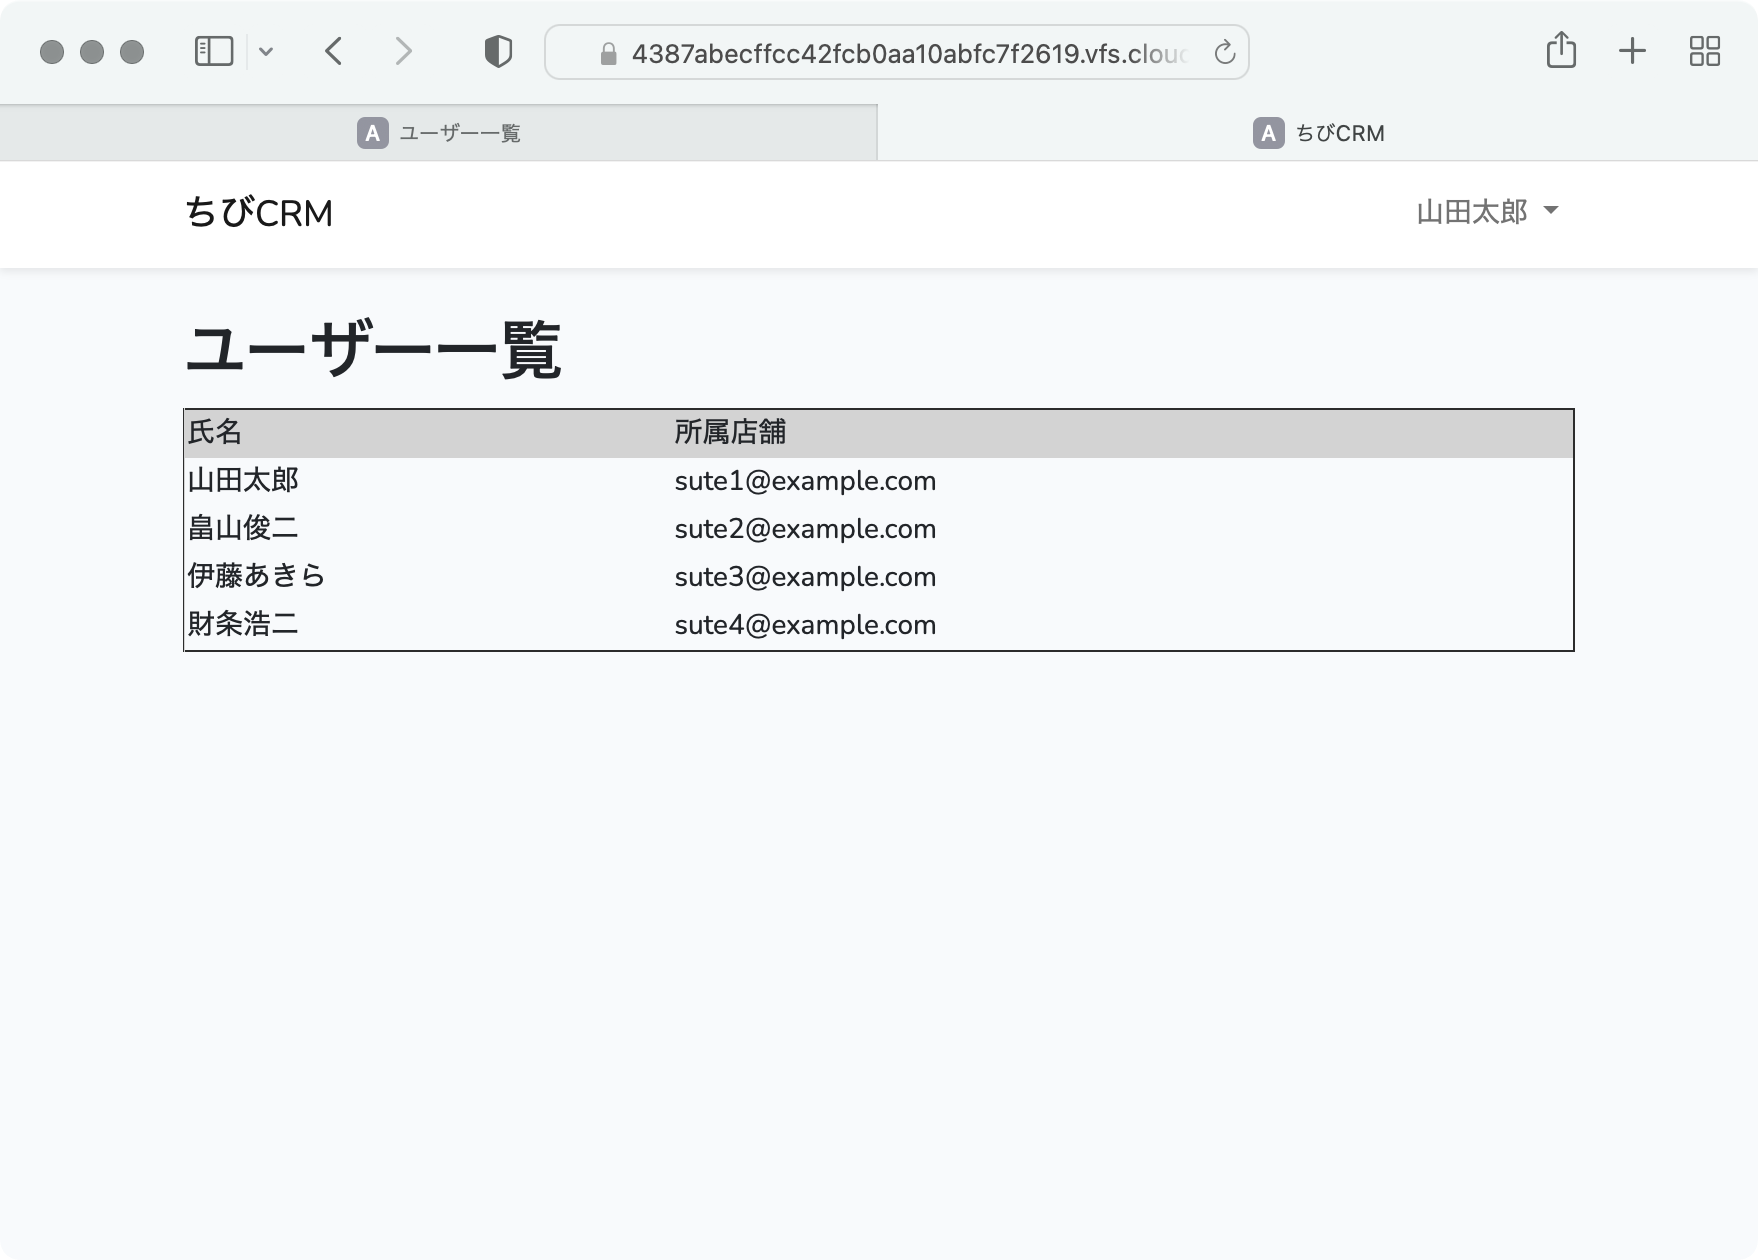
では users.blade.php も layouts.appを読み込んで表示するようにしてみます。
@extends('layouts.app')

@section('content')
<div class="container">

<h1>ユーザー一覧</h1>

<table width="100%" border="1">
    <thead>
    <tr style="background-color: lightgray">
        <td>氏名</td>
        <td>所属店舗</td>
    </tr>
    </thead>
    <tbody>
    @foreach($users as $user)  {{-- Controllerから渡された users を foreach で回す --}}
        <tr>
            <td>{{ $user->name }}</td> {{-- 各要素を表示 --}}
            <td>{{ $user->email }}</td>
        </tr>
    @endforeach
    </tbody>
</table>
</div>

@endsection
app.blade.phpのCSSが適用されている事を確認します。
役職一覧画面を作っていきます。
以下のような画面を作ります。

役職一覧画面は社員一覧画面とほぼ同じです。
同じ様にweb.phpを確認して、コントローラーとbladeファイルを作っていきます。
役職一覧画面コントローラの作成
php artisan make:controller RoleController
app/Http/Controllers/RoleController.php ファイルが作られます。
以下の様に変更します。
<?php

namespace App\Http\Controllers;

use App\Role;
use Illuminate\Http\Request;

class RoleController extends Controller
{
    public function index(Request $request)
    {
        $roles = \App\Models\Role::get(); // 役職一覧を取得
        return view('roles', compact('roles'));  // $roles一覧情報を渡して roles./index.blade.phpを呼びます
    }
}
役職一覧画面のusers.blade.php
resources/views/roles ディレクトリを作成して、
resources/views/roles/index.blade.php ファイルを作成します。
@extends('layouts.app')
@section('content')
    <div class="container">
        <div class="row justify-content-center">
            <div class="col-md-8">
                <div class="card">
                    <div class="card-header">役職一覧</div>
                    <table width="100%" border="1">
                        <thead>
                        <tr style="background-color: lightgray">
                            <td>ID</td>
                            <td>役職コード</td>
                            <td>役職</td>
                        </tr>
                        </thead>
                        @foreach($roles as $role)
                            <tr>
                                <td>{{ $role->id }}</td>
                                <td>{{ $role->name }}</td>
                                <td>{{ $role->memo }}</td>
                            </tr>
                        @endforeach
                    </table>
                </div>
            </div>
        </div>
    </div>
@endsection
役職一覧画面のweb.phpの定義
routes/web.phpをテキストエディタで開いて
以下の定義を記述します。
Route::get('/roles', [\App\Http\Controllers\RoleController::class,'index'])->name('ロール一覧')->middleware('auth');
ブラウザで役職一覧を確認
プレビュー画面のアドレス欄に roles を入力して、 ブラウザで開きます。
Role.phpを作っていなかったので、エラーになります。
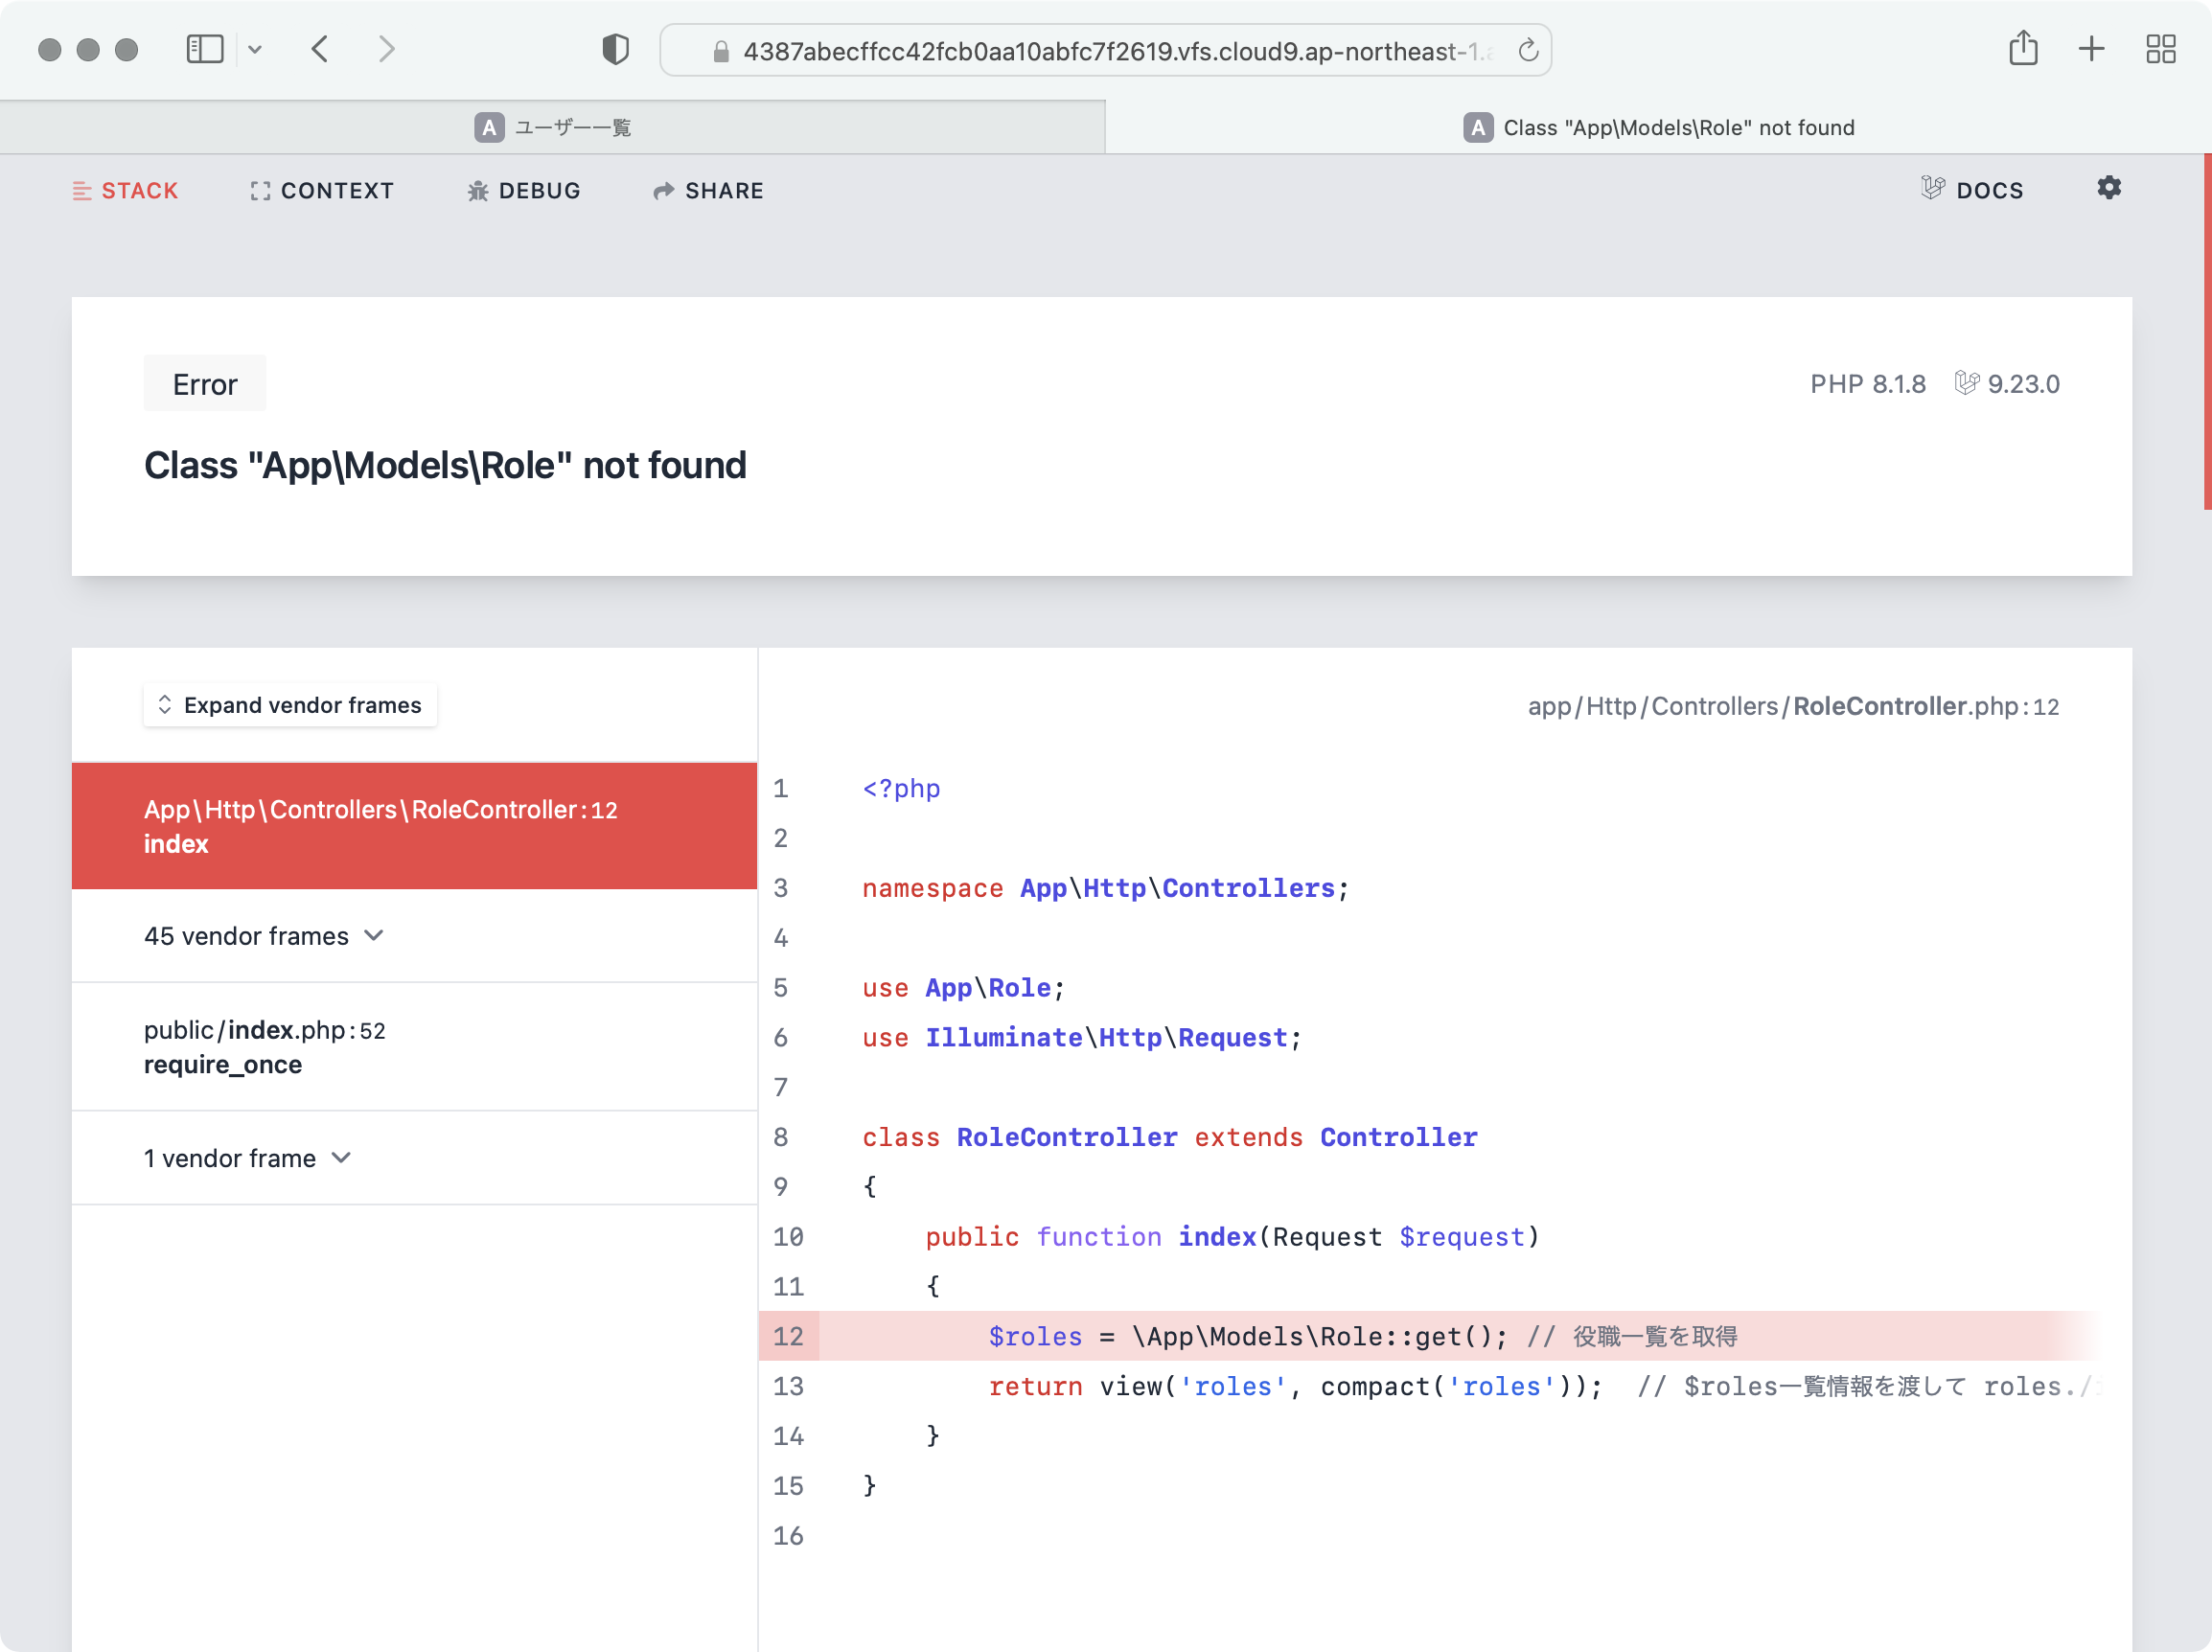
ターミナルで以下のコマンドを実行してRole.phpを作成します。
このときに --migration オプションを指定してRole.phpがアクセスするrolesテーブル定義も一緒に作成します。
php artisan make:model Role --migration
マイグレーションファイルはartisanコマンドで作った直後にはidとタイムスタンプカラムしかありません。
rolesテーブルにnameとmemoカラムを追加します。
また初期データを追加する以下の行と DBクラスを使うためにuse文の定義を追加します
# ファイルの先頭近くに追加
use Illuminate\Support\Facades\DB;// ← 追記 *

# up()関数に追加
DB::table('roles')->insert(['id'=>1,'name'=>'sv','memo'=>'スーパーバイザー']);// ← 追記 *********
DB::table('roles')->insert(['id'=>2,'name'=>'clerk','memo'=>'店員']);// ← 追記 *********
ファイルを開いて編集します。
<?php

use Illuminate\Database\Migrations\Migration;
use Illuminate\Database\Schema\Blueprint;
use Illuminate\Support\Facades\Schema;
use Illuminate\Support\Facades\DB;// ← 追記 *


return new class extends Migration
{
    /**
     * Run the migrations.
     *
     * @return void
     */
    public function up()
    {
        Schema::create('roles', function (Blueprint $table) {
            $table->id();
            $table->string('name', 8)->comment('ロール名');  // ← 追記 *********
            $table->string('memo')->comment('備考');  // ← 追記 *********
            $table->timestamps();
        });
        DB::table('roles')->insert(['id'=>1,'name'=>'sv','memo'=>'スーパーバイザー']);// ← 追記 *********
        DB::table('roles')->insert(['id'=>2,'name'=>'clerk','memo'=>'店員']);// ← 追記 *********
    }

    /**
     * Reverse the migrations.
     *
     * @return void
     */
    public function down()
    {
        Schema::dropIfExists('roles');
    }
};
$table->string('name', 8)->comment('ロール名'); の部分がカラムの定義になります。
Blueprintクラスのインスタンス $tableに対して stringメソッドを呼んで文字列型のカラムを追加しています。
$table->integer('amount');のようにintegerメソッドを呼ぶと数値型を格納するカラムを追加出来ます。
他にもDateなど日付を扱う指定もできます。
以下のコマンドを実行して、データベースを作成し直します。
php artisan migrate:fresh
プレビューウィンドウのアドレス欄に roles を入力して表示を確認します。

rolesテーブルの内容が表示されることを確認します。
ーーーーーーーーーーーーーーーーーーーーーーーーーーーーーーーーーーーーーーーーーーーーーーーーーーーーーーーーーーーーーーーーーーーーーーーーーーーーーーーーーーーーーーーーーーーーーーーーーーーーーー
ーーーーーーーーーーーーーーーーーーーーーーーーーーーーーーーーーーーーーーーーーーーーーーーーーーーーーーーーーーーーーーーーーーーーーーーーーーーーーーーーーーーーーーーーーーーーーーーーーーーーーー
ーーーーーーーーーーーーーーーーーーーーーーーーーーーーーーーーーーーーーーーーーーーーーーーーーーーーーーーーーーーーーーーーーーーーーーーーーーーーーーーーーーーーーーーーーーーーーーーーーーーーーー
ーーーーーーーーーーーーーーーーーーーーーーーーーーーーーーーーーーーーーーーーーーーーーーーーーーーーーーーーーーーーーーーーーーーーーーーーーーーーーーーーーーーーーーーーーーーーーーーーーーーーーー
ーーーーーーーーーーーーーーーーーーーーーーーーーーーーーーーーーーーーーーーーーーーーーーーーーーーーーーーーーーーーーーーーーーーーーーーーーーーーーーーーーーーーーーーーーーーーーーーーーーーーーー
RR***************** 以下作成途中 ****************
顧客一覧画面画面
顧客一覧画面のweb.phpを確認
routes/web.php の以下の部分が
顧客一覧コントローラを呼ぶ定義になります。
web.phpに追記します。
Route::resource('/customers', \App\Http\Controllers\CustomerController::class)->middleware('auth');
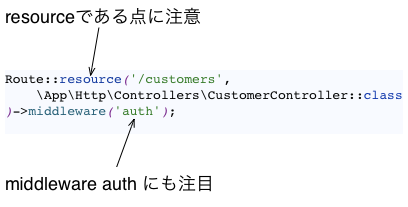
Route::resourceは 予め決められたメソッドに振り分ける記述方法です。
Webサーバーへのリクエスト送信種類にmethodというものがあり、GET,POST,PATCH,DELETEという種類があります。
ページを表示するためにPCやスマートフォンのブラウザがWebサーバーに投げるリクエストはGETメソッドで送ります。
参考URL https://ja.wikipedia.org/wiki/Hypertext_Transfer_Protocol
今まではRoutes::getでgetメソッドだけ受け付けていましたが、顧客情報は登録機能が必要なためGETとPOSTメソッドでの受付が必要です。
Route::post(..中略..)と書く方法もありますが、Laravelでは、GET,POSTで表示、変更を行うよく使うパータンのために
Route::resourceという書き方が用意されています。
Route::resourceと一行書くだけで、複数の種類のメソッドのリクエストを受け付ける書き方ができて楽が出来ます。
覚えるのはちょっと大変ですが。
振り分けは以下のようになっています。
(今はこんなものが有るんだなぁくらいの理解で大丈夫です)
| Verb | URI | アクション | ルート名 |
|---|---|---|---|
| GET | /customers | index | customers.index |
| GET | /customers/create | create | customers.create |
| POST | /customers | store | customers.store |
| GET | /customers/{customer} | show | customers.show |
| GET | /customers/{customer}/edit | edit | customers.edit |
| PUT | /PATCH/customers/{customer} | update | customers.update |
| DELETE | /customers/{customer} | destroy | customers.destroy |
顧客一覧画面コントローラの作成
以下のコマンドを実行してCustomerControllerを作成します。
php artisan make:controller CustomerController --resource --model=Customer
--resource オプションを入れることで CustomerControllerに予め表示、編集、削除などの処理を行う関数が作成されます。
--modelはこのコントローラーで操作するModelを指定します。顧客(Customer)を扱うため Customerモデルを指定します。
<?php

namespace App\Http\Controllers;

use App\Models\Customer;
use Illuminate\Http\Request;

class CustomerController extends Controller
{
    /**
     * Display a listing of the resource.
     *
     * @return \Illuminate\Http\Response
     */
    public function index()
    {
        //
    }

    /**
     * Show the form for creating a new resource.
     *
     * @return \Illuminate\Http\Response
     */
    public function create()
    {
        //
    }

    /**
     * Store a newly created resource in storage.
     *
     * @param  \Illuminate\Http\Request  $request
     * @return \Illuminate\Http\Response
     */
    public function store(Request $request)
    {
        //
    }

    /**
     * Display the specified resource.
     *
     * @param  \App\Models\Customer  $customer
     * @return \Illuminate\Http\Response
     */
    public function show(Customer $customer)
    {
        //
    }

    /**
     * Show the form for editing the specified resource.
     *
     * @param  \App\Models\Customer  $customer
     * @return \Illuminate\Http\Response
     */
    public function edit(Customer $customer)
    {
        //
    }

    /**
     * Update the specified resource in storage.
     *
     * @param  \Illuminate\Http\Request  $request
     * @param  \App\Models\Customer  $customer
     * @return \Illuminate\Http\Response
     */
    public function update(Request $request, Customer $customer)
    {
        //
    }

    /**
     * Remove the specified resource from storage.
     *
     * @param  \App\Models\Customer  $customer
     * @return \Illuminate\Http\Response
     */
    public function destroy(Customer $customer)
    {
        //
    }
}
app/Http/Controllers/CustomerController.php に変更を加えていきます。
顧客一覧処理の処理を加えるのでindex関数内に処理を書いていきます。
indexメソッドの部分を以下の様に変更します。
    /**
     * 顧客一覧表示
     * スーパーバイザーは全店舗の顧客を見られる
     * 以外は自分が所属する顧客のみ表示
     *
     * @return \Illuminate\Http\Response
     */
    public function index()
    {
        // 顧客情報はスーパーバイザーであれば 全店舗の顧客情報を閲覧できますが、店員の場合は自分が所属する店舗の顧客情報しか閲覧できません。
        if (auth()->user()->isSuperVisor()) {
            $customers = Customer::paginate();
        } else {
            $customers = Customer::where('shop_id', auth()->user()['shop_id'])->paginate();
        }
        return view('customers.index', compact('customers'));
    }
    ・・・・略・・・・
}
ページネーション
ページネーションとは一覧を表示するときに一度に表示する件数を、設定して次のページで続きのデータ一覧を表示する よくある機能です。
数万件を一度に一画面に表示するのは現実的ではありませんね。このためページに分けて、一度に50件程度の件数を表示して次ページ、前ページで表示していきます。
Customer::paginate();
この処理はページネーションを行い顧客一覧譲歩を取得します。デフォルトでは1ページに15件表示されます。
1ページ目は最初の15人分、2ページでは次の15人分の顧客一覧情報を取得します。
たった一行でページネーションの処理をやってくれるとはLaravelすごすぎ!
$customers = Customer::where('shop_id', auth()->user()['shop_id'])->paginate();
whereの部分はSQLのWHERE区の処理を行います。
店員が所属するショップの顧客だけを抽出する検索条件を設定しています。
顧客一覧画面のusers.blade.php
resources/views/customersフォルダを作成します。
次に、
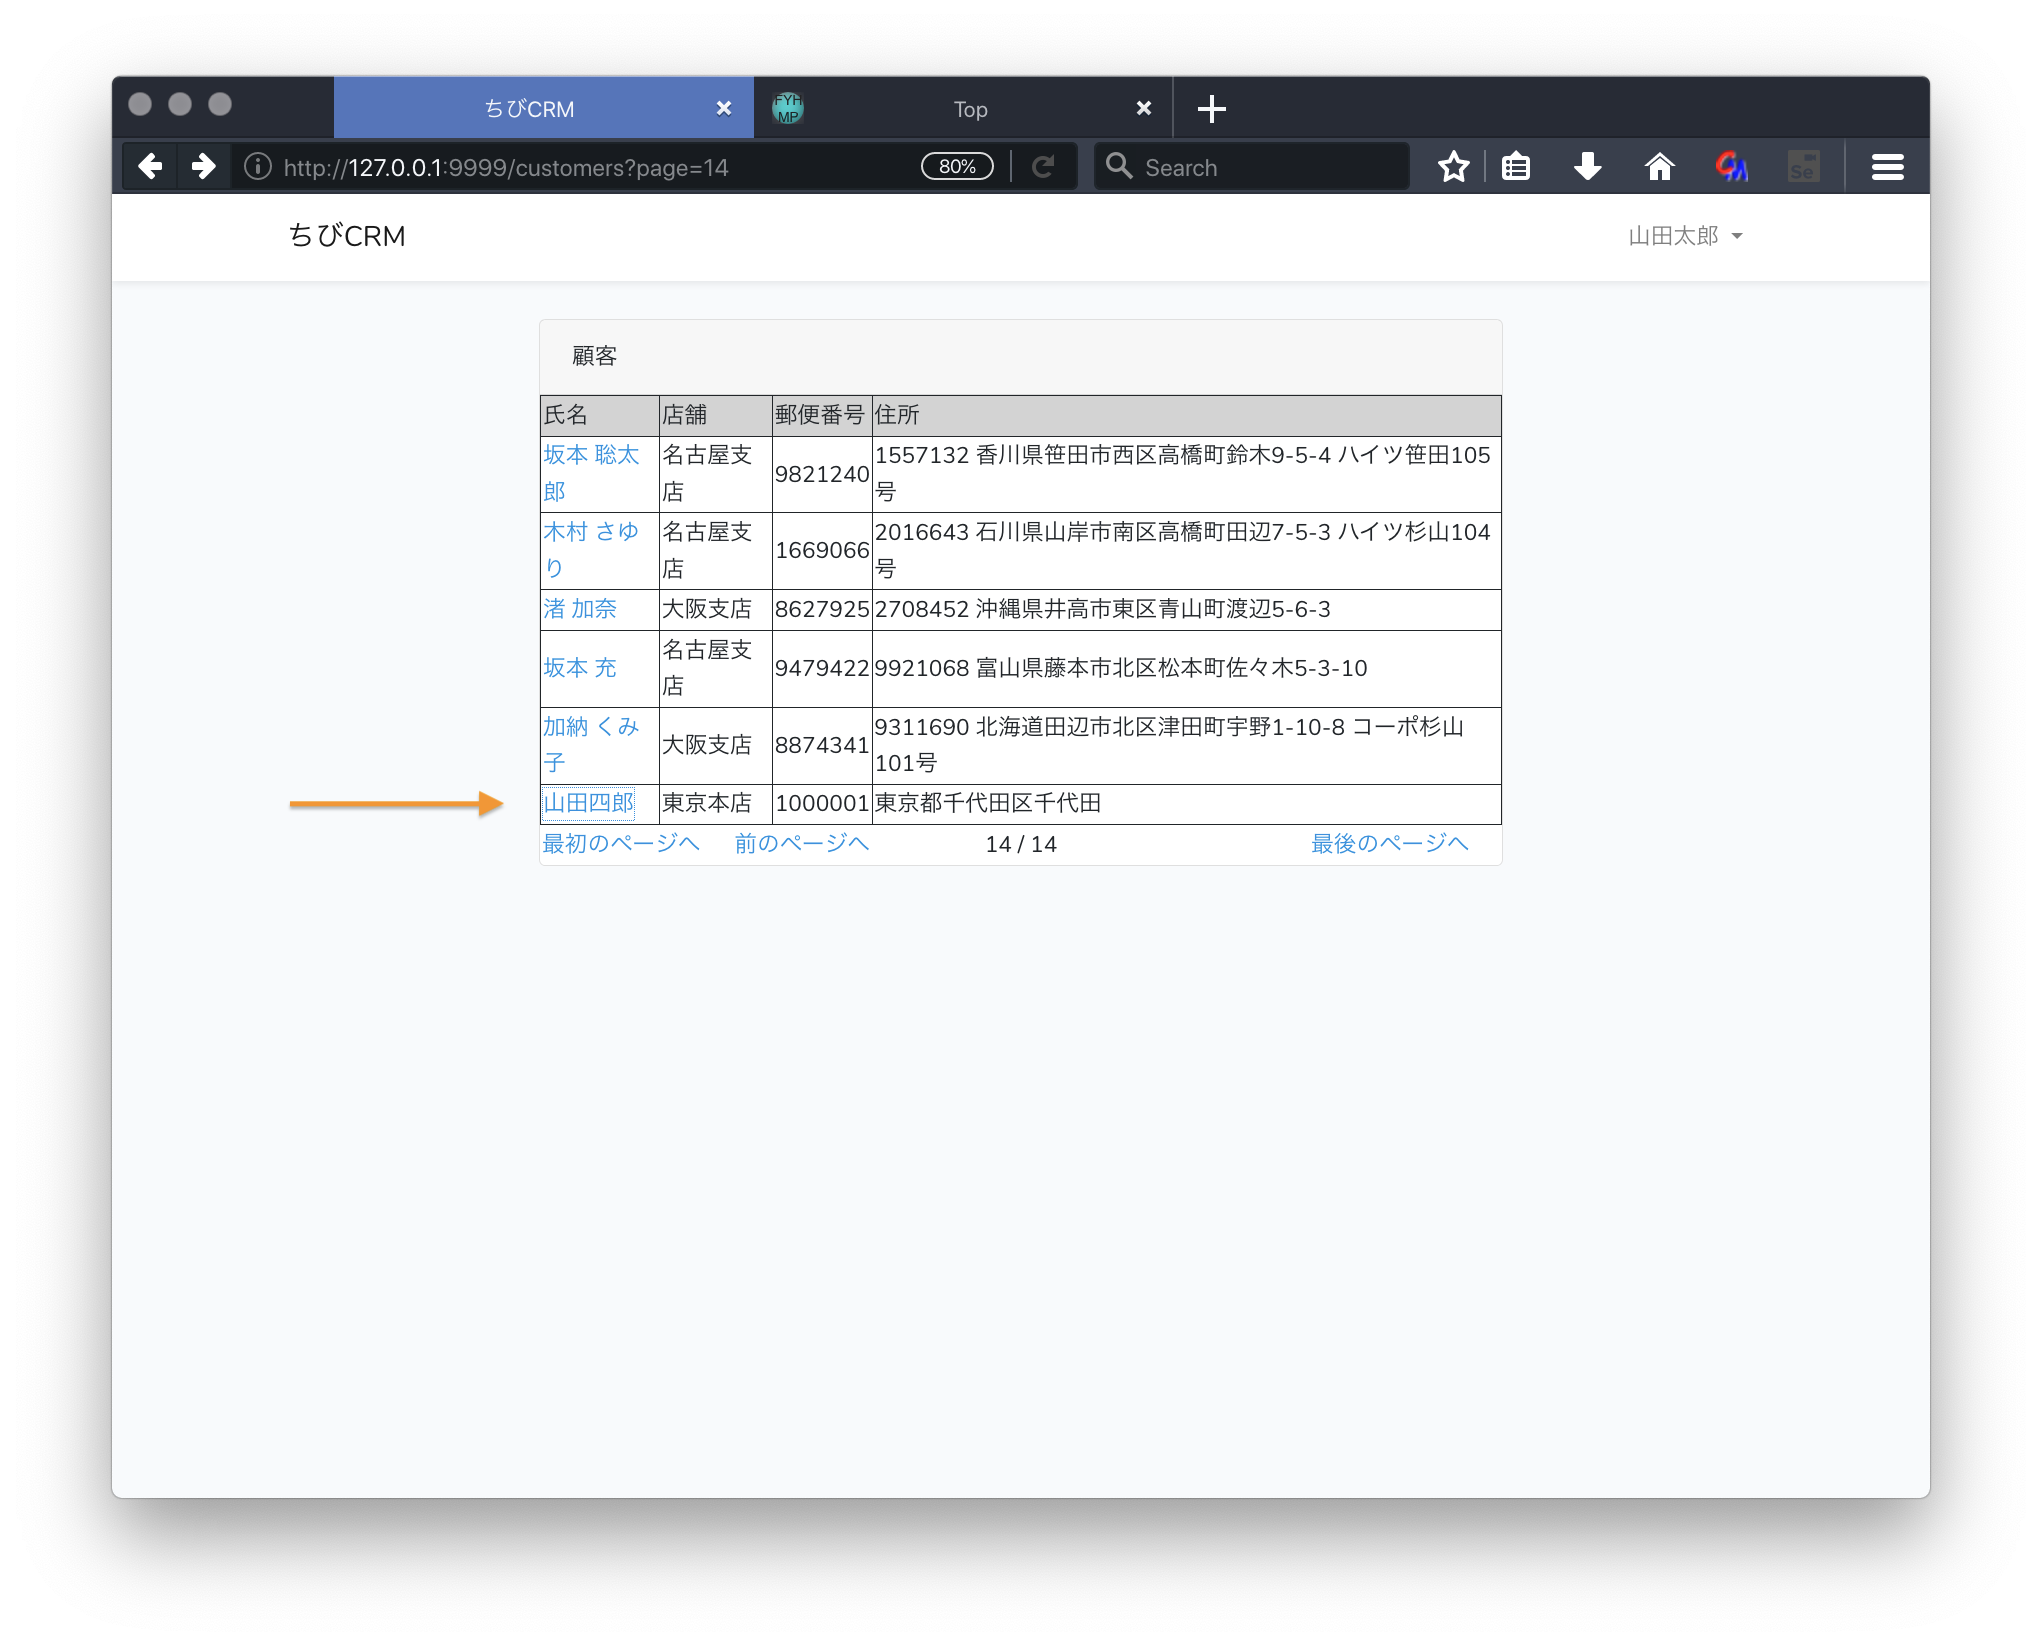
resources/views/customers/index.blade.phpファイルを作成します。
@extends('layouts.app')
@section('content')
    <div class="container">
        <div class="row justify-content-center">
            <div class="col-md-8">
                <div class="card">
                    <div class="card-header">顧客</div>
                    <table width="100%" border="1">
                        <thead>
                        <tr style="background-color: lightgray">
                            <td>氏名</td>
                            <td>店舗</td>
                            <td>郵便番号</td>
                            <td>住所</td>
                        </tr>
                        </thead>
                        @foreach($customers as $customer)
                            <tr>
                                <td>
                                    <a href="/customers/{{ $customer->id }}">
                                        {{ $customer->name }}
                                    </a>
                                </td>
                                <td>{{ $customer->shop->name }}</td>
                                <td>{{ $customer->postal }}</td>
                                <td>{{ $customer->address }}</td>
                            </tr>
                        @endforeach
                    </table>
                    {{--  pagenation link -------------------------------------------------------------------------------       --}}
                    <table width="100%">
                        <tr>
                            @if($customers->lastPage() > 1)
                                <td width="120px"><a href="{{ $customers->url(0) }}">最初のページへ</a></td>
                                <td width="120px">
                                    @if($customers->previousPageUrl())
                                        <a href="{{ $customers->previousPageUrl() }}">前のページへ</a>
                                    @endif
                                </td>
                                <td width="120px" style="text-align: center">{{ $customers->currentPage() }}
                                    / {{ $customers->lastPage() }}</td>
                                <td width="120px">
                                    @if($customers->nextPageUrl())
                                        <a href="{{ $customers->nextPageUrl() }}">次のページへ</a>
                                    @endif
                                </td>
                                <td width="120px"><a href="{{ $customers->url($customers->lastPage()) }}">最後のページへ</a>
                                </td>

                            @endif
                        </tr>
                    </table>
                    {{--  End of pagenation link -------------------------------------------------------------------------       --}}

                </div>
            </div>
        </div>
    </div>
@endsection
index.blade.phpの説明
-
ページネーション
$customers は コントローラーでCustomer::paginate();で取得したのでページネーション関連の機能を使えます。- $customers->previousPageUrl() 前ページのリンクを取得
- $customers->nextPageUrl() 次ページのリンクを取得
- $customers->url(0) 最初ページのリンクを取得
- $customers->url($customers->lastPage()) 最終ページのリンクを取得
- {{ \$customer->shop->name }} customersテーブルにはshop_idが入っていますが店舗名が入っていません。ですのでそのまま表示すると店舗欄には店舗IDが表示されますが Customer.php モデルで定義したshop関数でbelongsToを指定してあるので $customer->shop->name と書くことでLaravelが店舗名をデータベースから読んでくれます。楽ですね。
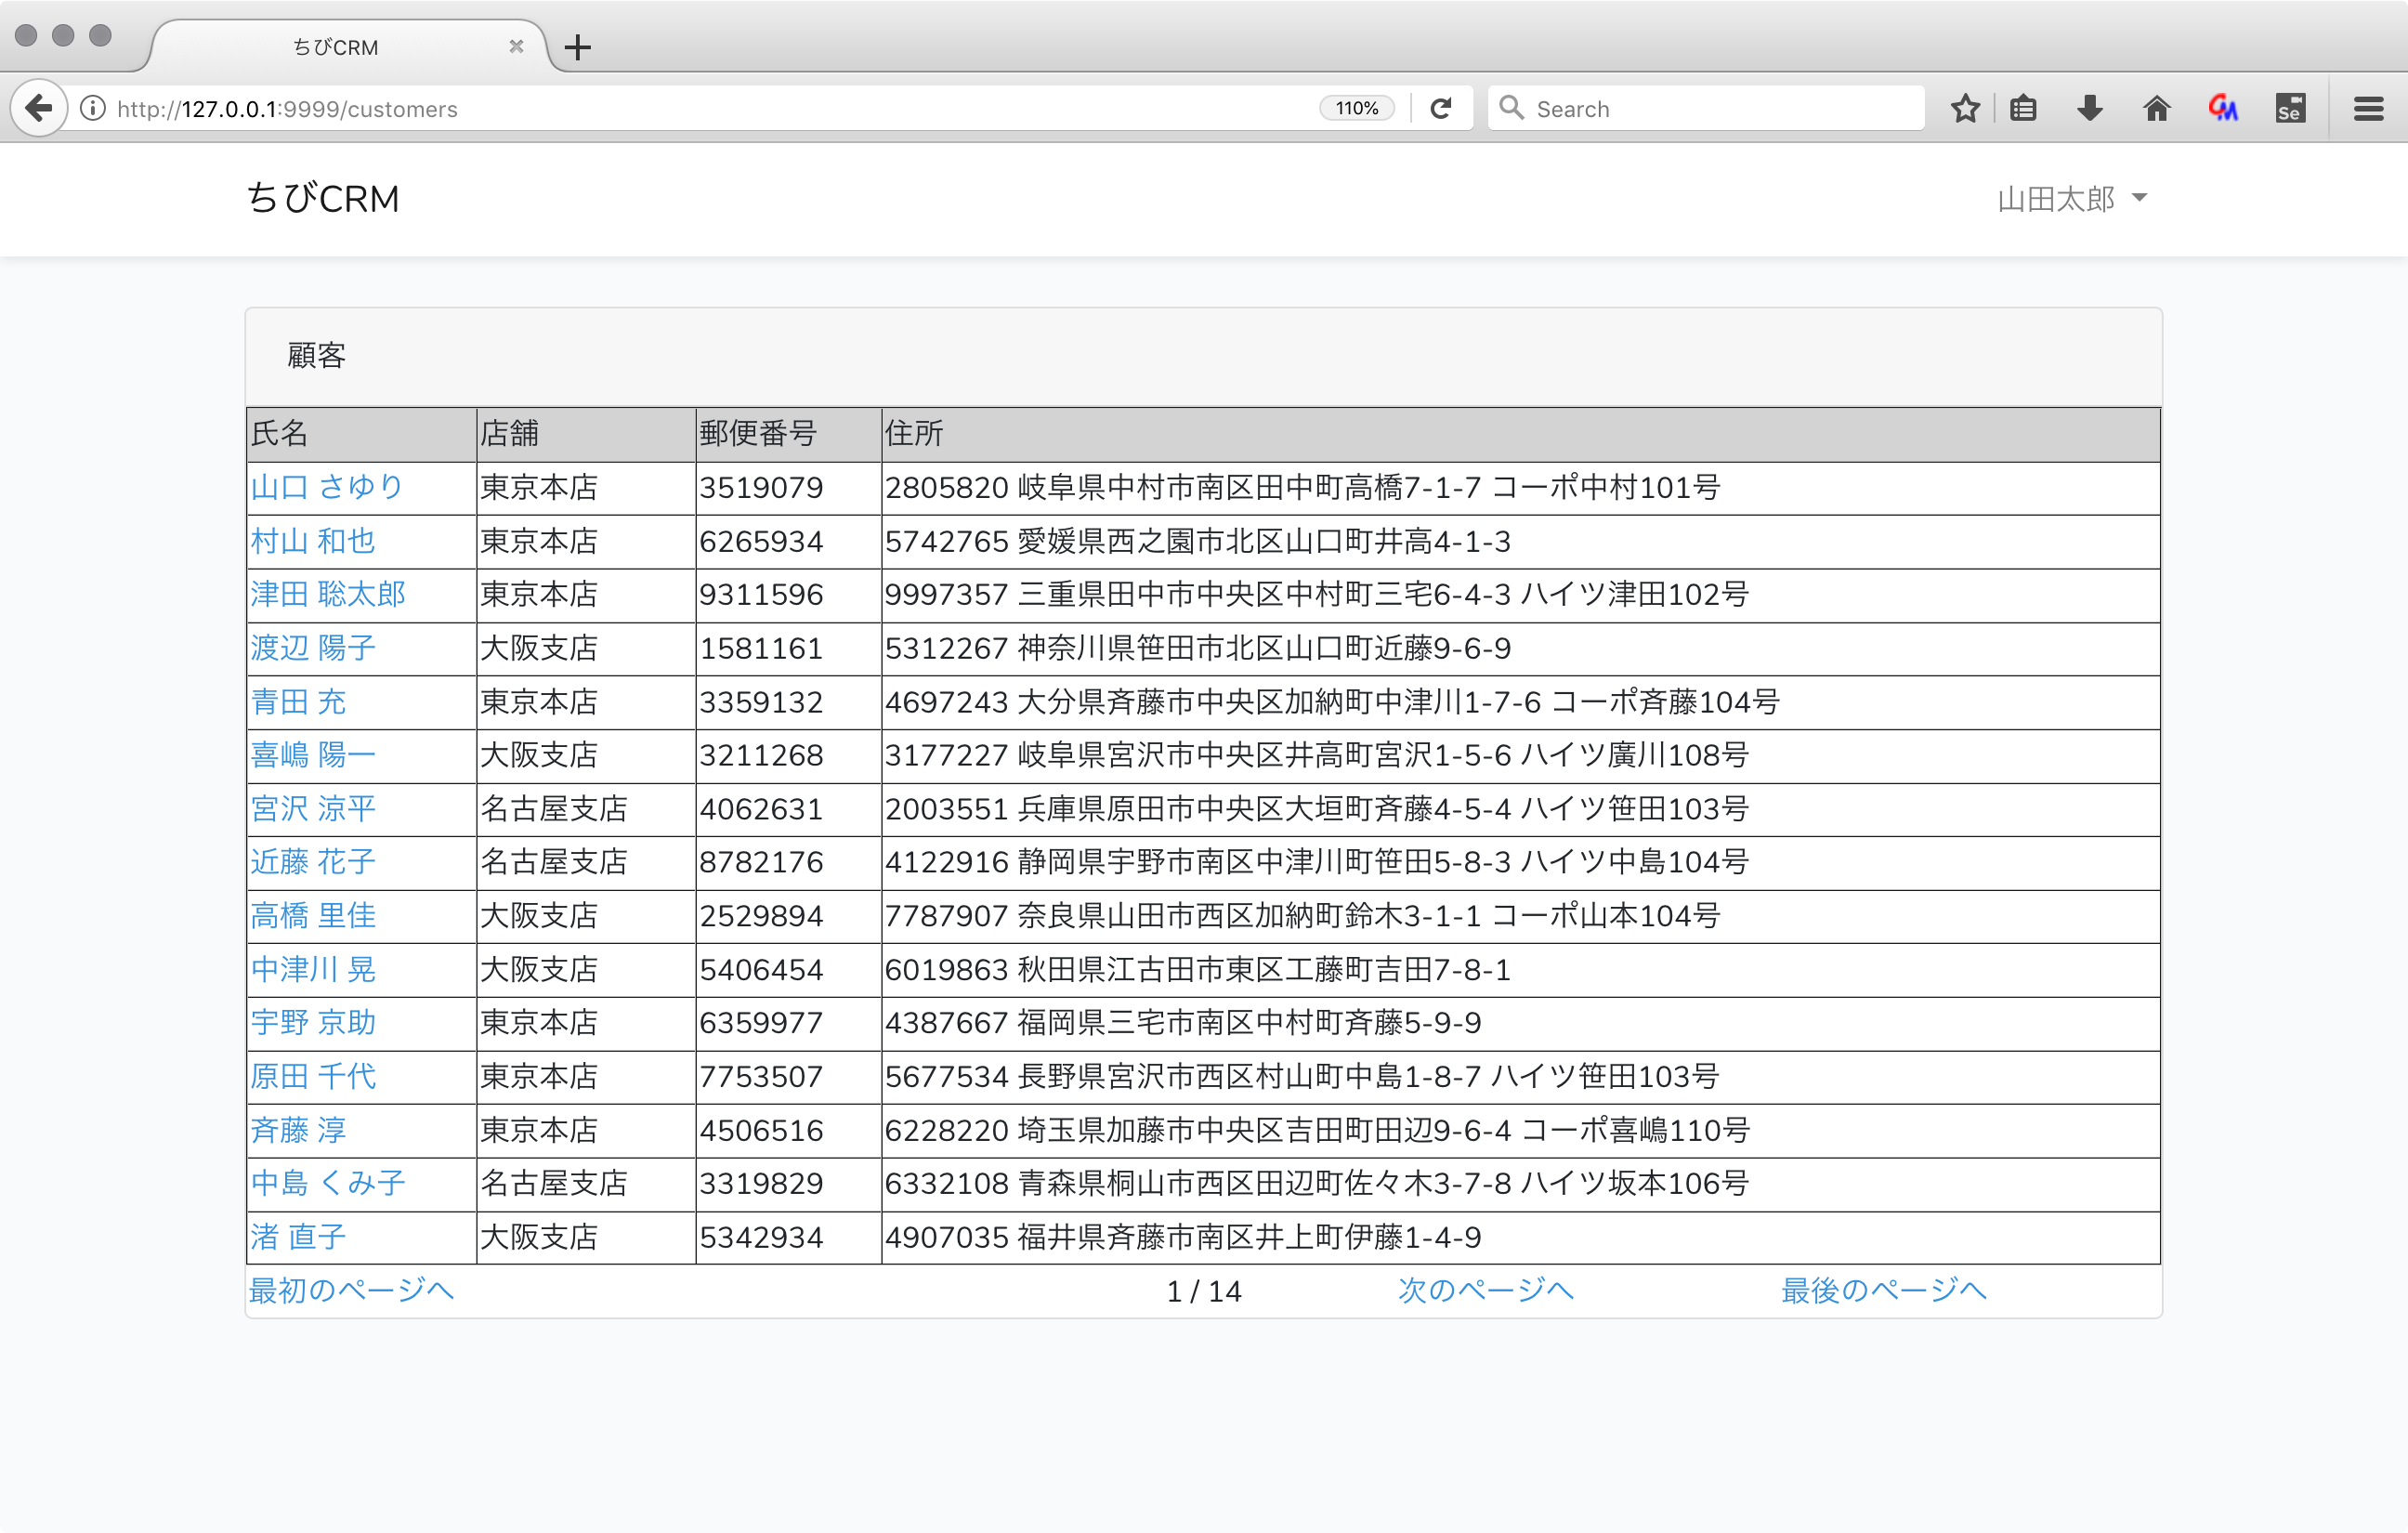
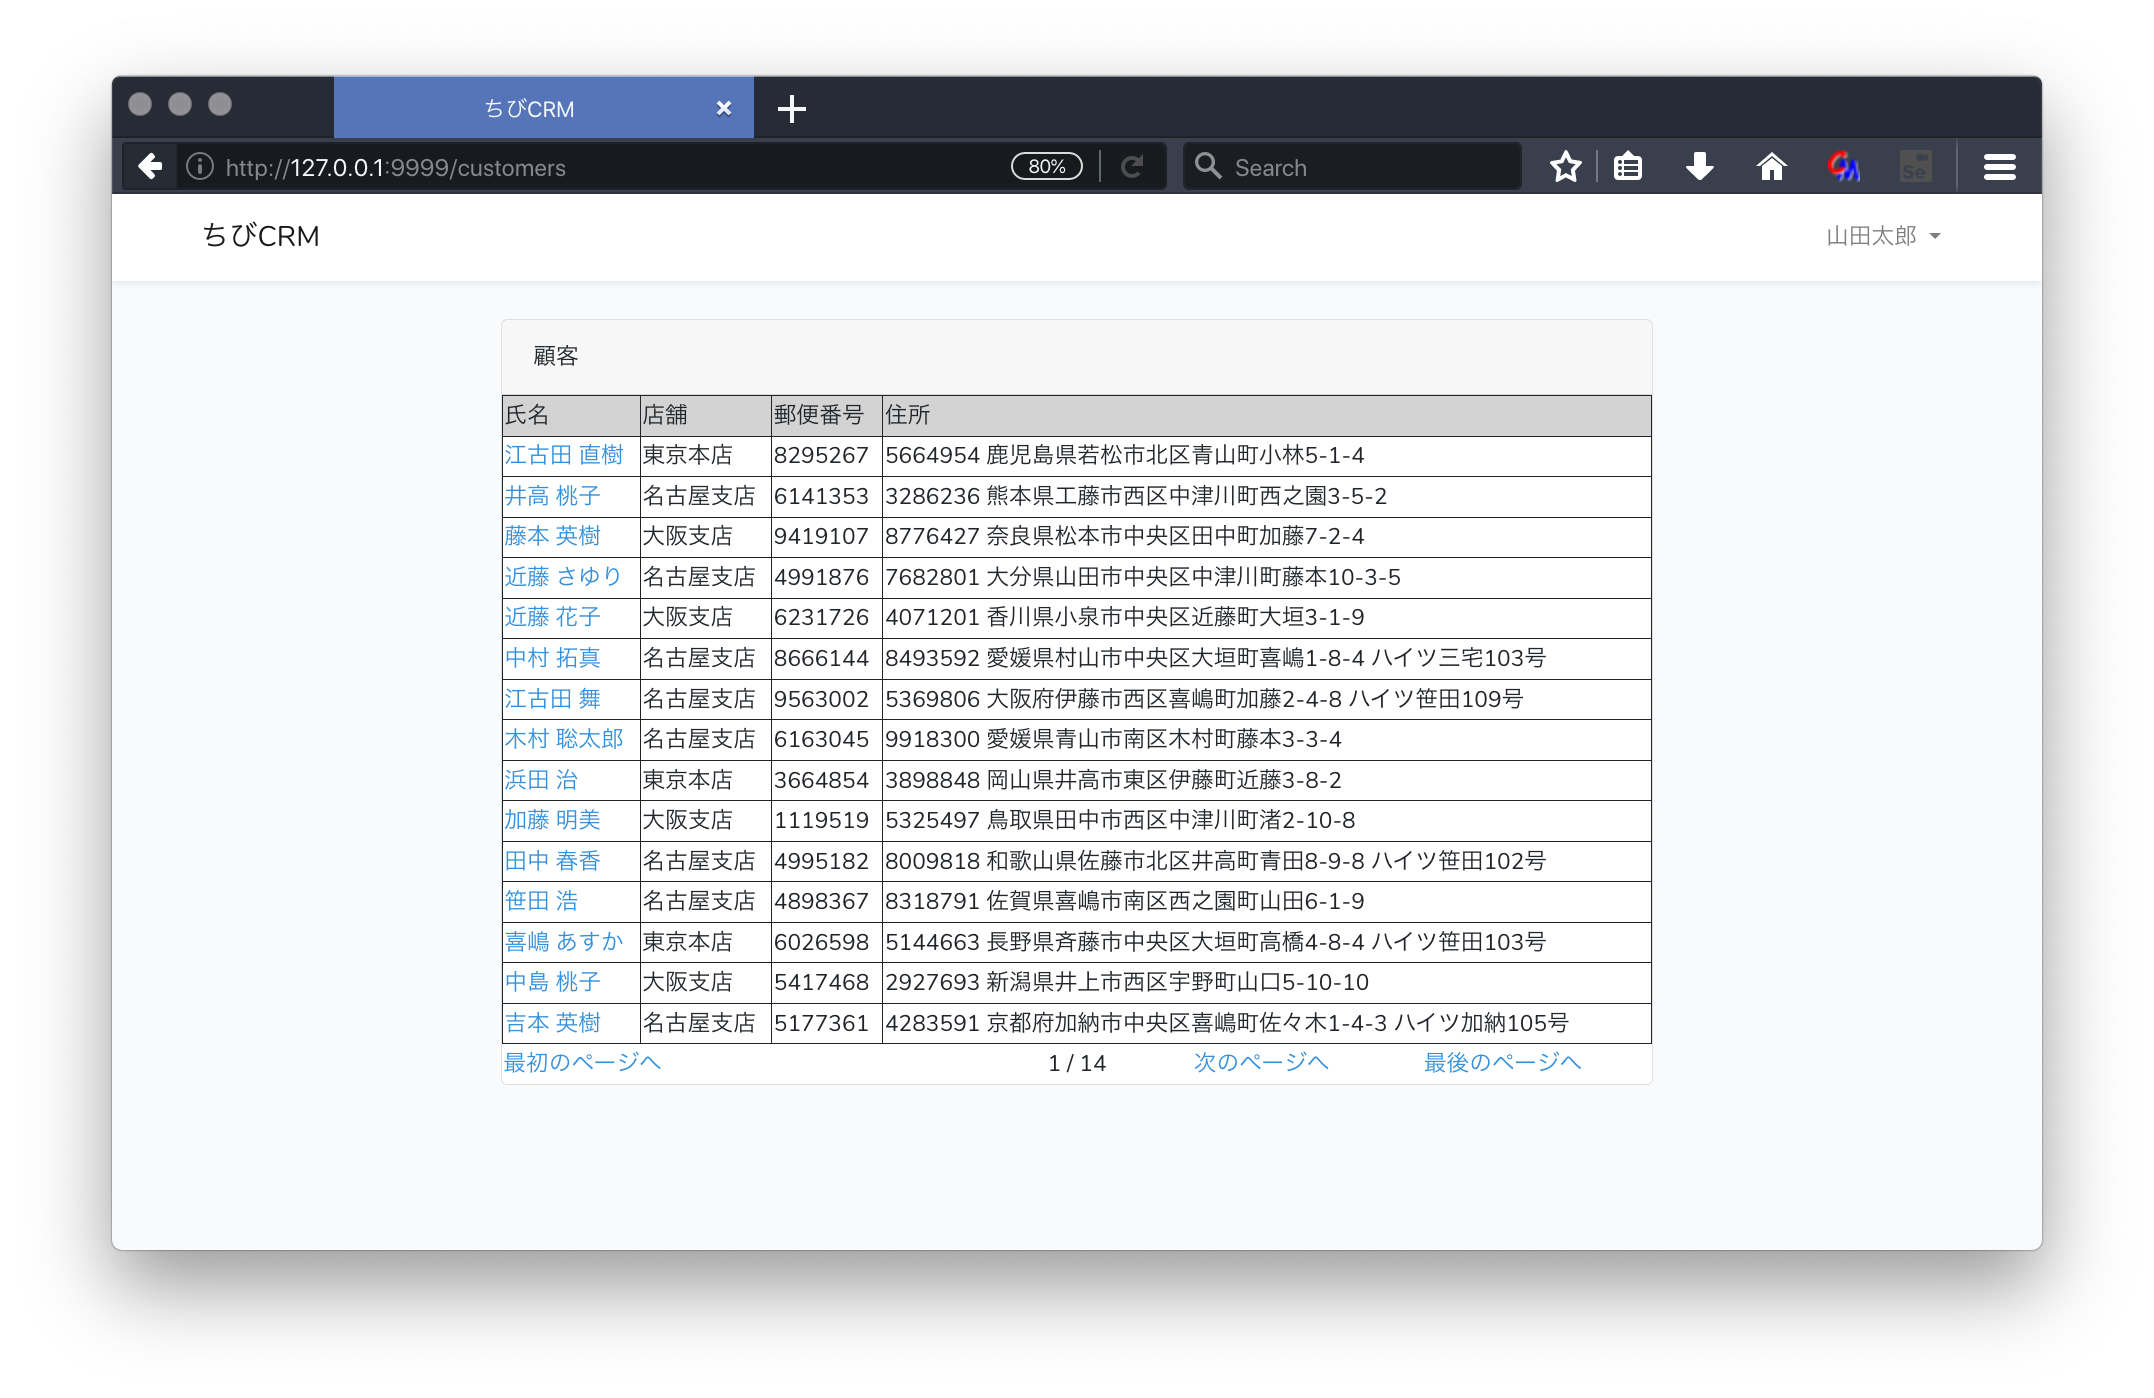
ブラウザで確認
http://127.0.0.1:9999/customers
をブラウザで開きます。
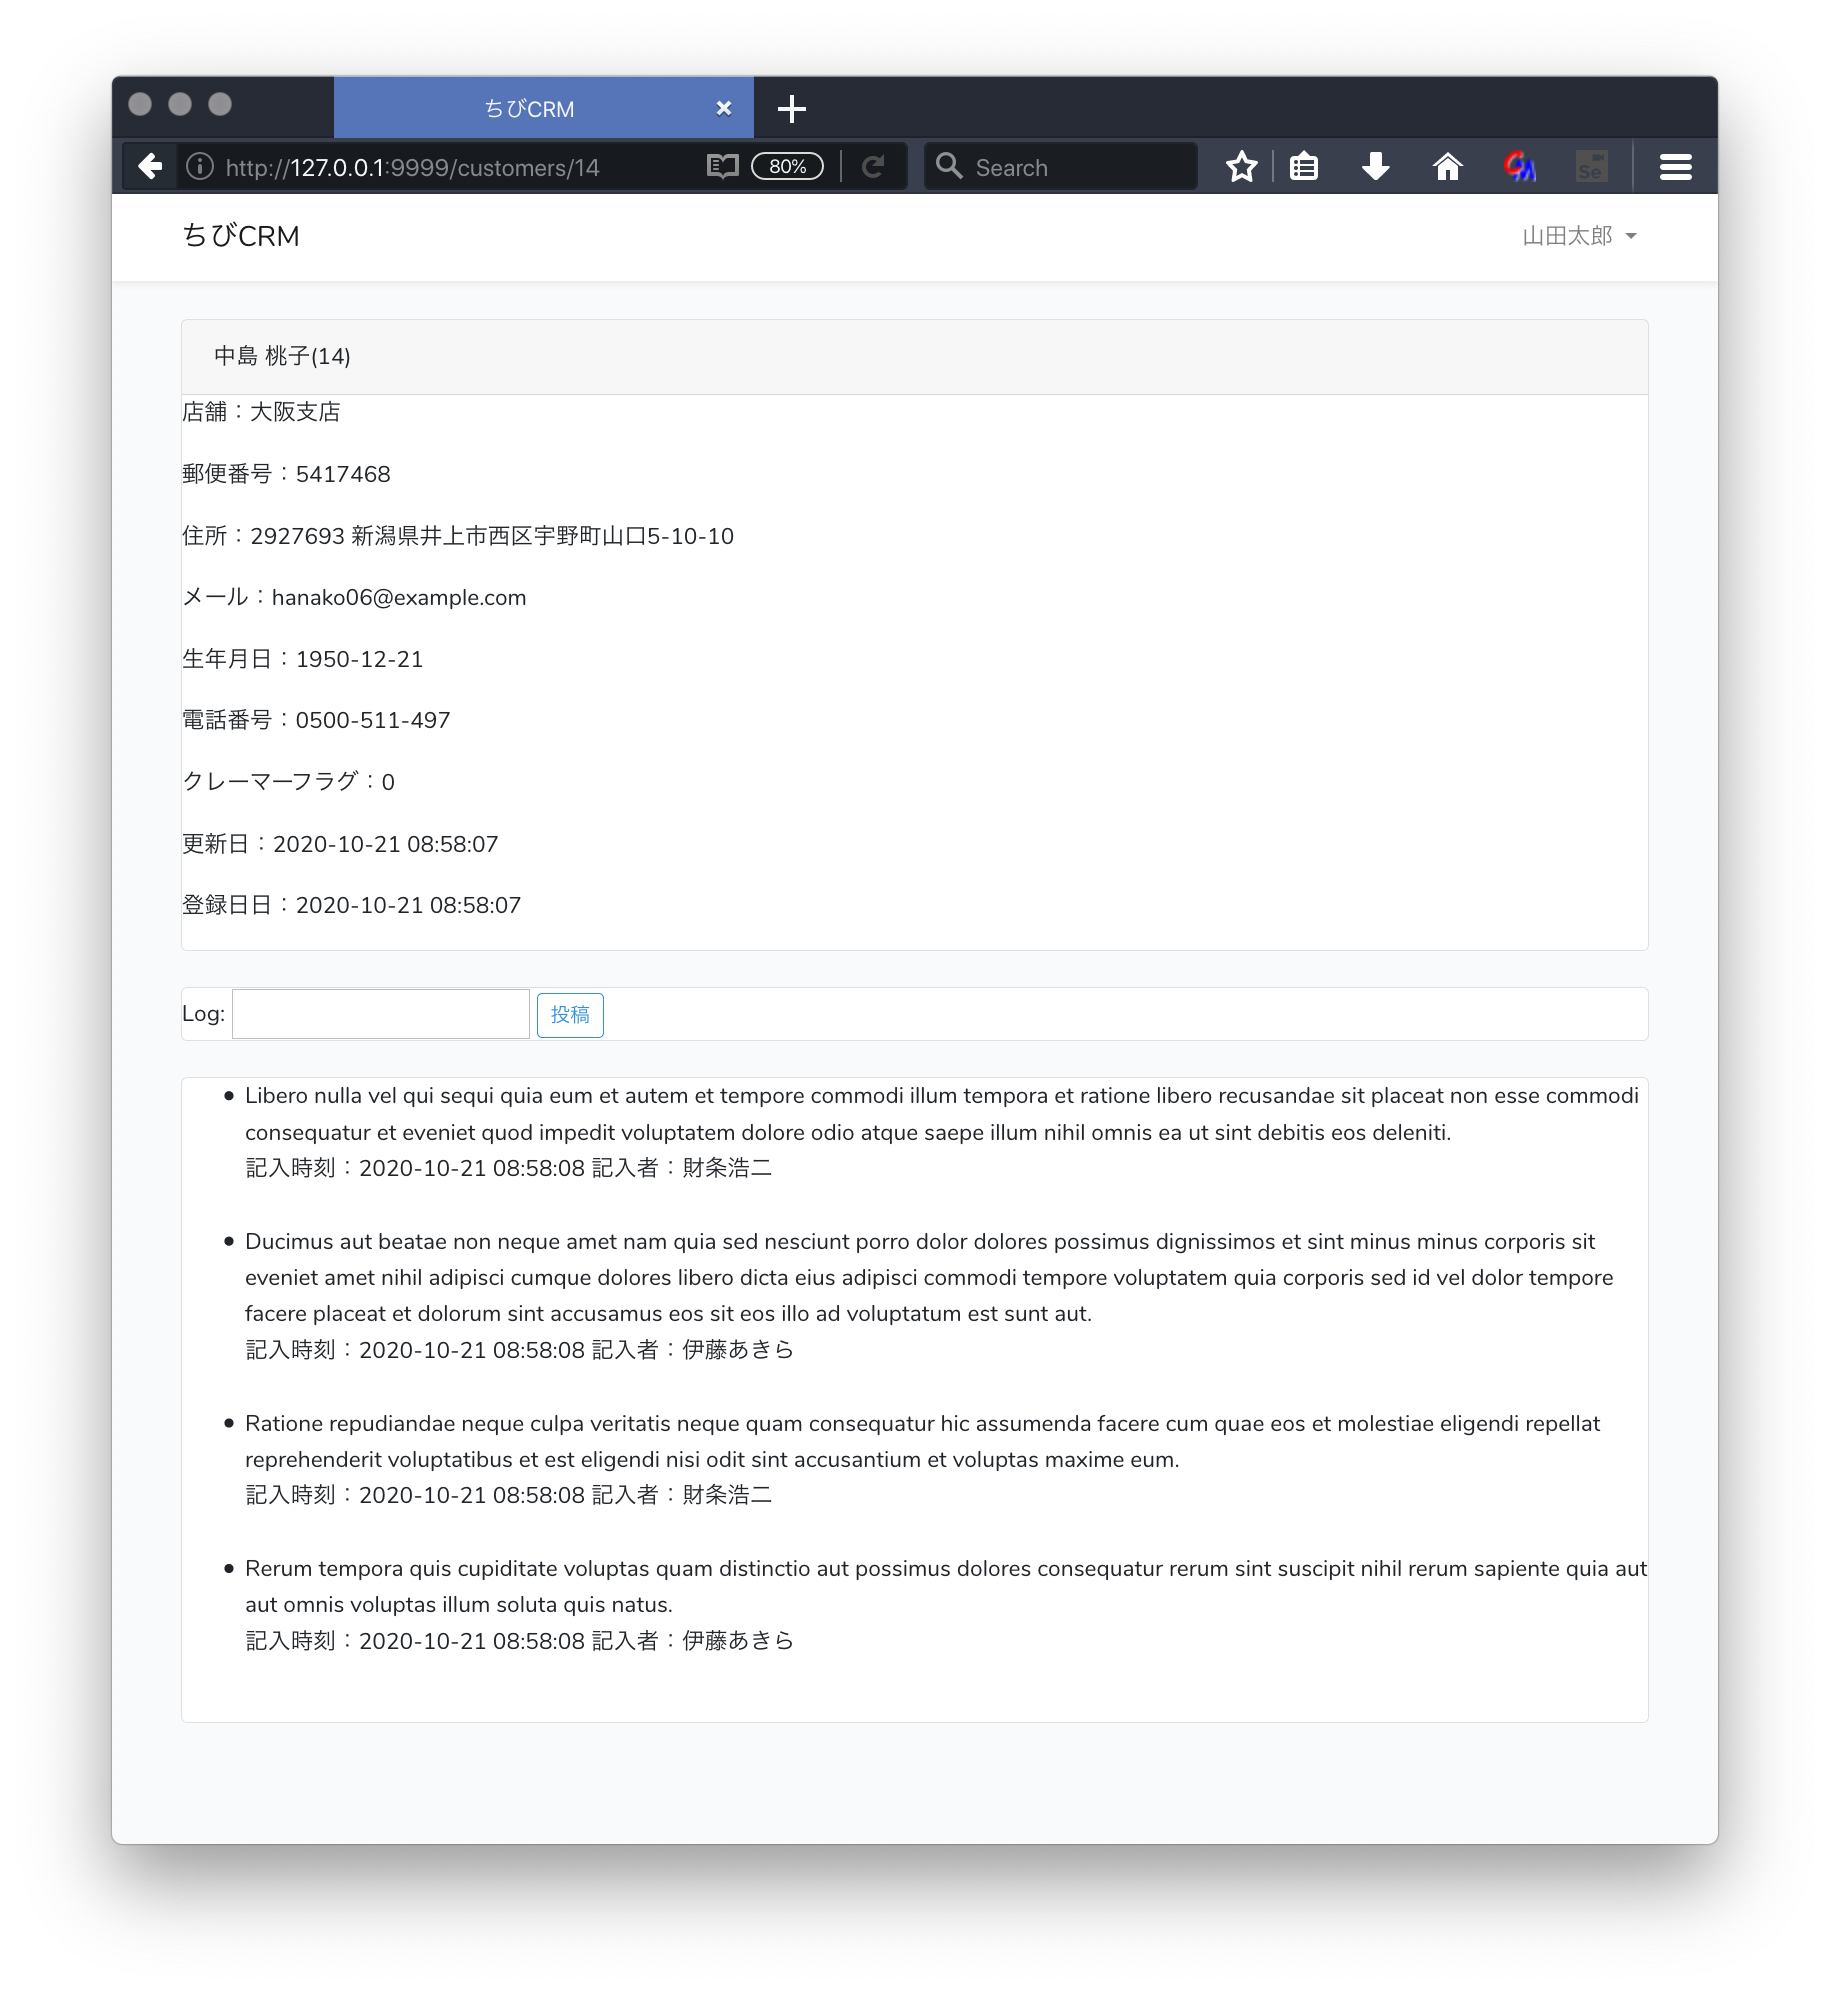
顧客詳細
顧客名をクリックしたら顧客の詳細情報を表示します。

顧客詳細画面のweb.phpを確認
routes/web.php の以下の部分が
先程web.phpに設定した resource の設定を確認します。
Route::resource('/customers', 'CustomerController')->middleware('auth');
/customers/{customer} のパスで GET リクエストが来ると。
CustomerControllerのshow()メソッドが呼ばれます。
このとき {customer} の部分にcustomersテーブルのidの値を指定するようにします。
顧客詳細画面コントローラの作成
顧客一覧画面で作った CustomerController を使います。
CustomerController.phpのshow()関数に処理を書きます。
    /**
     * Display the specified resource.
     *
     * @param \App\Models\Customer $customer
     * @return \Illuminate\Http\Response
     */
    public function show(Customer $customer)
    {
        $this->authorize('view', $customer);
        return view('customers.show', compact('customer'));
    }
showメソッドの説明
- public function show(Customer $customer)
Laravelが該当するカスタマー情報をデータベースから取得し $customer変数に入れます。引数にモデルを指定するだけなんて楽で良いですね。 - $this->authorize('view', $customer);
CustomerPolicy.phpのview関数を呼んで スーパーバイザーでなければ ユーザーの所属する顧客しか見られないように制御します。 - return view('customers.show', compact('customer'));
customer変数を渡して customers/show.blade.php で Viewを作成します。
顧客詳細画面のusers.blade.php
resources/views/customers/show.blade.php ファイルを作成して以下のように記述します。
@extends('layouts.app')
@section('content')
    <div class="container">
        <div class="row justify-content-center">
            <div class="col-md-12">
                <div class="card">
                    <div class="card-header">{{ $customer->name }}({{ $customer->id }})</div>
                    <p>店舗:{{ $customer->shop['name'] }}</p>
                    <p>郵便番号:{{ $customer->postal }}</p>
                    <p>住所:{{ $customer->address }}</p>
                    <p>メール:{{ $customer->email }}</p>
                    <p>生年月日:{{ $customer->birthdate }}</p>
                    <p>電話番号:{{ $customer->phone }}</p>
                    <p>クレーマーフラグ:{{ $customer->kramer_flag }}</p>
                    <p>更新日:{{ $customer->created_at }}</p>
                    <p>登録日日:{{ $customer->updated_at }}</p>

                </div>
                <br/>
                <div class="card">
                    <form action="/customers/{{$customer->id}}/logs" method="POST">
                        @csrf
                        Log: <input type="text" name="log" value="{{old('log')}}">
                        <button type="submit" class="btn btn-sm btn-outline-primary">投稿</button>
                    </form>

                </div>
                <br/>
                <div class="card">
                    <ul>
                        @foreach($customer->customerLogs as $log)
                            <li>
                                {{ $log->log }}<br/>
                                記入時刻:{{ $log->created_at }} 記入者:{{ $log->user->name }}<br/>
                                <br/>
                            </li>
                        @endforeach
                    </ul>
                </div>
            </div>
        </div>
    </div>
@endsection
show.blade.phpの説明
-
@foreach($customer->customerLogs as $log)
顧客履歴を表示します。CustomerController show関数内で 顧客履歴取得は行っていませんが、Customer モデルの customerLogs関数でhasManyを指定しているので Laravelが $customer->customerLogs で 顧客履歴をデータベースから取得します。
ブラウザで確認
顧客一覧から顧客名をクリックします。
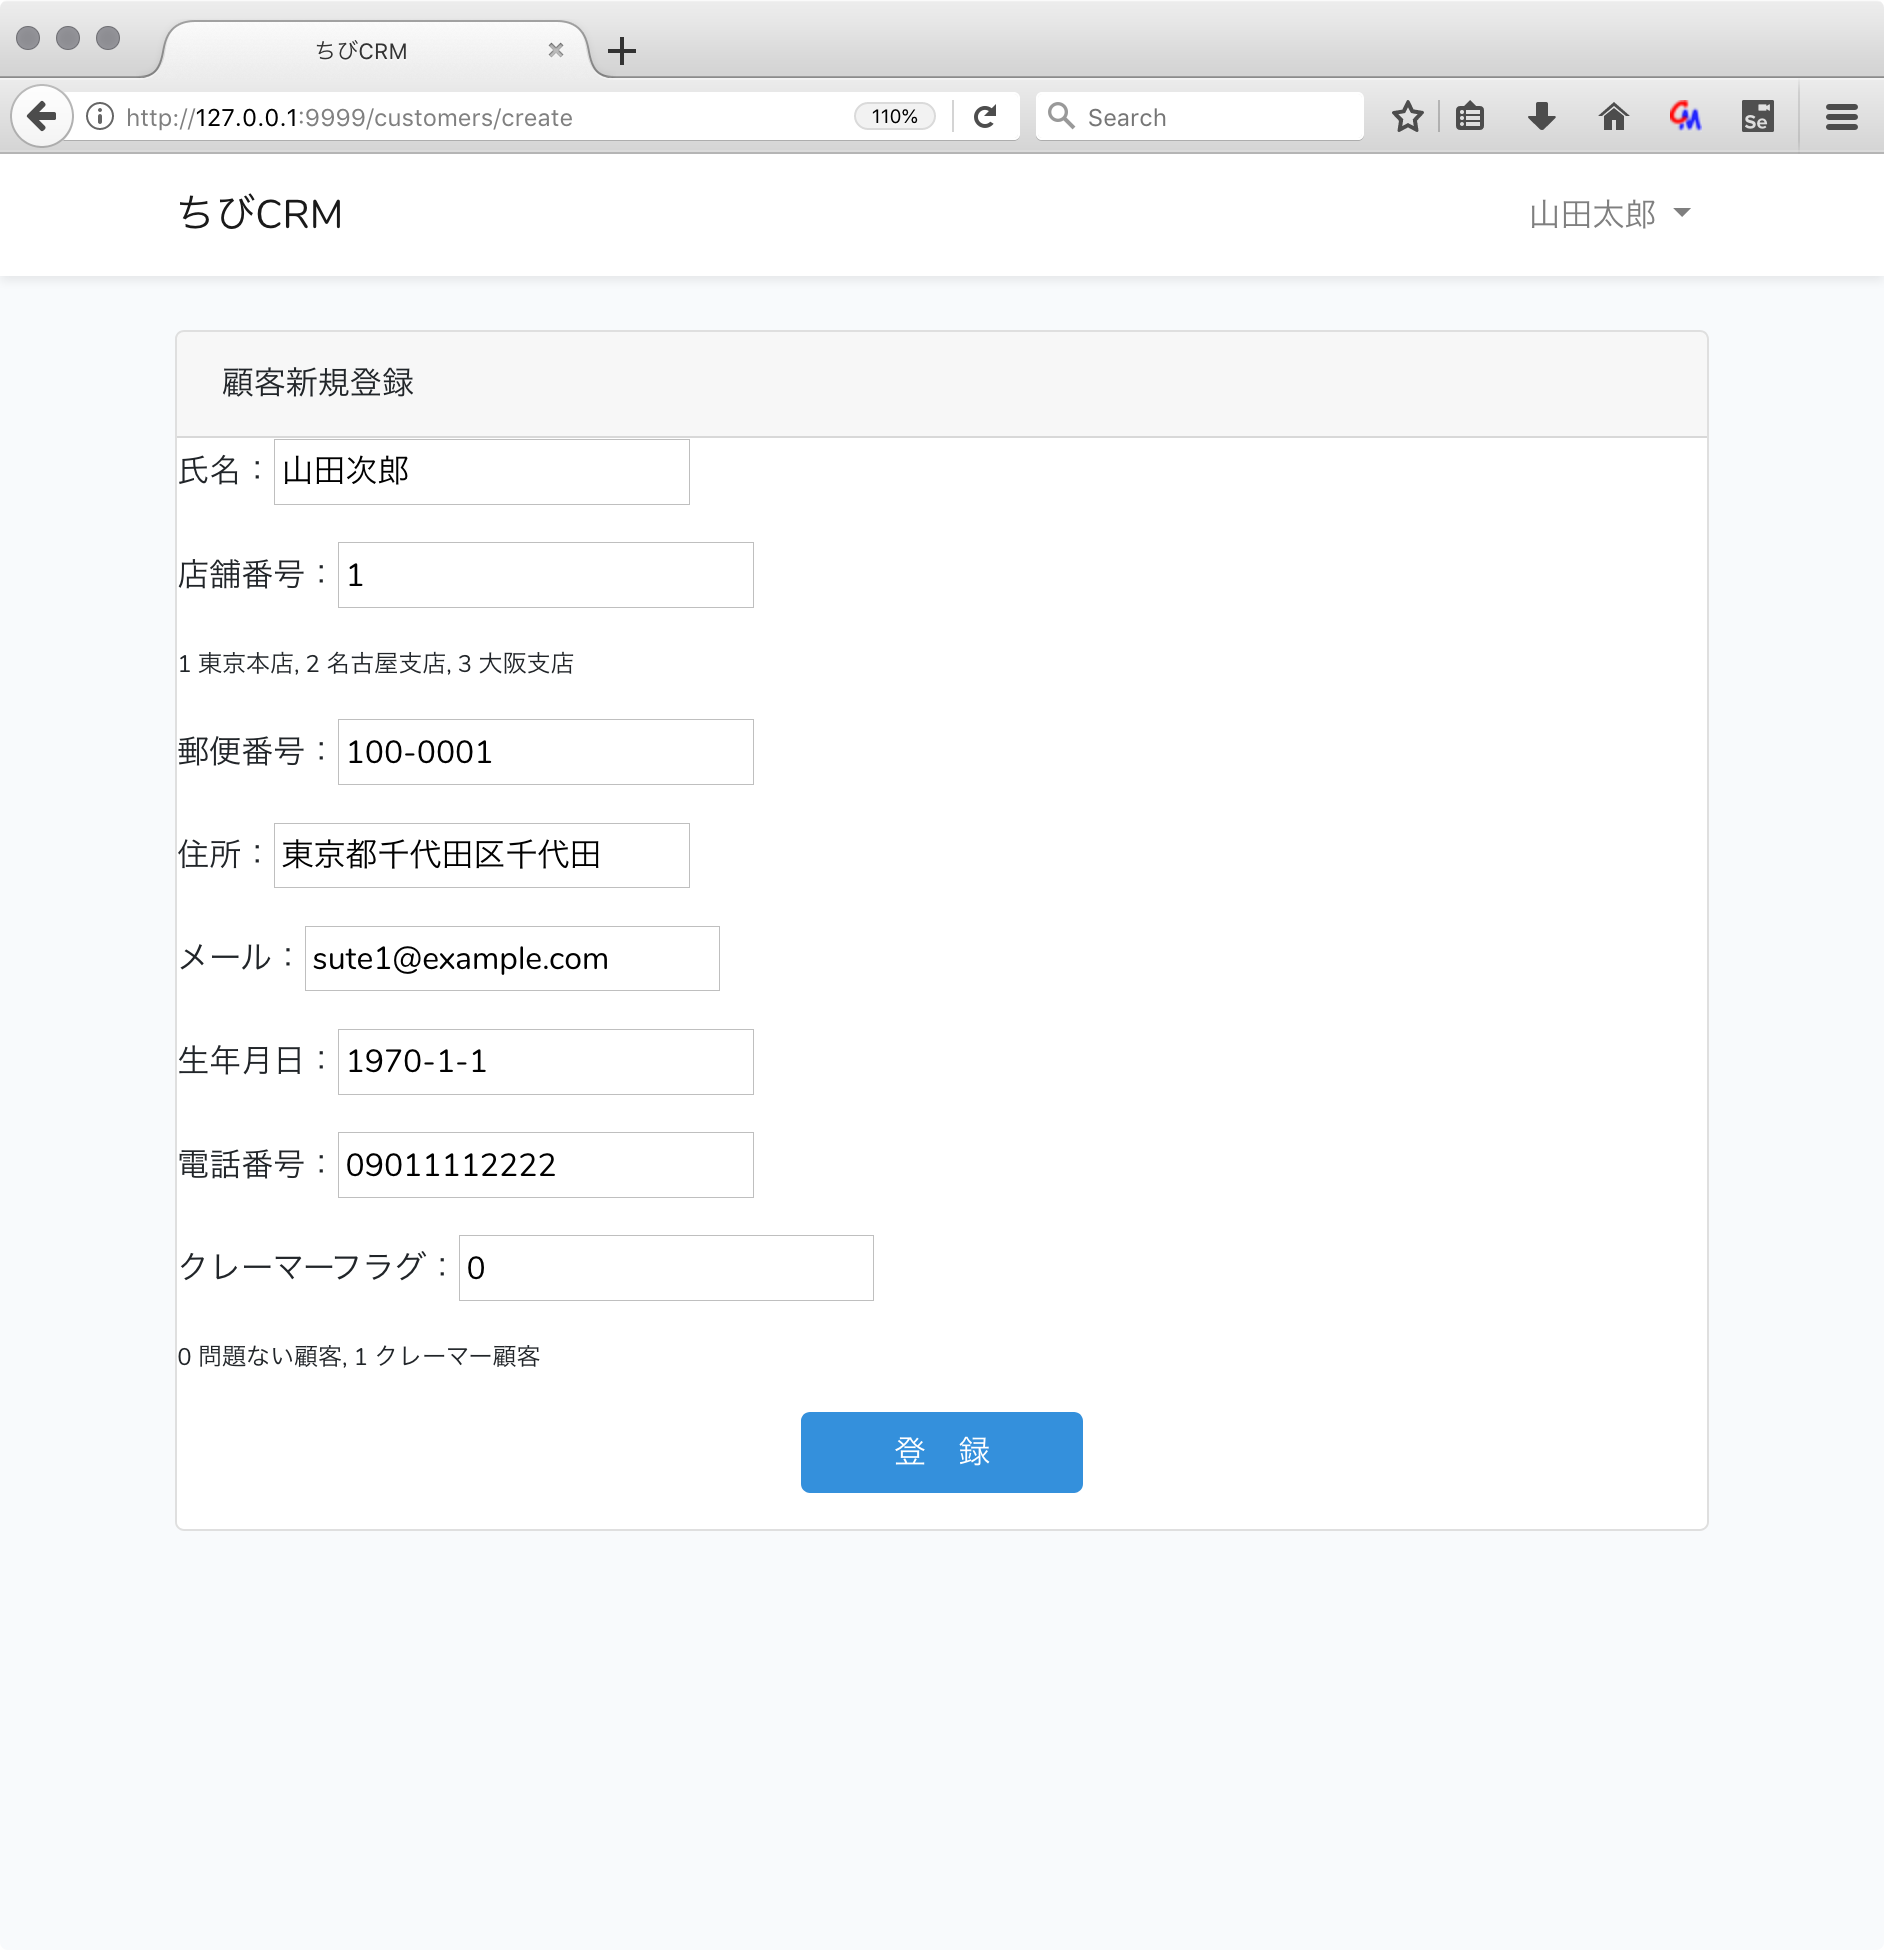
顧客新規登録
新規顧客登録画面を作っていきます。社員が顧客情報を入力します。
顧客新規登録画面のweb.phpを確認
- /customers/create のパスで get リクエストが呼ぶと CustomerControllerのcreate()メソッドが呼ばれます。
- /customers のパスを POST リクエストで呼ぶと CustomerControllerのstore()メソッドが呼ばれます。
顧客新規登録画面コントローラの作成
すでに作られている CustomerController を追加います。
createメソッドを以下のように変更します。
顧客情報入力画面のbladeを呼び出す処理を行います。
    /**
     * Show the form for creating a new resource.
     *
     * @return \Illuminate\Http\Response
     */
    public function create()
    {
        return view('customers.create');
    }
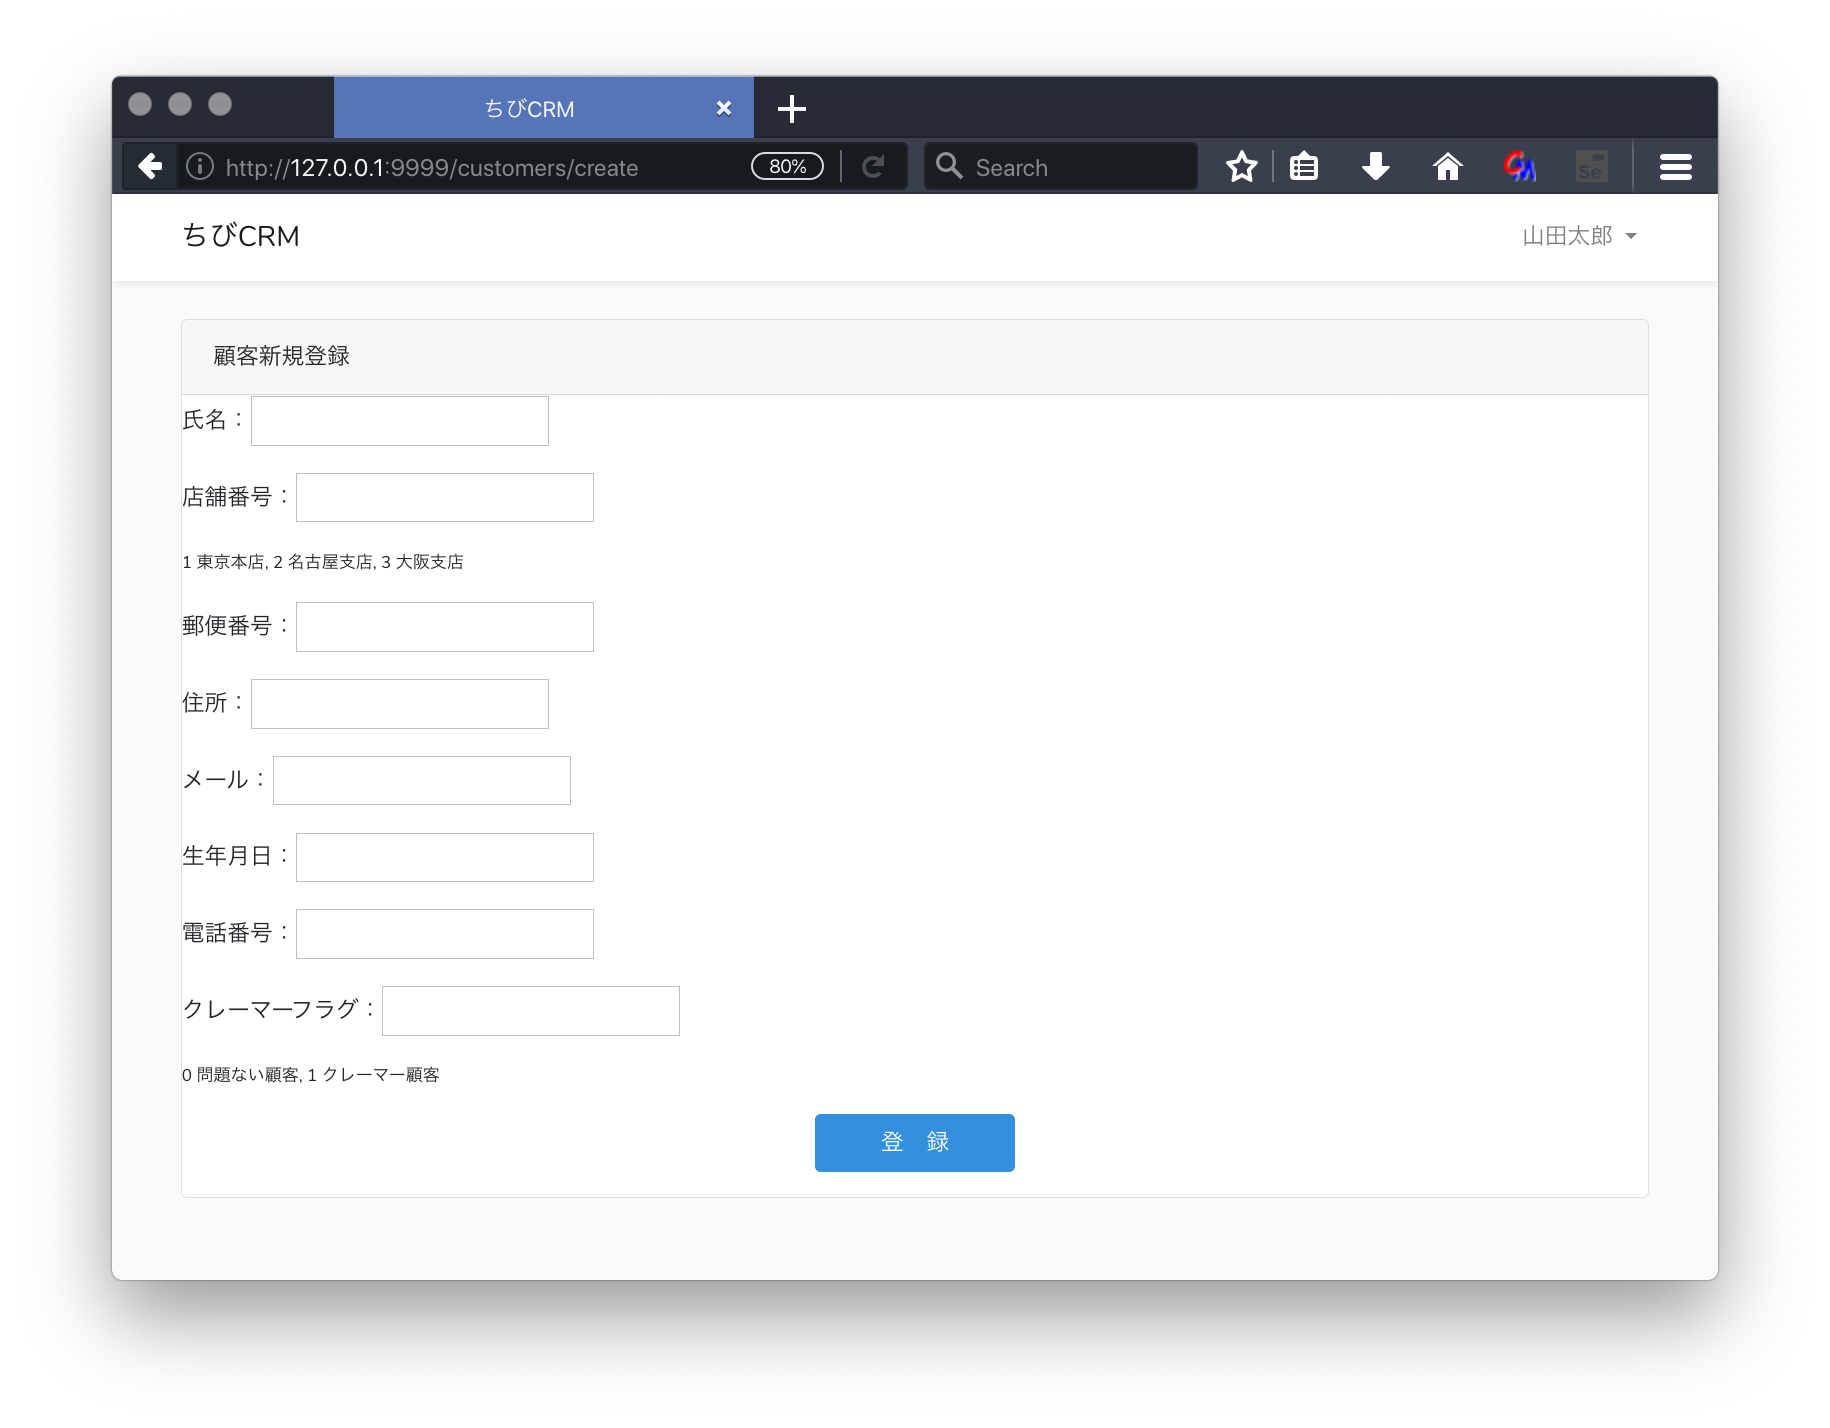
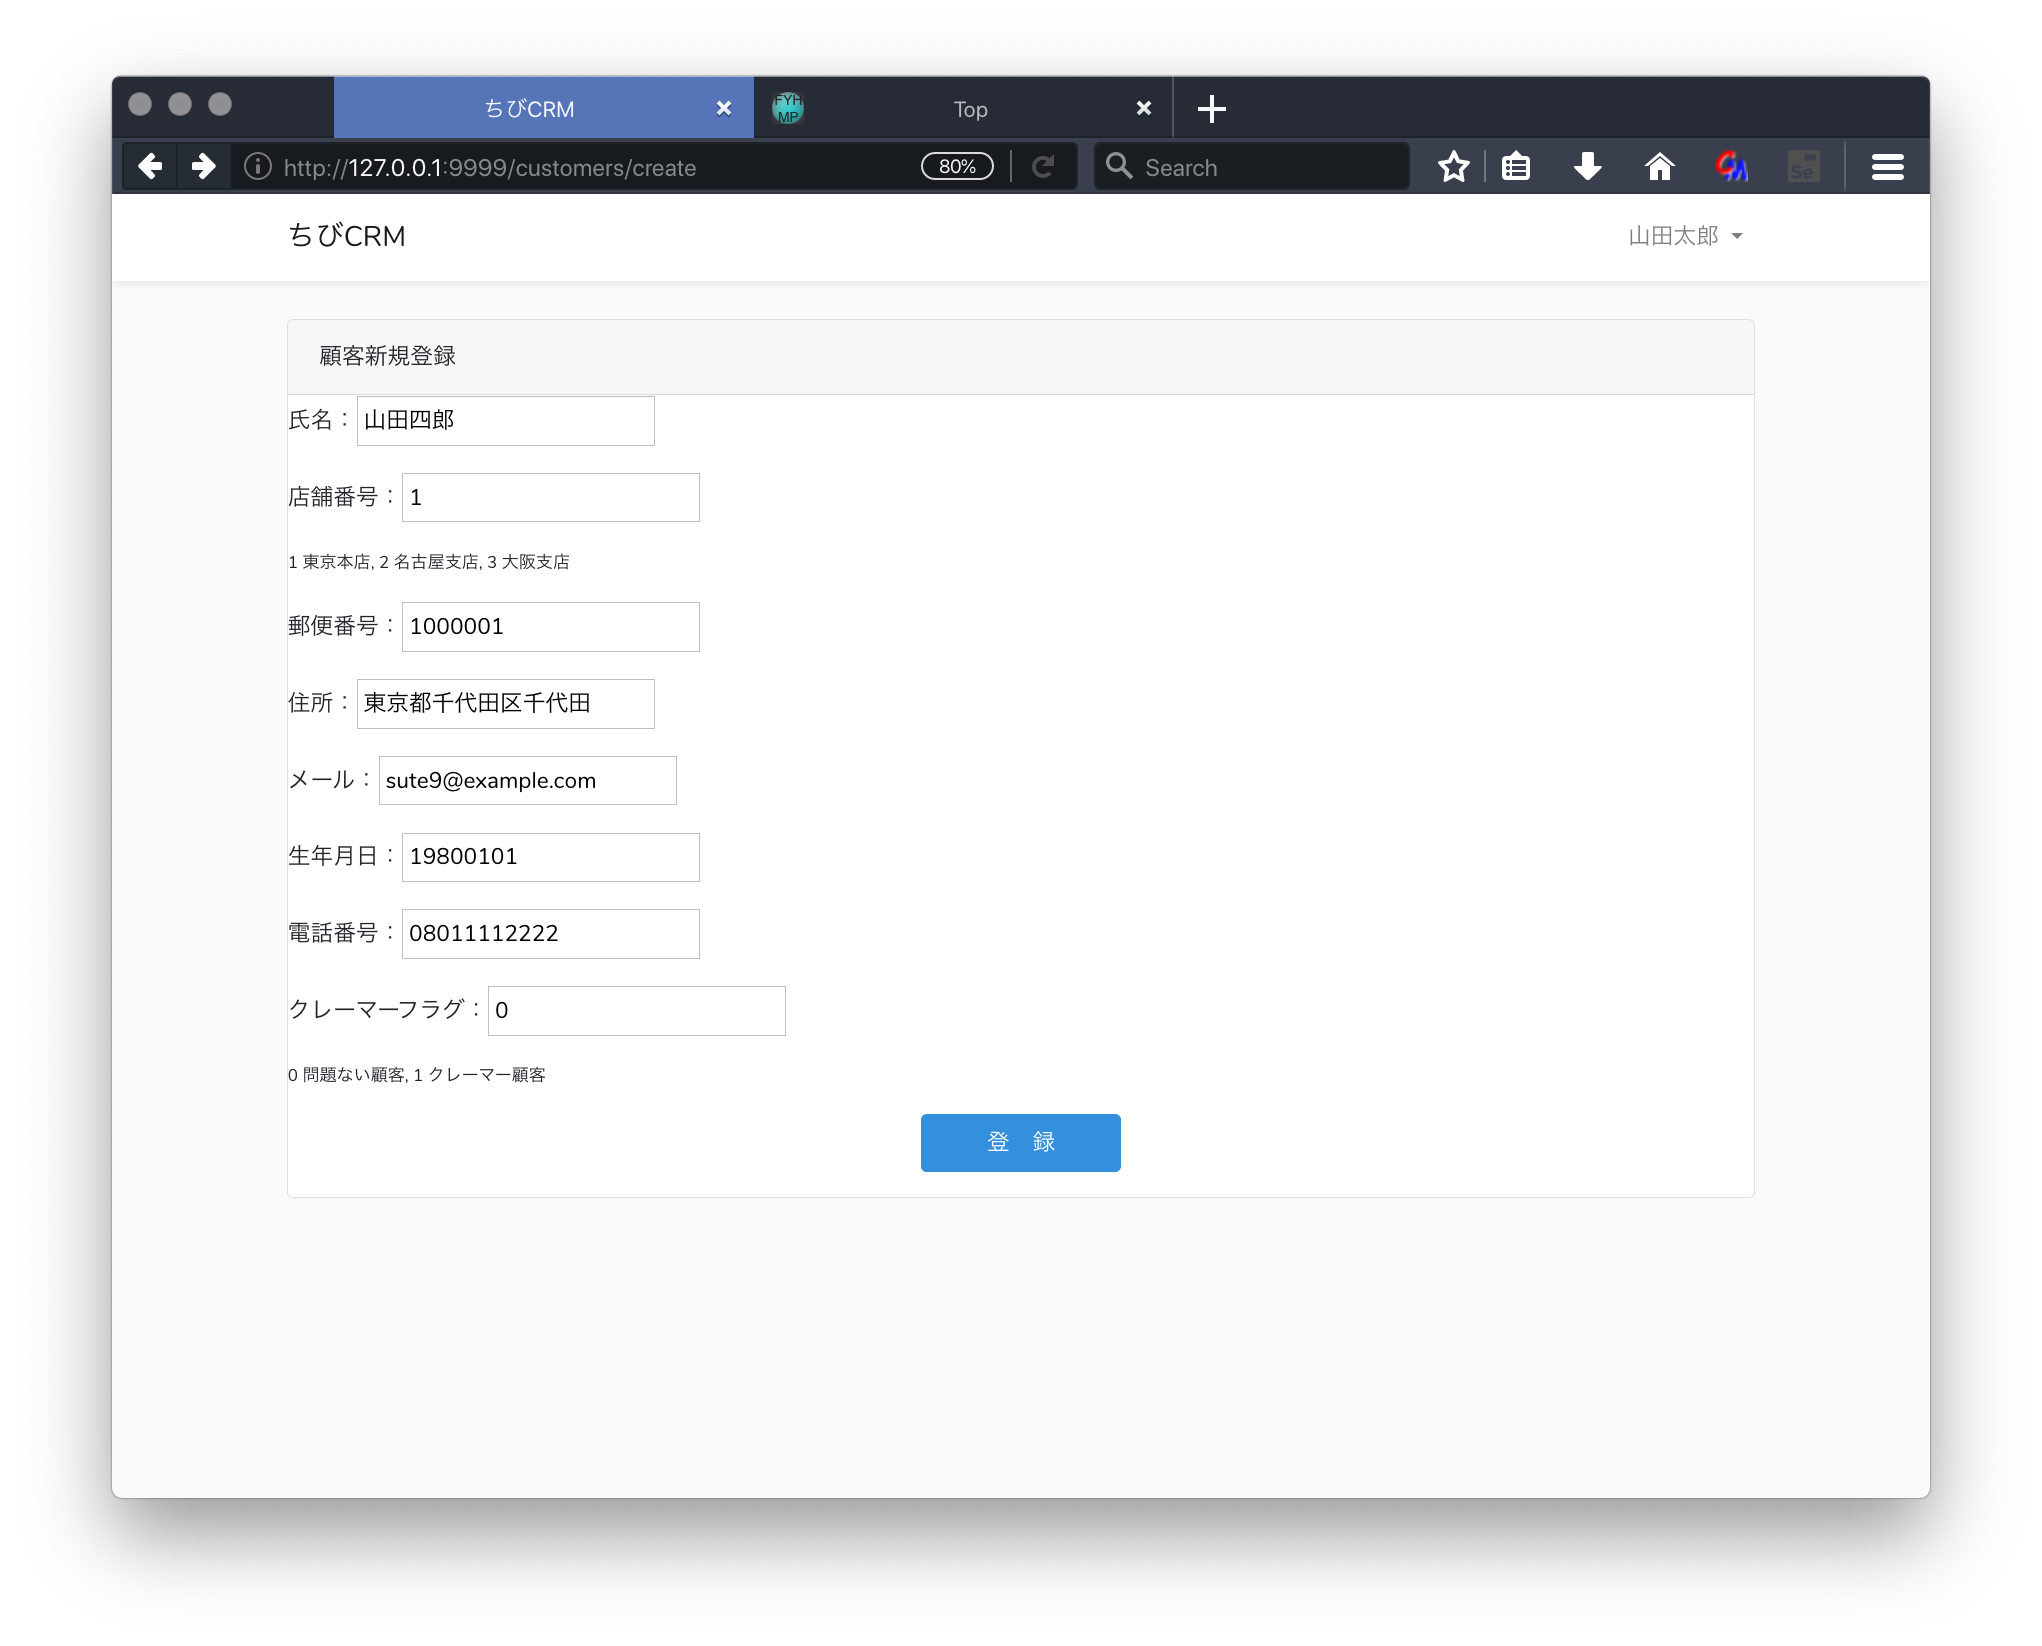
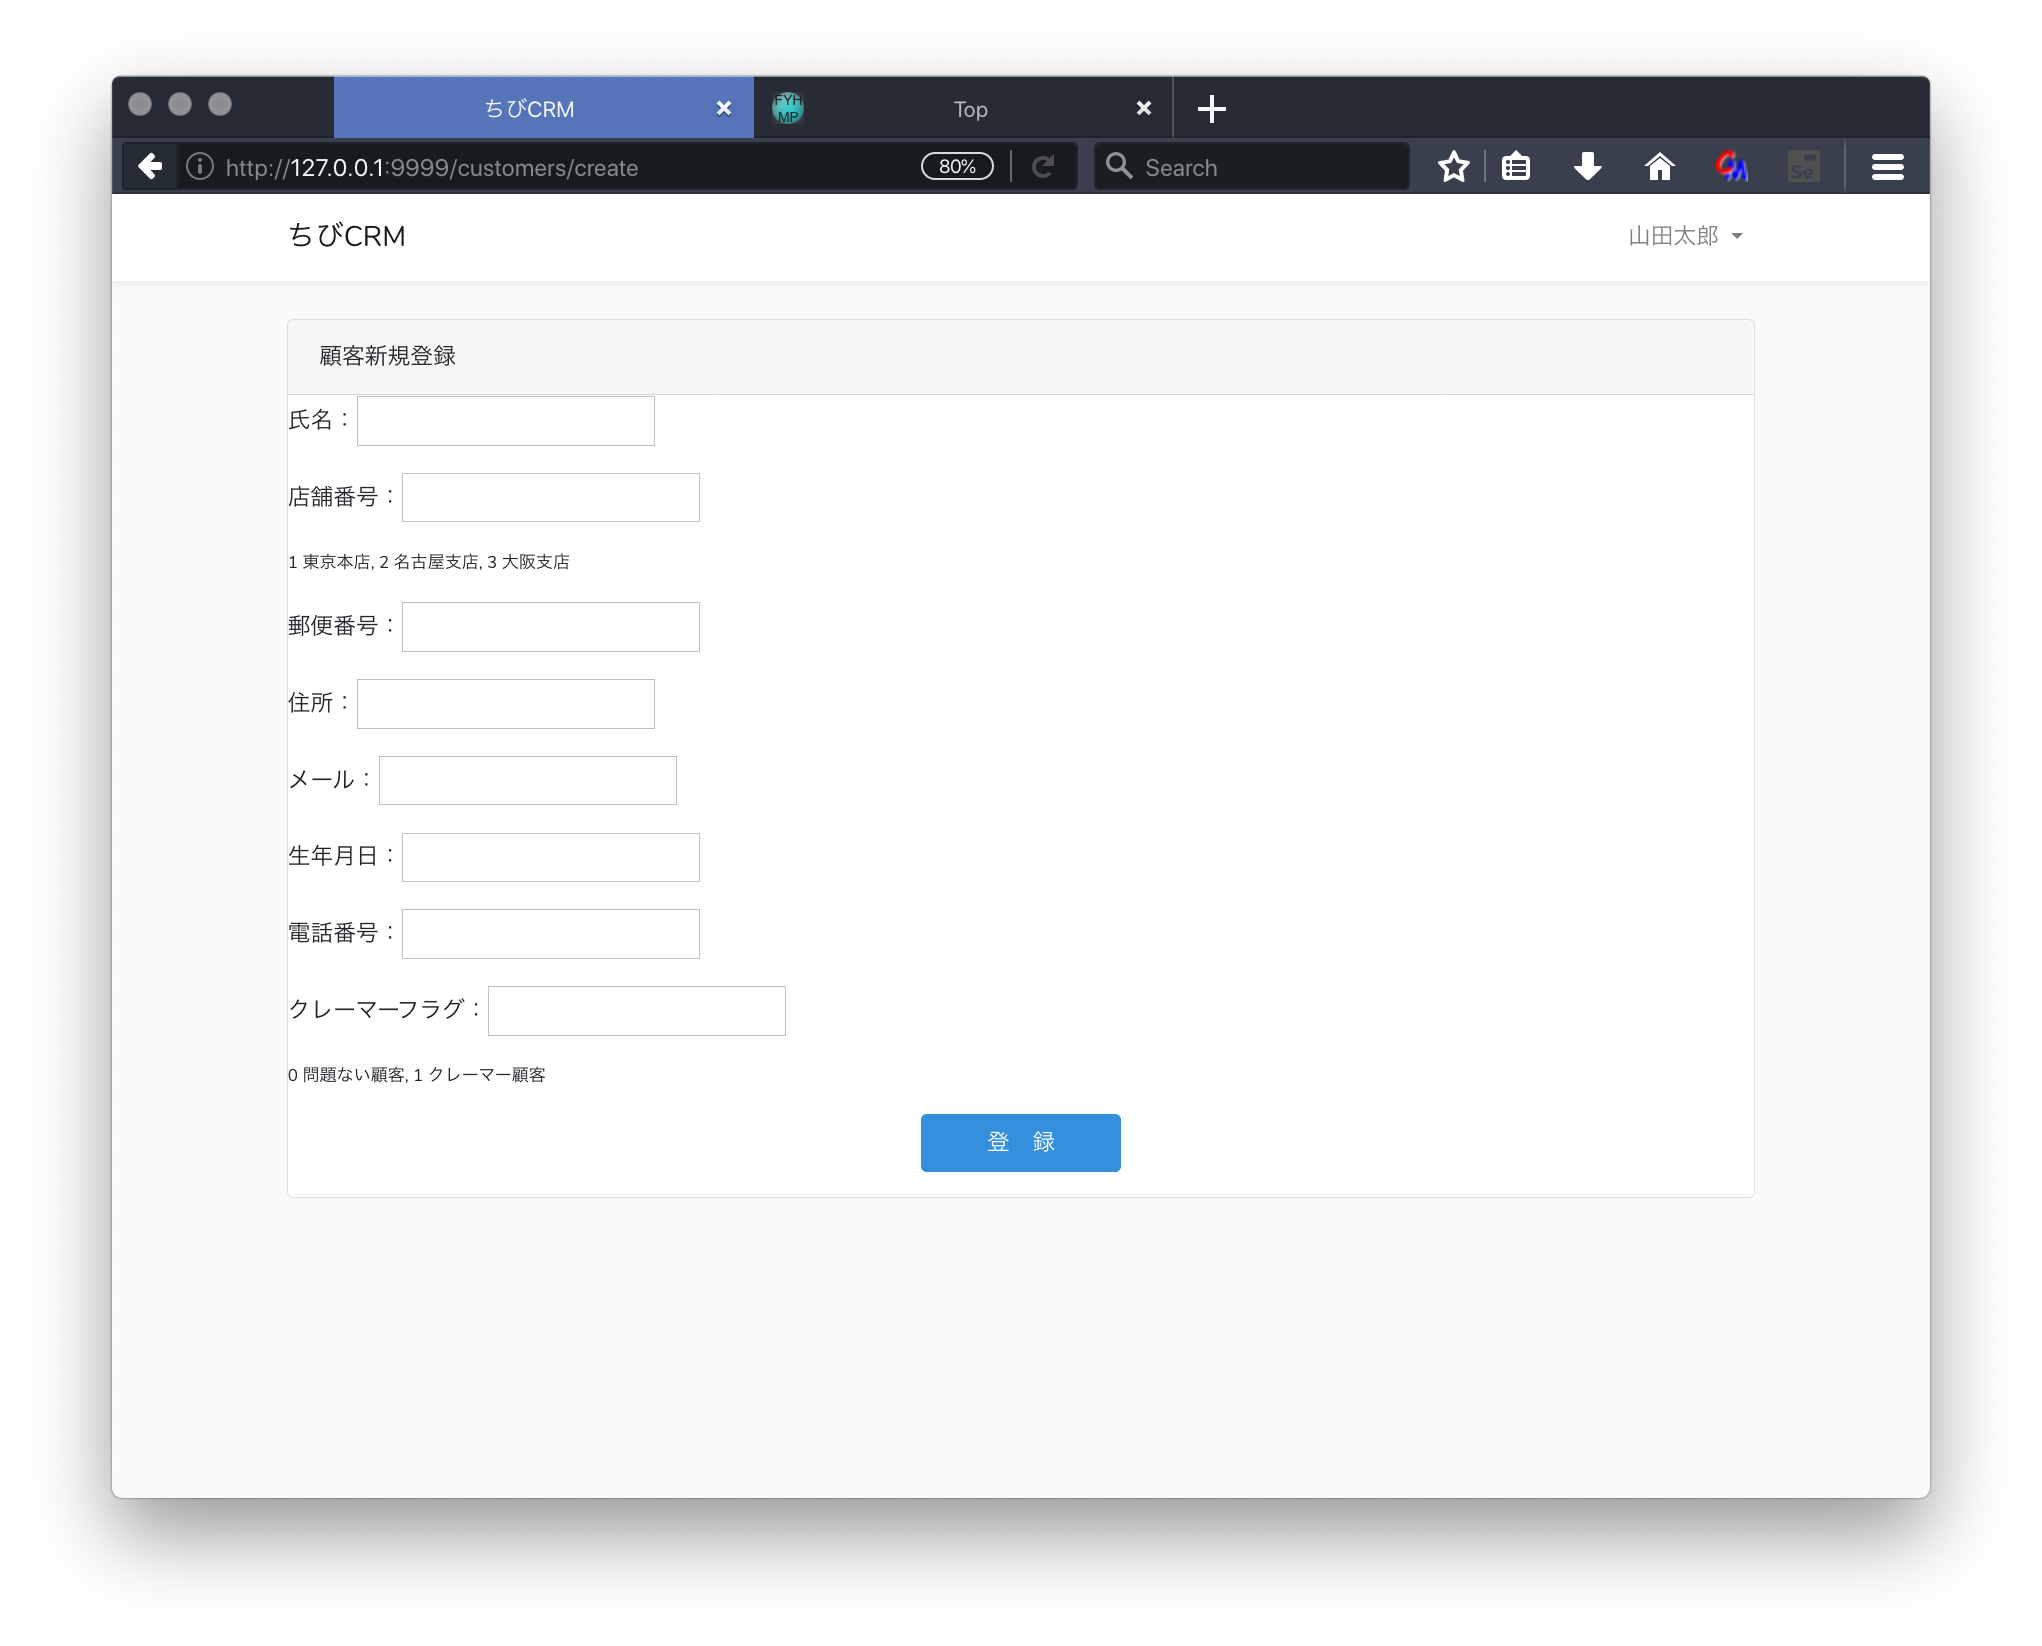
customers/create.blade.phpファイルを作成します。
@extends('layouts.app')
@section('content')
    <div class="container">
        <div class="row justify-content-center">
            <div class="col-md-12">
                <div class="card">
                    <div class="card-header">顧客新規登録</div>
                    <form action="/customers" method="POST">
                        @csrf
                        <p>氏名:<input type="text" name="name" value="{{ old('name') }}"></p>
                        <p>店舗番号:<input type="text" name="shop_id" value="{{ old('shop') }}"></p>
                        <p style="font-size: 0.75em">1 東京本店, 2 名古屋支店, 3 大阪支店</p>
                        <p>郵便番号:<input type="text" name="postal" value="{{ old('postal') }}"></p>
                        <p>住所:<input type="text" name="address" value="{{ old('address') }}"></p>
                        <p>メール:<input type="text" name="email" value="{{ old('email') }}"></p>
                        <p>生年月日:<input type="text" name="birthdate" value="{{ old('birthdate') }}"></p>
                        <p>電話番号:<input type="text" name="phone" value="{{ old('phone') }}"></p>
                        <p>クレーマーフラグ:<input type="text" name="kramer_flag" value="{{ old('kramer_flag') }}"></p>
                        <p style="font-size: 0.75em">0 問題ない顧客, 1 クレーマー顧客</p>
                        <p style="text-align: center"><button class="btn btn-primary" type="submit">  登 録  </button></p>
                    </form>

                </div>
            </div>
        </div>
    </div>
@endsection
ブラウザで確認
ダッシュボード画面から 顧客新規登録 リンクをクリックして 顧客新規登録画面に遷移します。
顧客情報データベース登録の処理
顧客新規登録画面に顧客情報を入力して、登録を行えるようにします。
create.blade.phpを確認。
<form action="/customers" method="POST">
顧客情報を入力して登録ボタンをクリックするとこのフォームのactionに定義されている
customersのパスにPOSTメソッドでリクエストが送られます。このときに入力された顧客情報が一緒の送られます。
@csrf に関して
create.blade.phpには @csrf という記述があります。これはセキュリティ対策のためにあるものです。LaravelでフォームをPOSTで送信するときに @csrf を入れないとエラーになってしまいます。
CustomController storeメソッド
CustomerControllerのstoreメソッドを以下のように記述します。
    /**
     * Store a newly created resource in storage.
     *
     * @param  \Illuminate\Http\Request  $request
     * @return \Illuminate\Http\Response
     */
    public function store(Request $request)
    {
        $attribute = request()->validate([
        'name' => ['required', 'min:3', 'max:32'],
            'shop_id' => ['required', 'Numeric', 'Between:1,3'],
            'postal' => ['required',],
            'address' => ['required',],
            'email' => ['required', 'E-Mail'],
            'birthdate' => ['required', 'Date'],
            'phone' => ['required',],
            'kramer_flag' => ['required', 'Numeric', 'Between:0,1'],
        ]);
        $customer = Customer::create($attribute);
        return redirect('/customers');
    }
処理の説明
- request()->validate の部分
バリデーションは入力が正しいか確認する仕組みです。
バリデーション関数にバリデーションルールを連想配列として渡します。
バリデーションに失敗すると新規顧客画面に戻ります。 - store(Request $request)
ストア関数 ユーザーが入力した情報の入っている Requestを受けます。 - $customer = Customer::create($attribute);
顧客情報をデータベースに新規登録します。 - return redirect('/customers');
顧客一覧画面に遷移します。
実際に登録してみる
顧客新規登録リンクをクリックして
一覧画面に表示されることを確認
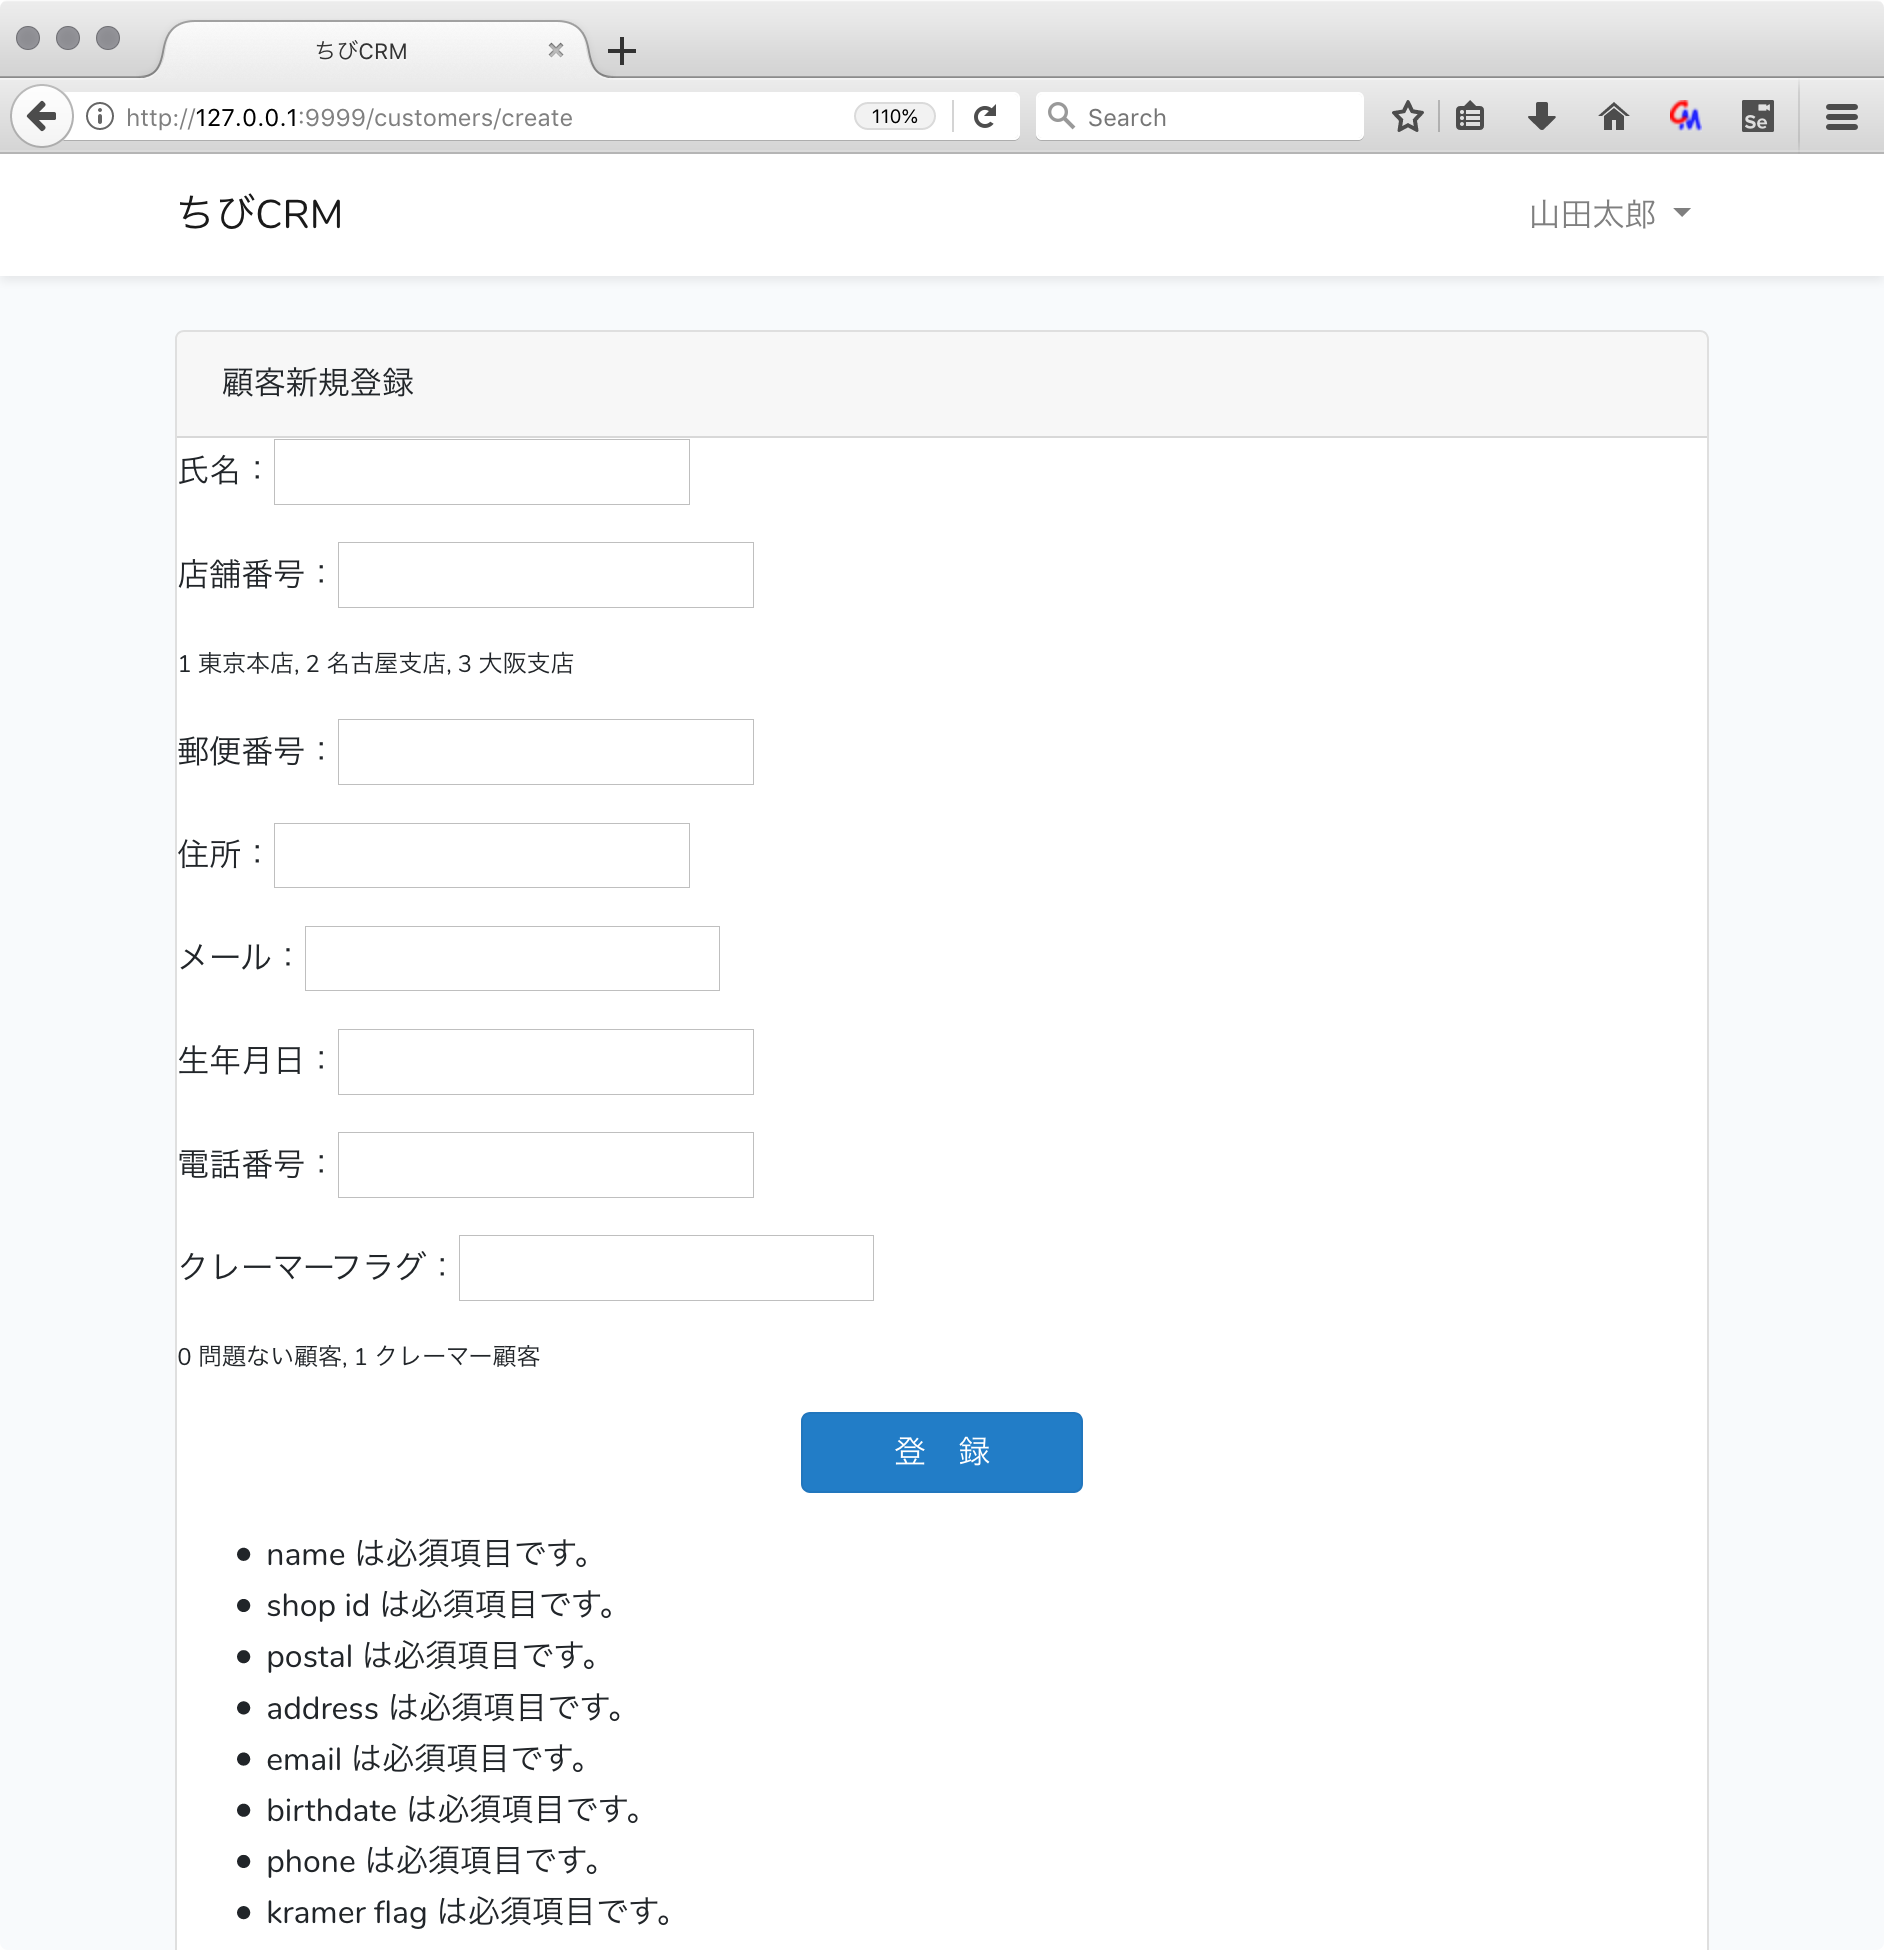
エラー処理を追加
必須項目が入力されなかった場合に、エラーにして登録中止して、エラー表示をさせます。
コントローラのvalidateの部分で自動的にバリデーション処理が動作するので、バリデーションエラーで返ってきた場合のエラーメッセージを表示する処理をbladeに記述します。
エディタで create.blade.phpを開いてエラー表示を追記します。
@extends('layouts.app')
@section('content')
    <div class="container">
        <div class="row justify-content-center">
            <div class="col-md-12">
                <div class="card">
                    <div class="card-header">顧客新規登録</div>
                    <form action="/customers" method="POST">
                        @csrf
                        <p>氏名:<input type="text" name="name" value="{{ old('name') }}"></p>
                        <p>店舗番号:<input type="text" name="shop_id" value="{{ old('shop') }}"></p>
                        <p style="font-size: 0.75em">1 東京本店, 2 名古屋支店, 3 大阪支店</p>
                        <p>郵便番号:<input type="text" name="postal" value="{{ old('postal') }}"></p>
                        <p>住所:<input type="text" name="address" value="{{ old('address') }}"></p>
                        <p>メール:<input type="text" name="email" value="{{ old('email') }}"></p>
                        <p>生年月日:<input type="text" name="birthdate" value="{{ old('birthdate') }}"></p>
                        <p>電話番号:<input type="text" name="phone" value="{{ old('phone') }}"></p>
                        <p>クレーマーフラグ:<input type="text" name="kramer_flag" value="{{ old('kramer_flag') }}"></p>
                        <p style="font-size: 0.75em">0 問題ない顧客, 1 クレーマー顧客</p>
                        <p style="text-align: center"><button class="btn btn-primary" type="submit">  登 録  </button></p>
                    </form>

                    {{-- エラーを表示--}}
                    @if( $errors->any() )
                        <ul>
                            @foreach($errors->all() as $error)
                                <li>{{$error}}</li>
                            @endforeach
                        </ul>
                    @endif

                </div>
            </div>
        </div>
    </div>
@endsection
ブラウザで確認
登録画面でなにも入力しないで登録ボタンをクリック。
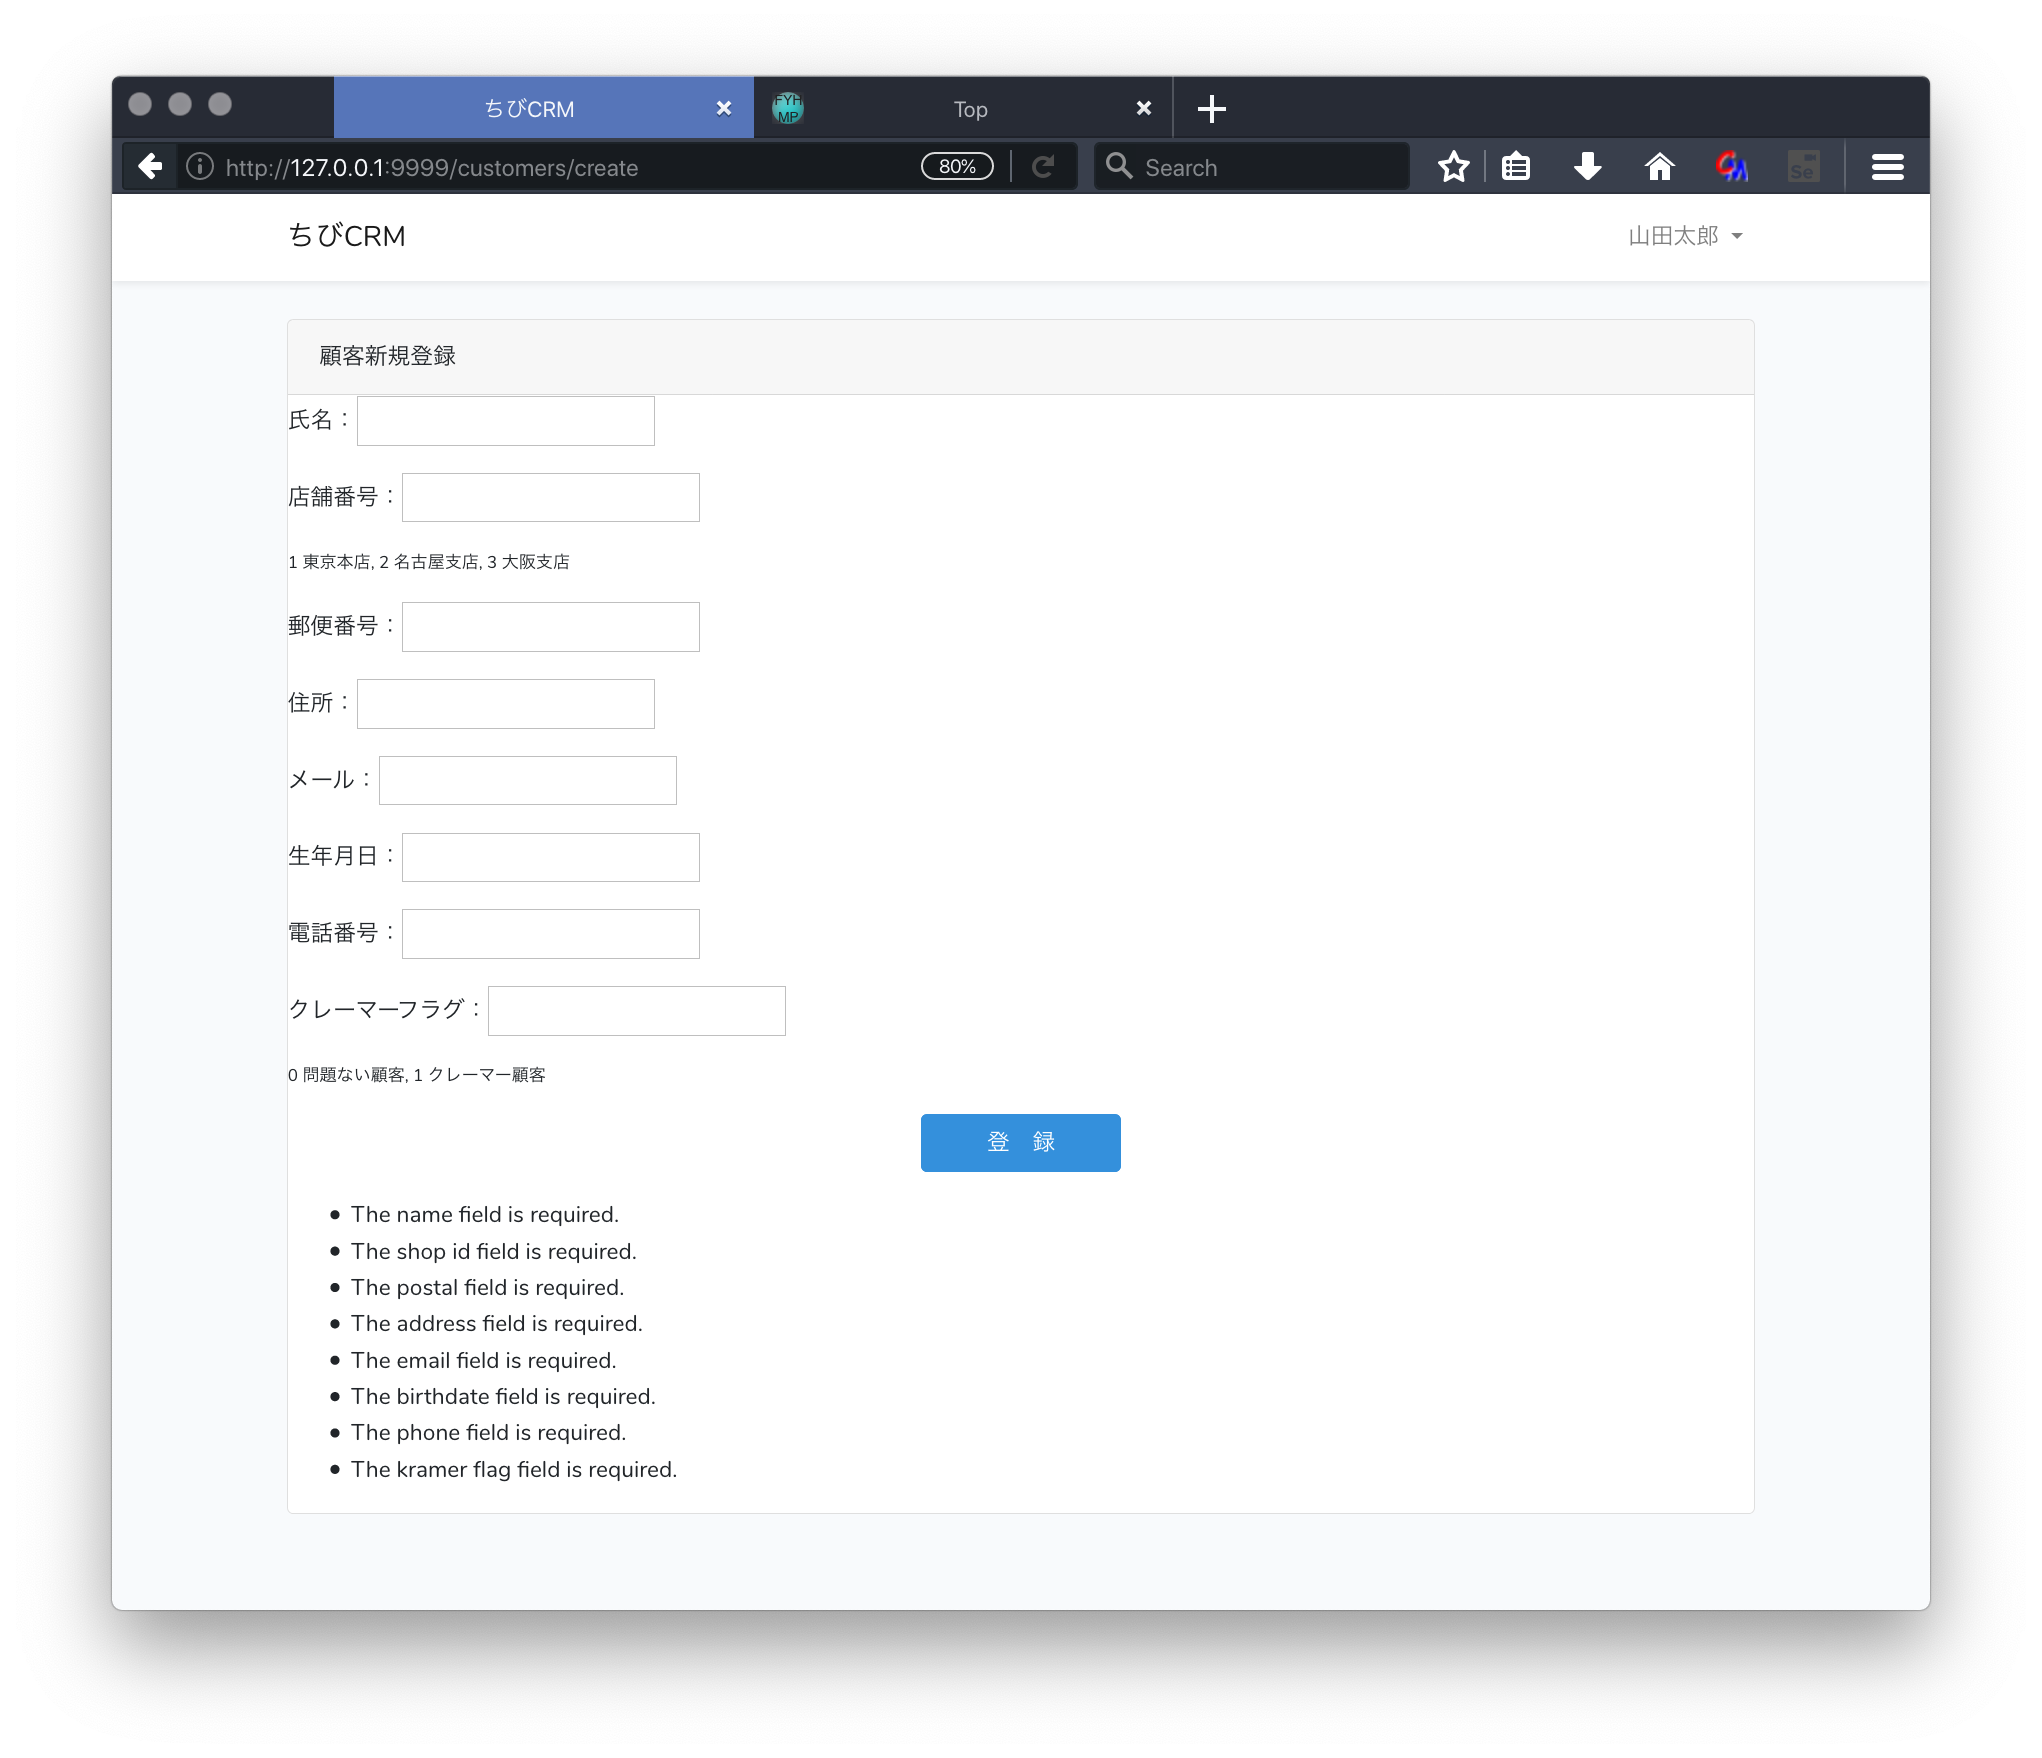
エラーメッセージが表示される。
エラーメッセージは英語で表示される。(日本語にする方法もありますが今回は説明しません。)
クレーマーが登録されたらスーパーバイザーにメールを送る
クレーマーが登録されたらスーパーバイザーにメールを送るようにします。
Laravelの Mail, Evnet, Listener の機能を使います。
メール KramerInComming
以下のコマンドを実行
php artisan make:mail KramerInComming --markdown="kramer-in-comming"
KramerInComming Mailableクラスを作成します。
app/Mail/KramerInComming.php が作られます。
コンストラクタを変更して kramer オブジェクトを保存するようにします。
app/Mail/KramerInComming.phpファイルをテキストエディタで開きます。
デフォルトで以下のようなファイルが作成されています。
<?php

namespace App\Mail;

use Illuminate\Bus\Queueable;
use Illuminate\Contracts\Queue\ShouldQueue;
use Illuminate\Mail\Mailable;
use Illuminate\Queue\SerializesModels;

class KramerInComming extends Mailable
{
    use Queueable, SerializesModels;

    /**
     * Create a new message instance.
     *
     * @return void
     */
    public function __construct()
    {
        //
    }

    /**
     * Build the message.
     *
     * @return $this
     */
    public function build()
    {
        return $this->markdown('kramer-in-comming');
    }
}
app/Mail/KramerInComming.phpを以下のように記述します。
<?php

namespace App\Mail;

use Illuminate\Bus\Queueable;
use Illuminate\Mail\Mailable;
use Illuminate\Queue\SerializesModels;

class KramerInComming extends Mailable
{
    use Queueable, SerializesModels;
    /**
     * @var \App\Models\Customer
     */
    public $kramer;

    /**
     * Create a new message instance.
     *
     * @return void
     */
    public function __construct(\App\Models\Customer $kramer)
    {
        $this->kramer = $kramer;
    }

    /**
     * Build the message.
     *
     * @return $this
     */
    public function build()
    {
        return $this->markdown('kramer-in-comming');
    }
}
artisan コマンドで markdown オプションを指定したので メール本文のテンプレートファイル kramer-in-comming.blade.phpが resources/views/kramer-in-comming.blade.phpに作られます。
resources/views/kramer-in-comming.blade.php をテキストエディタで開いて
以下の様に変更します。
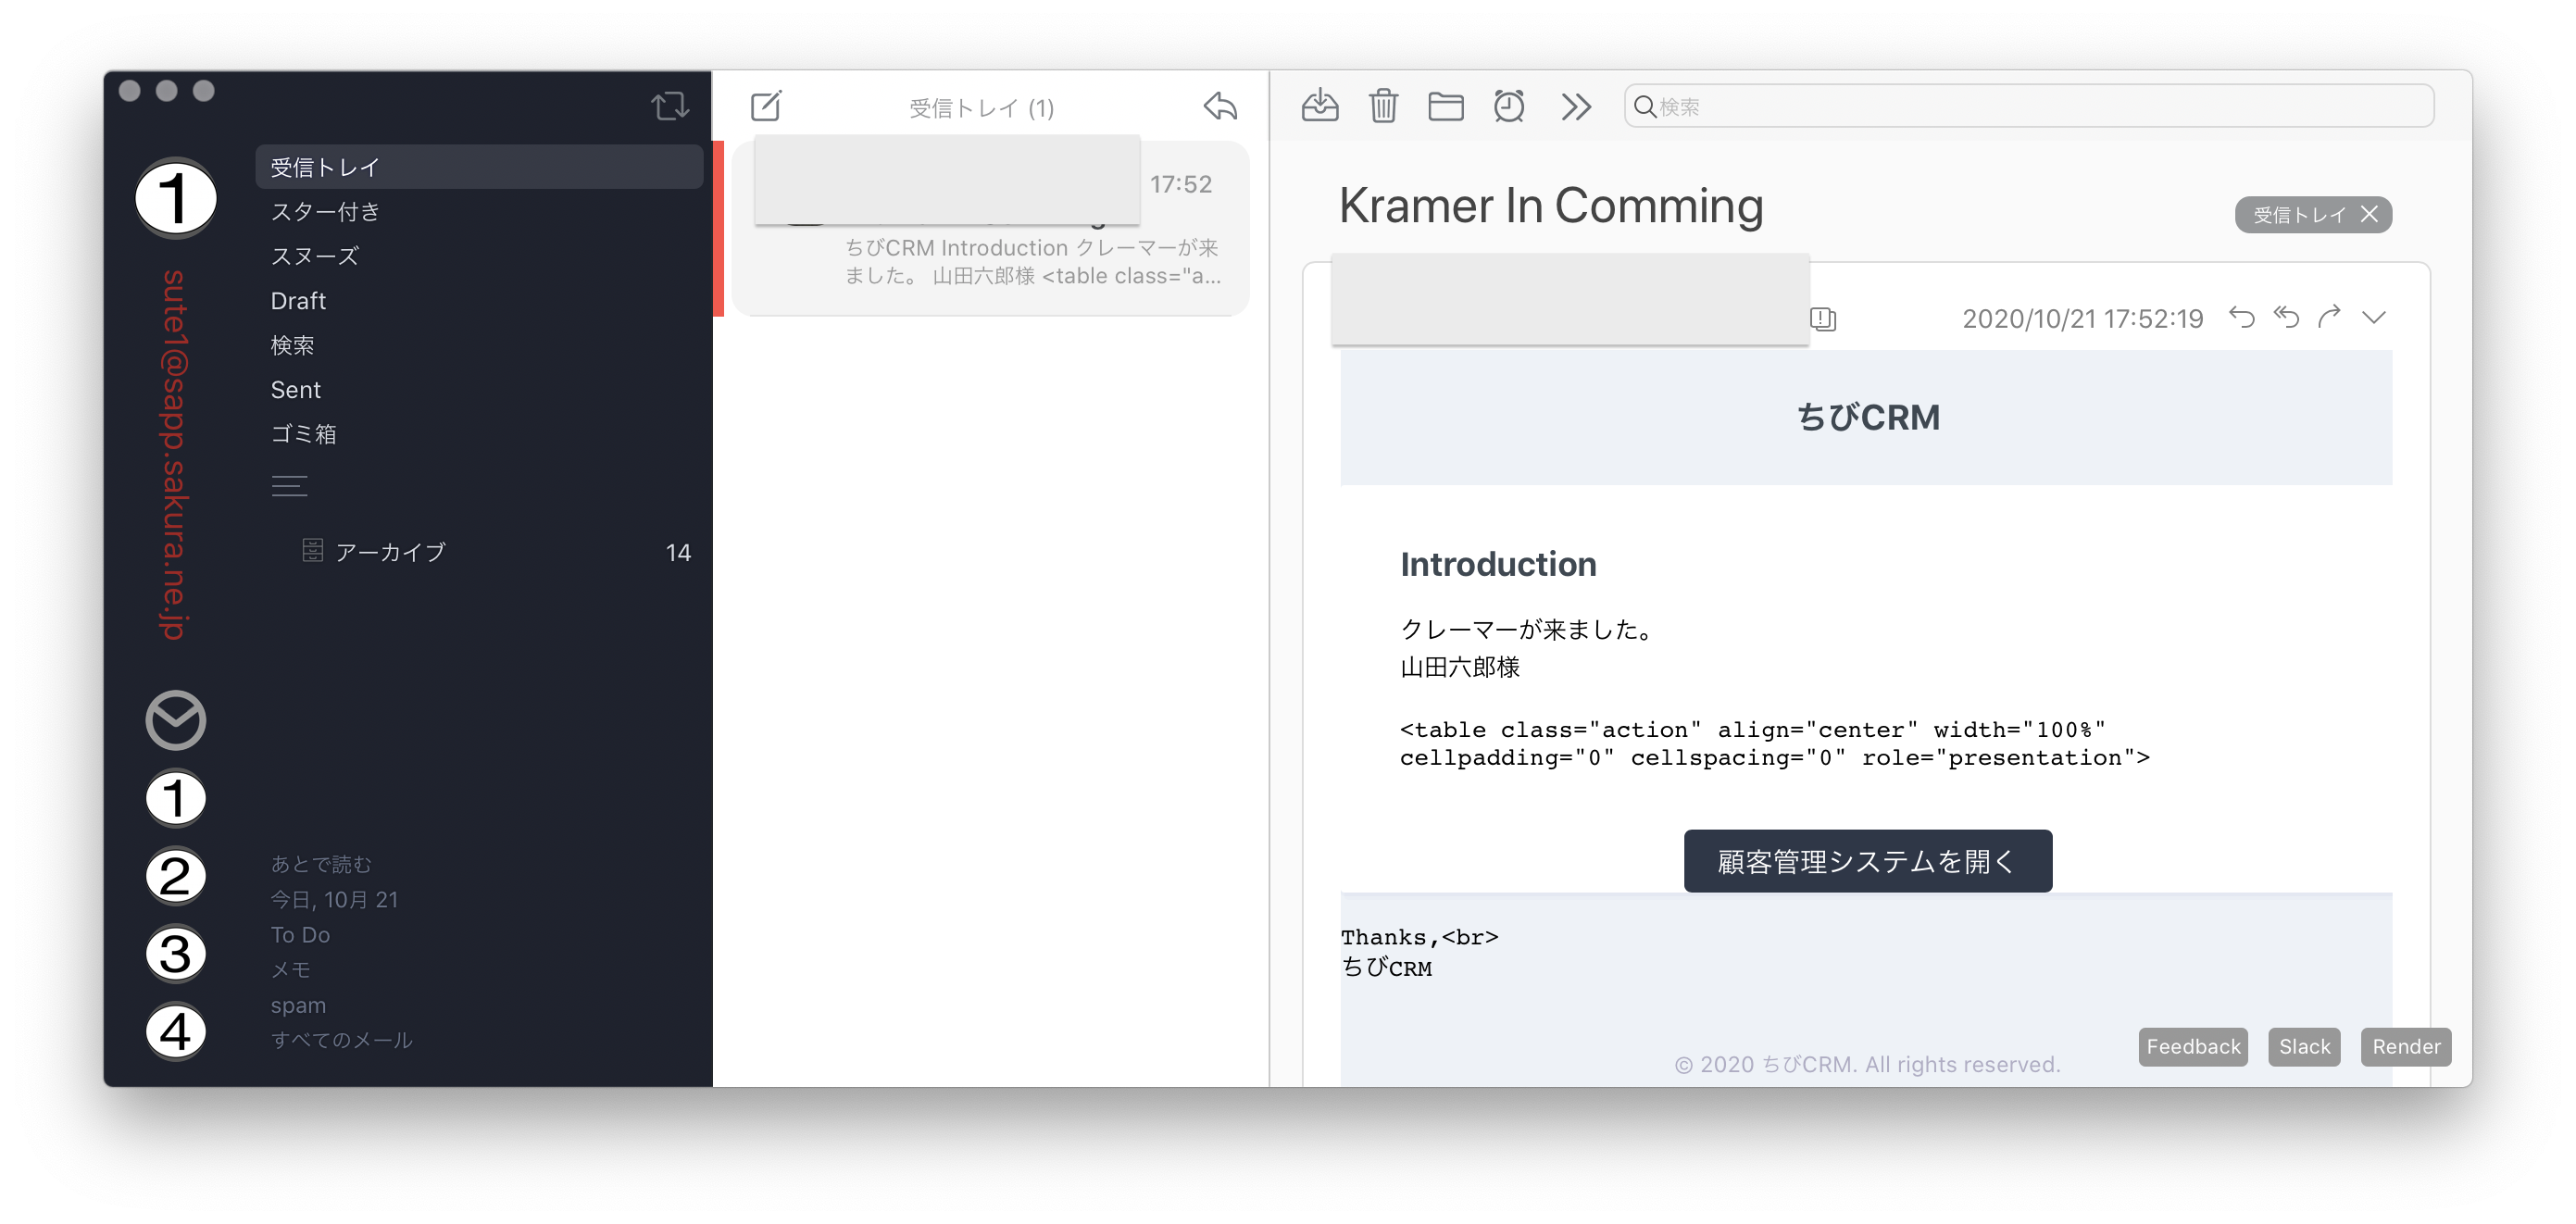
@component('mail::message')
# Introduction

クレーマーが来ました。
{{ $kramer->name }}様

@component('mail::button', ['url' => ''])
顧客管理システムを開く
@endcomponent

Thanks,<br>
{{ config('app.name') }}
@endcomponent
イベント KramerInComming
KramerInCommingイベントを作成します。(クレーマーが来たぞイベント)
以下のコマンドを実行
php artisan make:event KramerInComming
KramerInComming イベントを作成します。
app/Events/KramerInComming.php ファイルが作られます。
コンストラクタを変更して kramer オブジェクトを保存するようにします。
app/Events/KramerInComming.phpをエディタで開いて以下の様に変更します
<?php

namespace App\Events;

use Illuminate\Broadcasting\Channel;
use Illuminate\Broadcasting\InteractsWithSockets;
use Illuminate\Broadcasting\PresenceChannel;
use Illuminate\Broadcasting\PrivateChannel;
use Illuminate\Contracts\Broadcasting\ShouldBroadcast;
use Illuminate\Foundation\Events\Dispatchable;
use Illuminate\Queue\SerializesModels;

class KramerInComming
{
    use Dispatchable, InteractsWithSockets, SerializesModels;

    /**
     * @var \App\Models\Customer
     */
    public $kramer;

    /**
     * Create a new event instance.
     *
     * @return void
     */
    public function __construct(\App\Models\Customer $kramer)
    {
        $this->kramer = $kramer;
    }

    /**
     * Get the channels the event should broadcast on.
     *
     * @return \Illuminate\Broadcasting\Channel|array
     */
    public function broadcastOn()
    {
        return new PrivateChannel('channel-name');
    }
}
- Customer.php dispatchesEvents に KramerInCommingイベントを追加します。
app/Models/Customer.phpをテキストエディタで開いて以下の記述を追加。
<?php

namespace App\Models;

use Illuminate\Database\Eloquent\Factories\HasFactory;
use Illuminate\Database\Eloquent\Model;

class Customer extends Model
{
    use HasFactory;
    protected $guarded = [];

    protected $dispatchesEvents = [
        'created' => \App\Events\KramerInComming::class,
    ];

    public function shop()
    {
        return $this->belongsTo(Shop::class);
    }

    public function customerLogs()
    {
        return $this->hasMany(CustomerLog::class);
    }
}
リスナー SendKramerInCommingNotification
イベントを受け取るリスナーを作成します。
以下のコマンドを実行して SendKramerInCommingNotification リスナーを作成します。
php artisan make:listener SendKramerInCommingNotification --event=KramerInComming
app/Listeners/SendKramerInCommingNotification.php が作られます。
app/Listeners/SendKramerInCommingNotification.phpをテキストエディタで開いて、
handle()関数内に処理を書きます
<?php

namespace App\Listeners;

use App\Events\KramerInComming;
use Illuminate\Contracts\Queue\ShouldQueue;
use Illuminate\Queue\InteractsWithQueue;
use Illuminate\Support\Facades\Mail;

class SendKramerInCommingNotification
{
    /**
     * Create the event listener.
     *
     * @return void
     */
    public function __construct()
    {
        //
    }

    /**
     * Handle the event.
     *
     * @param KramerInComming $event
     * @return void
     */
    public function handle(KramerInComming $event)
    {
        // クレーマーなら通知を発送 。クレーマー確定前に クレーマー変数にカスタマーを入れているのはなんか変だなぁ。
        if ($event->kramer->isKramer()) {
            foreach (\App\Models\User::enumSupserVisor() as $superVisor) {
                Mail::to($superVisor->email)->send(new \App\Mail\KramerInComming($event->kramer));
                //Mail::to($superVisor->email)->send(\App\Mail\KramerInComming($event->kramer));
            }
        }
    }
}
EventServiceProvider.php に listen に追加します。
app/Providers/EventServiceProvider.phpをエディタで開いて $listen に SendKramerInCommingNotification を追記します。
<?php

namespace App\Providers;

use Illuminate\Auth\Events\Registered;
use Illuminate\Auth\Listeners\SendEmailVerificationNotification;
use Illuminate\Foundation\Support\Providers\EventServiceProvider as ServiceProvider;
use Illuminate\Support\Facades\Event;

class EventServiceProvider extends ServiceProvider
{
    /**
     * The event listener mappings for the application.
     *
     * @var array
     */
    protected $listen = [
        Registered::class => [
            SendEmailVerificationNotification::class,
        ],
        \App\Events\KramerInComming::class => [
            \App\Listeners\SendKramerInCommingNotification::class
        ],
    ];

    /**
     * Register any events for your application.
     *
     * @return void
     */
    public function boot()
    {
        //
    }
}
Customerクラスにクレーマー判断処理を追加
app/Models/Customer.phpをエディタで開いて以下のように記述
<?php

namespace App\Models;

use Illuminate\Database\Eloquent\Factories\HasFactory;
use Illuminate\Database\Eloquent\Model;

class Customer extends Model
{
    const KRAMER_FLAG_ON = 1;

    use HasFactory;
    protected $guarded = [];

    protected $dispatchesEvents = [
        'created' => \App\Events\KramerInComming::class,
    ];

    public function shop()
    {
        return $this->belongsTo(Shop::class);
    }

    public function customerLogs()
    {
        return $this->hasMany(CustomerLog::class);
    }

    public function isKramer(): bool
    {
        return $this->kramer_flag == Customer::KRAMER_FLAG_ON;
    }

}
これで新規顧客登録時に クレーマーフラグ 1 が登録されたら、クレーマーが来たとして スーパーバイザーに 通知メールが送られます。
ブラウザでクレーマーを登録して確認
クレーマーフラグを1にして登録
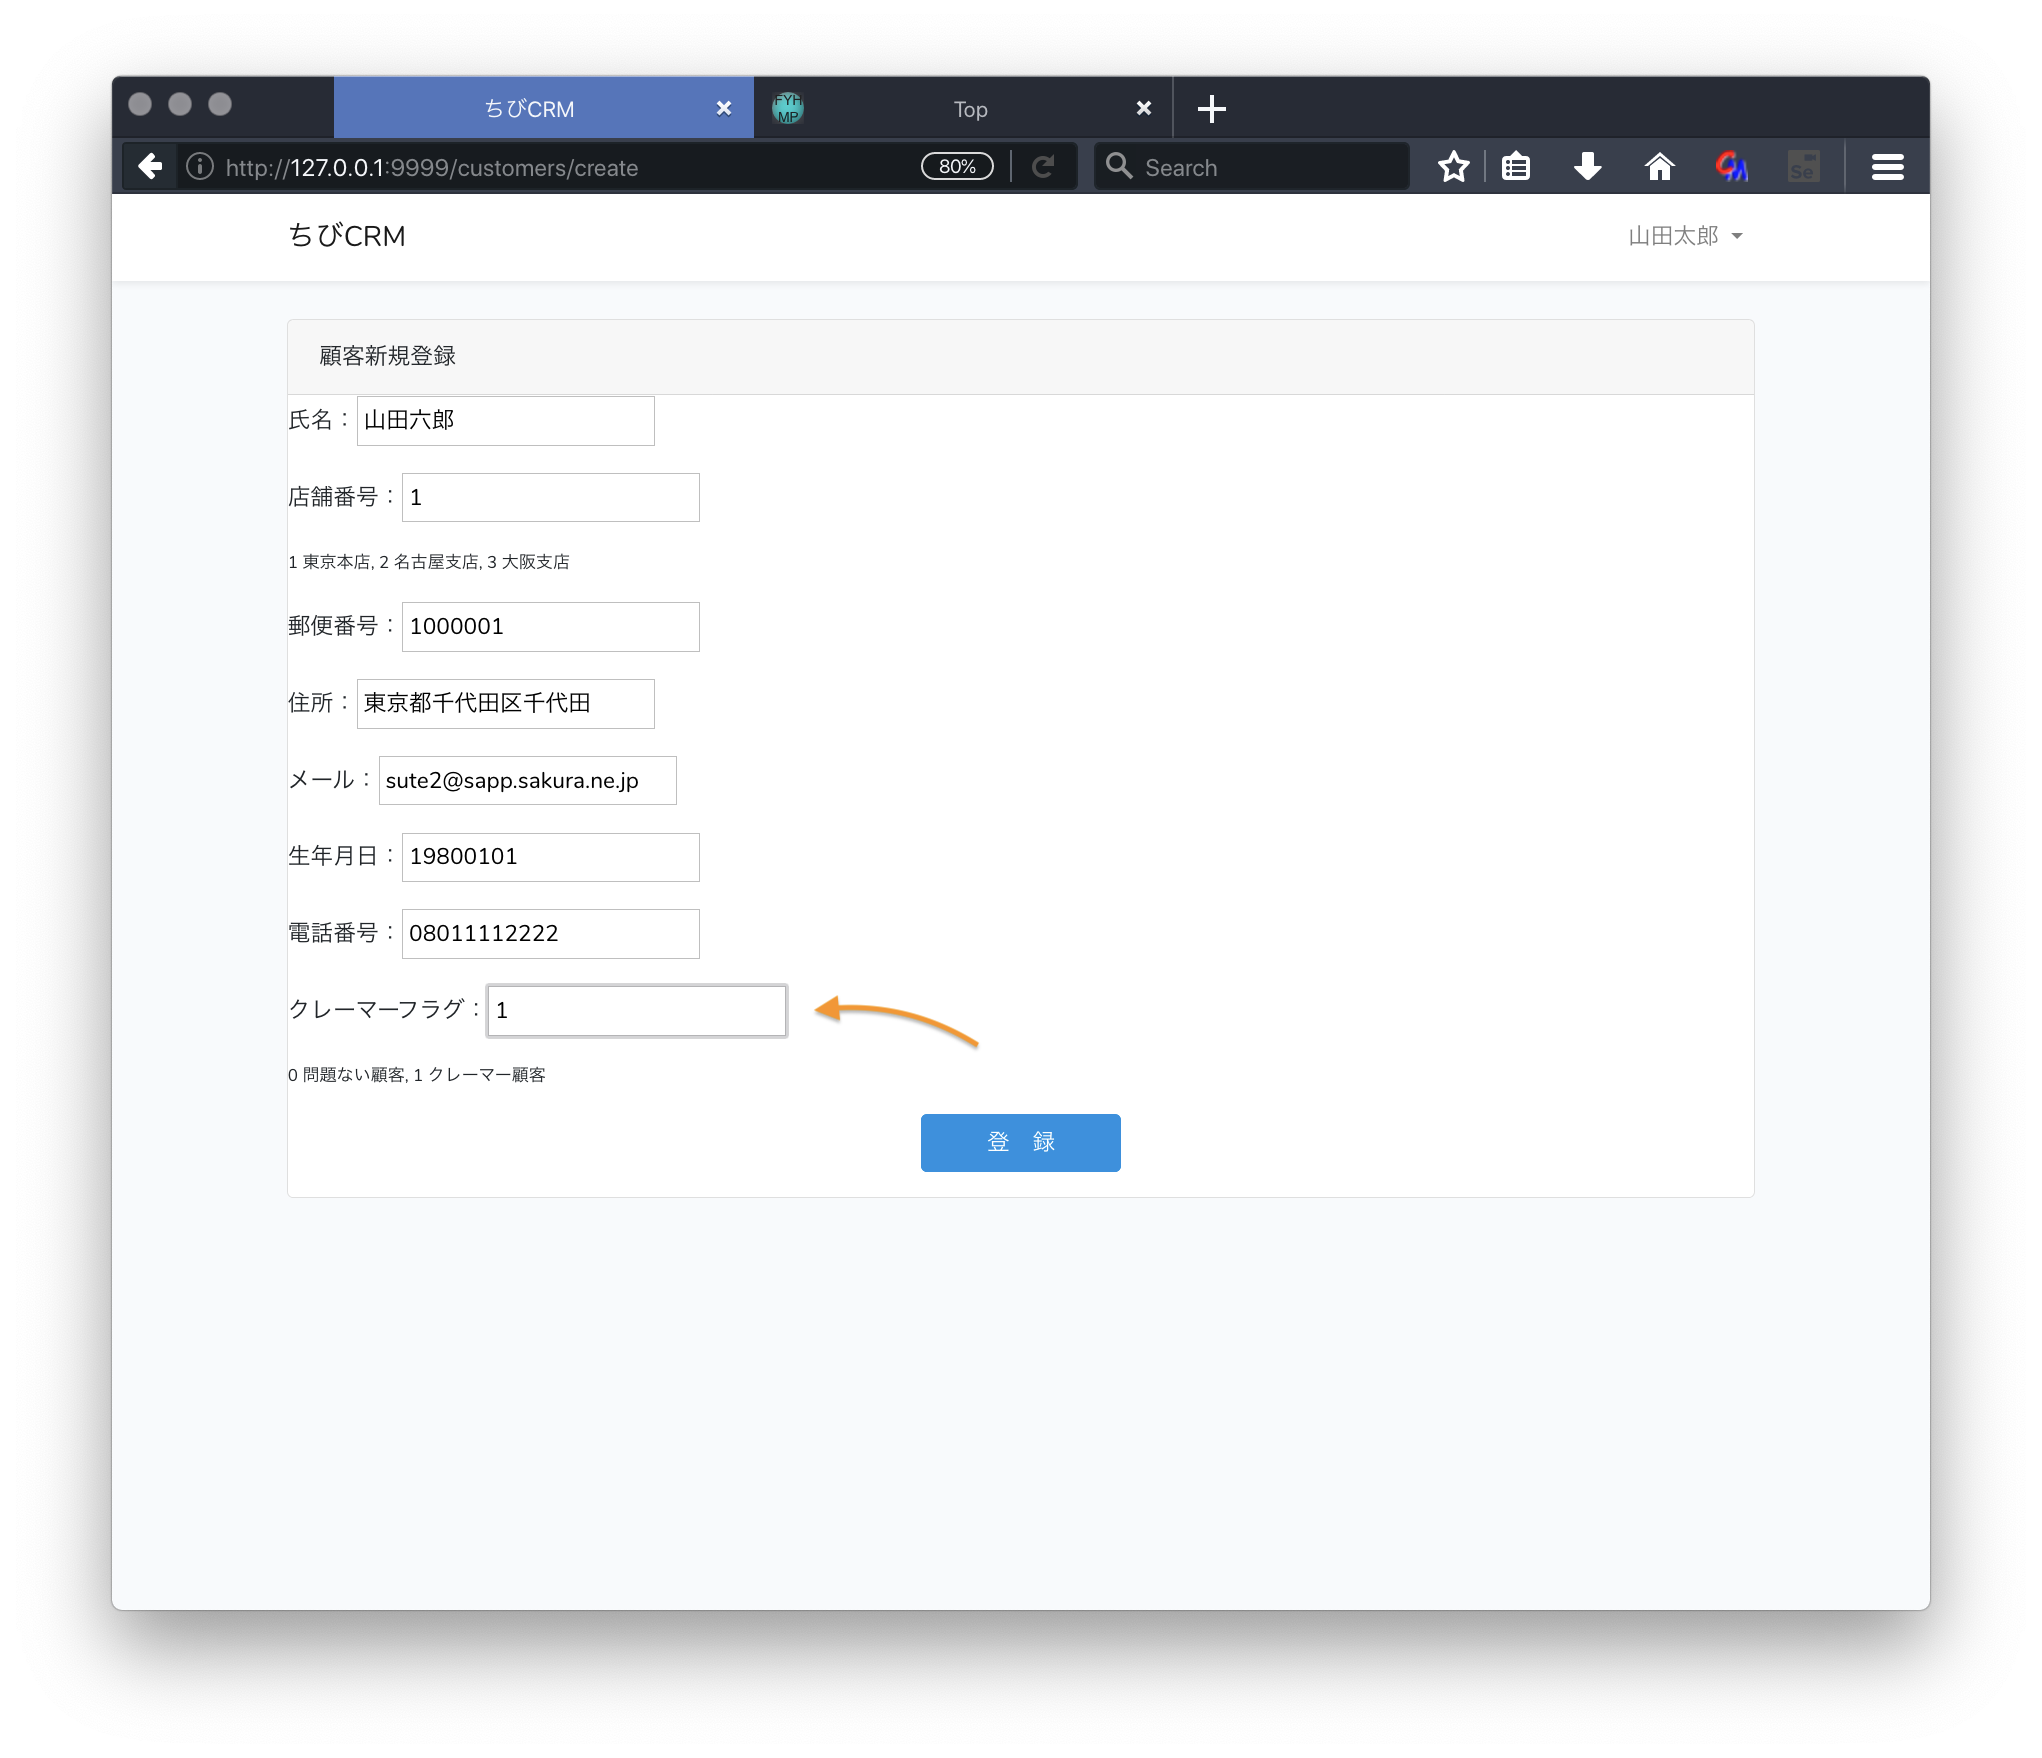
メールtが届くことを確認
顧客検索
MyApplicationService
顧客検索のController, Viewに入る前に、今回はアプリケーション全体で使う MyApplicationService を作成します。
このクラスはMVCのモデルに相当します。
ビジネスロジックを記述します。
先にユニットテストを作る(ここだけTDDっぽいな)
tests/Unit/MyApplicationServiceTest.php
<?php

namespace App\MyServices;


use Illuminate\Foundation\Testing\DatabaseTransactions;
use Illuminate\Support\Facades\App;
use Tests\TestCase;

class MyApplicationServiceTest extends TestCase
{
    use DatabaseTransactions;

    /** @test */
    public function get_birth_day_range()
    {
        $apService = App::make('myapplicationservice');

        try {
            $num = $apService->getBirthdayRange(1, strtotime('1940-1-1'));
            $this->assertTrue(false);
        } catch (\Exception $e) {
            $this->assertSame($e->getCode(), MyApplicationService::ERROR_CODE_WRONG_START_TIMESTAMP);
        }

        // 1970年境界値チェック
        try {
            $num = $apService->getBirthdayRange(1, strtotime('1969-12-31'));
            $this->assertTrue(false);
        } catch (\Exception $e) {
            $this->assertSame($e->getCode(), MyApplicationService::ERROR_CODE_WRONG_START_TIMESTAMP);
        }

        // 1970年境界値チェック
        try {
            $num = $apService->getBirthdayRange(1, strtotime('1970-1-1 8:59:59'));// Timezone JP
            $this->assertTrue(false);
        } catch (\Exception $e) {
            $this->assertSame($e->getCode(), MyApplicationService::ERROR_CODE_WRONG_START_TIMESTAMP);
        }

        // 1970年境界値チェック
        $num = $apService->getBirthdayRange(1, strtotime('1970-1-1 09:00'));
        $this->assertNotEmpty($num);

        // 1歳
        $num = $apService->getBirthdayRange(1);
        $this->assertNotEmpty($num);
        $num = $apService->getBirthdayRange(1, time());
        $this->assertNotEmpty($num);


        // 40歳
        $num = $apService->getBirthdayRange(10);
        $this->assertNotEmpty($num);
        $num = $apService->getBirthdayRange(10, strtotime('1980-1-1'));
        $this->assertSame(['start' => '1969-01-02', 'end' => '1970-01-01'], $num);

    }
}
MyApplicationServiceを作る
./app/MyServices ディレクトリを作成し
このディレクトリの中に MyApplicationService.php ファイルを作成します。
./app/MyServices/MyApplicationService.php
<?php


namespace App\MyServices;


class MyApplicationService
{
    const ERROR_CODE_WRONG_START_TIMESTAMP = 1992;

    /**
     * 年齢を指定して 誕生日の始まりの日と終わりの日を返す
     * @param int $age 年齢を指定
     * @param int $targetTimestamp 対象タイムスタンプ。指定するとこの時刻を基準にして年齢を計算する。デフォルトはNULL
     * @return array 0に開始日、1に終了日が入る
     */
    function getBirthdayRange(int $age, int $targetTimestamp = null)
    {
        if ($targetTimestamp < 0) {
            throw new \Exception('基準日は1970年以降', self::ERROR_CODE_WRONG_START_TIMESTAMP);
        }
        $ts = $targetTimestamp;
        if (is_null(($targetTimestamp))) {
            $targetTimestamp = time();
        }
        $_ts_b = $targetTimestamp + 86400;

        $start = mktime(0, 0, 0, date('m', $_ts_b), date('d', $_ts_b), date('Y', $_ts_b) - $age - 1);
        $end = mktime(0, 0, 0, date('m', $targetTimestamp), date('d', $targetTimestamp), date('Y', $targetTimestamp) - $age);
        return ['start' => date('Y-m-d', $start), 'end' => date('Y-m-d', $end)];
    }

}
顧客検索画面のweb.phpを確認
routes/web.php の以下の部分が
Route::get('customer_search', 'CustomerSearchController@index')->middleware('auth');
CustomerSearchControllerコントローラを呼ぶ定義になります。
顧客検索画面コントローラの作成
php artisan make:controller CustomerSearchController
を実行。app/Http/Controllers/CustomerSearchController.php が作られます。
<?php

namespace App\Http\Controllers;

use App\Customer;
use App\Http\Requests\CustomerSearchPost;
use App\MyServices\MyApplicationService;
use Illuminate\Http\Request;

class CustomerSearchController extends Controller
{
    protected $myApplicationService;

    public function __construct()
    {
        $this->myApplicationService = app()->make('myapplicationservice');
    }

    /**
     * 顧客を検索して表示する
     * @return \Illuminate\Http\Response
     */
    public function index(Request $request)
    {
        return view('customer_search');
    }

    public function search(CustomerSearchPost $request, MyApplicationService $myApplicationService)
    {
        $validated = $request->validated();
        $wheres = [];
        $search_criterias = [];

        // 氏名の指定は有るか
        if (!empty($validated['name'])) {
            array_push($wheres, ['name', '=', $validated['name']]);
            array_push($search_criterias, '氏名が' . $validated['name'] . 'に一致する');
        }
        // 年齢 from の指定は有るか
        if (!empty($validated['age_from'])) {
            $ages = $myApplicationService->getBirthdayRange(($validated['age_from']));
            array_push($wheres, ['birthdate', '<=', $ages['end']]);
        }

        // 年齢 to の指定は有るか
        if (!empty($validated['age_to'])) {
            $ages = $myApplicationService->getBirthdayRange(($validated['age_to']));
            array_push($wheres, ['birthdate', '>=', $ages['end']]);
        }

        $customers = Customer::where($wheres)->paginate();
        return view('customer_search', compact('customers', 'search_criterias', 'validated'));

    }

}
CustomerSearchPost の作成
今回は ユーザー入力のバリデーションを FormRequest クラスを使って行います。以下のartisan コマンドを実行して FormRequest クラスを生成します。
php artisan make:request CustomerSearchPost
./app/Http/Requests/CustomerSearchPost.php が作られます。
<?php

namespace App\Http\Requests;

use Illuminate\Foundation\Http\FormRequest;

class CustomerSearchPost extends FormRequest
{
    /**
     * Determine if the user is authorized to make this request.
     *
     * @return bool
     */
    public function authorize()
    {
        return true;
    }

    /**
     * Get the validation rules that apply to the request.
     *
     * @return array
     */
    public function rules()
    {
        return [
            'searchItems' => 'required_without_all:name,age_from,age_to',
            'name' => '',
            'age_from' => '',
            'age_to' => '',
        ];
    }

    public $attributes;

    public function attributes()
    {
        return [
            'name' => '氏名',
            'age_from' => '年齢から',
            'age_to' => '年齢まで',
        ];
    }
}
- rules にバリデーションのルールを書きます
- attributes関数で 項目名を日本語にします。エラーメッセージで使われます。
エラーメッセージをカスタマイズします
resources/lang/ja ディレクトリを作成し ここに resources/lang/en/validation.php ファイルをコピーします。
resources/lang/ja/validation.phpをエディタで開いてエラーメッセージをカスタマイズします。
'required_without_all' => ' :values のどれか一つは入力してください。',
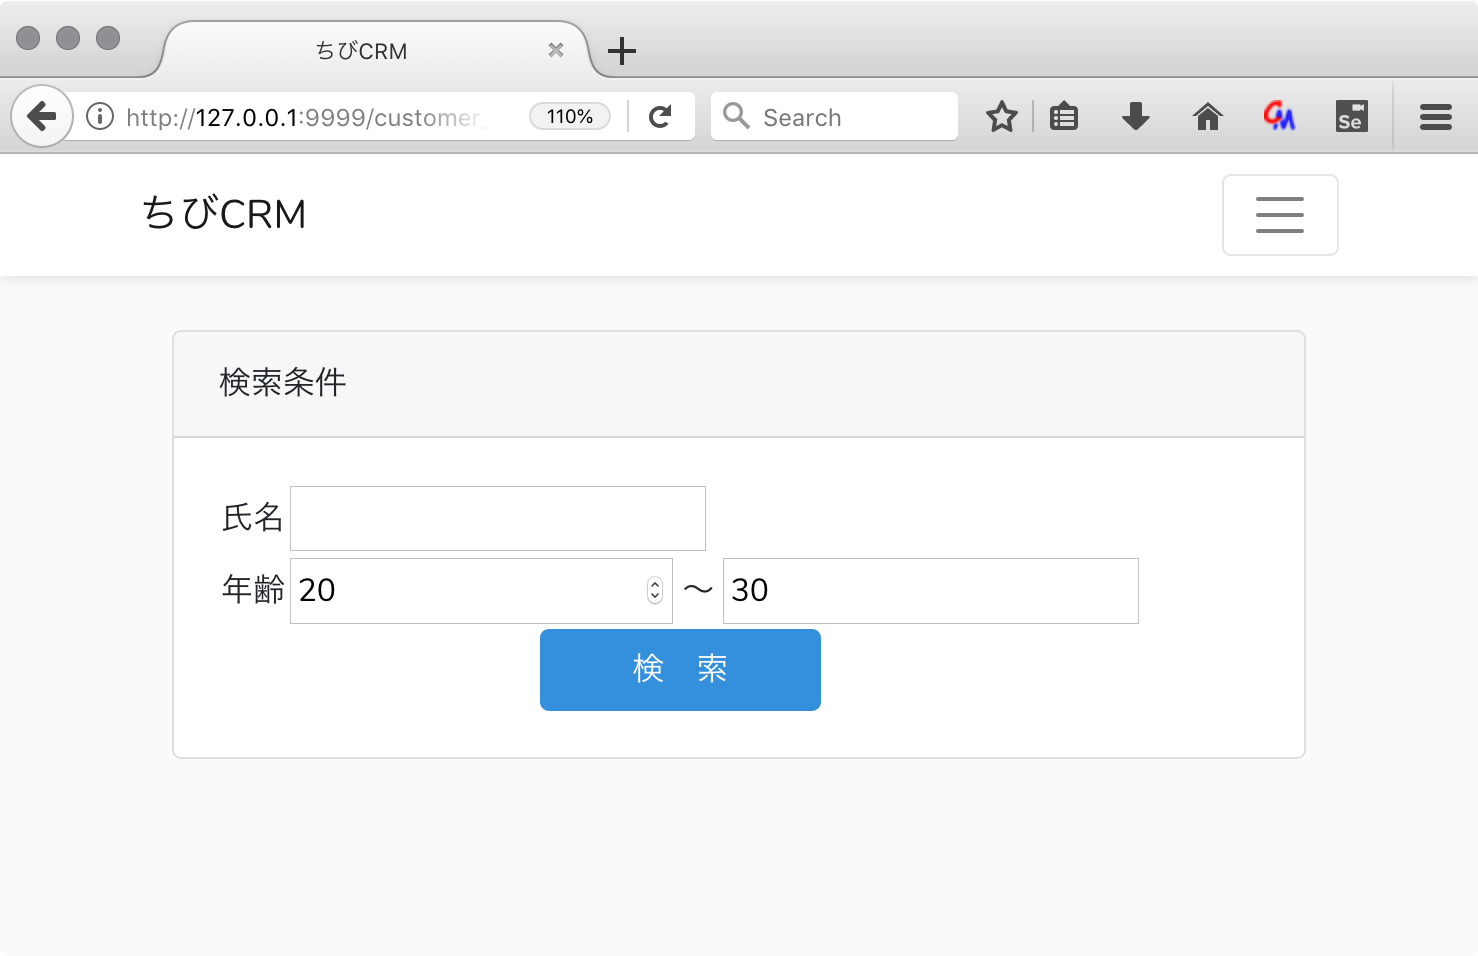
顧客検索画面のusers.blade.php
resources/views/customer_search.blade.php
@extends('layouts.app')

@section('content')
    <div class="container">
        <div class="row justify-content-center">
            <div class="col-md-12">
                <div class="card">
                    <div class="card-header">検索条件</div>
                    <div class="card-body">
                        <form action="/customer_search" method="POST">
                            @csrf
                            <table>
                                <tr>
                                    <td>氏名</td>
                                    <td>
                                        <input type="text" name="name"
                                               value="{{isset($validated['name'])?$validated['name']:''}}"
                                        />
                                    </td>
                                </tr>
                                <tr>
                                    <td>年齢</td>
                                    <td>
                                        <input type="number" min="0" max="999" name="age_from"
                                               value="{{isset($validated['age_from'])?$validated['age_from']:''}}"
                                        />
                                        〜
                                        <input type="text" min="0" max="999" name="age_to"
                                               value="{{isset($validated['age_to'])?$validated['age_to']:''}}"
                                        />
                                    </td>
                                </tr>
                                <tr>
                                    <td colspan="2" align="center">
                                        <button type="submit" class="btn btn-primary">  検 索  </button>
                                    </td>
                                </tr>
                            </table>
                        </form>
                        @include('errors')
                    </div>
                </div>
                <br/>
                @if(!empty($customers))
                    <div class="card">
                        <div class="card-header">
                            <p>検索結果</p>
                            <ul>
                                @foreach($search_criterias as $criteria)
                                    <li>{{$criteria}}</li>
                                @endforeach
                            </ul>
                        </div>
                        <div class="card-body">
                            <ul>
                                @foreach($customers as $customer)
                                    <li>
                                        <a href="/customers/{{$customer['id']}}">{{ $customer['name'] }}</a>
                                    </li>
                                @endforeach
                            </ul>
                        </div>
                    </div>
                @endif
            </div>
        </div>
    </div>
@endsection
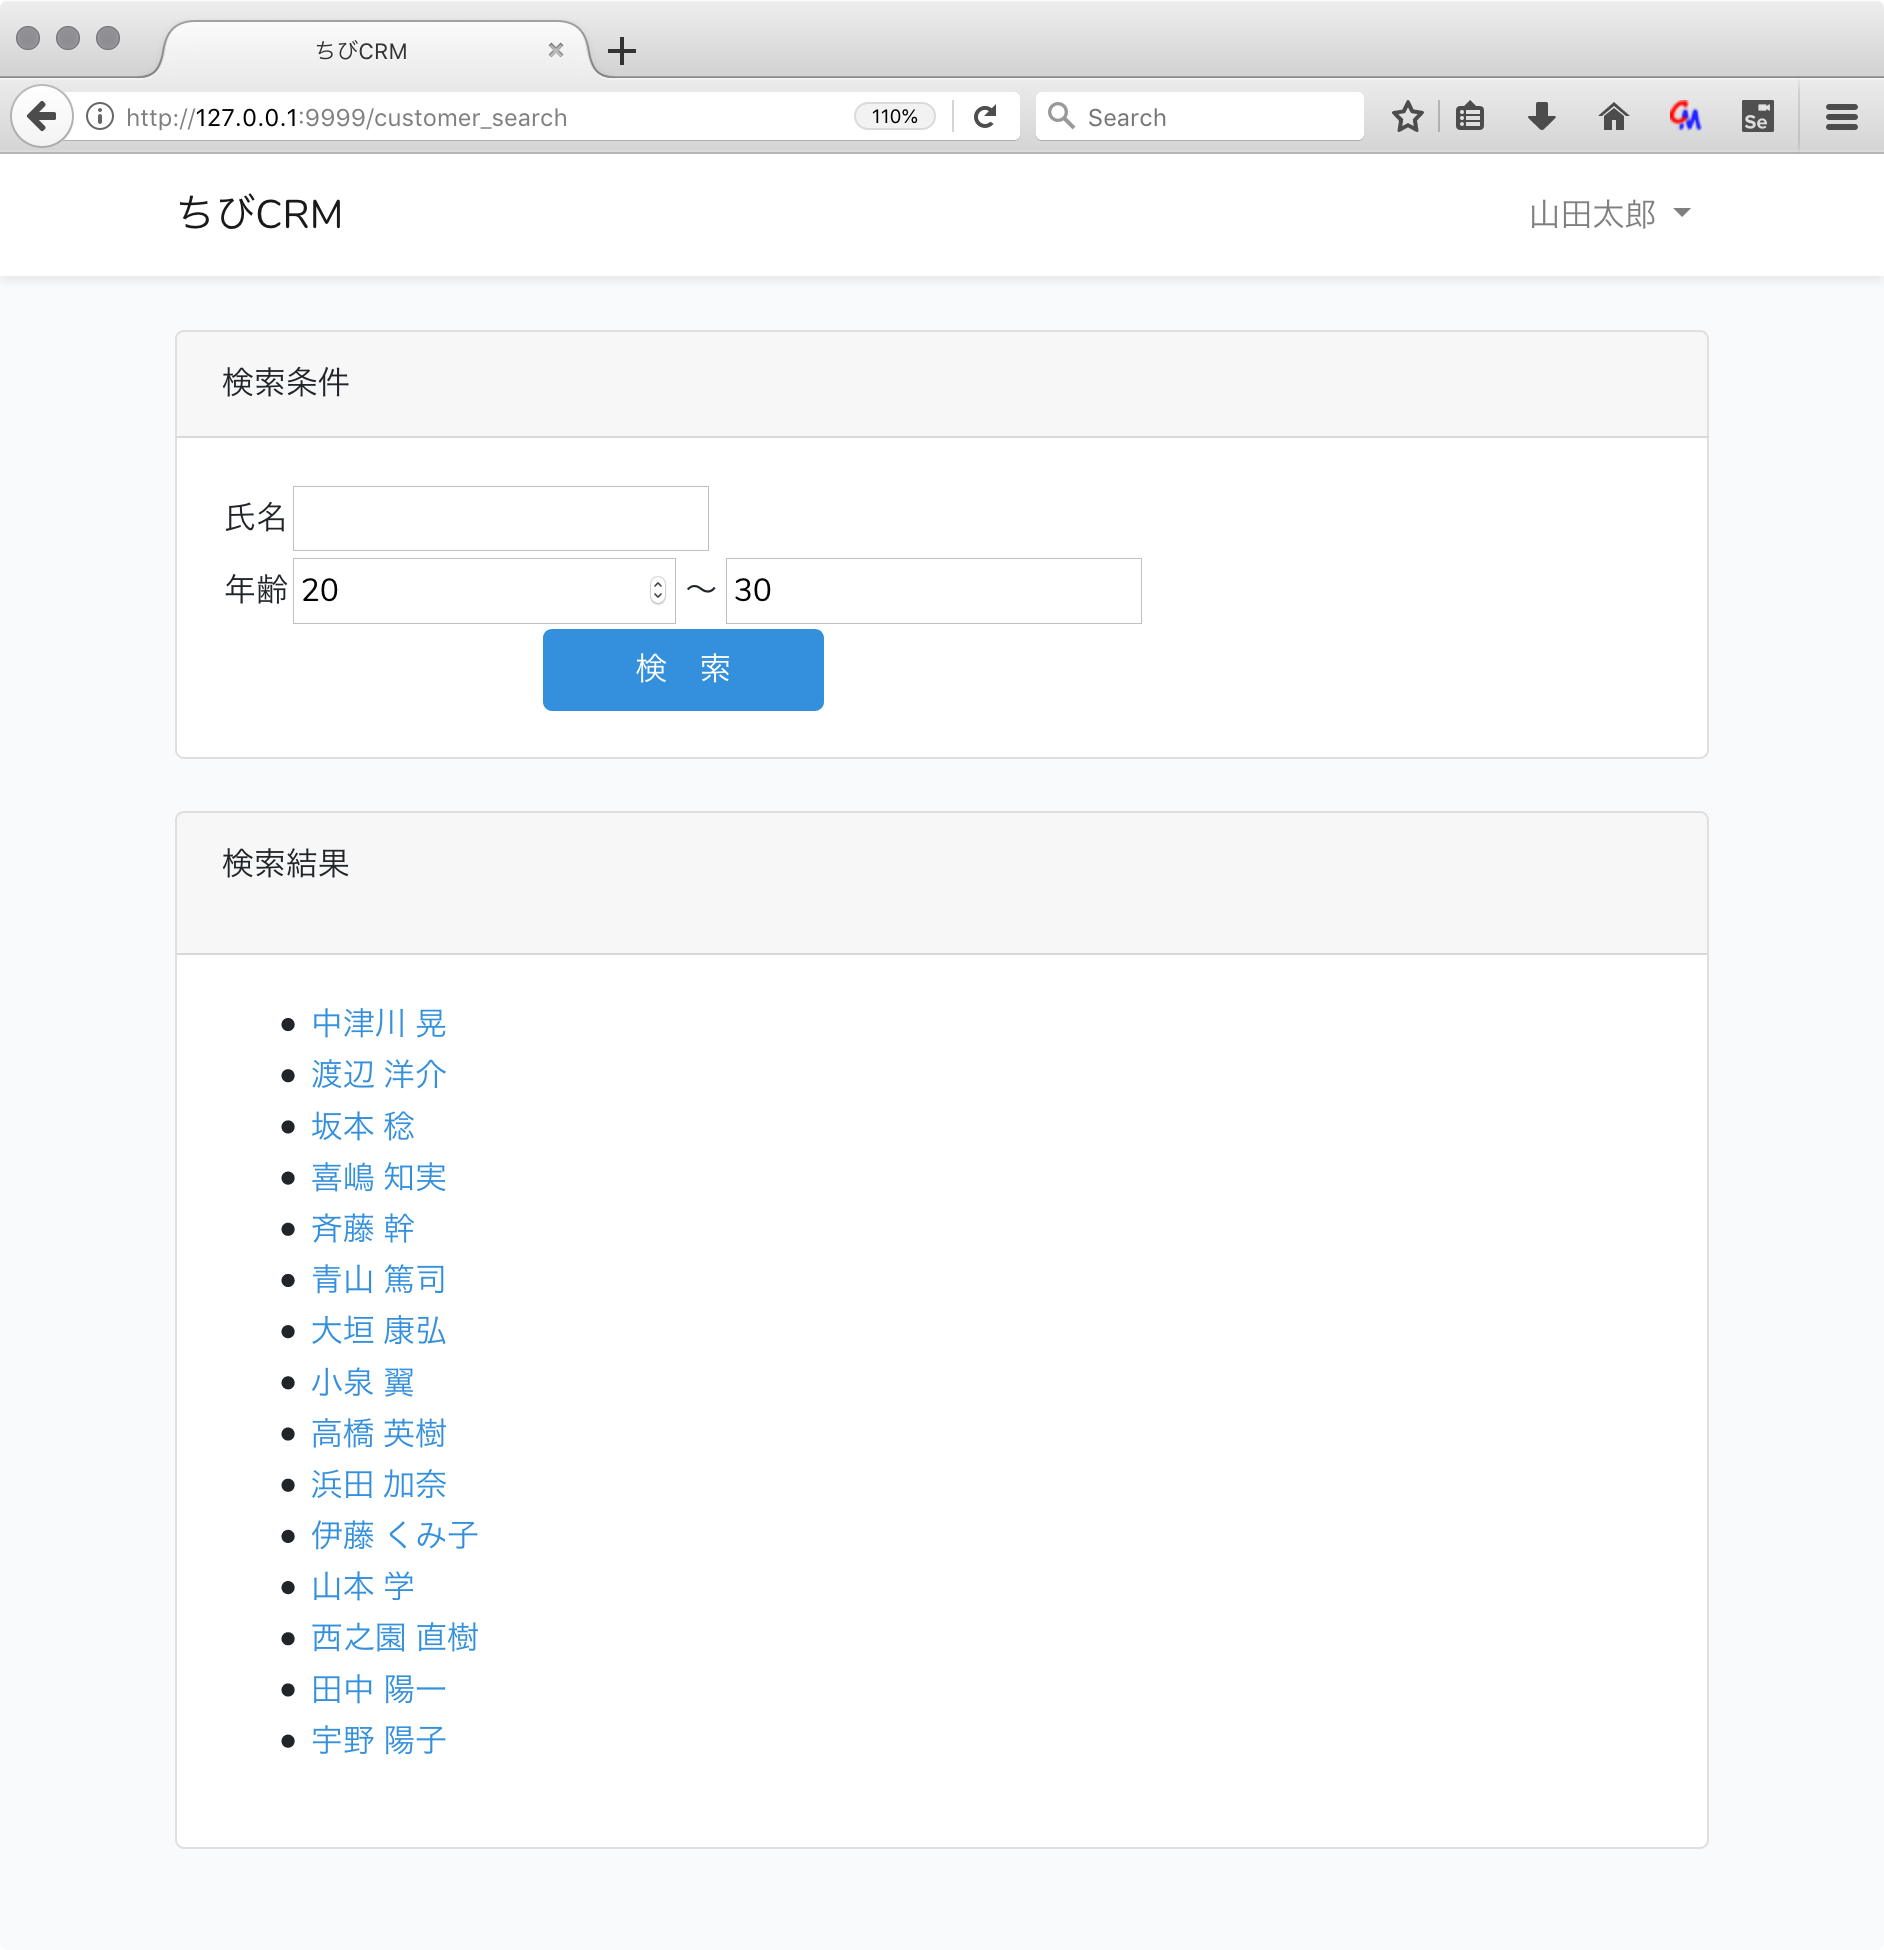
顧客検索結果
顧客検索結果画面のweb.phpを確認
routes/web.php の以下の部分が
Route::post('customer_search', 'CustomerSearchController@search')->middleware('auth');
CustomerSearchControllerのsearch関数を呼ぶ定義になります。
顧客検索結果画面コントローラの作成
すでに作られている CustomerSearchController.php を使います。
search関数に検索処理を書いていきます。
    public function search(CustomerSearchPost $request, MyApplicationService $myApplicationService)
    {
        $validated = $request->validated();
        $wheres = [];
        $search_criterias = [];

        // 氏名の指定は有るか
        if (!empty($validated['name'])) {
            array_push($wheres, ['name', '=', $validated['name']]);
            array_push($search_criterias, '氏名が' . $validated['name'] . 'に一致する');
        }
        // 年齢 from の指定は有るか
        if (!empty($validated['age_from'])) {
            $ages = $myApplicationService->getBirthdayRange(($validated['age_from']));
            array_push($wheres, ['birthdate', '<=', $ages['end']]);
        }

        // 年齢 to の指定は有るか
        if (!empty($validated['age_to'])) {
            $ages = $myApplicationService->getBirthdayRange(($validated['age_to']));
            array_push($wheres, ['birthdate', '>=', $ages['end']]);
        }

        $customers = Customer::where($wheres)->paginate();
        return view('customer_search', compact('customers', 'search_criterias', 'validated'));

    }
-
CustomerSearchPost $request で バリデーション済みの 検索条件が渡されます。バリデーションが成功しなければsearch関数は実行されません。
public function search(CustomerSearchPost $request, MyApplicationService $myApplicationService)
MyApplicationService $myApplicationService アプリケーションサービスインスタンスが渡されます
クラス型を指定することによって Laravelが自動的に対応するインスタンスを設定してくれます。便利です。 - $wheres 配列に 検索条件を追加していき Customer::where($wheres)->paginate(); で検索結果を得ます。paginate()を呼ぶことで1ページ分のレコードが設定されます。
顧客検索結果画面のcustomer_search.blade.php
resources/views/customer_search.blade.php
@extends('layouts.app')

@section('content')
    <div class="container">
        <div class="row justify-content-center">
            <div class="col-md-12">
                <div class="card">
                    <div class="card-header">検索条件</div>
                    <div class="card-body">
                        <form action="/customer_search" method="POST">
                            @csrf
                            <table>
                                <tr>
                                    <td>氏名</td>
                                    <td>
                                        <input type="text" name="name"
                                               value="{{isset($validated['name'])?$validated['name']:''}}"
                                        />
                                    </td>
                                </tr>
                                <tr>
                                    <td>年齢</td>
                                    <td>
                                        <input type="number" min="0" max="999" name="age_from"
                                               value="{{isset($validated['age_from'])?$validated['age_from']:''}}"
                                        />
                                        〜
                                        <input type="text" min="0" max="999" name="age_to"
                                               value="{{isset($validated['age_to'])?$validated['age_to']:''}}"
                                        />
                                    </td>
                                </tr>
                                <tr>
                                    <td colspan="2" align="center">
                                        <button type="submit" class="btn btn-primary">  検 索  </button>
                                    </td>
                                </tr>
                            </table>
                        </form>
                        @include('errors')
                    </div>
                </div>
                <br/>
                @if(!empty($customers))
                    <div class="card">
                        <div class="card-header">
                            <p>検索結果</p>
                            <ul>
                                @foreach($search_criterias as $criteria)
                                    <li>{{$criteria}}</li>
                                @endforeach
                            </ul>
                        </div>
                        <div class="card-body">
                            <ul>
                                @foreach($customers as $customer)
                                    <li>
                                        <a href="/customers/{{$customer['id']}}">{{ $customer['name'] }}</a>
                                    </li>
                                @endforeach
                            </ul>
                        </div>
                    </div>
                @endif
            </div>
        </div>
    </div>
@endsection
Customer log
 顧客詳細画面で顧客履歴を表示・登録が行えます
web.php に登録処理の定義をします。
Route::post('/customers/{customer}/logs', 'CustomerLogController')->middleware('auth');
php artisan make:controller CustomerLogController --invokable
を実行して ivokableなCustomerLogControllerクラスを作成します。
app/Http/Controllers/CustomerLogController.php
が作られます。
app/Http/Controllers/CustomerLogController.php
<?php

namespace App\Http\Controllers;

use App\Customer;
use App\CustomerLog;
use Illuminate\Http\Request;

class CustomerLogController extends Controller
{
    /**
     * Handle the incoming request.
     *
     * @param \Illuminate\Http\Request $request
     * @return \Illuminate\Http\Response
     */
    public function __invoke(Customer $customer)
    {
        $attribute = $this->validateLog();
        $attribute['customer_id'] = $customer['id']; // カスタマーIDを記録
        $attribute['user_id'] = auth()->user()['id']; // ログを記録した人を保存
        $customerLog = CustomerLog::create($attribute);
        return back();
    }

    protected function validateLog()
    {
        return request()->validate([
            'log' => ['required', 'min:1', 'max:100'],
        ]);
    }

}
おしまい
以上でLaravel6で作る顧客管理システムの記事はおしまいです。
読んでくれて ありがとう。
保留ブロック
社員一覧画面表示
Route::get('/users', 'UserController')->name('社員一覧')->middleware('auth');
http://127.0.0.1:8000/users へのGET リクエストを UserControllerに渡します。ミドルウェアにauthを指定しています。authミドルウェアを指定することでログインされたユーザーのみアクセス出来るようになっています。ミドルウェアの指定を省略することも出来ます。
役職一覧表示
Route::get('/roles', 'RoleController')->name('ロール一覧')->middleware('auth');
http://127.0.0.1:8000/roles へのGET リクエストを RoleControllerに渡します。
顧客画面 表示・登録画面
Route::resource('/customers', 'CustomerController')->middleware('auth');
resourceを指定しているので customersテーブルのCRUD 処理をコントローラー該当するメソッドに割り当てている。
顧客履歴登録
Route::post('/customers/{customer}/logs', 'CustomerLogController')->middleware('auth');
顧客履歴登録処理を行う。POSTリクエストをCustomerLogControllerに渡す。
顧客検索画面を表示する
Route::get('customer_search', 'CustomerSearchController@index')->middleware('auth');
/customer_searchへの GETリクエストをCustomerSearchControllerの index関数に渡す。
顧客検索結果画面を表示する
Route::post('customer_search', 'CustomerSearchController@search')->middleware('auth');
/customer_searchへの POSTリクエストをCustomerSearchControllerの search関数に渡す。
ミドルウェアの説明
Laravelの重要な機能。
ミドルウェアはアプリケーションの手前でRequestを処理し、アプリケーションんから出るResponseに処理を行うことが出来る仕組みです。
今回authミドルウェアを使うことによって ログイン認証を実装しています。
ミドルウェアは php artisan make:middleware コマンドで独自のミドルウェアを作成することもできますが、本記事では独自ミドルウェアは扱いません。
include
includeはbladeでヘッダーやフッターなどの共通部分を一箇所で定義して各画面で読み込んで使う場合などに使用します。
今回エラーメッセージ表示を errors.blade.php に共通化して必要な画面でincludeして使います。