WebRTC使って何かしてみたい感
前々からありました
SkyWay使うと一瞬でできると聞いたので、公式のドキュメントを読みながら
やってみます
ビデオ通話は周りの方がよくやってるので、テキスト送受信してみました。
出来上がったものがこちら⬇(小さくて見づらいのは許してください)
ソースはここに置いてます。
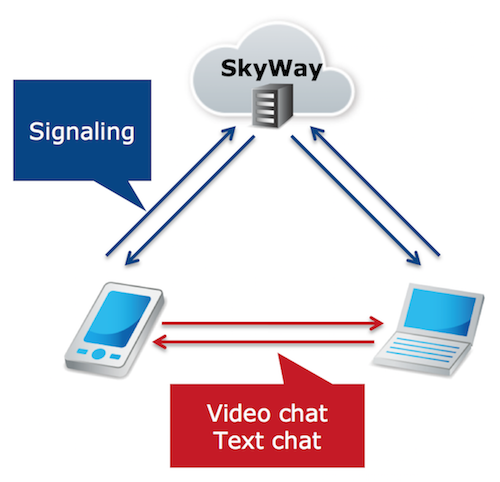
全体のイメージ
SkyWayを使うことで、以下の2つを意識するだけでリアルタイムな通信が可能です。
- 相手と接続する
- データを送受信する
※公式から引用
使ったもの
実装してみる
準備
今回はVue.jsで使いたいので、JavascriptSDKを使います。
vue-cliでプロジェクト作るのは省略します。
以下記事がすごくわかりやすくて参考になりました。
Vue CLI UIが想像以上に便利だった話
https://qiita.com/isihigameKoudai/items/eee3eb6a435675fdfd73
https://webrtc.ecl.ntt.com/js-sdk.html#sdkdownload
公式ガイドの手順通りに、npm installします
$ npm install -s skyway-js
今回は、components以下に、MdEditor.vueというコンポーネントを作成しました。
その他もnpm installします。
$ npm install lodash --save
$ npm install vuesax --save
$ npm install material-icons --save
$ npm install marked --save
vuesaxを使うための設定をします。
プロジェクトルート直下で、
$ mkdir src/plugins && touch ./src/plugins/vuesax.js
生成されたvuesax.jsに以下をコピペ
import Vue from 'vue'
import Vuesax from 'vuesax'

import 'vuesax/dist/vuesax.css'
import 'material-icons/iconfont/material-icons.css'

Vue.use(Vuesax)
作ったプラグインをmain.jsで読み込みます。
import Vue from 'vue'
import App from './App.vue'
// ここに追加
import './plugins/vuesax.js'

Vue.config.productionTip = false

new Vue({
  render: h => h(App),
}).$mount('#app')
準備OKです。
いざWebRTC
$ touch ./src/components/MdEditor.vue
<template>
  <div id="page">
    <vs-row>
      <vs-col vs-w="5">
        <p>id: {{ myId }}</p>
      </vs-col>
      <vs-col vs-w="5">
        <vs-input v-model="remoteId"/>
      </vs-col>
      <vs-col vs-w="2">
        <vs-button color="primary" @click="connect">接続</vs-button>
      </vs-col>
    </vs-row>
    <vs-row class="editor">
      <vs-col vs-type="flex" vs-justify="center" vs-w="6">
        <textarea v-model="text" @input="update"/>
      </vs-col>
      <vs-col class="previewArea" vs-type="flex" vs-w="6">
        <div v-html="compiledMarkdown" ></div>
      </vs-col>
    </vs-row>
  </div>

</template>

<script>
import marked from 'marked'
import _ from 'lodash'
import Peer from 'skyway-js'

export default {
  name: 'md-editor',
  data() {
    return {
      text: '',
      // SkyWayのpeer
      peer: null,
      // 接続しているpeerを管理するオブジェクト
      connectedPeers: {},
      dataConnection: null,
      myId: '',
      // 接続相手のID
      remoteId: ''
    }
  },
  mounted () {
    // 初期化
    const peer = new Peer({
      key: 'ここにシークレットキーをいれる',
      debug: 3,
    })

    // シグナリングサーバーに正常に接続できた時
    peer.on('open', () => {
      console.log('peer opened!')
      this.myId = this.peer.id
    })

    // p2pで接続相手と接続した時
    peer.on('connection', c => {
      console.log('peer connected!')
      this.dataConnection = c
      this.connectedPeers[this.dataConnection.remoteId] = 1
      // データコネクションがデータを受信した時
      c.on('data', data => {
        this.text = data
      })
    })

    // Peerに対する全ての接続を終了した時
    peer.on('close', () => console.log('peer close'))

    peer.on('error', err => console.log(err))
    // peerがmounted内に取り残されてしまうので、dataに入れる
    this.peer = peer
  },
  computed: {
    compiledMarkdown: function () {
      return marked(this.text, { sanitize: true })
    }
  },
  methods: {
    // テキストエリアに変更があった時に走るメソッド
    update: _.debounce(function (e) {
      this.text = e.target.value

      if (this.connectedPeers[this.dataConnection.remoteId]) {
        this.dataConnection.send(this.text)
      }
    }, 300),

    // 接続ボタンが押された時に走るメソッド
    connect: function () {
      const remoteId = this.remoteId
      if (!this.connectedPeers[remoteId]) {
        this.dataConnection = this.peer.connect(remoteId)
        this.dataConnection.on('data', data => {
          this.text = data
        })

        this.connectedPeers[this.dataConnection.remoteId] = 1
      }
    }
  }
}
</script>
<style scoped>
  #page {
    height: 100%;
  }

  .editor {
    height: 100%;
  }

  textarea {
    height: 100%;
    width: 100%;
    line-height: 1.5em;
    font-size: 1em;
  }

  .previewArea {
    background-color: beige;
  }
</style>
あとはこれをsrc/App.vueで読み込んで配置したら動きます。
所感
SkyWayを使ってみた感想です。
- マジで簡単
- めっちゃ遊べそう
- (遊ぶだけなら)無料で嬉しい
今回SkyWayを触れて勉強になりました。
徐々にWebRTCの中身にも触れていきたいと思いました。
今度はIoT分野でチャレンジしたいです。あとルーム形式の通信
ソースはここに置いてます。(2回目)
愛のあるマサカリをお待ちしております。
参考
WebRTC コトハジメ
https://gist.github.com/voluntas/67e5a26915751226fdcf#id16

