はじめに
わたしも現在勉強中で、間違っていることもあるかもしれません。
ここが違う!とか、こうしたほうがよくね?ってのがありましたら教えてください。
GitHubに上げました!
https://github.com/isuzu-shiranui/CalculationApplication
MEFとは
Managed Extensibility Framework.
.NET Framework 4から導入された、プラグインとか拡張機能とか言われているものを実装するためのフレームワークです。
私は「メフ」って呼んでます。
(依存性の注入については割愛)
実際に作ってみる
今回は、軽く足し算を行うプラグインを考えてみます。
また、画面のプラグイン化は次回行うとして、足し算のロジック部分だけ分離したいと思います。
本開発はPrismを使ったMVVMでの開発となりますのでNugetで以下3つを参照してください。
- Prism.Core v6.1.0
- Prism.Wpf v6.1.0
- Prism.Mef v6.1.0
下準備
まずは読み込み側の基礎部分をさくっと作っていきます。
ただ、ViewとViewModelのブーストラッパは今回使用していません。
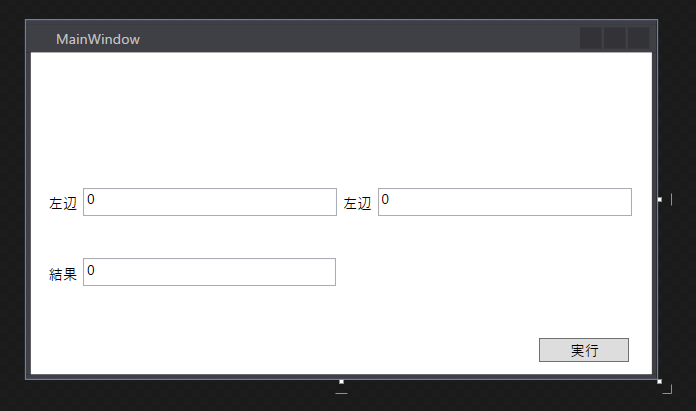
View (MainWindow)
外観
コード
Views\MainWindow.xaml
<Window x:Class="CalculationApplication.Views.MainWindow"
        xmlns="http://schemas.microsoft.com/winfx/2006/xaml/presentation"
        xmlns:x="http://schemas.microsoft.com/winfx/2006/xaml"
        xmlns:d="http://schemas.microsoft.com/expression/blend/2008"
        xmlns:mc="http://schemas.openxmlformats.org/markup-compatibility/2006"
        xmlns:vm="clr-namespace:CalculationApplication.ViewModels"
        xmlns:local="clr-namespace:CalculationApplication.Views"
        mc:Ignorable="d"
        Title="MainWindow" Height="300" Width="527.298">

    <Window.DataContext>
        <vm:MainWindowViewModel />
    </Window.DataContext>

    <Grid>
        <Grid>
            <StackPanel HorizontalAlignment="Left" Height="24" Margin="10,113,0,0" VerticalAlignment="Top" Width="499" Orientation="Horizontal">
                <Label Content="左辺" />
                <TextBox Width="212" Text="{Binding LeftValue, Mode=TwoWay}"/>
                <Label Content="左辺" />
                <TextBox Width="212" Text="{Binding RightValue, Mode=TwoWay}"/>
            </StackPanel>
            <Button Content="実行" HorizontalAlignment="Left" Margin="425,239,0,0" VerticalAlignment="Top" Width="75" Command="{Binding CalculationCommand, UpdateSourceTrigger=PropertyChanged}"/>
            <TextBox x:Name="textBox" HorizontalAlignment="Left" Height="23" Margin="44,172,0,0" TextWrapping="Wrap" VerticalAlignment="Top" Width="211" Text="{Binding ResultValue}"/>
            <Label x:Name="label" Content="結果" HorizontalAlignment="Left" Margin="10,172,0,0" VerticalAlignment="Top"/>
        </Grid>
    </Grid>
</Window>
Views\MainWindow.xaml.cs
using System.Windows;

namespace CalculationApplication.Views
{
    /// <summary>
    /// MainWindow.xaml の相互作用ロジック
    /// </summary>
    public partial class MainWindow : Window
    {
        public MainWindow()
        {
            InitializeComponent();
        }
    }
}
ViewModel (MainWindowViewModel)
ViewModels\MainWindowViewModel.cs
using Prism.Commands;
using System.ComponentModel.DataAnnotations;

namespace CalculationApplication.ViewModels
{
    public class MainWindowViewModel : Commons.ViewModelBase
    {
        private double leftValue;
        [Required]
        [Range(0, double.MaxValue)]
        public double LeftValue
        {
            get { return leftValue; }
            set { SetProperty(ref leftValue, value); CalculationCommand.RaiseCanExecuteChanged(); }
        }

        private double rightValue;
        [Required]
        [Range(0, double.MaxValue)]
        public double RightValue
        {
            get { return rightValue; }
            set { SetProperty(ref rightValue, value); CalculationCommand.RaiseCanExecuteChanged(); }
        }

        private double resultValue;
        public double ResultValue
        {
            get { return resultValue; }
            set { SetProperty(ref resultValue, value); }
        }


        private DelegateCommand calculationCommand;
        public DelegateCommand CalculationCommand => calculationCommand ?? (new DelegateCommand(CalculationExecute, () => !HasErrors));

        private void CalculationExecute()
        {

        }
    }
}
ViewModelBase
Commons\ViewModelBase.cs
using Prism.Mvvm;
using System;
using System.Runtime.CompilerServices;
using System.ComponentModel.DataAnnotations;
using System.ComponentModel;
using System.Collections;
using System.Collections.Generic;
using System.Linq;

namespace CalculationApplication.Commons
{
    public class ViewModelBase : BindableBase, INotifyDataErrorInfo
    {
        private ErrorsContainer<string> errorsContainer;

        public event EventHandler<DataErrorsChangedEventArgs> ErrorsChanged;

        public ViewModelBase()
        {
            errorsContainer = new ErrorsContainer<string>(propertyName => ErrorsChanged?.Invoke(this, new DataErrorsChangedEventArgs(propertyName)));
        }

        public bool HasErrors => errorsContainer.HasErrors;

        public IEnumerable GetErrors(string propertyName)
        {
            return errorsContainer.GetErrors(propertyName);
        }

        protected override bool SetProperty<T>(ref T storage, T value, [CallerMemberName] string propertyName = null)
        {
            if(!base.SetProperty<T>(ref storage, value, propertyName)) return false;

            var context = new ValidationContext(this) { MemberName = propertyName };
            var errors = new List<ValidationResult>();
            if(!Validator.TryValidateProperty(value, context, errors))
            {
                errorsContainer.SetErrors(propertyName, errors.Select(error => error.ErrorMessage).ToArray());
            }
            else
            {
                errorsContainer.ClearErrors(propertyName);
            }
            return true;
        }
    }
}
App.xaml
StartupUri="MainWindow.xaml" → StartupUri="Views/MainWindow.xaml"に変更
プラグイン対応のための実装
インターフェースを作る
これを作ることで、読み込むプラグインをある意味フィルタリングできます。
同じソリューション内で新しくクラスライブラリプロジェクトを作ってください。
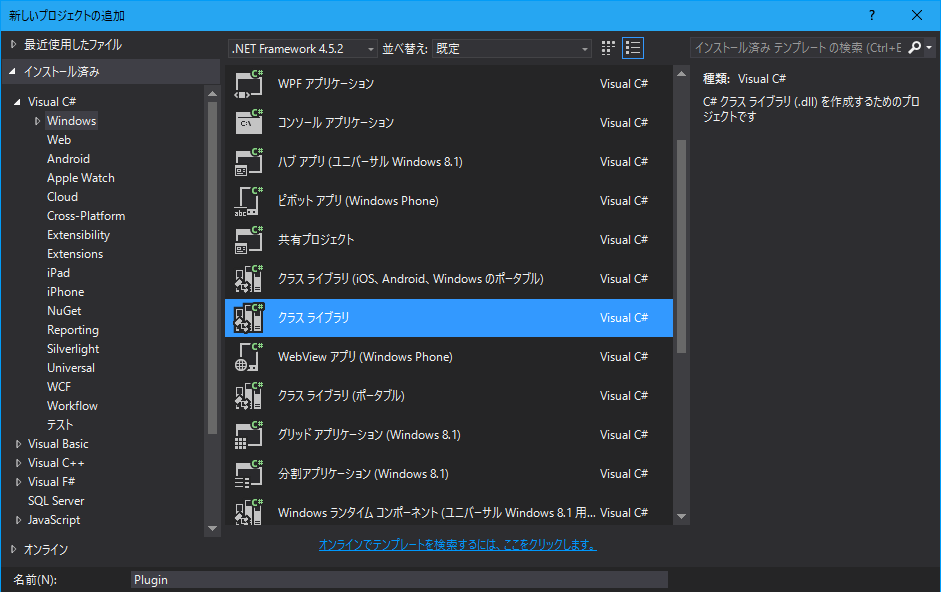
そして元あるクラスを消して、新しくインタフェースを下記のように実装してください。
IPlugin
namespace Plugin
{
    public interface IPlugin
    {
        double Calculation(double leftValue, double rightValue);
    }
}
読み込み側を対応させる
下記に追加をします。
usingの部分は新たに参照に追加してください。
MainWindowViewModel
using Plugin;
using System.ComponentModel.Composition;
[Import(typeof(IPlugin))]//プラグインを"1つだけ"読み込む
private IPlugin Plugin { get; set; }

private void CalculationExecute()
{
     ResultValue = Plugin.Calculation(LeftValue, RightValue);
}

public MainWindowViewModel()
{
   LoadPlugins();
}

/// <summary>
/// プラグインを全て読みこんで、[Import]がついているプロパティに格納する。
/// </summary>
private void LoadPlugins()
{
     //フォルダがなければ作る。
      string pluginsPath = Directory.GetCurrentDirectory() + @"\plugins";
      if (!Directory.Exists(pluginsPath)) Directory.CreateDirectory(pluginsPath);

      //プラグイン読み込み
      using (var catalog = new DirectoryCatalog(pluginsPath))
      using (var container = new CompositionContainer(catalog))
      {
          f (catalog.LoadedFiles.Count > 0) container.SatisfyImportsOnce(this);
      }
}
プラグインを作る
それでは足し算するだけのプラグインを作ります。
インターフェースを作ったのと同じように、新たにクラスライブラリプロジェクトを作ってください。
そして、そこにクラスを作って下記のように記述します。
using Plugin;
using System.ComponentModel.Composition;

namespace SummationPlugin
{
    [Export(typeof(IPlugin))]
    public class Summation : IPlugin
    {
        public double Calculation(double leftValue, double rightValue)
        {
            return leftValue + rightValue;
        }
    }
}
動かしてみる
プラグインを配置する
まずは作ったプラグインをビルドします。
すると、プラグインのDebugまたはReleaseフォルダに、(プラグイン名).dllができていると思います。
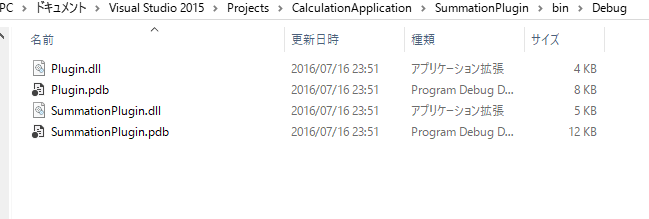
これを、読み込みアプリのDebugまたはReleaseフォルダにpluginフォルダがなければ作って貼り付けます。

読み込み側アプリの動作確認
実際にアプリを起動して、計算が行われれば完成です。お疲れ様でした!
冒頭にもあるように、GitHubにあげています。
https://github.com/isuzu-shiranui/CalculationApplication
一部別のフォルダも紛れてしまいました...申し訳ありません。