Let's Encrypt とは
認証局(CA)として「SSL/TLSサーバ証明書」を無料で発行するとともに、証明書の発行・インストール・更新のプロセスを自動化することにより、TLS や HTTPS(TLSプロトコルによって提供されるセキュアな接続の上でのHTTP通信)を普及させることを目的としているプロジェクトです。2016年4月12日 に正式サービスが開始されました。
公式 URL
https://letsencrypt.org/
なぜ無料なのか
非営利団体の ISRG (Internet Security Research Group) が運営しており、シスコ(Cisco Systems)、Akamai、電子フロンティア財団(Electronic Frontier Foundation)、モジラ財団(Mozilla Foundation)などの大手企業・団体が、ISRG のスポンサーとして Let's Encrypt を支援しています。
ちなみに現在のスポンサー一覧は下記のとおり。
https://letsencrypt.org/sponsors/
対応ブラウザー
対応ブラウザーは、PC ブラウザー、 Android、 iPhone 向けブラウザーなど、ほぼすべてのブラウザーに対応しています。
Mozilla Firefox >= v2.0
Google Chrome
Internet Explorer on Windows XP SP3 and higher
Microsoft Edge
Android OS >= v2.3.6
Safari >= v4.0 on macOS
Safari on iOS >= v3.1
やってみる
Let's Encrypt の SSL 証明書は、 cPanel、Plesk、WordPress などのホスティングサービスから Web ブラウザー経由でも入手できますが、 CLI でも簡単に入手できます。
それが ACME という証明書を取得するためのプロトコルを使うわけですが、その中でも Let's Encrypt が推奨しているクライアント ツールが、「Certbot」です。
以下引用
Recommended: Certbot
We recommend that most people start with the Certbot client. It can simply get a cert for you or also help you install, depending on what you prefer. It’s easy to use, works on many operating systems, and has great documentation.
今回は CentOS7 に certbot コマンドをインストールして SSL 証明書を入手してみます。
必要なパッケージ
これだけです
# yum install certbot
Loaded plugins: fastestmirror, langpacks
Loading mirror speeds from cached hostfile
epel/x86_64/metalink                                                                        | 6.2 kB  00:00:00
 * epel: ftp.riken.jp
base                                                                                        | 3.6 kB  00:00:00
epel                                                                                        | 4.7 kB  00:00:00
extras                                                                                      | 3.4 kB  00:00:00
openlogic                                                                                   | 2.9 kB  00:00:00
updates                                                                                     | 3.4 kB  00:00:00
(1/5): epel/x86_64/updateinfo                                                               | 990 kB  00:00:05
(2/5): epel/x86_64/primary_db                                                               | 6.6 MB  00:00:00
(3/5): extras/7/x86_64/primary_db                                                           | 187 kB  00:00:05
(4/5): openlogic/7/x86_64/primary_db                                                        |  90 kB  00:00:05
(5/5): updates/7/x86_64/primary_db                                                          | 3.4 MB  00:00:05
Resolving Dependencies
--> Running transaction check
---> Package certbot.noarch 0:0.30.2-1.el7 will be updated
---> Package certbot.noarch 0:0.31.0-2.el7 will be an update
--> Processing Dependency: python2-certbot = 0.31.0-2.el7 for package: certbot-0.31.0-2.el7.noarch
--> Running transaction check
---> Package python2-certbot.noarch 0:0.30.2-1.el7 will be updated
---> Package python2-certbot.noarch 0:0.31.0-2.el7 will be an update
--> Finished Dependency Resolution

Dependencies Resolved

===================================================================================================================
 Package                         Arch                   Version                         Repository            Size
===================================================================================================================
Updating:
 certbot                         noarch                 0.31.0-2.el7                    epel                  37 k
Updating for dependencies:
 python2-certbot                 noarch                 0.31.0-2.el7                    epel                 547 k

Transaction Summary
===================================================================================================================
Upgrade  1 Package (+1 Dependent package)

Total download size: 584 k
Is this ok [y/d/N]: y
Downloading packages:
Delta RPMs disabled because /usr/bin/applydeltarpm not installed.
(1/2): certbot-0.31.0-2.el7.noarch.rpm                                                      |  37 kB  00:00:05
(2/2): python2-certbot-0.31.0-2.el7.noarch.rpm                                              | 547 kB  00:00:00
-------------------------------------------------------------------------------------------------------------------
Total                                                                               99 kB/s | 584 kB  00:00:05
Running transaction check
Running transaction test
Transaction test succeeded
Running transaction
  Updating   : python2-certbot-0.31.0-2.el7.noarch                                                             1/4
  Updating   : certbot-0.31.0-2.el7.noarch                                                                     2/4
  Cleanup    : certbot-0.30.2-1.el7.noarch                                                                     3/4
  Cleanup    : python2-certbot-0.30.2-1.el7.noarch                                                             4/4
  Verifying  : certbot-0.31.0-2.el7.noarch                                                                     1/4
  Verifying  : python2-certbot-0.31.0-2.el7.noarch                                                             2/4
  Verifying  : certbot-0.30.2-1.el7.noarch                                                                     3/4
  Verifying  : python2-certbot-0.30.2-1.el7.noarch                                                             4/4

Updated:
  certbot.noarch 0:0.31.0-2.el7

Dependency Updated:
  python2-certbot.noarch 0:0.31.0-2.el7

Complete!

# rpm -qa | grep certbot
python2-certbot-0.30.2-1.el7.noarch
python2-certbot-apache-0.30.2-1.el7.noarch
certbot-0.30.2-1.el7.noarch
証明書発行コマンド
コマンド リファレンスはここに書いてあります。
https://free-ssl.jp/command/
コマンド)
certbot certonly --manual --domain <証明書を取得したいドメイン名> --email <e-mail アドレス> --agree-tos --manual-public-ip-logging-ok --preferred-challenges dns
なお、RSA 暗号鍵を利用した証明書を作成する際には以下のようなオプションを追加して作成します
certbot certonly --manual --domain <証明書を取得したいドメイン名> --email <e-mail アドレス> --agrd-challenges dns --key-type rsa --rsa-key-size 2048
オプション解説
certonly → 証明書の取得のみ行う
--domain → 取得したいドメイン名を指定
--email → アカウントの登録や回復などに使用するアドレス(一般公開はされないので、gmail などでも可)
--agree-tos →利用規約に同意を求める画面を表示させない
--manual-public-ip-logging-ok → グローバルIPアドレスを認証局でロギングすることに関する確認画面を表示させない
--preferred-challenges dns → ワイルドカードの SSL 証明書を取得したい場合は DNS-01 方式を使う必要があります。この方式は、 Let's Encrypt が発行したトークンを DNS サーバ TXT レコードに登録して認証される必要があります。やり方については後述します。
--rsa-key-size N 既定では 2048 ビットが指定されます
--key-type ECDSA 形式ではなく RSA 形式を指定したい際には明示的に --key-type rsa で指定します
参考URL
https://community.letsencrypt.org/t/acme-v2-production-environment-wildcards/55578
該当箇所抜粋
To request a wildcard certificate simply send a wildcard DNS identifier in the newOrder request. Under Let’s Encrypt’s policy, wildcard identifiers must be validated by a DNS-01 challenge, so order authorizations corresponding to wildcard identifiers will only offer a DNS-01 challenge. DNS names in certificates may only have a single wildcard character, and it must be the entire leftmost DNS label, for instance “*.example.com”.
コマンド例)
# certbot certonly --manual --domain sts.shyamag004.work --email xxxx@xxxxx.com --agree-tos --manual-public-ip-logging-ok --preferred-challenges dns
Saving debug log to /var/log/letsencrypt/letsencrypt.log
Plugins selected: Authenticator manual, Installer None
Starting new HTTPS connection (1): acme-v02.api.letsencrypt.org
Obtaining a new certificate
Performing the following challenges:
dns-01 challenge for sts.shyamag004.work

- - - - - - - - - - - - - - - - - - - - - - - - - - - - - - - - - - - - - - - -
Please deploy a DNS TXT record under the name
_acme-challenge.sts.shyamag004.work with the following value:

LbeLyFAp3GeJcS2BpJU2g1aEpch-2DaSBrVdqSZsRaU

Before continuing, verify the record is deployed.
- - - - - - - - - - - - - - - - - - - - - - - - - - - - - - - - - - - - - - - -
上記に表示された LbeLyFAp3GeJcS2BpJU2g1aEpch-2DaSBrVdqSZsRaU を TXT レコードとして登録する必要があります。
下記のような感じです。

DNSが浸透するまで待って、浸透された後に、 Enterキーをたたくと証明書が発行されます。
# dig -t txt _acme-challenge.sts.shyamag004.work

; <<>> DiG 9.9.4-RedHat-9.9.4-61.el7 <<>> -t txt _acme-challenge.sts.shyamag004.work
;; global options: +cmd
;; Got answer:
;; ->>HEADER<<- opcode: QUERY, status: NOERROR, id: 39272
;; flags: qr rd ra; QUERY: 1, ANSWER: 1, AUTHORITY: 0, ADDITIONAL: 1

;; OPT PSEUDOSECTION:
; EDNS: version: 0, flags:; udp: 512
;; QUESTION SECTION:
;_acme-challenge.sts.shyamag004.work. IN        TXT

;; ANSWER SECTION:
_acme-challenge.sts.shyamag004.work. 59 IN TXT  "LbeLyFAp3GeJcS2BpJU2g1aEpch-2DaSBrVdqSZsRaU"

;; Query time: 70 msec
;; SERVER: 8.8.8.8#53(8.8.8.8)
;; WHEN: Wed Apr 03 16:11:15 UTC 2019
;; MSG SIZE  rcvd: 120
発行されました。
Waiting for verification...
Cleaning up challenges
Resetting dropped connection: acme-v02.api.letsencrypt.org

IMPORTANT NOTES:
 - Congratulations! Your certificate and chain have been saved at:
   /etc/letsencrypt/live/sts.shyamag004.work/fullchain.pem
   Your key file has been saved at:
   /etc/letsencrypt/live/sts.shyamag004.work/privkey.pem
   Your cert will expire on 2019-07-02. To obtain a new or tweaked
   version of this certificate in the future, simply run certbot
   again. To non-interactively renew *all* of your certificates, run
   "certbot renew"
 - If you like Certbot, please consider supporting our work by:

   Donating to ISRG / Let's Encrypt:   https://letsencrypt.org/donate
   Donating to EFF:                    https://eff.org/donate-le
下記ディレクトリに証明書一式が格納されます。
/etc/letsencrypt/live/sts.shyamag004.work

# ls -lrth
total 12K
lrwxrwxrwx. 1 root root   46 Apr  3 16:11 privkey.pem -> ../../archive/sts.shyamag004.work/privkey1.pem
lrwxrwxrwx. 1 root root   48 Apr  3 16:11 fullchain.pem -> ../../archive/sts.shyamag004.work/fullchain1.pem
lrwxrwxrwx. 1 root root   44 Apr  3 16:11 chain.pem -> ../../archive/sts.shyamag004.work/chain1.pem
lrwxrwxrwx. 1 root root   43 Apr  3 16:11 cert.pem -> ../../archive/sts.shyamag004.work/cert1.pem
-rw-r--r--. 1 root root  692 Apr  3 16:11 README
今回は、 Windows の AD FS サーバーにインストールするために必要な pfx 形式の証明書を作成します。
コマンドの書式は以下のとおりです。
openssl pkcs12 -export -in <証明書> -inkey <秘密鍵> -out <出力ファイル名.pfx>
# openssl pkcs12 -export -in fullchain.pem -inkey privkey.pem -out shyamag004.pfx
Enter Export Password:
Verifying - Enter Export Password:

lrwxrwxrwx. 1 root root   46 Apr  3 16:11 privkey.pem -> ../../archive/sts.shyamag004.work/privkey1.pem
lrwxrwxrwx. 1 root root   48 Apr  3 16:11 fullchain.pem -> ../../archive/sts.shyamag004.work/fullchain1.pem
lrwxrwxrwx. 1 root root   44 Apr  3 16:11 chain.pem -> ../../archive/sts.shyamag004.work/chain1.pem
lrwxrwxrwx. 1 root root   43 Apr  3 16:11 cert.pem -> ../../archive/sts.shyamag004.work/cert1.pem
-rw-r--r--. 1 root root  692 Apr  3 16:11 README
-rw-r--r--. 1 root root 4.1K Apr  3 16:15 shyamag004.pfx
作成された PFX 形式の証明書を、 WinSCP などをつかって Windows コンピューター上にコピーし、 SSL 証明書をインストールしたいサーバーに配置します。
おまけ
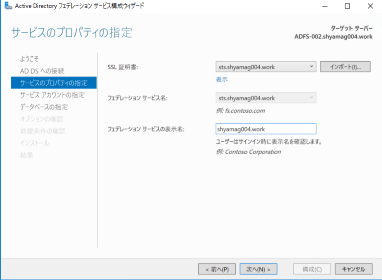
ここからはおまけですが、例えば AD FS サーバーに Let's Encrypt の SSL 証明書をインストールするとこんな感じになります。
まず、 openssl pkcs12 -export コマンド実行時に入力した、秘密鍵のパスワードを入力し、「OK」ボタンをクリックします。
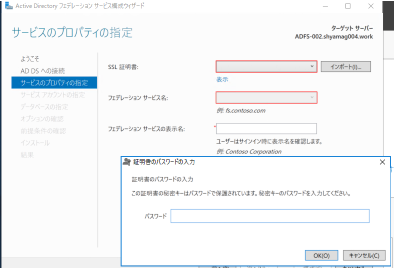
秘密鍵のパスワードの入力に成功すると下記のとおり、証明書が入ります。
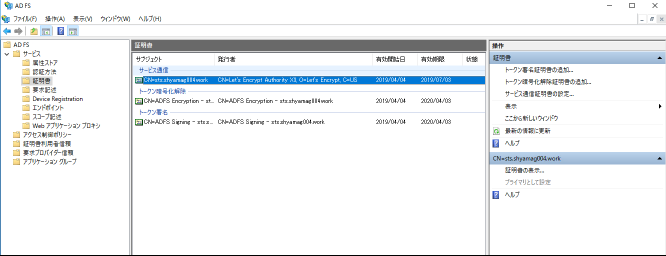
AD FS 構成後に、「AD FS の管理」より証明書情報を確認すると、 Let's Encrypt で発行された証明書(3か月間)が構成されていることが確認できます。
まとめ
オレオレ証明書を作成する手間を考えると、Let's Encrypt による CA 発行の正規な SSL 証明書の発行の方が、やり方さえ覚えてしまえば簡単に入手できます。
これを機に、オレオレ証明書を卒業してみてはいかがでしょうか。