はじめに
Nuxt.js Rails Docker postgresqlで新規プロジェクトがあったのでその認証機能の備忘録
環境
macOS
前提条件
docker-compose upでfornt,apiのコンテナが立ち上がり
localhost:8080(Nuxt)とlocalhost:3000(Rails)でウェルカムページが表示されていること
環境構築がまだの方はこちらを参考にどうぞ
この記事を読んでできること
devise/devise_token_auth/authModuleを使用したログイン/ログアウト/新規登録の実装
*細かいコードの説明はしていません
ログインの流れ
- front側でメールアドレス/パスワードを入力してHTTPリクエストをapi側へ送信
- api側でHTTPリクエストを受け取り
devise_token_authにて認証する - 認証正常:ヘッダー情報をfront側へ返す
認証失敗:エラーメッセージをfornt側へ返す - front側でapi側から返ってきたヘッダー情報を
localStorageへ保存する - フラッシュメッセージで 「ログインに成功しました」と表示する
ログアウトの流れ
- localStorageに保存されたヘッダー情報を乗せてapi側にHTTPリクエストを送る
- api側からレスポンスを受け取り
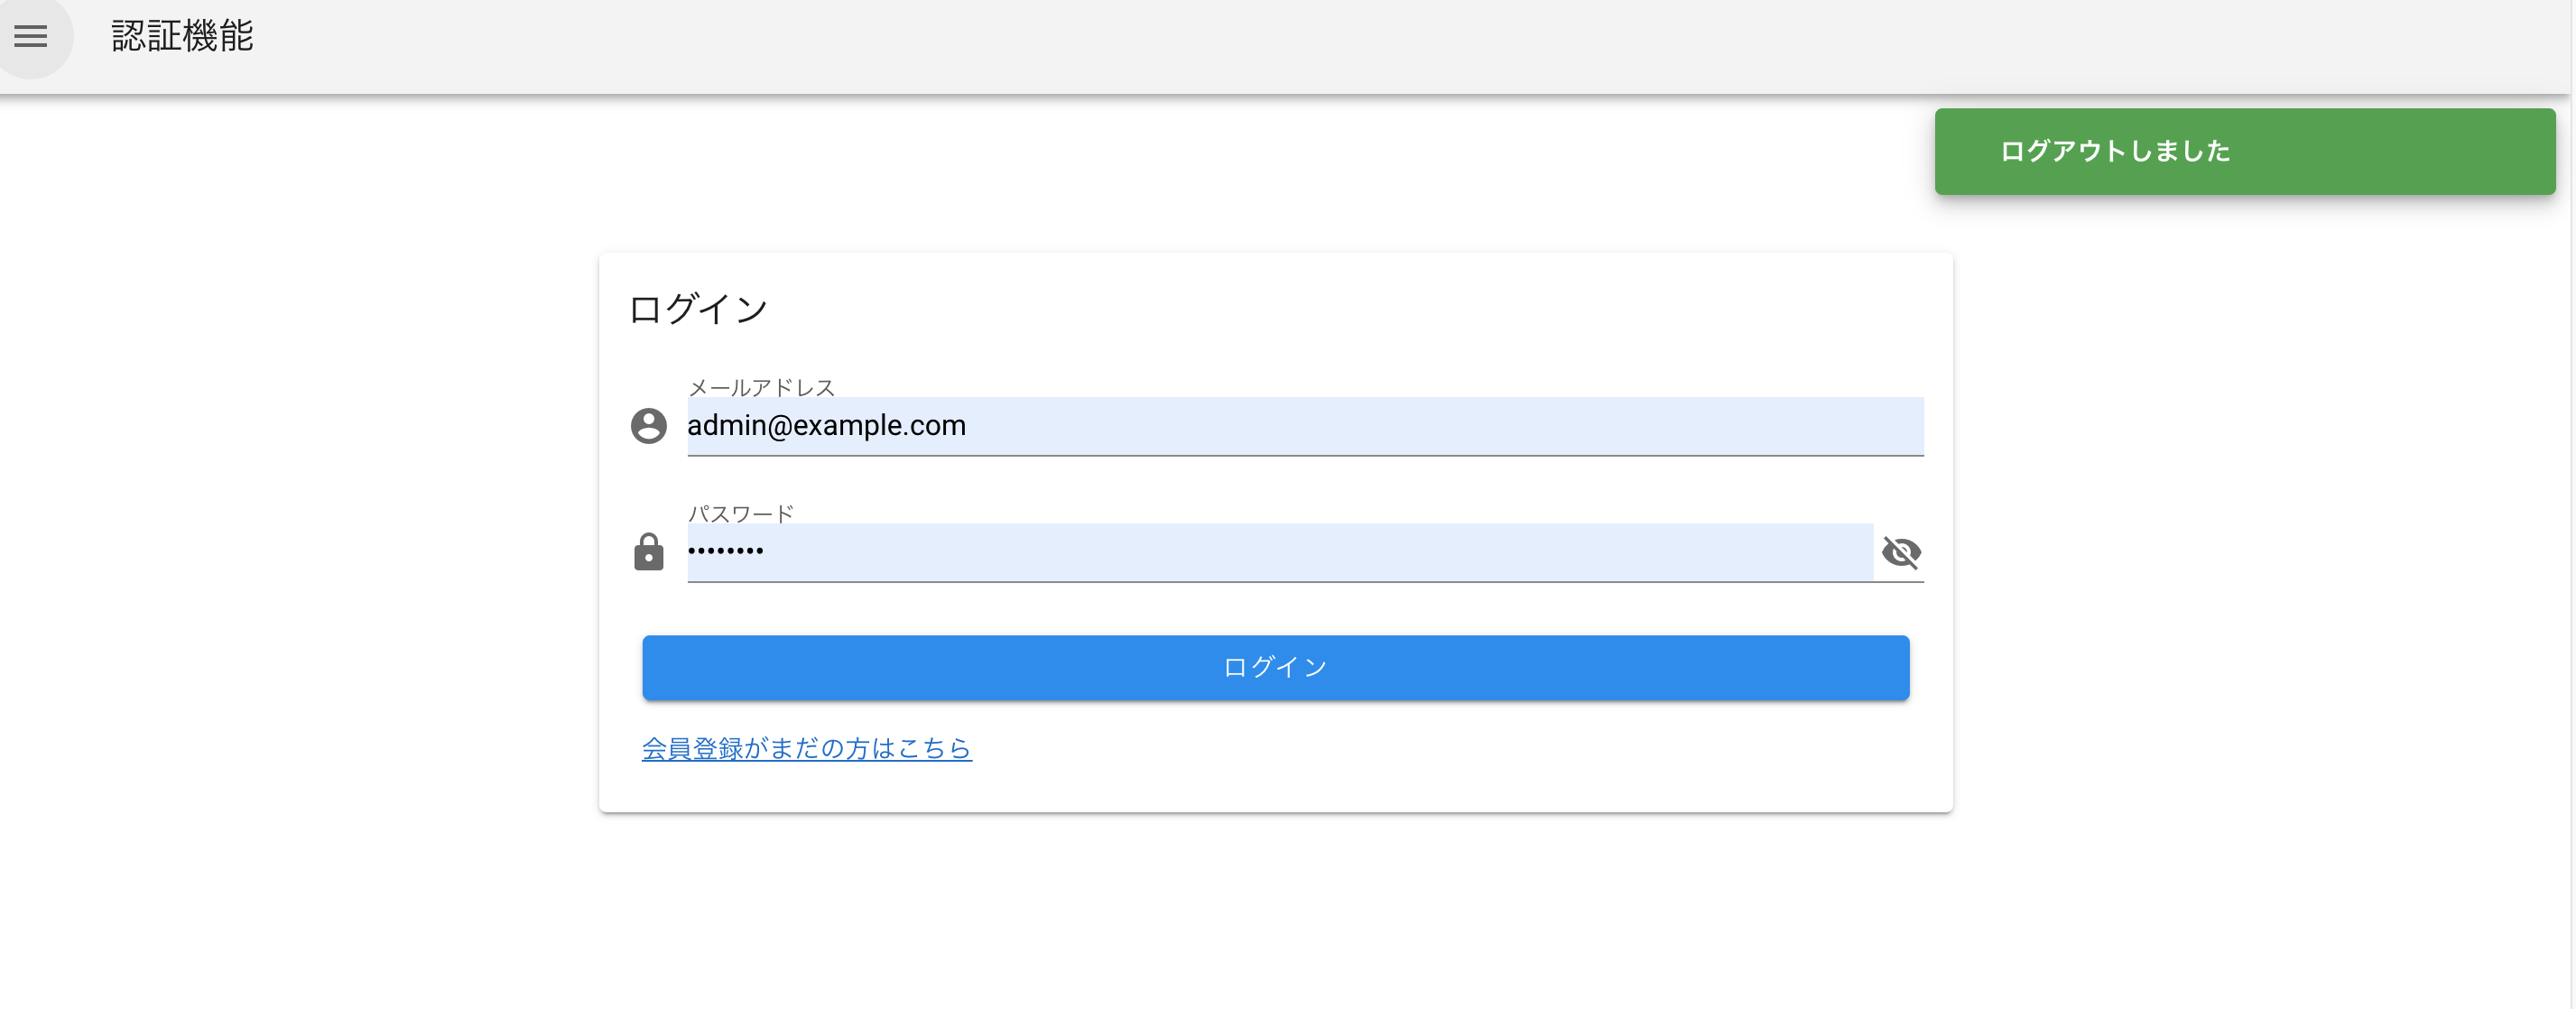
localStorage内のヘッダー情報の削除を行う - フラッシュメッセージで「ログアウトしました」と表示する
新規登録の流れ
- メールアドレス/パスワード/パスワード再確認を入力してHTTPリクエストをapi側へ送信
- 登録正常:正常レスポンスをfront側へ返す
登録異常:エラーメッセージをfront側へ返す
*今回は新規登録後にログイン状態にしたい為、新規登録とログインを合わせて行います
ページデザイン
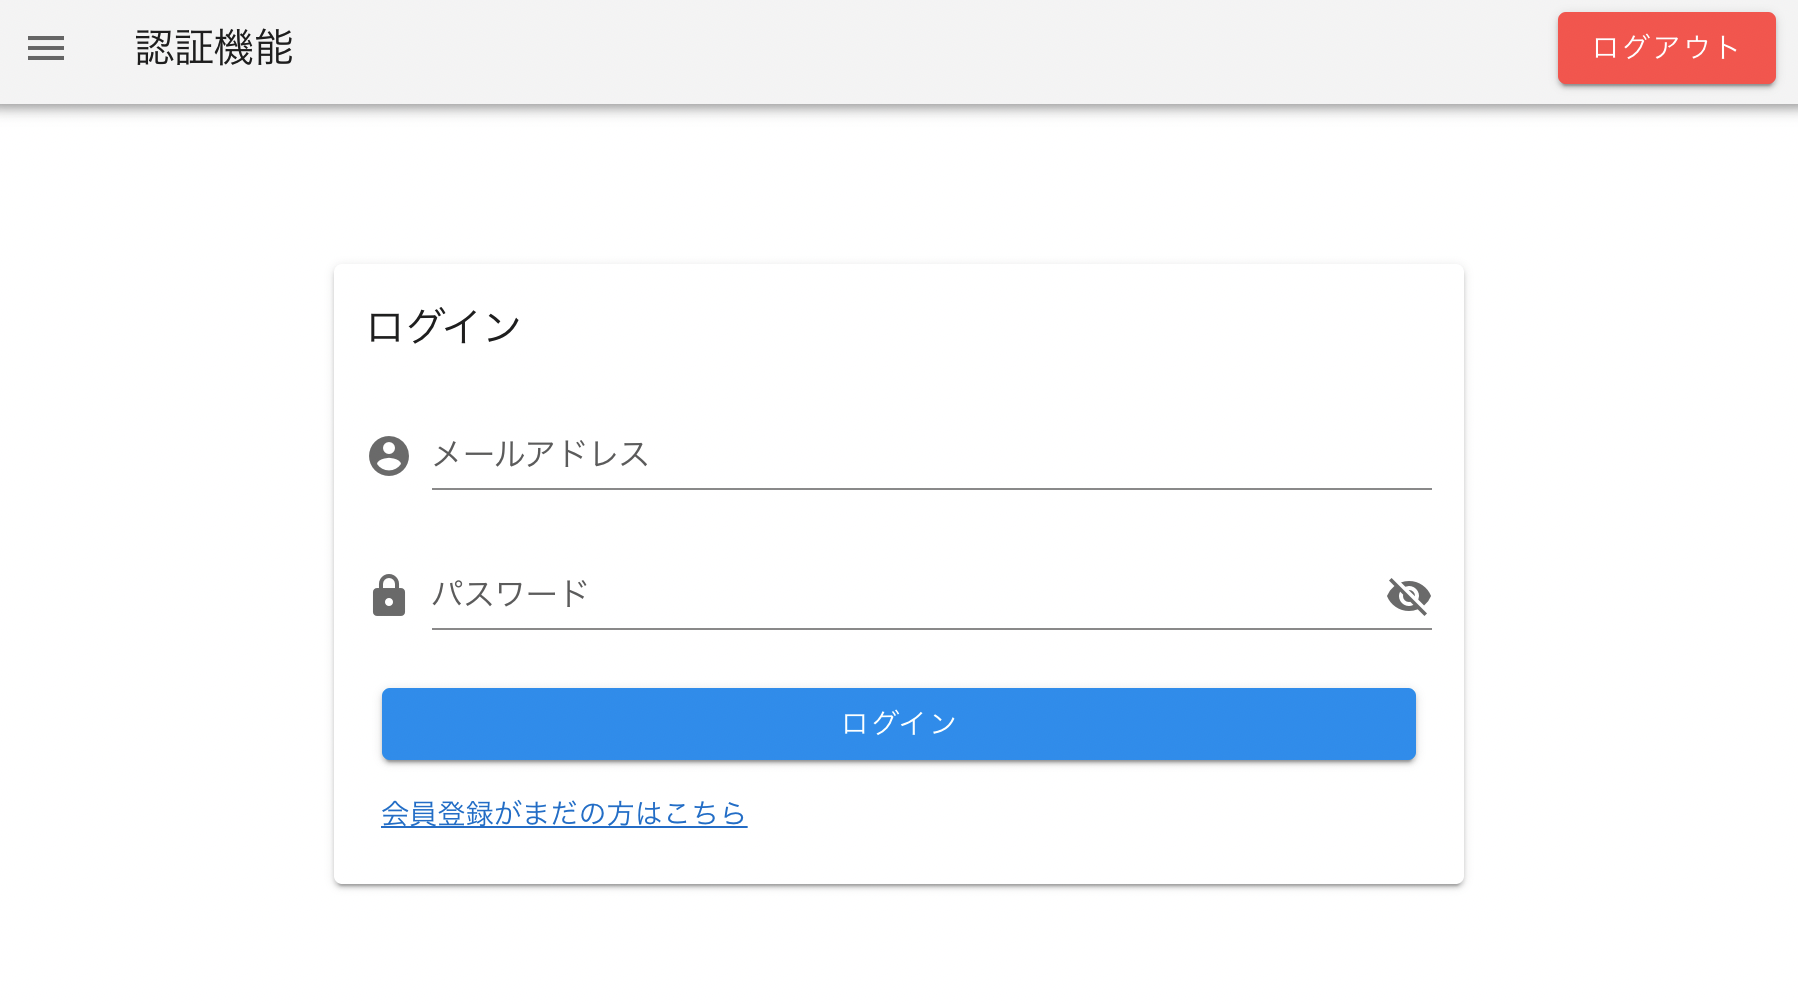
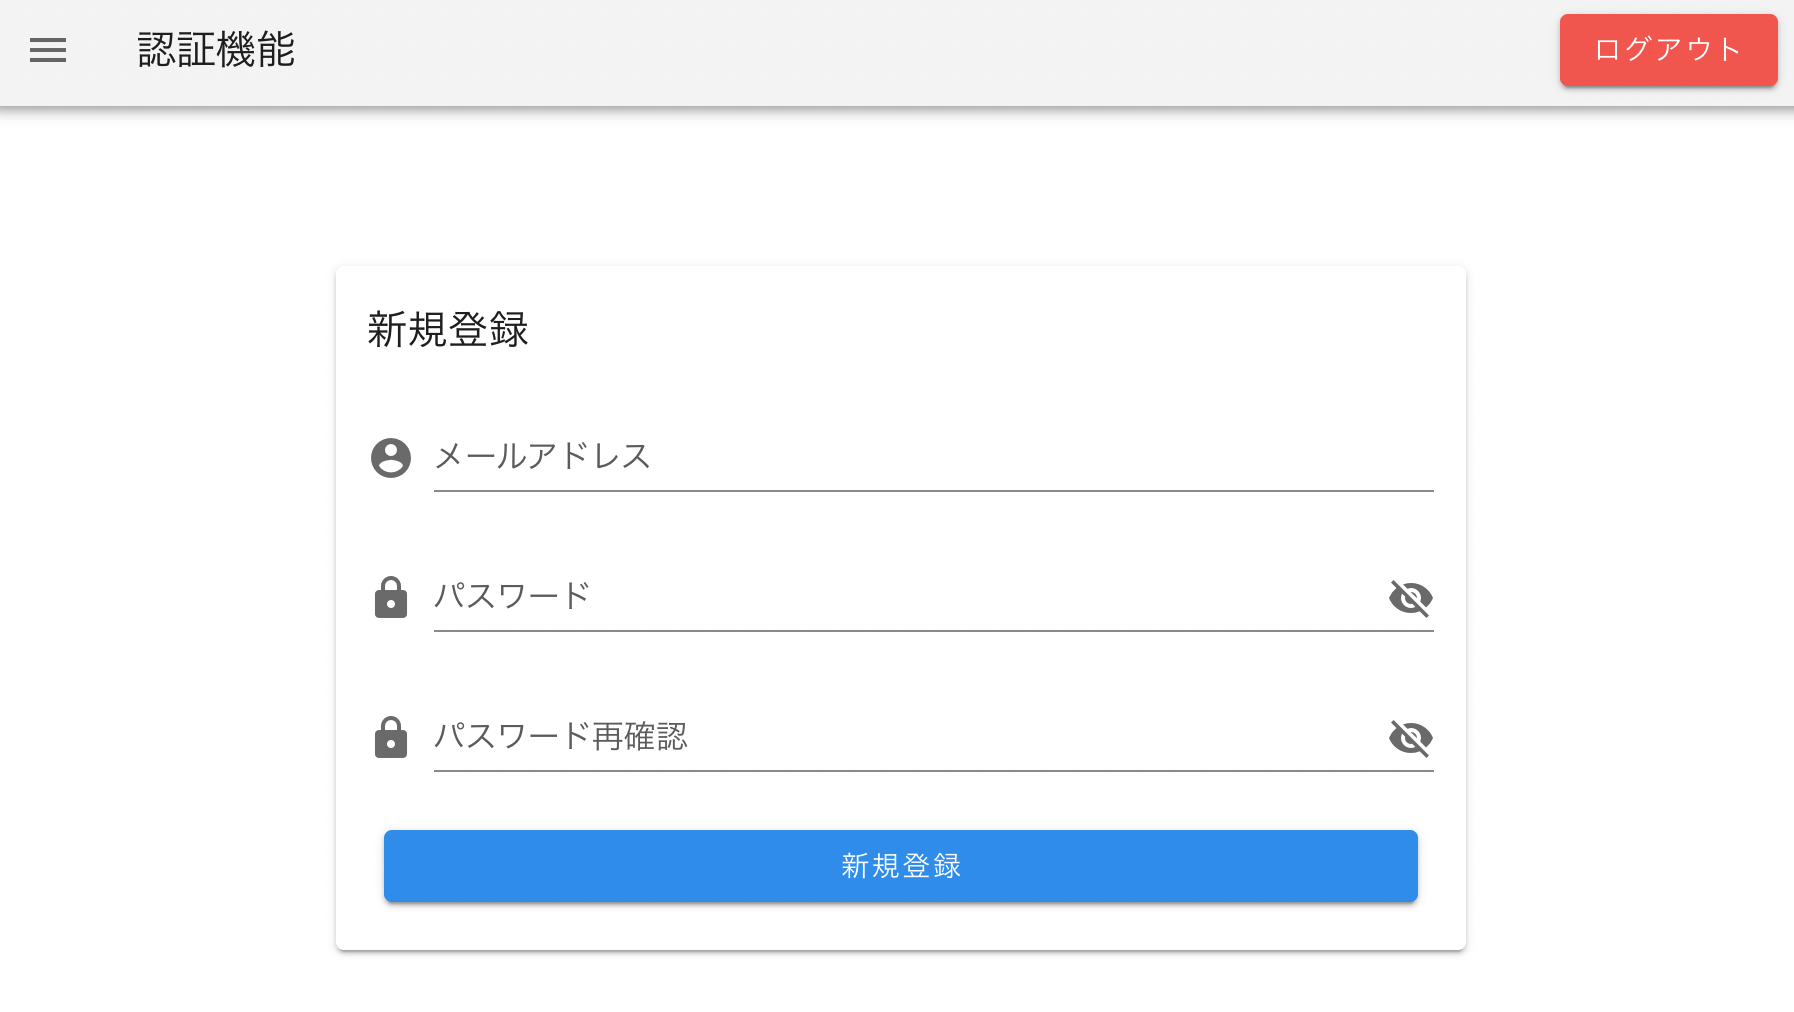
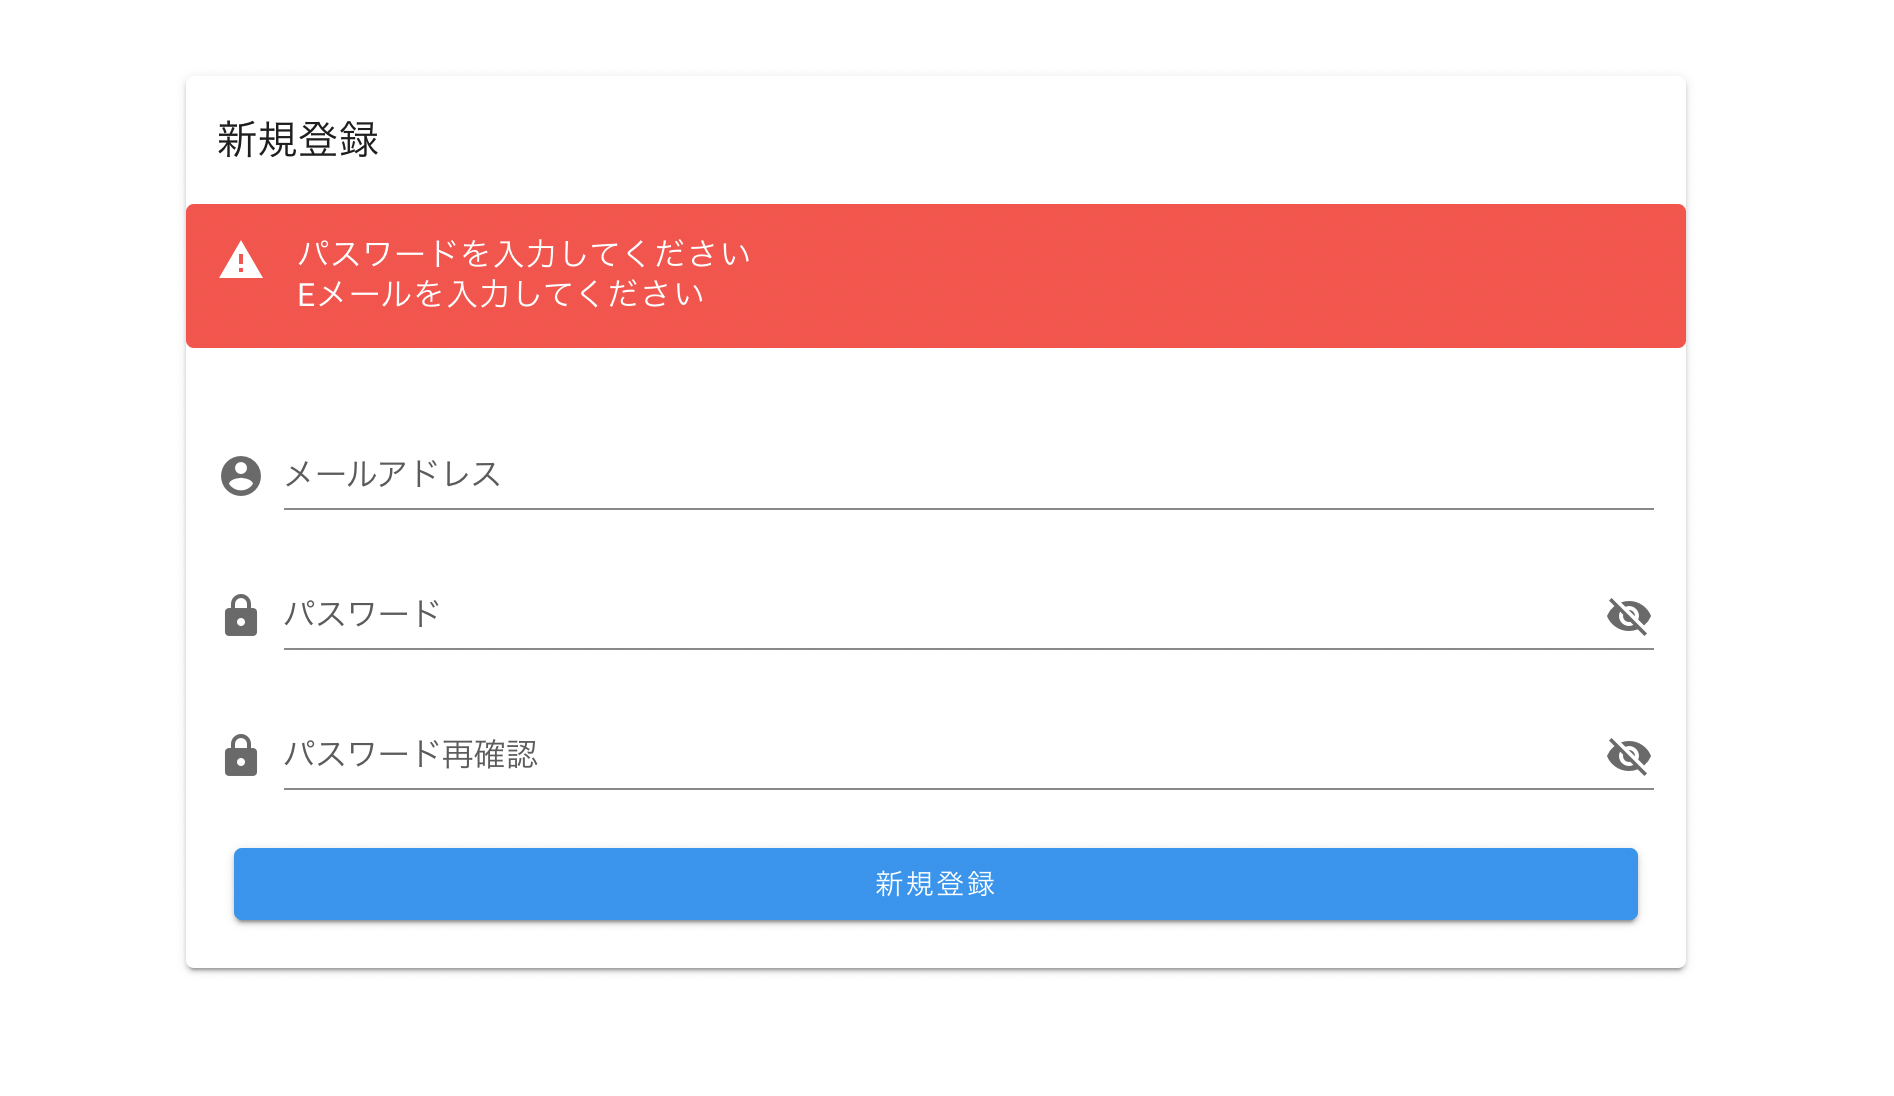
今回はvuetifyを使用し下記画像のようなデザインにします。
※背景が黒になっている方はnuxt.config.jsの55行目付近のdarkをfalseに変更してください
front側
<template>
<v-app>
<v-navigation-drawer
v-model="drawer"
:mini-variant="miniVariant"
:clipped="clipped"
fixed
app
>
<v-list>
<v-list-item
v-for="(item, i) in items"
:key="i"
:to="item.to"
router
exact
>
<v-list-item-content>
<v-list-item-title v-text="item.title" />
</v-list-item-content>
</v-list-item>
</v-list>
</v-navigation-drawer>
<v-app-bar
:clipped-left="clipped"
fixed
app
>
<v-app-bar-nav-icon @click.stop="drawer = !drawer" />
<v-toolbar-title v-text="title" />
<v-spacer />
<span v-if="$auth.loggedIn">
<v-btn
color="error"
dark
@click="logout"
>
ログアウト
</v-btn>
</span>
</v-app-bar>
<v-main>
<v-container>
<FlashMessage />
<Nuxt />
</v-container>
</v-main>
<v-navigation-drawer
v-model="rightDrawer"
:right="right"
temporary
fixed
>
<v-list>
<v-list-item @click.native="right = !right">
<v-list-item-action>
<v-icon light>
mdi-repeat
</v-icon>
</v-list-item-action>
<v-list-item-title>Switch drawer (click me)</v-list-item-title>
</v-list-item>
</v-list>
</v-navigation-drawer>
<v-footer
:absolute="!fixed"
app
>
<span>© {{ new Date().getFullYear() }}</span>
</v-footer>
</v-app>
</template>
<script>
export default {
data () {
return {
clipped: false,
drawer: false,
fixed: false,
items: [
{
title: 'ログイン',
to: '/'
},
{
title: '新規登録',
to: '/sign_up'
}
],
miniVariant: false,
right: true,
rightDrawer: false,
title: '認証機能'
}
},
methods: {
logout () {
this.$axios.delete('/api/v1/auth/sign_out', {
headers: {
uid: localStorage.getItem('uid'),
'access-token': localStorage.getItem('access-token'),
client: localStorage.getItem('client')
}
})
.then((res) => {
this.$auth.logout()
localStorage.removeItem('uid')
localStorage.removeItem('access-token')
localStorage.removeItem('client')
this.$router.push('/')
this.$store.dispatch(
'flashMessage/showMessage',
{
message: 'ログアウトしました',
type: 'success',
status: true
},
{ root: true }
)
this.$store.commit('user_information/logout')
})
}
}
}
</script>
ログインページ
<template>
  <v-main>
    <v-container>
      <v-row justify="center" align-content="center" class="text-caption">
        <v-col cols="8">
          <v-card>
            <v-card-title>
              ログイン
            </v-card-title>
            <Notification v-if="errors" :messages="errors" />
            <v-card-text>
              <v-form>
                <v-text-field
                  v-model="email"
                  prepend-icon="mdi-account-circle"
                  label="メールアドレス"
                />
                <v-text-field
                  v-model="password"
                  :type="showPassword ? 'text' : 'password'"
                  :append-icon="showPassword ? 'mdi-eye' : 'mdi-eye-off'"
                  prepend-icon="mdi-lock"
                  label="パスワード"
                  @click:append="showPassword = !showPassword"
                />
              </v-form>
              <v-card-actions>
                <v-btn
                  color="info"
                  block
                  @click="loginWithAuthModule"
                >
                  ログイン
                </v-btn>
              </v-card-actions>
              <v-layout justify-right>
                <v-card-actions>
                  <nuxt-link to="/sign_up">
                    会員登録がまだの方はこちら
                  </nuxt-link>
                </v-card-actions>
              </v-layout>
            </v-card-text>
          </v-card>
        </v-col>
      </v-row>
    </v-container>
  </v-main>
</template>

<script>
export default {
  data () {
    return {
      message: '新規登録です',
      showPassword: false,
      email: '',
      password: '',
      errors: null,
      user: {}
    }
  },
  methods: {
    // loginメソッドの呼び出し
    async loginWithAuthModule () {
      await this.$auth
        .loginWith('local', {
          // emailとpasswordの情報を送信
          data: {
            email: this.email,
            password: this.password
          }
        })
        .then(
          (response) => {
          // 認証に必要な情報をlocalStorageに保存
            localStorage.setItem('access-token', response.headers['access-token'])
            localStorage.setItem('client', response.headers.client)
            localStorage.setItem('uid', response.headers.uid)
            localStorage.setItem('token-type', response.headers['token-type'])
            this.$router.push('/')
            this.$store.dispatch(
              'flashMessage/showMessage',
              {
                message: 'ログインしました.',
                type: 'success',
                status: true
              },
              { root: true }
            )
            this.user = response.data.data
            this.$store.dispatch('user_information/setUser', this.user)
            return response
          }
        )
        .catch((e) => {
          this.errors = e.response.data.errors
        })
    },
    authenticate () {
      this.$auth.loginWith('app')
    }
  }
}
</script>

<style scoped>
p {
  font-size: 2em;
}
.v-divider {
  margin: 30px;
  border-width:medium;
}
.v-icon {
  float:left;
}
</style>
新規登録
sign_up.vueファイルの作成
sample $ cd front

front $ touch pages/sign_up.vue
<template>
  <v-main>
    <v-container>
      <v-row justify="center" align-content="center" class="text-caption">
        <v-col cols="8">
          <v-card>
            <v-card-title>
              新規登録
            </v-card-title>
            <Notification v-if="errors" :messages="errors" />
            <v-card-text>
              <v-form>
                <v-text-field
                  v-model="user.email"
                  prepend-icon="mdi-account-circle"
                  label="メールアドレス"
                />
                <v-text-field
                  v-model="user.password"
                  :type="showPassword ? 'text' : 'password'"
                  :append-icon="showPassword ? 'mdi-eye' : 'mdi-eye-off'"
                  prepend-icon="mdi-lock"
                  label="パスワード"
                  @click:append="showPassword = !showPassword"
                />
                <v-text-field
                  v-model="user.password_confirmation"
                  :type="showPassword ? 'text' : 'password'"
                  :append-icon="showPassword ? 'mdi-eye' : 'mdi-eye-off'"
                  prepend-icon="mdi-lock"
                  label="パスワード再確認"
                  @click:append="showPassword = !showPassword"
                />
              </v-form>
              <v-card-actions>
                <v-btn
                  color="info"
                  block
                  @click="registerUser"
                >
                  新規登録
                </v-btn>
              </v-card-actions>
            </v-card-text>
          </v-card>
        </v-col>
      </v-row>
    </v-container>
  </v-main>
</template>

<script>
import Notification from '../components/Notification.vue'
export default {
  components: { Notification },
  auth: false,
  data () {
    return {
      showPassword: false,
      errors: null,
      user: {
        email: '',
        password: '',
        password_confirmation: '',
        host: 0,
        host_name: false
      }
    }
  },
  methods: {
    registerUser () {
      this.$axios.post('/api/v1/auth', this.user)
        .then((response) => {
          this.$router.push('/')
          this.$store.dispatch(
            'flashMessage/showMessage',
            {
              message: '新規登録しました',
              type: 'success',
              status: true
            },
            { root: true }
          )
          this.loginWithAuthModule()
        })
        .catch((e) => {
          this.errors = e.response.data.errors.full_messages
        })
    },
    loginWithAuthModule () {
      this.$auth
        .loginWith('local', {
          // emailとpasswordの情報を送信
          data: {
            email: this.user.email,
            password: this.user.password
          }
        })
        .then(
          (response) => {
            // レスポンスで返ってきた、認証に必要な情報をlocalStorageに保存
            localStorage.setItem('access-token', response.headers['access-token'])
            localStorage.setItem('client', response.headers.client)
            localStorage.setItem('uid', response.headers.uid)
            localStorage.setItem('token-type', response.headers['token-type'])
            this.user = response.data
            this.$store.commit('user_information/login', this.user)
            return response
          }
        )
    }
  }
}
</script>

<style scoped>
p {
  font-size: 2em;
}
.v-divider {
  margin: 30px;
  border-width:medium;
}
.v-icon {
  float:left;
}
</style>
コンポーネントの追加
フラッシュメッセージ用
front $ touch conponents/FlashMessage.vue
<template>
  <v-snackbar
    v-model="status"
    transition="slide-x-reverse-transition"
    right
    top
    :color="type"
  >
    <div class="ml-5 font-weight-bold white--text">
      {{ message }}
    </div>
  </v-snackbar>
</template>

<script>
import { mapGetters } from 'vuex'
export default {
  computed: {
    ...mapGetters({
      message: 'flashMessage/message',
      type: 'flashMessage/type',
      status: 'flashMessage/status'
    })
  }
}
</script>
エラーメッセージ用
front $ touch conponents/Notification.vue
<template>
  <v-alert
    type="error"
  >
    <span v-for="m in messages" :key="m.id">
      <span>{{ m }}</span><br>
    </span>
  </v-alert>
</template>

<script>
export default {
  name: 'Notification',
  props: {
    messages: {
      type: Array,
      reauired: false,
      default: () => {}
    }
  }
}
</script>
authModuleの追加
sample $ docker-compose run front yarn add @nuxtjs/auth
インストール完了後、nuxt.config.jsに追加
 modules: [
    '@nuxtjs/axios',
    '@nuxtjs/auth' //追加
  ],
authModuleオプション追加
// 追加
 auth: {
    redirect: {
      login: '/',
      logout: '/',
      callback: false,
      home: '/'
    },
    strategies: {
      local: {
        endpoints: {
          login: { url: '/api/v1/auth/sign_in', method: 'post', propertyName: 'token' },
          logout: false,
          callback: false,
          user: false
        }
      }
    }
  }
vuex用のファイルの作成
AuthModuleはVuexを使用して、ユーザの認証情報を管理します。
front/storeディレクトリ内にuser_information.jsを作成します。
front $ touch store/user_information.js
export const state = () => ({
  user: 'null'
})

export const mutations = {
  login (state, payload) {
    state.user = payload
  },
  logout (state) {
    state.user = null
  }
}

export const actions = {
  setUser (context, user) {
    context.commit('login', user)
  }
}

export const getters = {
  getUser: state => state.user
}
フラッシュメッセージ用ファイルの作成
front $ touch store/flashMessage.js
export const state = () => ({
  message: '',
  type: '',
  status: false
})

export const getters = {
  message: state => state.message,
  type: state => state.type,
  status: state => state.status
}

export const mutations = {
  setMessage (state, message) {
    state.message = message
  },
  setType (state, type) {
    state.type = type
  },
  setStatus (state, bool) {
    state.status = bool
  }
}

export const actions = {
  showMessage ({ commit }, { message, type, status }) {
    commit('setMessage', message)
    commit('setType', type)
    commit('setStatus', status)
    setTimeout(() => {
      commit('setStatus', !status)
    }, 3000)
  }
}
api側
フロント側はある程度、デザインが整いましたね
では、続いてRails側をやっていきましょう
# ログイン機能
gem 'devise' # 追加
gem 'devise_token_auth' # 追加
gem 'devise-i18n',        '1.9.4' # 追加

# CORS設定
gem 'rack-cors' # 追加
イメージ作成
gemfileを書き換えたので一度buildを行います
sample $ docker-compose build
devise/devise_token_auth関連ファイル生成
sample $ docker-compose run api bundle exec rails g devise:install

sample $ docker-compose run api bundle exec rails g devise_token_auth:install User auth

sample $ docker-compose run api bundle exec rails db:migrate
devise_token_authの設定
セットアップ項目がコメントアウトされているので必要箇所のコメントアウトを外す
# 8行目付近
config.change_headers_on_each_request = false

# 12行目付近
config.token_lifespan = 2.weeks

# 45行目付近
config.headers_names = {:'access-token' => 'access-token',
                          :'client' => 'client',
                          :'expiry' => 'expiry',
                          :'uid' => 'uid',
                          :'token-type' => 'token-type' }
devise日本語化
module App
  class Application < Rails::Application
    config.load_defaults 6.0

    config.i18n.default_locale = :ja # 追加
    config.api_only = true
  end
en
ja.ymlファイル追加
api $ touch config/locales/ja.yml
ja:
  activerecord:
    errors:
      messages:
        record_invalid: "バリデーションに失敗しました: %{errors}"
        restrict_dependent_destroy:
          has_one: "%{record}が存在しているので削除できません"
          has_many: "%{record}が存在しているので削除できません"
  date:
    abbr_day_names:
      - 日
      - 月
      - 火
      - 水
      - 木
      - 金
      - 土
    abbr_month_names:
      -
      - 1月
      - 2月
      - 3月
      - 4月
      - 5月
      - 6月
      - 7月
      - 8月
      - 9月
      - 10月
      - 11月
      - 12月
    day_names:
      - 日曜日
      - 月曜日
      - 火曜日
      - 水曜日
      - 木曜日
      - 金曜日
      - 土曜日
    formats:
      default: "%Y/%m/%d"
      long: "%Y年%m月%d日(%a)"
      short: "%m/%d"
    month_names:
      -
      - 1月
      - 2月
      - 3月
      - 4月
      - 5月
      - 6月
      - 7月
      - 8月
      - 9月
      - 10月
      - 11月
      - 12月
    order:
      - :year
      - :month
      - :day
  datetime:
    distance_in_words:
      about_x_hours:
        one: 約1時間
        other: 約%{count}時間
      about_x_months:
        one: 約1ヶ月
        other: 約%{count}ヶ月
      about_x_years:
        one: 約1年
        other: 約%{count}年
      almost_x_years:
        one: 1年弱
        other: "%{count}年弱"
      half_a_minute: 30秒前後
      less_than_x_seconds:
        one: 1秒以内
        other: "%{count}秒未満"
      less_than_x_minutes:
        one: 1分以内
        other: "%{count}分未満"
      over_x_years:
        one: 1年以上
        other: "%{count}年以上"
      x_seconds:
        one: 1秒
        other: "%{count}秒"
      x_minutes:
        one: 1分
        other: "%{count}分"
      x_days:
        one: 1日
        other: "%{count}日"
      x_months:
        one: 1ヶ月
        other: "%{count}ヶ月"
      x_years:
        one: 1年
        other: "%{count}年"
    prompts:
      second: 秒
      minute: 分
      hour: 時
      day: 日
      month: 月
      year: 年
  errors:
    format: "%{attribute}%{message}"
    messages:
      accepted: を受諾してください
      blank: を入力してください
      confirmation: と%{attribute}の入力が一致しません
      empty: を入力してください
      equal_to: は%{count}にしてください
      even: は偶数にしてください
      exclusion: は予約されています
      greater_than: は%{count}より大きい値にしてください
      greater_than_or_equal_to: は%{count}以上の値にしてください
      inclusion: は一覧にありません
      invalid: は不正な値です
      less_than: は%{count}より小さい値にしてください
      less_than_or_equal_to: は%{count}以下の値にしてください
      model_invalid: "バリデーションに失敗しました: %{errors}"
      not_a_number: は数値で入力してください
      not_an_integer: は整数で入力してください
      odd: は奇数にしてください
      other_than: は%{count}以外の値にしてください
      present: は入力しないでください
      required: を入力してください
      taken: はすでに存在します
      too_long: は%{count}文字以内で入力してください
      too_short: は%{count}文字以上で入力してください
      wrong_length: は%{count}文字で入力してください
    template:
      body: 次の項目を確認してください
      header:
        one: "%{model}にエラーが発生しました"
        other: "%{model}に%{count}個のエラーが発生しました"
  helpers:
    select:
      prompt: 選択してください
    submit:
      create: 登録する
      submit: 保存する
      update: 更新する
  number:
    currency:
      format:
        delimiter: ","
        format: "%n%u"
        precision: 0
        separator: "."
        significant: false
        strip_insignificant_zeros: false
        unit: 円
    format:
      delimiter: ","
      precision: 3
      separator: "."
      significant: false
      strip_insignificant_zeros: false
    human:
      decimal_units:
        format: "%n %u"
        units:
          billion: 十億
          million: 百万
          quadrillion: 千兆
          thousand: 千
          trillion: 兆
          unit: ""
      format:
        delimiter: ""
        precision: 3
        significant: true
        strip_insignificant_zeros: true
      storage_units:
        format: "%n%u"
        units:
          byte: バイト
          eb: EB
          gb: GB
          kb: KB
          mb: MB
          pb: PB
          tb: TB
    percentage:
      format:
        delimiter: ""
        format: "%n%"
    precision:
      format:
        delimiter: ""
  support:
    array:
      last_word_connector: "、"
      two_words_connector: "、"
      words_connector: "、"
  time:
    am: 午前
    formats:
      default: "%Y年%m月%d日(%a) %H時%M分%S秒 %z"
      long: "%Y/%m/%d %H:%M"
      short: "%m/%d %H:%M"
    pm: 午後
CSRFチェック
現在のままだとapiリクエストでCSRFチェックに引っかかるのでapplication_controllerとcors.rbを編集
class ApplicationController < ActionController::API
        include DeviseTokenAuth::Concerns::SetUserByToken
        skip_before_action :verify_authenticity_token, if: :devise_controller?, raise: false

end
Rails.application.config.middleware.insert_before 0, Rack::Cors do
  allow do
    origins ENV["API_DOMAIN"] || "localhost:8080"

    resource '*',
      headers: :any,
      expose: ['access-token', 'uid', 'client', 'token-type'], #この行を新たに追加
      methods: [:get, :post, :put, :patch, :delete, :options, :head]
  end
end
ルーティング設定
Rails.application.routes.draw do
  devise_for :users


  namespace :api do
    scope :v1 do
      mount_devise_token_auth_for 'User', at: 'auth'
    end
  end
end
seeds.rb編集
ログインできるように予めユーザをデータベースに登録します。
User.create(email: 'admin@example.com',
            password: 'password')
seedsファイルを反映させる
sample $ docker-compose run api bundle exec rails db:migrate:reset

sample $ docker-compose run api bundle exec rails db:migrate

sample $ docker-compose run api bundle exec rails db:seed
リクエストテスト
さあ それでは実際にリクエストテストを行っていきましょう
今回はAdvanced REST client(ARC)を使用してテストを行います。
インストールがまだの方はこちらを参考にどうぞ
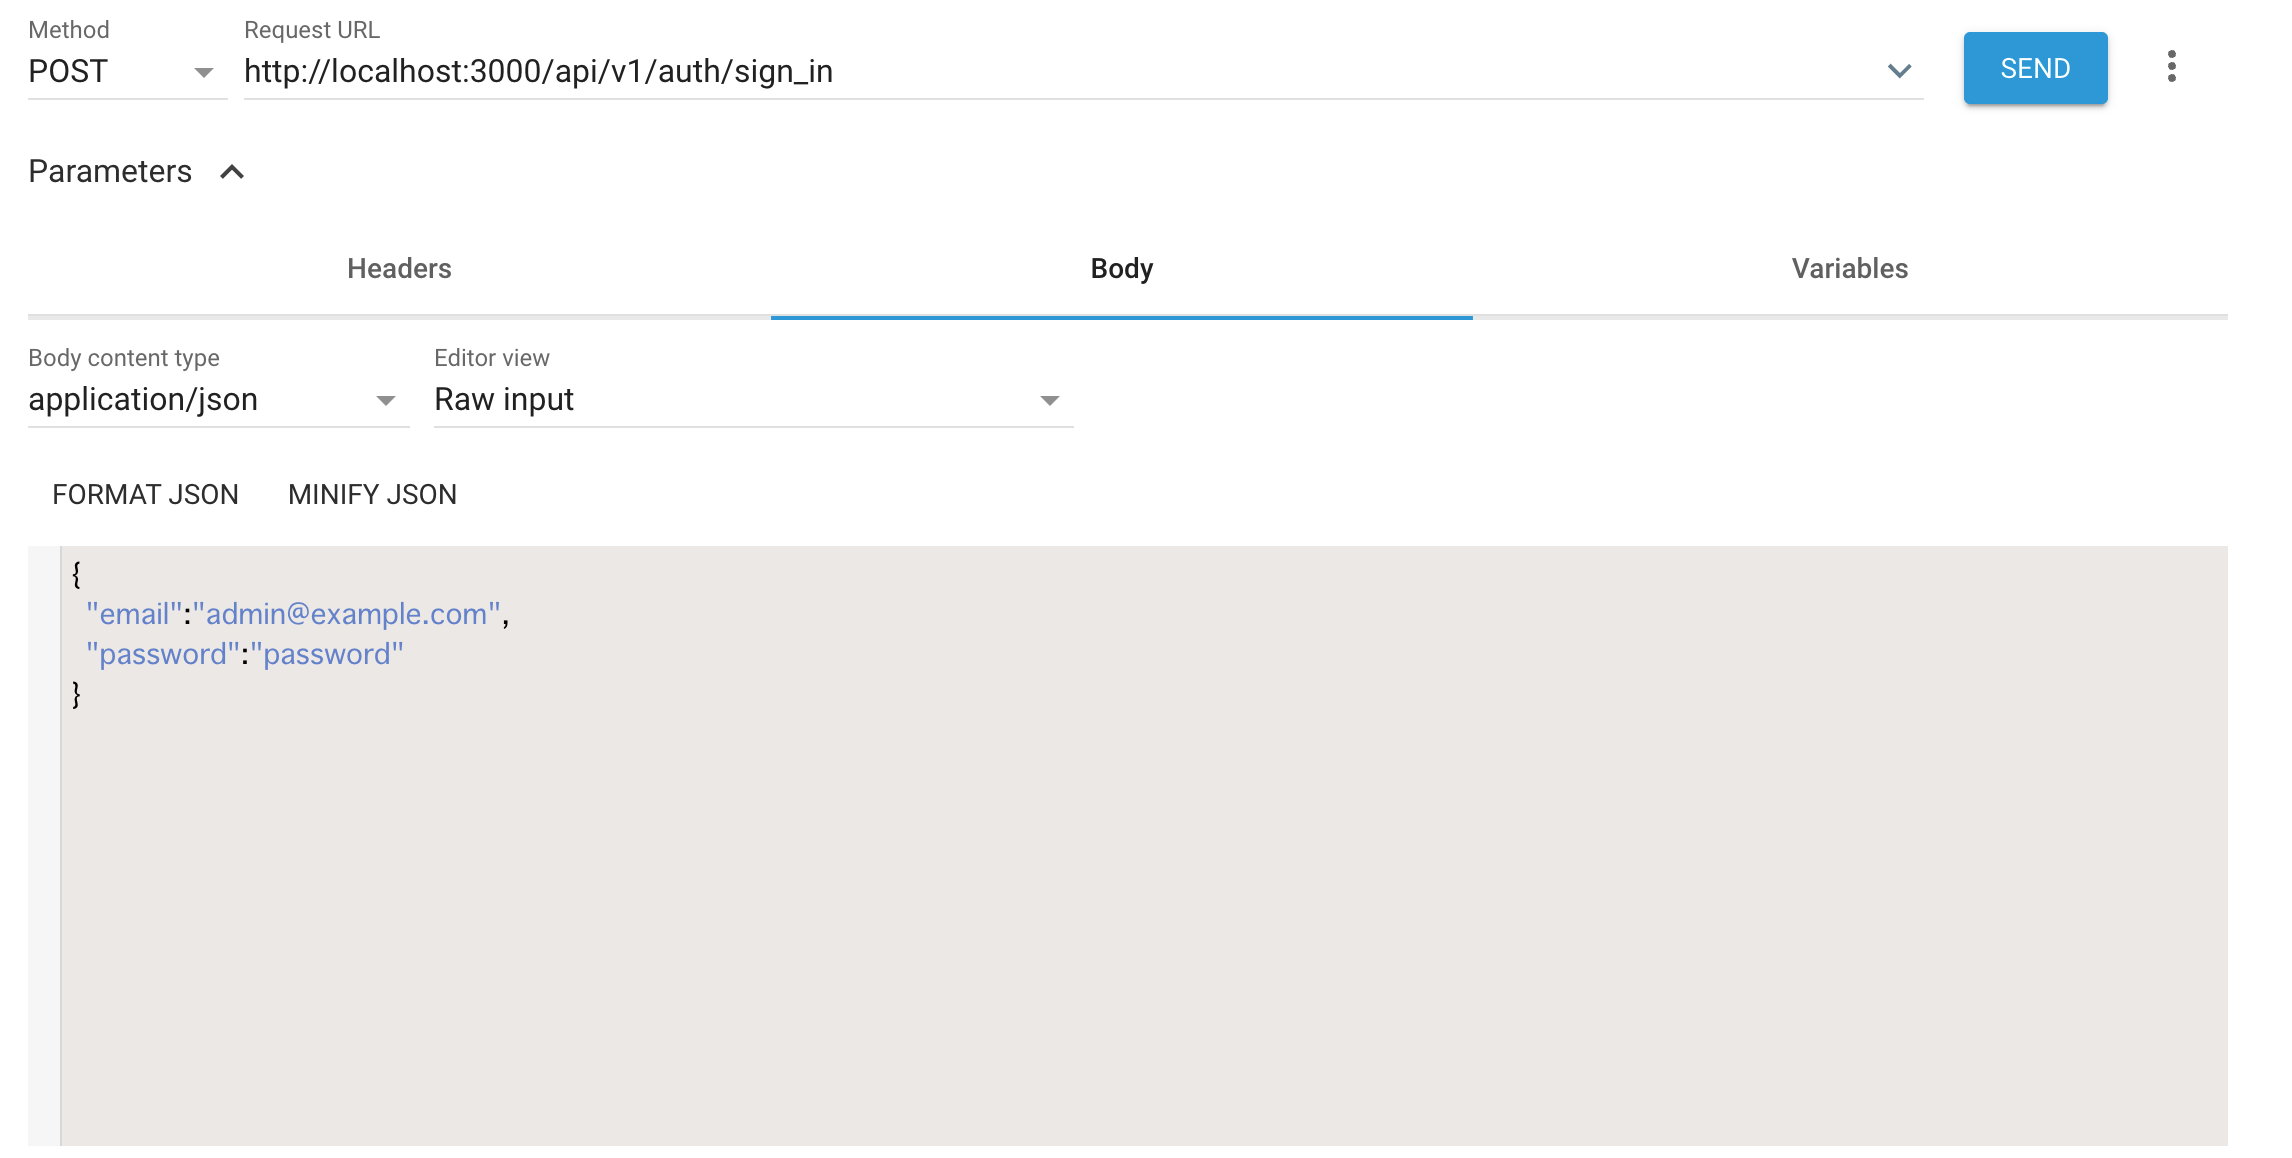
ログイン
- method: post
- URL: http://localhost:3000/api/v1/auth/sign_in
- Body: {"email":"admin@example.com", "password":"password"}
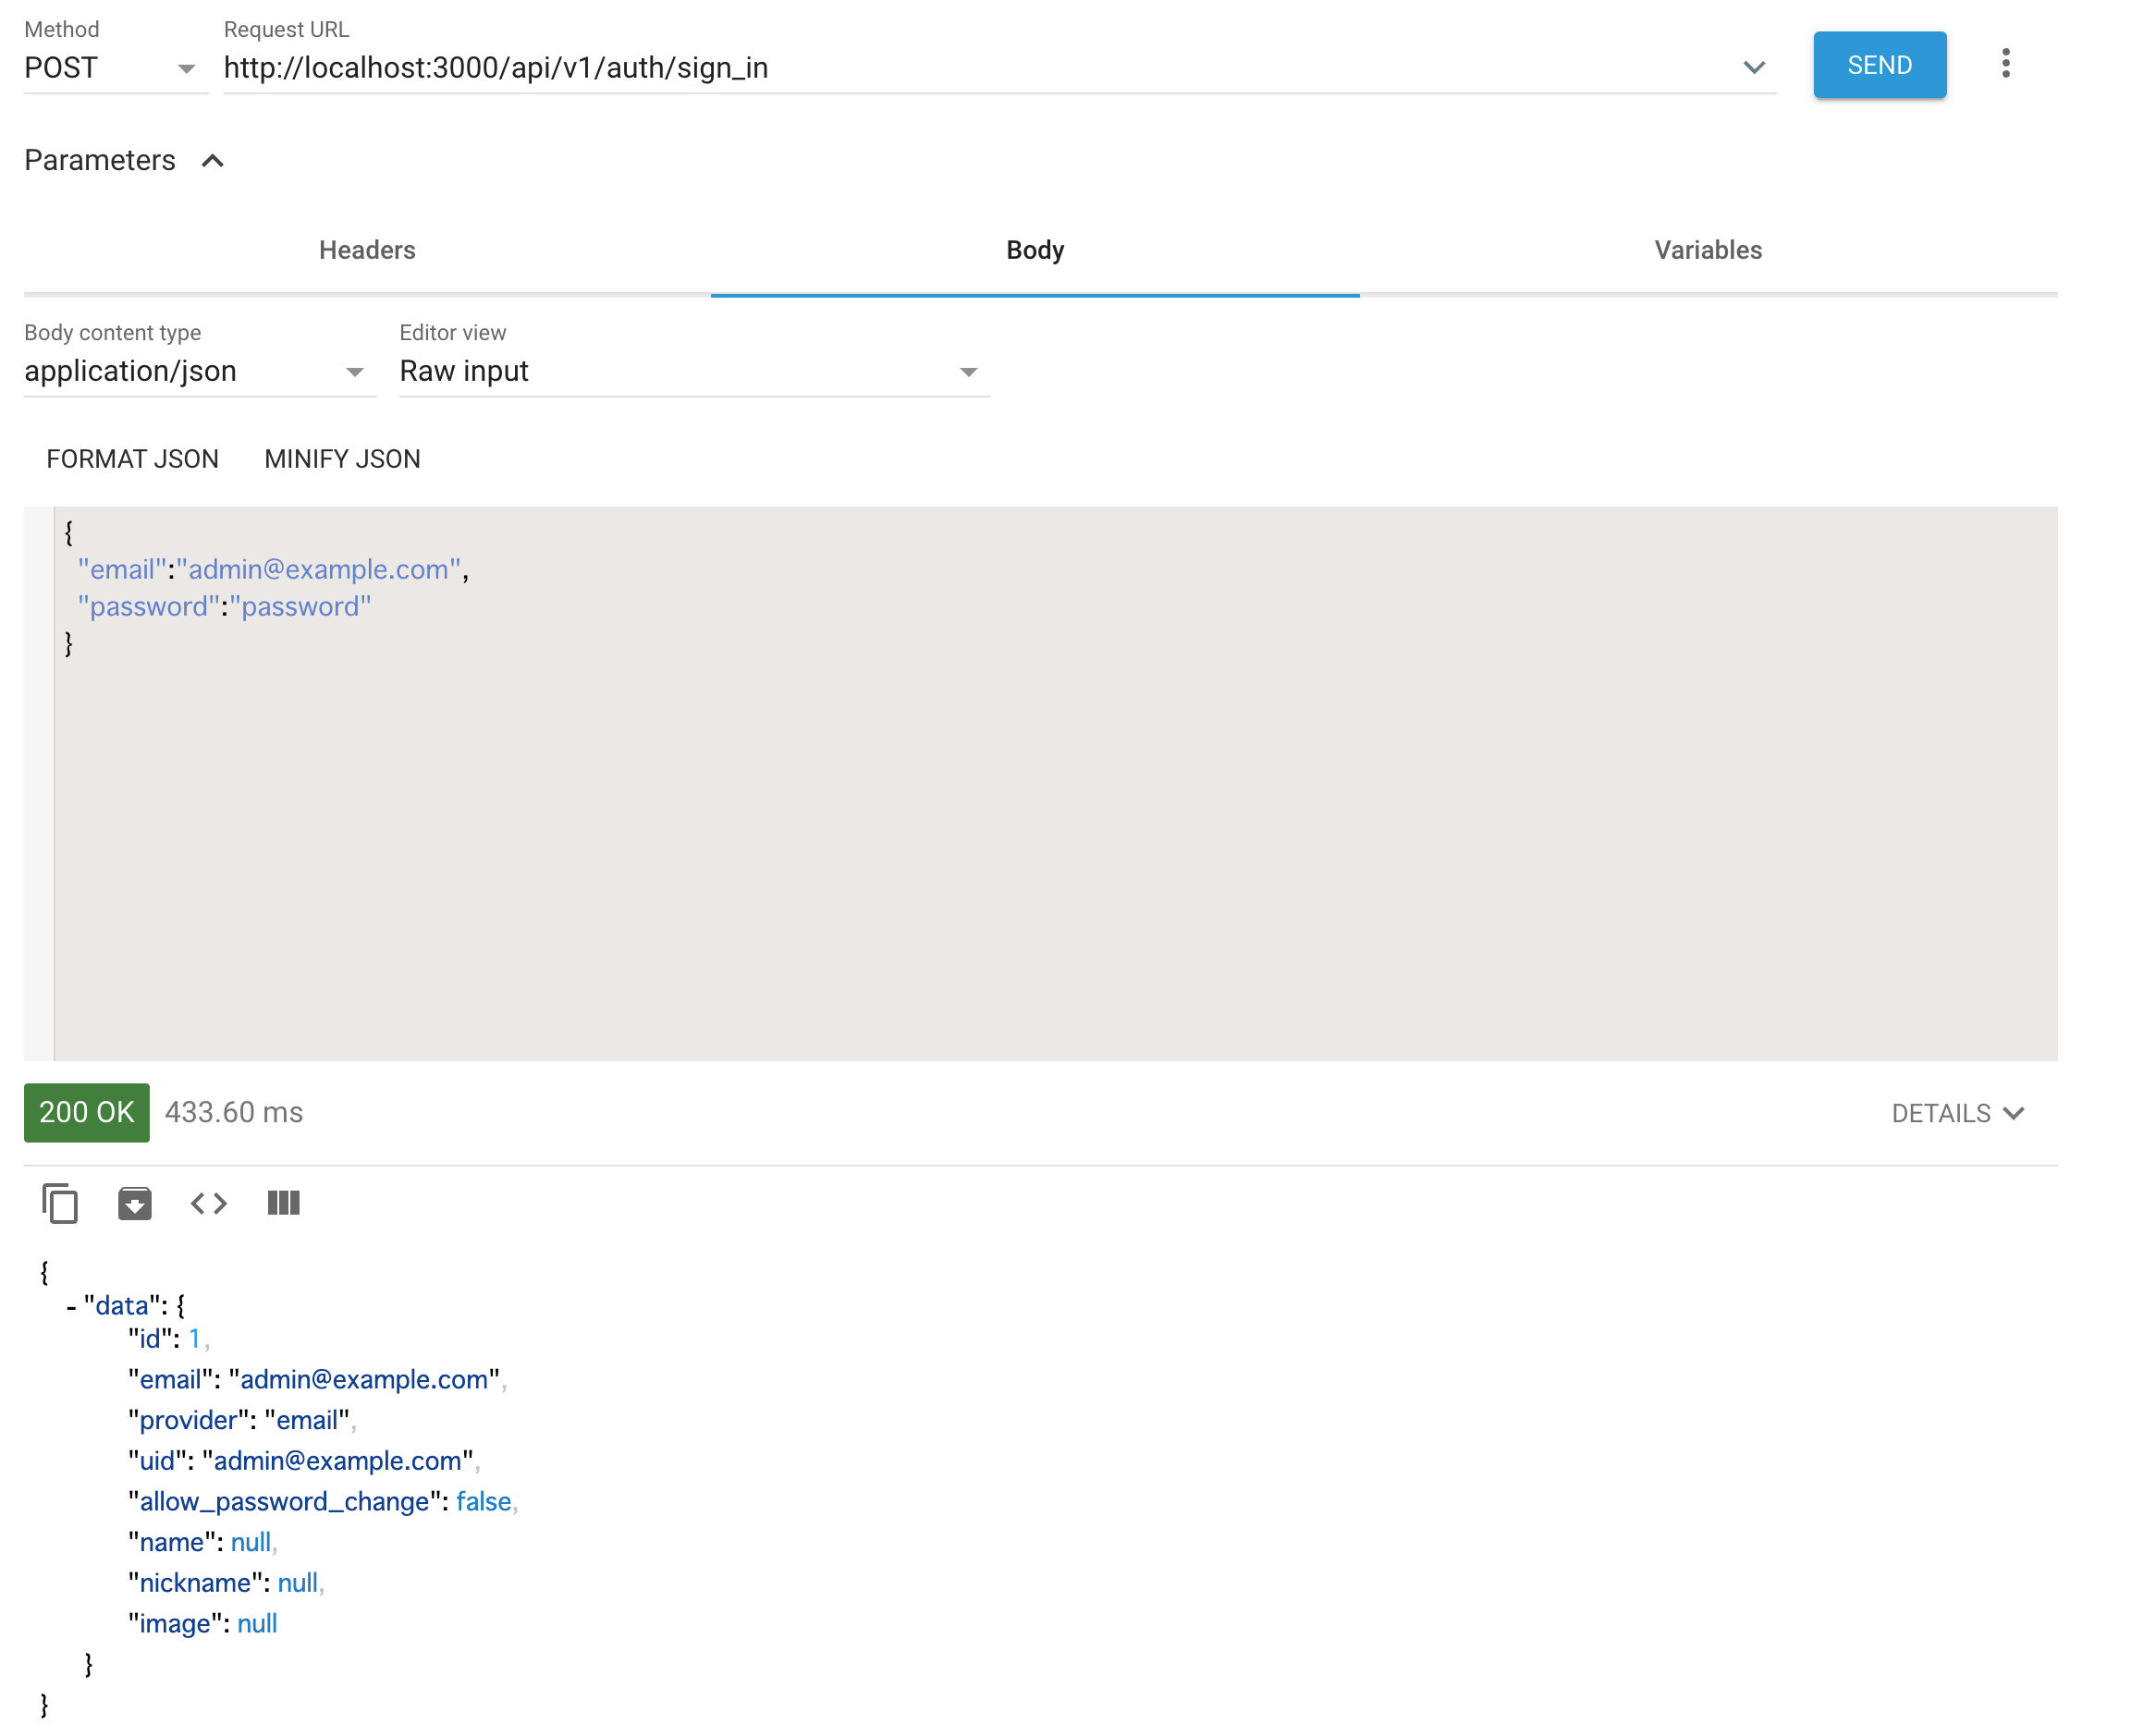
上記項目を選択/入力してsendボタンを押すと成功の場合、レスポンスが返って来ます。
*レスポンス情報のDETAILSを押すとResponse headersを確認できます
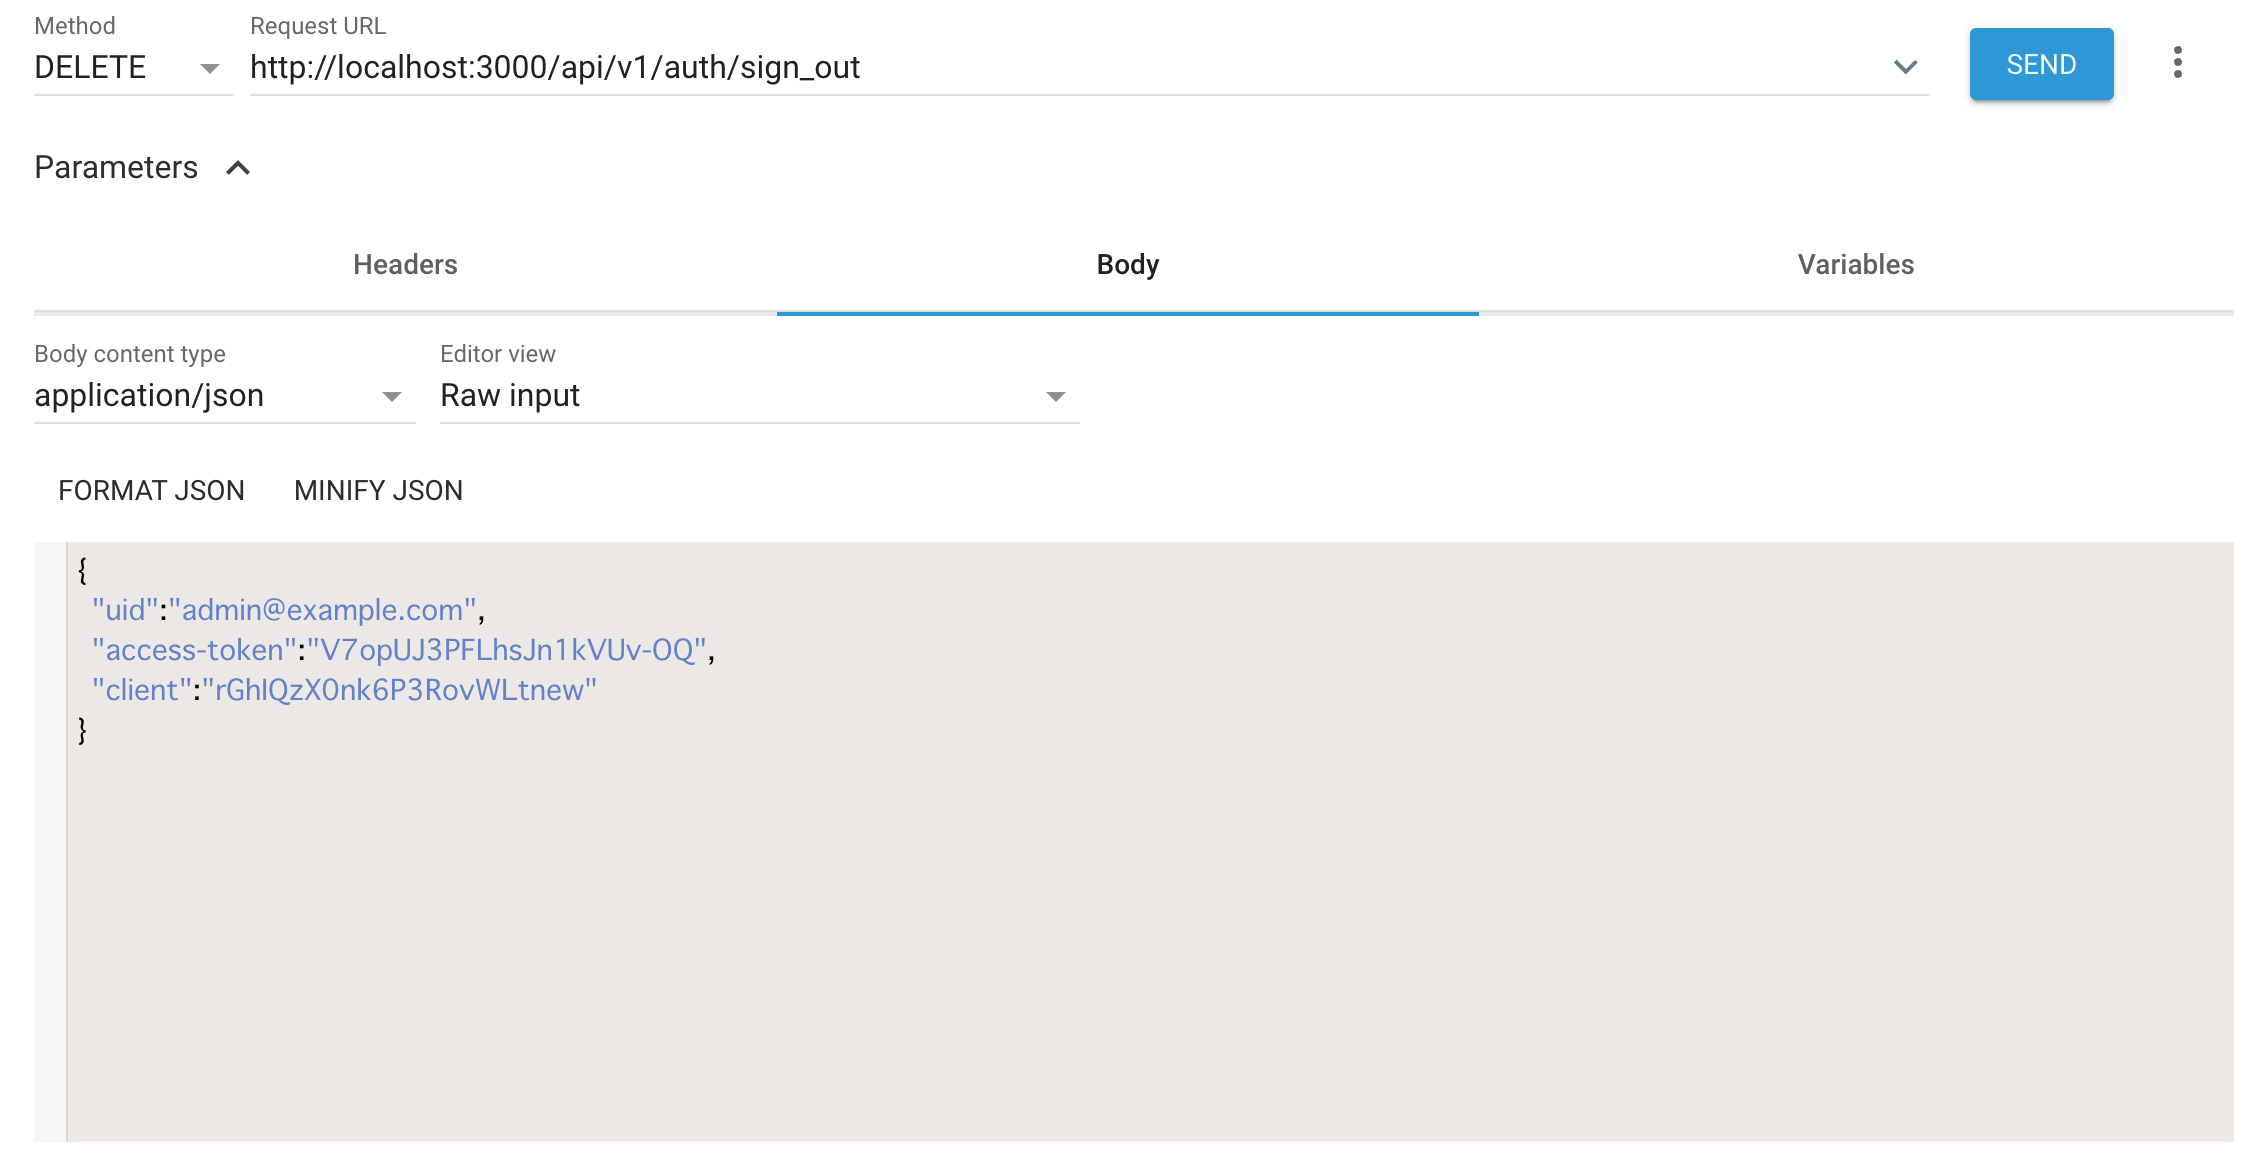
ログアウト
- method: delete
- URL: http://localhost:3000/api/v1/auth/sign_out
- Body: ログインテスト時に取得したResponse headersの
uid/access-token/client情報を乗せる
参考
実際に新規登録/ログイン/ログアウトをしてみよう
sample $ docker-compose up
コンテナ起動後localhost:8080へアクセス
ログイン
成功の場合
- メールアドレス/パスワードを入力してログインボタンを押す
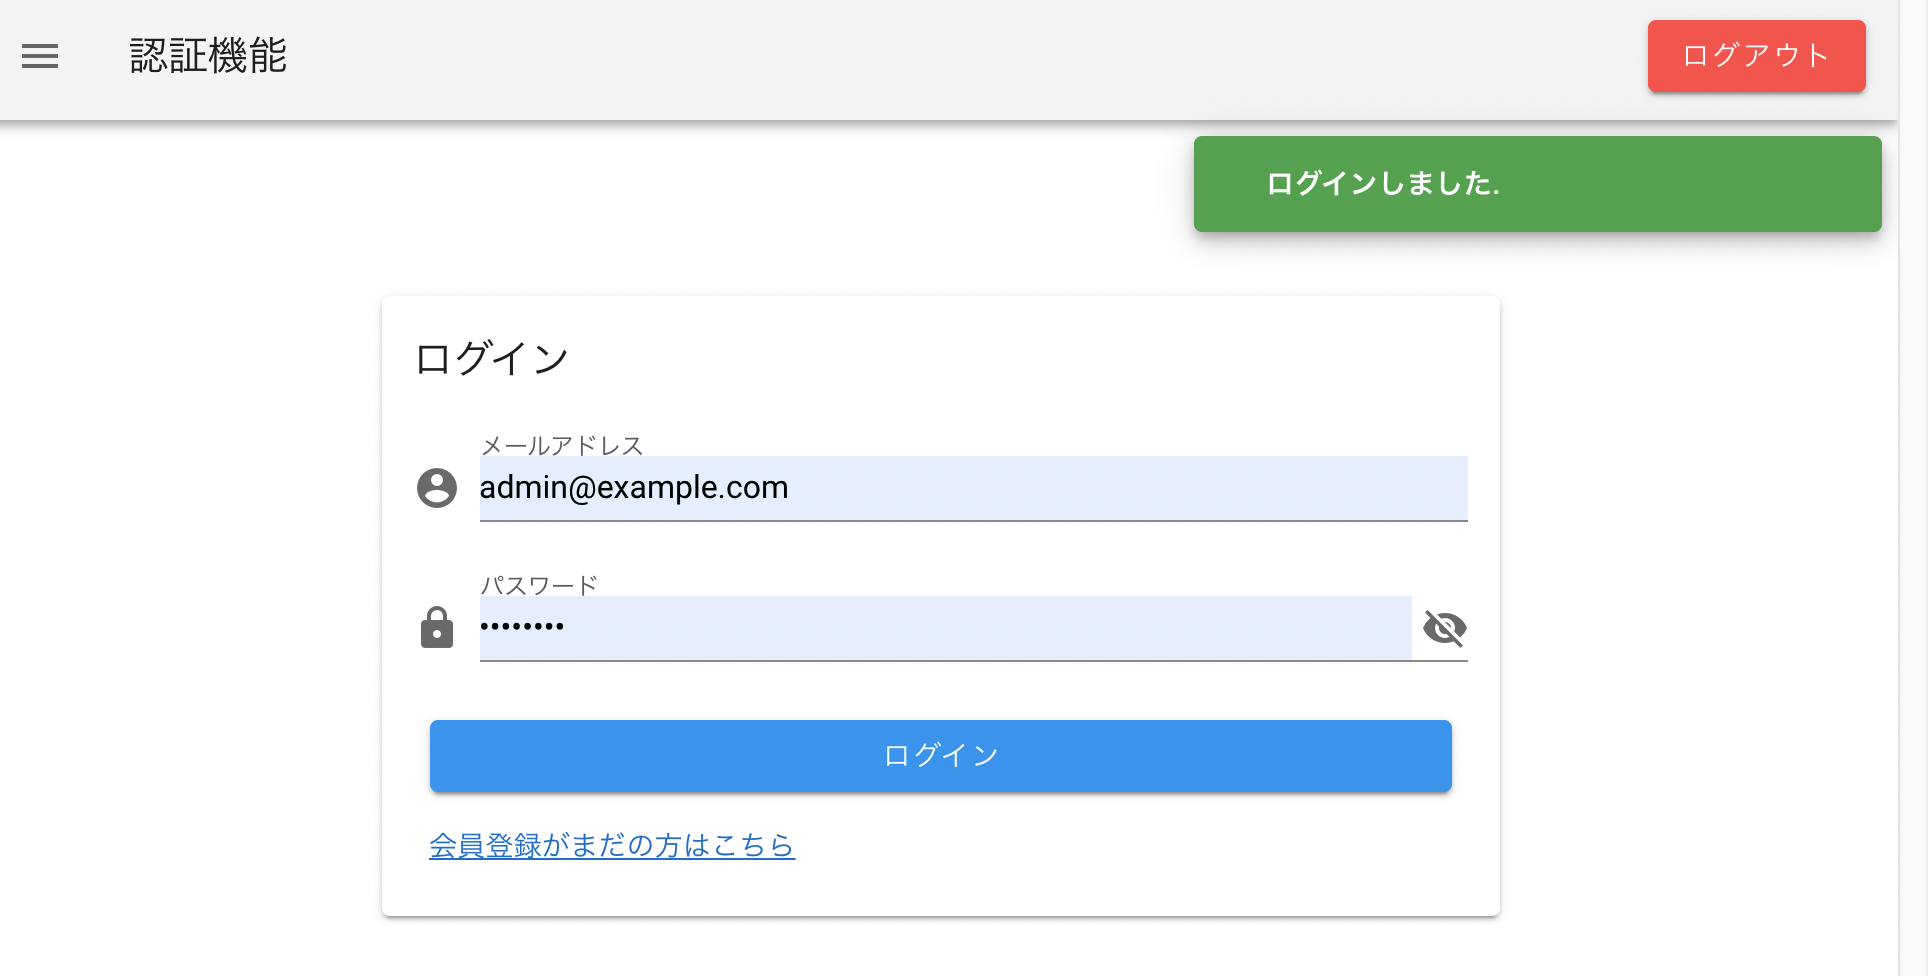
- 画面右側にフラッシュメッセージで
ログインしましたと表示される - 画面右側上部にログアウトボタンが表示される
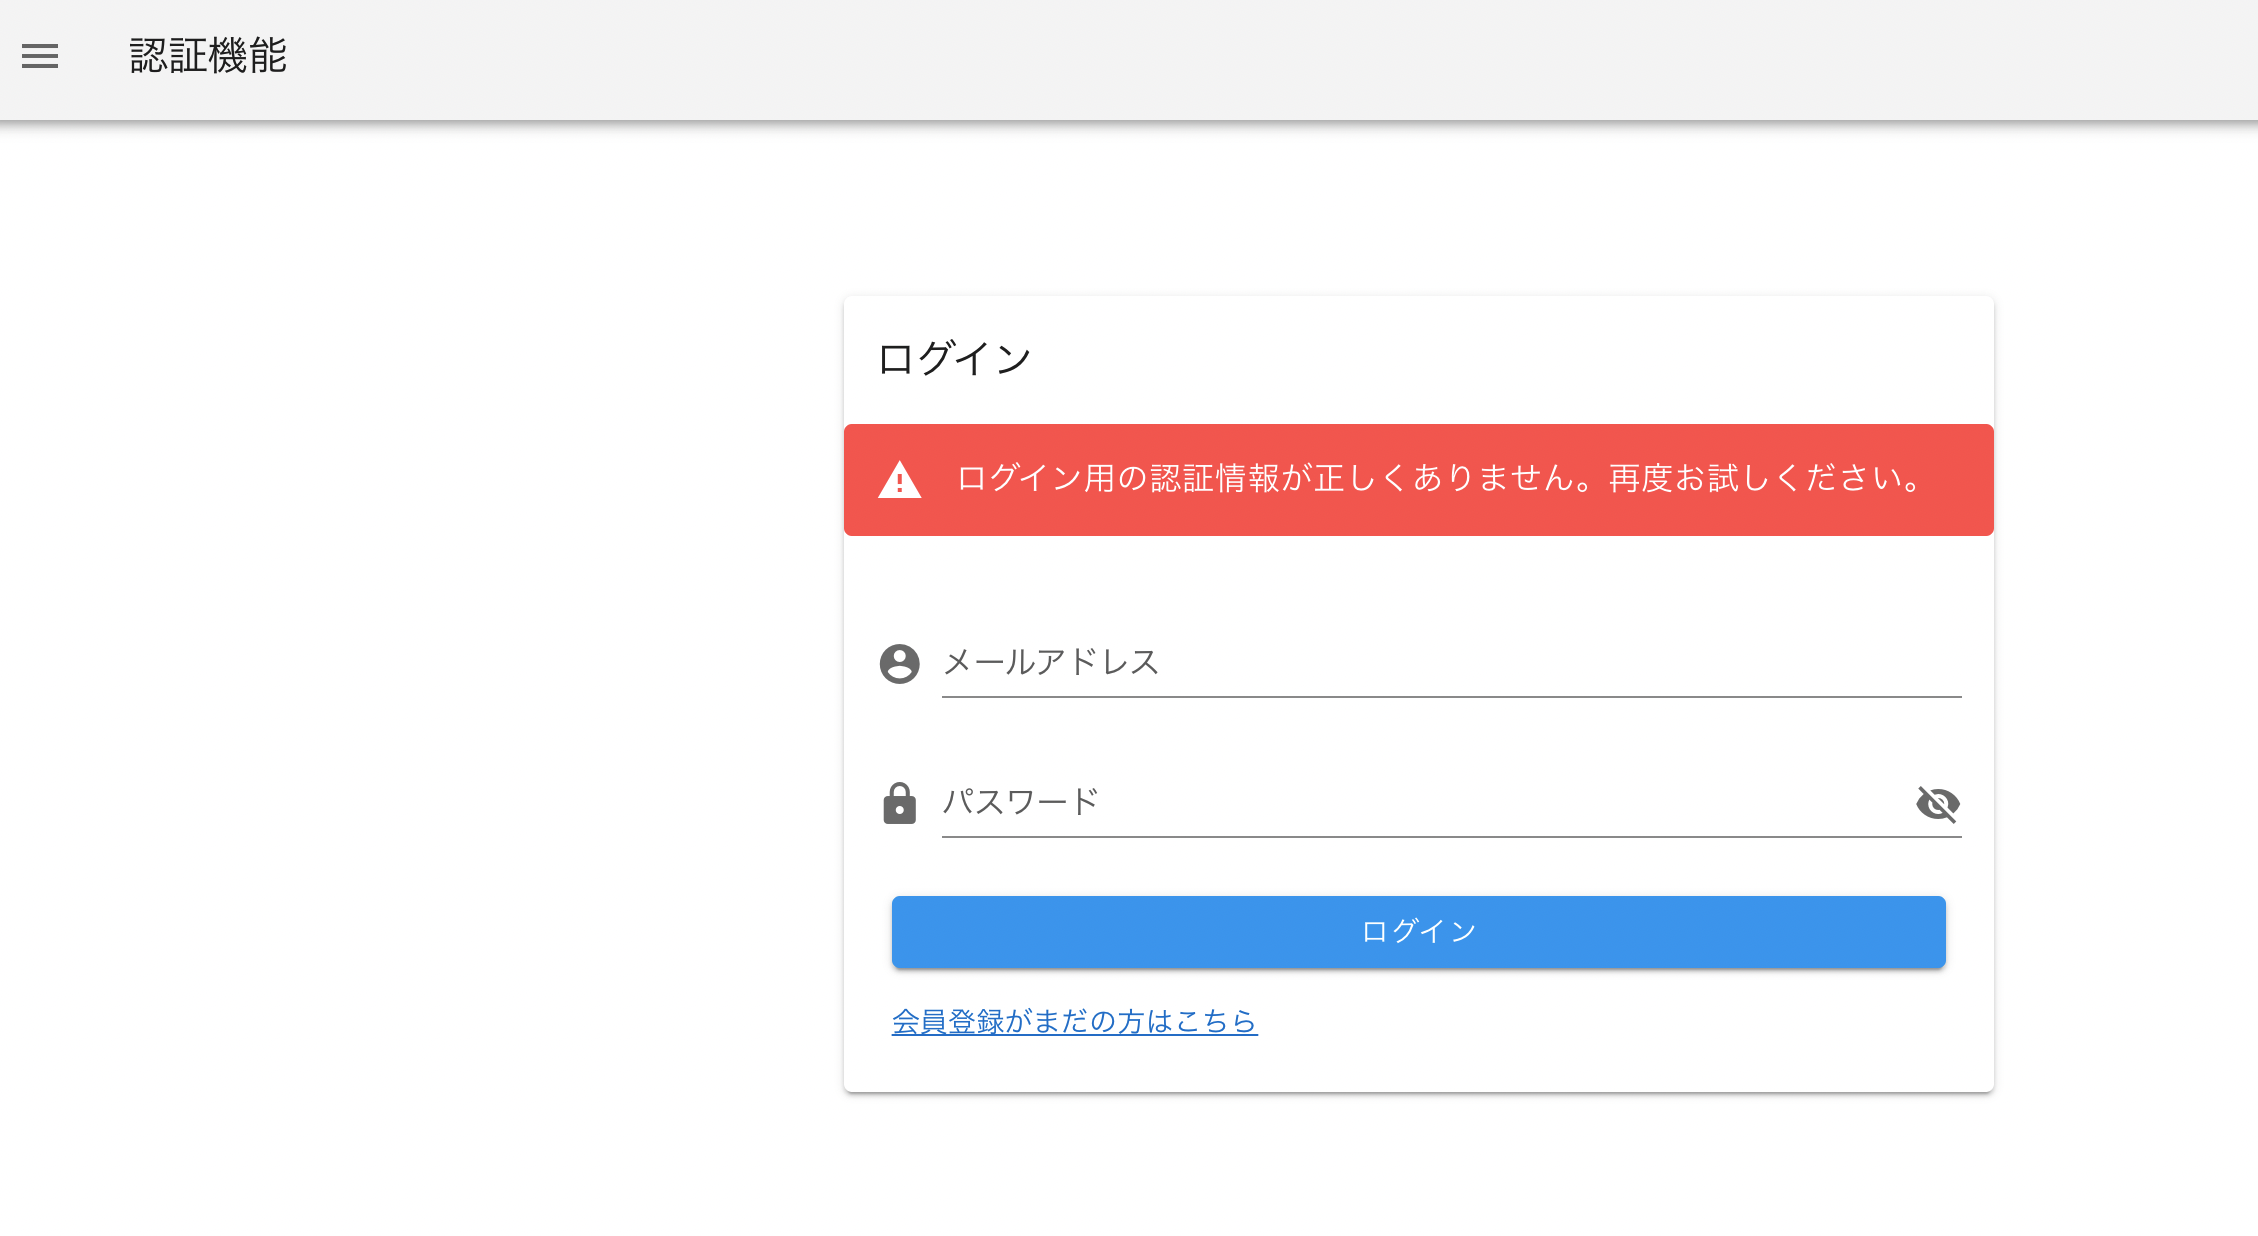
失敗の場合
ログアウト
新規登録
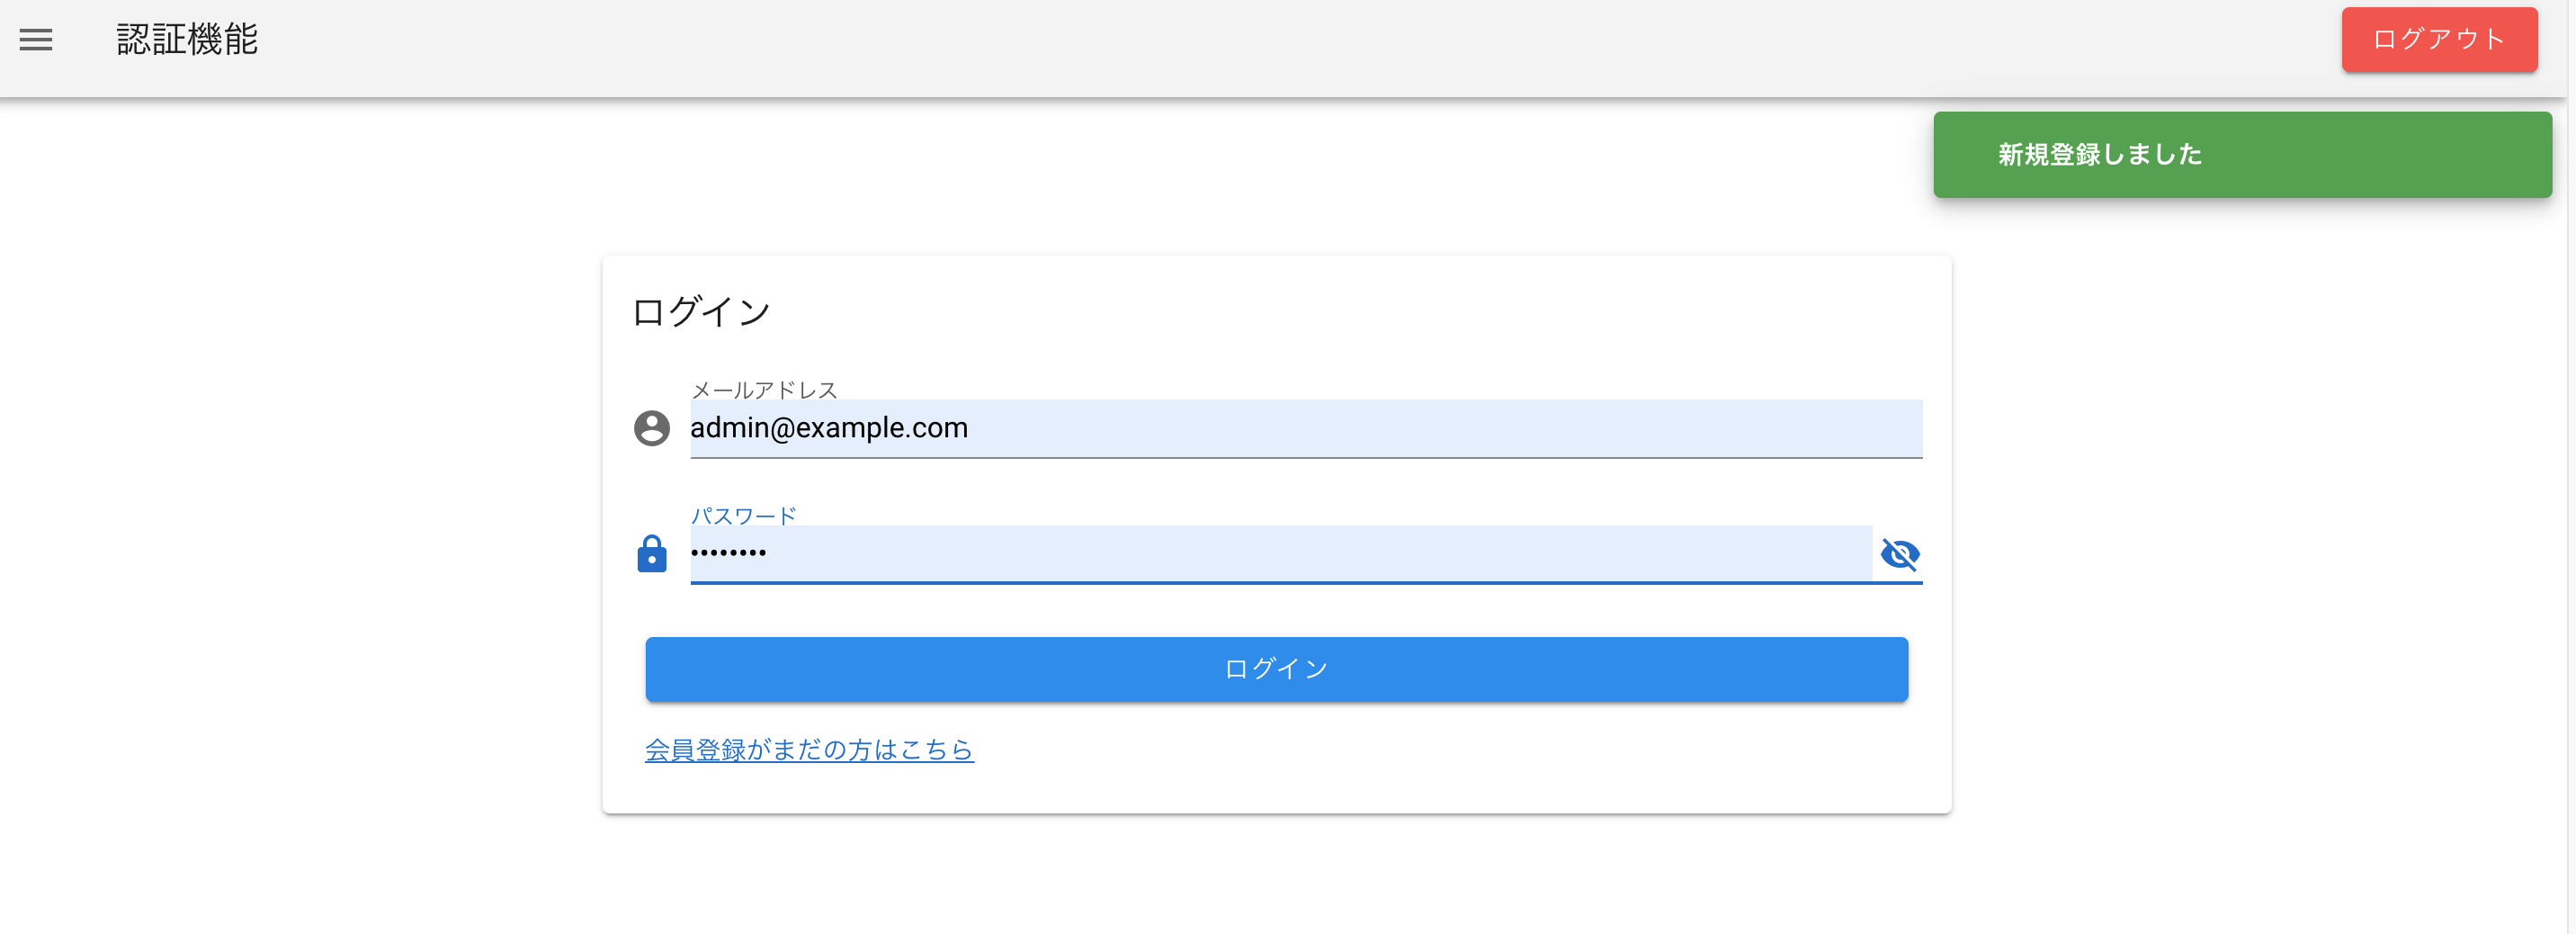
成功の場合
失敗の場合
お疲れ様でした
