本記事では、fits の切り取りの方法について紹介します。
例として、国立天文台の FUGIN プロジェクトで得られた野辺山45m電波望遠鏡の CO 輝線のアーカイブデータを使用します。データは
http://jvo.nao.ac.jp/portal/nobeyama/
から
FGN_03100+0000_2x2_12CO_v1.00_cube.fits
をダウンロードします (重いです)。
まず、fits を astropy.io.fits で開きます。
from astropy.io import fits
from astropy.wcs import WCS
import numpy as np
import matplotlib.pyplot as plt
import copy

hdu = fits.open("FGN_03100+0000_2x2_12CO_v1.00_cube.fits")[0]
絵を確認しておきます。
plt.imshow(np.nansum(hdu.data, axis=0), vmin=0, vmax=600, origin="lower left")
plt.show()
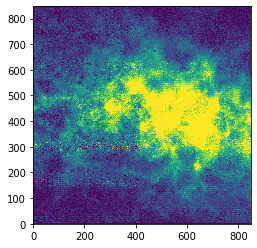
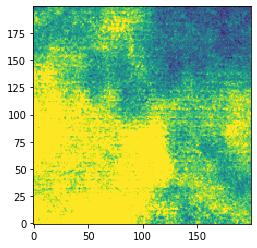
例えば、この絵の x軸 600-800 pixel, y軸 400-600 pixel を切り取りたい場合は、以下のようにします。
new_data = copy.deepcopy(hdu.data)
new_data = new_data[:, 400:600, 600:800] # v, y, x のスライス

plt.imshow(np.nansum(new_data, axis=0), vmin=0, vmax=600, origin="lower left")
plt.show()
大抵は切り取ったものを fits で保存したいかと思います。また、切り取る範囲を座標で指定したいです。
以下のような関数を定義します。
def xyv2ch(x, y, v, w):#km/s
    x_ch, y_ch, v_ch   = w.wcs_world2pix(x, y, v*1000.0, 0)
    x_ch = int(round(float(x_ch), 0))
    y_ch = int(round(float(y_ch), 0))
    v_ch = int(round(float(v_ch), 0))
    return x_ch, y_ch, v_ch
def xy2ch(x, y, w):
    x_ch, y_ch   = w.wcs_world2pix(x, y, 0)
    x_ch = int(round(float(x_ch), 0))
    y_ch = int(round(float(y_ch), 0))
    return x_ch, y_ch
def xy_cut(fits_name, x_start, x_end, y_start, y_end):
    from astropy.io import fits
    from astropy.wcs import WCS

    save_name = fits_name[:-5]+".xy_cut.fits"
    hdu = fits.open(fits_name)
    h = hdu[0].header
    d = hdu[0].data
    w = WCS(h)
    if d.ndim==3:
        x_start_ch, y_start_ch, v_tempo = xyv2ch(x_start, y_start, 0.0, w)
        x_end_ch, y_end_ch, v_tempo = xyv2ch(x_end, y_end, 0.0, w)
        if x_start_ch<0 or y_start_ch<0 or x_end_ch>h["NAXIS1"]-2 or y_end_ch>h["NAXIS2"]-2:
            print("x_start_ch, x_end_ch = ", x_start_ch, x_end_ch)
            print("y_start_ch, y_end_ch = ", y_start_ch, y_end_ch)
            print("out of fits.")
            return
        d = d[:, y_start_ch:y_end_ch+1, x_start_ch:x_end_ch+1] # +1 してます
    elif d.ndim==2:
        x_start_ch, y_start_ch = xy2ch(x_start, y_start, w)
        x_end_ch, y_end_ch = xy2ch(x_end, y_end, w)
        if x_start_ch<0 or y_start_ch<0 or x_end_ch>h["NAXIS1"]-2 or y_end_ch>h["NAXIS2"]-2:
            print("x_start_ch, x_end_ch = ", x_start_ch, x_end_ch)
            print("y_start_ch, y_end_ch = ", y_start_ch, y_end_ch)
            print("out of fits.")
            return
        d = d[y_start_ch:y_end_ch+1, x_start_ch:x_end_ch+1] # +1 してます
    else:
        print("data.ndim must be 2 or 3. ")
        return

    h['CRPIX1'] = h['CRPIX1'] - x_start_ch
    h['CRPIX2'] = h['CRPIX2'] - y_start_ch

    new_fits = fits.PrimaryHDU(d, h)
    new_fits.writeto(save_name, overwrite=True)
    return

def v_cut(fits_name, v_start, v_end):
    from astropy.io import fits
    from astropy.wcs import WCS

    save_name = fits_name[:-5]+".v_cut.fits"
    hdu = fits.open(fits_name)
    h = hdu[0].header
    d = hdu[0].data
    w = WCS(h)

    x_tempo, y_tempo, v_tempo = w.wcs_pix2world(0, 0, 0, 0)
    x_tempo_ch, y_tempo_ch, v_start_ch = xyv2ch(x_tempo, y_tempo, v_start, w)
    x_tempo_ch, y_tempo_ch, v_end_ch = xyv2ch(x_tempo, y_tempo, v_end, w)
    if v_start_ch<0 or v_end_ch>h["NAXIS3"]-2:
            print("v_start_ch, v_end_ch = ", v_start_ch, v_end_ch)
            print("out of fits.")
            return
    d = d[v_start_ch:v_end_ch+1, :, :] # +1 してます

    h['CRPIX3'] = h['CRPIX3'] - v_start_ch

    new_fits = fits.PrimaryHDU(d, h)
    new_fits.writeto(save_name, overwrite=True)
    return
使い方は、 xy の切り取りの場合 (3D fits でも 2D fits でも大丈夫です) は、
fits_name = "~/your/fits/dir/FGN_03100+0000_2x2_12CO_v1.00_cube.fits"
x_start, x_end = 30.8, 30.3 # degree で、左-右の順で入れる
y_start, y_end =  -0.5,    0.0 # degree で、下-上の順で入れる
xy_cut(fits_name, x_start, x_end, y_start, y_end)
v の切り取りの場合は、
fits_name = "~/your/fits/dir/FGN_03100+0000_2x2_12CO_v1.00_cube.fits"
v_start, v_end = 75.0, 125.0 # km/s で、下-上の順で入れる
v_cut(fits_name, v_start, v_end)
大きな fits の場合など、projection には注意してください。また、回転項が入っている fits の場合上手くいかない場合があります。
v が km/s で書かれている fits については、xyv2ch の中の *1000.0 を消したりしてください。v が逆順になっている fits の場合は、v_start, v_end を 上-下 の順で指定してください。
よくあるエラー
ALMA の cube データがうまく開けない!
ALMA データはデフォルトでは 4軸目に Stokes parameter が入っています。しかも3軸目がfrequencyです。
casaで一回読み込んで出力すると大抵うまくいきます。casa のターミナルを起動して、
importfits(fitsimage="yourfits.fits", imagename="yourfits.im")
exportfits(imagename="yourfits.im/", fitsimage="yourfits_new.fits", velocity=True, dropstokes=True, overwrite=True)
で出てきた fits を使いましょう。
以上です。
リンク
目次