こちらのは2026年4月でサービスを終了する旧SkyWayについての記事です
現在のSkyWayとはAPI仕様が異なります
現在のSkyWayの仕様については、以下開発者ドキュメントをご覧ください。
https://skyway.ntt.com/ja/docs/user-guide/
SkyWay ConferenceはSkyWayを利用したのブラウザ上で動作するWeb会議デモアプリです。OSSとして公開されています。
今回はSkyWay Confを改造して文字起こし機能をつけてみました!
Web会議アプリに文字起こし機能がついてると、出先でイヤホンを忘れてもなんとかなるかもしれません。 議事録も自動で出来て素晴らしいですね。
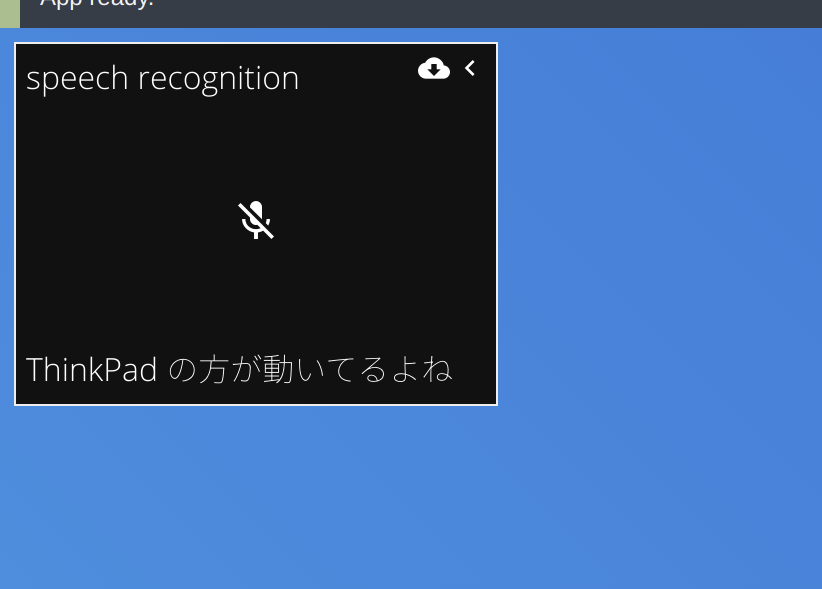
左上の窓で文字起こし関連の操作が出来て、画面中央下部に書き起こされた文字が表示されるようにしました。
できたもの
まずデモアプリはこちら。Chromeで開いてください!
- 文字起こし機能つきSkyWay Confのデモページ
ソースコードなど
- 文字起こし機能つきSkyWay Confのソースコード
- 本家との差分
デモの操作方法
基本的な操作方法はSkyWayConfに準拠しているので、このあたりを参照してください。
左上の黒い窓が文字起こし機能の操作エリアです。
黒い窓の中央のマイクボタンが文字起こし機能のオンオフボタンです。
右上のダウンロードボタンが議事録をダウンロードするボタンです。
文字起こし機能は基本的には初めから起動していますが、環境によって自動で開始しないことがあるので、文字起こし機能のオンオフボタンをつけたり消したりしてみてください、そのうち文字起こしが動き始めるはずです。
それでもだめならページをF5かなんかでリロードしてみてください。
実装した機能
- 字幕
- 議事録の保存
使っている技術
SkyWay Confが使っている技術
- WebRTCによる映像、音声通信
- プログラミング言語
- TypeScript
- Webフロントエンドフレームワーク
- バンドラー
- webpack
MobXは今回初めて触りましたが、そんなに学習コストは高くない印象を受けました。
文字起こし機能を実装するための技術
文字起こし機能を実現するのにライブラリを追加する必要はありません。
ブラウザに生えているSpeechRecognition APIで文字起こし機能を実現できます。
ただし、ChromeかChromiumベースのブラウザ(新Edge含む)でしか動かないはずですのでご注意を。
実装
SpeechRecognition APIを使ってみる
export class RecognitionEffect {
  recognition: SpeechRecognition = new (window as any).webkitSpeechRecognition();
  running = false;

  onFinal?: (str: string) => void;
  onProgress?: (str: string) => void;
  onError?: () => void;

  constructor() {
    this.recognition.continuous = true;
    this.recognition.interimResults = true;

    this.recognition.onresult = (event) => {
      for (let i = event.resultIndex; i < event.results.length; ++i) {
        if (event.results[i].isFinal) {
          if (this.onFinal) this.onFinal(event.results[i][0].transcript);
        } else {
          // eslint-disable-next-line no-lonely-if
          if (this.onProgress) this.onProgress(event.results[i][0].transcript);
        }
      }
    };

    this.recognition.onerror = (event) => {
      console.warn(event);
      if (this.onError) this.onError();
    };

    this.start();
  }

  start() {
    this.running = true;
    this.recognition.start();
  }

  stop() {
    this.running = false;
    this.recognition.stop();
  }

  toggle() {
    if (this.running) {
      this.stop();
    } else {
      this.start();
    }
  }
}
SpeechRecognitionをReactで管理したくなかったのでクラスに分けました。
SpeechRecognitionは発話中の暫定的な文字列と、話し終わったときの文字列の両方を取れるので、発話中の文字列をonProgressで、発言完了時の文字列をonFinalで取れるようにしました。
次はこのクラスをReactとつなぎ込みます。
RecognitionEffectとReactのつなぎ込み
import React, {
  useContext,
  useCallback,
  useEffect,
  useRef,
  useState,
} from "react";
import { FunctionComponent } from "react";
import { Observer } from "mobx-react";
import { StoreContext } from "../contexts";
import RecognitionLayout from "../components/recognition-layout";
import { RecognitionEffect } from "../effects/recognition";

const Recognition: FunctionComponent<{}> = () => {
  const store = useContext(StoreContext);
  const recognitionRef = useRef<RecognitionEffect>();
  const [progress, setProgress] = useState("");

  useEffect(() => {
    const recognition = (recognitionRef.current = new RecognitionEffect());
    recognition.onFinal = (str) => {
      store.room.addLocalSubtitle({
        from: store.client.displayName,
        text: str,
      });
    };
    recognition.onError = () => {
      store.subtitle.toggleMuted();
    };
    recognition.onProgress = setProgress;
  }, [store]);

  const onClickToggleAudioMuted = useCallback(() => {
    const recognition = recognitionRef.current!;
    recognition.toggle();
    store.subtitle.toggleMuted();
  }, [store]);

  const { media, client, ui, subtitle } = store;
  return (
    <Observer>
      {() => {
        if (ui.isSettingsOpen) {
          return <></>;
        }

        return (
          <RecognitionLayout
            stream={media.stream}
            displayName={client.displayName}
            browser={client.browser}
            isAudioTrackMuted={subtitle.isAudioTrackMuted}
            onClickToggleAudioMuted={onClickToggleAudioMuted}
            onClickDownload={onClickDownload}
            progress={progress}
          />
        );
      }}
    </Observer>
  );
};

export default Recognition;
RecognitionEffect内での営みをReactに直接関知させたくないのでuseRefを使って扱います。
useEffect内でrefにRecognitionEffectを登録しています。
RecognitionEffectの操作を行う際にはrefを介して行います。
書き起こした文字列(字幕)を他の参加者に送る
SkyWayにはRoom.sendというルームに参加しているすべてのユーザにデータを送信する機能があります。今回はこのRoom.send機能を用いて字幕を他の参加者に送っています。
SkyWayConfには既にチャット機能が実装されているのでそのへんのコードを参考に字幕送信を実装しました。
    reaction(
      () => room.myLastChat,
      (chat) => {
        if (chat === null) {
          return;
        }
        log("reaction:send(chat)");
        confRoom.send({ type: "chat", payload: chat });
      }
    ),
    reaction(
      () => room.myLastSubtitle,
      (subtitle) => {
        if (subtitle === null) {
          return;
        }
        log("reaction:send(subtitle)");
        confRoom.send({ type: "subtitle", payload: subtitle });
      }
    ),
上部が既存のチャット送信のコードです。confRoom.sendがRoom.sendです。
reactionという見慣れない関数がありますがこれはMobXのやつです。
受け取る側は
    switch (type) {
      case "chat": {
        const chat = payload as RoomChat;
        log("on('data/chat')", chat);

        // notify only when chat is closed
        ui.isChatOpen || notification.showChat(chat.from, chat.text);
        room.addRemoteChat(chat);
        break;
      }
      case "subtitle": {
        const data = payload as RoomSubtitle;
        room.addRemoteSubtitle(data);
        break;
      }
    }
roomのaddRemoteSubtitleで得られた字幕を足しています(ちなみにroomはMobXのStoreです)
議事録の保存
右上のダウンロードボタンを押すと議事録を.txt形式で保存できるようにしました。
そこの実装はこんな感じです
  const onClickDownload = useCallback(() => {
    const content = [...store.room.subtitles].reduce((acc, cur) => {
      acc += `${cur.from}:${cur.text}\n`;
      return acc;
    }, "");
    const blob = new Blob([content], { type: "text/plain" });
    const url = window.URL.createObjectURL(blob);
    const anchor = document.createElement("a");
    anchor.download = name;
    anchor.href = url;
    anchor.click();
  }, [store]);
roomのStoreを取ってきて字幕を取り出し、フォーマットを加工して、ダウンロードしています。
Github Actions
pushに反応して最新のコードを元に自動的にGithub PagesにデプロイできるようにGithub Actionsのワークフローを書きました。
name: Node CI

on:
  push:
    branches:
      - develop
      - "feature/*"

jobs:
  build:
    runs-on: ubuntu-latest

    strategy:
      matrix:
        node-version: [12.x]

    steps:
      - uses: actions/checkout@v1
      - name: Use Node.js ${{ matrix.node-version }}
        uses: actions/setup-node@v1
        with:
          node-version: ${{ matrix.node-version }}
      - name: prepare
        run: |
          npm install
      - name: build
        run: |
          npm run build
      - name: Commit files
        run: |
          git config --local user.email "action@github.com"
          git config --local user.name "GitHub Action"
          git add --all
          git commit -m "Add changes"
      - name: serve stable
        uses: ad-m/github-push-action@master
        with:
          github_token: ${{ secrets.GITHUB_TOKEN }}
          branch: "master"
          force: true
    env:
      CI: true
developブランチとfeature/* ブランチに反応してActionsが走ります。
ビルドした結果をmasterブランチにpushしています。GithubPagesをmasterブランチのDocsディレクトリを参照するように設定していれば自動的にデプロイされます!
まとめ
SkyWayConfはコードが読みやすくて、改造しやすくて良かったです!
アカウントまわりもSkyWayにしか依存していないのでSkyWayのアカウントさえあれば無料でサクッと動かせました。
リンク
- SkyWay
- SkyWay Conference
- 文字起こし機能つきSkyWay Confのソースコード
- 文字起こし機能つきSkyWay Confのデモページ
- 本家との差分

