概要
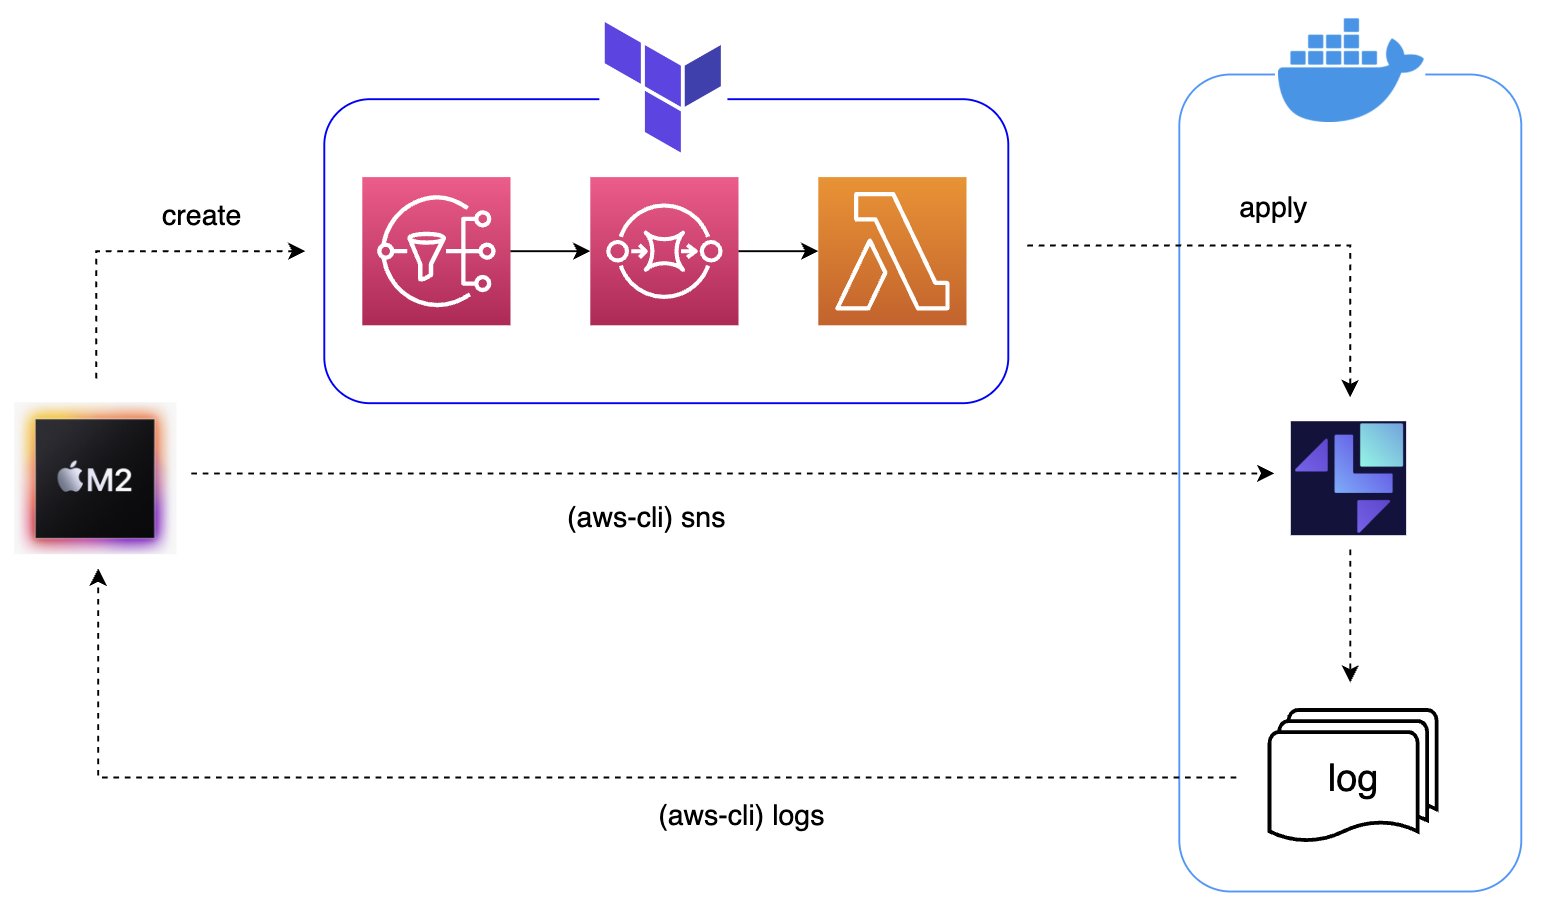
Mac(M2チップ)環境でTerraform + LocalStack(無料版)を使い、以下の環境を作るのがゴールです。
ハローキータ
AWSの勉強をしようと思ったものの、個人でそんなにお金はかけられない、けど勉強はしたい...
そこへLocalStackとの出会いがあり、せっかくやるならTerraformも一緒に覚えようと思い立ちました![]()
己の頭の整理も兼ねて、今回初めて記事を書きます![]()
謝辞
筆者自身TerraformとLocalStackの経験が浅いため、詳しい説明は省きますのでご了承ください。
そのため、本記事は"LocalStackとTerraformでこんなことができるんだ!"という体験を重視しています。
これをやらないと先へは進めない...と思っていたけど
ご存知の諸兄方が多いと思いますが、どうもM2チップかつLocalStackで構築したLambdaを実行すると応答が返ってこないバグ(?)があるようです![]()
再現しようとしましたが起こりませんでした...
やり方が悪かったのかもしれませんが、何がどうしてどう解決したか、というのは残しておきますね。
やったことメモ
症状としては、仮想AWS環境を構築後にaws-cliで何かしらのリクエストを投げますが、応答が返ってきません。% aws --profile=localstack --endpoint-url http://localhost:4566 sns publish --topic-arn "arn:aws:sns:us-east-1:000000000000:test-sns" --message 'Hello AWS SNS!! check tail LOG!'
(...何も返ってこない)
dockerのログを見ると以下のログが延々に流れている状態に陥ります。
localstack.utils.container_utils.container_client.ContainerException: Unable to detect IP address for container xxxxx in network host: Address cannot be empty
色々調べても出てこないので途方に暮れていたのですが、もしかしてM2チップが原因...?
とりあえずターミナルでRosettaを使用して開くをチェック![]()

ターミナルを開き直し、LocalStackも作り直すとようやく応答が返ってくるようになりました![]()
% uname -m
x86_64

...

% aws --profile=localstack --endpoint-url http://localhost:4566 sns publish --topic-arn "arn:aws:sns:us-east-1:000000000000:test-sns" --message 'Hello AWS SNS!! check tail LOG!'
{
    "MessageId": "09588aab-2a65-4be2-9afd-c369a2a47267"
}
検証環境のバージョン情報
検証環境は以下の通りです。
% sw_vers
ProductName:		macOS
ProductVersion:		13.3
BuildVersion:		22E252

% aws --version
aws-cli/2.13.0 Python/3.11.4 Darwin/22.4.0 exe/x86_64 prompt/off

% tfenv --version
tfenv 3.0.0

% terraform -version
Terraform v1.5.4
on darwin_arm64

% docker -v
Docker version 24.0.2, build cb74dfc

% docker compose version
Docker Compose version v2.18.1

[in dokcer]# bin/localstack -v
2.2.0
GitHub
本記事で記載しているソースはこちらで公開しています。
やってみよう
LocalStackのDockerを建てる
サンプルにdocker-compose.yamlを用意していますので、そちらをお使いください。
version: "3.8"

services:
  localstack:
    container_name: localstack
    image: localstack/localstack:2.2.0-arm64
    ports:
      - "127.0.0.1:4566:4566"
      - "127.0.0.1:4510-4559:4510-4559"
    environment:
      - DOCKER_HOST=unix:///var/run/docker.sock
    volumes:
      - "/var/run/docker.sock:/var/run/docker.sock"
% docker compose ps
NAME                IMAGE                               COMMAND                  SERVICE             CREATED             STATUS                    PORTS
localstack          localstack/localstack:2.2.0-arm64   "docker-entrypoint.sh"   localstack          50 minutes ago      Up 50 minutes (healthy)   127.0.0.1:4510-4559->4510-4559/tcp, 127.0.0.1:4566->4566/tcp, 5678/tcp
AWS CLIのインストールと初期設定
インストールについては公式サイトをご覧ください。
また、以下の設定が入っている前提で説明を進めます。
% cat ~/.aws/config
[profile localstack]
region = us-east-1
output = json

% cat ~/.aws/credentials
[localstack]
aws_access_key_id = dummy
aws_secret_access_key = dummy
Terraformのインストール
macならbrewでインストールできます。
tfenvというものもあり、nodenvのようにバージョン切り替えも可能なのでこちらがお勧めです〜
$ brew install tfenv

(バージョン選択などは省略)

$ terraform -v
Terraform v1.5.4
on darwin_arm64
Terraformでインフラ構成を書く
構成とスクリプト
検証時の構成は以下のとおりです。
% tree
.
├── lambda_ts
│   ├── dist
│   │   ├── index.js
│   │   └── index.zip
│   ├── index.ts
│   ├── node_modules
│   └── package.json
└── tf
    ├── main.tf
    └── resources.tf
{
  "name": "lambdas",
  "version": "1.0.0",
  "description": "aws terraform samples",
  "main": "index.js",
  "license": "MIT",
  "dependencies": {
    "@types/aws-lambda": "^8.10.119",
    "esbuild": "^0.18.20"
  },
  "scripts": {
    "prebuild": "rm -rf dist",
    "build": "esbuild index.ts --bundle --minify --sourcemap --platform=node --target=es2020 --outfile=dist/index.js",
    "postbuild": "cd dist && zip -r index.zip index.js*",
    "pretf_init": "cd ../tf",
    "tf_init": "rm -rf .terraform/ .terraform* terraform.tfstate",
    "posttf_init": "cd ../tf && terraform init",
    "tf_apply": "cd ../tf && terraform apply -auto-approve"
  }
}
以下のスクリプトをトランスパイル、zip化したものをLambdaにデプロイします。
export const handler = async (event, context) => {
  event.Records.forEach((record) => {
    const { body } = record;
    console.log("body from sns-sqs.");
    console.log(body);
    const data = JSON.parse(body);
    console.log(`data.Message: ${data.Message}`);
  });
  return {
    statusCode: 200,
    body: JSON.stringify({
      message: "hello world",
    }),
  };
};
package.jsonにコマンドを用意しているのでそちらを使ってbuildします。
$ yarn build
main.tf
メインの設定です。
endpointsのURLとポートは、LocalStackのDockerのURLです。
基本的に変わることはないと思いますが、実際に建てた環境に合わせて変更してください。
provider "aws" {
    region     = "us-east-1"
    access_key = "dummy"
    secret_key = "dummy"

    skip_requesting_account_id  = true
    skip_credentials_validation = true

    endpoints {
        lambda = "http://localhost:4566"
        sns    = "http://localhost:4566"
        sqs    = "http://localhost:4566"
        iam    = "http://localhost:4566"
    }
}
SNS, SQS, Lambda
各リソースの設定です。
# SNS
resource "aws_sns_topic" "test-sns" {
  name = "test-sns"
}
output "test-sns-arn" {
  value = aws_sns_topic.test-sns.arn
}
# SQS
resource "aws_sqs_queue" "test-sqs" {
  name = "test-sqs"
}

resource "aws_sns_topic_subscription" "test" {
  topic_arn = aws_sns_topic.test-sns.arn
  protocol  = "sqs"
  endpoint  = aws_sqs_queue.test-sqs.arn
}

resource "aws_iam_role" "lambda_sqs" {
  name                 = "lambda_sqs"
  max_session_duration = 3600
  description          = "None"
  assume_role_policy   = <<EOF
{
    "Version": "2012-10-17",
    "Statement": [
        {
            "Effect": "Allow",
            "Action": [
                "sqs:*"
            ],
            "Resource": "*"
        },
        {
            "Effect": "Allow",
            "Action": [
                "logs:CreateLogGroup",
                "logs:CreateLogStream",
                "logs:PutLogEvents"
            ],
            "Resource": "arn:aws:logs:*:*:*"
        }
    ]
}
EOF
}

# Lambda
data "archive_file" "example_zip" {
  type        = "zip"
  source_dir  = "${path.cwd}/../lambda_ts/dist"
  output_path = "${path.cwd}/../lambda_ts/dist/index.zip"
}

resource "aws_lambda_function" "test-lambda" {
  function_name    = "test-lambda"
  description      = "Test Lambda"
  role             = aws_iam_role.lambda_sqs.arn
  handler          = "index.handler"
  runtime          = "nodejs18.x"
  timeout          = 3
  filename         = data.archive_file.example_zip.output_path
  source_code_hash = filebase64sha256(data.archive_file.example_zip.output_path)
}

resource "aws_lambda_event_source_mapping" "test-lambda-trigger" {
  event_source_arn = aws_sqs_queue.test-sqs.arn
  function_name    = "test-lambda"
  batch_size       = 10
}
${path.cwd}という見慣れない変数が現れましたね![]()
...
  source_dir  = "${path.cwd}/../lambda_ts/dist"
  output_path = "${path.cwd}/../lambda_ts/dist/index.zip"
...
これは、そのリソースのディレクトリパスを返す変数です。
ここではtfに変換されて以下のように展開されます。
tf/../lambda_ts/dist/index.zip
デプロイしてみよう
こちらもpackage.jsonのコマンドを使って実行します。
terraform init
まず、terraform initを実行します。
% yarn tf_init

Initializing the backend...

Initializing provider plugins...
- Finding latest version of hashicorp/aws...
- Finding latest version of hashicorp/archive...
...
Terraform has been successfully initialized!
...
成功すると、contextファイルなどが生成されます。
...
tf
├ .terraform
├ .terraform.lock.hcl
└ terraform.tfstate
terraform apply
次にterraform applyを実行すると、これから作成する構成の詳細が表示されます。
また、対話型で最終的にデプロイするか否かの確認が行われます。
% yarn tf_apply

Terraform used the selected providers to generate the following execution plan. Resource actions are indicated with the following symbols:
  + create

Terraform will perform the following actions:

  # aws_iam_role.lambda_sqs will be created
  + resource "aws_iam_role" "lambda_sqs" {
  ...
  }

  # aws_lambda_event_source_mapping.test-lambda-trigger will be created
  + resource "aws_lambda_event_source_mapping" "test-lambda-trigger" {
  ...
  }

  # aws_lambda_function.test-lambda will be created
  + resource "aws_lambda_function" "test-lambda" {
  ...
  }

  # aws_sns_topic.test-sns will be created
  + resource "aws_sns_topic" "test-sns" {
  ...
  }

  # aws_sns_topic_subscription.test will be created
  + resource "aws_sns_topic_subscription" "test" {
  ...
  }

  # aws_sqs_queue.test-sqs will be created
  + resource "aws_sqs_queue" "test-sqs" {
  ...
  }

Plan: 6 to add, 0 to change, 0 to destroy.
...
Do you want to perform these actions?
  Terraform will perform the actions described above.
  Only 'yes' will be accepted to approve.

  Enter a value:
Do you want to perform these actions?
Terraform will perform the actions described above.
Only 'yes' will be accepted to approve.Enter a value:
ここでyesと入力して実行するとデプロイが行われます。
aws_iam_role.lambda_sqs: Creating...
aws_sqs_queue.test-sqs: Creating...
aws_sns_topic.test-sns: Creating...
aws_iam_role.lambda_sqs: Creation complete after 0s [id=lambda_sqs]
aws_sns_topic.test-sns: Creation complete after 0s [id=arn:aws:sns:us-east-1:000000000000:test-sns]
aws_lambda_function.test-lambda: Creating...
aws_lambda_function.test-lambda: Creation complete after 5s [id=test-lambda]
aws_sqs_queue.test-sqs: Still creating... [10s elapsed]
aws_sqs_queue.test-sqs: Still creating... [20s elapsed]
aws_sqs_queue.test-sqs: Creation complete after 25s [id=http://localhost:4566/000000000000/test-sqs]
aws_sns_topic_subscription.test: Creating...
aws_lambda_event_source_mapping.test-lambda-trigger: Creating...
aws_lambda_event_source_mapping.test-lambda-trigger: Creation complete after 0s [id=fe53c2a8-443d-4a1a-8626-dca76f1f9296]
aws_sns_topic_subscription.test: Creation complete after 0s [id=arn:aws:sns:us-east-1:000000000000:test-sns:9056dac2-0385-4e7d-a85b-e84271e2d626]
...
Apply complete! Resources: 6 added, 0 changed, 0 destroyed.
...
Apply complete!と表示されればデプロイ完了です![]()
動かしてみよう
LocakStackを使っているため、AWSのUIコンソール上で操作できません。。。
aws-cliを使って確認していきましょう!
sns publish
今回の例ではSNSにpublishしてLambdaを動かす構成になっているので、SNSにメッセージを投げましょう。
% aws sns publish \
 --profile=localstack \
 --endpoint-url http://localhost:4566 \
 --topic-arn "arn:aws:sns:us-east-1:000000000000:test-sns" \
 --message 'Hello AWS SNS!! check tail LOG!'
MesssageIdが返って来れば成功です![]()
{
    "MessageId": "0d04b3e2-aa0b-4f5c-ab3a-86f94261b60a"
}
結果はlogsを使えば確認することができます。
logs describe-log-groups
まずはロググループを確認します。
$ aws logs describe-log-groups \
 --profile=localstack \
 --endpoint-url http://localhost:4566
{
    "logGroups": [
        {
            "logGroupName": "/aws/lambda/test-lambda",
            "creationTime": 1698473196925,
            "metricFilterCount": 0,
            "arn": "arn:aws:logs:us-east-1:000000000000:log-group:/aws/lambda/test-lambda:*",
            "storedBytes": 1073
        },
        {
            "logGroupName": "sns/us-east-1/000000000000/test-sns",
            "creationTime": 1698473194764,
            "metricFilterCount": 0,
            "arn": "arn:aws:logs:us-east-1:000000000000:log-group:sns/us-east-1/000000000000/test-sns:*",
            "storedBytes": 397
        }
    ]
}
続いて、Lambdaのログのストリームを見ていきましょう。
$ aws logs describe-log-streams \
 --profile=localstack \
 --endpoint-url http://localhost:4566 \
 --log-group-name "/aws/lambda/test-lambda"
 --order-by "LastEventTime"
{
    "logStreams": [
        {
            "logStreamName": "2023/10/28/[$LATEST]c13452ba6c7e2b1fc5361590b9de84f0",
            "creationTime": 1698473196936,
            "firstEventTimestamp": 1698473196914,
            "lastEventTimestamp": 1698473196930,
            "lastIngestionTime": 1698473196940,
            "uploadSequenceToken": "1",
            "arn": "arn:aws:logs:us-east-1:000000000000:log-group:/aws/lambda/test-lambda:log-stream:2023/10/28/[$LATEST]c13452ba6c7e2b1fc5361590b9de84f0",
            "storedBytes": 1073
        }
    ]
}
ログのストリーム名(= logStreamName)が確認できたところで、実際のログを確認してみましょう。
logs get-log-events
% aws logs get-log-events \
 --profile=localstack \
 --endpoint-url http://localhost:4566 \
 --log-group-name "/aws/lambda/test-lambda" \
 --log-stream-name '2023/10/28/[$LATEST]c13452ba6c7e2b1fc5361590b9de84f0'
{
    "events": [
        {
            "timestamp": 1698473196914,
            "message": "START RequestId: 17cc5309-deaa-42ad-8c99-b6b13ae342bc Version: $LATEST",
            "ingestionTime": 1698473196940
        },
        {
            "timestamp": 1698473196917,
            "message": "2023-10-28T06:06:36.902Z\t17cc5309-deaa-42ad-8c99-b6b13ae342bc\tINFO\tbody from sns-sqs.",
            "ingestionTime": 1698473196940
        },
        {
            "timestamp": 1698473196920,
            "message": "2023-10-28T06:06:36.905Z\t17cc5309-deaa-42ad-8c99-b6b13ae342bc\tINFO\t{\"Type\": \"Notification\", \"MessageId\"
: \"0d04b3e2-aa0b-4f5c-ab3a-86f94261b60a\", \"TopicArn\": \"arn:aws:sns:us-east-1:000000000000:test-sns\", \"Message\": \"Hello AWS SNS!
! check tail LOG!\", \"Timestamp\": \"2023-10-28T06:06:34.734Z\", \"SignatureVersion\": \"1\", \"Signature\": \"EXAMPLEpH+..\", \"Signin
gCertURL\": \"https://sns.us-east-1.amazonaws.com/SimpleNotificationService-0000000000000000000000.pem\", \"UnsubscribeURL\": \"http://l
ocalhost:4566/?Action=Unsubscribe&SubscriptionArn=arn:aws:sns:us-east-1:000000000000:test-sns:995fff09-56ab-44fc-a92f-00722801199b\"}",
            "ingestionTime": 1698473196940
        },
        {
            "timestamp": 1698473196923,
            "message": "2023-10-28T06:06:36.905Z\t17cc5309-deaa-42ad-8c99-b6b13ae342bc\tINFO\tdata.Message: Hello AWS SNS!! check tail L
OG!",
            "ingestionTime": 1698473196940
        },
        {
            "timestamp": 1698473196927,
            "message": "END RequestId: 17cc5309-deaa-42ad-8c99-b6b13ae342bc",
            "ingestionTime": 1698473196940
        },
        {
            "timestamp": 1698473196930,
            "message": "REPORT RequestId: 17cc5309-deaa-42ad-8c99-b6b13ae342bc\tDuration: 22.53 ms\tBilled Duration: 23 ms\tMemory Size:
 128 MB\tMax Memory Used: 128 MB\t",
            "ingestionTime": 1698473196940
        }
    ],
    "nextForwardToken": "f/00000000000000000000000000000000000000000000000000000005",
    "nextBackwardToken": "b/00000000000000000000000000000000000000000000000000000000"
}
ちょっとわかりにくいですが、messageの中を見ると、publishした値が入っていることがわかりますね。
console.logしたログも出力されていますね!
...
            "message": "2023-10-28T06:06:36.902Z\t17cc5309-deaa-42ad-8c99-b6b13ae342bc\tINFO\tbody from sns-sqs.",
...
            "message": "2023-10-28T06:06:36.905Z\t17cc5309-deaa-42ad-8c99-b6b13ae342bc\tINFO\t{\"Type\": \"Notification\", \"MessageId\"
: \"0d04b3e2-aa0b-4f5c-ab3a-86f94261b60a\", \"TopicArn\": \"arn:aws:sns:us-east-1:000000000000:test-sns\", \"Message\": \"Hello AWS SNS!
! check tail LOG!\", \"Timestamp\": \"2023-10-28T06:06:34.734Z\", \"SignatureVersion\": \"1\", \"Signature\": \"EXAMPLEpH+..\", \"Signin
gCertURL\": \"https://sns.us-east-1.amazonaws.com/SimpleNotificationService-0000000000000000000000.pem\", \"UnsubscribeURL\": \"http://l
ocalhost:4566/?Action=Unsubscribe&SubscriptionArn=arn:aws:sns:us-east-1:000000000000:test-sns:995fff09-56ab-44fc-a92f-00722801199b\"}",
...
            "message": "2023-10-28T06:06:36.905Z\t17cc5309-deaa-42ad-8c99-b6b13ae342bc\tINFO\tdata.Message: Hello AWS SNS!! check tail L
...
トラブルシューティング
publishは成功したけどログが出力されない場合
対応方法
筆者も何度か経験したのですが、いくつか原因が考えられると思います。- Lambdaにデプロイしたzipファイルの中身が正しいか?
- handler名が合っているか?
- aws-cliで直接Lambdaにデプロイしてみる
- (上記で解決できない場合)Dockerコンテナを作り直してみる
"1."に関してはzipをローカルで解凍してみて中身を確認しましょう。
index.zip
└ index
  ├ index.js
  └ index.js.map
"2."に関してはエラーログで気づくかもしれませんが、handlerの名前が間違っているうっかりミスです。
...
handler       = "index.handler" // indexファイルのhandlerという関数名で実行する宣言
...
export const handler = async (event, context) => { // ファイル名も含め正しいか確認
...
"3."に関しては単純なjsをzip化してaws-cliを使って直接Lambdaにデプロイして動作確認する方法です。
/*
 * 削除 (デプロイ済みの関数を削除する)
 */
$ aws lambda delete-function \
 --profile=localstack \
 --endpoint-url http://localhost:4566 \
 --function-name "test-lambda"

/*
 * デプロイ (zip-fileオプションのパスはzipファイルまでのフルパス)
 */
$ aws lambda create-function \
 --profile=localstack \
 --endpoint-url=http://localhost:4566 \
 --function-name test-lambda \
 --zip-file fileb:///Users/path.../to.../index.zip \
 --handler index.handler \
 --runtime nodejs18.x \
 --role arn:aws:iam::123456789012:role/lambda-execute

/*
 * 実行 (return値はローカルのresponse.jsonファイルに出力される)
 */
$ aws lambda invoke \
 --profile=localstack \
 --endpoint-url http://localhost:4566 \
 --function-name "test-lambda" \
 response.json
これでも解決しない場合はDockerの作り直し(imageも含めて全部削除)をしてやり直してみましょう。
(他にも少し古いバージョンを変えてやり直してみるのもやってみましょう)
あとがき
昨今ではインフラ環境も含めソースでGitでバージョン管理する機会が増えました。
DevOpsという観点でも、属人化を避けて誰でもリソース管理するのが常識になってきています。
ミドルウェアのバージョンアップとか、大きな変更が加わる時に依存関係が見える化されていないと、怖くて手が出せずにいつまでも放置されていることになってしまいます...(実体験談)
とはいえ、今回のIaC化はあくまで一つの手段でしかないので、運用保守どうしようか?という点も考えないといけないですね![]()
料理(趣味)
初の家庭菜園で育てた小松菜とゴボウ(50円)を肉巻きにしてみました![]()
醤油と砂糖で照り焼き風にてお弁当のおかずにしました![]()


