株式会社 ONE WEDGEの@Shankouです。
前回に引き続き、認証ロジックの実装を行っていきたいと思います。
featuresディレクトリ構成
React(Next.js)初心者が最初に迷うのが「ディレクトリ構成はどうすればいいのか」ということだと思います。
かく言う自分がその状態になっていろいろ調べたのですが、今回はfeaturesディレクトリ構成でやりたいと思います。
featuresディレクトリ構成というのはライブラリ(ReactやNext.js)から見た属性でディレクトリを切るのではなく、機能に着目してディレクトリを切っていきましょうという考え方です。
ライブラリから見た属性でディレクトリを切ると以下の用になると思います。
src/
 ├ app/
 ├ components/
 │ └ LoginForm.tsx
 ├ hooks/
 ├ providers/
 │ └ AuthProvider.ts
 └ types/
  ├ LoginForm.type.ts
  ├ LoginFormRequest.type.ts
  └ LoginFormResponse.type.ts
これをfeaturesディレクトリ構成にすると以下の通りです。
src/
 ├ app/
 ├ components/
 ├ features/
 │ ├ Auth/
 │ │ ├ components
 │ │ │ └ LoginForm.tsx
 │ │ ├ hooks
 │ │ ├ providers/
 │ │ │ └ AuthProvider.ts
 │ │ └ types/
 │ │  ├ LoginForm.type.ts
 │ │  ├ LoginFormRequest.type.ts
 │ │  └ LoginFormResponse.type.ts
 ├ hooks/
 ├ providers/
 └ types/
ぱっと見は何が違うのかと思われるかもしれませんが、効果を発揮するのは機能が増えたときです。
最初に示した構成でcomponentsディレクトリを例にすると、いろいろな機能のコンポーネントファイルがごった煮状態で配置されることになります。
そんな状態では目的のファイルを探すのは一苦労です。関連ファイルもいろいろな場所でごった煮になっています。
これをfeaturesディレクトリ構成にして、機能ごとに階層を作るととても見通しが良くなると思いませんか?
src直下のcomponentsディレクトリ等は共通で利用するものを配置してください。
これで、機能が増えていっても視認性をキープすることができます。
以上、featuresディレクトリ構成の簡単な解説でした。
参考にしてみてください。
.env
.envファイルはプロジェクト直下に作成してください。
まずはAPIの呼び出し先を設定していきます。
今回はフロントのみなので実際にAPIを呼び出すところまでやりませんが、設定のやり方としてまとめていきます。
以前説明した通り、フロント側で使う設定値にはNEXT_PUBLIC_のプレフィックスが必須になります。
また、通常JavascriptはインラインスクリプトとしてHtmlファイル内に埋め込まれます。
インラインスクリプトが禁止されている場合もあるので、そういった場合はINLINE_RUNTIME_CHUNK=falseを設定しておくことで、Javascriptを外部ファイルとして出力するようにビルドしてくれます。
INLINE_RUNTIME_CHUNK=false
NEXT_PUBLIC_API_BASE_URL="https://api.dev.sample.com/v1"
前回軽く説明しましたが、環境ごとにAPIの呼び出し先を変えたい場合は
.env.stg等を作成して、専用のビルドコマンドをpackage.jsonに用意してあげましょう。
  "scripts": {
    "dev": "next dev",
    "build": "next build",
    "build:dev": "env-cmd -f .env.dev next build",
    "build:stg": "env-cmd -f .env.stg next build",
    "build:prd": "env-cmd -f .env.prd next build",
    "start": "next start",
    "lint": "next lint",
  },
src/config/index.ts
src/config/index.tsを作成してください。
.envの設定値はprocess.env.XXXXでいつでも呼び出すことはできます。
ですが、直接呼び出すのではなくconfigとして読み込ませてから使用するのが柔軟性のあるやり方です。
export const API_BASE_URL = process.env.NEXT_PUBLIC_API_BASE_URL as string
src/libs/myAxios.ts
src/libs/myAxios.tsを作成してください。
インスタンスの初期設定値を入れていきます。
将来的にはinterceptorsを使って割り込み処理を設定していきます。
import { API_BASE_URL } from '@/config'
import axios, { AxiosInstance } from 'axios'

const createMyAxios = (): AxiosInstance => {
  const instance = axios.create({
    baseURL: API_BASE_URL,
    headers: {},
  })

  return instance
}

const myAxios = createMyAxios()
export default myAxios
src/app/layout.tsx
src/app/layout.tsxはそのまま利用できるかと思いますが、適宜修正してください。
import type { Metadata } from 'next'
import { Inter } from 'next/font/google'
import './globals.css'

const inter = Inter({ subsets: ['latin'] })

export const metadata: Metadata = {
  title: '',
  description: '',
}

export default function RootLayout({
  children,
}: Readonly<{
  children: React.ReactNode
}>) {
  return (
    <html lang='ja'>
      <body className={`min-h-screen bg-white ${inter.className}`}>
        {children}
      </body>
    </html>
  )
}
src/features/Auth/types/request/PostLoginRequest.type.ts
LoginRequest用の型定義ファイルになります。
import { z } from 'zod'

export const zPostLoginRequest = z.object({
  email: z.string(),
  password: z.string(),
})
export type PostLoginRequest = z.infer<typeof zPostLoginRequest>
src/features/Auth/types/response/PostLoginResponse.type.ts
LoginResponse用の型定義ファイルになります。
import { z } from 'zod'

export const zPostLoginResponse = z.object({
  accessToken: z.string(),
  refreshToken: z.string(),
})
export type PostLoginResponse = z.infer<typeof zPostLoginResponse>
src/components
簡単なコンポーネントを作成していきます。
機能に依存しない共通コンポーネントはsrc/components/以下に作成していきます。
まずはsrc/components/ErrorMessage.tsxから。
import React, { ReactElement, ReactNode } from 'react'

type ErrorMessageProps = {
  children?: ReactNode | undefined
  className?: string | undefined
}

export default function ErrorMessage({ children = undefined, className = '' }: ErrorMessageProps): ReactElement {
  return <p className={`h-6 text-red-600/80 ${className}`}>{children}</p>
}
ここで、前回インストールを忘れてしまったライブラリを一つインストールします。
react-hook-formはフォーム周りのバリデーションロジック等のサポートをしてくれるライブラリとなります。
npm i react-hook-form
インストールができたら、src/components/elements/CustomInputField.tsxを作成しましょう。
すこし特殊なのが、ComponentPropsWithoutRefというものを利用していることでしょうか。
Refを親から受け取るようなコンポーネントには必要な書き方となります。
import React, { ComponentPropsWithoutRef, ReactElement, forwardRef } from 'react'
import { ChangeHandler } from 'react-hook-form'
import ErrorMessage from '@/components/ErrorMessage'

type CustomInputFieldProps = {
  id: string
  type?: string | undefined
  name?: string | undefined
  placeholder?: string | undefined
  defaultValue?: string | undefined
  autoComplete?: string | undefined
  label?: string | undefined
  className?: string | undefined
  error?: string | undefined
  onBlur?: ChangeHandler | undefined
  onChange?: ChangeHandler | undefined
}

type CustomInputFieldPropsWithoutRef = ComponentPropsWithoutRef<'input'> & CustomInputFieldProps

function CustomInputField(
  {
    id,
    type = 'text',
    name = '',
    placeholder = '',
    defaultValue = '',
    autoComplete = undefined,
    label = '',
    className = '',
    error = undefined,
    onBlur = undefined,
    onChange = undefined,
  }: CustomInputFieldProps,
  ref: React.ForwardedRef<HTMLInputElement>
): ReactElement {
  return (
    <div className={`flex flex-col text-start ${className}`}>
      <label htmlFor={id} className='font-extrabold'>
        {label}
      </label>
      <input
        type={type}
        name={name}
        id={id}
        placeholder={placeholder}
        defaultValue={defaultValue}
        autoComplete={autoComplete}
        onBlur={onBlur}
        onChange={onChange}
        ref={ref}
        className={`mt-2 p-2 bg-slate-200/60 border outline-none ${error ? 'border-red-600/80' : ''}`}
      />
      <ErrorMessage>{error}</ErrorMessage>
    </div>
  )
}

export default forwardRef<HTMLInputElement, CustomInputFieldPropsWithoutRef>(CustomInputField)
src/app/()/login/page.tsx
src/app/()/login/page.tsxを作成してください。
ログインページです。
react-hook-formを使用することで、registerでフォームのバリデーションチェックを簡単に設定することができます。
先程作成したコンポーネントと組み合わせて、入力エラーメッセージもバッチリです。
handleSubmitはバリデーションチェックが通った場合にのみonSubmitを実行してくれます。
本来はLoginFormとしてコンポーネントに切り出すべきですが、今回は手を抜きます!
'use client'

import CustomInputField from '@/components/elements/CustomInputField'
import { PostLoginRequest, zPostLoginRequest } from '@/features/Auth/types/request/PostLoginRequest.type'
import { PostLoginResponse } from '@/features/Auth/types/response/PostLoginResponse.type'
import { useRouter } from 'next/navigation'
import { ReactElement } from 'react'
import { useForm, SubmitHandler } from 'react-hook-form'

export default function Login(): ReactElement {
  const route = useRouter()
  const {
    register,
    handleSubmit,
    formState: { errors },
  } = useForm<PostLoginRequest>()
  const onSubmit: SubmitHandler<PostLoginRequest> = async (data) => {
    try {
      const params: PostLoginRequest = zPostLoginRequest.parse(data)
      /** 本来であればここでAPIを呼び出します **/
      // const result: PostLoginResponse | false = await myAxios.post('/login', params)
      //   .then((res) => zPostLoginResponse.parse(res))
      //   .catch(() => false)

      // if (result === false) {
      //   // APIエラー処理
      //   return
      // }

      /** 今回はフロント周りの動作のみのため、一旦適当なデータを用意 **/
      const result: PostLoginResponse = { accessToken: 'hogehoge', refreshToken: 'fugafuga' }
      sessionStorage.setItem('accessToken', result.accessToken)
      localStorage.setItem('refreshToken', result.refreshToken)
      route.push('/mypage')
    } catch (e) {
      console.error(e)
      // エラー処理
    }
  }

  return (
    <>
      <h1>ログイン</h1>
      <div className='flex justify-center'>
        <form className='m-2 w-96' onSubmit={handleSubmit(onSubmit)}>
          <CustomInputField
            type='email'
            id='login-id'
            label='メールアドレス'
            className='mt-2'
            error={errors.email?.message}
            {...register('email', {
              required: 'メールアドレスを入力してください',
            })}
          />
          <CustomInputField
            type='password'
            autoComplete='current-password'
            minLength={8}
            id='password'
            label='パスワード'
            className='mt-2'
            error={errors.password?.message}
            {...register('password', {
              required: 'パスワードを入力してください',
              minLength: {
                value: 8,
                message: 'パスワードは8文字以上で入力してください',
              },
            })}
          />
          <button type='submit' className='mt-6 p-4 w-full border bg-slate-200/60'>ログイン</button>
        </form>
      </div>
    </>
  )
}
実際はonSubmitでAPIを呼び出すのですが、そっちの実装までは行わないのでとりあえずそれっぽく動作するようにしています。
src/app/(authenticated)/mypage/page.tsx
最後に遷移先となるmypageを用意してあげましょう。
'use client'

import { ReactElement } from 'react';

export default function Mypage(): ReactElement {
  return (
    <>
      <h1>Mypage</h1>
      <div></div>
    </>
  )
}
ここまでできたらnpm run devでローカル起動をしてみましょう。
/loginにアクセスするとログイン画面が表示され、メールアドレスっぽいものとパスワードっぽいものを入力してログインっぽいものができると思います。
まだまだ続く
これでログインっぽい動作をするところまでができました。
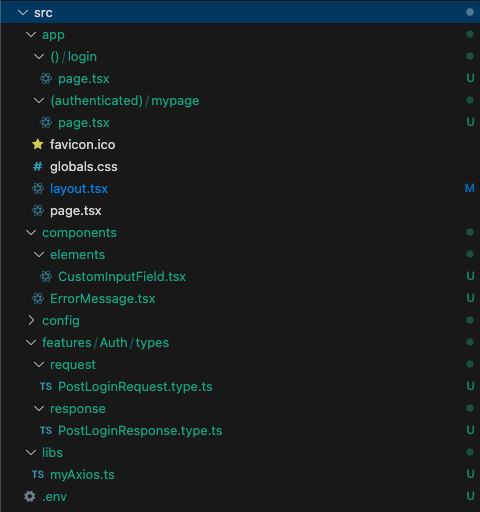
今のディレクトリ構成はこんな感じです!
次回はAuthProviderを作成して、認証済み専用ページのアクセス制限を実施していきます。
next > ④

