DataGridViewでドラッグ&ドロップ機能を実装する方法を説明します。具体的には、 異なる行にドロップした場合はセル値をコピーし、同じ行にドロップした場合はセル値を移動するロジックに焦点を当てます。
動作の流れ
- DataGridViewの設定 DataGridViewの設定は、SetupDataGridViewメソッドでは、以下のような設定を行います。
- 右クリックの操作
- MouseDownイベントを使用して、ユーザーが右クリックしたかどうかを判定します。
- 右クリックされたセルの情報を取得し、入力フォームを表示します。
- ユーザーが入力フォームで値を入力し、「OK」をクリックすると、その値がセルに反映されます。
- ドラッグ機能の実装
- MouseMoveイベントを使用して、ユーザーがセルをドラッグしたかどうかを判定します。
- ドラッグ元のセルの位置を記録し、ドラッグ操作を開始します。
- DragEnterイベントを使用して、ドラッグ中の処理を行います。
- ドロップ操作
- DragDropイベントがトリガーされます。
- HitTestメソッドを使用して、ドロップ先のセルの位置を特定します。
- 異なる行にドロップされた場合:セル値がコピーされます。(ドラッグ元のセルは変更されません)
- 同じ行にドロップされた場合:セル値が移動されます。(ドラッグ元のセルはクリアされます)
DataGridViewDragDropDemo.cs
private void SetupDataGridView()
{
    // 空白行の自動追加を無効
    dataGridViewSchedule.AllowUserToAddRows = false;
    // 行ヘッダーを非表示
    dataGridViewSchedule.RowHeadersVisible = false;
    // 列の幅を自動調整
    dataGridViewSchedule.AutoSizeColumnsMode = DataGridViewAutoSizeColumnsMode.Fill;
    // 行の高さを設定
    dataGridViewSchedule.RowTemplate.Height = 40;
    // セルのテキストを折り返す
    dataGridViewSchedule.DefaultCellStyle.WrapMode = DataGridViewTriState.True;
    // 時間列を追加
    dataGridViewSchedule.Columns.Add("Time", "時間");
    // 曜日列を追加
    dataGridViewSchedule.Columns.Add("Monday", "月");
    dataGridViewSchedule.Columns.Add("Tuesday", "火");
    dataGridViewSchedule.Columns.Add("Wednesday", "水");
    dataGridViewSchedule.Columns.Add("Thursday", "木");
    dataGridViewSchedule.Columns.Add("Friday", "金");
    dataGridViewSchedule.Columns.Add("Saturday", "土");
    dataGridViewSchedule.Columns.Add("Sunday", "日");
    // 9時から17時までの時間枠を追加
    for (int hour = 9; hour <= 17; hour++)
    {
        string time = $"{hour}:00 - {hour + 1}:00";
        dataGridViewSchedule.Rows.Add(time, "", "", "", "", "", "", "");
    }
    // 編集を無効
    foreach (DataGridViewColumn column in dataGridViewSchedule.Columns)
    {
        column.ReadOnly = true;
    }
    // 列ヘッダーのスタイルを設定
    dataGridViewSchedule.ColumnHeadersDefaultCellStyle.BackColor = Color.SkyBlue;
    dataGridViewSchedule.ColumnHeadersDefaultCellStyle.Alignment = DataGridViewContentAlignment.MiddleCenter;
    // ドラッグ&ドロップを有効
    dataGridViewSchedule.AllowDrop = true;
    dataGridViewSchedule.EnableHeadersVisualStyles = false;
    // 行の高さを設定
    dataGridViewSchedule.RowTemplate.Height = 150;
    // デフォルトの選択色を無効
    dataGridViewSchedule.DefaultCellStyle.SelectionBackColor = dataGridViewSchedule.DefaultCellStyle.BackColor; // 背景色を一致
    dataGridViewSchedule.DefaultCellStyle.SelectionForeColor = dataGridViewSchedule.DefaultCellStyle.ForeColor; // テキスト色を一致
    // ソートを無効
    dataGridViewSchedule.Columns.Cast<DataGridViewColumn>().ToList().ForEach(col => col.SortMode = DataGridViewColumnSortMode.NotSortable)
}
DataGridViewのセルを右クリックしたときに、入力用のフォームを表示する機能を実装します。この機能を使うと、ユーザーはセルを右クリックして新しい値を入力できます。
DataGridViewDragDropDemo.cs
private void DataGridViewSchedule_MouseDown(object sender, MouseEventArgs e)
{
    // マウスクリック位置のセルを取得
    var hitTest = dataGridViewSchedule.HitTest(e.X, e.Y);

    // 右クリックが行われた場合
    if (e.Button == MouseButtons.Right)
    {
        // クリックされたセルの列ヘッダー(曜日)を取得
        string Week = dataGridViewSchedule.Columns[hitTest.ColumnIndex].HeaderText;

        // クリックされたセルの時間を取得(1列目の値)
        string time = dataGridViewSchedule.Rows[hitTest.RowIndex].Cells[0].Value.ToString();

        // 入力フォームを表示
        using (var inputForm = new InputForm(string.Empty, Week, time))
        {
            // 子フォームを親フォームの中央に表示する
            inputForm.StartPosition = FormStartPosition.Manual;

            // 親フォームの中央位置を計算
            int parentCenterX = this.Location.X + (this.Width - inputForm.Width) / 2;
            int parentCenterY = this.Location.Y + (this.Height - inputForm.Height) / 2;

            // 子フォームの位置を設定
            inputForm.Location = new Point(parentCenterX, parentCenterY);

            // 入力フォームを表示し、結果を待つ
            if (inputForm.ShowDialog() == DialogResult.OK)
            {
                // 入力された値をセルに反映
                dataGridViewSchedule.Rows[hitTest.RowIndex].Cells[hitTest.ColumnIndex].Value = inputForm.EnteredValue;
            }
        }
    }
}
DataGridViewのセルをドラッグする機能を実装します。この機能を使うと、ユーザーはセルの値をドラッグして別のセルに移動またはコピーできます。
以下は、DataGridViewSchedule_MouseMoveメソッドとDataGridViewSchedule_DragEnterメソッドの完全なコードとその説明です。
DataGridViewDragDropDemo.cs
private void DataGridViewSchedule_MouseMove(object sender, MouseEventArgs e)
{
    // マウスの位置にあるセルを取得
    var hitTest = dataGridViewSchedule.HitTest(e.X, e.Y);

    // 左クリックが行われた場合
    if (e.Button == MouseButtons.Left)
    {
        // ドラッグ元のセルの位置を記録
        sourceRowIndex = hitTest.RowIndex;
        sourceColumnIndex = hitTest.ColumnIndex;

        // セルが有効かつ値が空でない場合
        if (hitTest.Type == DataGridViewHitTestType.Cell && hitTest.ColumnIndex > 0 && !string.IsNullOrEmpty(dataGridViewSchedule.Rows[hitTest.RowIndex].Cells[hitTest.ColumnIndex].Value?.ToString()))
        {
            // ドラッグ操作を開始
            dataGridViewSchedule.DoDragDrop(dataGridViewSchedule.Rows[hitTest.RowIndex].Cells[hitTest.ColumnIndex].Value, DragDropEffects.Move);
        }
    }
}

private void DataGridViewSchedule_DragEnter(object sender, DragEventArgs e)
{
    // ドラッグされたデータが文字列の場合
    if (e.Data.GetDataPresent(typeof(string)))
    {
        // ドラッグ操作を許可
        e.Effect = DragDropEffects.Move;
    }
    else
    {
        // ドラッグ操作を無効にする
        e.Effect = DragDropEffects.None;
    }
}
ユーザーがセルに値をドロップすると、以下の処理が行われます。
DataGridViewDragDropDemo.cs
private void DataGridViewSchedule_DragDrop(object sender, DragEventArgs e)
{
    // マウスの位置をDataGridViewの座標に変換
    var clientPoint = dataGridViewSchedule.PointToClient(new Point(e.X, e.Y));
    var hitTest = dataGridViewSchedule.HitTest(clientPoint.X, clientPoint.Y);

    // ドロップ先が有効なセルかつ最初の列でない場合
    if (hitTest.Type == DataGridViewHitTestType.Cell && hitTest.ColumnIndex > 0)
    {
        // ドラッグされた値を取得
        var task = e.Data.GetData(typeof(string)).ToString();

        // ドロップ先が同じ行かどうかを判定
        if (hitTest.RowIndex == sourceRowIndex)
        {
            // 同じ行の場合:値を移動(ドラッグ元のセルをクリア)
            dataGridViewSchedule.Rows[sourceRowIndex].Cells[sourceColumnIndex].Value = "";
        }

        // ドロップ先のセルに値を設定
        dataGridViewSchedule.Rows[hitTest.RowIndex].Cells[hitTest.ColumnIndex].Value = task;
    }
}
入力フォームの説明
タスクを入力するためのフォームです。以下は、InputFormの主要な部分です。InputForm.cs
public InputForm(string draggedValue, string weekDay, string hours)
{
    // フォームの設定
    this.Text = "タスク入力";
    this.Size = new System.Drawing.Size(300, 250);

    // ラベルを追加
    var week = new Label();
    week.Location = new Point(40, 20);
    week.Size = new System.Drawing.Size(20, 20);
    week.Text = weekDay;
    this.Controls.Add(week);

    var time = new Label();
    time.Location = new System.Drawing.Point(60, 20);
    time.Size = new System.Drawing.Size(80, 20);
    time.Text = hours;
    this.Controls.Add(time);

    // テキストボックスを追加
    TextBox textArea = new TextBox();
    textArea.Multiline = true;
    textArea.ScrollBars = ScrollBars.Vertical;
    textArea.Location = new Point(40, 40);
    textArea.Size = new Size(150, 100);
    textArea.WordWrap = true;
    textArea.AcceptsReturn = true;
    textArea.Text = draggedValue;
    this.Controls.Add(textArea);

    // OKボタンを追加
    var okButton = new Button();
    okButton.Text = "OK";
    okButton.Location = new Point(50, 150);
    okButton.Click += (s, e) =>
    {
        EnteredValue = textArea.Text;
        this.DialogResult = DialogResult.OK;
        this.Close();
    };
    this.Controls.Add(okButton);

    // Cancelボタンを追加
    var cancelButton = new Button();
    cancelButton.Text = "Cancel";
    cancelButton.Location = new System.Drawing.Point(150, 150);
    cancelButton.Click += (s, e) =>
    {
        this.DialogResult = DialogResult.Cancel;
        this.Close();
    };
    this.Controls.Add(cancelButton);
}
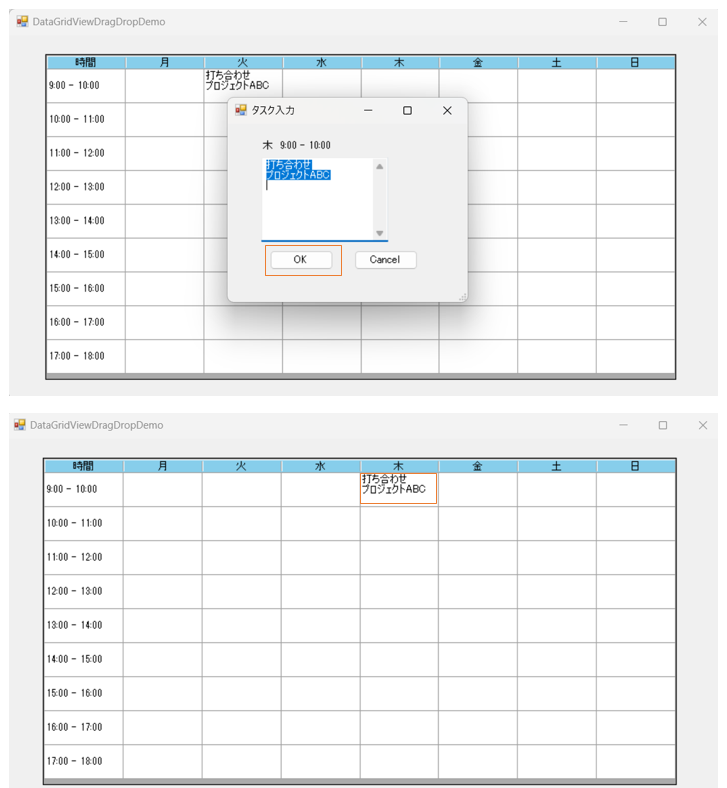
動作イメージ
最初は右クリックで時間9:00-10:00行の火曜日のセルにタスクを入力します。
シナリオ1:同じ行内での移動
時間9:00-10:00行: 火曜日のセルをドラッグします。
時間9:00-10:00行、木曜日のセルにドロップします。
値が移動され、ドラッグ元のセルは空になります。
シナリオ2:異なる行へのコピー
時間9:00-10:00行、木曜日のセルをドラッグします。
時間10:00-11:00行、金曜日のセルにドロップします。
値がコピーされ、ドラッグ元のセルは変更されません。

まとめ
この記事では、DataGridViewを使ったドラッグ&ドロップ機能の実装方法を詳しく説明しました。以下のポイントを押さえることで、ユーザーが直感的にデータを操作できるアプリケーションを作成できます。
- DataGridViewの設定: 空白行の自動追加を無効にし、行ヘッダーを非表示にすることで、ユーザーが不要な操作をしないようにしました。
- 右クリックでの入力フォーム表示: ユーザーがセルを右クリックすると、入力フォームが表示され、新しい値を入力できるようにしました。
- ドラッグ&ドロップ機能: ユーザーがセルをドラッグすると、その値を別のセルに移動またはコピーできるようにしました。
- 入力フォームの活用: ドラッグ&ドロップ時に表示される入力フォームを使うことで、ユーザーがタスクの詳細を入力できるようにしました。