FastAPIは便利ですね。APIサーバを簡単に構築できるフレームワークとして個人的に愛用しています。今回はFastAPIに認証機能を追加します。
注意 :FastAPI, Firebase のインストールなどセットアップは前提としてここでは触れません。
Bearer認証
サーバにリクエストしてきたユーザの識別・認証を行い、要求されたリソースへ適切な許可を制御したい需要は多々あると思います。ここではHTTPヘッダに追加するだけで簡単に実装できるBearer認証を実装します。
HTTPのAuthorizationヘッダにスキームとして指定でき,
Authorization: Bearer <token>のようにして指定する.
トークンの形式はtoken68の形式で指定することが定められている.
token の発行や検証など自分で実装するのは大変ですので、今回はFirebaseを利用します。
全体の構成
Firebaseを利用したBearer認証の全容を図示

- クライアントでAPIサーバへの問い合わせが発生
Firebaseに適切なユーザとしてログインしてtokenを取得 - クライアントは
tokenを添えてHTTPでAPIサーバに投げる - サーバはHTTPヘッダの
tokenをFirebaseに問い合わせて検証する
検証が成功すればユーザの識別・認証が完了 - サーバは適切にリクエストに応答
Firebase Admin SDK のセットアップ
Firebase Admin SDK を利用して認証機能を実装します
秘密鍵の準備
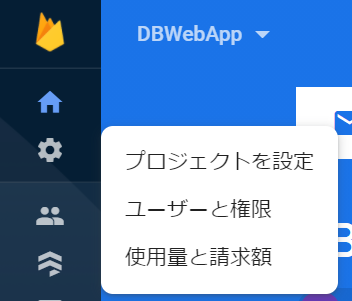
Firebaseのアカウントは事前に取得しておきましょう。まずプロジェクトのコンソールを開きます
右上の歯車アイコンから設定を開きます
「サービスアカウント」タブの最下部にあるボタンから秘密鍵をJSONファイルで取得します。ここではaccount_key.jsonとして保存します。

SDK の準備
$ pip install firebase_admin
実装
APIエンドポイント
まず簡単なエンドポイントを用意して最低限のAPIサーバを構築します。
from fastapi import FastAPI

app = FastAPI()

@app.get("/api/")
async def hello():
    return {"msg":"Hello, this is API server"}
uvicorn でテストサーバを立ててみます
$ uvicorn main:app --port 8001 --reload
試しにAPIサーバを叩いてみましょう(WebブラウザでもOK)
PS > curl http://localhost:8001/api
StatusCode        : 200
StatusDescription : OK
Content           : {"msg":"Hello, this is API server"}
RawContent        : HTTP/1.1 200 OK
                    Content-Length: 35
                    Content-Type: application/json
                    Date: Wed, 18 Nov 2020 11:11:20 GMT
                    Server: uvicorn

                    {"msg":"Hello, this is API server"}
Bearer認証の追加
from fastapi.security import HTTPBearer, HTTPAuthorizationCredentials
from fastapi import Depends, HTTPException, status, Response
from firebase_admin import auth, credentials
import firebase_admin

cred = credentials.Certificate('./account_key.json')
firebase_admin.initialize_app(cred)

def get_user(res: Response, cred: HTTPAuthorizationCredentials=Depends(HTTPBearer(auto_error=False))):
    if cred is None:
        raise HTTPException(
            status_code=status.HTTP_401_UNAUTHORIZED,
            detail="Bearer authentication required",
            headers={'WWW-Authenticate': 'Bearer realm="auth_required"'},
        )
    try:
        decoded_token = auth.verify_id_token(cred.credentials)
    except Exception as err:
        raise HTTPException(
            status_code=status.HTTP_401_UNAUTHORIZED,
            detail=f"Invalid authentication credentials. {err}",
            headers={'WWW-Authenticate': 'Bearer error="invalid_token"'},
        )
    res.headers['WWW-Authenticate'] = 'Bearer realm="auth_required"'
    return decoded_token
まずAuthorizationヘッダよりtokenを取り出す必要があります。FastAPIではリクエストの認証ヘッダもValidationできるので便利ですね。
[FastAPI] Query Parameters and String Validations
[Qiita] PythonでFirebase Authenticationのトークン取得とFastAPIでトークン検証
次にtokenを検証します。上のコードではtokenが存在しない、不正な場合の対応をそれぞれ定義しています。エラーに対するレスポンスの内容はBearer認証を定めたRFC 6750に準じます。HTTPExeptionを投げるだけでFastAPIが勝手に拾ってレスポンスを生成してくれるので楽ちんです。
Firebaseの公式ドキュメント
Firebase Admin Python SDK
[Qiita] RFC 6750 に準拠した Bearer スキームを実装するには
注意 :HTTPBearer(auto_error=True)(デフォルト)にすると、token無しのリクエストに対して
PS > curl http://localhost:8001/api/me
curl : {"detail":"Not authenticated"}
PS > $error[0].exception
リモート サーバーがエラーを返しました: (403) 使用不可能
とFastAPIが勝手に例外処理+レスポンスを生成します。
認証ありAPIエンドポイント
ユーザ認証が必要なAPIエンドポイントを追加します。
from fastapi import FastAPI, Depends
from user import get_user

app = FastAPI()

@app.get("/api/")
async def hello():
    return {"msg":"Hello, this is API server"}


@app.get("/api/me")
async def hello_user(user = Depends(get_user)):
    return {"msg":"Hello, user","uid":user['uid']}
uidはFirebaseにログインしたユーザの識別子で、e-mail&password に限らずTwitter, Googleなど多種サービスで認証したユーザも識別できます。
テスト
実際にクライアントからAPIを叩いて応答を見てみます。
tokenの取得
API key の取得
Firebaseコンソールからプロジェクトを選択して、設定>全般よりコピペ

REST API を叩く
プロジェクトにユーザ(e-mail&password)が既に登録されているとして、
- Method :
POST - URL :
https://identitytoolkit.googleapis.com/v1/accounts:signInWithPassword?key=${API_KEY} - Body : JSONで記述したログインに必要な情報
{
  "email":"test@example.com",
  "password":"your password",
  "returnSecureToken":true
}
[Firebase] Auth REST API - 公式ドキュメント
PS >  curl -Method Post -Body $Body -Headers @{"content-type"="application/json"} $URL
StatusCode        : 200
StatusDescription : OK
Content           : {
                      "kind": "identitytoolkit#VerifyPasswordResponse",
                      "localId": "OZzdeAtK4VM4OlHHbUXTY6YNr8C3",
                      "email": "test@example.com",
                      "displayName": "",
                      "idToken": "eyJhbGciOiJSUzI1NiIsImtpZCI6IjNlNTQ...
RawContent        : HTTP/1.1 200 OK
                    Pragma: no-cache
                    Vary: X-Origin,Referer,Origin,Accept-Encoding
                    X-XSS-Protection: 0
                    X-Frame-Options: SAMEORIGIN
                    X-Content-Type-Options: nosniff
                    Alt-Svc: h3-Q050=":443"; ma=2592000...
応答もJSONで、idTokenの値をBearer認証に使います。
実行
成功例
PS > curl -Headers @{"Authorization"="Bearer ${token}"} http://localhost:8001/api/me
StatusCode        : 200
StatusDescription : OK
Content           : {"msg":"Hello, user","uid":"OZzdeAtK4VM4OlHHbUXTY6YNr8C3"}
RawContent        : HTTP/1.1 200 OK
                    Content-Length: 58
                    Content-Type: application/json
                    Date: Fri, 20 Nov 2020 15:28:18 GMT
                    Server: uvicorn
                    WWW-Authenticate: Bearer realm="auth_required"

                    {"msg":"Hello, user","uid":...
不正なtokenの例
tokenの値を適当に弄って渡してみる
PS > curl -Headers @{"Authorization"="Bearer ${token}"} http://localhost:8001/api/me
curl : {"detail":"Invalid authentication credentials. Could not verify token signature."}
token欠損の例
PS > curl http://localhost:8001/api/me
curl : {"detail":"Bearer authentication required"}