はじめに
こんにちは、H×Hのセンリツ大好きエンジニアです。(同担OKです😉)
今回はGoogle CloudとTerraformの勉強がてらに作ったサービスで構築したCI/CDをご紹介したいと思います!
基本的にはnicky_tree55さんの記事を基にしておりますので、そちらで述べられている説明は省きたいと思います🙇
参考にした記事がとても勉強になりますので、そちらをまず閲覧していただくことをお勧めします💪
構成
Eracerに作成してもらいました。
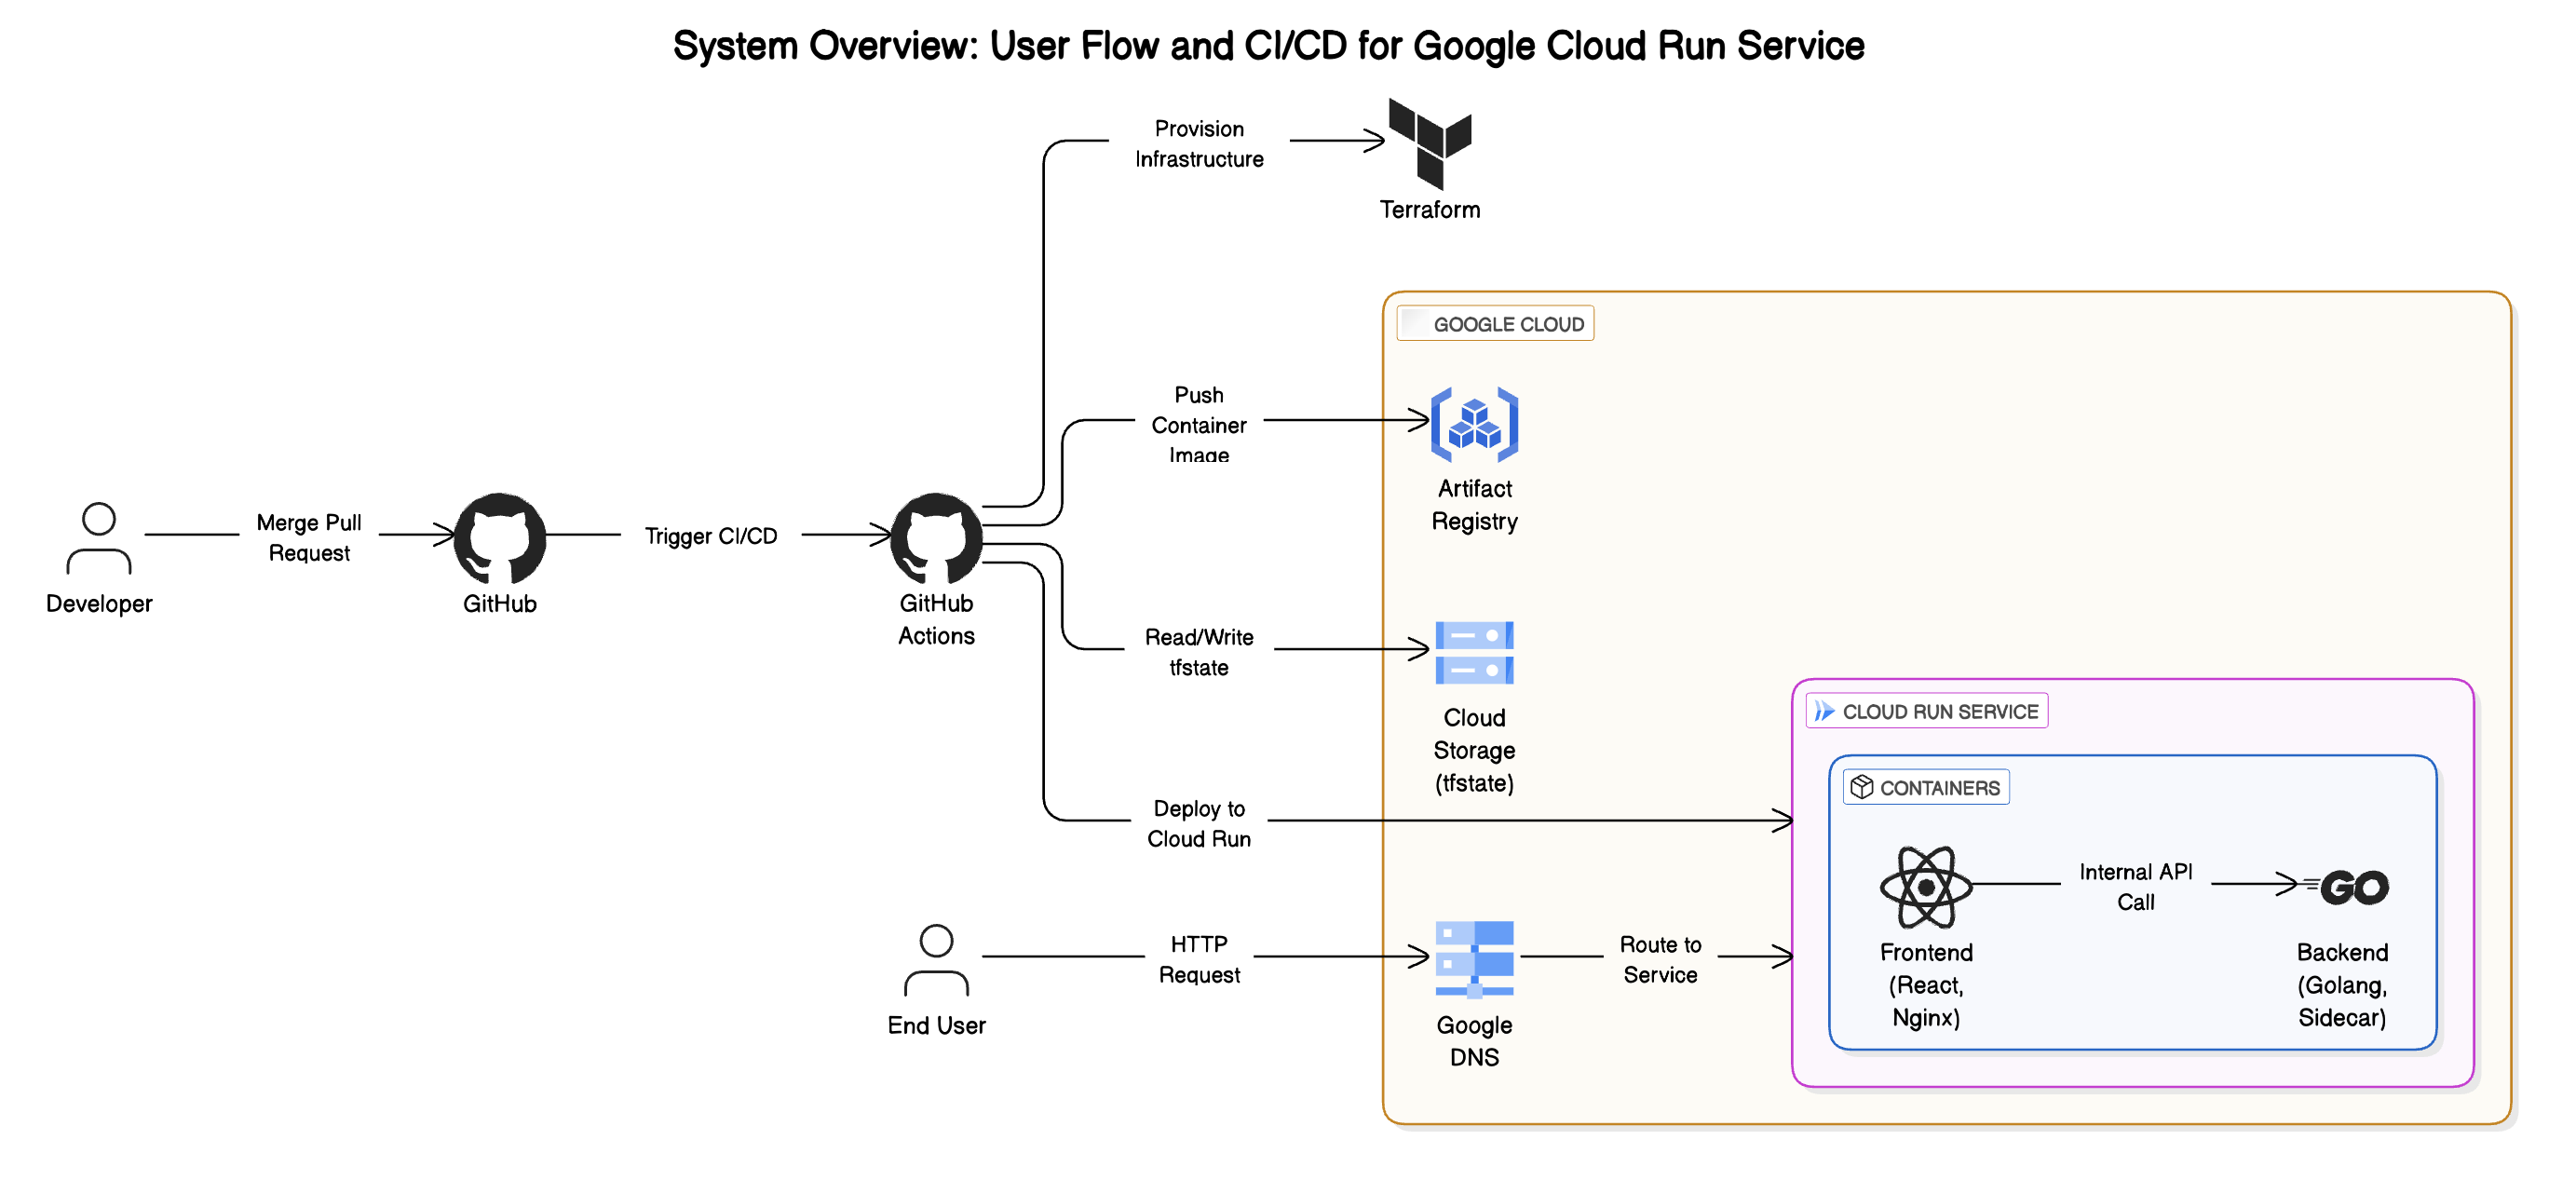
大まかに言うと、以下のようになっています。
- GitHub ActionsによるCI/CD
- Terraformを用いて、Google Cloudの環境構築、デプロイを実行
- フロントエンドはReact、バックエンドはGo
- Vite + Reactでビルドされた静的ファイルをNginxで配信するようにしている
- コンテナイメージはArtifact Registory、tfstateはCloud Storageに保存
- デプロイ先はCloud Run
- マルチコンテナ構成で、バックエンドコンテナはサイドカー方式(フロントエンドコンテナにくっついて起動する)
ユーザーがアクセスする時に、Cloud DNSがリクエストをキャッチしてCloud Runへ促すようにしています。
DNSとCloud Runの連携部分のみ手動で行いました🖐️
方法はざっくりとこちらの通り
参考元からの変更点
ほぼ一緒ですが、今回はフロントエンドでNext.jsではなくReactを採用しています。
Lovableにフロントを作ってもらったので、React + Vite構成になってたのが理由です🤫
そのため、Next.jsで内包されていた静的ファイル配信をNginxで行う必要があり、そこだけ変更しました。
変更した箇所は以下の通り
- フロントエンドのDockerfile
- nginx.conf.templateの作成
フロントエンドのDockerfile
# syntax = docker/dockerfile:1
# ローカルでの実行用ステージは割愛
#####################################
# build stage
#####################################
FROM oven/bun:1.2.2 AS builder
WORKDIR /app

# Install dependencies (optionally add --production to skip devDependencies if build tools are in prod deps)
COPY package.json bun.lock ./
# use --production if possible to avoid dev-only deps​:contentReference[oaicite:2]{index=2}
RUN bun install

# Copy source and build the app
COPY . .
# ensure production build optimizations
ENV NODE_ENV=production
# this runs "vite build", outputting to /app/dist
RUN bun run build

#####################################
# runner stage
#####################################
FROM nginx:alpine AS runner
RUN apk add --no-cache gettext
# Copy build output to nginx's web root
COPY --from=builder /app/dist /usr/share/nginx/html
COPY nginx.conf.template /etc/nginx/templates/default.conf.template
RUN apk add --no-cache net-tools && netstat -tuln

ENV PORT=80
CMD ["/bin/sh", "-c", "envsubst '$PORT' < /etc/nginx/templates/default.conf.template > /etc/nginx/conf.d/default.conf && exec nginx -g 'daemon off;'"]
※マルチステージにしてますが、devステージ(開発用)は割愛してます。
今回はBunを用いているため、ビルドステージでBunのインストールやビルドの実行など行っていますが、こちらはNode.jsに変えていただいても大丈夫です。
また、ランナーステージではnginx:alpineというNginxの軽量イメージを使用しています。nginx.conf.templateをコピーして、envsubstという環境変数展開用のライブラリを用いて設定ファイルをコンテナ内に作成しています。
※ENV PORT=80はCloud RunでPortの設定がされてない場合のものなので、無くても良いです。
nginx.conf.template
server {
    listen $PORT;
    server_name _;
    root /usr/share/nginx/html;
    index index.html index.htm;

    location / {
        try_files $uri $uri/ /index.html;
    }

    location ~* \.(ico|png|jpg|jpeg|svg|gif|webp|css|js)$ {
        try_files $uri =404;
    }

    location /api/ {
        proxy_pass バックエンドのパス;
        proxy_set_header Host $host;
        proxy_set_header X-Forwarded-For $proxy_add_x_forwarded_for;
    }
}
こちらに関しては、基本的な設定さえあれば大丈夫だと思います👌
特筆する所としては、画像の配信用にlocation ~*を追加したり、バックエンドのAPIにプロキシさせる用のリバースプロキシを追加したりくらいですかね。
後は前述の記事に書いているような手順で行なってもらうとCloud Runへのデプロイが行われ、成功すれば実際に外部公開ができるようになっていると思います!🎉
-
terraform/initでGoogle Cloudの環境構築(API有効化、アカウント作成や権限の付与など) -
terraform/bucketでtfstate管理用のバケット追加 -
terraform/applicationと.github/workflowsを追加してPR作成〜mainへのマージまで実行
おわりに
今回は、インフラの勉強として下記の記事を参考に自分なりに少し変更してみました!
インフラの勉強が億劫だとお思いの方でもとっつき易い内容だと思いますので、是非チェックしてみてください!
最後までご覧いただきありがとうございました!