 以前、PostProcessingStackV2(PPSV2)のカスタムPostProcessで、深度テクスチャと法線テクスチャを扱う方法を記載しました。
[PostProcessingStackV2のシェーダで_CameraDepthNormalsTextureから深度と法線を取り出す方法](https://qiita.com/ScreenPocket/items/e154ab90db5ef2a9cd74)
以前、PostProcessingStackV2(PPSV2)のカスタムPostProcessで、深度テクスチャと法線テクスチャを扱う方法を記載しました。
[PostProcessingStackV2のシェーダで_CameraDepthNormalsTextureから深度と法線を取り出す方法](https://qiita.com/ScreenPocket/items/e154ab90db5ef2a9cd74)
では、UniversalRP(URP)のカスタムPostProcessで深度と法線を扱うには、どのようにすれば良いのか調べてみました。
環境はこちら
- Unity 2020.2.4f1
- UniversalRP 10.3.1
PPSV2の深度と法線を表示するカスタムPostProcessを、URPのPostProcessに移植する
深度と法線を表示する仕組みを、先日書いたミニマムなURPカスタムPostProcessに移植してみましょう
深度と法線を表示するPPSV2のカスタムPostProcessについては、前述の
PostProcessingStackV2のシェーダで_CameraDepthNormalsTextureから深度と法線を取り出す方法
ミニマムなURPカスタムPostProcessについては
UniversalRPでのミニマムなカスタムPostProcessを作成する
を参照ください。
という事で移植をしていきましょう。
PostProcessEffectSettingsをVolumeComponent化
PPSV2のDepthNormals.csをURPのPostProcess用に書き換えていきます
using System;
using UnityEngine;
using UnityEngine.Rendering;
using UnityEngine.Rendering.Universal;

namespace ScreenPocket.PostProcess
{
    [Serializable, VolumeComponentMenu("ScreenPocket/PostProcess/DepthNormals")]
    public class DepthNormals : VolumeComponent, IPostProcessComponent
    {
        [Tooltip("DepthNormal effect intensity.")]
        public ClampedFloatParameter weight = new ClampedFloatParameter(0.5f,0f,1f);
        [Tooltip("Depth or Normal. 0:Depth ~ 1:Normal")]
        public ClampedFloatParameter depthOrNormal = new ClampedFloatParameter(0.5f,0f,1f);

        public bool IsActive() => weight.value > 0f;

        public bool IsTileCompatible() => false;
    }
}
ポイントは
- blendをリネームして、weightにしている
- RangeAttribute(Range(0,1))は止めて、FloatParameterをClampedParameterにしている
辺りでしょうか。
リネームについてはそれほど深い意味は無い(内部でそう記載している部分があったので合わせた)のですが、
Range(0,1)がClampedFloatParameterになっている点は重要です。
そう記載しておかないと、Inspectorで見た時に表示が普通のFloat表示になってしまうので気を付けましょう。
PostProcessEffectRendererをPostProcessPassに移動
ミニマムの記事で書いたように、PPSV2の描画処理はPostProcessのExcute内に移動します。
using ScreenPocket.PostProcess;
using UnityEngine;
using UnityEngine.Rendering;
using UnityEngine.Rendering.Universal;

namespace ScreenPocket.Rendering
{
    public sealed class PostProcessPass : ScriptableRenderPass
    {
        private static readonly int keepFrameBuffer = Shader.PropertyToID("KeepFrameBuffer");

        private Material _depthNormalsMaterial;

        private RenderTargetIdentifier _target;

        private const string renderPostProcessingTag = "Render PostProcessing Effects";

        private static readonly ProfilingSampler profilingRenderPostProcessing = new ProfilingSampler(renderPostProcessingTag);
        public PostProcessPass(RenderPassEvent evt)
        {
            base.profilingSampler = new ProfilingSampler(nameof(PostProcessPass));
            renderPassEvent = evt;
            var shader = Shader.Find("ScreenPocket/PostProcess/DepthNormals");
            _depthNormalsMaterial = CoreUtils.CreateEngineMaterial(shader);
        }

        public void Setup(RenderTargetIdentifier target)
        {
            _target = target;
            ConfigureInput(ScriptableRenderPassInput.Normal);
        }

        public override void Execute(ScriptableRenderContext context, ref RenderingData renderingData)
        {
            if (!renderingData.cameraData.postProcessEnabled)
            {
                return;
            }

            var cmd = CommandBufferPool.Get();
            using (new ProfilingScope(cmd, profilingRenderPostProcessing))
            {
                if (TryGetVolume<DepthNormals>(out var depthNormals))
                {
                    RenderDepthNormals(cmd, depthNormals, ref renderingData.cameraData);
                }
            }
            context.ExecuteCommandBuffer(cmd);
            CommandBufferPool.Release(cmd);
        }

        /// <summary>
        /// VolumeComponentを取得する
        /// </summary>
        /// <param name="out"></param>
        /// <typeparam name="T"></typeparam>
        /// <returns>取得出来たらtrue</returns>
        private bool TryGetVolume<T>(out T @out)
            where T : VolumeComponent, IPostProcessComponent
        {
            var stack = VolumeManager.instance.stack;
            @out = stack.GetComponent<T>();
            if (@out == null)
            {
                return false;
            }

            if (!@out.IsActive())
            {
                return false;
            }

            return true;
        }

        private void RenderDepthNormals(CommandBuffer commandBuffer, DepthNormals depthNormals, ref CameraData cameraData)
        {
            int width = cameraData.cameraTargetDescriptor.width;
            int height = cameraData.cameraTargetDescriptor.height;

            var destination = keepFrameBuffer;
            _depthNormalsMaterial.SetFloat("_Weight", depthNormals.weight.value);
            _depthNormalsMaterial.SetFloat("_DepthOrNormal", depthNormals.depthOrNormal.value);
            //ビュー空間の法線をワールド空間に変換するための行列
            var viewToWorld = cameraData.camera.cameraToWorldMatrix;
            _depthNormalsMaterial.SetMatrix("_ViewToWorld", viewToWorld);

            commandBuffer.GetTemporaryRT(destination, width, height,
                0, FilterMode.Point, RenderTextureFormat.Default);
            commandBuffer.SetGlobalTexture("_MainTex", destination);
            commandBuffer.Blit(_target, destination);
            commandBuffer.Blit(destination, _target, _depthNormalsMaterial, 0);
            commandBuffer.ReleaseTemporaryRT(destination);
        }

        public void Cleanup()
        {
            CoreUtils.Destroy(_depthNormalsMaterial);
        }
    }
}
ポイントは
- TryGetVolumeで目的のVolumeを取り出すようにしている
- Setup()タイミングでConfigureInput(ScriptableRenderPassInput.Normal); を指定している
点でしょうか。
前回ミニマムの記事で記載したモノクロ描画処理は端折りましたが、もし必要ならば、RenderDepthNormals()の辺りで
                if (TryGetVolume<Monochrome>(out var monochrome))
                {
                    RenderMonochrome(cmd, monochrome, ref renderingData.cameraData);
                }
としてあげて、RenderMonochrome()内にモノクロ描画処理を書いてあげる事でまとめてエフェクトをかける事が可能となります。
もう一つのポイント ConfigureInput() については今回非常に重要なので後ほど記載します。
シェーダ
という事で、今回の肝のシェーダコードの記載です。
Shader "ScreenPocket/PostProcess/DepthNormals"
{
    HLSLINCLUDE
        #include "Packages/com.unity.render-pipelines.universal/Shaders/PostProcessing/Common.hlsl"
        #include "Packages/com.unity.render-pipelines.universal/ShaderLibrary/DeclareDepthTexture.hlsl"
        #include "Packages/com.unity.render-pipelines.universal/ShaderLibrary/DeclareNormalsTexture.hlsl"

        TEXTURE2D_X(_MainTex);
        SAMPLER(sampler_MainTex);
        float _Weight;
        float _DepthOrNormal;
        float4x4 _ViewToWorld;

        half4 Frag(Varyings i) : SV_Target
        {
            float4 mainColor = SAMPLE_TEXTURE2D(_MainTex, sampler_MainTex, i.uv);

            float depth = SampleSceneDepth(i.uv);
            float3 normal = SampleSceneNormals(i.uv);

            depth = Linear01Depth(depth, _ZBufferParams);
            //View空間からWorld空間に変換
            normal = mul((float3x3)_ViewToWorld, normal);

            half4 color = float4(lerp(float3(depth,depth,depth), normal, _DepthOrNormal),1);

            return lerp(mainColor, color, _Weight);
        }
    ENDHLSL

    SubShader
    {
        Cull Off ZWrite Off ZTest Always
        Pass
        {
            HLSLPROGRAM
                #pragma vertex Vert
                #pragma fragment Frag
            ENDHLSL
        }
    }
}
大枠は変わっていないのですが、下記のポイントにご注意ください
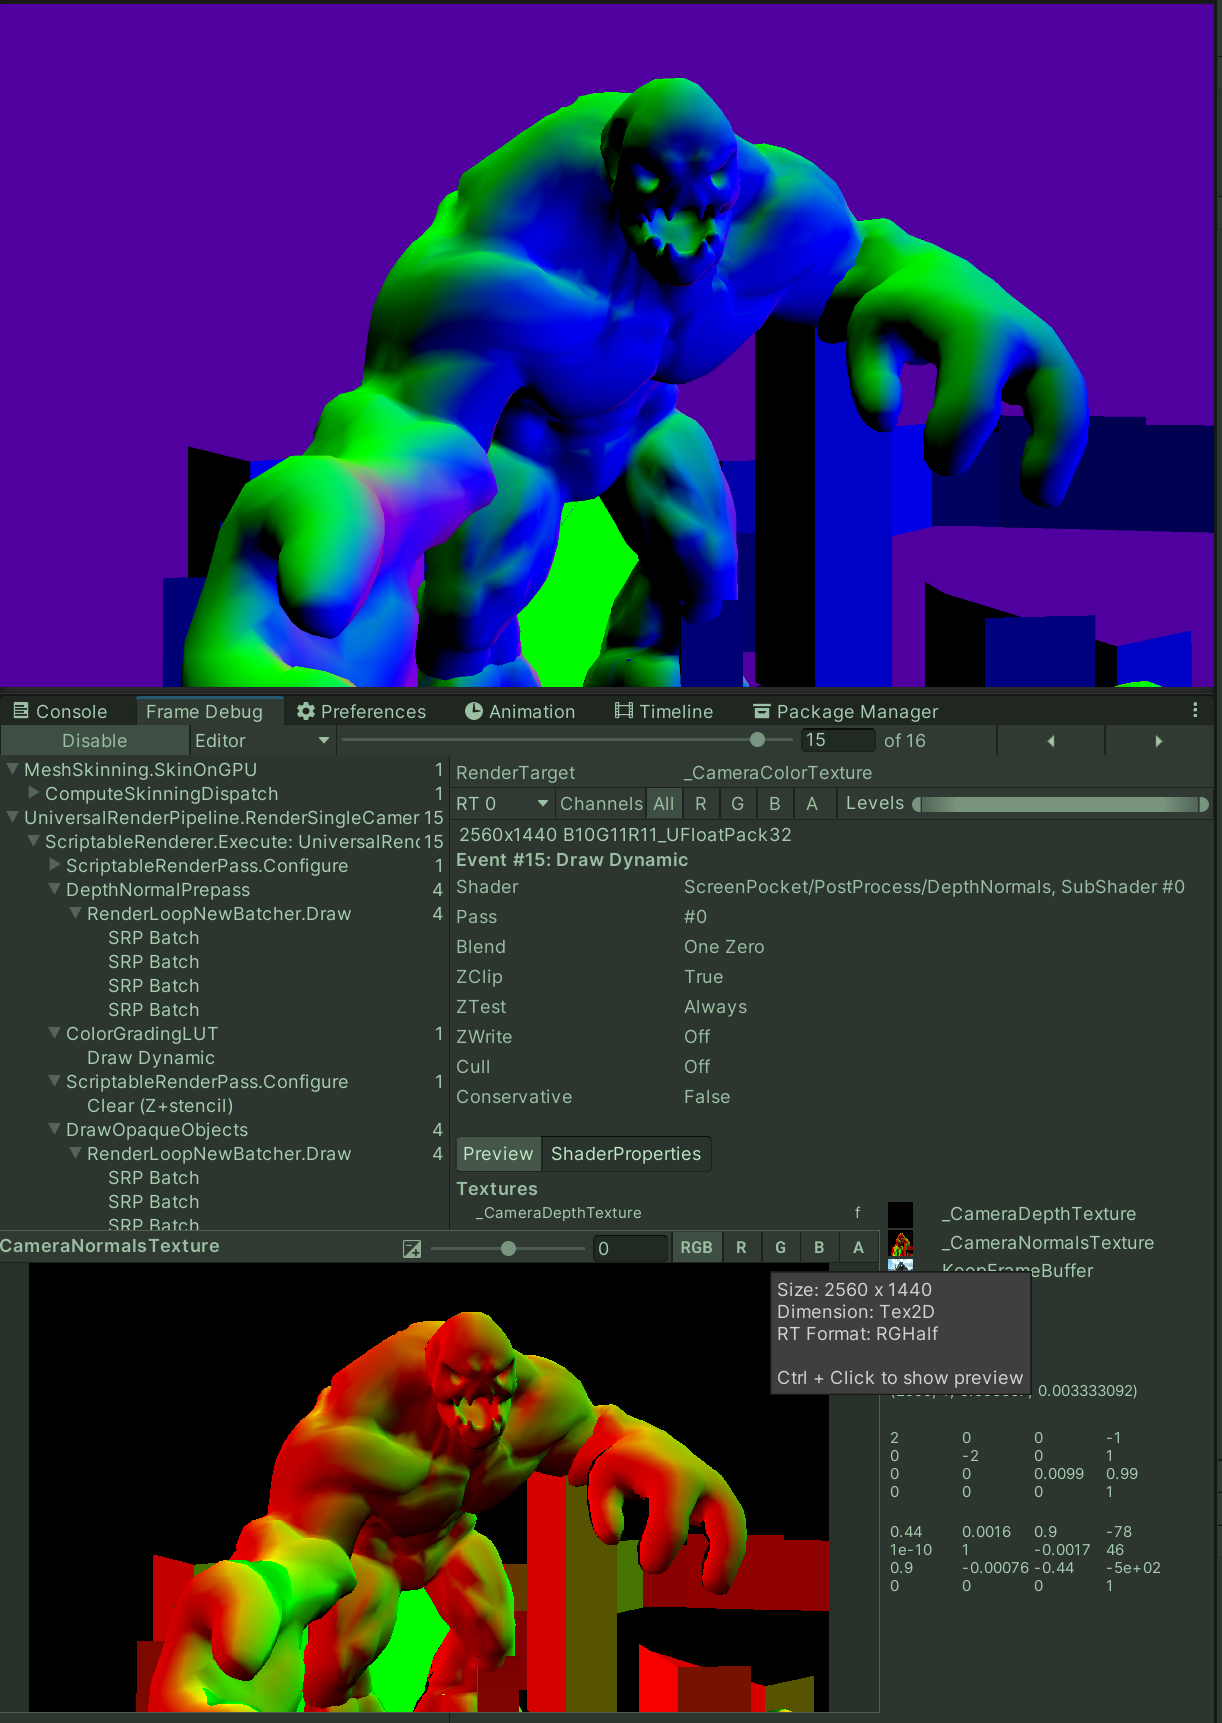
- URPではPPSV2にあった_CameraDepthNormalsTextureが無い(少なくとも現状発見できない)。その代わり_CameraDepthTextureと_CameraNormalsTextureの2つのテクスチャが存在している
- _CameraDepthTextureを使うにはDeclareDepthTexture.hlslを、_CameraNormalsTextureを使うにはDeclareNormalsTexture.hlslをそれぞれincludeしなければならない
- SampleSceneDepth()、SampleSceneNormals()でそれぞれ 線形化前の深度値、ビュー空間から見た法線 を取得できる。
- SampleSceneDepth()を有効化するためにはUniversalRenderPipelineAssetのDepthTextureにチェックを入れる事
- SampleSceneNormals()を有効化するためには、PostProcess.csのSetup()タイミングでConfigureInput(ScriptableRenderPassInput.Normal);を呼ぶこと
特に一番最後のConfigureInput()に辿り着くまでに結構時間がかかってしまいました。
こちらの記載の有る無しで_CameraNormalsTextureの有効無効が切り替わってしまうので、FrameDebuggerなどで確認してみてください
まとめ
という事でURPのPostProcessで深度、法線を扱う際の重要ポイントは下記
- 深度テクスチャを使いたかったら DeclareDepthTexture.hlsl をincludeする事
- 法線テクスチャを使いたかったら DeclareNormalsTexture.hlsl をincludeする事
- 法線テクスチャを有効化したかったら ConfigureInput(ScriptableRenderPassInput.Normal); を呼ぶこと
となります。
URPは日々更新されているので今後も仕様は変わることが予想されますが、結構調査がしんどかったので記載しておきます。