はじめに
前回記事 [UnityのVR SamplesのMazeをTouchコントローラで操作できるようにする]
(https://qiita.com/Satoshi_Takahama/items/d44a65c5cfd4e3dd32bc) の続きです。
今回は、前回記事の最後に課題として挙げていた以下の点に対処するための改造をしてみます。
・スタートボタンの位置が押しにくい
・キャラクターが移動した後にカメラを操作して追いかける必要がある
・クリアしてゲーム再開後、キャラクターのみ初期位置に移動するためカメラを操作して追いかける必要がある
開発環境
Unity 2019.2.0f1
VR Samples - 1.4
Oculus Integration for Unity - 1.39
変更方法の検討
キャラクターが停止したときにカメラの位置をキャラクターの背後に更新する(VR Chatみたいな移動方法のイメージ)ように変更してみたいと思います。
キャラクターの停止は、ソースコードの以下の箇所を改造すると判断できそうです。
      ...
        private void Update()
        {
            agent.SetDestination(m_TargetPosition);

            if (agent.remainingDistance > agent.stoppingDistance)
            {
                character.Move(agent.desiredVelocity, false, false);
                m_Rigidbody.isKinematic = false;
            }
            else
            {
                character.Move(Vector3.zero, false, false);
                m_Rigidbody.isKinematic = true;
            }

            if (m_Player.Dead)
                m_Rigidbody.isKinematic = false;
        }
      ...
ゲーム再開時のキャラクター位置の移動は、ソースコードの以下の箇所でm_Agent.Warpで実行されています。この後にカメラの位置を更新すればよさそうです。AICharacterControl.csのSetTriggerが呼ばれているため、ここで更新することにします。
      ...
        public void Restart()
        {
            // When the game starts the character should be able to move and the collider should be on but the player is not dead.
            m_AiCharacter.enabled = true;
            m_Collider.enabled = true;
            m_IsDying = false;

            // Move the character back to the start position.
            m_Agent.Warp(m_OriginPosition);

            // Make sure the character is already at the position that is trying to be reached.
            m_AiCharacter.SetTarget(transform.position);

            // Reset the animator.
            m_Animator.SetTrigger(m_HashResetPara);

            // The game is not over.
            m_IsGameOver = false;
        }
      ...
スタートボタンの位置は、カメラの位置を更新するときにあわせてキャラクターの全面にくるように更新するようにします。
ここまでの方針を反映し、修正したソースコードは以下になります。
using UnityEngine;
using UnityEngine.AI;
using VRStandardAssets.Maze;

namespace VRStandardAssets.Maze
{
    [RequireComponent(typeof(UnityEngine.AI.NavMeshAgent))]
    [RequireComponent(typeof(ThirdPersonCharacter))]
    public class AICharacterControl : MonoBehaviour
    {
        public UnityEngine.AI.NavMeshAgent agent { get; private set; }             // Navmesh agent required for the path finding
        public ThirdPersonCharacter character { get; private set; } // Character we are controlling
        public Transform followCamera;
        public float followCameraOffset = 1.0f;
        public RectTransform startButton;
        public float startButtonOffset = 1.0f;

        private Rigidbody m_Rigidbody;
        private Player m_Player;
        private Vector3 m_TargetPosition;
        private enum PlayerState
        {
            Initial,
            Idle,
            Walk,
            Jump,
            Crouching,
            Winning,
            Dead
        };
        private PlayerState m_PlayerState;


        private void Start()
        {
            // get the components on the object we need ( should not be null due to require component so no need to check )
            agent = GetComponentInChildren<NavMeshAgent>();
            character = GetComponent<ThirdPersonCharacter>();
            m_Rigidbody = GetComponent<Rigidbody>();
            m_Player = GetComponent<Player>();
            m_PlayerState = PlayerState.Initial;

            agent.updateRotation = false;
            agent.updatePosition = true;

            m_TargetPosition = transform.position;
        }


        private void Update()
        {
            agent.SetDestination(m_TargetPosition);

            if (m_Player.Dead)
            {
                m_Rigidbody.isKinematic = false;
                m_PlayerState = PlayerState.Dead;
            }

            if (m_PlayerState == PlayerState.Initial)
            {
                m_Rigidbody.isKinematic = true;
                m_PlayerState = PlayerState.Idle;
                UpdatePosition();
            }
            else if (m_PlayerState == PlayerState.Idle)
            {
                if (agent.remainingDistance > agent.stoppingDistance)
                {
                    character.Move(agent.desiredVelocity, false, false);
                    m_Rigidbody.isKinematic = false;
                    m_PlayerState = PlayerState.Walk;
                }
            }
            else if (m_PlayerState == PlayerState.Walk)
            {
                if (agent.remainingDistance > agent.stoppingDistance)
                {
                    character.Move(agent.desiredVelocity, false, false);
                }
                else
                {
                    character.Move(Vector3.zero, false, false);
                    m_Rigidbody.isKinematic = true;
                    m_PlayerState = PlayerState.Idle;
                    //キャラが停止したらカメラを追従させる
                    UpdatePosition();
                }

            }
            else if (m_PlayerState == PlayerState.Dead)
            {
                if (!m_Player.Dead)
                {
                    m_Rigidbody.isKinematic = true;
                    m_PlayerState = PlayerState.Idle;
                }
            }
        }

        private void UpdatePosition()
        {
            followCamera.position = transform.position - transform.forward * followCameraOffset + new Vector3(0, 1.0f, 0);
            followCamera.rotation = transform.rotation;
            startButton.position = transform.position + transform.forward * startButtonOffset + new Vector3(0, 3.0f, 0);
            startButton.rotation = transform.rotation;
        }

        public void SetTarget(Vector3 targetPosition)
        {
            m_TargetPosition = targetPosition;
            if (targetPosition == transform.position)
            {
                //ゲーム再開
                m_PlayerState = PlayerState.Initial;
            }
        }
    }
}
(2019/8/27修正)スタートボタンの表示位置が原因でキャラクターが時々しゃがむ動きになっていたので位置を修正しました。
ビルド手順
前回記事で作成したプロジェクトで引き続き作業します。
- 今回もThe Mazeを改造するので、サンプルのシーンMazeを開きます。
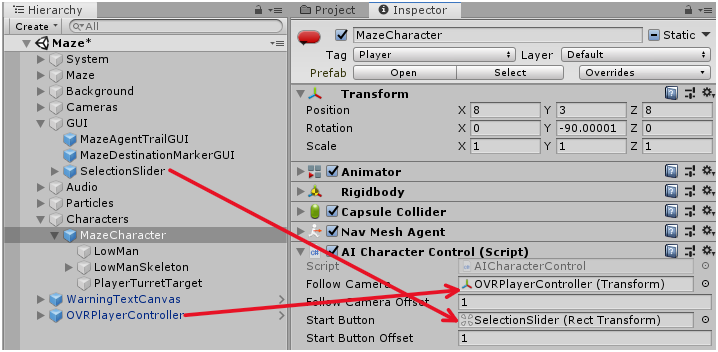
- AICharacterControlにカメラとスタートボタンを設定します。
-
このままではスタートボタンにキャラクターが引っかかってしまうため、Layerを分けて引っかからないようにします。Inspector上で、Layerを選択->Add Layer...を選択します。LayerにPlayerを追加します。(2019/8/28修正)後で気が付いたのですが、スタートボタンの表示位置を修正したら3~5の手順は不要でした。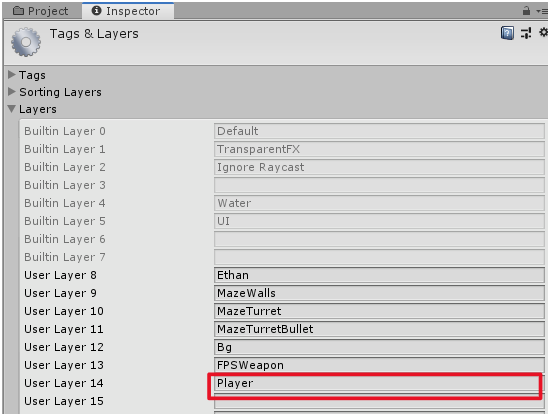
-
MazeCharacterのLayerをPlayerに変更します。この時子オブジェクトにも適用するか聞かれますが、このオブジェクトだけにしておきます。
-
Project Settings->Physicsを選択し、PlayerとUIの判定のチェックを外します。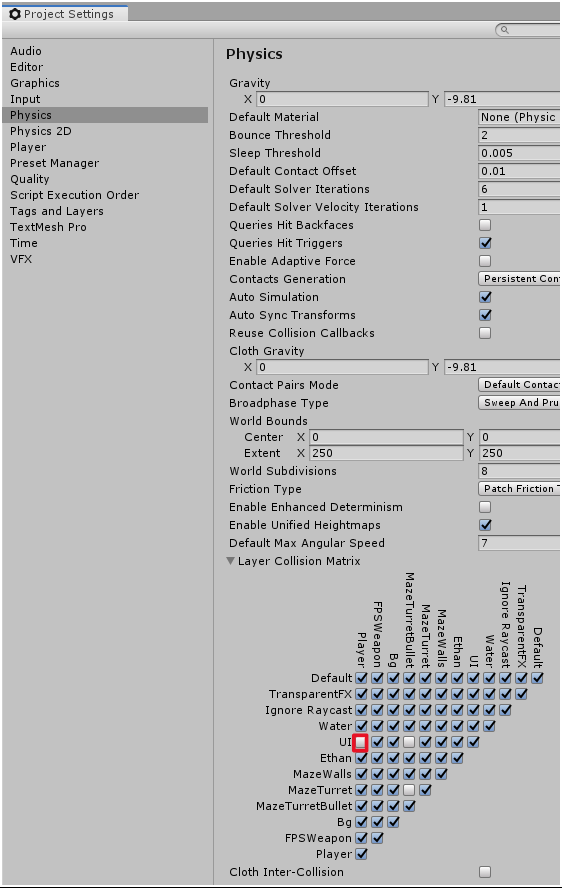
- Build Settings からビルドします。

さいごに
このあとは以下のような改造を検討中です。
・キャラクターを変更する。=>記事を追加しました。[UnityのVR SamplesのMazeでキャラクターを変更する]
(https://qiita.com/Satoshi_Takahama/items/c95227acf3456eb2255d)
・敵キャラクターを追加する。