Most Azure services need us to deploy a network environment to locate and manage these services when we use Azure.
The most representative network topology in Azure is the Hub&Spoke network topology.
Putting the management resources like the VPN gateway, Azure firewall, or Bastion into the Hub virtual network. The resources that belong to systems will be located in the virtual networks called the Spoke virtual network.
This topology actually helps users manage the network more easily. I love this topology too.
But here is the thing.
The dull point is that you need to deploy a Network Peering between two virtual networks to let them communicate with each other.
As the diagram below shows, to deploy a network environment with one Hub virtual network and three Spoke virtual networks, three Network Peerings are necessary.
 |
|---|
But, in some cases, clients need to connect Spoke virtual networks to each other. Then, the increase of the Network Peering will be exponential.
Think about the necessary number of Network Peering under the conditions below.
(In the case that Spoke virtual networks need to connect with each other)
・6 Network Peerings are needed for 1 Hub virtual network and 3 Spoke virtual networks.

・15 Network Peerings are needed for 1 Hub virtual network and 5 Spoke virtual networks.
・36 Network Peerings are needed for 1 Hub virtual network and 8 Spoke virtual networks.
The necessary number of Network Peering can be calculated following the formula:
n×(n-1)/2
※n=the number of virtual networks you want to connect with.(including the hub virtual network)
So manually managing the Network Peering could be chaos, depending on the number.
And once you missed the setting of a Network Peering, then you screwed up.
Okay, let's start talking about the solution.
Here is the solution: Azure Virtual Network Manager.
Azure Virtual Network Manager is a management service that enables you to group, configure, deploy, and manage virtual networks globally across subscriptions.
Simply put.
Virtual Network Manager helps users manage their virtual networks more efficiently.
The most significant advantage of using this service is that it can deploy Network Peering automatically, and users only need to group Spoke virtual networks and tell which virtual network is the Hub.
Next, let us try to deploy a Virtual Network Manager and use it to create a Hub and Spoke network topology environment.
Network Diagram
 |
|---|
We have a total of five virtual networks in the subscription and one of them will be the Hub virtual network and the other four will be the Spoke virtual networks.
■ Hub virtual network
self-s2s-hub-vnet
■ Spoke virtual network
1.self-s2s-spoke01-vnet
2.self-s2s-spoke02-vnet
3.self-s2s-spoke03-azuremigration
4.self-s2s-spoke04-private-VNET
We will do the following operations.
- Deploy a Virtual Network Manager
- Create two virtual network groups
- Create a Hub and Spoke connectivity rule for the two virtual network groups
※ Allow the Spoke virtual networks in one network group to connect with each other. - Assign the connectivity rule to the Japan Eash Region to enable it
- Confirm the network peerings
Step.1
Deploy a Virtual Network Manager
1. Open the [Network managers] in the Azure Portal
 |
|---|
2. Click [Create]
 |
|---|
3. Tab [Basic]
Virtual Network Manager needs a resource group to store its information.
Personally, I prefer to choose the hub virtual network's resource group.
Select ”connectivity” in the [Feature] section.
 |
|---|
4. Tab [Managerment scope]
Click [Add] to add a new management scope.
Virtual Network Manager can be assigned to a management group or a subscription.
This time, we assign the manager to the subscription scale.
Note: Remember that multiple virtual network managers cannot overlap on one selected scope. For example, two Azure Virtual Network Managers can’t manage security for the same management group.
 |
|---|
 |
|---|
5. Review and create
Set up the Tags if you need them, but we will skip it this time.
Click [Create] to start deploying after you confirm the information.
 |
|---|
6. After the deployment
We can find the resource we deployed in the list.
 |
|---|
Step.2
Create two virtual network groups
After deploying the Virtual Network Manager instance, we need to create two network groups for the four Spoke virtual networks next.
1. Select [Network groups] from the blade menu on the left side and click [Create]
 |
|---|
2. Give it a name
Give the network group a name and click [Create]. That's it.
 |
|---|
And then create the other network groups.
Now, there are two network groups in the list.
 |
|---|
3. Add group members
We've created two network groups.
Now, we will add Spoke virtual networks to the network groups following the structure below.
■network-group-01
- self-s2s-spoke01-vnet
- self-s2s-spoke02-vnet
■network-group-02
- self-s2s-spoke03-azuremigration
- self-s2s-spoke04-private-VNET
Note: Do not add the Hub virtual network to any network group.
=========
i. Click [network-group-01] and then select [Group members] from the blade menu.
Click [Add] and choose [Manually add members.]
※You can also create Azure Policies to add automatically virtual networks.
 |
|---|
ii. Select the virtual networks you want to add and click [Add].
 |
|---|
iii. The virtual networks that are added to the network group can be found in the group member list.
※Sometimes, you may need to click "Refresh" to update the information on the screen.
 |
|---|
iv. Let's do the same thing for [network-group-02].
 |
|---|
Step.3
Create a Hub&Spoke connectivity rule for the two virtual network groups
We created two network groups for the four Spoke virtual networks.
The next step will be making a network connectivity rule.
1. Select [Configurations] from the blade menu of the Virtual Network Manager and click [Connectivity configuration].
 |
|---|
2. [Basic] Tab
Define a name that makes you quickly understand what this resource is for.
 |
|---|
3. [Topology] Tab
This is the main tab.
Select [Hub and Spoke] Topology and choose a virtual network as the Hub. Remember that the Hub virtual network must not belong to any Spoke network group.
If you already have network peerings between the Hub virtual network and the Spoke virtual networks and you want to keep it, then do not check the item [Delete existing peerings]. It depends on your requirements.
Finally, add the two network groups to the rule.
(At least one network group is necessary to finish the setup.)
Check the option [Hub as gateway] if you need all the Spoke virtual networks to use the Gataway in the Hub virtual networks.
Check the option [Enable connectivity within network group] if you need virtual networks in the network group to connect with each other.
Check the option [Enable mesh connectivity across regions] if you need to do so.
 |
|---|
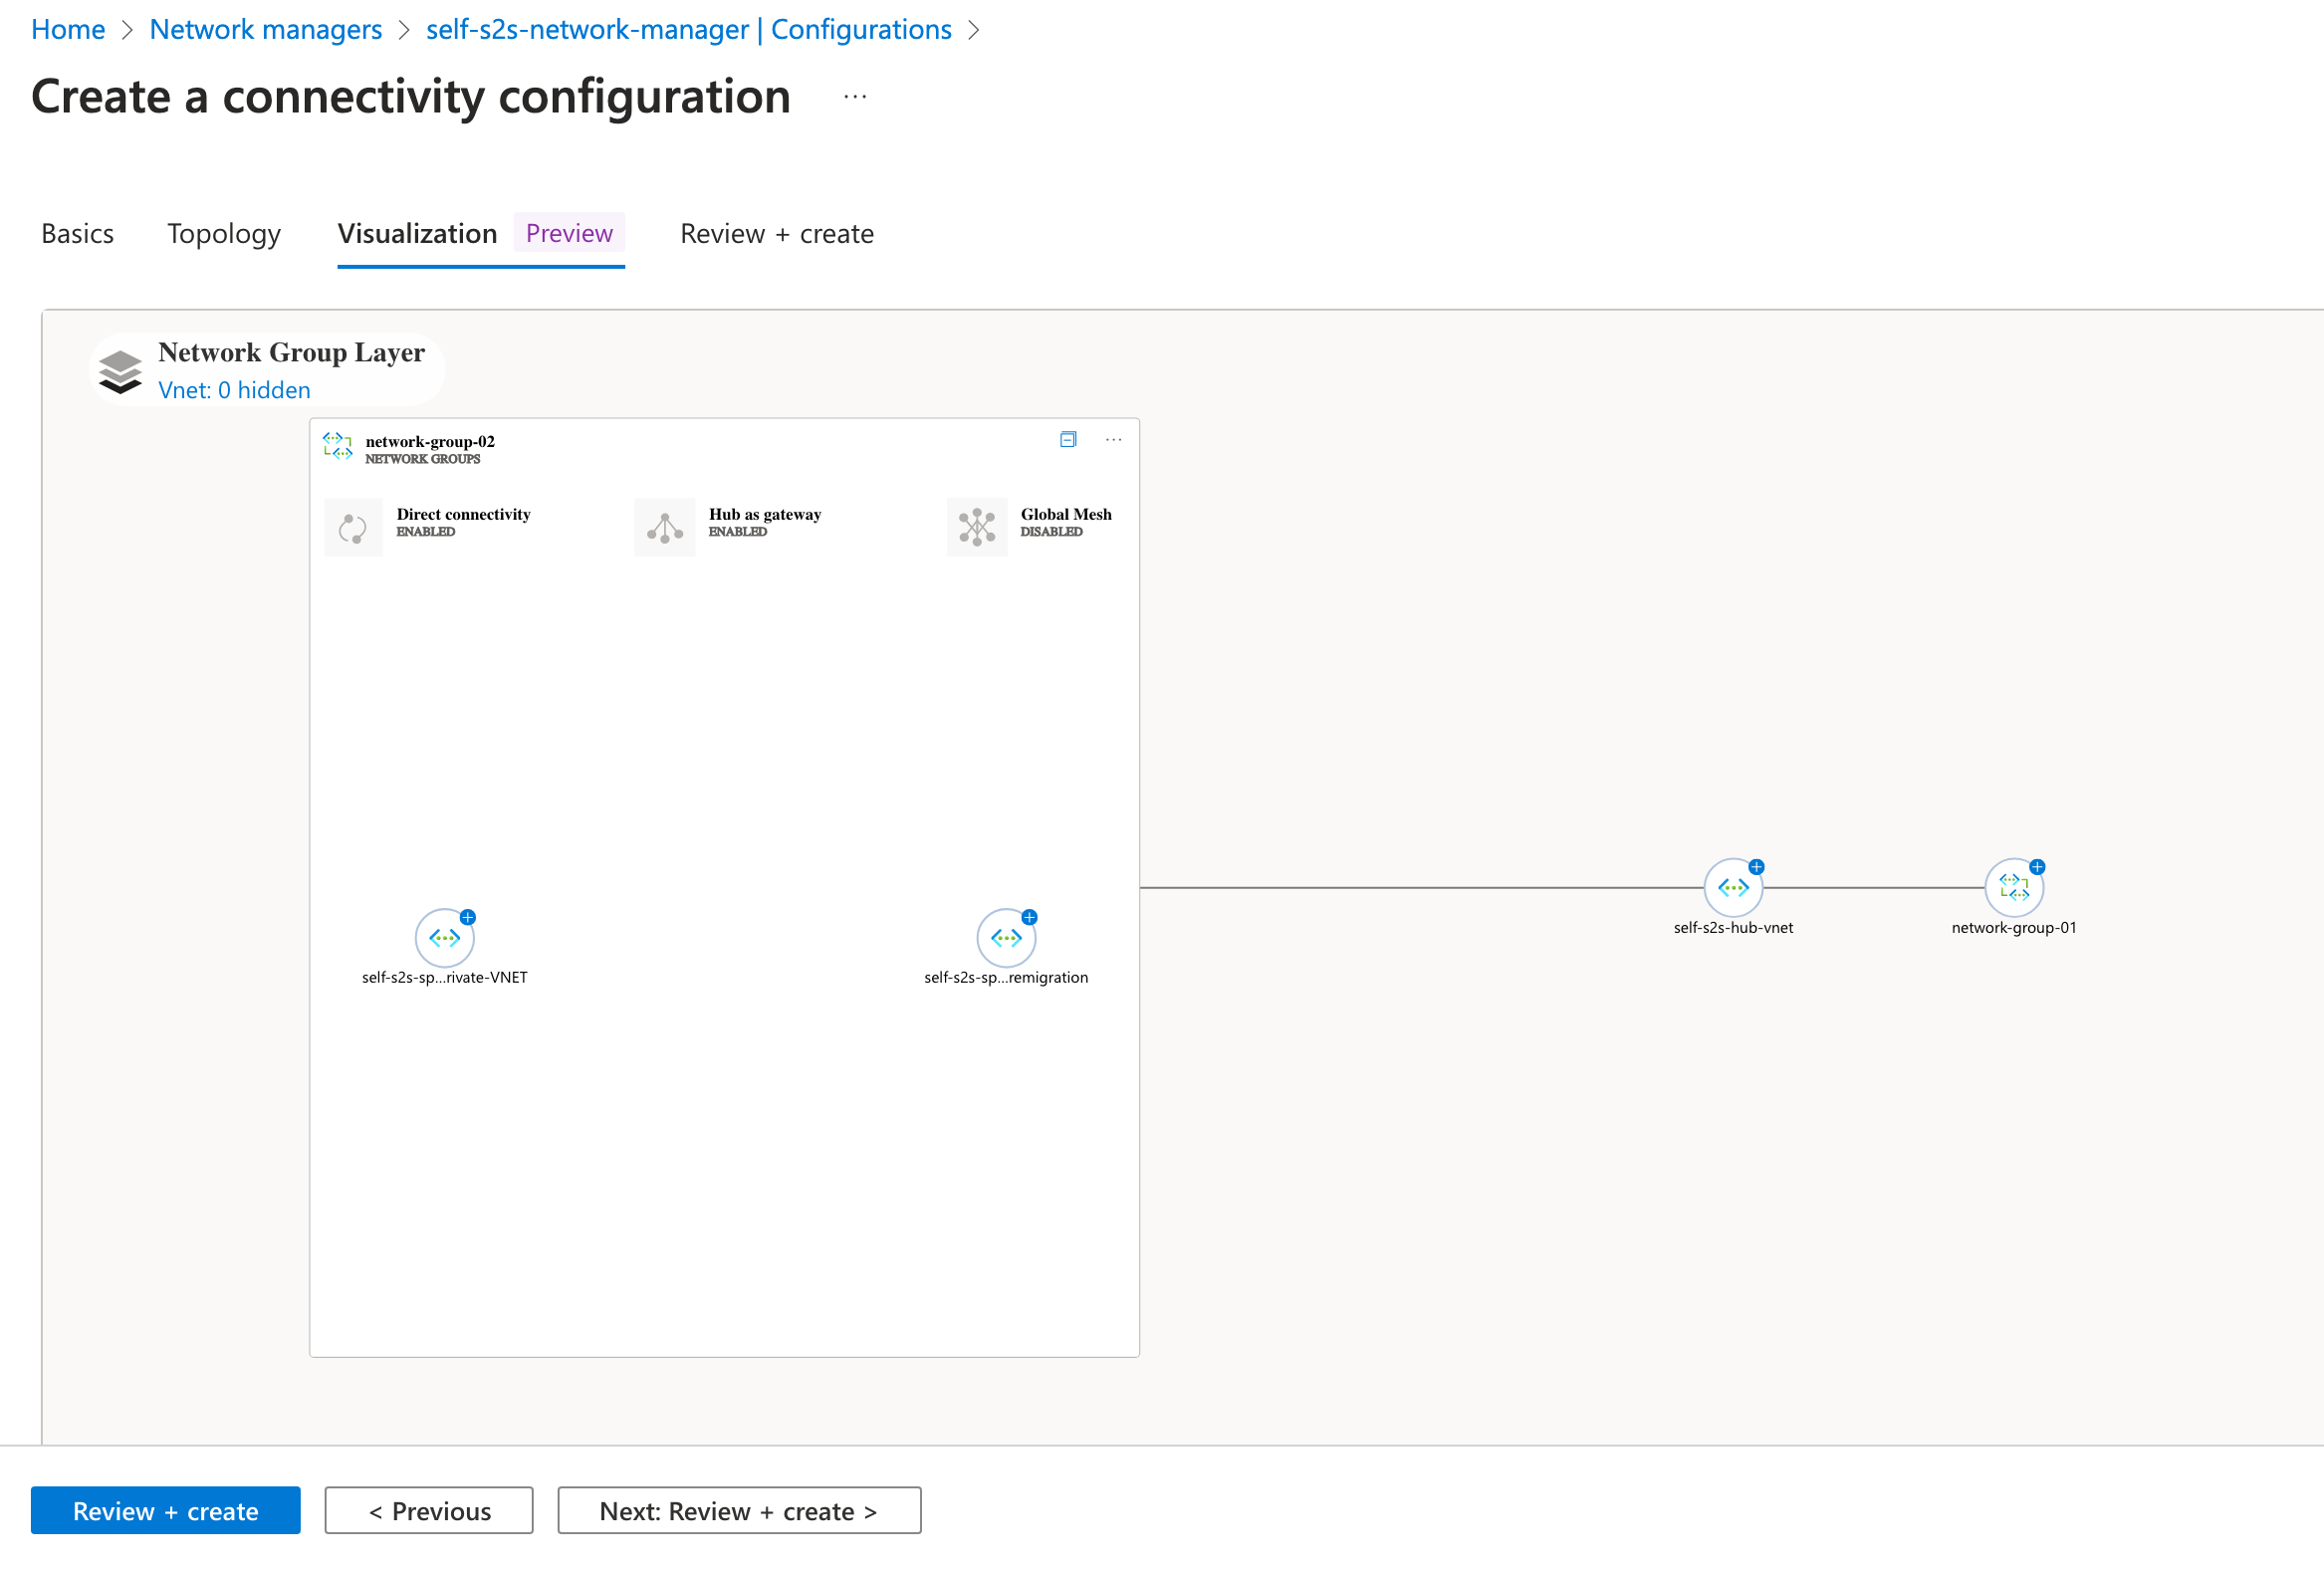
4. [Visualization] Tab
Connectivity within the Hub virtual network and network groups can be confirmed here.
 |
|---|
5. Review and deploy
Click [Create] after confirming the information.
 |
|---|
6. Confirm after deployment
We can find the deployed rule in the [Configuration] list, and the setup information about network groups can be found in the [Network groups] menu in the rule.
 |
|---|
 |
|---|
Step.4
Assign the connectivity rule to the Japan East region to enable it
To enable the connectivity rule, we need to assign the rule to regions.
1. Select [Deployments] from the Network Manager's blade menu and click [Connectivity configuration]
 |
|---|
2. [Goal state] Tab
Select the connectivity rule(configuration) we deployed.
 |
|---|
Select the regions to which you need the connectivity rule to be assigned.
This time we only select Japan East.
 |
|---|
3. [Review + deploy] Tab
Click [Deploy] after confirming the information.
 |
|---|
 |
|---|
 |
|---|
Step.5
Confirm the network peerings
These are all the operations we need to accomplish to set up a Hub and Spoke network topology within Virtual Network Manager.
In the last part of this blog, let's confirm the Network Peerings between the Hub virtual network and Spoke virtual networks.
Move to the list of Virtual Networks.
=========
[Hub virtual network]
The Hub virtual network should have four Network Peerings connected to each Spoke virtual network.
 |
|---|
[self-s2s-spoke01-vnet]
This spoke virtual network has only one Network Peering connected to the Hub virtual network.
 |
|---|
[self-s2s-spoke02-vnet]
This spoke virtual network also has only one Network Peering connected to the Hub virtual network.
 |
|---|
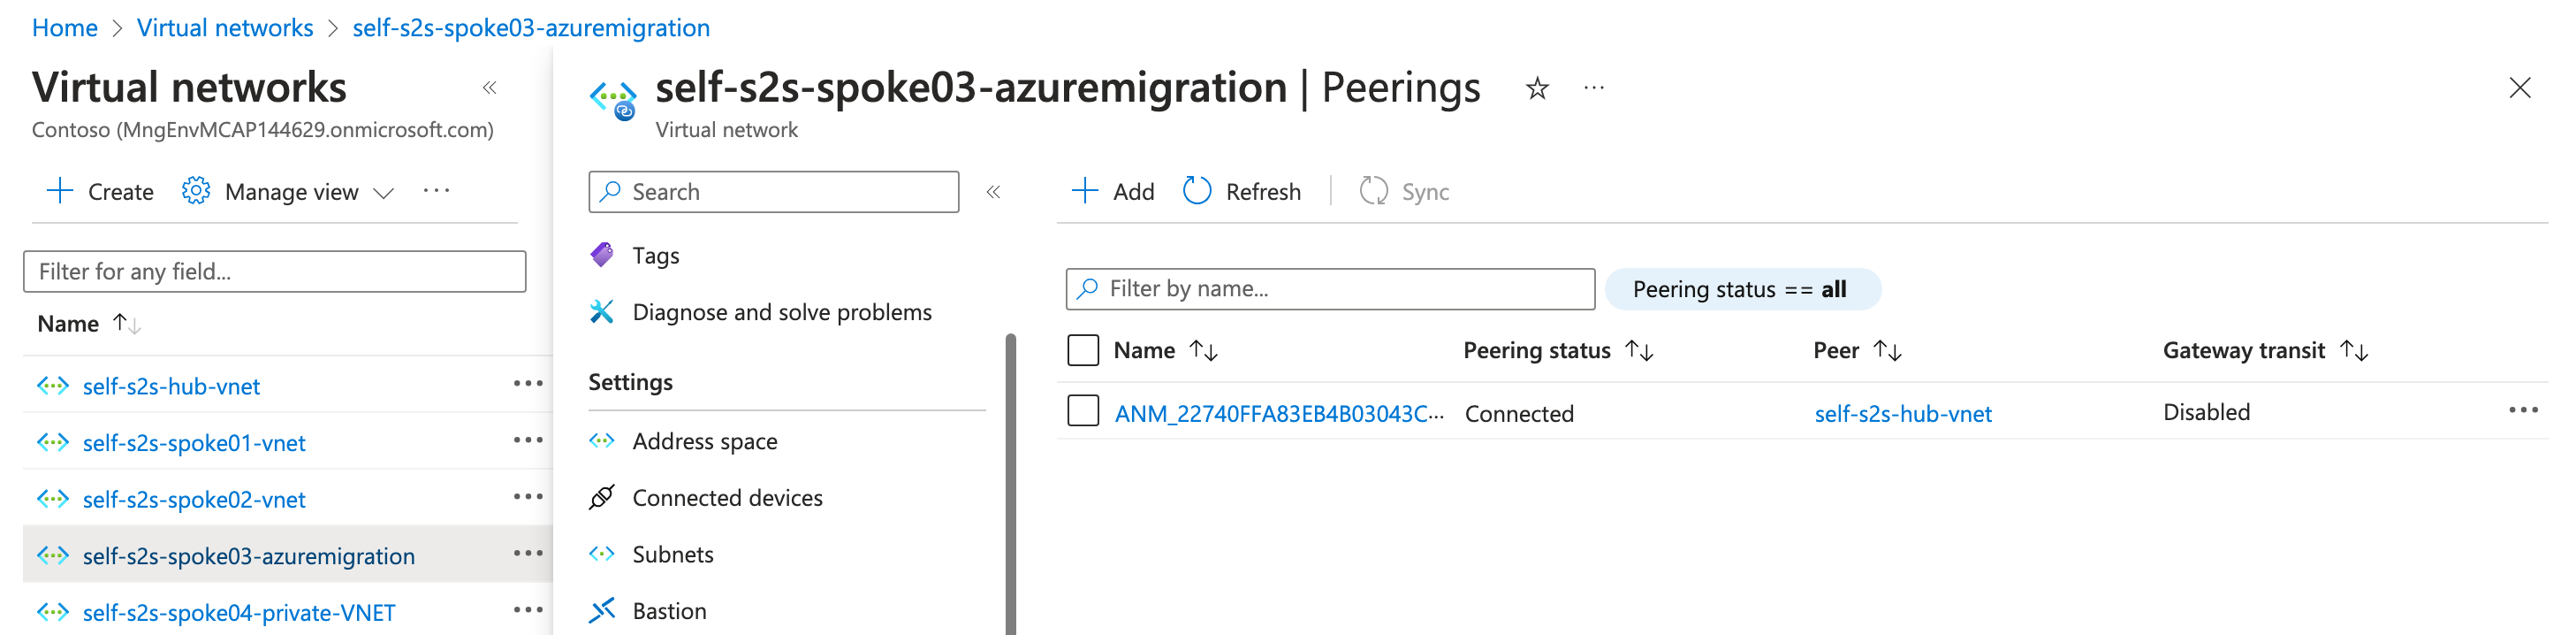
[self-s2s-spoke03-azuremigration]
Note: We may think this spoke virtual network should have two Network Peerings that are one for the Hub virtual network and the other for the Spoke virtual network [self-s2s-spoke04-private-VNET]. But there is only one Network Peering connecting with the Hub virtual network, which can be found in the Network Peering list.
It is because the connections in a network group are not listed in the Network Peering list. But, the connections exist exactly!
 |
|---|
[self-s2s-spoke04-private-VNET]
This Spoke virtual network also has only one Network Peering in the list. But for the same reason as [self-s2s-spoke03-azuremigration], This virtual network can access other virtual networks in the same network group.
 |
|---|
These are all for deploying a Hub and Spoke network topology within the Virtual Network Manager. Virtual Network Manager can help you manage the Network Peerings in a Hub and Spoke topology, making it more efficient and easier.
Here is some additional information that you need to know before leaving.
1. When assigning new rules(configurations) to a region that already has rules, if you want to keep the current rules, you need to select both the new rules and the current rules. If you don't do so, the current rules will be removed.
[assigning new rules without selecting the current rules]
 |
|---|
[assigning new rules within selecting the current rules]
 |
|---|
=========
2. The setting of "Direct connectivity," "Global mesh," and "Hub as gateway" in the category [Topology] cannot be modified once the rule(configuration) is deployed.
So, Deploy a new rule(configuration) if you need to change the setting of the items mentioned above.
You can change the settings while deploying the rule(configuration)
 |
|---|
The settings cannot be changed after the deployment
 |
|---|
=========
3. As we have mentioned previously, remember that virtual networks in a network group with "Direct connectivity" enabled can connect with each other.
 |
|---|
You cannot find the Network Peering representing the connections of these virtual networks because personally, I assume the connections are not looked at as Network Peerings but they exist exactly.
Thank you very much for reading the entire article.
See you next time!
Have a nice day!