Djangoのウェブサーバーを作ります。ハッカソンとかで良く使うのでメモです。
インスタンスの作成
EC2のダッシュボードを開き、インスタンスを作成します。
イメージはAmazon Linux 2 AMI (HVM), SSD Volume Type - ami-0d7ed3ddb85b521a6を選択しました。
インスタンスタイプはt2.microです。
セキュリティグループの設定で、SSH(22)、HTTP(80)、HTTPS(443)、TCP(8000)用のポートを開放します。
キーペアを任意の名前で作成し、できた.pemファイルをPuTTY genで.ppkファイルに変換します。
インスタンスの作成が完了したら、Elastic IPを開き、新しいアドレスを割り当てます。作成したインスタンスにそのIPアドレスを関連付けます。
ドメインを取得
Route53でdomainを作ってください。
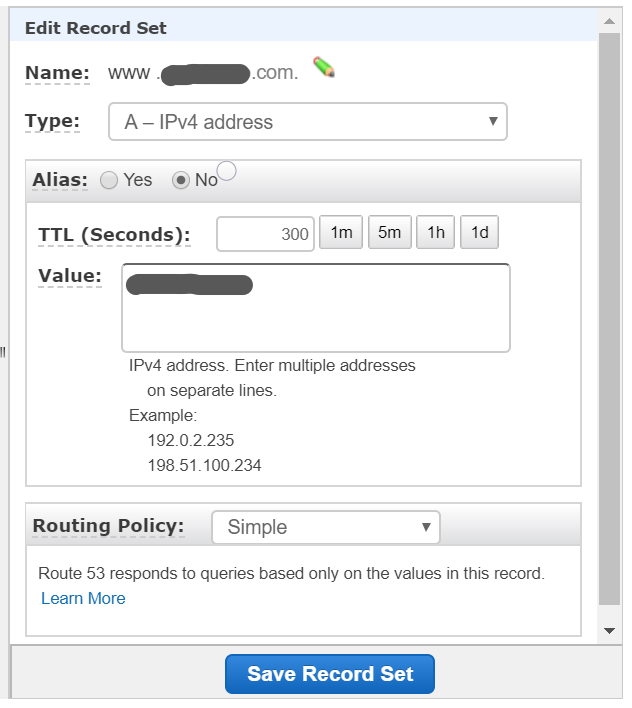
www.{name}.com のValueのところにElastic IPを設定します。
チュートリアル: Amazon Linux 2 に LAMP ウェブサーバーをインストールする
PuTTYでパブリックIPもしくは、DNS名(www.{name}.com)でSSH接続します。ここで.ppkファイルを使います。ユーザー名はec2-userです。
sudo yum update -y
sudo amazon-linux-extras install -y lamp-mariadb10.2-php7.2 php7.2
sudo yum install -y httpd mariadb-server
sudo systemctl start httpd
sudo systemctl enable httpd
sudo systemctl is-enabled httpd
Test Pageを表示( http://www.{name}.com )します。
sudo usermod -a -G apache ec2-user
exit
もう一回ログインします。
groups
sudo chown -R ec2-user:apache /var/www
sudo chmod 2775 /var/www && find /var/www -type d -exec sudo chmod 2775 {} \;
find /var/www -type f -exec sudo chmod 0664 {} \;
HTTPSに対応させます。(Google Home MiniでWebAPIを使ったアプリ作るときとかに必要だったので)
sudo systemctl is-enabled httpd
sudo systemctl start httpd && sudo systemctl enable httpd
sudo yum update -y
sudo yum install -y mod_ssl
インスタンスを再起動します。
sudo systemctl restart httpd
HTTPSで接続(https://www.{name}.com )します。
プライバシーエラーになりますが、下の詳細設定からアクセスできます。
保護されていないアクセスとなります。
CA 署名証明書の取得
付録: Amazon Linux 2 での Let's Encrypt と Certbot の使用を参考にします。
sudo wget -r --no-parent -A 'epel-release-*.rpm' http://dl.fedoraproject.org/pub/epel/7/x86_64/Packages/e/
sudo rpm -Uvh dl.fedoraproject.org/pub/epel/7/x86_64/Packages/e/epel-release-*.rpm
sudo yum-config-manager --enable epel*
sudo yum repolist all
/etc/httpd/conf/httpd.confのListen 80の下に追記します。
sudo vi /etc/httpd/conf/httpd.conf
<VirtualHost *:80>
    DocumentRoot "/var/www/html"
    ServerName "{name}.com"
    ServerAlias "www.{name}.com"
</VirtualHost>
Cerbotを実行します。
sudo systemctl restart httpd
sudo yum install -y certbot python2-certbot-apache
sudo certbot
1."Enter email address (used for urgent renewal and security notices)" というプロンプトが表示されたら、メールアドレスを入力し、Enter
2.Let's Encrypt のサービス利用規約に同意するため、Aを入力し、Enter
3.EFF のメーリングリストに登録するための承認のため、Yを入力し、Enter
4.共通名およびサブジェクト代替名 (SAN) が表示され、2を入力し、Enter
1: {name}.com
2: www.{name}.com
5.HTTP クエリを HTTPS にリダイレクトするどうかの確認で、HTTPS 経由の暗号化接続のみ受け入れる場合、2を入力し、Enter
HTTPS( https://www.{name}.com )に安全に接続できることを確かめます。
Certbot を自動化
sudo vi /etc/crontab
39 1,13 * * * root certbot renew --no-self-upgrade
sudo systemctl restart crond
Djangoやーる
ここからは、LAMP環境作ったのに、Djangoやーるっていう内容です。
Amazon Linux 2にAnacondaをインストールします。
wget https://repo.continuum.io/archive/Anaconda3-2018.12-Linux-x86_64.sh
bash Anaconda3-2018.12-Linux-x86_64.sh
yesを入力してインストール、最後にyesを入力して.bashrcを生成します。
/home/ec2-user/anaconda3にインストールされました。
Django用にPython3.6環境を作ります。
conda create -n django python=3.6
condaのコマンドがないと言われたら、
source /home/ec2-user/anaconda3/etc/profile.d/conda.sh
PATHが通ってないので、cat /home/ec2-user/.bashrcで確認しましょう。
# .bashrc

# Source global definitions
if [ -f /etc/bashrc ]; then
        . /etc/bashrc
fi

# Uncomment the following line if you don't like systemctl's auto-paging feature:
# export SYSTEMD_PAGER=

# User specific aliases and functions
# added by Anaconda3 2018.12 installer
# >>> conda init >>>
# !! Contents within this block are managed by 'conda init' !!
__conda_setup="$(CONDA_REPORT_ERRORS=false '/home/ec2-user/anaconda3/bin/conda' shell.bash hook 2> /dev/null)"
if [ $? -eq 0 ]; then
    \eval "$__conda_setup"
else
    if [ -f "/home/ec2-user/anaconda3/etc/profile.d/conda.sh" ]; then
        . "/home/ec2-user/anaconda3/etc/profile.d/conda.sh"
        CONDA_CHANGEPS1=false conda activate base
    else
        \export PATH="/home/ec2-user/anaconda3/bin:$PATH"
    fi
fi
unset __conda_setup
# <<< conda init <<<
cat /home/ec2-user/.bashrc-anaconda3.bakも確認しましょう。
# .bashrc

# Source global definitions
if [ -f /etc/bashrc ]; then
        . /etc/bashrc
fi

# Uncomment the following line if you don't like systemctl's auto-paging feature:
# export SYSTEMD_PAGER=

# User specific aliases and functions
Anacondaでdjango環境に入り、Djangoをインストールします。
source activate django
(django) pip install django
(django) django-admin startproject project_name
(django) cd helloworld
(django) python manage.py migrate
(django) python manage.py runserver
もし、activateがないと言われたら、
source /home/ec2-user/anaconda3/bin/activate django
次にHTTPSに対応させます。
pip install django-sslserver
cd helloworld
sudo vi settings.py
DEBUG = False
ALLOWED_HOSTS = ['www.{name}.com']

# Application definition

INSTALLED_APPS = [
    'django.contrib.admin',
    'django.contrib.auth',
    'django.contrib.contenttypes',
    'django.contrib.sessions',
    'django.contrib.messages',
    'django.contrib.staticfiles',
    'sslserver',
]

SECURE_PROXY_SSL_HEADER = ('HTTP_X_FORWARDED_PROTO', 'https')
SECURE_SSL_REDIRECT = True
SESSION_COOKIE_SECURE = True
CSRF_COOKIE_SECURE = True
python manage.py runsslserver 0.0.0.0:8000の後に、.crtと.keyを指定する必要があります。/etc/letsencrypt/live/www.{name}.com/ 以下にあるのですが、.pemファイルになっているので、拡張子を変えてコピペします。
sudo cp /etc/letsencrypt/live/www.{name}.com/fullchain.pem /etc/letsencrypt/live/www.{name}.com/fullchain.crt
sudo cp /etc/letsencrypt/live/www.{name}.com/privkey.pem /etc/letsencrypt/live/www.{name}.com/privkey.key
sudo chmod 755 /etc/letsencrypt/live/
sudo chmod 755 /etc/letsencrypt/live/www.{name}.com/fullchain.crt
sudo chmod 755 /etc/letsencrypt/live/www.{name}.com/privkey.key
実行してみましょう。
python manage.py runsslserver 0.0.0.0:8000 --certificate /etc/letsencrypt/live/www.{name}.com/fullchain.crt --key /etc/letsencrypt/live/www.{name}.com/privkey.key
( https://www.{name}.com:8000/ )に接続します。
Not Found
The requested resource was not found on this server.
( https://www.{name}.com:8000/admin/ )に接続します。

adminユーザーを作るには、下記のようにします。
(django) [ec2-user@ip-xxx-xx-xx-xx helloworld]$ python manage.py createsuperuser
Username (leave blank to use 'ec2-user'): admin
Email address: xxxx@xxxx.xxx
Password:
Password (again):
Superuser created successfully.
HelloWorld
HelloWorldコンテンツを作成します。
views.pyを作成します。
from django.http import HttpResponse

def helloworld(req):
  return HttpResponse('Hello, World !!')
settings.pyにhelloworldを追加します。
INSTALLED_APPS = [
    ....
    'helloworld',
]
urls.pyにもhelloworldを追加します。
import helloworld.views
urlpatterns = [
    path('helloworld/', helloworld.views.helloworld),
    path('admin/', admin.site.urls),
]
実行して、( https://www.{name}.com:8000/helloworld/ )に接続します。
バックグラウンドで実行
バックグラウンドでサーバーを起動します。
末尾に&をつけるだけだと、標準出力されてしまいますので、nohupと&で囲みましょう。
nohup python manage.py runsslserver 0.0.0.0:8000 --certificate /etc/letsencrypt/live/www.{name}.com/fullchain.crt --key /etc/letsencrypt/live/www.{name}.com/privkey.key > /dev/null 2>&1 < /dev/null &
バックグラウンドのサーバーを停止します。
ps -ef|awk 'BEGIN{}{if(match($8, /python/))system("kill -9 " $2)}END{}'