Azure Blobに画像をアップロードしたらAzure FunctionsでPythonとOpenCVを使ってなんかしてみました。
BlobをトリガーにするFunction App (Python)の作成
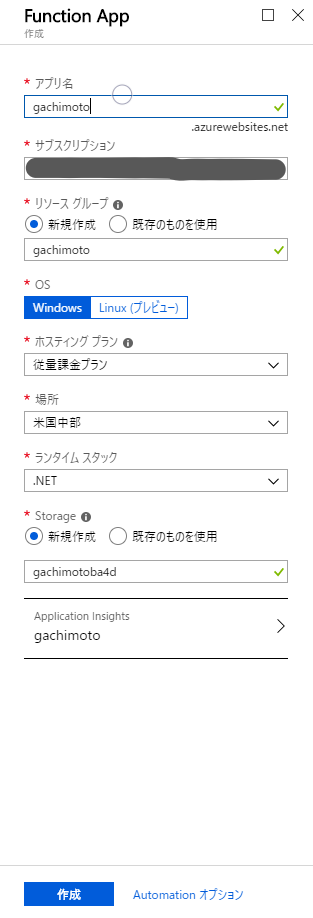
1.リソースの作成からFunction Appを検索し、新規作成します。(Linux(プレビュー)を選ぶとランタイムスタックでPythonを選べますが今回はやってません。)
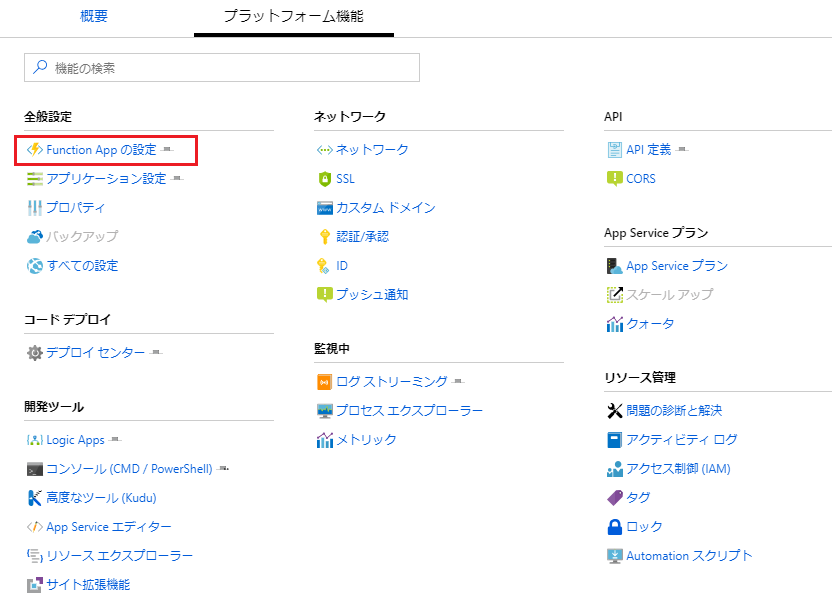
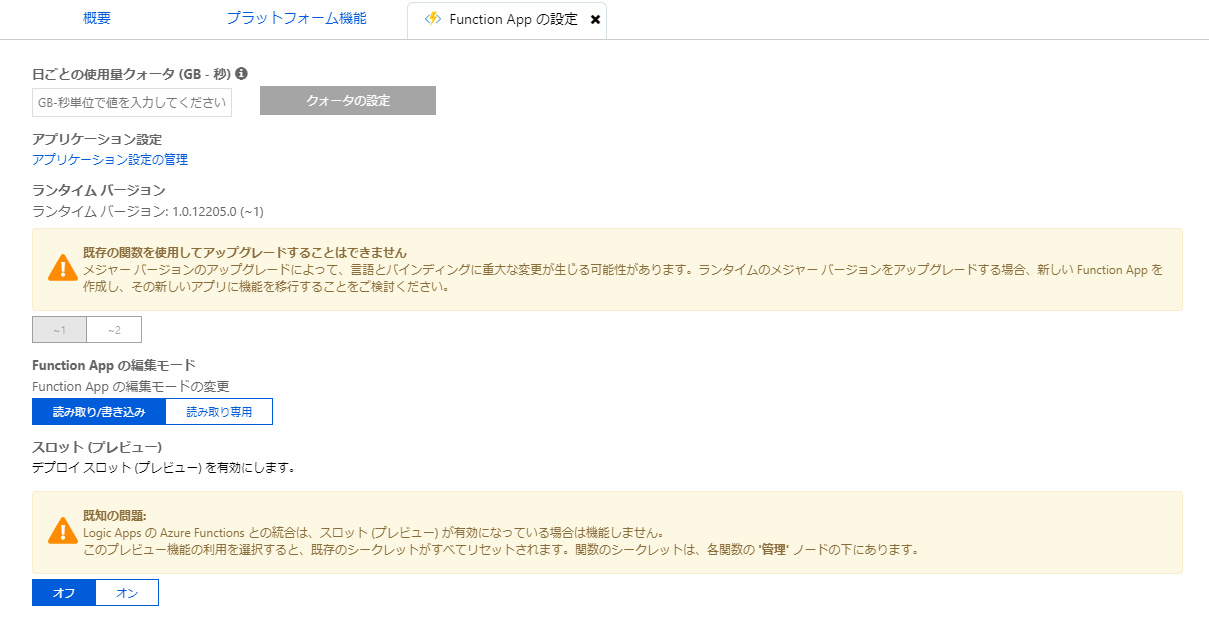
2.できたリソースへ移動し、Function Appの設定からランタイムバージョンを~1に変更します。
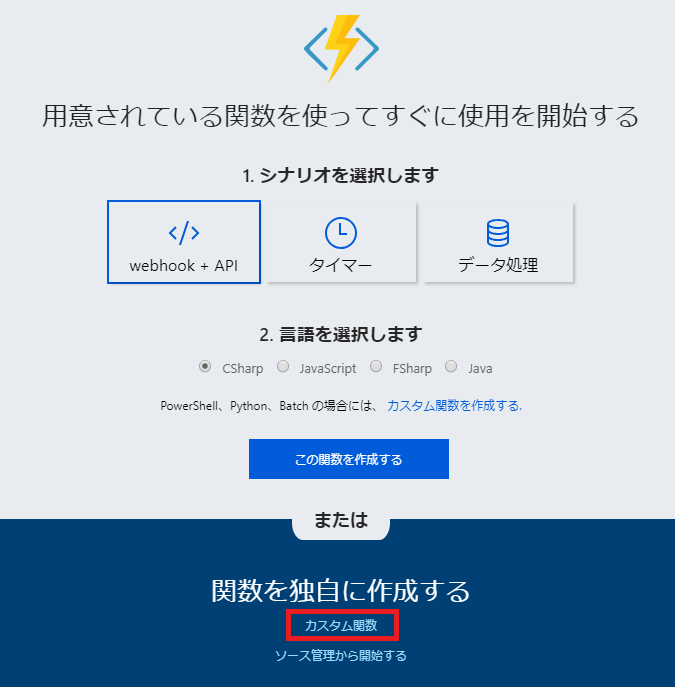
3.新しくカスタム関数を作成します。ランタイムバージョンが~2の時と見え方が違い、古いバージョンに戻ってることが確認できます。
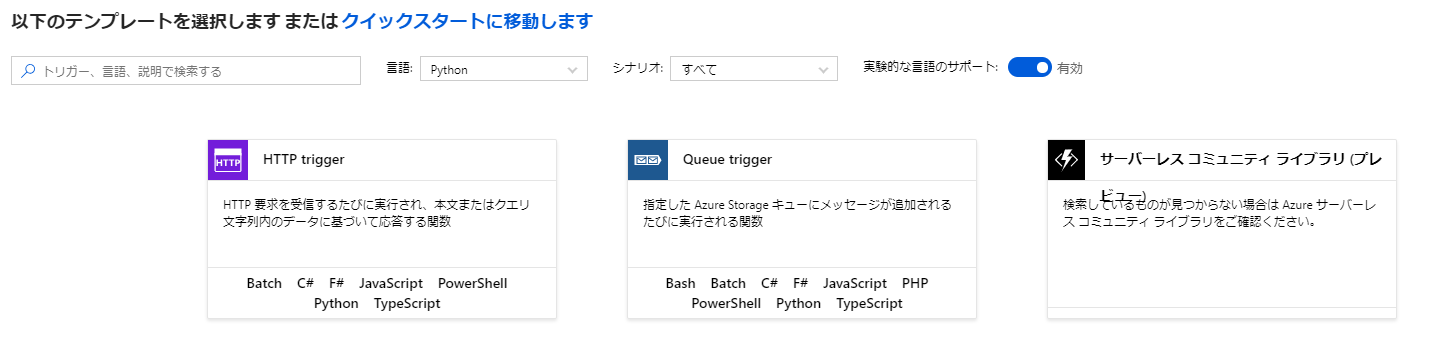
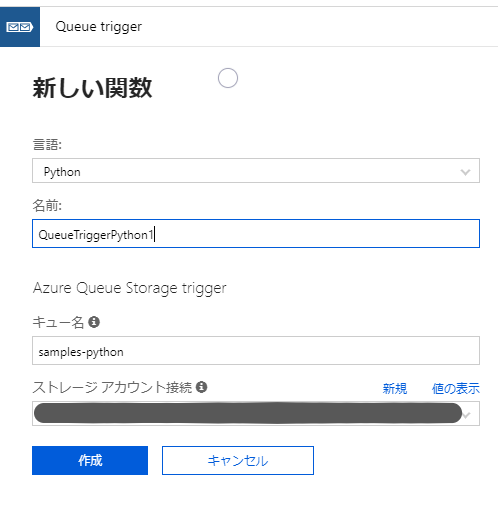
4.実験的なサポートを有効化すると言語でPythonが選べます。Blob Storageをトリガーにしたいですがサンプルがないので、まずはQueue Triggerを選んで作成しましょう。ストレージアカウント接続の新規から接続するストレージアカウントを選べます。ストレージにコンテナを作成しておいてください。(参考まで:[1])
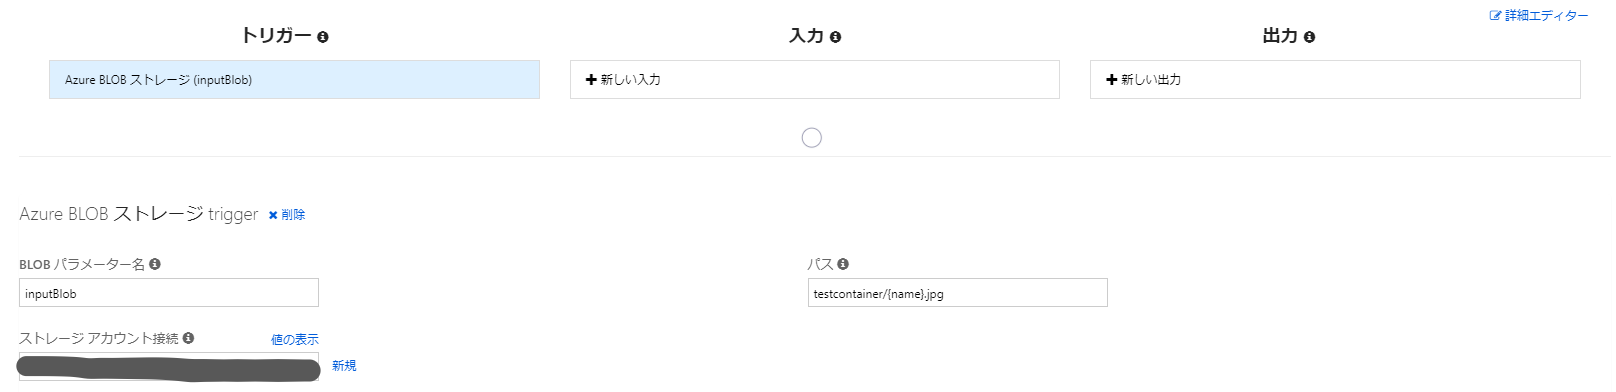
5.関数を作成したら、統合のトリガーからQueue Triggerを削除し、Azure BLOB ストレージ Triggerに変更します。パスのところにtestcontainer/{name}.jpgとありますが、接続しているストレージのコンテナ(testcontainer)に画像(.jpg)がアップロードされたときにこの関数が実行されます。
6.関数を下記のようにして保存および実行します。テストは実際に存在するコンテナ名/Blob名(例:testcontainer/lena.jpg)にしてください。
import os
print(os.environ['inputBlob'])
画像ファイルの一時的なパスが見えれば成功です。
2019-01-10T08:32:08.519 [Info] Function started (Id=xxxxxxxx-xxxx-xxxx-xxxx-xxxxxxxxxxxx)
2019-01-10T08:32:10.129 [Info] D:\local\Temp\Functions\Binding\xxxxxxxx-xxxx-xxxx-xxxx-xxxxxxxxxxxx\inputBlob
2019-01-10T08:32:10.129 [Info] Function completed (Success, Id=xxxxxxxx-xxxx-xxxx-xxxx-xxxxxxxxxxxx, Duration=1605ms)
Azure FunctionsでPython3を使う
1.pythonのバージョンは2.7になっていますが、python3とopencvを使いたいので[2],[4]を参考に環境構築してください。まず、ブラウザからKuduのデバッグコンソールを開きます。{your-app-name}のところにはFunction Appの名前を入れます。
https://{your-app-name}.scm.azurewebsites.net/DebugConsole
2.Python3をインストールします。コンソールで下記コマンドをたたいてください。
> cd D:\home\site\tools
> nuget.exe install -Source https://www.siteextensions.net/api/v2/ -OutputDirectory D:\home\site\tools python361x64
> mv /d/home/site/tools/python361x64.3.6.1.3/content/python361x64/* /d/home/site/tools/
3.Functionsに戻り、Pythonのバージョン確認は関数を下記のようにして実行します。
import sys
print(sys.version)
Python3.6.1になっていれば成功です。
2019-01-10T08:44:43.901 [Info] Function started (Id=xxxxxxxx-xxxx-xxxx-xxxx-xxxxxxxxxxxx)
2019-01-10T08:44:45.903 [Info] 3.6.1 (v3.6.1:69c0db5, Mar 21 2017, 18:41:36) [MSC v.1900 64 bit (AMD64)]
2019-01-10T08:44:45.903 [Info] Function completed (Success, Id=xxxxxxxx-xxxx-xxxx-xxxx-xxxxxxxxxxxx, Duration=2001ms)
4.Kuduに戻り、pipでopencvをインストールしましょう。下記のコマンドをたたいて、インストールします。contribも入ります。
> D:\home\site\tools\python.exe -m pip install opencv-python
> D:\home\site\tools\python.exe -m pip install opencv-contrib-python
5.Functionsに戻り、OpenCVのバージョンの確認は関数を下記のようにして実行します。dir(cv2.aruco)は、contribであるarucoが入っているかを確認するためです。
import cv2
print(cv2.__version__)
print(dir(cv2.aruco))
2019-01-10T08:48:24.299 [Info] Function started (Id=xxxxxxxx-xxxx-xxxx-xxxx-xxxxxxxxxxxx)
2019-01-10T08:48:32.566 [Info] 4.0.0
2019-01-10T08:48:32.566 [Info] ['Board_create', 'CORNER_REFINE_APRILTAG', 'CORNER_REFINE_CONTOUR', 'CORNER_REFINE_NONE', 'CORNER_REFINE_SUBPIX', 'CharucoBoard_create', 'DICT_4X4_100', 'DICT_4X4_1000', 'DICT_4X4_250', 'DICT_4X4_50', 'DICT_5X5_100', 'DICT_5X5_1000', 'DICT_5X5_250', 'DICT_5X5_50', 'DICT_6X6_100', 'DICT_6X6_1000', 'DICT_6X6_250', 'DICT_6X6_50', 'DICT_7X7_100', 'DICT_7X7_1000', 'DICT_7X7_250', 'DICT_7X7_50', 'DICT_APRILTAG_16H5', 'DICT_APRILTAG_16h5', 'DICT_APRILTAG_25H9', 'DICT_APRILTAG_25h9', 'DICT_APRILTAG_36H10', 'DICT_APRILTAG_36H11', 'DICT_APRILTAG_36h10', 'DICT_APRILTAG_36h11', 'DICT_ARUCO_ORIGINAL', 'DetectorParameters_create', 'Dictionary_create', 'Dictionary_create_from', 'Dictionary_get', 'Dictionary_getBitsFromByteList', 'Dictionary_getByteListFromBits', 'GridBoard_create', '__doc__', '__loader__', '__name__', '__package__', '__spec__', 'calibrateCameraAruco', 'calibrateCameraArucoExtended', 'calibrateCameraCharuco', 'calibrateCameraCharucoExtended', 'custom_dictionary', 'custom_dictionary_from', 'detectCharucoDiamond', 'detectMarkers', 'drawAxis', 'drawDetectedCornersCharuco', 'drawDetectedDiamonds', 'drawDetectedMarkers', 'drawMarker', 'drawPlanarBoard', 'estimatePoseBoard', 'estimatePoseCharucoBoard', 'estimatePoseSingleMarkers', 'getBoardObjectAndImagePoints', 'getPredefinedDictionary', 'interpolateCornersCharuco', 'refineDetectedMarkers']
2019-01-10T08:48:32.738 [Info] Function completed (Success, Id=3c09b959-a09c-4aa3-9626-f51330b9f4a7, Duration=8432ms)
OpenCV4.0.0がインストールされました。バージョンを指定してインストールしたい場合は、[3]を確認してください。
Blobに画像がアップロードされたら、画像サイズを確認する
1.関数を下記のようにして実行します。
import os
import cv2
img = cv2.imread(os.environ['inputBlob'], -1)
print(img.shape)
画像サイズが表示されたら成功です。
2019-01-10T08:58:41.010 [Info] Function started (Id=66057cdb-6a7c-4057-a0b2-e2feedf8b531)
2019-01-10T08:58:48.015 [Info] (512, 512, 3)
2019-01-10T08:58:48.120 [Info] Function completed (Success, Id=66057cdb-6a7c-4057-a0b2-e2feedf8b531, Duration=7104ms)
2.実際にAzureポータルやAzure Storage Explorerからコンテナ(testcontainer)に画像(.jpg)をアップロードして、ログを確認してみてください。
3.これでBlobに画像がアップロードされたらFunctionsでPythonとOpenCVを使ってなんかできるようになります。
まとめ
- BlobをトリガーにしてなんかするAzure Functions (Python) を作成しました
- Azure FunctionsをPython3とOpenCVに対応しました
- Azure Functions v2でPythonを選べる日は来るのか気になります
参考文献
[1] Azure Functions: BlobコンテナーをトリガーとするPython関数を作成してみる
[2] Azure FunctionsでPython3とpipを使う
[3] opencv-python
[4] Azure Functions: FaceAPIとOpenCVで顔検出をしてみた。① -Python3と外部ライブラリの導入-