はじめに
リアルタイムインスタンスセグメンテーションのYOLACTをやってみます。
開発環境
- Windows 10
- Python 3.7
- CUDA 10.0
- PyTorch 1.2.0
導入
1.ここからクローンします。
2.YOLACT環境を作成します。
conda create -n yolact python=3.7
conda activate yolact
cd yolact-master
3.各ライブラリをインストールします。
requirements.txtを作成し、インストールします。
cython
# pytorch::torchvision
# pytorch::pytorch >=1.0.1
# cudatoolkit
# cudnn
# pytorch::cuda100
matplotlib
# git # to download COCO dataset
# curl # to download COCO dataset
# unzip # to download COCO dataset
# conda-forge::bash # to download COCO dataset
opencv-python
pillow<7.0 # bug PILLOW_VERSION in torchvision, must be < 7.0 until torchvision is upgraded
# pycocotools
PyQt5 # needed on KDE/Qt envs for matplotlib
pip install -r requirements.txt
pycocotoolsをインストールします。I can't install cocoapi on Windows 10 #185
pip install "git+https://github.com/philferriere/cocoapi.git#egg=pycocotools&subdirectory=PythonAPI"
PyTorchをインストールします。PyTorch v1.2.0 CUDA 10.0
pip install torch==1.2.0 torchvision==0.4.0 -f https://download.pytorch.org/whl/torch_stable.html
4.weightsフォルダを作成し、yolact_base_54_800000.pthをダウンロードして、置きます。
実行
下記コマンドを実行してみましょう。input_image.pngを変更して、任意の画像を指定してください。
python eval.py --trained_model=weights/yolact_base_54_800000.pth --score_threshold=0.15 --top_k=15 --image=input_image.png:output_image.png
| input | output |
|---|---|
 |
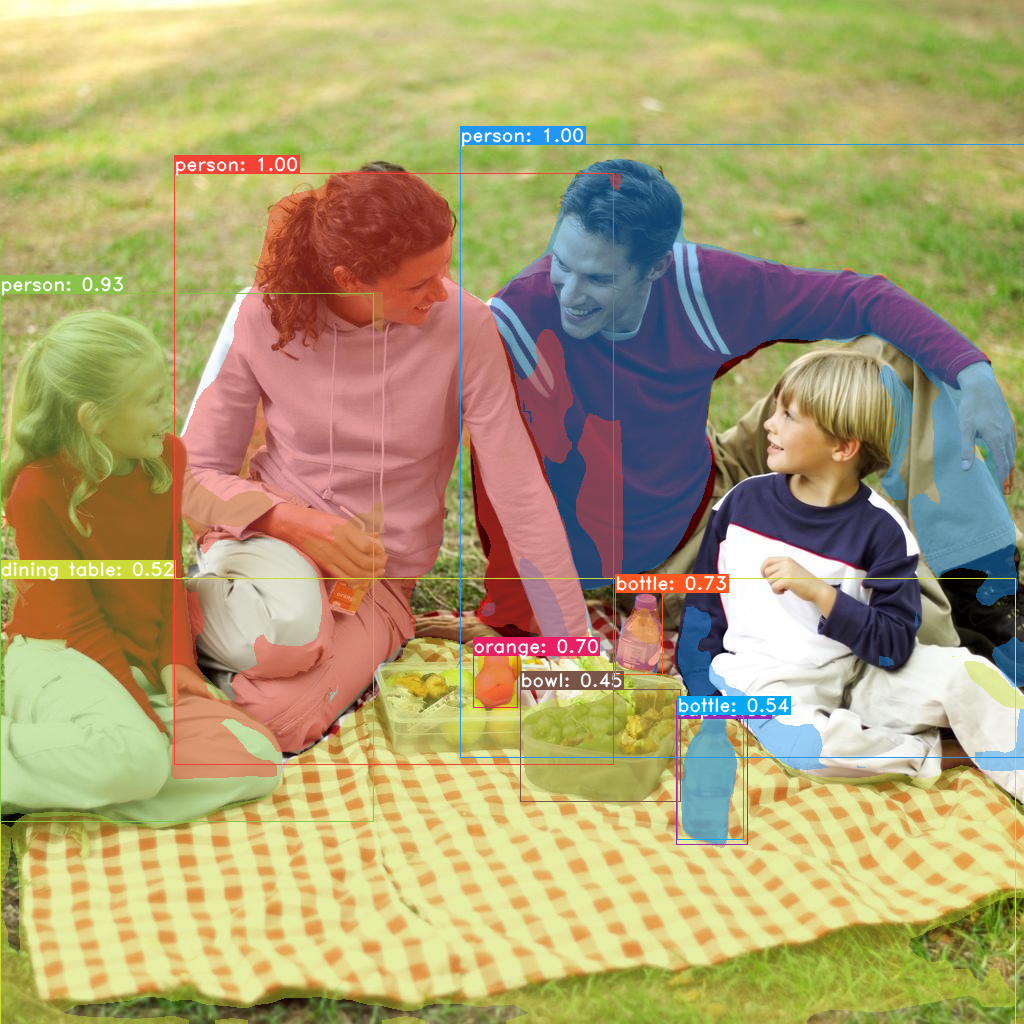 |
下記コマンドを実行し、ウェブカメラの映像を入力します。
python eval.py --trained_model=weights/yolact_base_54_800000.pth --score_threshold=0.15 --top_k=15 --video_multiframe=4 --video=0
SnapCamera等にウェブカメラを占有されている場合は、--video=1などに変更してみてください。
処理速度は8.3fpsくらいでした。
Real-Time Instance Segmentation YOLACT#YOLACT #Python #PyTorch #AI #機械学習 #DeepLearning pic.twitter.com/kXKGZ4ZckQ
— 藤本賢志(ガチ本)@pixivFANBOXはじめました (@sotongshi) August 6, 2020
YOLACT++
YOLACT++を実行するためには、DCNv2をセットアップする必要がありますが、
cd external/DCNv2
python setup.py build develop
Visual Studioのエラーが出ました。
C:\Program Files\NVIDIA GPU Computing Toolkit\CUDA\v9.0\include\crt/host_config.h(133): fatal error C1189: #error:  -- unsupported Microsoft Visual Studio version! Only the versions 2012, 2013, 2015 and 2017 are supported!
error: command 'C:\\Program Files\\NVIDIA GPU Computing Toolkit\\CUDA\\v9.0\\bin\\nvcc.exe' failed with exit status 2
エラーの内容を見ると、CUDA9.0のパスが読まれており、しかもVisual Studio 2019には対応していないようです。CUDAのパス(システム環境変数)を10.0にしてみましたが、Visual Studio 2017が入っているのにもかかわらず、参照してくれない模様。Visual Studio 2019はアンインストールしたくないのであきらめることにします。
お疲れ様でした。