はじめに
Azure Speech SDKを用いて、音声からテキストへ変換してみます。
開発環境
- Windows 10
- Python 3.6
- Anaconda
- Azure Speech SDK
マイクから音声を認識する
1.Azureポータルにログインして、音声サービスを作成します。
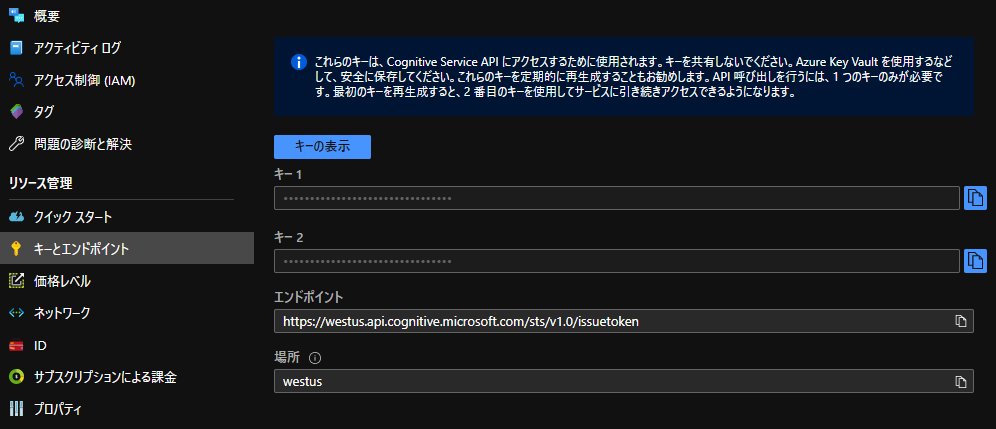
2.作成したリソースへ移動し、キーと場所をコピーしておいてください。
3.Python 3.6環境を作成します。
conda create -n py36 python=3.6
conda activate py36
4.ライブラリをインストールします。
pip install azure-cognitiveservices-speech
5.プログラムを作成します。
一度だけ音声入力して認識結果を表示するプログラムです。"YourSubscriptionKey"に先ほどコピーしたキーを, "YourServiceRegion"に先ほどコピーした場所を貼り付けてください。日本語を認識したいのでlanguageは"ja-JP"にします。
stt.py
import azure.cognitiveservices.speech as speechsdk

# Creates an instance of a speech config with specified subscription key and service region.
# Replace with your own subscription key and service region (e.g., "westus").
speech_key, service_region, language = "YourSubscriptionKey", "YourServiceRegion", "ja-JP"
speech_config = speechsdk.SpeechConfig(subscription=speech_key, region=service_region)

# Creates a recognizer with the given settings
speech_recognizer = speechsdk.SpeechRecognizer(speech_config=speech_config)

print("Say something...")


# Starts speech recognition, and returns after a single utterance is recognized. The end of a
# single utterance is determined by listening for silence at the end or until a maximum of 15
# seconds of audio is processed.  The task returns the recognition text as result.
# Note: Since recognize_once() returns only a single utterance, it is suitable only for single
# shot recognition like command or query.
# For long-running multi-utterance recognition, use start_continuous_recognition() instead.
result = speech_recognizer.recognize_once()

# Checks result.
if result.reason == speechsdk.ResultReason.RecognizedSpeech:
    print("Recognized: {}".format(result.text))
elif result.reason == speechsdk.ResultReason.NoMatch:
    print("No speech could be recognized: {}".format(result.no_match_details))
elif result.reason == speechsdk.ResultReason.Canceled:
    cancellation_details = result.cancellation_details
    print("Speech Recognition canceled: {}".format(cancellation_details.reason))
    if cancellation_details.reason == speechsdk.CancellationReason.Error:
        print("Error details: {}".format(cancellation_details.error_details))
こちらは継続的に音声入力して、認識結果を表示するプログラムです。同様にキーと場所、言語の設定をお願いします。
stt.py
import azure.cognitiveservices.speech as speechsdk
import time

# Creates an instance of a speech config with specified subscription key and service region.
# Replace with your own subscription key and service region (e.g., "westus").
speech_key, service_region, language = "YourSubscriptionKey", "YourServiceRegion", "ja-JP"
speech_config = speechsdk.SpeechConfig(
    subscription=speech_key, region=service_region, speech_recognition_language=language)

# Creates a recognizer with the given settings
speech_recognizer = speechsdk.SpeechRecognizer(speech_config=speech_config)

print("Say something...")

def recognized(evt):
    print('「{}」'.format(evt.result.text))
    # do something

def start(evt):
    print('SESSION STARTED: {}'.format(evt))

def stop(evt):
    print('SESSION STOPPED {}'.format(evt))

speech_recognizer.recognized.connect(recognized)
speech_recognizer.session_started.connect(start)
speech_recognizer.session_stopped.connect(stop)

try:
    speech_recognizer.start_continuous_recognition()
    time.sleep(60)
except KeyboardInterrupt:
    print("bye.")
    speech_recognizer.recognized.disconnect_all()
    speech_recognizer.session_started.disconnect_all()
    speech_recognizer.session_stopped.disconnect_all()
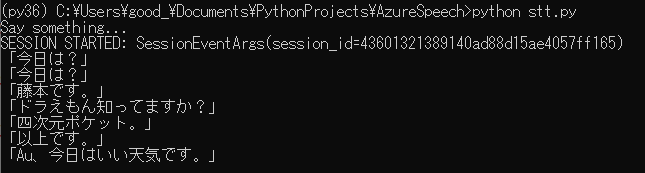
6.下記コマンドを実行し、話しかけてみてください。
python stt.py
認識結果が以下のように表示されます。
音声ファイル(.wav)から音声を認識する
1.導入方法は上と同様にしてください。
2.プログラムを作成します。
.wavファイルを読み込み、音声認識結果を表示するプログラムです。キーと場所を設定してください。
stt_from_file.py
import azure.cognitiveservices.speech as speechsdk

# Creates an instance of a speech config with specified subscription key and service region.
# Replace with your own subscription key and region identifier from here: https://aka.ms/speech/sdkregion
speech_key, service_region = "YourSubscriptionKey", "YourServiceRegion"
speech_config = speechsdk.SpeechConfig(subscription=speech_key, region=service_region)

# Creates an audio configuration that points to an audio file.
# Replace with your own audio filename.
audio_filename = "aboutSpeechSdk.wav"
audio_input = speechsdk.audio.AudioConfig(filename=audio_filename)

# Creates a recognizer with the given settings
speech_recognizer = speechsdk.SpeechRecognizer(speech_config=speech_config, audio_config=audio_input)

print("Recognizing first result...")

# Starts speech recognition, and returns after a single utterance is recognized. The end of a
# single utterance is determined by listening for silence at the end or until a maximum of 15
# seconds of audio is processed.  The task returns the recognition text as result.
# Note: Since recognize_once() returns only a single utterance, it is suitable only for single
# shot recognition like command or query.
# For long-running multi-utterance recognition, use start_continuous_recognition() instead.
result = speech_recognizer.recognize_once()

# Checks result.
if result.reason == speechsdk.ResultReason.RecognizedSpeech:
    print("Recognized: {}".format(result.text))
elif result.reason == speechsdk.ResultReason.NoMatch:
    print("No speech could be recognized: {}".format(result.no_match_details))
elif result.reason == speechsdk.ResultReason.Canceled:
    cancellation_details = result.cancellation_details
    print("Speech Recognition canceled: {}".format(cancellation_details.reason))
    if cancellation_details.reason == speechsdk.CancellationReason.Error:
        print("Error details: {}".format(cancellation_details.error_details))
音声ファイルはcognitive-services-speech-sdkにあるsampledata\audiofiles\aboutSpeechSdk.wavを用います。
3.下記コマンドを実行し、結果を見てみましょう。
python stt_from_file.py
キーと場所が正しくないと下記のようなエラーが出ます。
(py36) C:\Users\good_\Documents\PythonProjects\AzureSpeech>python stt_from_file.py
Recognizing first result...
Speech Recognition canceled: CancellationReason.Error
Error details: Connection failed (no connection to the remote host). Internal error: 1. Error details: 11001. Please check network connection, firewall setting, and the region name used to create speech factory. SessionId: 77ad7686a9d94b7882398ae8b855d903
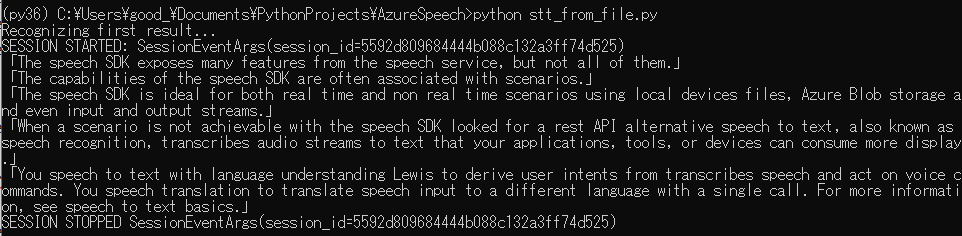
結果は下記のようになりました。

52秒あるのですが、最初の一行を認識したら、終了してしまうようです。
4.継続的に読み込み、音声認識するためには、下記のようにします。
stt_from_file.py
import azure.cognitiveservices.speech as speechsdk
import time

# Creates an instance of a speech config with specified subscription key and service region.
# Replace with your own subscription key and region identifier from here: https://aka.ms/speech/sdkregion
speech_key, service_region = "YourSubscriptionKey", "YourServiceRegion"
speech_config = speechsdk.SpeechConfig(subscription=speech_key, region=service_region)

# Creates an audio configuration that points to an audio file.
# Replace with your own audio filename.
audio_filename = "aboutSpeechSdk.wav"
audio_input = speechsdk.audio.AudioConfig(filename=audio_filename)

# Creates a recognizer with the given settings
speech_recognizer = speechsdk.SpeechRecognizer(speech_config=speech_config, audio_config=audio_input)

print("Recognizing...")

def recognized(evt):
    print('「{}」'.format(evt.result.text))
    # do something

def start(evt):
    print('SESSION STARTED: {}'.format(evt))

def stop(evt):
    print('SESSION STOPPED {}'.format(evt))

speech_recognizer.recognized.connect(recognized)
speech_recognizer.session_started.connect(start)
speech_recognizer.session_stopped.connect(stop)

try:
    speech_recognizer.start_continuous_recognition()
    time.sleep(60)
except KeyboardInterrupt:
    print("bye.")
    speech_recognizer.recognized.disconnect_all()
    speech_recognizer.session_started.disconnect_all()
    speech_recognizer.session_stopped.disconnect_all()
5.再度実行してみましょう。
下記のように継続的に音声認識できているようです!
お疲れ様でした。