OpenCV3.0 RGB-D Odometry 評価プログラム
- OpenCV3.0のmodulesにはrgbdモジュールが新たに追加されている。
- RGB-D (Direct法)によるOdometry推定に加えて、ICPとRGB-D ICPがある。
- サンプルには親切にTUMのRGB-D Datasetを用いたodometry評価用のプログラムがある。
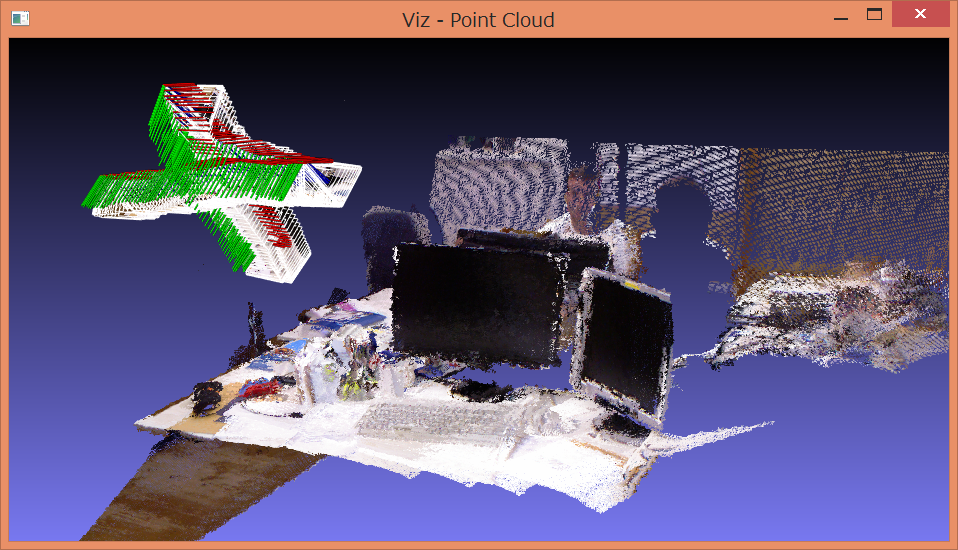
- Vizを用いて、3次元点群とカメラの軌跡を表示してみる。
- さらに、ICL-NUIMデータセットも用いれるようにした。
Vizを用いてかっこよく表示する
- VizWindow初期化
	viz::Viz3d myWindow("Point Cloud");
	/// Pose of the widget in camera frame
	cv::Affine3d cloud_pose = cv::Affine3d().translate(cv::Vec3d(0.0f, 0.0f, 0.0f));
	/// Pose of the widget in global frame
	cv::Affine3d cloud_pose_global = cloud_pose;
	cv::Affine3d cam_pose;
- 3次元点群の表示(10フレームごとに初期フレームへ変換した3次元点群を表示)
- 数フレームごとやダウンサンプリングして表示しないと重くなる
			//10フレームごと変換して表示
			Mat rot = Rts[count](Rect(0, 0, 3, 3)).t();
			Mat tvec = Rts[count](Rect(3, 0, 1, 3)).t();
			if (count % 10 == 0){
				int downSamplingNum = 4; //e.g. 4
				Mat image2(image.rows / downSamplingNum, image.cols / downSamplingNum, CV_8UC3);
				resize(image, image2, image2.size(), 0, 0, INTER_LINEAR);
				Mat pCloud(image.rows / downSamplingNum, image.cols / downSamplingNum, CV_64FC3);

				for (int y = 0; y < 480; y += downSamplingNum){
					for (int x = 0; x < 640; x += downSamplingNum){
						if (depth.at<float>(y, x) < 8.0 && depth.at<float>(y, x) > 0.4){
							//RGB-D Dataset
							Mat pmat(1, 3, CV_64F);
							pmat.at<double>(0, 2) = (double)depth.at<float>(y, x);
							pmat.at<double>(0, 0) = (x - cx) * pmat.at<double>(0, 2) / fx;
							pmat.at<double>(0, 1) = (y - cy) * pmat.at<double>(0, 2) / fy;
							pmat = (pmat)*rot + tvec;
							Point3d p(pmat);
							pCloud.at<Point3d>(y / downSamplingNum, x / downSamplingNum) = p;
							pmat.release();
						}
						else{
							//RGB-D Dataset
							pCloud.at<Vec3d>(y / downSamplingNum, x / downSamplingNum) = Vec3d(0.f, 0.f, 0.f);
						}
					}
				}

				viz::WCloud wcloud(pCloud, image2);
				string myWCloudName = "CLOUD" + NumToString(count);
				myWindow.showWidget(myWCloudName, wcloud, cloud_pose_global);
- カメラ軌跡の表示(frustumにimageを表示することもできる)
cam_pose = cv::Affine3d(rot.t(), tvec);
			viz::WCameraPosition cpw(0.1); // Coordinate axes
			viz::WCameraPosition cpw_frustum(cv::Matx33d(cameraMatrix), /*image,*/ 0.1, viz::Color::white()); // Camera frustum
			string widgetPoseName = "CPW" + NumToString(count);
			string widgetFrustumName = "CPW_FRUSTUM" + NumToString(count);
			myWindow.showWidget(widgetPoseName, cpw, cam_pose);
			myWindow.showWidget(widgetFrustumName, cpw_frustum, cam_pose);
			myWindow.spinOnce(1, true);
実験環境
- Visual Studio 2013
- OpenCV3.0 (rgbd, viz)
- PC : intel Core i7-4600 CPU @2.1~2.7GHz 8GBメモリ
実行準備
- OpenCV3.0の導入はこちら
- OpenCV 3.0 の拡張モジュール群 opencv_contrib の導入が必要
- modulesのrgbd, vizのincludeファイルはopencv300\build\includeの下にコピペしておくこと
- ソースコードはこちら
- データセットのダウンロード(TUMデータセット、ICL-NUIMデータセット)
- 実行時にRgbd, ICP, RgbdICPのいずれかを引数として指定する。(Properties→Debugging→Command Arguments)
TUMデータセット:RGB-D SLAMの評価用データセット。軌跡の評価には、モーションキャプチャシステムにより得た高精度な真値が用いられる。※evaluate_toolsを用いてRGBとDepthフレームの同期associations.txtファイルの生成が必要。
ICL-NUIMデータセット:RGB-D SLAMの評価用データセット。軌跡だけでなく3次元再構築の評価もできる。データセットはPOV-Rayのシミュレーションにより生成されている。
結果
ダウンサンプリングせずに(downSamplingNum=1)表示した。ICPで推定したTUMデータセットfr1/xyzの結果。

- RGB-D ICPの精度が比較的良い。次にRGB-D(Direct法)。ICPは構造がはっきりしている環境でないとうまくいかない。
- RGB-Dが一番高速。(RGB-D ~30ms, ICP ~70ms, RGB-D ICP ~100ms)