概要
Vue.js #1 Advent Calendar 17日目です。
こんにちは、@SatohJohnです。
Vue.js人気ですね。導入して良かったです。(結果論
今回は実際に実務で使った際に覚えたVue-Routerのナビゲーションガード(before)について書きます。
つらつら書いてもわかりにくかったので、今回「許可のないidでは対象のページにアクセスさせず、failページに飛ばす。」という課題を考えました。
idが直打ちなのかよとかのツッコミは入れないでください。
前提
| バージョン | |
|---|---|
| Vue | 2.5.11 |
| Vue-Router | 3.0.1 |
Vue-Routerのモードはhashを想定しています。
Vue-router
Vue-RouterはVue.jsでSPAを作る際につかいます。
ナビゲーションガード
画面にルーティングされる前にパラメータのバリデーションをして、アクセスのガードできます。
イベントの起きる順番と書き方
主にガードする場所は以下の4箇所です
- グローバルbeforeEach
- ルート単位beforeEnter
- コンポーネント単位beforeRouteEnter
- コンポーネント単位beforeRouteUpdate
import Vue from 'vue';
import Router from 'vue-router';

Vue.use(Router);

const TestComponent = { // アクセスさせない画面を持つコンポーネント
    render: function(h) {
        return h('div', `hello: ${this.id}`)
    },
    beforeRouteEnter (to, from, next) { // [3]
        console.log('component: beforeRouteEnter');
        next();
    },
    beforeRouteUpdate (to, from, next) { // [4]
        console.log('component: beforeRouteUpdate');
        next();
    },
    props: ['id']
};
const FailComponent = {
    render: h => h('div', `you cannot access`)
};

const router = new Router({
    routes: [
        {path: '/', redirect: '/test'},
        {path: '/fail', component: FailComponent},
        {path: '/:id', component: TestComponent, props: true,
        beforeEnter: (to, from, next) => { // [2]
            console.log('router: beforeEnter');
            next();
        }},
    ]
});
router.beforeEach((to, from, next) => { // [1]
    console.log('global: beforeEach');
    next();
});

new Vue({
    router,
    render: h => h('router-view'),
}).$mount((() => {
    const list = document.getElementsByTagName('div');
    if (list.length < 1) {
        const appArea = document.createElement('div');
        document.body.appendChild(appArea);
        return appArea
    }
    return list[0];
})());
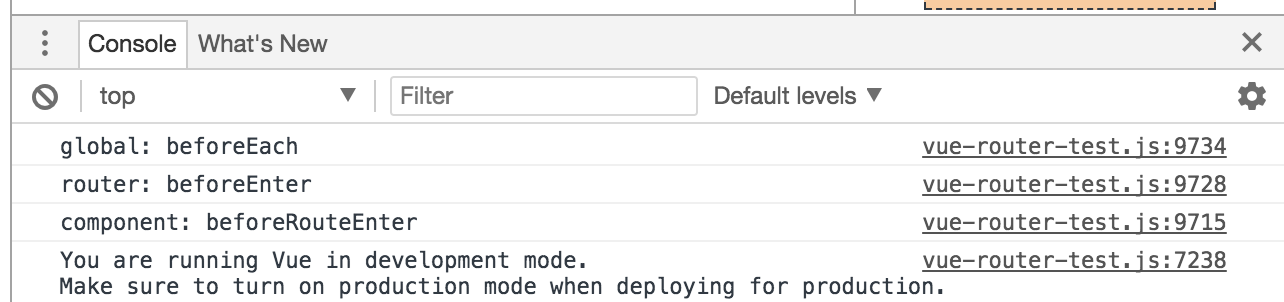
初回のページ読み込み時に実行される順番としては1→2→3です。
現状何もガードを書けていないので/#/satohでも/#/johnでもTestComponentの画面にたどり着けます。
それではガードを書いてみます。
各場所でガードしてみる
1. グローバルでガードする
nextを呼ぶとtoのコンポーネントに遷移します。
しかし、ここで、idが定義されていないことを考慮しなきゃいけないのは厳しい。。。(この例だと見なければ無限ループになる。
他にコンポーネントが増えたときに。。。とか考えたくないですね。
router.beforeEach((to, from, next) => { // [1]
    console.log('global: beforeEach');
    if (to.params.id === undefined || to.params.id === 'satohjohn') {
        next();
    } else {
        next({path: '/fail'});
    }
});
2. ルート単位でガードする
書き方は1.と変わりません。ただ、ここに来るときのtoはTestComponentに対するrouteオブジェクトになるためidが無いときというのを気にしなくても良いかもしれません。
ただ、propsで指定しているのにparamsを見ているのもどうなんだろうという気がします。
また、routerの定義でロジックを書きたくは無い気がしています。(個人の感想
        {path: '/:id', component: TestComponent, props: true,
        beforeEnter: (to, from, next) => { // [2]
            console.log('router: beforeEnter');
            if (to.params.id === 'satohjohn') {
                next();
            } else {
                next({path: '/fail'});
            }
        }},
3.component単位でガードする
書き方はやはり1と変わりませんが、2と同じようにcomponentが特定されているのでidだけをみてよいと思います。2と同じようにparamsみることになります。
    beforeRouteEnter (to, from, next) { // [3]
        console.log('component: beforeRouteEnter');
        if (to.params.id === 'satohjohn') {
            next();
        } else {
            next({path: '/fail'});
        }
    },
しかし、propを参照できるように変更します。
    beforeRouteEnter (to, from, next) { // [3]
        console.log('component: beforeRouteEnter');
        next(vm => {
            if (vm.id !== 'satohjohn') {
                next({path: '/fail'});
            }
        });
    },
できたかと思いますが、しかし、これはまだガードが完全ではありません。初回アクセス時のみのガードしかできていないのです。
/#/satohjohnにアクセスした時ページが表示されていますが、これを/#/satohに変更してみると、通ってしまいます。
これは、hash eventに対して、2と3が動かないためです。
4.hash changeの際にガードする。
この問題にはコンポーネントに対するbeforeRouteUpdateを利用します。
beforeRouteUpdateはコンポーネントが再利用される際に呼ばれます。逆に言えば初回には呼ばれません。
シグネチャは今までのものと同じではありますが、thisパラメータを利用し、コンポーネントの値を取得することができます。しかし、このタイミングでは、遷移する前のidしか取れないので、to.paramsから取ります。
    beforeRouteUpdate (to, from, next) {
        console.log('component: beforeRouteUpdate');
        if (to.params.id === 'satohjohn') {
            next();
        } else {
            next({path: '/fail'});
        }
    },
これによってbeforeRouteUpdateで弾かれるようになります。

これでsatohjohnさんしかTestComponentにアクセスすることができなくなりました!
その他4の解決方法
$routeオブジェクトをwatchするという手があります。
こちらの場合はnextがパラメータに渡ってこないため、$router.pushする必要があります。
ただ、this.idが更新されているのでto.paramsを見なくても良いという利点があります。
    watch: {
        $route(to, from) {
            if (this.id !== 'satohjohn') {
                this.$router.push('/fail');
            }
        }
    },
まとめ
Vue-Routerのガードを使ってみました。
beforeRouteUpdateあたりは知らずにいるとハマるポイントだと思います。
今回関係はないんですが、せっかくなのでparcelで作ってみました。
webpackより導入も簡単で、検証とかする際にとてもいいですね!