micro:bitとは
以前記事で紹介したchibi:bitと特に仕様は変わらず
BBC(英国放送協会)が主体となって作っている教育向けマイコンボードです。
仕様は25個のLED、2個のボタンスイッチのほか、加速度センサーと磁力センサー、BLE機能を搭載したマイコンボードです。
今回micro:bitは日本の技適通った事でスイッチサイエンスで発売になった訳です
スイッチサイエンス
chibi:bitとの違い
・本家
・安く手に入る 大体2千円ぐらい
・サポートしている拡張基盤が多い
開発環境は以前と変わらずブラウザ型のエディターになります
ブロックエディターとコードエディターが選べます
どちらでも自由に開発できます
micro:bit日本語開発環境
今回目指すもの
micro:bitをWiiUっぽいコントローラーとしてUnityと連携してみたいと思います
以前はchibi:bitからシリアル通信を送るだけでしたが、今回受ける所までやってみたいと思います
開発環境
・Windows10
・Unity2017.1.0
用意する物
・micro:bit
・SparkFun gamer:bit(拡張基盤)
セットアップ
こちらを参考
http://qiita.com/Sase/items/cbae0084d1147b9e9c64
micro:bit側の実装
micro:bit日本語開発環境を開きます
ブロックエディターを選ぶ
SparkFun gamer:bit(拡張基盤)のパッケージを追加します
やり方
https://learn.sparkfun.com/tutorials/microarcade-kit-experiment-guide/installing-the-gamerbit-package-for-microsoft-makecode
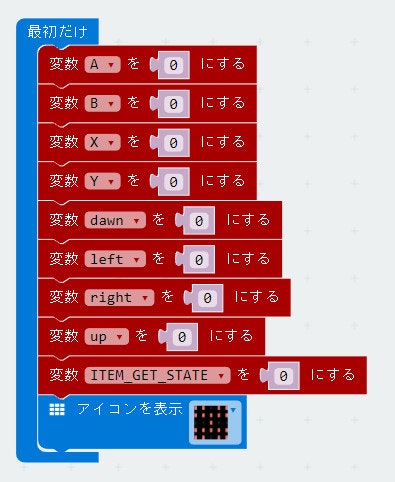
入力処理
一部をUpDate関数の中で組んでます
上を押した時 マイフレームLED処理をすると重くなるので、押した瞬間だけLED処理が走るようにしています

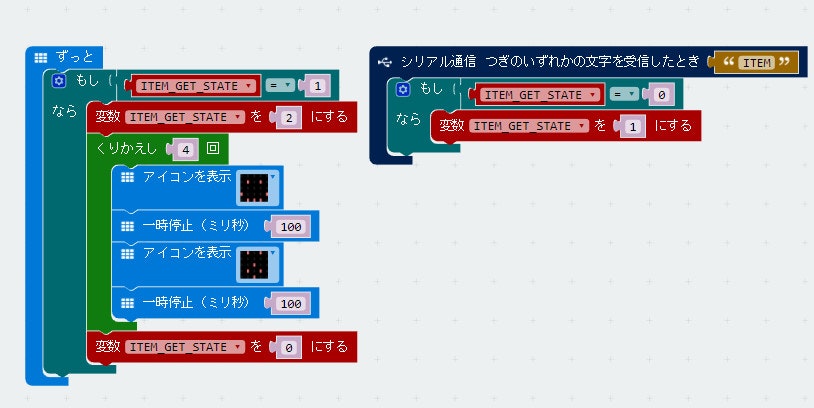
シリアル通信受信処理
ITEMってゆう文字列が受信されたらITEM_GET_STATEを変えてLEDのアニメーションが実行されるようになっています
LEDのアニメーション処理をシリアル通信受信処理の中で組まずUpDate関数に書いている理由は
なぜかその中で組むと余計に数回呼ばれたので組んでいないです 多分バグかも

余談ですが、以前の記事のブロックエディターでキャスト(int->string)が出来なかったのですが、micro:bitのエディターではブロック側でもキャストできました。
ちなみにこんな感じ
ここまで実装完了
hexファイルをダウンロードしてきて、micro:bitをusb接続してストレージとしてPC上に出てきたら、先ほど
ダウンロードしてきたhexファイルをコピペして焼き付ける。
完成形のhexファイルgithubに上げました
https://github.com/SatoSeiichi/micro-bit_GameController
ちなみにhexファイルにしてもプロジェクトとしてブラウザエディターで開けます
シリアル通信の動作確認
こちらを参考
http://qiita.com/Sase/items/cbae0084d1147b9e9c64
Unity側の実装
最初にシリアル通信の受信部分のスクリプトの実装します。
こちらをお借りしました。文字列が切れる事がなくなりました
https://gist.github.com/asus4/86d48b80c295db826e37eef99d5438b2
次にオブジェクトにシリアル通信の値を反映するスクリプトの実装します
動かしたいオブジェクトにObjRotation.csをアタッチする
using System.Collections;
using System.Collections.Generic;
using UnityEngine;
using AppKit;
using System.Text;

public class ObjContllol : MonoBehaviour {
	ArduinoSerial serial;
	Vector3 rotation;
	public string portNum;
	public Transform rotationObj;
	public string massage;

	enum MOVE_STATE
	{
		UP,
		DOWN,
		LEFT,
		RIGHT,
	}

	void Start()
	{
		serial = ArduinoSerial.Instance;
		bool success = serial.Open(portNum, ArduinoSerial.Baudrate.B_115200);
		if (!success)
		{
			return;
		}
		serial.OnDataReceived += SerialCallBack;
	}
	void OnDisable()
	{
		serial.Close();
		serial.OnDataReceived -= SerialCallBack;
	}
	// Update is called once per frame
	void Update () {
	}

	void SerialCallBack(string m)
	{
		objMove (m);
		objRotation(m);
		massage = m;
	}

	void objRotation(string message)
	{
		string[] a;

		a = message.Split("="[0]);
		if(a.Length != 2) return;
		int v = int.Parse( a[1]);
		switch(a[0])
		{
		case "pitch":
			rotation = new Vector2(v, rotation.y);
			break;
		case "roll":
			rotation = new Vector2( rotation.x, v);
			break;
		}
		Quaternion AddRot = Quaternion.identity;
		AddRot.eulerAngles = new Vector3( -rotation.x, 0, -rotation.y );

		transform.rotation = AddRot;
	}

	void objMove(string message)
	{
		string[] a;

		a = message.Split("="[0]);
		if(a.Length != 2) return;
		int v = int.Parse( a[1]);
		string m = a [0];
		if (m == "button") {

			string mc = a [1];

			//a_button
			if (mc [0] == '1') {
				print ("a_button");
			}
			//b_button
			if (mc [1] == '1') {
				print ("b_button");
			}
//			//y_button
			if (mc [2] == '1') {
				print ("y_button");
				rotationObj.GetComponent<Renderer> ().material.color = Color.blue;
			}
			//x_button
			if (mc [3] == '1') {
				print ("x_button");
				rotationObj.GetComponent<Renderer> ().material.color = Color.red;
			}
			//up
			if (mc [4] == '1') {
				print ("up");
				transform.SetPositionAndRotation (transform.position + (Vector3.up * 0.05f), transform.rotation);
				rotationObj.GetComponent<Renderer> ().material.color = Color.green;
			}
			//dawn
			if (mc [5] == '1') {
				print ("dawn");
				transform.SetPositionAndRotation (transform.position + (Vector3.down * 0.05f), transform.rotation);
				rotationObj.GetComponent<Renderer> ().material.color = Color.magenta;
			}
			//left
			if (mc [6] == '1') {
				print ("left");
				transform.SetPositionAndRotation (transform.position + (Vector3.left * 0.05f), transform.rotation);
				rotationObj.GetComponent<Renderer> ().material.color = Color.yellow;
			}
			//right
			if (mc [7] == '1') {
				print ("right");
				transform.SetPositionAndRotation (transform.position + (Vector3.right * 0.05f), transform.rotation);
				rotationObj.GetComponent<Renderer> ().material.color = Color.cyan;
			}

		}
	}

	void OnTriggerEnter(Collider co)
	{
		Destroy (co.gameObject);
		serial.Write ("ITEM");
		Debug.LogError("item_get");
	}
}
以上です。
完成Unityプロジェクトをgithubに上げました
https://github.com/SatoSeiichi/micro-bit_unity
結論
Unityでシリアル通信をするならこちらのコードを参考にしよう
https://gist.github.com/asus4/86d48b80c295db826e37eef99d5438b2
デモ動画
シリアル通信処理変更前
#microbit と #unity で遊んでみる
— SASE (@SaseKubrick) 2017年8月8日
うーん やっぱ2017にしてもシリアル通信はダメやなー 思い切ってBLE通信をやってみるかな pic.twitter.com/4njbtq3NSk
シリアル通信処理変更後
やったー! シリアル通信処理を変更したらましになった! #microbit #unity pic.twitter.com/ZWXVpGwxTl
— SASE (@SaseKubrick) 2017年8月8日


