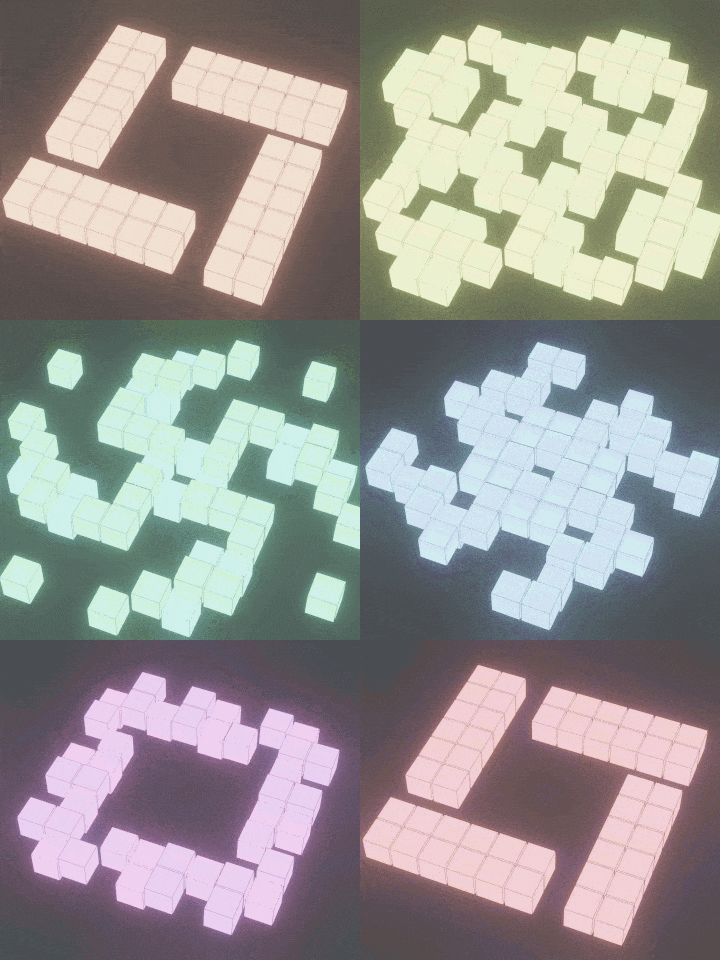
これなに
Blenderでライフゲームのアニメーションを作成してみました。
完成物
配置は銀河です。
手順
- Blenderを起動する
- Scriptingワークスペースを開く
- 新規テキストを作成、以下をコピペし実行する
# ライフゲームのアニメーションを作成
from itertools import product

import bpy
import numpy as np


def galaxy() -> tuple[np.ndarray, int]:
    """銀河の配置と周期を返す"""
    # https://conwaylife.com/wiki/Kok's_galaxy
    cells = np.zeros((17, 17), bool)
    cells[4:6, 4:10] = cells[11:13, 7:13] = 1
    cells[7:13, 4:6] = cells[4:10, 11:13] = 1
    return cells, 8


def add_geometry(obj: bpy.types.Object) -> None:
    """ライフゲーム用のジオメトリーノード作成

    :param obj: 対象オブジェクト
    """
    modifier = obj.modifiers.new("GeometryNodes", "NODES")
    node_tree = bpy.data.node_groups.new("Geometry Nodes", "GeometryNodeTree")
    modifier.node_group = node_tree
    modifier.node_group.is_modifier = True
    node_tree.interface.new_socket("Instances", in_out="OUTPUT", socket_type="NodeSocketGeometry")
    node_tree.interface.new_socket("Instance", in_out="INPUT", socket_type="NodeSocketGeometry")
    ndgi = node_tree.nodes.new("NodeGroupInput")
    ndgo = node_tree.nodes.new("NodeGroupOutput")
    ndip = node_tree.nodes.new("GeometryNodeInstanceOnPoints")
    ndpo = node_tree.nodes.new("GeometryNodeInputPosition")
    ndsx = node_tree.nodes.new("ShaderNodeSeparateXYZ")
    ndcb = node_tree.nodes.new("GeometryNodeMeshCube")
    node_tree.links.new(ndgi.outputs[0], ndip.inputs[0])
    node_tree.links.new(ndip.outputs[0], ndgo.inputs[0])
    node_tree.links.new(ndpo.outputs[0], ndsx.inputs[0])
    node_tree.links.new(ndsx.outputs[2], ndip.inputs[1])
    node_tree.links.new(ndcb.outputs[0], ndip.inputs[2])
    node_tree.links.new(ndip.outputs[0], ndgo.inputs[0])
    nds = [ndgi, ndgo, ndip, ndpo, ndsx, ndcb]
    poss = [[-80, 40], [250, 40], [90, 40], [-240, -99], [-80, -99], [-400, -28]]
    for nd, pos in zip(nds, poss):
        nd.location = pos


def main(cells: np.ndarray, ncycle: int, unit: int = 5) -> None:
    """ライフゲームのアニメーションを作成

    :param cells: 初期配置
    :param ncycle: 周期
    :param unit: フレーム数/周期, defaults to 5
    """
    nx, ny = cells.shape
    bpy.ops.mesh.primitive_grid_add(x_subdivisions=nx - 1, y_subdivisions=ny - 1, size=nx)
    vtx = np.array(bpy.context.object.data.vertices).reshape(nx, ny)
    for x, y in product(range(nx), range(ny)):
        vtx[x, y].co.z = cells[x, y] * 0.5
    ss = [slice(None, -2), slice(1, -1), slice(2, None)]  # 前中後用のスライス
    sc = ss[1]  # 中央用のスライス
    bpy.context.scene.frame_end = ncycle * unit + 1
    for tm in range(ncycle + 1):
        bpy.context.scene.frame_current = tm * unit + 1
        for v in vtx.flat:
            v.keyframe_insert("co")
        new = np.sum([cells[s1, s2] for s1 in ss for s2 in ss if s1 != sc or s2 != sc], 0)
        n2, n3 = new == 2, new == 3
        cells[sc, sc] = cells[sc, sc] & n2 | n3
        for x, y in product(range(nx), range(ny)):
            vtx[x, y].co.z = cells[x, y] * 0.5
    bpy.context.scene.frame_current = 1
    add_geometry(bpy.context.object)


main(*galaxy())
- Layoutワークスペースに戻り、スペースでアニメーションを開始する。
説明
ライフゲームのセルを構成する格子は、Gridオブジェクトとします。ここで、1つのセルは、面ではなく頂点とします。このとき、頂点の生死は、Z座標で判断することにします。
時間ごとの生死を記録する必要があります。ここでは、頂点座標(co)にキーフレームを打ちます。
そして、Z座標の値による立方体の表示は、ジオメトリーノードを使うことにします(後述)。
galaxy()関数
銀河の2次元配列を作成し、周期とともに返します。
周期は8なので、8回目に同じ配置に戻ります。
add_geometry()関数
下記のジオメトリーノードを作成します。
対象のメッシュは格子(Grid)です。このポイントに立方体を出せばいいので、Instance on Pointsを挟んで、CubeをInstanceに繋ぎます。
生きているセルだけ表示したいので、Positionで座標をとり、Separate XYZでZ座標だけにしぎます。
※ Blenderでは0以上をTrueとみなします。そのためZ座標をSelectionにつなぐと、Z座標が正の頂点が選択されます。
main()関数
順番に説明します。
    nx, ny = cells.shape
    bpy.ops.mesh.primitive_grid_add(x_subdivisions=nx - 1, y_subdivisions=ny - 1, size=nx)
    vtx = np.array(bpy.context.object.data.vertices).reshape(nx, ny)
    for x, y in product(range(nx), range(ny)):
        vtx[x, y].co.z = cells[x, y] * 0.5
-
nx、nyに縦のセル数、横のセル数を入れます -
primitive_grid_addで格子を作成します -
vtxに格子上の頂点を2次元配列として作成します -
vtxのco.zに初期配置を設定します。生きていれば0.5に、そうでなければ0になります
    ss = [slice(None, -2), slice(1, -1), slice(2, None)]  # 前中後用のスライス
    sc = ss[1]  # 中央用のスライス
    bpy.context.scene.frame_end = ncycle * unit + 1
-
ss、scは、ライフゲームの計算用のスライスです - シーンの
frame_endに周期 * フレーム数 + 1を設定します
for tm in range(ncycle + 1):
- 周期数+1回ループします。ループの最初と最後が同じ配置なので、アニメーションを繰り返し再生すると繋がります
        bpy.context.scene.frame_current = tm * unit + 1
        for v in vtx.flat:
            v.keyframe_insert("co")
- 時刻を進めます
- 頂点座標(
co)にキーフレームを打ちます
        new = np.sum([cells[s1, s2] for s1 in ss for s2 in ss if s1 != sc or s2 != sc], 0)
        n2, n3 = new == 2, new == 3
        cells[sc, sc] = cells[sc, sc] & n2 | n3
- 次の配置を計算します。
newは、隣接8マスの生存数の和です -
n2とn3が、「和が2か」と「和が3か」です。n2ならば現在生存⇛生存で、n3なら発生です
        for x, y in product(range(nx), range(ny)):
            vtx[x, y].co.z = cells[x, y] * 0.5
- 新しい配置で座標を更新します
    bpy.context.scene.frame_current = 1
    add_geometry(bpy.context.object)
- 時刻を1に戻します
- ジオメトリーノードを作成します
追記
アドオン化しました。
- インストールするとサイドバーの編集タブにパネルがでます
- 銀河を作りたい場合は、「Make Sample」ボタンを押すだけで、メッシュ、キーフレームアニメーション、ジオメトリーノードを自動生成して、アニメーションが始まります
- 任意のパターンを作成したい場合は、「Make Grid」で格子を作成したあと、初期配置に置きたいセルの頂点を選択して「Make Anim」を押すとアニメーションが始まります
NX、NYが格子の横と縦の数で、NCycleが周期、Unitが1コマのキーフレーム数です。
以上

