この記事について
shadowとwillとretainを活用してAWS IoT CoreとPubSubする②AWSリソースの構築で構築した環境を使ったラズパイGW broker <-> AWS IoT間でのMQTT通信、ここから3回はmosquittoでmessageのpubsub、shadowのupdate/get、retainとwillの設定をします。
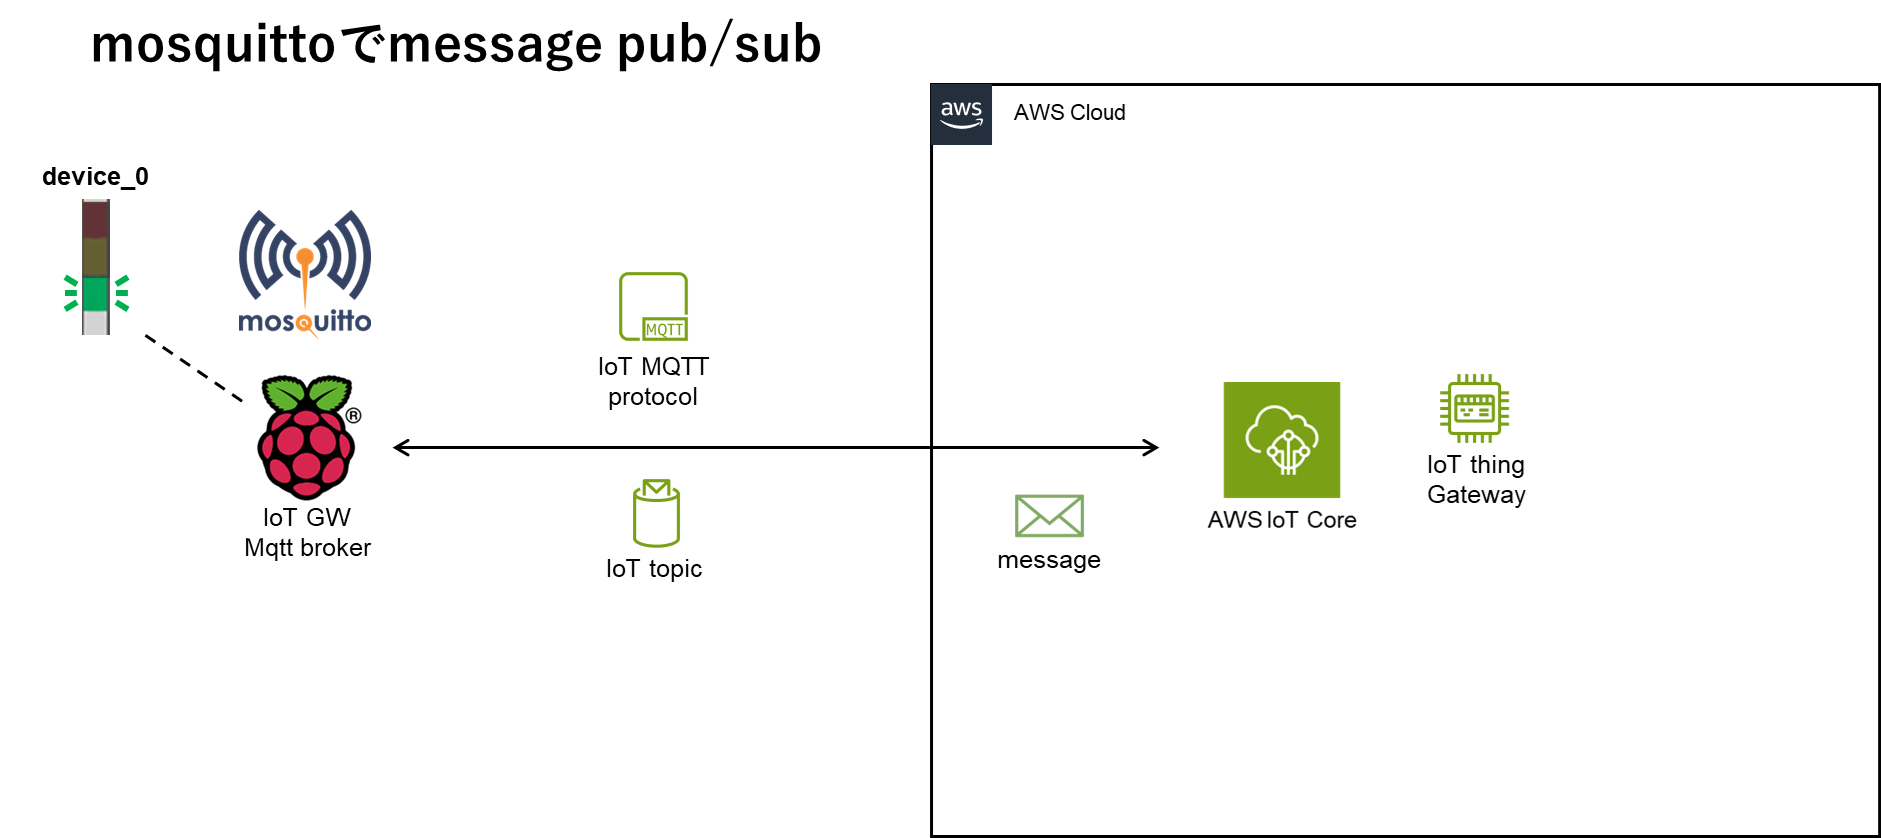
今回はラズパイに接続された仮想のdevice_0のシグナルをAWS IoTとpubsubします。
ライブラリー
GitHub
開発者ガイド
brokerとbridge
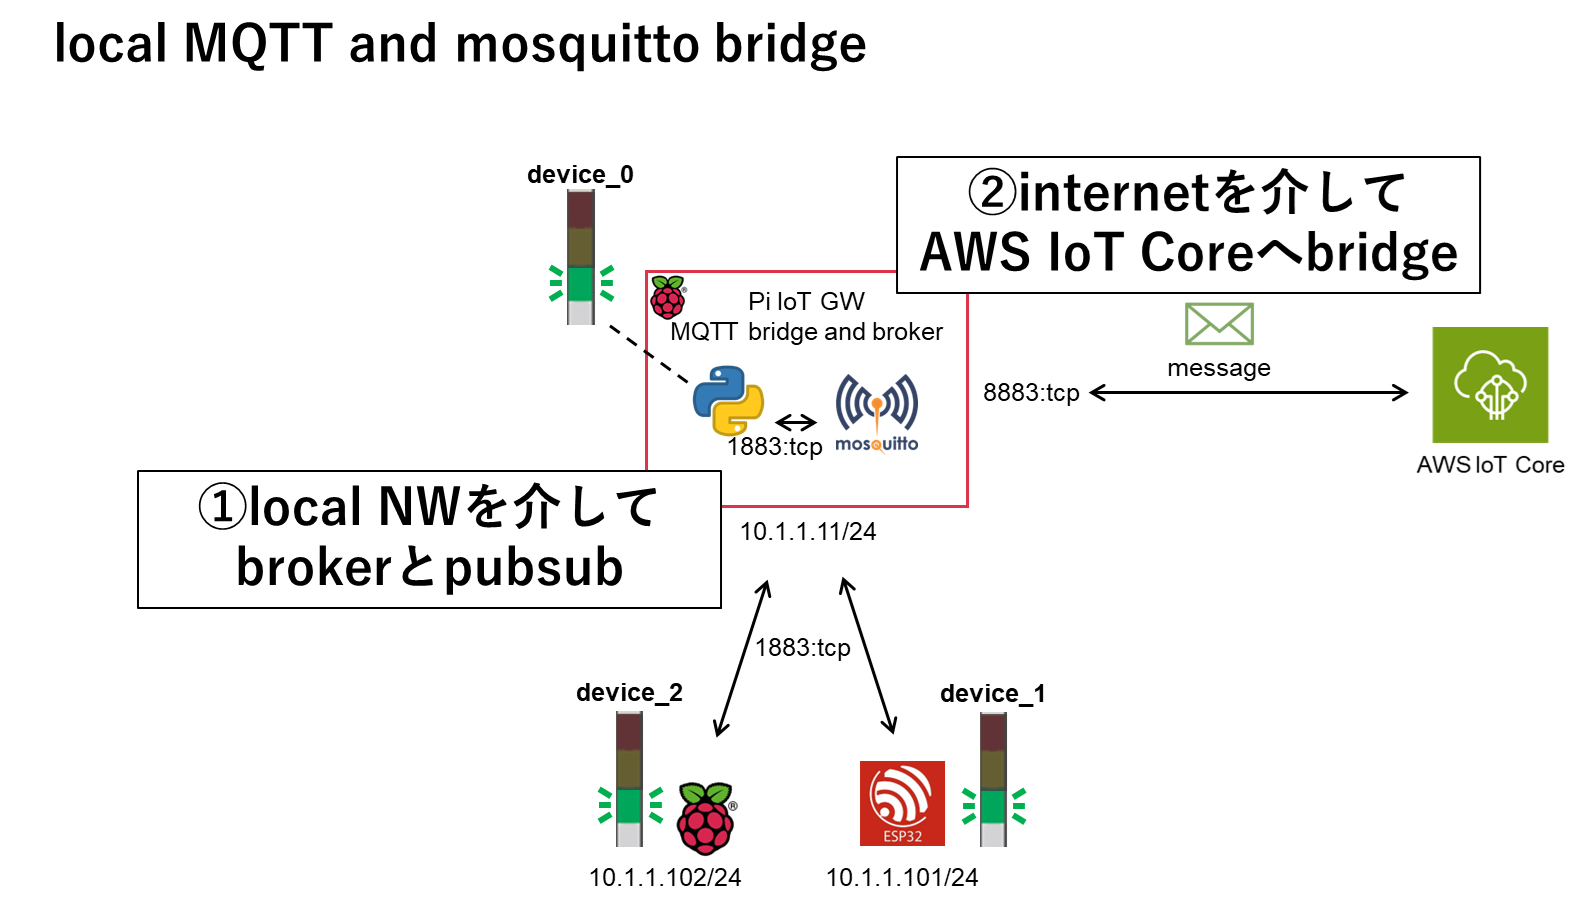
今回は、mosquittoを使ってPi GW broker <-> AWS IoT間でpubsubするために
① edge nodeはlocal networkを介してPi GW brokerとpubsub
② Pi GW brokerはlocal networkをAWS IoT Coreにbridge
という手順を踏みます。
mosquittoは「shadowとwillとretainを活用してAWS IoT CoreとPubSubする②AWSリソースの構築」でインストール済みの前提でbrokerとbridgeを設定します。
broker
/etc/mosquitto/mosquitto.confで
- 匿名クライアントの接続を禁止
- パスワードファイルを1883:tcpでのbroker接続の認証に使用
等を設定します。
# 各リスナーごとに独自の設定を使用できるようにする
per_listener_settings true
# Mosquitto のプロセスID (PID) を保存するファイルのパス
pid_file /run/mosquitto/mosquitto.pid

# 永続化を有効にする、サーバの再起動後にメッセージキューの状態を保持する
persistence true
# 永続化データを保存するディレクトリのパス
persistence_location /var/lib/mosquitto/

# ログ出力先をファイルに設定し、そのファイルのパスを指定
log_dest file /var/log/mosquitto/mosquitto.log

# 追加の設定ファイルが存在するディレクトリを指定
include_dir /etc/mosquitto/conf.d

# ポート1883でリスニングするリスナーを設定
listener 1883
# 匿名クライアントの接続を禁止する
allow_anonymous false
# 認証に使用するパスワードファイルのパスを指定
password_file /etc/mosquitto/passwd
mosquittoログイン用に任意のusernameとpasswordを用意します。
username:mosquittouser
password:mosquittopassword
パスワードファイル作成にはmosquitto_passwdコマンドを使います。
sudo mosquitto_passwd -c /etc/mosquitto/passwd mosquittouser
# 準備したpasswordを入力
Password:
bridge
「shadowとwillとretainを活用してAWS IoT CoreとPubSubする②AWSリソースの構築」でダウンロードした証明書を/etc/mosquitto/certs/にコピーします。
sudo cp $(ls ~/cert/*CA1.pem) /etc/mosquitto/certs/
sudo cp $(ls ~/cert/*pem.crt) /etc/mosquitto/certs/
sudo cp $(ls ~/cert/*private.pem.key) /etc/mosquitto/certs/
/etc/mosquitto/conf.d/bridge.confでAWS IoTへのbridge接続に必要な設定をします。
# AWS IoT endpoint, use AWS CLI aws iot describe-endpoint
# 接続名を "awsiot" に設定
connection awsiot
# AWS IoTのエンドポイントとポート8883を指定
address xxxxxxxxxxxxxxxxxxx-ats.iot.ap-northeast-1.amazonaws.com:8883

# Specifying which topics are bridged
# トピック "MQTTServer/MQTTServer1/#" を両方向でQoS1でブリッジする
topic MQTTServer/MQTTServer1/# both 1

# Setting protocol version explicitly
# MQTTプロトコルのバージョンを3.1.1に設定
bridge_protocol_version mqttv311
# セキュアなブリッジ接続を使用
bridge_insecure false

# Bridge connection name and MQTT client Id,
# enabling the connection automatically when the broker starts.
# クリーンセッションを有効にする
cleansession true
# クライアントIDを "MQTTServer1" に設定
clientid MQTTServer1
# 自動的に接続を開始
start_type automatic
# 通知を無効にする
notifications false
# すべてのログタイプを有効にする
log_type all
# ログの出力先を標準エラーに設定
log_dest stderr
# ログにタイムスタンプを追加
log_timestamp true
# デバッグログを有効にする
log_type debug

# ============================
# Certificate based SSL/TLS support
# ----------------------------
#Path to the rootCA
bridge_cafile /etc/mosquitto/certs/AmazonRootCA1.pem
# Path to the PEM encoded client certificate
bridge_certfile /etc/mosquitto/certs/MQTTServer1-certificate.pem.crt
# Path to the PEM encoded client private key
bridge_keyfile /etc/mosquitto/certs/MQTTServer1-private.pem.key
parameters.confへmosquitto user/password追加
自分的に後々の使い勝手をよくしておきます。
PROJECT_NAME=MQTTServer
THING_NAME=MQTTServer1
AWS_AccountId=123456789012
REGION_DATA=ap-northeast-1
# 以下を追加
username=mosquittouser
password=mosquittopassword
起動設定と再起動
sudo systemctl enable mosquitto
sudo systemctl daemon-reload
sudo systemctl restart mosquitto
ラズパイGW <-> AWS IoT でpubsub
topicとpayload bodyのmessageはpaho/awssdkと同じ(同じテイスト)にします。
subscribe
consoleで先にmosquitto_subを起動して待ち受けにしておきます。
THING_NAME=$(grep 'THING_NAME' ./parameters.conf | awk -F'=' '{print $2}' | tr -d '\r\n')
PROJECT_NAME=$(grep 'PROJECT_NAME' ./parameters.conf | awk -F'=' '{print $2}' | tr -d '\r\n')
password=$(grep 'password' ./parameters.conf | awk -F'=' '{print $2}' | tr -d '\r\n')
username=$(grep 'username' ./parameters.conf | awk -F'=' '{print $2}' | tr -d '\r\n')
# topic設定
topic="${PROJECT_NAME}/${THING_NAME}/#"
echo $topic
# subscriber起動
mosquitto_sub -h 127.0.0.1 -u ${username} -P ${password} -t "$topic"  -v
publish
messageは最後までこれで行きますヨシッ👉
THING_NAME=$(grep 'THING_NAME' ./parameters.conf | awk -F'=' '{print $2}' | tr -d '\r\n')
PROJECT_NAME=$(grep 'PROJECT_NAME' ./parameters.conf | awk -F'=' '{print $2}' | tr -d '\r\n')
password=$(grep 'password' ./parameters.conf | awk -F'=' '{print $2}' | tr -d '\r\n')
username=$(grep 'username' ./parameters.conf | awk -F'=' '{print $2}' | tr -d '\r\n')
# topic設定
topic="${PROJECT_NAME}/${THING_NAME}/0"
echo $topic
# payload設定
msg="AWS IoTにmosquittoで接続ヨシッ👉"
payload="{\"msg\": \"${msg}\"}"
echo $payload
# publish
mosquitto_pub -h 127.0.0.1 -u ${username} -P ${password} -t "$topic" -m "$payload"
実行結果
$ mosquitto_sub -h 127.0.0.1 -u ${username} -P ${password} -t "$topic"  -v
MQTTServer/MQTTServer1/#
MQTTServer/MQTTServer1/0 {"msg": "AWS IoTにmosquittoで接続ヨシッ👉"}
$ mosquitto_pub -h 127.0.0.1 -u ${username} -P ${password} -t "$topic" -m "$payload"
{"msg": "AWS IoTにmosquittoで接続ヨシッ👉"}
MQTTServer/MQTTServer1/0
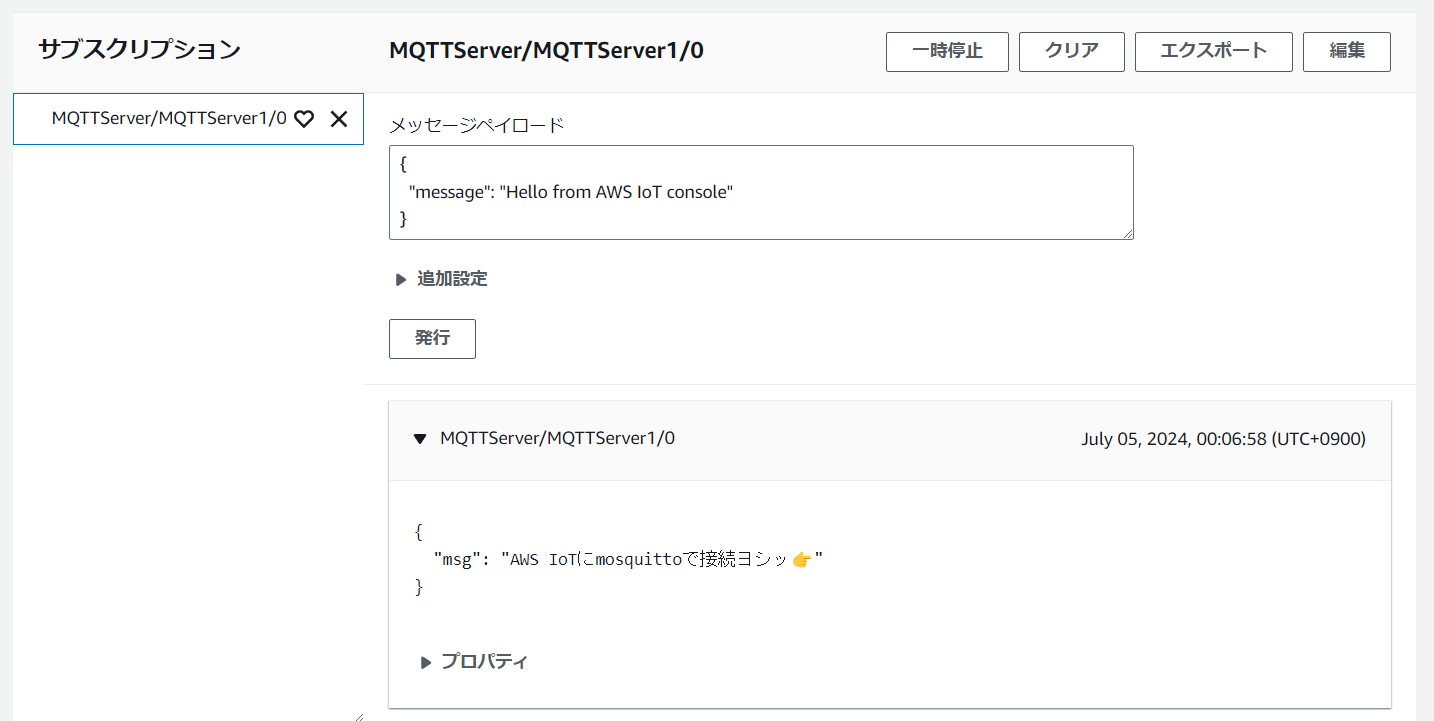
AWS IoTのテストクライアント上でもsubscribeを確認できました。
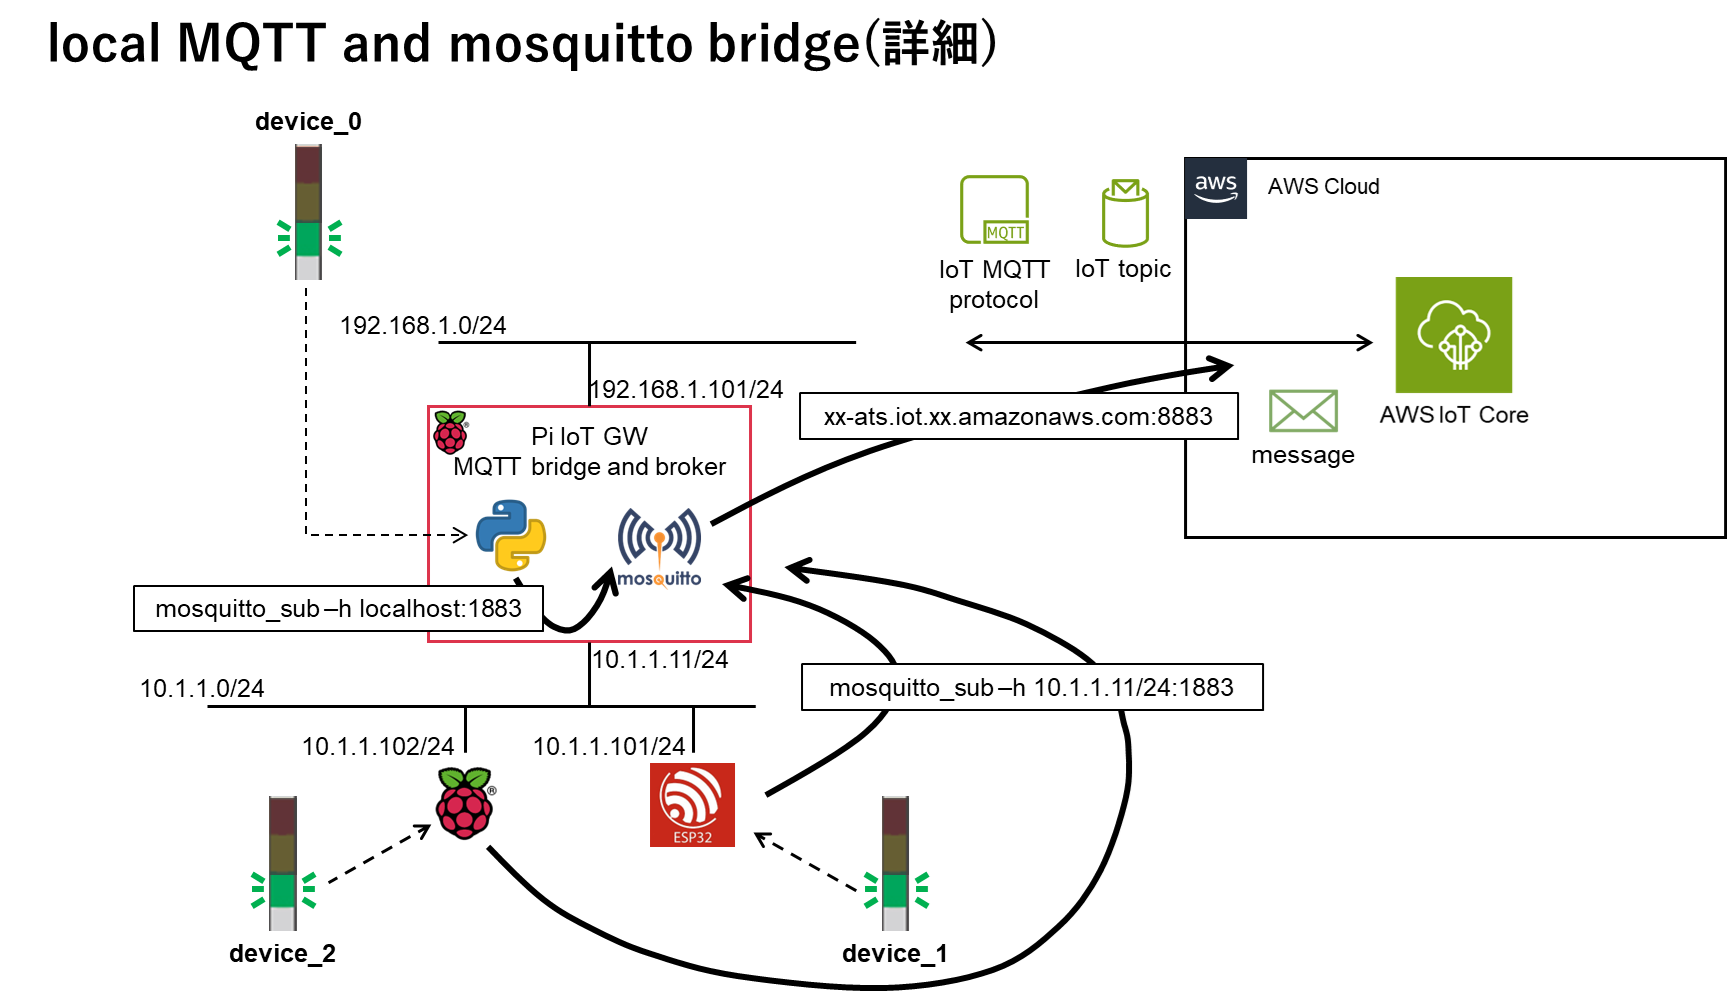
(おまけ)broker接続からbridgeする流れを最初の説明より詳細に書くと以下のようになるかと思います。
次回
shadowとwillとretainを活用してAWS IoT CoreとPubSubする⑩mosquittoでshadow update