端末のカメラロールに表示される動画をアプリ内のコレクションビューに一覧表示する方法
*試行錯誤の結果この方法で実現しただけなので、他にもっと良い方法があるのかもしれません。。。
◆準備
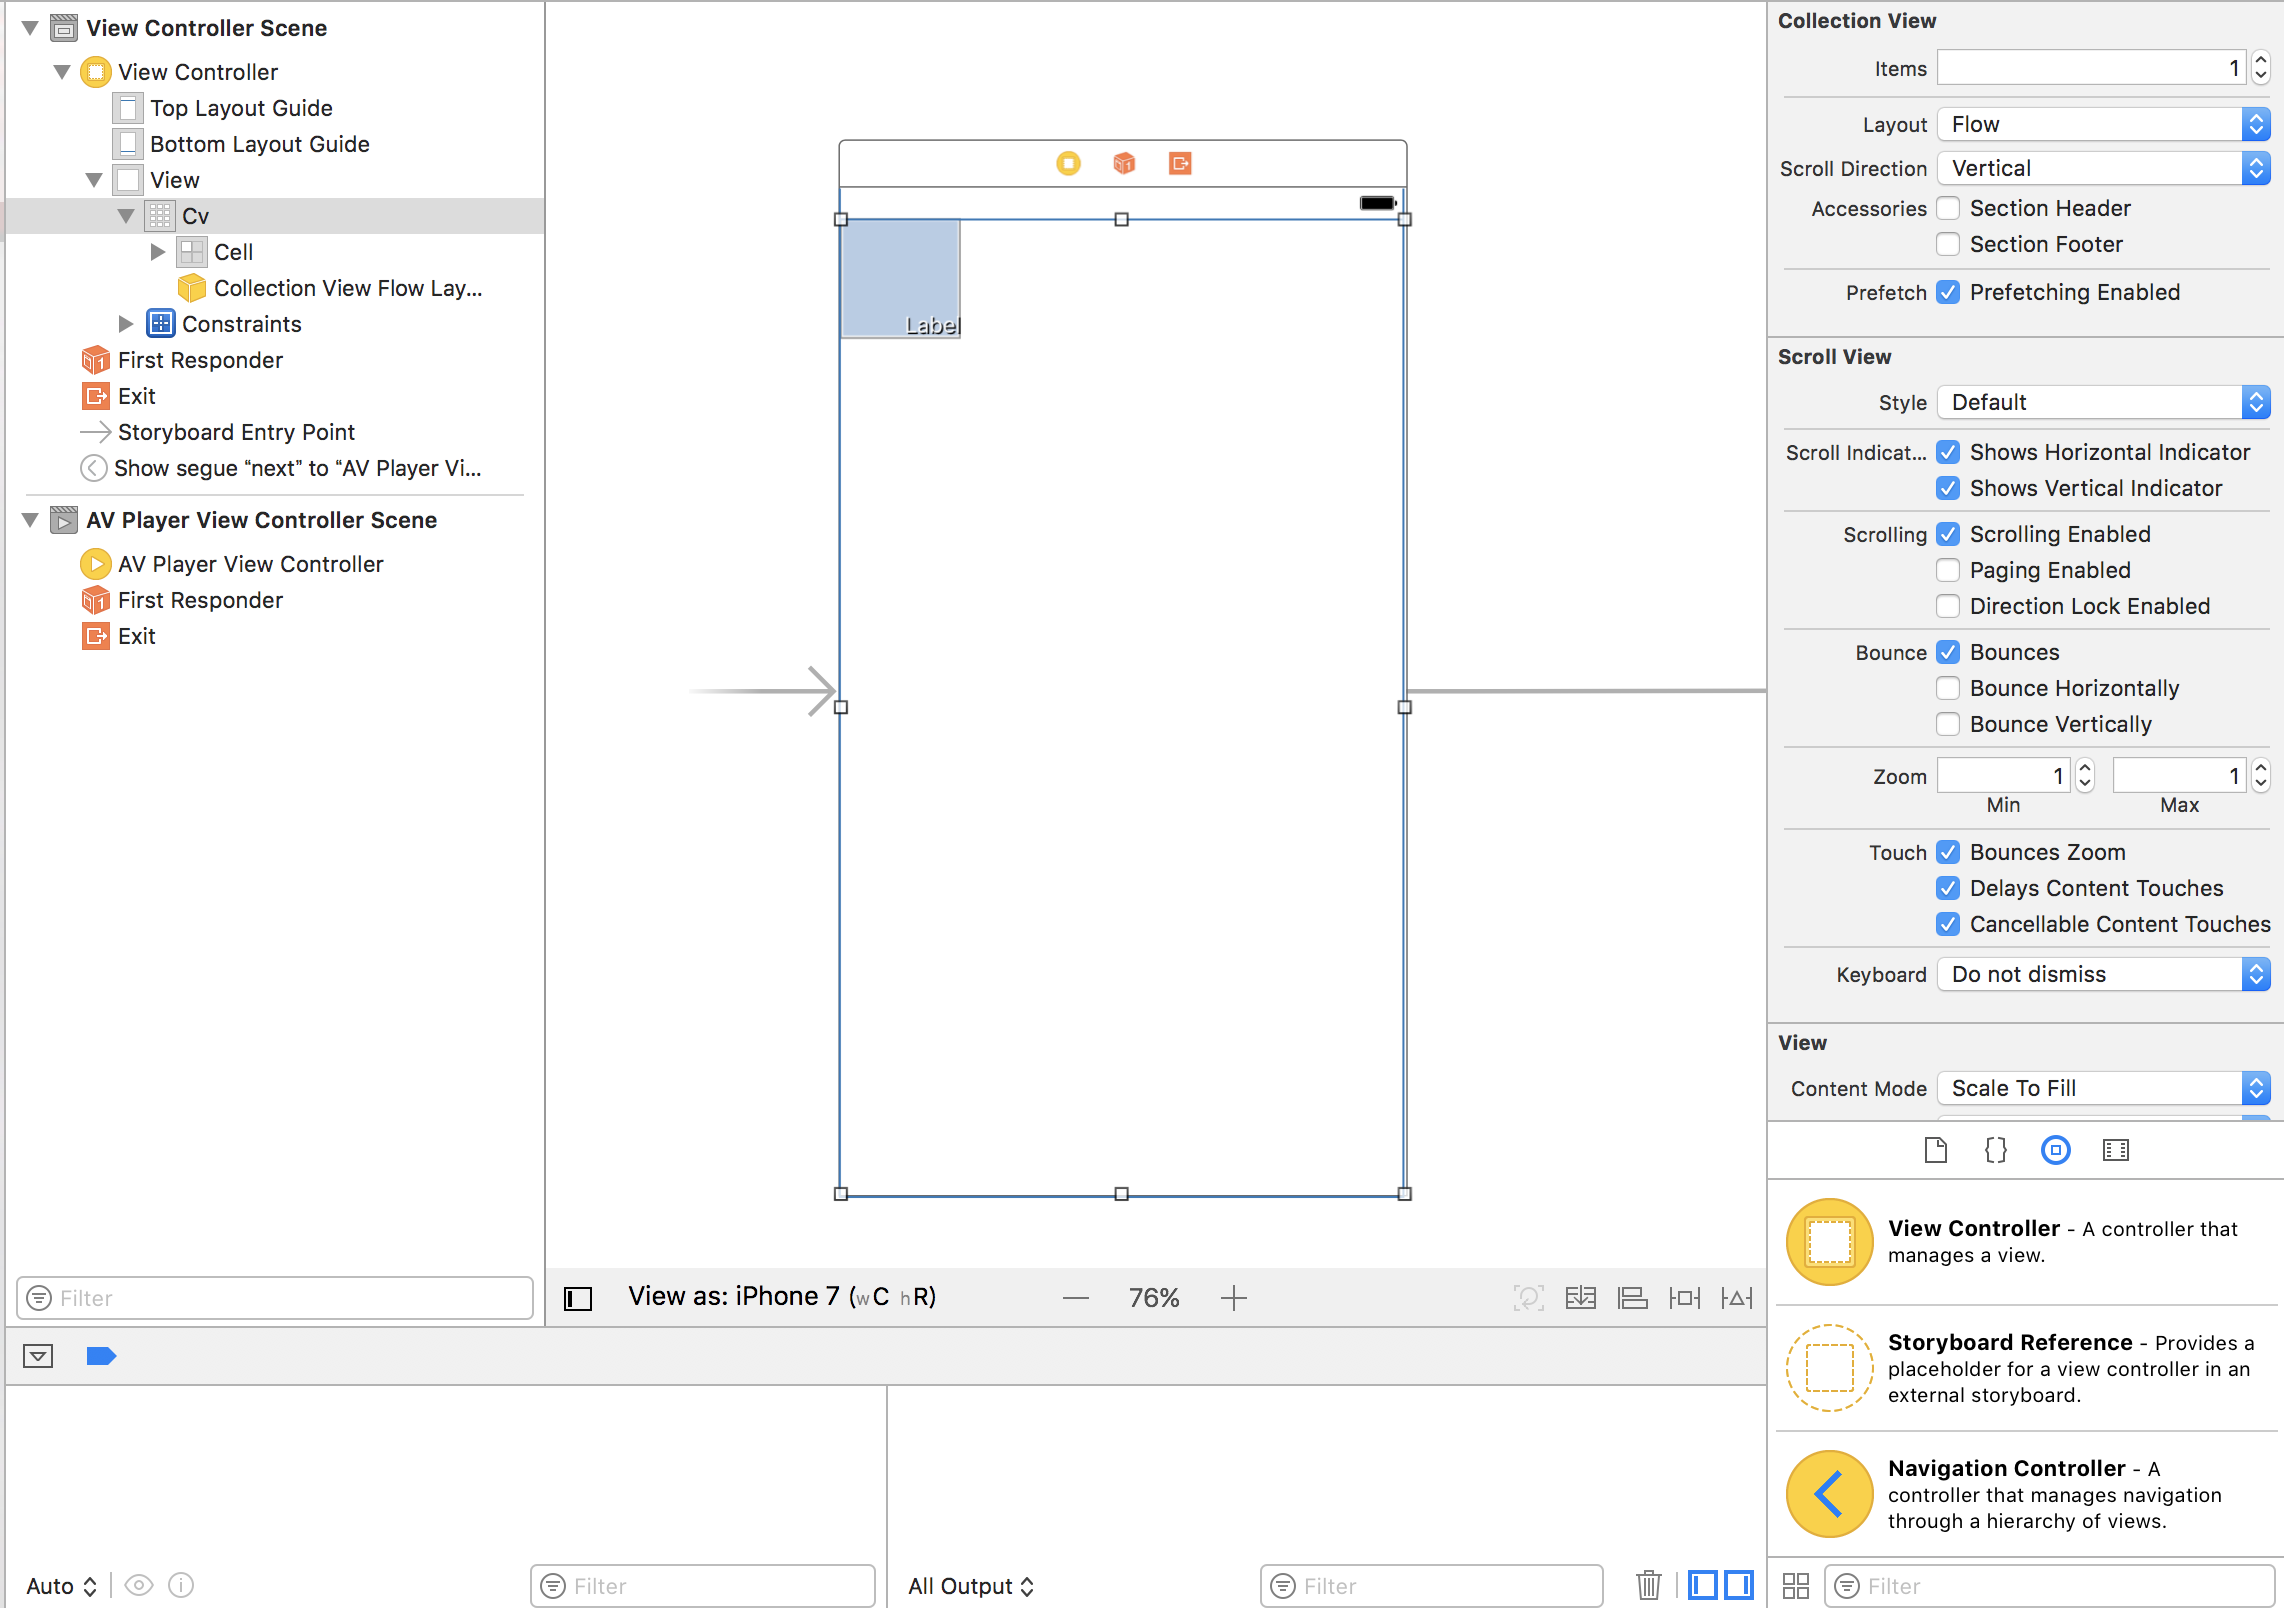
↓まずはUICollectionViewを配置。
↓コレクションビューのセルにUIImageViewとUILabelを設置。
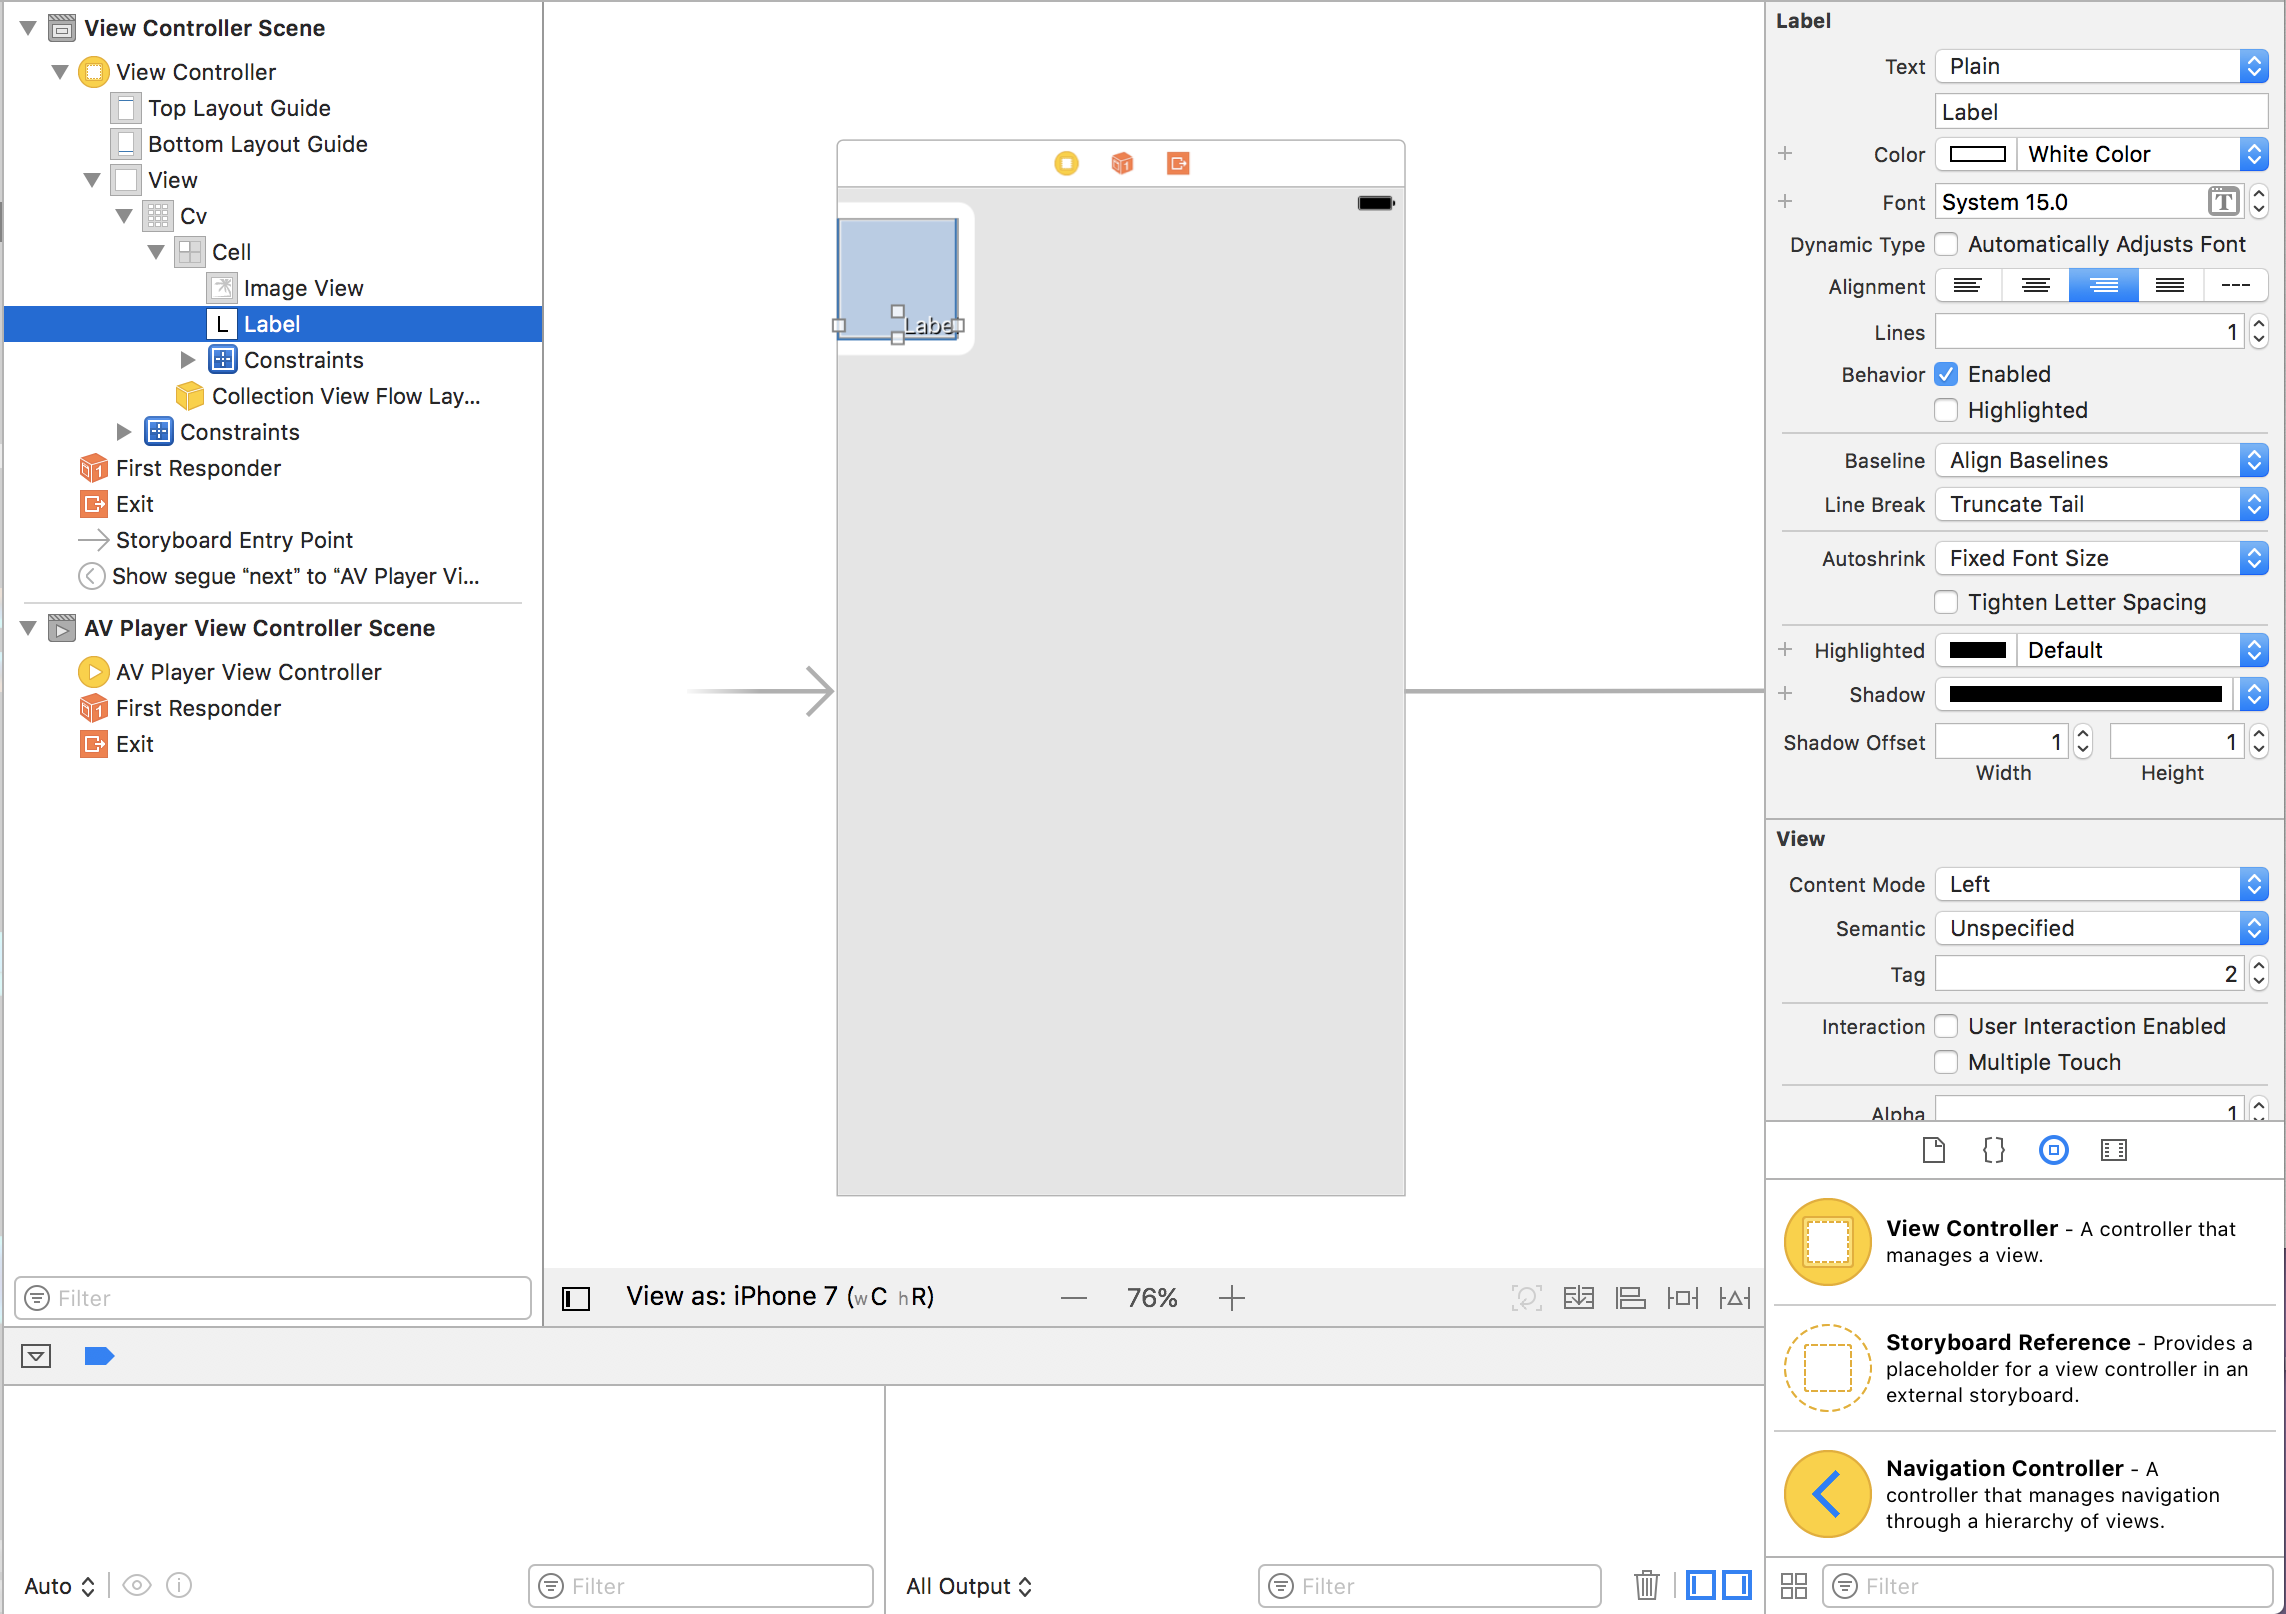
UIImageViewのTagに1、UILabelのTagに2を設定。
↓コレクションビューを右クリックして、delegateとdataSourceをselfに設定(オレンジまでドラッグ)。
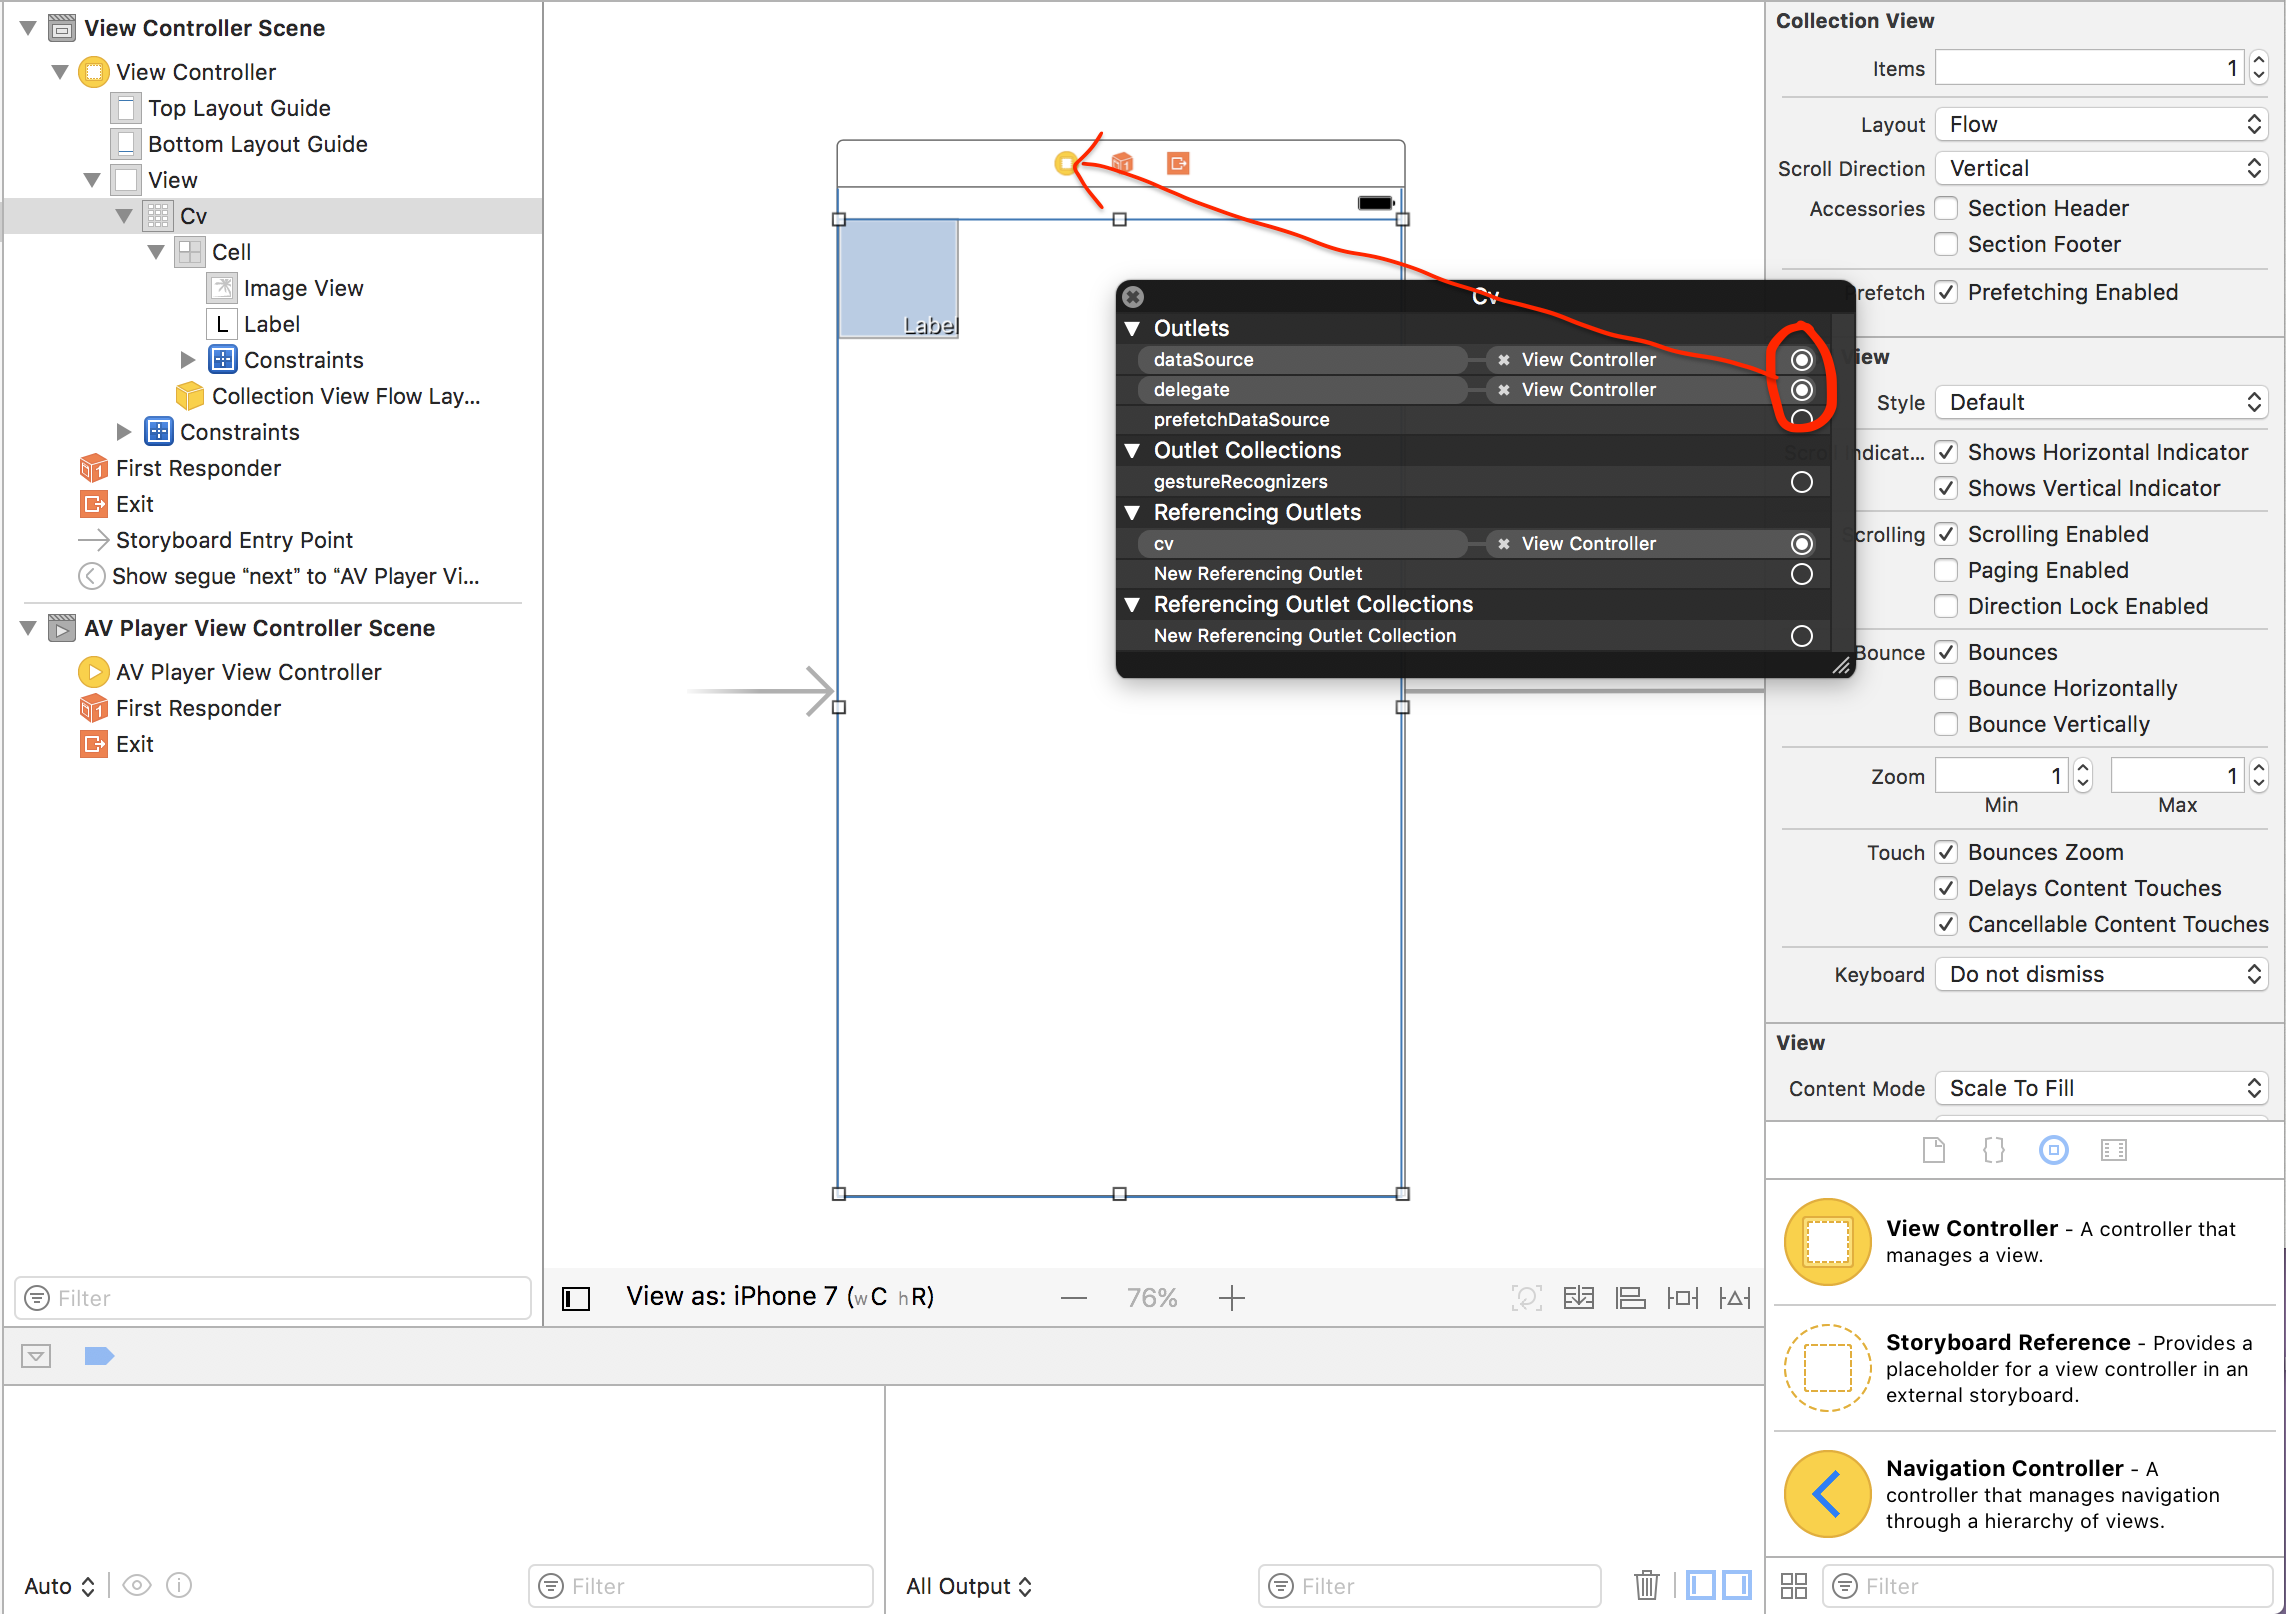
↓Outletを繋ぎ、コレクションビューのプロトコルを継承。
class ViewController: UIViewController,UICollectionViewDelegate,UICollectionViewDataSource {

    @IBOutlet weak var cv: UICollectionView!

    override func viewDidLoad() {
        super.viewDidLoad()
        // Do any additional setup after loading the view, typically from a nib.

    }
}
これで準備は完了。
◆Photosフレームワークを使う
インポートする。
import UIKit
import Photos
コレクションビューの必須項目を実装。
class ViewController: UIViewController,UICollectionViewDelegate,UICollectionViewDataSource {

    @IBOutlet weak var cv: UICollectionView!

    //配列を用意
    var videos:NSMutableArray!

    override func viewDidLoad() {
        super.viewDidLoad()
        // Do any additional setup after loading the view, typically from a nib.

    }
}
//要素数
    func collectionView(_ collectionView: UICollectionView, numberOfItemsInSection section: Int) -> Int {
        return self.videos.count
    }

//表示内容
    func collectionView(_ collectionView: UICollectionView, cellForItemAt indexPath: IndexPath) -> UICollectionViewCell {
        let cell:UICollectionViewCell = self.cv.dequeueReusableCell(withReuseIdentifier: "Cell", for: indexPath)
        //配列から動画を取得
        let item:AVPlayerItem = self.videos.object(at: indexPath.row) as! AVPlayerItem
       //動画から画像を切り出し
        let asset1:AVAsset = item.asset
        let gene = AVAssetImageGenerator(asset:asset1)
        gene.maximumSize = CGSize(width:self.view.frame.size.width/4, height:self.view.frame.size.width/4)
        let capImg = try! gene.copyCGImage(at: asset1.duration, actualTime: nil)

        //切り出した画像をイメージビューで表示
        let img:UIImageView = cell.viewWithTag(1) as! UIImageView
        img.image = UIImage.init(cgImage: capImg)

        //動画の尺をラベルに表示
        let lab:UILabel = cell.viewWithTag(2) as! UILabel
        let sec:Float64 = asset1.duration.seconds
        let sec2:Int = Int(sec)
        lab.text = String(format:"%02d:%02d",sec2/60,sec2%60)
        return cell

    }
動画取得を実装。
まずはiOS10からのお約束を守るべく、info.plistにPrivacyを追加。
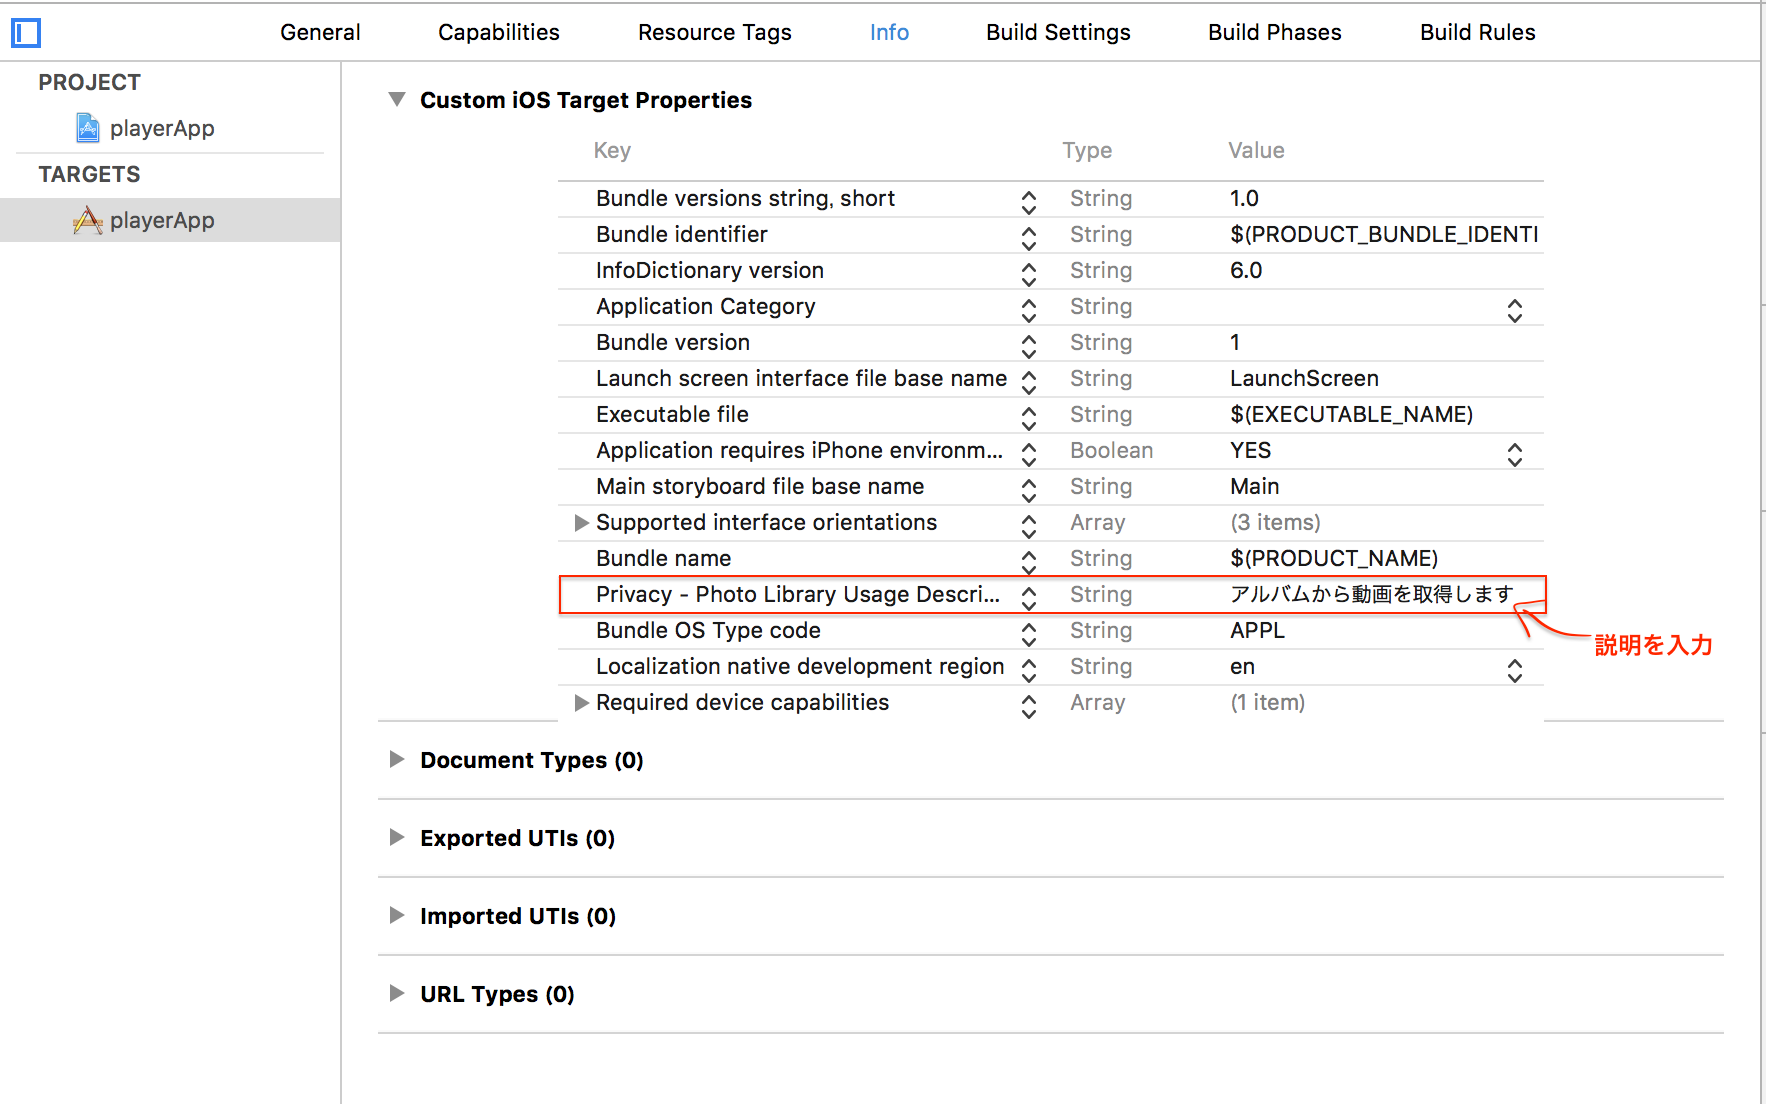
Privacy - Photo Library Usage Descriptionを追加します。
んで以下実装。
    @IBOutlet weak var cv: UICollectionView!

    //変数を定義
    var videos:NSMutableArray?
    var phmov:PHImageManager!
    var movie:AVPlayerItem!
    var status = PHPhotoLibrary.authorizationStatus(){
        //カメラロールへのアクセスが許可されたら読み込む
        didSet{
            if status == .authorized{
                loadVideos()
            }
        }
    }


    override func viewDidLoad() {
        super.viewDidLoad()
        // Do any additional setup after loading the view, typically from a nib.

        //諸々を初期化
        videos = NSMutableArray()
        self.phmov = PHImageManager()

        switch self.status {
        //アクセス許可済みならロード
        case .authorized:
            self.loadVideos()
            break

        //初回起動用。ダイアログを閉じた後にステータスを変数に代入するメソッドを呼ぶ
        default:
            let nc = NotificationCenter.default
            nc.addObserver(self, selector: #selector(ViewController.checkState), name: .UIApplicationDidBecomeActive, object: nil)
            break

        }

    }

    //ここでステータスを変数に代入
    func checkState(){
        self.status = PHPhotoLibrary.authorizationStatus()
    }

    //カメラロールから動画を読み込む
    func loadVideos() {
        //ロード中がわかるようにインジケータを表示
        let ai = UIActivityIndicatorView.init(activityIndicatorStyle: UIActivityIndicatorViewStyle.whiteLarge)
        ai.frame = CGRect(x: 0, y: 0, width: 100, height: 100)
        ai.center = self.view.center
        ai.backgroundColor = UIColor.black
        ai.hidesWhenStopped = true
        self.view.addSubview(ai)
        ai.startAnimating()

        //メディアタイプをビデオに絞って取得
        let assets:PHFetchResult = PHAsset.fetchAssets(with: PHAssetMediaType.video, options: nil)
        //取得したアセットを変換
        assets.enumerateObjects({(obj, index, stop) -> Void in
            //PHImageManagerを使ってplayerItemに
            self.phmov.requestPlayerItem(forVideo: assets[index], options: nil, resultHandler: {(playerItem, info) -> Void in
                //配列に追加
                self.videos!.add(playerItem!)

                //最後の処理が終わったらメインスレッドでコレクションビューをリロード
                if index == assets.count-1{
                    DispatchQueue.main.async {
                        self.cv.reloadData()
                        //インジケータ消す
                        ai.stopAnimating()
                        ai.removeFromSuperview()
                    }
                }
            })
        })

    }
これで一応目的は達成できました。
アプリにするときは冒頭のswitch文で他のステータスの時に設定変更を促したり、コレクションビューのfunc collectionView(_ collectionView: UICollectionView, didSelectItemAt indexPath: IndexPath)でindexPath.rowを使って配列からplayerItemを取り出して、好きに愛でる事ができます。
let movie = self.videos.object(at: indexPath.row) as! AVPlayerItem
とすれば扱いやすいと思います。
◆ViewController全貌
一応、コード全体を載せておきます。
import UIKit
import Photos

class ViewController: UIViewController,UICollectionViewDelegate,UICollectionViewDataSource {

    @IBOutlet weak var cv: UICollectionView!

    //変数を定義
    var videos:NSMutableArray?
    var phmov:PHImageManager!
    var status = PHPhotoLibrary.authorizationStatus(){
        //カメラロールへのアクセスが許可されたら読み込む
        didSet{
            if status == .authorized{
                loadVideos()
            }
        }
    }


    override func viewDidLoad() {
        super.viewDidLoad()
        // Do any additional setup after loading the view, typically from a nib.

        //諸々を初期化
        videos = NSMutableArray()
        self.phmov = PHImageManager()

        switch self.status {
        //アクセスが許可済みならロード
        case .authorized:
            self.loadVideos()
            break

        //初回起動用。ダイアログを閉じた後にステータスを変数に代入するメソッドを呼ぶ
        default:
            let nc = NotificationCenter.default
            nc.addObserver(self, selector: #selector(ViewController.checkState), name: .UIApplicationDidBecomeActive, object: nil)
            break

        }

    }

    //ここでステータスを変数に代入
    func checkState(){
        self.status = PHPhotoLibrary.authorizationStatus()
    }

    //カメラロールから動画を読み込む
    func loadVideos() {
        //ロード中がわかるようにインジケータを表示
        let ai = UIActivityIndicatorView.init(activityIndicatorStyle: UIActivityIndicatorViewStyle.whiteLarge)
        ai.frame = CGRect(x: 0, y: 0, width: 100, height: 100)
        ai.center = self.view.center
        ai.backgroundColor = UIColor.black
        ai.hidesWhenStopped = true
        self.view.addSubview(ai)
        ai.startAnimating()

        //メディアタイプをビデオに絞って取得
        let assets:PHFetchResult = PHAsset.fetchAssets(with: PHAssetMediaType.video, options: nil)
        //取得したアセットを変換
        assets.enumerateObjects({(obj, index, stop) -> Void in
            //PHImageManagerを使ってplayerItemに
            self.phmov.requestPlayerItem(forVideo: assets[index], options: nil, resultHandler: {(playerItem, info) -> Void in
                //配列に追加
                self.videos!.add(playerItem!)

                //最後の処理が終わったらメインスレッドでコレクションビューをリロード
                if index == assets.count-1{
                    DispatchQueue.main.async {
                        self.cv.reloadData()
                        //インジケータ消す
                        ai.stopAnimating()
                        ai.removeFromSuperview()
                    }
                }
            })
        })

    }

//要素の数
    func collectionView(_ collectionView: UICollectionView, numberOfItemsInSection section: Int) -> Int {
        return self.videos!.count
    }

//表示内容
    func collectionView(_ collectionView: UICollectionView, cellForItemAt indexPath: IndexPath) -> UICollectionViewCell {
        let cell:UICollectionViewCell = self.cv.dequeueReusableCell(withReuseIdentifier: "Cell", for: indexPath)

        let item:AVPlayerItem = self.videos!.object(at: indexPath.row) as! AVPlayerItem
        let asset1:AVAsset = item.asset
        let gene = AVAssetImageGenerator(asset:asset1)
        gene.maximumSize = CGSize(width:self.view.frame.size.width/4, height:self.view.frame.size.width/4)
        let capImg = try! gene.copyCGImage(at: asset1.duration, actualTime: nil)

        let img:UIImageView = cell.viewWithTag(1) as! UIImageView
        img.image = UIImage.init(cgImage: capImg)

        let lab:UILabel = cell.viewWithTag(2) as! UILabel
        let sec:Float64 = asset1.duration.seconds
        let sec2:Int = Int(sec)
        lab.text = String(format:"%02d:%02d",sec2/60,sec2%60)
        return cell

    }

    override func didReceiveMemoryWarning() {
        super.didReceiveMemoryWarning()
        // Dispose of any resources that can be recreated.
    }

}
おわりに
「いやいや、こっちの方がスマートでしょ。」とか、「そんな事したらやばくね?」などございましたら是非ご教授お願いします!
僕に理解できるかわかりませんが。。。
2019/8/28追記
コメント欄にて、Swift5に対応したコードを共有して頂きました!
上記のコードのイケてない部分も修正いただいているので、こちらをご参考されると良いと思います。
ありがとうございます!
一部、コード改変して、キレイに書き直してみました。Swift5 に対応してます。
ViewController
https://github.com/osmszk/MovieThumbnail/blob/master/MovieThumbnail/ThumbnailViewController.swift
カスタムセル
https://github.com/osmszk/MovieThumbnail/blob/master/MovieThumbnail/ThumbnailCell
それと、久しぶりにこの記事のコードを見返して気づいたのですが、インジケータを毎回addSubviewすると二重表示になって消えない事になり得るので、1つを使い回したほうが良いと思います。
あとクロージャ内のselfはweakでキャプチャするなどメモリリークしないようにしましょう。