はじめに
Nextcloudは、自前のサーバを使って手軽にセキュアなファイル共有環境を実現できるオンラインストレージです。
先日、Nextcloud18.0.4をCentOS7にインストールしてお手軽に体験してみる の記事で、最低限Nextcloudを動作させる環境構築手順をご紹介いたしましたが、今回は、通常運用するのにも十分なようにデータベースとインメモリキャッシュサーバを追加してインストールする手順となります。
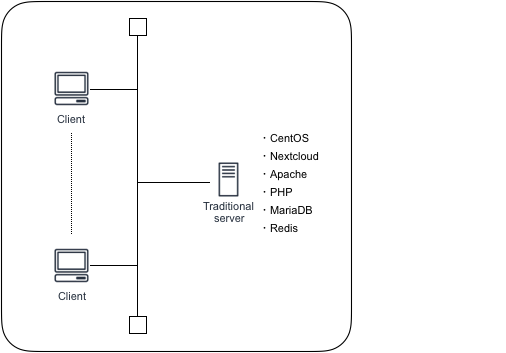
今回構築する環境
構成イメージ
こんな感じで、いたってシンプルです。まずはインターネットに出ない環境で試してみます。
利用するOS、ミドルウェア
サーバOS(CentOS)
今回はCentOS7を利用します。VirtualBoxやVagrantなどで準備いただいても問題ありません。
ここで展開している手順の環境は以下のとおりです。
$ cat /etc/redhat-release
CentOS Linux release 7.7.1908 (Core)
$ uname -a
Linux localhost.localdomain 3.10.0-957.el7.x86_64 #1 SMP Thu Nov 8 23:39:32 UTC 2018 x86_64 x86_64 x86_64 GNU/Linux
Nextcloud本体
もちろんこれがないとNextcloudが使えません。
Nextcloudのバージョンはいろいろありますが、2020/4/27時点の最新版である 18.0.4 を使います。
Webサーバ(Apache)
NextcloudはWebベースで動作しますので、Webサーバが動作する環境が必要です。今回はApacheを使います。
ここで展開している手順でのApacheのバージョンは以下のとおりです。
$ httpd -v
Server version: Apache/2.4.6 (CentOS)
Server built:   Aug  8 2019 11:41:18
PHP
NextcloudはPHPで動作します。
ここで展開している手順でのPHPのバージョンは以下のとおりです。
$ php -v
PHP 7.4.5 (cli) (built: Apr 14 2020 12:54:33) ( NTS )
Copyright (c) The PHP Group
Zend Engine v3.4.0, Copyright (c) Zend Technologies
    with Zend OPcache v7.4.5, Copyright (c), by Zend Technologies
データベース(MariaDB)
Nextcloudではデータベースを利用します。本格的な運用ではMariaDB/MySQLといったデータベースを利用することが推奨されます。今回はMariaDBを利用します。
ここで展開している手順でのMariaDBのバージョンは以下のとおりです。
$ mysql --version
mysql  Ver 15.1 Distrib 10.4.12-MariaDB, for Linux (x86_64) using readline 5.1
インメモリキャッシュサーバ(Redis)
Nextcloudではセッションを管理したりファイルのロック管理をしたりしておりますが、このデータ管理にインメモリキャッシュサーバを使うことによりパフォーマンス向上が期待できます。今回はRedisを利用します。
ここで展開している手順でのRedisのバージョンは以下のとおりです。
$ redis-server --version
Redis server v=5.0.9 sha=00000000:0 malloc=jemalloc-5.1.0 bits=64 build=b8fc6671bdb40404
構築手順
ほぼほぼNextcloud公式ドキュメントにのっている内容です。これに基づいて進めていきます。
①インストール作業に必要なパッケージをインストールします。
sudo yum install -y epel-release yum-utils unzip curl wget bash-completion bzip2
②システムを最新状態にアップデートします。
sudo yum update -y
③Webサーバ(Apache)をインストールします。
sudo yum install -y httpd
④Apacheの追加設定ファイルを作成します。
sudo vi /etc/httpd/conf.d/nextcloud.conf
※内容※
<VirtualHost *:80>
  DocumentRoot /var/www/html/
  ServerName  (サーバのIPアドレス)

<Directory "/var/www/html/">
  Require all granted
  AllowOverride All
  Options FollowSymLinks MultiViews
</Directory>
</VirtualHost>
⑤Apacheを自動起動するように設定し、Apacheを起動します。
sudo systemctl enable httpd.service
sudo systemctl start httpd.service
⑥Nextcloudの動作に必要なPHPモジュールをインストールします。
sudo yum install http://rpms.famillecollet.com/enterprise/remi-release-7.rpm -y

sudo yum install --enablerepo=remi,remi-php74 php php-fpm php-cli php-common php-curl php-gd php-mbstring php-mysqlnd php-process php-xml php-opcache php-pecl-apcu php-intl php-pecl-redis php-pecl-zip php-pear -y
⑦Nextcloudパッケージ本体とチェックサムファイル(Nextcloudパッケージ本体が正しくダウンロードされているかをチェックするためのファイル)をダウンロードします。
wget https://download.nextcloud.com/server/releases/nextcloud-18.0.4.tar.bz2

wget https://download.nextcloud.com/server/releases/nextcloud-18.0.4.tar.bz2.md5
⑧チェックサムファイルを利用してNextcloudパッケージが正しくダウンロードされているか確認します。
md5sum -c nextcloud-18.0.4.tar.bz2.md5 < nextcloud-18.0.4.tar.bz2
※nextcloud-18.0.4.tar.bz2: OK または nextcloud-18.0.4.tar.bz2: 完了 と表示されれば OK です
⑨ダウンロードしたNextcloudパッケージを展開します。
tar xf nextcloud-18.0.4.tar.bz2
⑩展開したNextcloudをWebサーバのドキュメントルートにコピーします。
sudo cp -R nextcloud/ /var/www/html/
⑪Nextcloudのデータディレクトリを作成します。
sudo mkdir /var/www/html/nextcloud/data
⑫Nextcloudのディレクトリ全体で読み書きができるように所有者情報を変更します。
sudo chown -R apache:apache /var/www/html/nextcloud
⑬Apacheを再起動します。
sudo systemctl restart httpd.service
⑭データベース(MariaDB)をインストールします。
curl -sS https://downloads.mariadb.com/MariaDB/mariadb_repo_setup | sudo bash

sudo yum install MariaDB-server MariaDB-client -y
⑮MariaDBを自動起動するように設定し、MariaDBを起動します。
sudo systemctl enable mariadb.service

sudo systemctl start mariadb.service
⑯MariaDBの基本セットアップを行います。いくつか質問されますが New password: 、Re-enter new password:で rootユーザのパスワードを設定する以外は全て[Enter]キーを押しておきます。
sudo mysql_secure_installation
※実行例※
NOTE: RUNNING ALL PARTS OF THIS SCRIPT IS RECOMMENDED FOR ALL MariaDB
      SERVERS IN PRODUCTION USE!  PLEASE READ EACH STEP CAREFULLY!

In order to log into MariaDB to secure it, we'll need the current
password for the root user. If you've just installed MariaDB, and
haven't set the root password yet, you should just press enter here.

Enter current password for root (enter for none):
OK, successfully used password, moving on...

Setting the root password or using the unix_socket ensures that nobody
can log into the MariaDB root user without the proper authorisation.

You already have your root account protected, so you can safely answer 'n'.

Switch to unix_socket authentication [Y/n]
Enabled successfully!
Reloading privilege tables..
 ... Success!


You already have your root account protected, so you can safely answer 'n'.

Change the root password? [Y/n]
New password:
Re-enter new password:
Password updated successfully!
Reloading privilege tables..
 ... Success!
#
# These groups are read by MariaDB server.
# Use it for options that only the server (but not clients) should see
#
      5 # See the examples of server my.cnf files in /usr/share/mysql/


By default, a MariaDB installation has an anonymous user, allowing anyone
to log into MariaDB without having to have a user account created for
them.  This is intended only for testing, and to make the installation
go a bit smoother.  You should remove them before moving into a
production environment.

Remove anonymous users? [Y/n]
 ... Success!

Normally, root should only be allowed to connect from 'localhost'.  This
ensures that someone cannot guess at the root password from the network.

Disallow root login remotely? [Y/n]
 ... Success!

By default, MariaDB comes with a database named 'test' that anyone can
access.  This is also intended only for testing, and should be removed
before moving into a production environment.

Remove test database and access to it? [Y/n]
 - Dropping test database...
 ... Success!
 - Removing privileges on test database...
 ... Success!

Reloading the privilege tables will ensure that all changes made so far
will take effect immediately.

Reload privilege tables now? [Y/n]
 ... Success!

Cleaning up...

All done!  If you've completed all of the above steps, your MariaDB
installation should now be secure.

Thanks for using MariaDB!
⑰MariaDBで扱う文字コードの設定をするため、MariaDB設定ファイルを編集します。
sudo cp -pi /etc/my.cnf.d/server.cnf{,.orig}

sudo vi /etc/my.cnf.d/server.cnf
※修正箇所※ [mariadb] 行の下の4行を追加します。
$ cat /etc/my.cnf.d/server.cnf
#
# These groups are read by MariaDB server.
# Use it for options that only the server (but not clients) should see
#
# See the examples of server my.cnf files in /usr/share/mysql/
#

# this is read by the standalone daemon and embedded servers
[server]

# this is only for the mysqld standalone daemon
[mysqld]

#
# * Galera-related settings
#
[galera]
# Mandatory settings
# wsrep_on=ON
# wsrep_provider=
# wsrep_cluster_address=
# binlog_format=row
# default_storage_engine=InnoDB
# innodb_autoinc_lock_mode=2
#
# Allow server to accept connections on all interfaces.
#
# bind-address=0.0.0.0
#
# Optional setting
# wsrep_slave_threads=1
# innodb_flush_log_at_trx_commit=0

# this is only for embedded server
[embedded]

# This group is only read by MariaDB servers, not by MySQL.
# If you use the same .cnf file for MySQL and MariaDB,
# you can put MariaDB-only options here
[mariadb]
character-set-server = utf8mb4

[client-mariadb]
default-character-set = utf8mb4

# This group is only read by MariaDB-10.4 servers.
# If you use the same .cnf file for MariaDB of different versions,
# use this group for options that older servers don't understand
[mariadb-10.4]
⑱設定を反映させるためにMariaDBを再起動します。
sudo systemctl restart mariadb
⑲MariaDBコンソールに接続し、文字コードの設定がutf8mb4になっていることを確認します。
sudo mysql -u root -p
show variables like "chara%";
※下のように表示されることを確認します。
+--------------------------+----------------------------+
| Variable_name            | Value                      |
+--------------------------+----------------------------+
| character_set_client     | utf8mb4                    |
| character_set_connection | utf8mb4                    |
| character_set_database   | utf8mb4                    |
| character_set_filesystem | binary                     |
| character_set_results    | utf8mb4                    |
| character_set_server     | utf8mb4                    |
| character_set_system     | utf8                       |
| character_sets_dir       | /usr/share/mysql/charsets/ |
+--------------------------+----------------------------+
8 rows in set (0.00 sec)
⑳MariaDBコンソールを使い、引き続きNextcloudで使用するユーザ、データベース、権限の追加をします。ここではそれぞれ以下のとおり設定します。
- ユーザ: nextcloud
- データベース名: nextcloud
CREATE DATABASE nextcloud DEFAULT CHARACTER SET utf8mb4;

CREATE USER 'nextcloud'@'localhost' IDENTIFIED BY '[nextcloudユーザに対して設定したいパスワード]';

GRANT ALL ON nextcloud.* TO "nextcloud"@"localhost";

SHOW GRANTS FOR 'nextcloud'@'localhost';
※SHOW GRANTS~ の実行結果
+------------------------------------------------------------------------------------------------------------------+
| Grants for nextcloud@localhost                                                                                   |
+------------------------------------------------------------------------------------------------------------------+
| GRANT USAGE ON *.* TO 'nextcloud'@'localhost' IDENTIFIED BY PASSWORD 'xxxxxxxxxxxxxxxxxxxxxxxxxxxxxxxxxxxxxxxxx' |
| GRANT ALL PRIVILEGES ON `nextcloud`.* TO 'nextcloud'@'localhost'                                                 |
+------------------------------------------------------------------------------------------------------------------+
㉑MariaDB コンソールを抜けます。
quit;
㉒このサーバーに外部から http でアクセスできるようにファイアウォール等の設定を行います。
sudo setenforce 0

sudo sed -i s/SELINUX=enforcing/SELINUX=disabled/ /etc/selinux/config

sudo firewall-cmd --permanent --zone public --add-service http

sudo firewall-cmd --reload
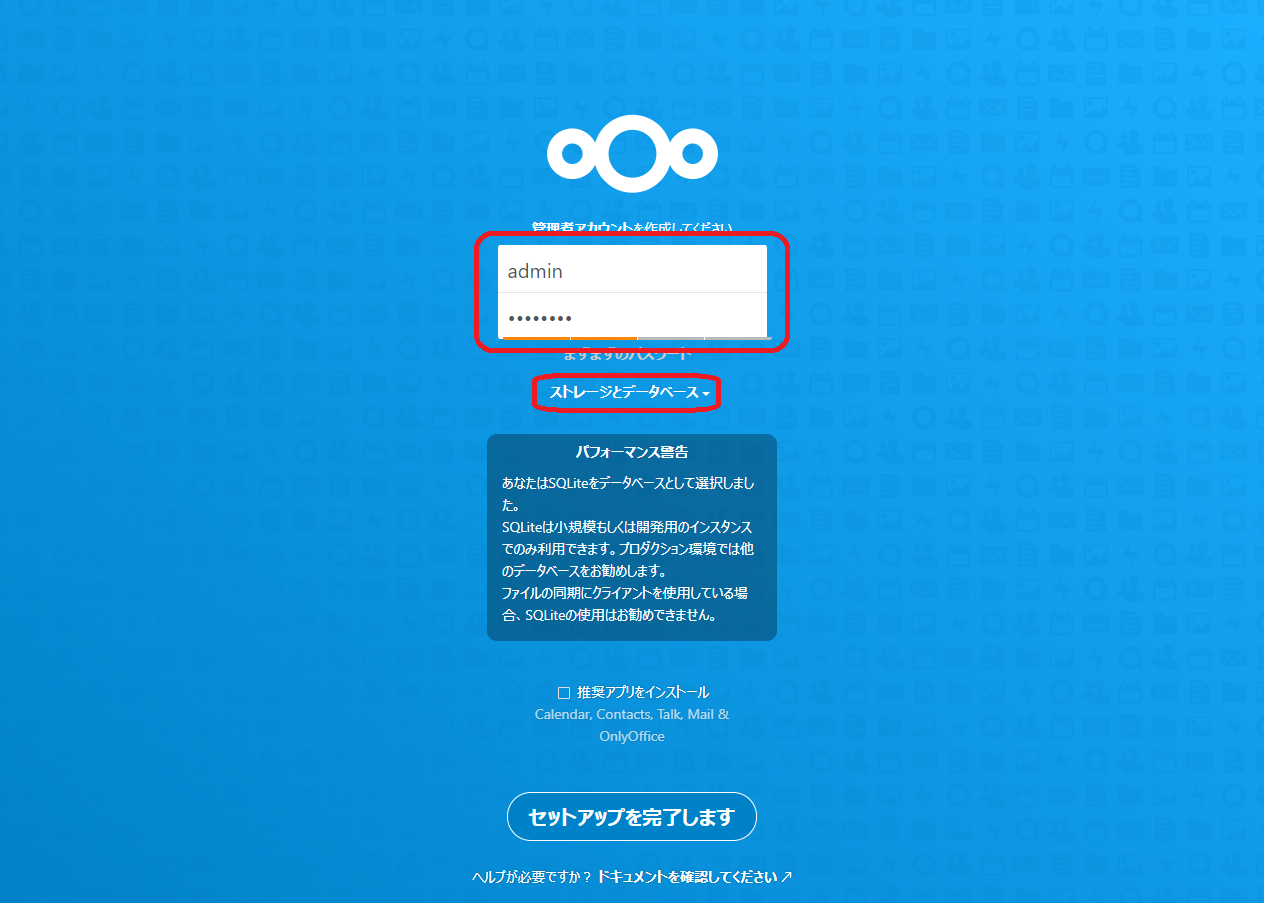
㉓ブラウザで http://(サーバのIPアドレス)/nextcloud にアクセスします。下のような画面が出ればOKです。この画面で初期ユーザー名、パスワードを決めて入力します。さらに「ストレージとデータベース」をクリックします。
㉔さらに「MySQL/MariaDB」をクリックします。
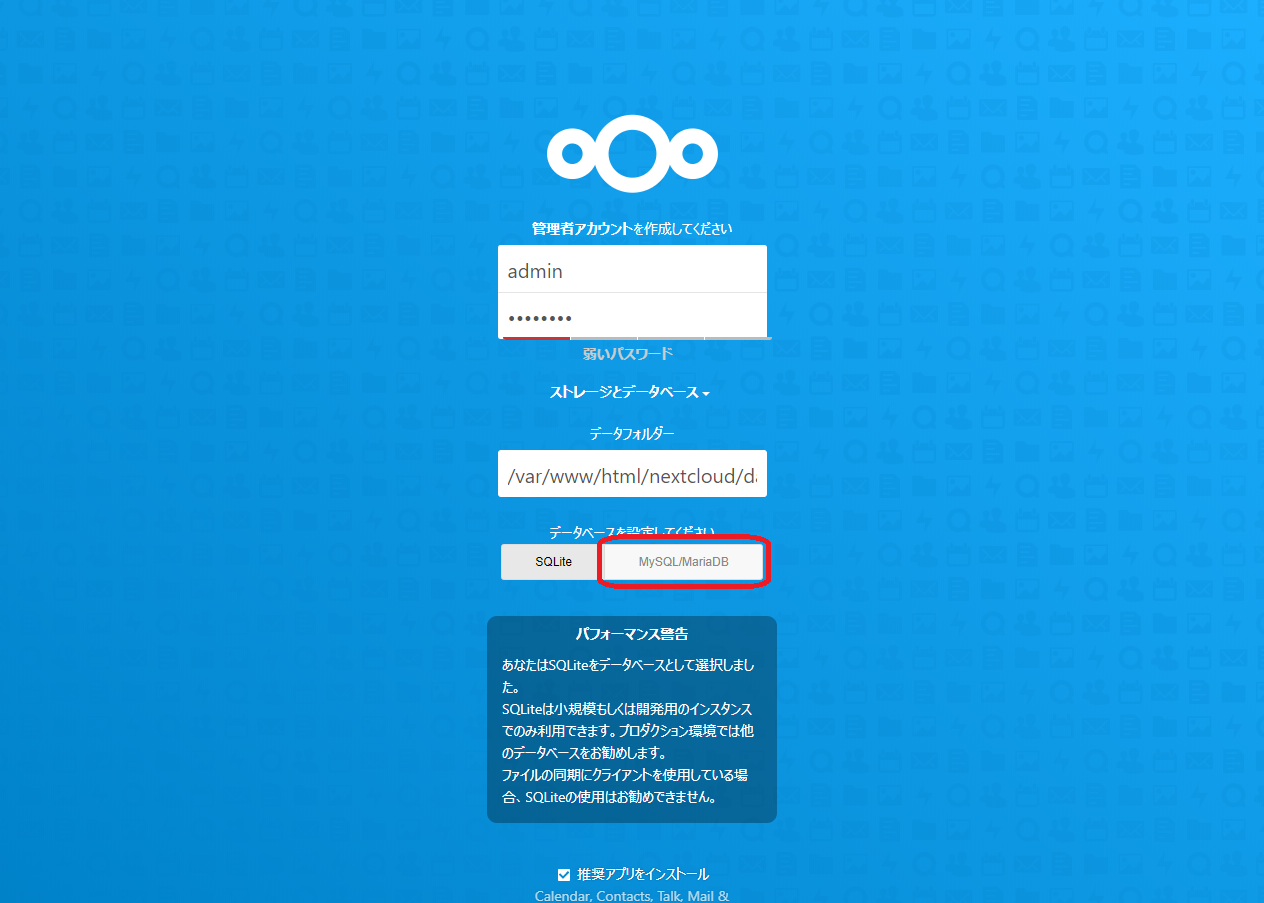
㉕Nextcloudの管理者向けのユーザー名、パスワードを決めて入力します。さらに、「データベースを設定してください」で「MySQL/MariaDB」をクリックするとデータベース関連の設定入力フォームが現れるので、以下のとおり設定値を入力します。
- データベースのユーザ名: <MariaDBに作成したユーザ>
- データベースのパスワード: <MariaDBに作成したユーザに対するパスワード>
- データベース名: <MariaDBに作成したデータベース名>
- データベースのホスト名: localhost:3306

終わったら「推奨アプリをインストール」のチェックを外し、「セットアップを完了します」をクリックします。
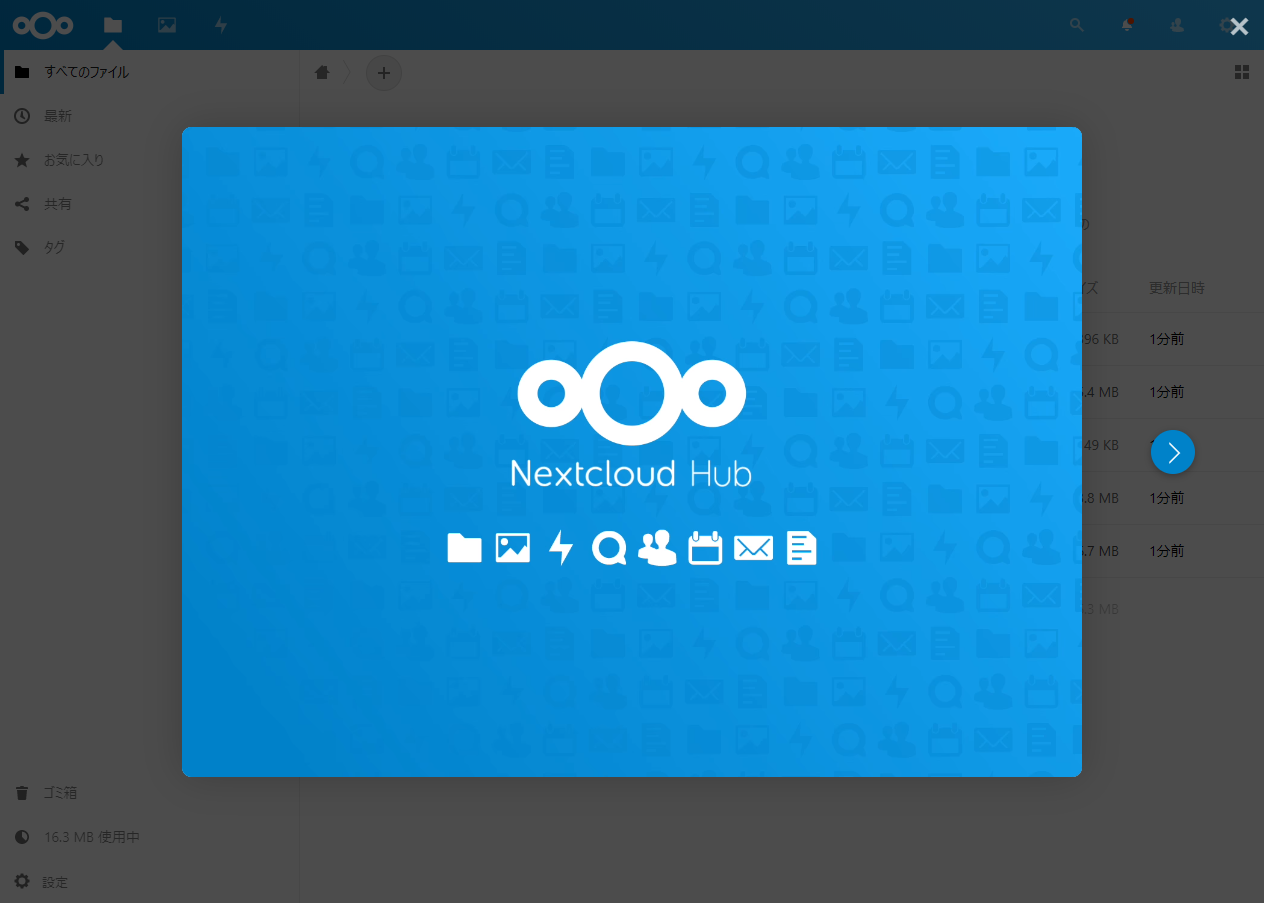
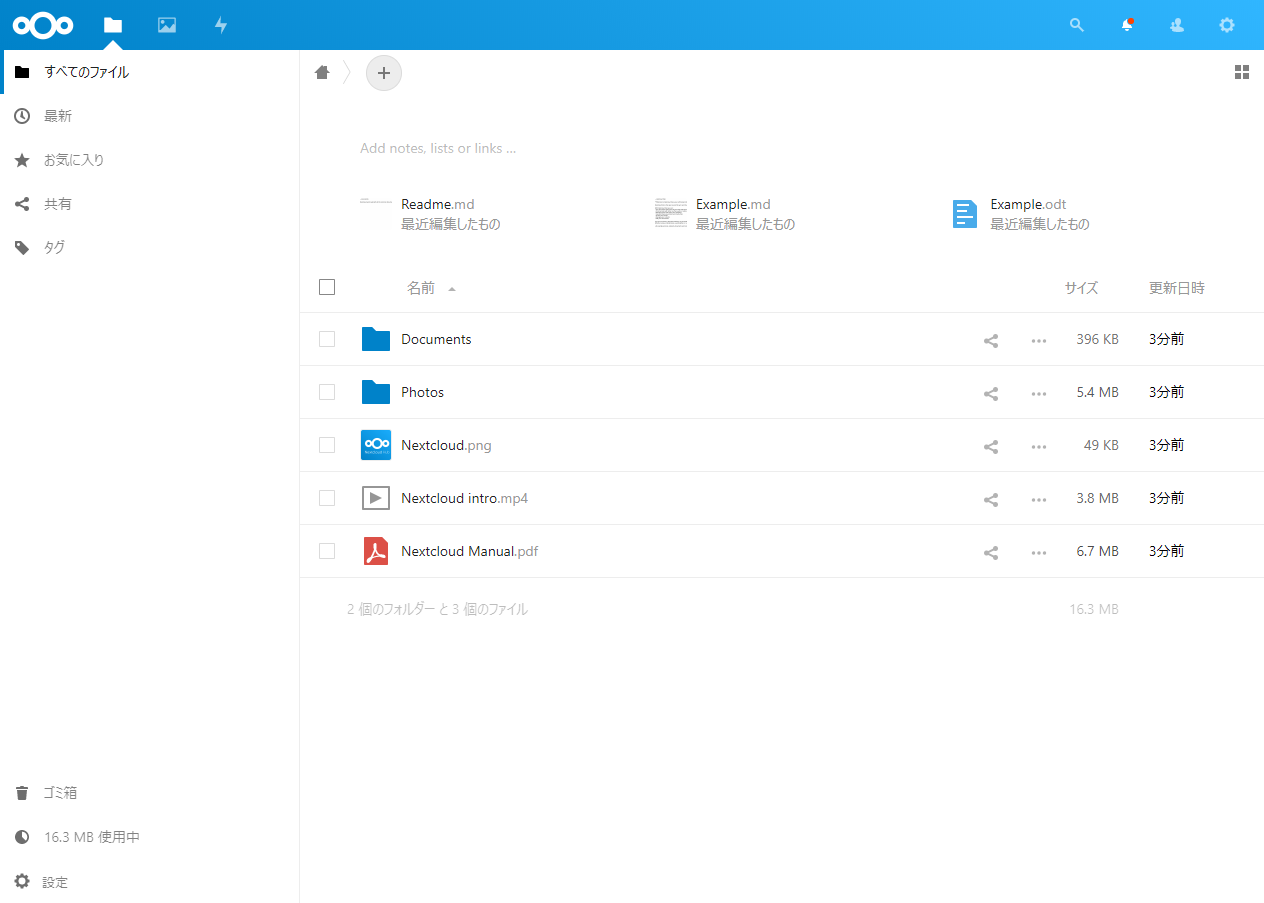
㉖データベースに必要なテーブルなどが自動作成され、このような画面が表示され、Nextcloudが動作します。
㉗データベースにテーブルができていることを確認します。これでデータベース周りの設定は終わりです。
sudo mysql -u nextcloud -p nextcloud
SHOW TABLES;
※SHOW TABLES; の実行結果
+-----------------------------+
| Tables_in_nextcloud         |
+-----------------------------+
| oc_accounts                 |
| oc_activity                 |
| oc_activity_mq              |

~~~ (中略) ~~~

| oc_vcategory                |
| oc_vcategory_to_object      |
| oc_whats_new                |
+-----------------------------+
㉘MariaDB コンソールを抜けます。
quit;
㉙インメモリキャッシュサーバーのRedisをインストールします。
sudo yum install --enablerepo=remi redis -y
㉚Redisを自動起動するように設定し、Redisを起動します。
sudo systemctl enable redis.service

sudo systemctl start redis.service
㉛NextcloudでRedisを使うようにNexcloud設定ファイルを編集します。
sudo cp -pi /var/www/html/nextcloud/config/config.php{,.orig}

sudo vi /var/www/html/nextcloud/config/config.php
※修正箇所※ memcache.〜行と redis 行を追加します。
$ sudo cat /var/www/html/nextcloud/config/config.php  # 'memcache.〜'行と'redis'行を追加します。
<?php
$CONFIG = array (
  'instanceid' => 'xxxxxxxxxxxx',
  'passwordsalt' => 'xxxxxxxxxxxxxxxxxxxxxxxxxxxxxx',
  'secret' => 'xxxxxxxxxxxxxxxxxxxxxxxxxxxxxxxxxxxxxx',
  'trusted_domains' =>
  array (
    0 => '<サーバのIPアドレス>',
  ),
  'datadirectory' => '/var/www/html/nextcloud/data',
  'dbtype' => 'mysql',
  'version' => '18.0.4.0',
  'overwrite.cli.url' => 'http://<サーバのIPアドレス>/nextcloud',
  'dbname' => 'nextcloud',
  'dbhost' => 'localhost:3306',
  'dbport' => '',
  'dbtableprefix' => 'oc_',
  'dbuser' => 'nextcloud',
  'dbpassword' => 'xxxxxxxx',
  'installed' => true,
  'memcache.distributed' => '\\OC\\Memcache\\Redis',
  'memcache.locking' => '\\OC\\Memcache\\Redis',
  'memcache.local' => '\\OC\\Memcache\\APCu',
  'redis' =>
  array (
    'host' => 'localhost',
    'port' => 6379,
  ),
);
㉜Apacheを再起動します。
sudo systemctl restart httpd.service
㉝NextcloudでRedisが利用されているかどうかを確認するため、Redisのモニタリング機能を起動します。
redis-cli monitor
㉞この状態でNextcloudをログインするなど適当に触ってみます。この時に次のようにアクセスログが出力されればRedisが正しく設定されています。
・・・
1587956310.804419 [0 127.0.0.1:47168] "GET" "8924842f75705fec205fcdd0f54c05dd/JS-4d3c1191d80cb633e342867f6cc7d180files-merged-index.js.deps"
1587956310.804658 [0 127.0.0.1:47168] "EXISTS" "8924842f75705fec205fcdd0f54c05dd/JS-4d3c1191d80cb633e342867f6cc7d180files-merged-index.js.deps"
1587956310.811691 [0 127.0.0.1:47168] "GET" "8924842f75705fec205fcdd0f54c05dd/JS-4d3c1191d80cb633e342867f6cc7d180activity-activity-sidebar.js.deps"
・・・
あとがき
Nextcloudはサーバー1つあれば気軽に試せますので、使い勝手とかいろいろ試してみてください。
今後も不定期ですが、いろいろなケースのNextcloudの構築手順を展開してみます。
更新履歴
- 2019/2/10: 初版。
- 2020/4/27: CentOS7 + Apache2.4 + PHP7.4 + MariaDB10.4 + Redis5 + Nextcloud 18 の環境に即した修正、他こまごま修正。