こんにちは。
ソニーセミコンダクタソリューションズの高橋です。
はじめに
ジム、流行っていますね ![]()
マッチョになることは素晴らしいですが、不慮の事故や体調不良には気をつけていきたいものです。
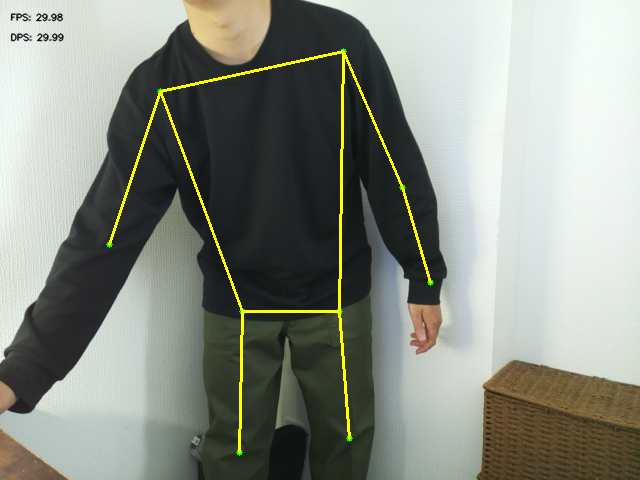
本記事では、Raspberry Pi 向けのエッジAIカメラモジュール「Raspberry Pi AI Camera」を使って、ジムでの体調不良者 (=トレーニングマシンの近くで動かなくなっている人) を検知するアプリを作ってみます。

※緑枠が検知対象エリアを示しています
手順
事前準備
必要な機材を用意します。
- Raspberry Pi 一式
- Raspberry Pi 本体 (本記事では Raspberry Pi 5 を使用して動作確認をしています)
- Raspberry Pi OS (64-bit) がインストールされた microSD カード
- ACアダプタ
- Raspberry Pi AI Camera (リンク)
- (Raspberry Pi をモニタに接続して操作したい場合) モニタ、キーボード、マウス、HDMIケーブル
Raspberry Pi AI Camera のセットアップ
Raspberry Pi AI Camera のセットアップ手順は、過去のQiita記事にて紹介したものと同じです!
こちらを参照してください。
Application Module Library のインストール
Raspberry Pi AI Camera 用の SDK である Application Module Library のインストールも、過去のQiita記事と同様に完了できます!
こちらを参照してください。
ここまで完了したら、同じく Application Module Library のリポジトリにて提供されているサンプルスクリプトを下記のように実行してみましょう。
# Application Module Library (modlib) がインストールされた仮想環境をアクティベートしておく
cd aitrios-rpi-application-module-library
python3 examples/aicam/posenet.py
ウィンドウが立ち上がり、骨格検出の結果が正しく表示されれば環境準備はオーケーです!
実際に体調不良者検出アプリを作る
この章でご紹介するアプリの完全なコードは GitHub にて公開しています。
実装の詳細や、アプリの構成はそちらを参照してください。
ジムにおける「体調不良者」の定義
本アプリでは、下記の条件を満たす人をジムにおける「体調不良者」とみなすことにしました。
- 一定時間以上、手足の動きがないこと
- 身体の中心位置だけではトレーニング中か否かの判断ができないので、手足の動きを観察する
- トレーニングマシンの近くにいること
- トレーニングマシンから離れたところで休んでいる人は「体調不良者」に含めない

アプリの実装上の特徴
このアプリの主な特徴は下記になります。それぞれご紹介していきます。
- AIモデルとして Posenet を利用
- 画角の一部を指定してモニタリング
- 簡単な時系列処理
- 処理結果をWebアプリとして可視化
弊社メンバーから、似た特徴を持つ他のアプリの開発事例を発信しています!
こちらもぜひご覧ください!
-
Raspberry Pi AI Cameraで居眠りしている人、見~つけた
- Posenet と簡単な時系列処理を組み合わせて利用
-
Raspberry Pi AI Camera で転倒検知してみた
- HigherHRNet (Posenet に似た骨格推定モデル) を利用
-
Raspberry Pi AI Camera の Workout Monitoring サンプルアプリをアレンジしてバーチャル試着アプリを作る
- 同じく HigherHRNet を利用
1. AIモデルとして Posenet を利用
手足の動きを観察するために、人の骨格を推定する Posenet というモデルを利用します。
次のように記述して、Raspberry Pi AI Camera へモデルを設定します。
# Camera and model initialization function
def initialize_camera():
    device = AiCamera()
    model = Posenet()
    device.deploy(model)
    return device, Annotator()
device, annotator = initialize_camera()
2. 画角の一部を指定してモニタリング
app.py の中に直接モニタリングの対象となるエリアをピクセル単位で指定します。
画面全体のサイズは 640ピクセル × 480ピクセル です。
monitoring_area = {'x': 100, 'y': 100, 'width': 300, 'height': 300}
キーポイント (=Posenet で取得する骨格特徴点) の配列から身体の中心を計算し、それがモニタリング対象のエリアに含まれているか (=人がトレーニングマシンの近くにいるか) を判断します。
# Function to calculate the center point of a person
def get_center_point(keypoints):
    valid_points = [kp for kp in keypoints if kp['x'] > 0.0 and kp['y'] > 0.0]
    if not valid_points:
        return None
    sum_x = sum(kp['x'] for kp in valid_points)
    sum_y = sum(kp['y'] for kp in valid_points)
    return {'x': sum_x / len(valid_points), 'y': sum_y / len(valid_points)}

# Function to check if a point is in the monitoring area
def is_point_in_area(point, area):
    if not point:
        return False
    return (point['x'] >= area['x'] and point['x'] <= area['x'] + area['width'] and
            point['y'] >= area['y'] and point['y'] <= area['y'] + area['height'])
3. 簡単な時系列処理
非常にシンプルな時系列処理として、ある期間 (time window) を定め、その範囲内で最も古いフレームと最新のフレームを比較します。
この処理により、手足が動いているかどうかを判断します。
まず、期間 [秒] 、動作変化量のしきい値、チェック間隔 [秒] を定義しておきます。
motion_settings = {'time_window': 6, 'movement_threshold': 10000, 'check_interval': 1}
定義したチェック間隔ごとに、check_movement() 関数を実行します。
# Periodically check motion
current_time = time.time()
if current_time - person_tracker.last_check_time >= motion_setting['check_interval']:
    check_movement()
    person_tracker.last_check_time = current_time
check_movement() 関数では、 「実際の動作変化量 < 事前に定義した動作変化量のしきい値」となった場合に、アラートのフラグを立てます。
# Function to check motion
def check_movement():
    global person_tracker, alert_active

    # Do not check if no person is in the area
    if not person_tracker.in_area or len(person_tracker.positions) < 2:
        return

    current_time = time.time()

    # Get data within a certain time window
    cutoff_time = current_time - motion_settings['time_window']
    valid_positions = [p for p in person_tracker.positions if p['timestamp'] >= cutoff_time]

    # Check if there is enough data
    if len(valid_positions) >= 2:
        # Calculate the amount of motion
        movement_amount = calculate_movement_specific_keypoints(valid_positions)
        person_tracker.last_movement = movement_amount

        # Trigger alert if below the threshold
        if movement_amount < motion_settings['movement_threshold']:
            alert_active = True
            print("No Motion Detected:", movement_amount, "<", motion_settings['movement_threshold'])
        else:
            # Clear alert if there is enough motion
            alert_active = False
            print("Motion Detected   :", movement_amount, ">", motion_settings['movement_threshold'])
実際の動作変化量は、筋トレ時に頻繁に動かすことが想定される特徴点として、両手首と両ひざのキーポイントに注目して算出してみます。 (用途に応じて他のキーポイントを選択してもいいでしょう。)
両手首・両ひざに相当する ID は、モデルの仕様に従い、下記のように定義されています。
MOTION_CHECK_KEYPOINTS = [9, 10, 13, 14] # leftWrist, rightWrist, leftKnee, rightKnee
両手首・両ひざの中で有効なキーポイントを見つけ、それらのフレーム間の移動量 (ユークリッド距離) の平均を算出して、これを動作変化量とします。
# Function to calculate motion for specific keypoints (both wrists and both knees)
def calculate_movement_specific_keypoints(positions):
    # Get the oldest and newest positions
    oldest = positions[0]
    newest = positions[-1]

    # Get frame size
    w, h = oldest['frame_size']

    total_distance = 0
    valid_keypoint_count = 0

    # Check only specific keypoints (both wrists and both knees)
    for keypoint_idx in MOTION_CHECK_KEYPOINTS:
        # Find corresponding keypoints in the old and new frames
        old_kp = next((kp for kp in oldest['keypoints'] if kp['id'] == keypoint_idx), None)
        new_kp = next((kp for kp in newest['keypoints'] if kp['id'] == keypoint_idx), None)

        # If keypoints are detected in both frames
        if old_kp and new_kp:
            # Convert to pixel coordinates
            x0 = int(old_kp['x'] * w)
            y0 = int(old_kp['y'] * h)
            x1 = int(new_kp['x'] * w)
            y1 = int(new_kp['y'] * h)

            # Calculate squared distance (Euclidean distance squared)
            distance = (x1 - x0)**2 + (y1 - y0)**2

            total_distance += np.sqrt(distance)  # Take square root for actual distance
            valid_keypoint_count += 1

    # Return average distance if there are valid keypoints, otherwise 0
    if valid_keypoint_count > 0:
        return total_distance / valid_keypoint_count
    else:
        return 0
4. 処理結果をWebアプリとしてリアルタイム表示
これまでの処理結果などは、グローバル変数である frame_buffer に格納されています。
この値を MJPEG ストリームとしてブラウザに送信することで、リアルタイムに処理結果を表示します。
def generate_frames():
    global frame_buffer

    while True:
        # Wait until the frame buffer is available
        if frame_buffer is not None:
            with frame_lock:
                yield (b'--frame\r\n'
                       b'Content-Type: image/jpeg\r\n\r\n' + frame_buffer + b'\r\n')

        # Short wait time
        time.sleep(0.03)

# Video stream endpoint
@app.route('/video_feed')
def video_feed():
    return Response(generate_frames(), mimetype='multipart/x-mixed-replace; boundary=frame')
以上が、体調不良者検出アプリの実装上の特徴です。
その他の細部や関連ファイル (Webアプリ向け静的ファイルなど) を含めた全体の実装については GitHub (再掲) にて公開していますので、参照してください。
アプリの実行
作成したアプリは、python3 app.py で実行できます。
その後、ブラウザで http://localhost:5000 にアクセスすると、アプリが表示されます。
困った時は
もし、記事の途中でうまくいかなかった場合は、お気軽にこの記事へコメントいただくか、下記のサポートページをご活用ください。
コメントのお返事にはお時間を頂く可能性もありますがご了承ください。
おわりに
今回は、ジムにおける体調不良者を検出するアプリを作成してみました。
本アプリが持っている特徴 (Posenet を利用した骨格検出、画角の一部を指定、簡単な時系列処理、Webアプリ化) は、他のアプリにも応用しやすいと思います。
ぜひ色々なユースケースを考えて、アプリを作ってみてください!