[[[ Disclaimer ]]]
- This article is an English translation of the articles shown below:
- The images used in this article are mostly taken from the original Japanese articles.
- Please note that the content of these articles is based on information from February 2024, and some details may now be outdated.
- (For example, you need to run a partition changing script to update the firmware with SZP123S-001.)
Please keep this in mind as you read through the article.
As this article consolidates the two-part Japanese article into a single piece, it is lengthy, but includes all necessary information in a centralized location.
Hello! I'm Takahashi from Sony Semiconductor Solutions.
To commemorate the launch of the AITRIOS Qiita Organization, I'm writing an article about trying out AITRIOS and the compatible device SZP123S-001.
What you'll learn
-
How to use AITRIOS and the compatible device SZP123S-001, so you can create an object detection AI model and execute inference to obtain metadata, without any priormachine learning knowledge.
-
This article explains the process from registering the device to obtaining the inference result metadata, while actually performing the steps.
-
The article is mainly aimed at those who are learning about, interested in, or planning to start using AITRIOS.
Introduction
This article introduces a step-by-step process of using the AITRIOS Developer Edition and SZP123S-001 to create an object detection AI model on AITRIOS, actually perform shooting and inference on the SZP123S-001, and obtain the inference result metadata.
This article is based on information as of February 29, 2024.
What is AITRIOS™?
AITRIOS is an edge AI sensing platform that revolutionizes the way we use IoT devices.
There are also pages explaining the overall vision and purpose of AITRIOS, including our name origin, which we encourage you to read!
To briefly explain the benefits of AITRIOS, currently, to execute image recognition inference, the typical process is to shoot an image, send it to the cloud, and execute inference on the cloud. However, by utilizing AITRIOS and compatible devices, you can execute image recognition inference on the edge side and obtain inference results without sending to the cloud.
In other words, cameras have been outputting light signals as image files, but devices (cameras) compatible with AITRIOS output data of image recognition inference results instead of image files.
There are also benefits from a privacy and security perspective, as only metadata is handled. If you're interested, please feel free to contact us!
Prerequisites
First, as of the current time (February 2024), AITRIOS services are for corporate customers. Please keep this in mind.
Secondly, if you are using AITRIOS for the very first time, in addition to what is written in this article, the following tasks and purchases are required, shared in the bried overview below.
- Registering an account for the AITRIOS Portal
- Purchasing compatible devices/equipment
- List of compatible devices
- (For SZP123S-001) A PoE-compatible switching hub, etc. is required
- Applying for a new project on the AITRIOS Portal
- Project application manual "Applying for a New Project" section
- Purchasing Console Developer Edition / Enterprise Edition
- See here for differences between each edition
- This article uses the Developer Edition
Main Content
0. Workflow of this Article
1. Register device to Console
2. Update device firmware to the latest version
3. Create an object detection AI model using 15 (or more) images with Custom Vision, convert for device + create Config for deploying the created AI model
4. Obtain Vision and Sensing App (Edge App) for object detection that runs on the device and Command Parameter that specifies inference parameters, and register them to Console
5. Deploy AI model and Edge App to the device, associate Command Parameter with the device
6. Perform shooting & inference
7. Decode and deserialize inference result metadata
Note that while programming and AI knowledge are generally not required, please be aware that step 7, decoding/deserializing metadata, currently requires knowledge of Git, Python, etc.
1. Accessing Console and Registering Device
(Add 2024/10)
We recently add Provisioning Hub which let you register your device more intuitive!
First, register the purchased device to the Console.
Relevant manuals are as follows:
The general steps are as follows, as explained in the above manual:
1. Connect to the AITRIOS Portal in a browser and open Console
2. Generate a QR code for device registration by clicking `Enroll device`
3. Use your device to scan the generated QR code
Here are supplementary explanations for each step:
1.
Log in to the Portal and open Console
Select Console from the top left menu

2. / 3.
Click Enroll device in the Console left menu

Next, click Setup Enrollment at the top of the screen

Here, create a QR code for registering the device to the Console. By having the device scan the created QR code, it can obtain the information for connecting to the Console.
To generate the QR code, entering NTP server information is required.
If you are using AIH-IVRW2 (Wi-Fi model), please also enter the Wi-Fi's SSID and password that the device will use.
Three Notes on Generating and Scanning QR Codes
① Some NTP servers return an IPv6 address as a result of name resolution, but the SZP123S-001 does not support IPv6, so specify an NTP server that returns IPv4.
In my case, I entered 1.jp.pool.ntp.org.
② Only the initial firmware available immediately after purchase can be used with DHCP, so if you want to use a static IP, first register the device with DHCP, then update the firmware before using a static IP.
To connect an edge AI device (SZP123S-001, AIH-IVRW2) with a static IP immediately after purchase or after performing a factory reset, you need to first connect to Console via DHCP and update to the latest device firmware.
(Source: https://developer.aitrios.sony-semicon.com/en/edge-ai-sensing/support | 1.19. How to connect an Edge Device to Console using a fixed IP address)
After entering the NTP server information, click Generate to create the QR code.
③ Advice for properly scanning the QR code.
Also mentioned in FAQ - Cannot scan the Enrollment QR code or the service QR code, when having the device scan the QR code, we assume scanning the QR code with a size of about 9 cm x 9cm, from a distance of 15 cm.
In my case, I enlarged the QR code to fill the screen of a 14-inch laptop, held it about 20 cm away, and pointed the device at the QR code for about 10 seconds, which often succeeded. If you notice your capture of the QR code is failing, try to zoom into the code and take the picture slightly further back.
When the device scans the QR code, the device that was blinking orange will either light up orange or turn to a red double-light state indicating startup.
After scanning the QR code, wait about 3-5 minutes, and if it turns to a green double-light state, the device registration was successful.
Also, as mentioned in the device setup guide, even if it turns to a green+red state indicating not connected to Console, following the steps of Manage Device -> select registered device -> click "Preview" on the right side may successfully connect it to the green double-light state.
Click the "Preview" toggle switch, and if video from the camera is displayed in the browser, the connection to Console is complete! Congratulations!
If the lamp stays in a green-red state even after scanning the QR code
Please refer to the following questions for troubleshooting.
As also introduced in the above URL, some points to check include:
- Can the PC communicate externally when connected to the PoE switch, etc. that the device is connected to?
- Does ping reach the device?
- Did you wait a few minutes after scanning the QR code?
- Did you enter information other than NTP and generate a QR code before the firmware update?
- From my experience, older firmware may not operate stably, so until updating the firmware, try registering to Console by only entering NTP server information.
Also, as a bit of a side note, using a switching hub that supports port mirroring and Wireshark (etc.) to check what kind of communication the device is doing is helpful during this process.
It will allows you to understand situations such as name resolution not working or not being able to communicate anywhere at all, which is helpful for troubleshooting.
2. Updating Device Firmware
Next, update the device firmware.
This improves device stability, so be sure to do this at this point in the steps.
If you factory reset the device for any reason, also be sure to update the firmware after registering to Console.
Refer to 5. Updating Edge AI Device Firmware in the Device Setup Guide.
As also mentioned in the above link, firmware can be downloaded from the following:
(※Login required for download)
The firmware update steps are as follows:
1. Download and extract the device firmware
2. Check `Version.txt` and confirm the latest firmware version
3. Check if the latest firmware confirmed in step 2 is registered in the project's Console
4. If the latest firmware is not registered in Console in step 3, add the latest one to Console
5. Create a Config for deployment that registers the latest firmware
6. Using the Config created in step 5, deploy the latest firmware to the device
Here are supplementary explanations for each step:
3.
The firmware versions registered in the project can be checked from Settings -> Firmware in Console. The following is a reference image.
As of the current time (February 2024), the latest versions of each firmware are as follows, so in this example, latest firmware is already registered in Console.
| FW | Version(2024/02) |
|---|---|
| MCU(AppFw) | 070018 |
| IMX500(Sensor) | 010701 |
| IMX500(Sensor Loader) | 020301 |
4.
If the latest firmware is not registered in the Console as a result of the check in 3., click Import at the bottom right of the above image and register the downloaded firmware.
5.
Create a Config for deployment that specifies the latest firmware as shown in the example below, from Deploy to device -> New Config.
6.
Select the Config created in 5., and from the right menu Deploy, select the registered device to deploy the firmware.
The deployment status can be checked from Manage device by selecting your device and going to Status -> Deployment in the right menu.
※ The screen does not automatically refresh, so periodically click Reload at the top of the screen to check the status.
3. Creating an Object Detection AI Model with Custom Vision + Creating Config for Deploying the AI Model
Up until now the work has been a bit basic, but from here it will be more exciting!
Before this, there is one important point. The AI model conversion and training introduced in this chapter incurs costs, so please be aware now.
Reference: https://www.aitrios.sony-semicon.com/en/services/edge-ai/products-and-services
In this step, we will create an AI model for object detection. We will do so using a tool called Custom Vision.
To perform object detection on AITRIOS devices, it is necessary to deploy ① an AI model and ② a Vision and Sensing Application to the device.
The Vision and Sensing Application is also called a VnS App or Edge App, but in this article, it will be referred to as an Edge App.
The AI model itself takes an image as numerical data input, performs computation, and outputs a result.
The output of the AI model is not yes in metadata format, so it is necessary to format this output into metadata and send it to the AITRIOS Console, which is the role of the Edge App.
In these steps, we will use a sample Edge App for object detection that can be officially downloaded (explained in the next part), to create the AI model on the Console.
The manuals that are helpful for this part of the guide are as follows:
- Custom Vision AI Model Deployment Guide
-
Console User Manual
- 3.4.1. Deploying Registered AI Models/Firmware
- 3.5. Create model
- 3.6. Train model
- 3.7. Labeling & Training
Referring to the above manuals for details, the steps can be written as follows:
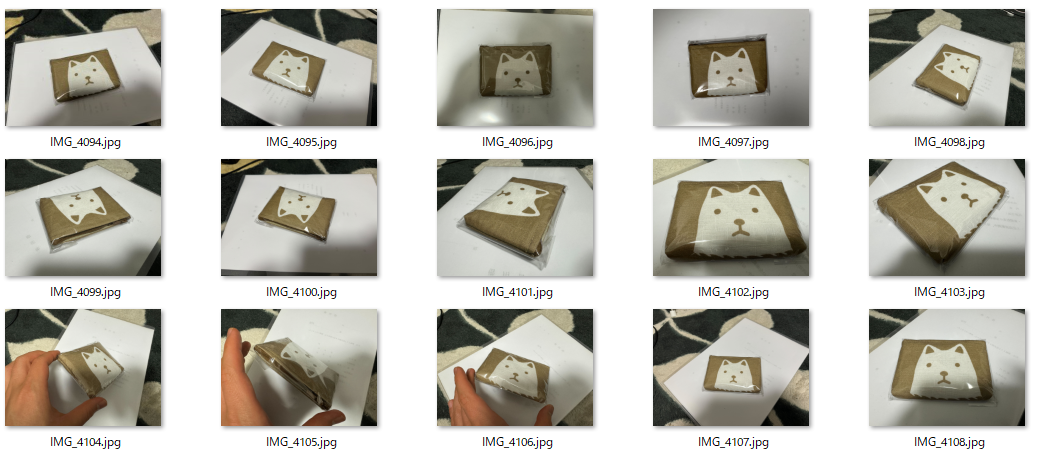
1. Using your smartphone etc., take 15 or more photos of the object you want to recognize from various angles
2. Send the captured images to the terminal used to log in to Console
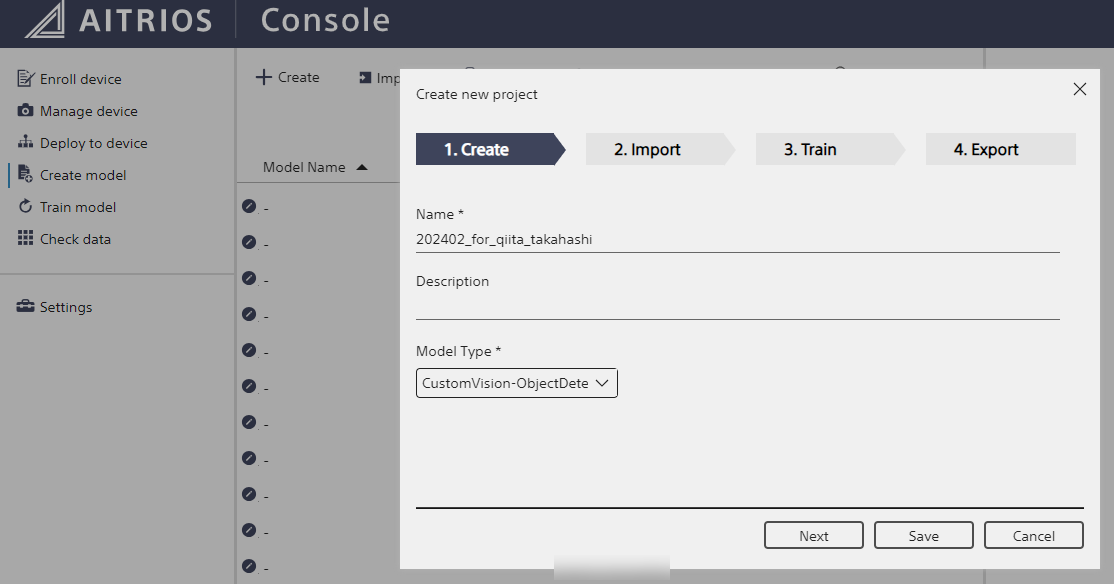
3. Log in to AITRIOS Console on that terminal, select "Create Model", click "+ Create"
4. Select "CustomVision-ObjectDetection" for "Model Type"
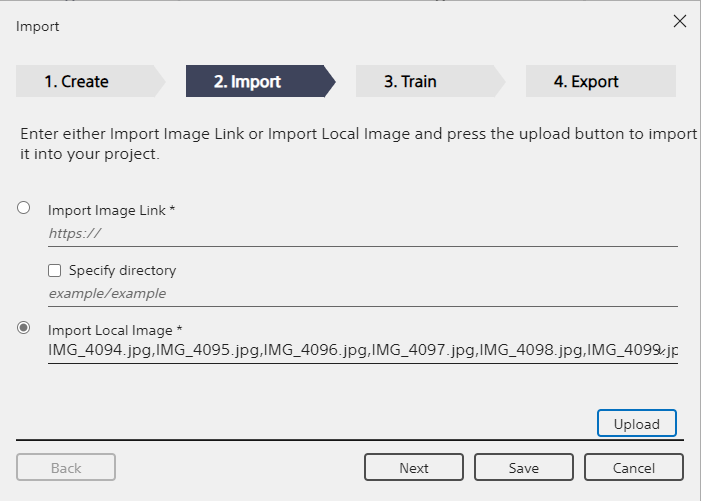
5. Select "Import Local Image" and upload the images captured in `1.`
6. Select "Labelling & Training", draw rectangles around the target objects in the captured images, and assign tags (= labeling)
7. Train the model and create the model
8. Convert the created model for the device
9. Create a Config for deploying the AI model
Here are supplementary explanations for each step:
1. 2.
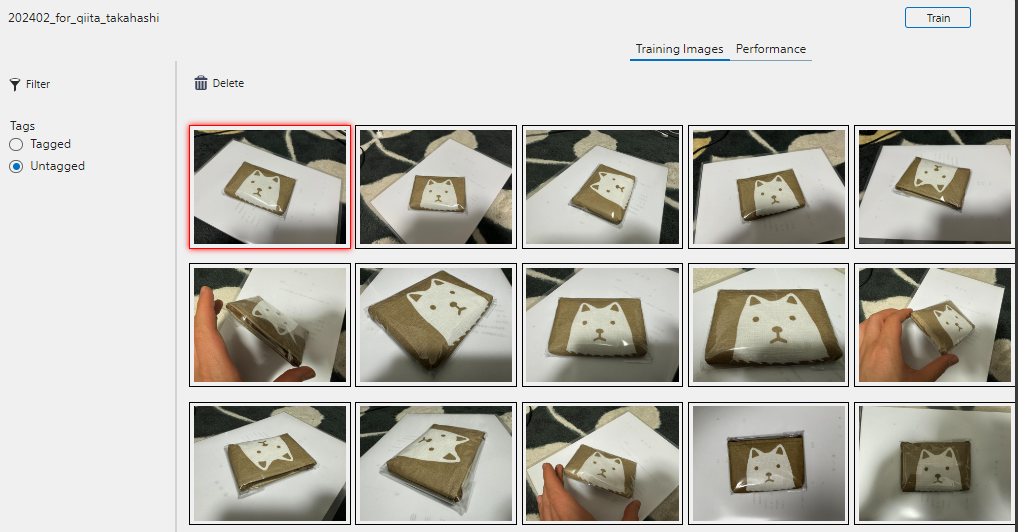
I took the following photos of an eco-bag with a dog illustration.
3. 4.
Operate as follows.
5.
Don't forget to press Uploador you will lose your progress.
6. 7.
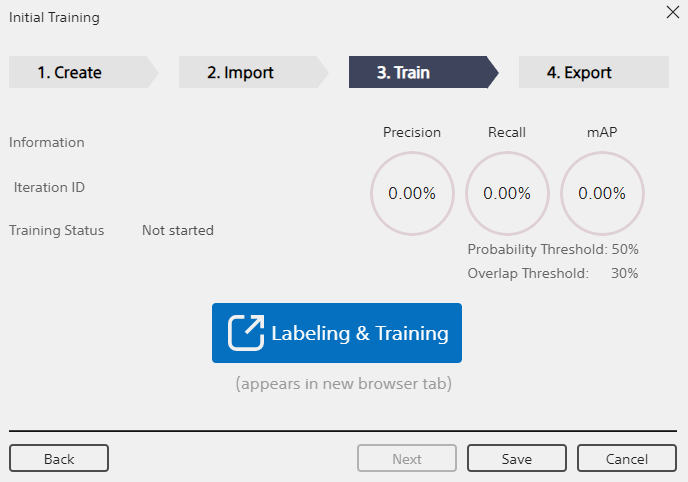
After performing Upload -> Next, Labeling & Training will be displayed, so click it to move on to the labeling work.
Clicking it will open a labeling page in a separate tab.
We will now assign tags to the Untagged images.
Double-clicking an image from the list on the right side of the screen allows you to start the work of assigning a tag to a certain range in that image.
As shown in the figure, select the target range, and if it is the first time labeling, first enter the tag and add it. This time I used dog.
If Region proposal is ON, it will automatically divide the image into likely regions. Convenient!
Perform this work for all the uploaded images.
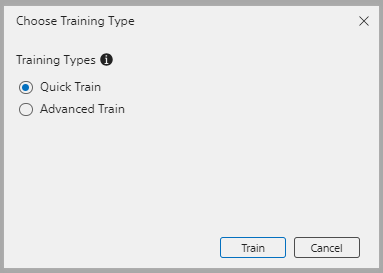
After confirming that there are no more Untagged images, click Train in the upper right.
There are two types of training. Advanced Train is necessary if you require accuracy, but this time we will select Quick Train for verification purposes.
Then training will begin. Wait while processing occurs.
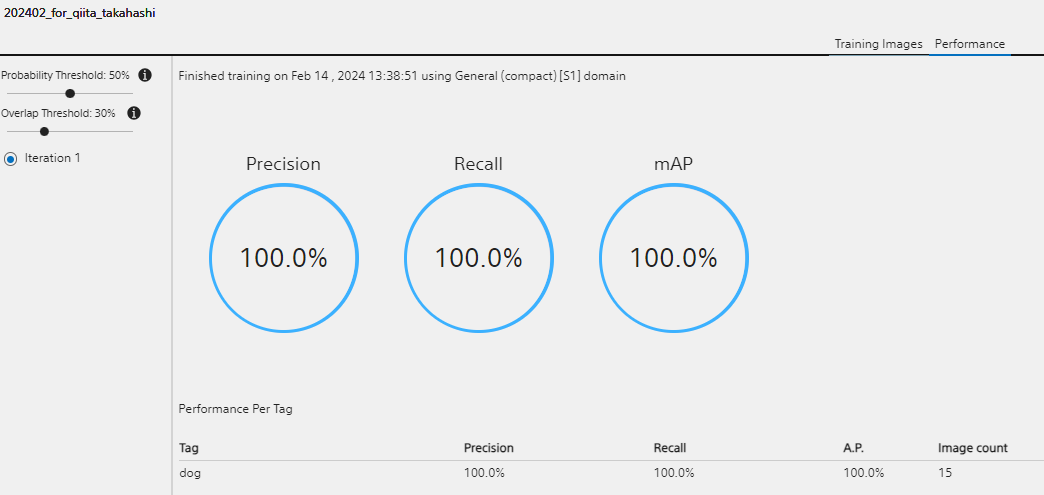
After processing, the training results will be displayed.
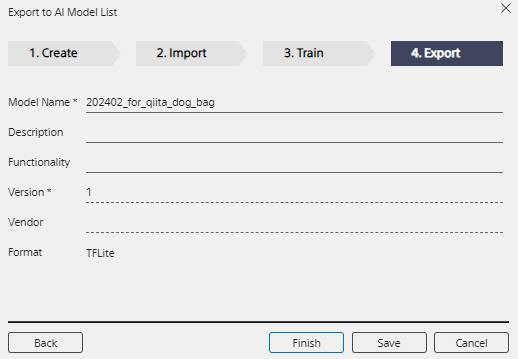
When training is complete, return to the original tab and click Next, where you can enter the model name, description, and version information. Enter those and click Finish to complete the model creation.
8.
After model creation is complete, next you will need to convert it for the device.
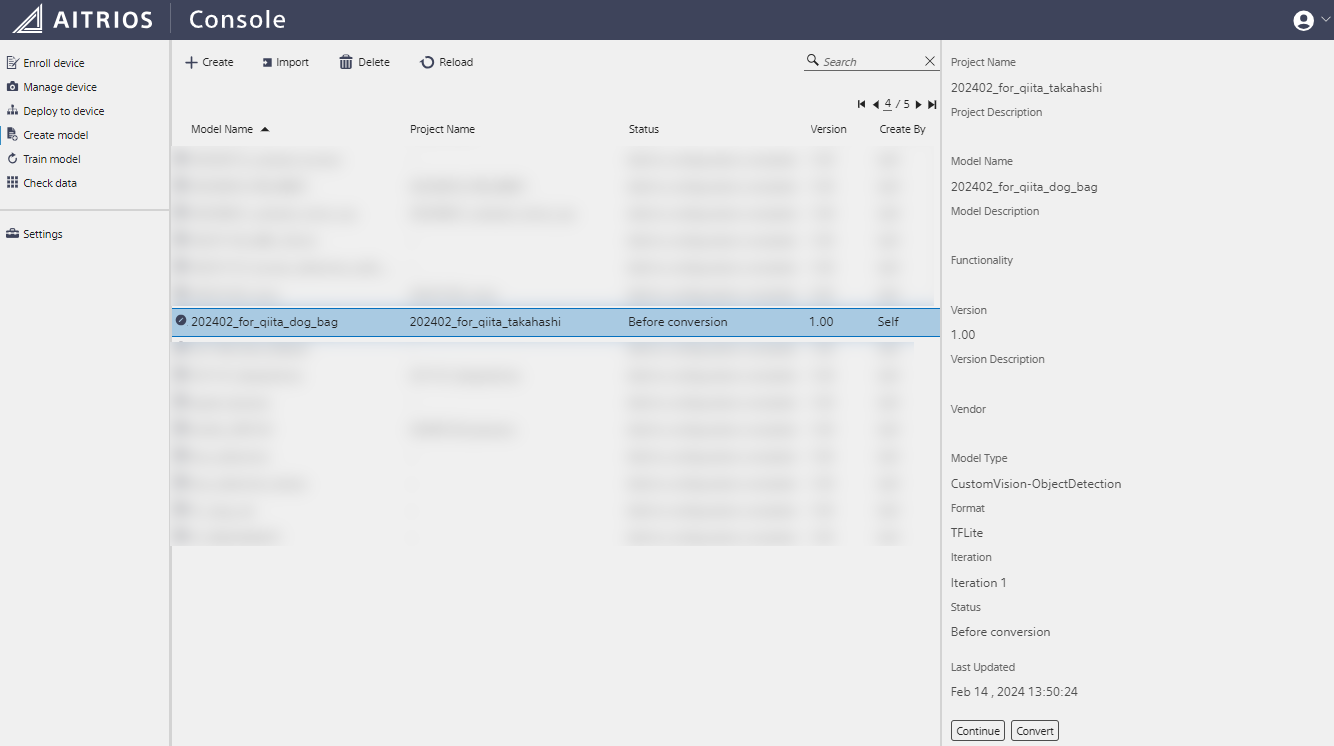
When you select the created model, its status should read Status: Before conversion, so you will need to select Convert from the right menu.
A confirmation menu will appear. Select Convert again to start the model conversion work.
This may also take some time, so press Reload at the top of the screen while waiting for to the Status to change to Add to configuration complete.
Once the Status changes over, the AI model was successfully created!
9.
To deploy the AI model, you need to create a Config for deployment.
This work is almost the same as updating the device firmware, so please refer those steps as necessary.
At that time, we created a Config by specifying various firmware, but this time, we'll specify the AI model created in this part and create a Config.
please note, the firmware fields do not need to be selected (= None).
4. Obtaining Vision and Sensing App (Edge App) and Command Parameter and Registering to Console
Now that we have the AI model, you might think all that's left is to shoot! But there are just a few more steps to prepare.
First, we need to obtain the Edge App that runs inside the camera to process the AI model output into metadata.
This needs to correspond to the AI model being run.
This time, we will use an AI model for object detection using Custom Vision on the Console in the previous part, so we will prepare the Edge App for that.
Also, a Command Parameter file that sets the parameters when performing inference is required at the same time, so we will create and register it to the Console too.
The manuals that are helpful for these steps are as follows:
-
Custom Vision AI Model Deployment Guide
-
3.Deploying Vns Application and Applying PPL Parameters
-
-
Console User Manual
- 3.9.2. Managing Command Parameter Files for Edge AI Devices
- 3.9.4. Managing Vision and Sensing Applications
Referring to the above manuals for details, the steps can be written as follows:
1. Download the sample Edge App for object detection using Custom Vision
2. Register the downloaded Edge App to Console
3. Create a Command Parameter file that specifies parameters during inference execution
4. Register the created Command Parameter file to Console
Here are supplementary explanations for each step:
1.
The sample application for object detection using Custom Vision is published on the AITRIOS Developer Site, for use.
From the link above, download and extract the Sample Object Detection Application {version} in Vision and Sensing Application (Sample).
The latest version at the time of writing this article (February 2024) was v1.1.1.2.
2.
Select Settings from the left menu in Console and click the Application tab.
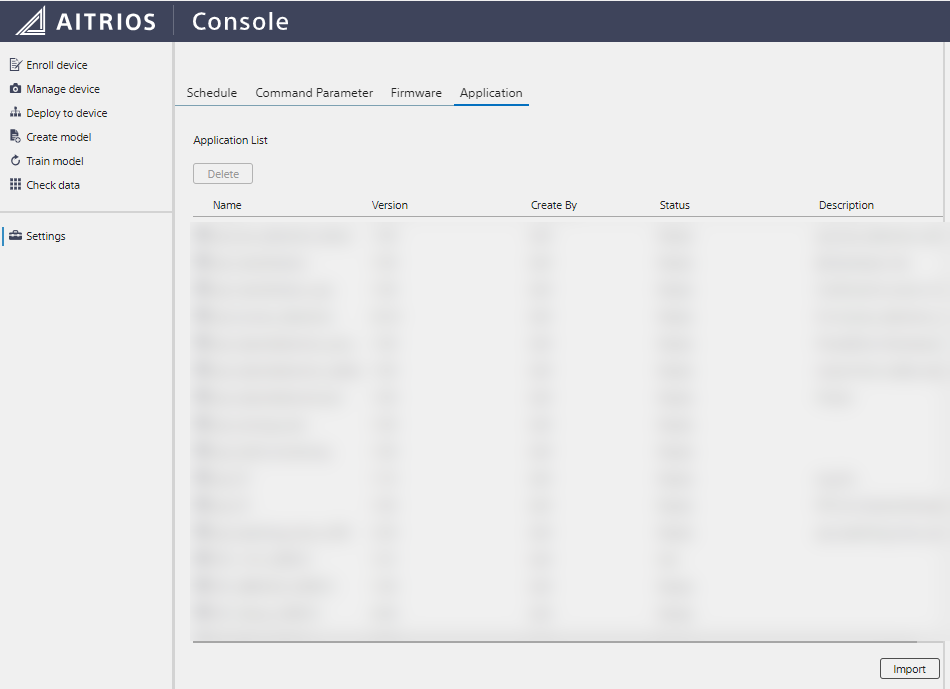
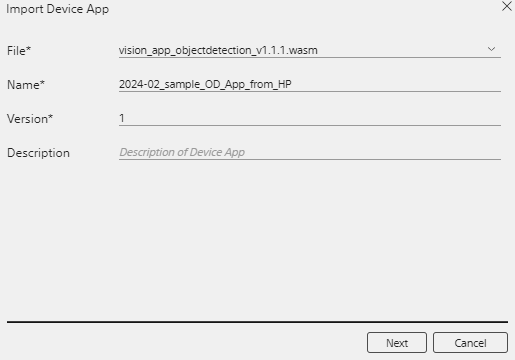
Select Import at the bottom right, select the downloaded vision_app_objectdetection_v1.1.1.wasm. Enter an appropriate name and version, and then press Next (the Metadata Format ID field can be left blank), and finally select Create to register the Edge App.
3. 4.
This portion of the steps will require a bit of work.
A JSON file called Command Parameter is required when executing inference.
This contains settings such as whether to only send metadata or also send images during inference, whether to crop images, file format, save destination, and various parameters used by the Edge App within the application.
Among the files of the object detection sample application downloaded in 2., there is a file called CustomVisionPPLParameterSample.json. Based on this, create a Command Parameter while referring to the Command Parameter specifications found in the link below.
This time, I created a file like the following. It is based on the example introduced in the link above, but with the following changes:
- Set
Modeto2to only send metadata during inference - Set
NumberOfImagesto5to perform inference 5 times per shooting - Set
UploadIntervalto30to perform inference every 30 frames (at 30fps) = 1 second
{
    "commands": [
        {
            "command_name": "StartUploadInferenceData",
            "parameters": {
                "Mode": 2,
                "UploadMethod": "BlobStorage",
                "FileFormat": "JPG",
                "UploadMethodIR": "MQTT",
                "CropHOffset": 0,
                "CropVOffset": 0,
                "CropHSize": 4056,
                "CropVSize": 3040,
                "NumberOfImages": 5,
                "UploadInterval": 30,
                "NumberOfInferencesPerMessage": 1,
                "PPLParameter": {
                    "header" :
                    {
                        "id" : "00",
                        "version" : "01.01.00"
                    },
                    "dnn_output_detections" : 64,
                    "max_detections" : 5,
                    "threshold" : 0.3,
                    "input_width" : 320,
                    "input_height" : 320
                }
            }
        }
    ]
}
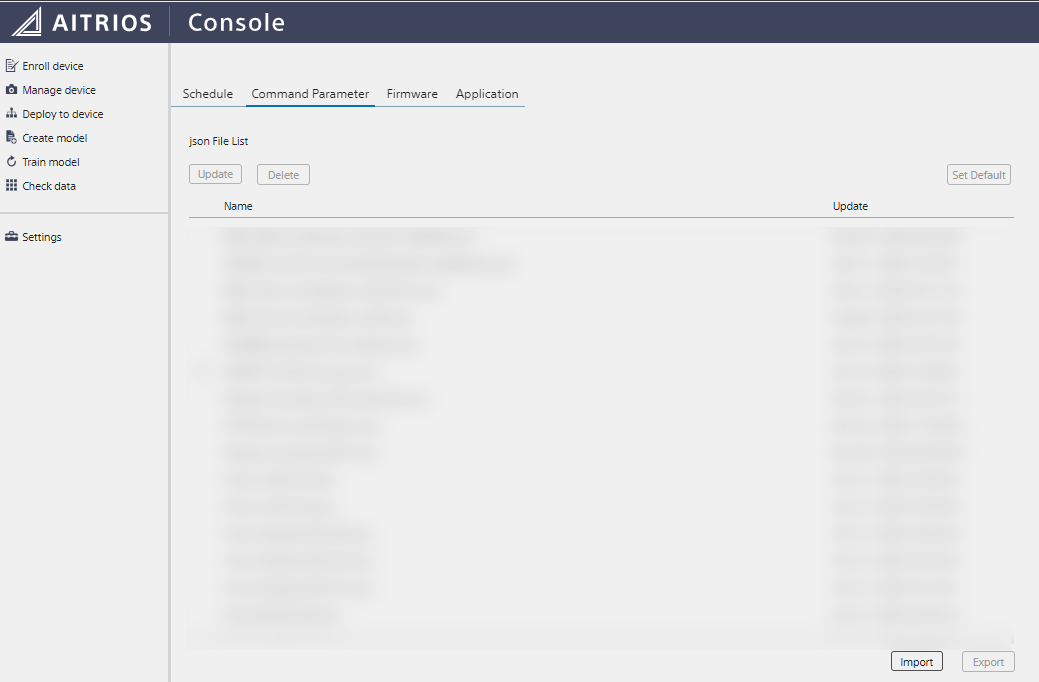
And by Importing the created Command Parameter from Settings -> Command Parameter in Console, you can now register it to Console.
5. Deploying AI Model and Edge App to Device, Associating Command Parameter with Device
Finally, let's deploy and associate the created/registered AI model, Edge App, and Command Parameter to the device.
The manuals that continue to be helpful are as follows:
-
Console User Manual
- 3.3.4. Applying Command Parameter Files to Edge AI Devices
- 3.4 Deploy to device
The steps are as follows:
1. (AI Model) Create a Config for deployment that specifies the created AI model
2. (AI Model) Using the created deployment Config, deploy the AI model to the device
3. (Edge App) Deploy the Edge App registered in Console
4. (Command Parameter) Associate the Command Parameter registered in Console with the device
Here are supplementary explanations for each step:
1.
Log in to Console and from Deploy to device -> New Config, specify the created AI model (=DNN Model), leave the other firmware as None, and create a Config for deployment with Create.
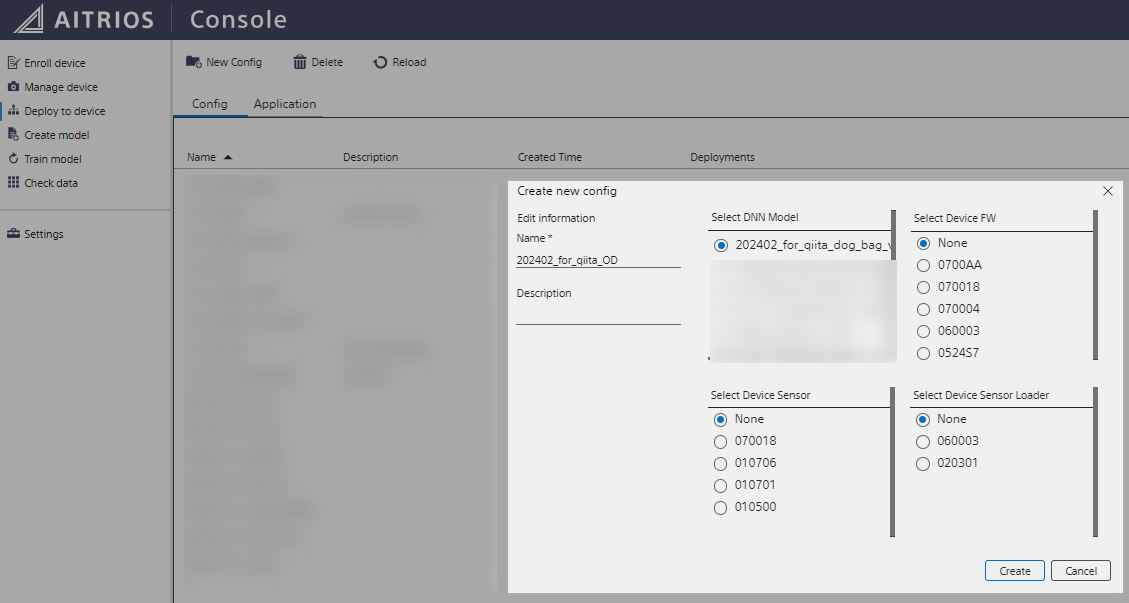
2.
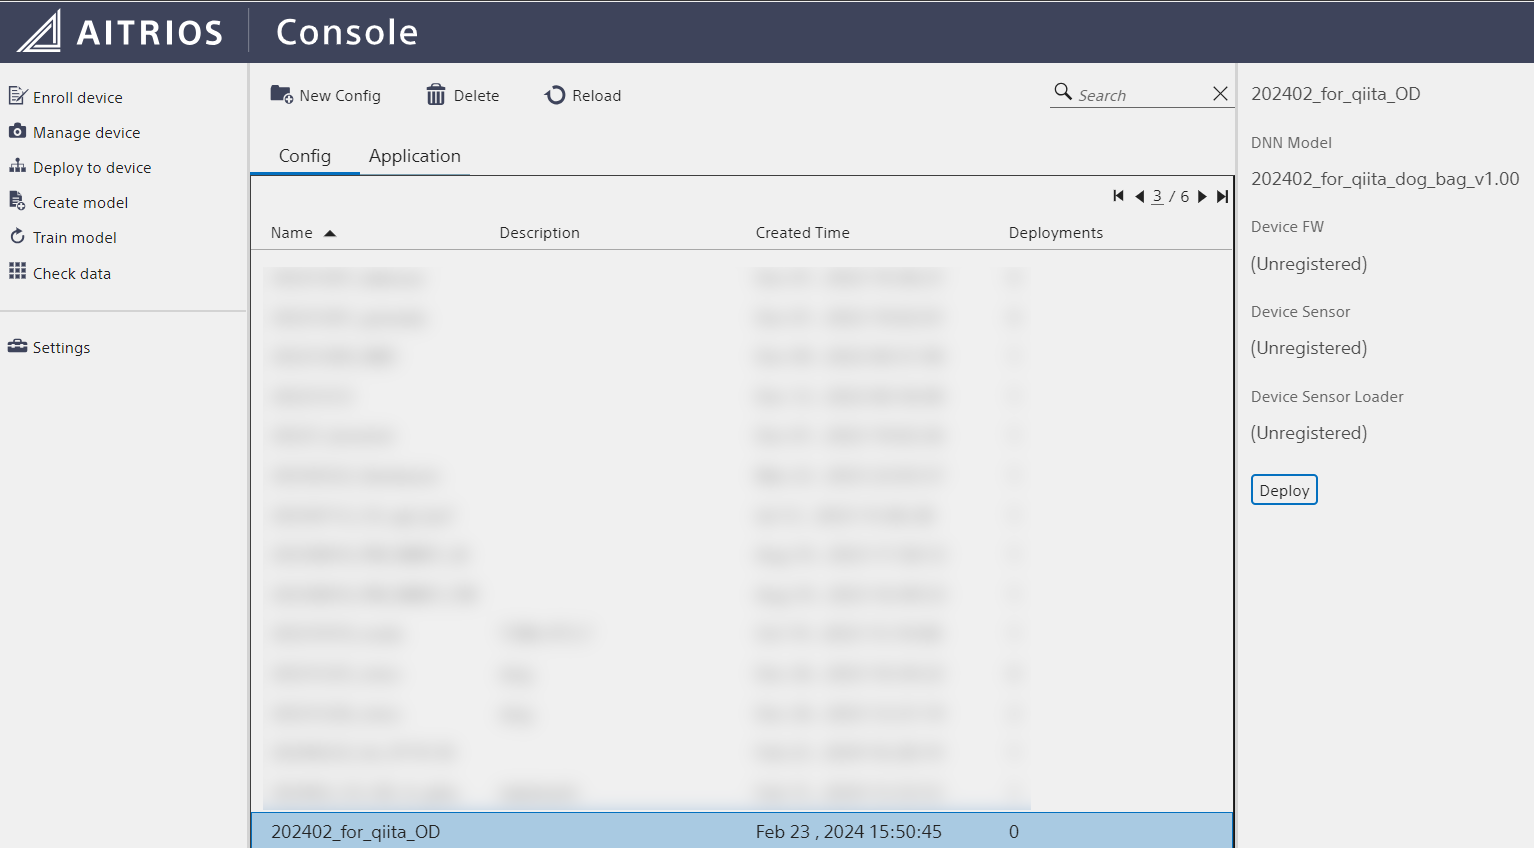
Select the Config for deployment created in Deploy to device and select Deploy from the right menu.
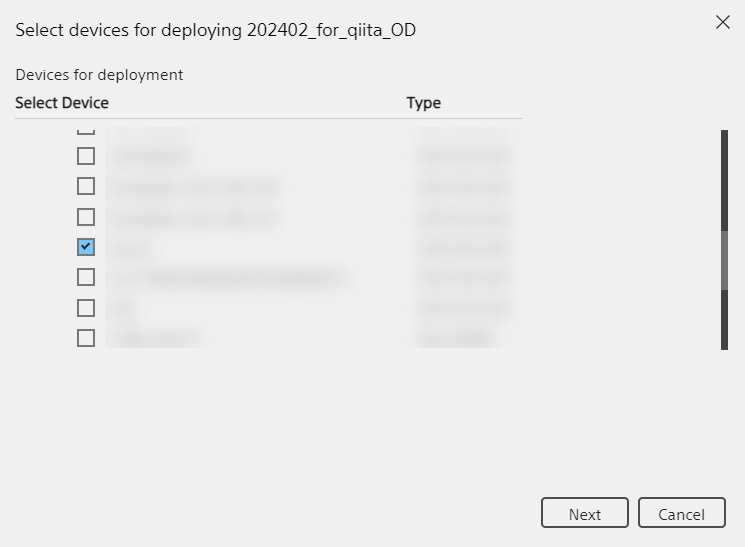
Next, check the device you want to deploy the AI model to.
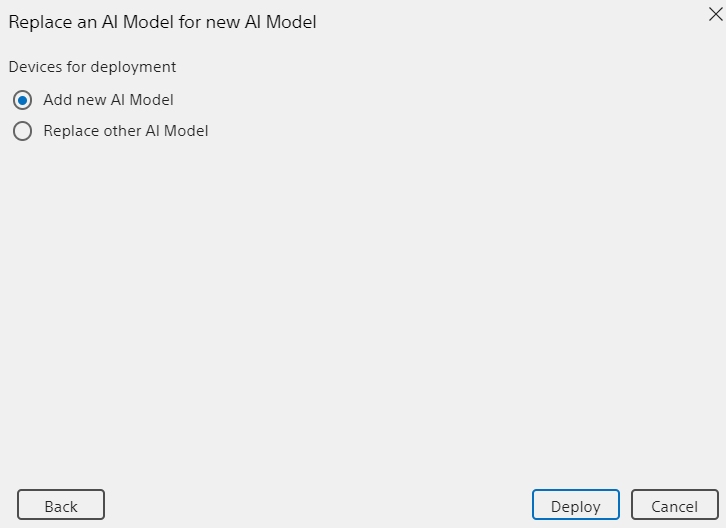
On the next screen, select Add new AI Model and the AI model will be deployed with Deploy.
3.
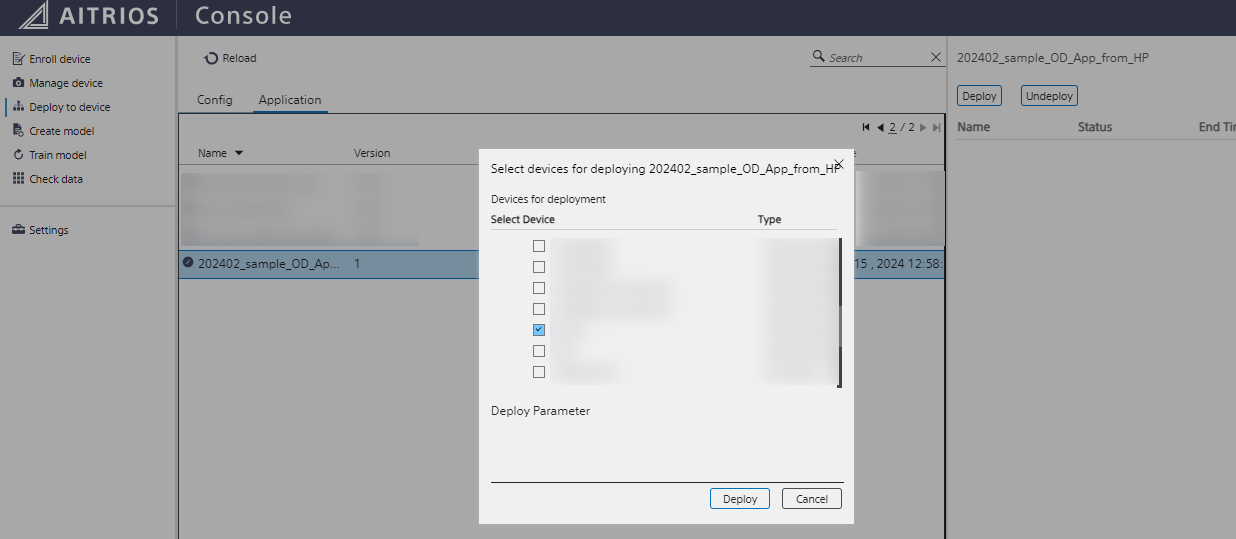
While on the Deploy to device screen, switch the Config and Application tabs at the top center of the screen to Application and select the Edge App previously registered in Console.
Then select Deploy from the right menu, select the device you want to deploy to, and select Deploy to deploy the Edge App to the device.
The deployment status can also be checked from Manage device by selecting your device and going to Status -> Deployment in the right menu.
4.
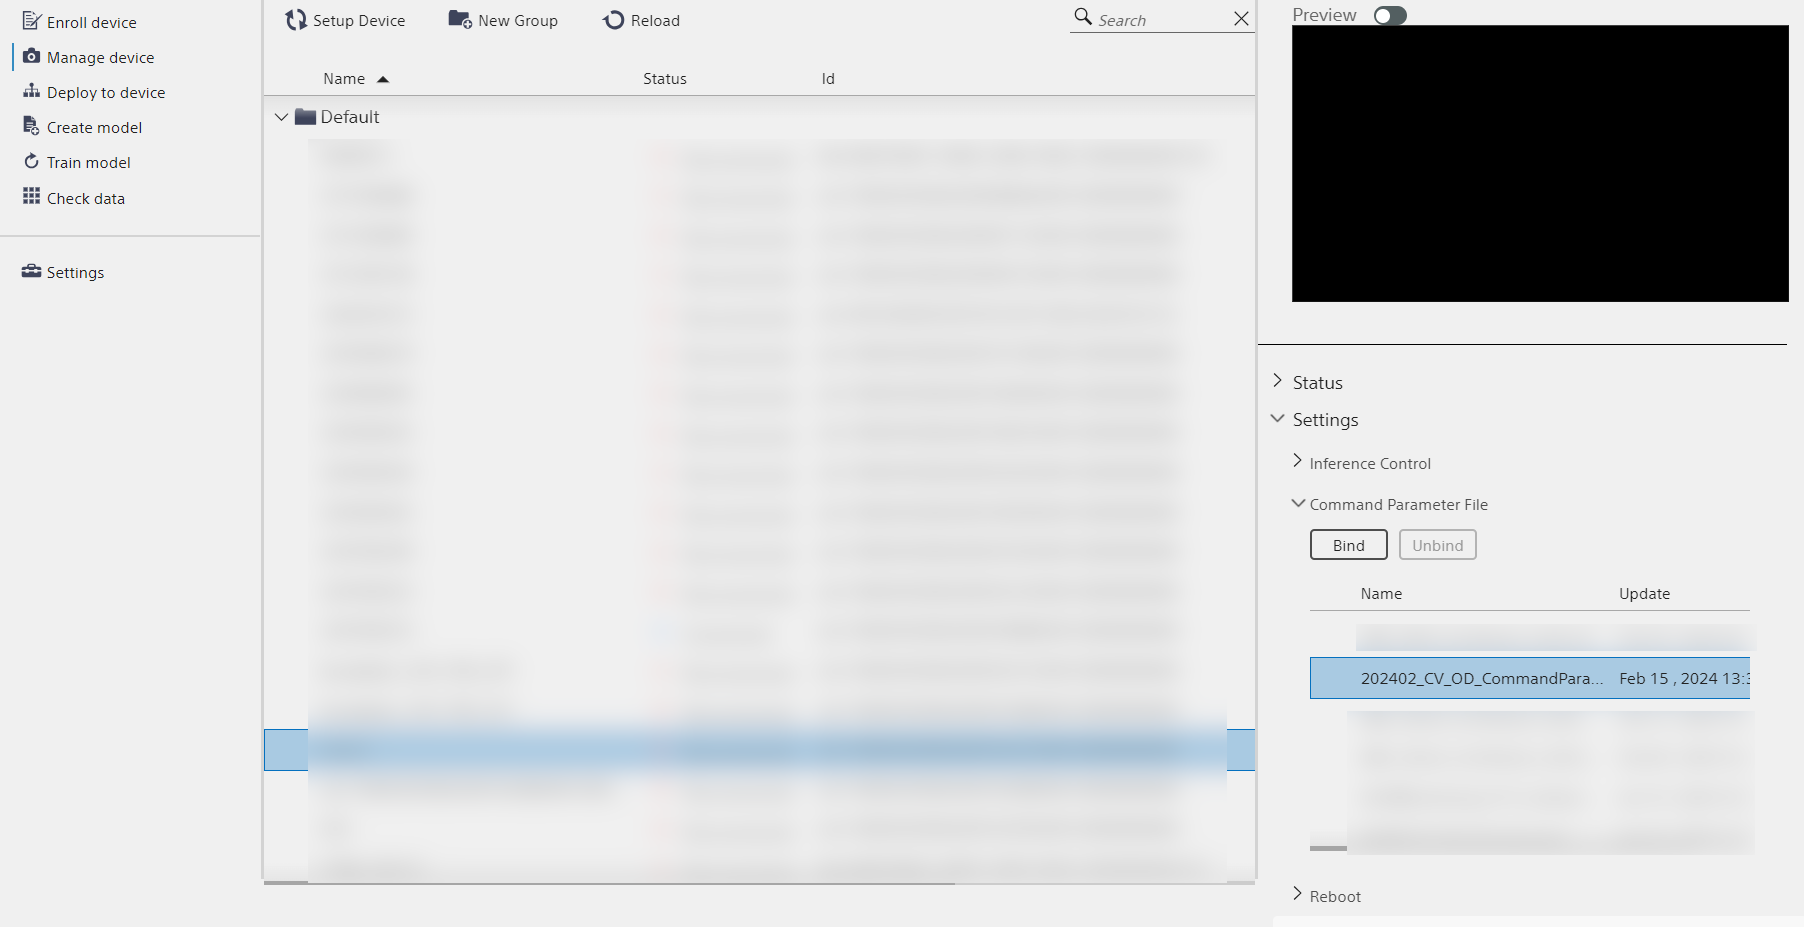
Select Manage Device and select the device you deployed the AI model and Edge App to.
In the right menu, select Settings -> Command Parameter File, select the Command parameter file uploaded in the previous step, and Bind the file to the device.
6. Shooting & Inference
If you’ve made it this far into the setup guide, congratulations and thanks for sticking with us to this point!
Now, we'll actually execute out Object Detection on the SZP123S-001 using the device, AI model, Edge App, and command parameters we've prepared so far.
If the preparation up to this point is complete, executing the inference is simple.
For this portion, the manuals that continue to be helpful are as follows:
-
Console User Manual
- 3.3.6. Edge AI Device Operation (Start Inference, Restart, Reset)
- 3.8 Check data
The steps are as follows:
1. Execute inference on the set up device
2. Check the output metadata
   * Note that the inference result metadata output here is serialized + BASE64 encoded, so the inference result cannot be read by humans yet
Here are supplementary explanations for each step:
1.
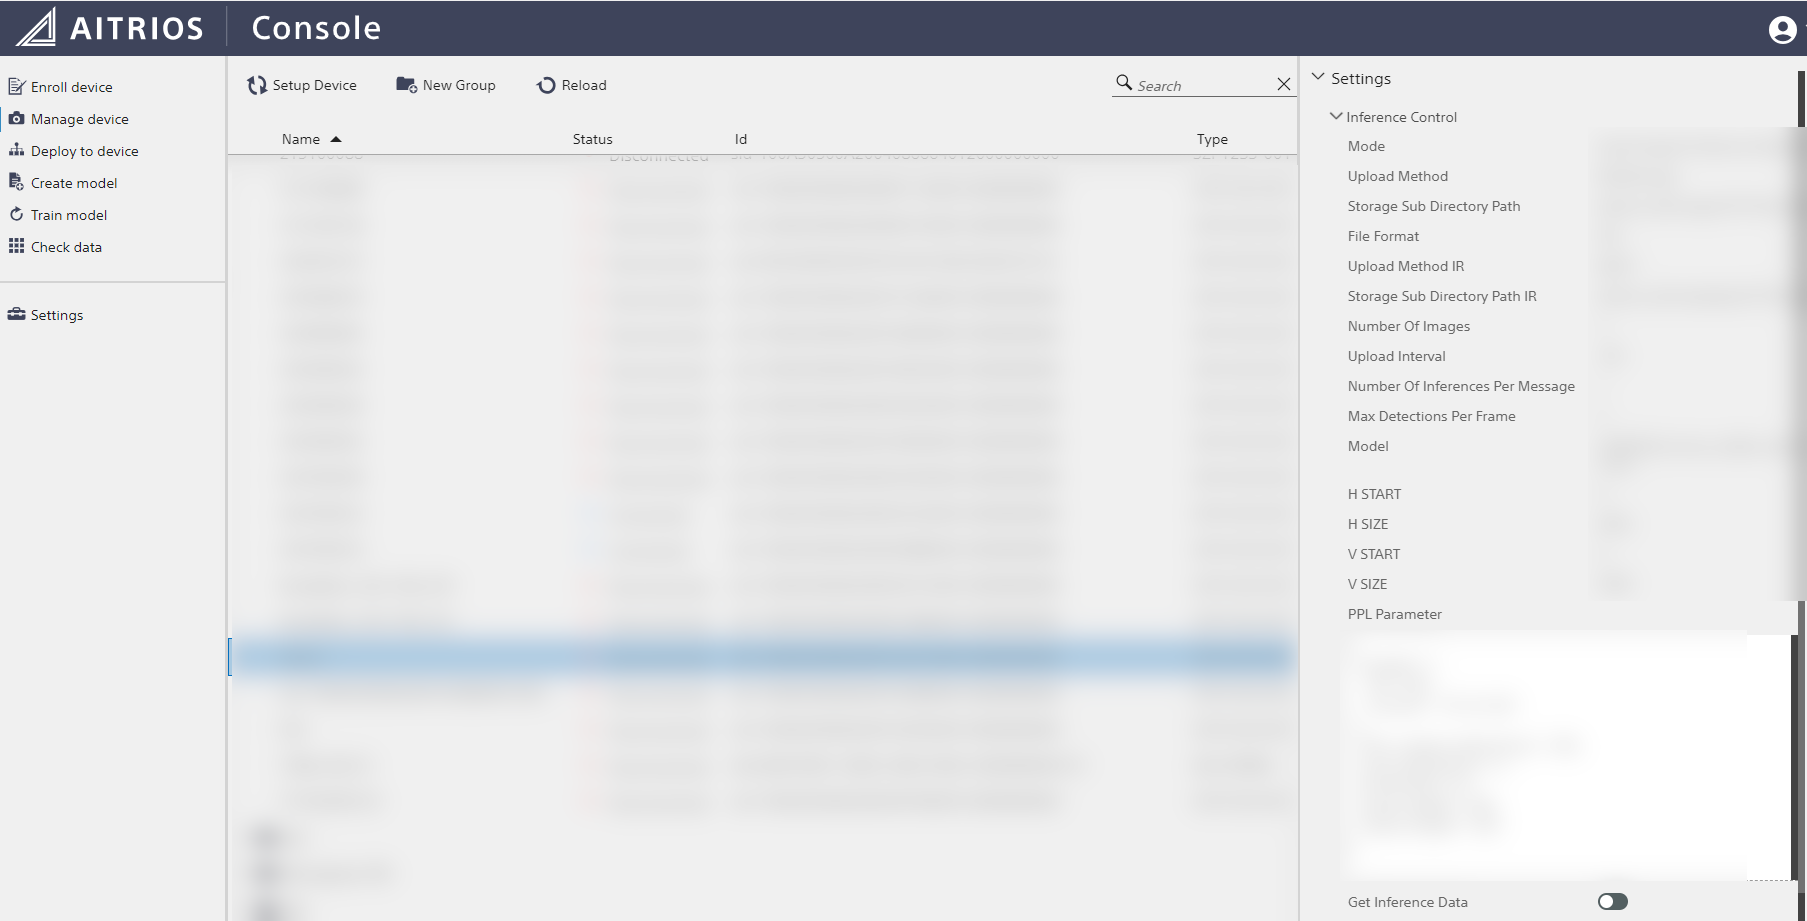
Select the set up device from Manage device.
Select Settings -> Inference Control from the right menu and turn ON the Get Inference Data switch to execute inference.
2.
Select the set up device from Check data.
If inference is executed correctly, selecting the device will show a Meta Data folder. (If images are also acquired at the same time, an Image folder will also exist)
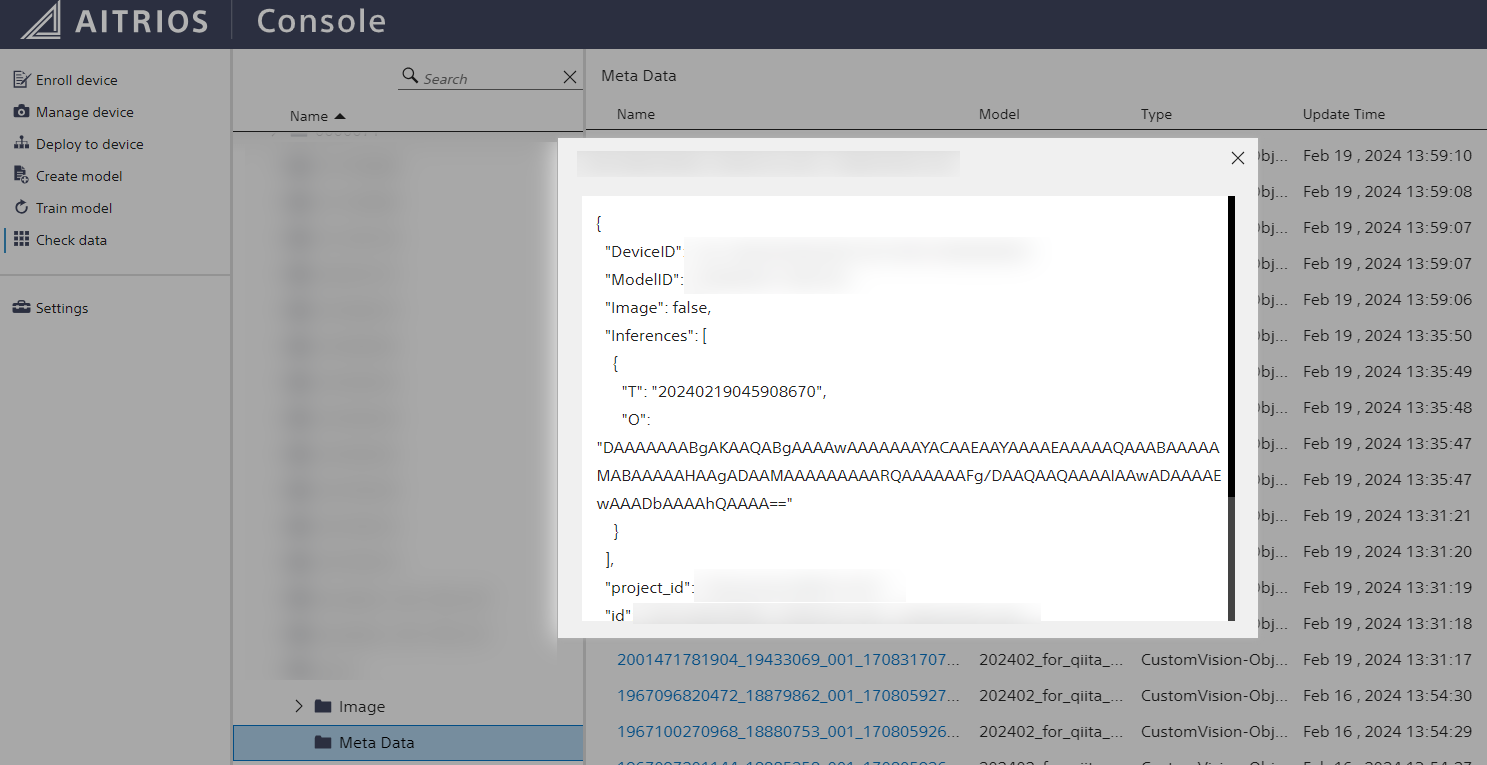
Select the Meta Data folder and click on the file for the time inference was performed to display the metadata obtained by the device.
In the above image, "O" inside "Inferences" is the inference result, but as mentioned earlier, it is BASE64 encoded and serialized, so at this point it is not yet meaningful.
In the next step, we will convert this data into a format that humans can read and use.
7. Decoding and Deserializing Metadata
(Add 2024/10)
We recently add Data Hub which let you check your inference results easier!
Now that we've executed the inference and output serialized metadata, let's deserialize it so that it can be used.
However, as mentioned at the beginning, up to this point no programming knowledge was required, but programming knowledge will now become necessary to execute deserialization.
In this article, we will use a Python-based deserialization sample program published on GitHub, so please note that some knowledge of Git and Python is required.
The steps are as follows:
1. Clone the repository of the deserialization sample program published on GitHub to an environment where Python can run
2. Install the necessary libraries according to the Requirements (Flatbuffers, numpy)
3. Copy the metadata saved in Console to `ObjectDetection_encoded.json` inside the repository
4. Execute `sample/Python/ObjectDetection/decode.py`
5. The deserialized/decoded data will be output to `decoded_result_ObjectDetection.json` created in the root directory of the repository, completing the process
The most helpful manual is the repository's Tutorial.
Alternatively, the following may also be helpful.
-
Custom Vision AI Model Deployment Guide
- 4.3. Checking Inference Results Using Deserialization Sample Code
Here are supplementary explanations for each step:
1.
The target repository is here.
https://github.com/SonySemiconductorSolutions/aitrios-sdk-deserialization-sample
Clone this repository.
2.
The libraries required for the Python version of the sample code are listed in requirements.txt inside the repository.
As of the time of writing this article, the libraries required to run this sample code are Flatbuffers used for serialization and numpy for numerical calculations.
Additionally, when using Python 3.12 series, out installation of numpy was stalled.
The following article (Japanese) helped me out. This may be helpful if you encounter the same issue.
3.
Paste the inference result obtained in the previous step from Console into ObjectDetection_encoded.json.
4.
Execute python sample/Python/ObjectDetection/decode.py from the root directory.
5.
Confirm that the deserialized/decoded metadata is output to decoded_result_ObjectDetection.json in the root directory.
In my case, the following metadata was output.
(IDs etc. are masked as XXX.)
{
    "DeviceID": "XXX",
    "ModelID": "XXX",
    "Image": false,
    "Inferences": [
        {
            "T": "20240219045908670",
            "1": {
                "class_id": 0,
                "score": 0.84375,
                "left": 76,
                "top": 0,
                "right": 219,
                "bottom": 133
            }
        }
    ],
    "project_id": "XXX",
    "id": "XXX",
    "_rid": "XXX",
    "_self": "XXX",
    "_etag": "XXX",
    "_attachments": "attachments/",
    "_ts": 1708318750
}
Interpreting this result in English, the AI model used this time has an input image size of 320x320, so with the top left as (0,0), the region enclosed by the rectangle with (76,0) and (219,133) was detected as having class_id 0 (= the dog eco-bag) with a score of 84.4%.
With that, congratulations, the metadata was successfully output!
Although this was a long article, we hope it makes everyone's experience with AITRIOS even a little bit easier.
For additional support with these steps
If you have trouble along the way in the article, feel free to comment on this article or check out the support page below.
Please note that it may take out team some time to respond to comments.
Also, if you have any other questions, comments, or sticking-points with AITRIOS besides the content of this article, please contact us using the link below.
Conclusion
I personally want to write articles on how to utilize the output metadata, how to obtain this metadata from external sources, and so on, so I would be very happy for your to follow along the AITRIOS Qiita Organization page for more resources as time goes on.
At the same time, we highly welcome posts tagged with #AITRIOS about trying something out with AITRIOS, so please do that for a chance to be reposted by our SNS team on our channels!
Lastly, if there are any other types of articles you would like to read in the future, please let me know in the comments.
Also, for the latest information on AITRIOS, we are distributing it on X and LinkedIn, so please follow us there as well, and tag us using the #AITRIOSbySony!
Thank you again for reading this article!


