こんにちは。
ソニーセミコンダクタソリューションズの明です。
今回はRaspberry Pi AI Cameraのユースケースとして、運転手の携帯電話の使用検知と通報を行うサンプルを作ってみました。
本記事ではサンプルの内容と利用方法について紹介します。

はじめに
最近の自動車にはたくさんのカメラが搭載されており、事故防止に対して大きな役割を担っているかと思います。
私も事故防止の観点から何か役立つものを作ることができないかと考え、物体検出モデルを応用した運転手の携帯電話使用検知のサンプルを作成してみました。
検出ではModel Zooの物体検出モデル「nanodet_plus_416x416_pp」を使用し、運転手と携帯電話を認識します。
携帯電話が認識された場合、運転手が携帯電話を使用している可能性があることをアラームとメール送信によって行います。
本記事では、動作検証用のサンプルを公開し、下記の通り実行まで解説します。
- Prerequisites
- Raspberry Pi 5 とRaspberry Pi AI Cameraでの動作確認
- サンプルスクリプト
- 実行例
1. Prerequisites
まず、下記のコマンドを実行して最新環境へ更新します。
$ sudo apt update && sudo apt full-upgrade
IMX500ファームウェアをインストールします。
$ sudo apt install imx500-all
現時点では、Linux Kernel version
"uname -a"と打つと下記のように "(2024-11-25)" と表示されます。
$ uname -a
Linux raspberrypi 6.6.62+rpt-rpi-2712 #1 SMP PREEMPT Debian 1:6.6.62-1+rpt1 (2024-11-25) aarch64 GNU/Linux
picamera2をcloneします。
$ git clone https://github.com/raspberrypi/picamera2
2. Raspberry Pi 5 とRaspberry Pi AI Cameraでの動作確認
Raspberry Pi 5とRaspberry Pi AI Cameraの環境構築については省略します。
以前こちら の記事で紹介していますので、気になる方はご確認ください。
リンク先の記事にて、2章まで完了していれば本記事用のセットアップとしては十分です。
では、セットアップが完了した前提で、AIモデルが動くか動作確認を実施します。
下記の通り、Cloneしたpicamera2のディレクトリへ移動し、AIモデルを動作させて下さい。
$ cd ~/picamera2/examples/imx500
$ python imx500_object_detection_demo_phone.py --model /usr/share/imx500-models/imx500_network_nanodet_plus_416x416_pp.rpk
実行に成功するとカメラ画面が立ち上がり、何か物体が認識されると結果が画面内に表示されるようになります。
下記は、私の環境でcupを認識した例になります。

3. サンプルスクリプト
サンプルスクリプトは、下記の流れで作成しました
携帯電話の使用検知
↓
アラームを鳴らす
↓
スクリーンショットを撮影
↓
Emailで通知
今回はespeakやgmail等を使用しましたが、あくまで一例となります。
他の方法でも実現できるかと思いますので、自分にとって必要なサービスを選定すると良いかと思います。
携帯電話の使用検知
携帯電話の使用検知では、一定時間継続して携帯電話が認識された場合にアラートを鳴らし、スクリーンショットを保存し、メール通知を送信する処理を行います。
下記では主に携帯電話の認識と、一定時間継続して使用しているかの判定を実装しています。
phone_detected = False
cell_phone_counter = 0
DETECTION_THRESHOLD = 5

start_time = None
    labels = get_labels()
    TARGET_LABELS = ["cell phone", "remote"]
    detected_phone = any(labels[int(detection.category)].lower() in TARGET_LABELS for detection in last_detections)

    if detected_phone:
        cell_phone_counter += 1
    else:
        cell_phone_counter -= 1

    cell_phone_counter = max(0, min(DETECTION_THRESHOLD, cell_phone_counter))

    if cell_phone_counter >= DETECTION_THRESHOLD and not phone_detected:
        print("cell phone detected")
        phone_detected = True
        start_time = time.time()
        play_alert_sound()

    elif cell_phone_counter >= DETECTION_THRESHOLD and phone_detected:
        elapsed_time = time.time() - start_time
        print(f"cell phone detected for {elapsed_time:.2f} seconds")

    elif cell_phone_counter == 0 and phone_detected:
        elapsed_time = time.time() - start_time
        print(f"cell phone detect finish, detected for {elapsed_time:.2f} seconds")
        phone_detected = False
        start_time = None

        image_path = "/home/mingxianwen/git/picamera2/examples/imx500/screenshoot/cell_phone_detected.jpg"
        frame = picam2.capture_array()
        frame = cv2.cvtColor(frame, cv2.COLOR_BGR2RGB)
        cv2.imwrite(image_path, frame)
        print(f"Save screenshoot: {image_path}")

        send_email_notification(image_path, elapsed_time)
アラームを鳴らす
下記関数によって、espeak を用いて運転中の携帯電話使用を禁止するメッセージを音声で流します。
def play_alert_sound():
    os.system('espeak "Warning! Warning! Cell phone detected! Cell phone detected! Please do not use cell phone during driving"&')
    print("warning benn played")
スクリーンショットを撮影
一定時間の携帯電話使用を検知した場合、警告音と共にドライバーの写真をスクリーンショットで保存します。
image_path = "/home/mingxianwen/git/picamera2/examples/imx500/screenshoot/cell_phone_detected.jpg"
        frame = picam2.capture_array()
        frame = cv2.cvtColor(frame, cv2.COLOR_BGR2RGB)
        cv2.imwrite(image_path, frame)
        print(f"Save screenshoot: {image_path}")
Emailでの通知
保存した写真は、今回はgmailを使ってメール送信します。gmailの設定方法はこちらを参考にしてください。主にアカウント作成、二段階認証の設定とパスワードが必要になるかと思います。
通知部分のコードは以下になります。
SMTP_SERVER = "smtp.gmail.com"
SMTP_PORT = 587
EMAIL_SENDER = "送信で使用するGmailアドレス"
EMAIL_PASSWORD = "Gmailのパスワード"
EMAIL_RECEIVER = "受信したいメールアドレス"


def send_email_notification(image_path, duration):
    msg = EmailMessage()
    msg["From"] = EMAIL_SENDER
    msg["To"] = EMAIL_RECEIVER
    msg["Subject"] = "Cell phone usage report"
    msg.set_content(f"Duration of using phone : {duration:.2f} seconds \n please check the screenshoot")


    with open(image_path, "rb") as f:
        msg.add_attachment(f.read(), maintype="image", subtype="jpeg", filename="cell_phone_detected.jpg")

    try:
        with smtplib.SMTP(SMTP_SERVER, SMTP_PORT) as server:
            server.starttls()
            server.login(EMAIL_SENDER, EMAIL_PASSWORD)
            server.send_message(msg)
            print("email send successfully")
    except Exception as e:
        print(f"sending error: {e}")
4. 実行例
サンプル準備
3章で説明したサンプルの公開場所をこの記事の最後に記載しています。まずはそちらからサンプルをダウンロードし、下記の通り解凍をしてください。
$ unzip imx500_object_detection_demo_phone.zip
解凍したサンプルに移動し、 picamera2内にあるimx500ディレクトリをコピー後、imx500_object_detection_demo_phone.pyを実行します。
 $ cd imx500_object_detection_demo_phone
 $ cp * ~/picamera2/examples/imx500
 $ cd ~/picamera2/examples/imx500
 $ python imx500_object_detection_demo_phone.py --model /usr/share/imx500-models/imx500_network_nanodet_plus_416x416_pp.rpk
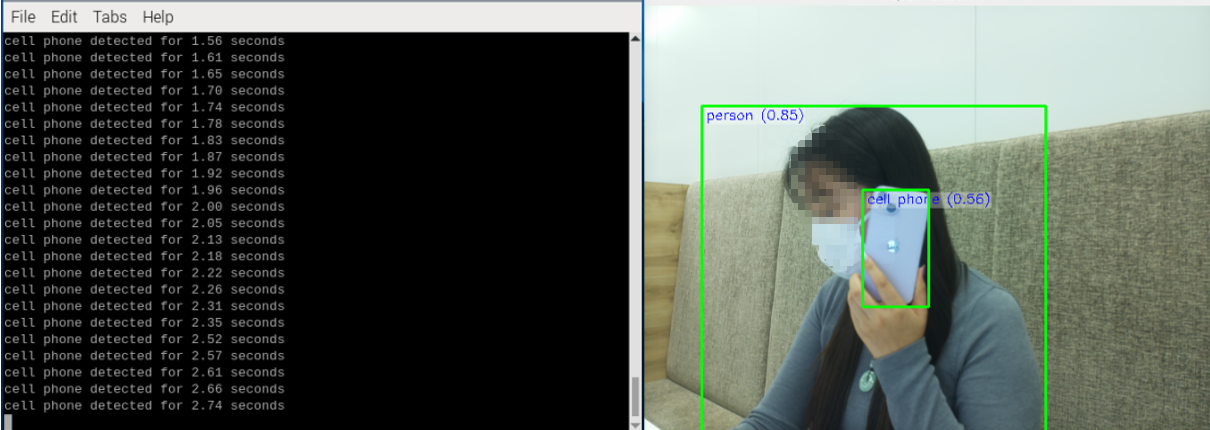
携帯電話の使用を検知した結果
下記画像は実際にRaspberry Pi 5上で表示されている結果になります。左のターミナルでは携帯電話の使用時間を表示しています。同時にアラーム音声("Warning! Warning! Cell phone detected! Cell phone detected! Please do not use cell phone during driving")も再生されています。
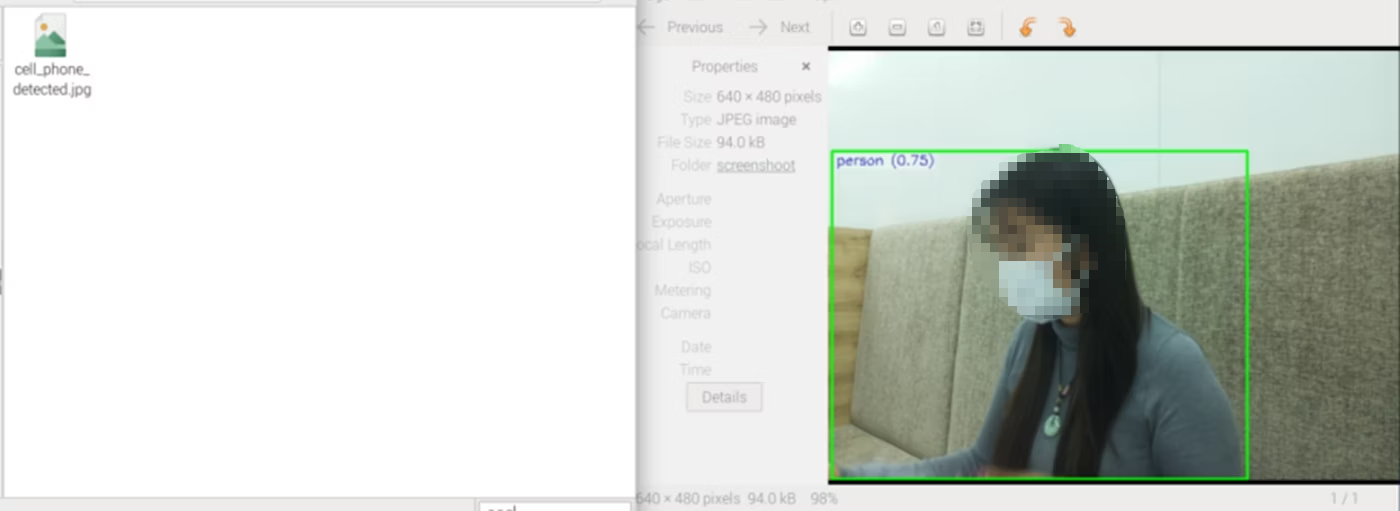
スクリーンショット
サンプル内で指定した場所にスクリーンショットが自動的に保存されます。下記の画像では、左のディレクトリに保存された画像を開いた結果が右の写真になります。
メール受信
携帯電話を使用したというメールが届きます。メールには撮影したスクリーンショットを添付し、携帯電話の使用時間が記載されています

サンプル公開
GitHub上で公開していますので、ご使用になる場合はそちらからダウンロードをお願いします。
https://github.com/SonySemiconductorSolutions/aitrios-rpi-sandbox/tree/main/examples/driver_detect
困った時は
もし、記事の途中でうまくいかなかった場合は、気軽にこの記事にコメントいただいたり、以下のサポートのページもご覧ください。
コメントのお返事にはお時間を頂く可能性もありますがご了承ください。
また、記事の内容以外で AITRIOS についてお困りごとなどあれば以下よりお問い合わせください。
RaspberryPiに関連する疑問がある場合は、下記フォーラムをご確認、ご活用ください。