はじめに
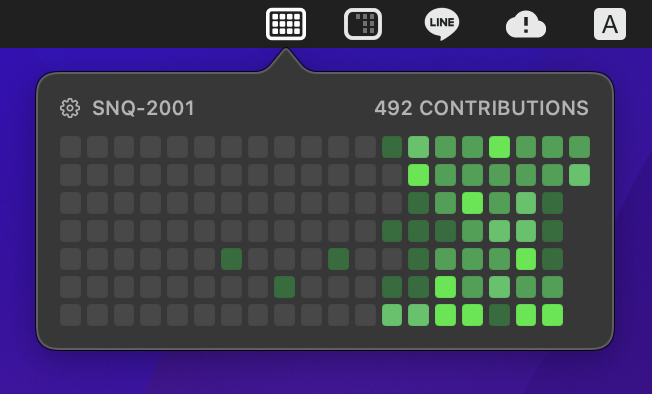
私はGitHubの草をメニューバーから確認できるというメニューバーアプリを作成しました。
アプリURL
GitHubリポジトリ
今回は一通りサンプルアプリを作成しながら解説していこうと思います。
躓きポイントやリジェクトポイントがいくつかあるので参考になれば嬉しいです
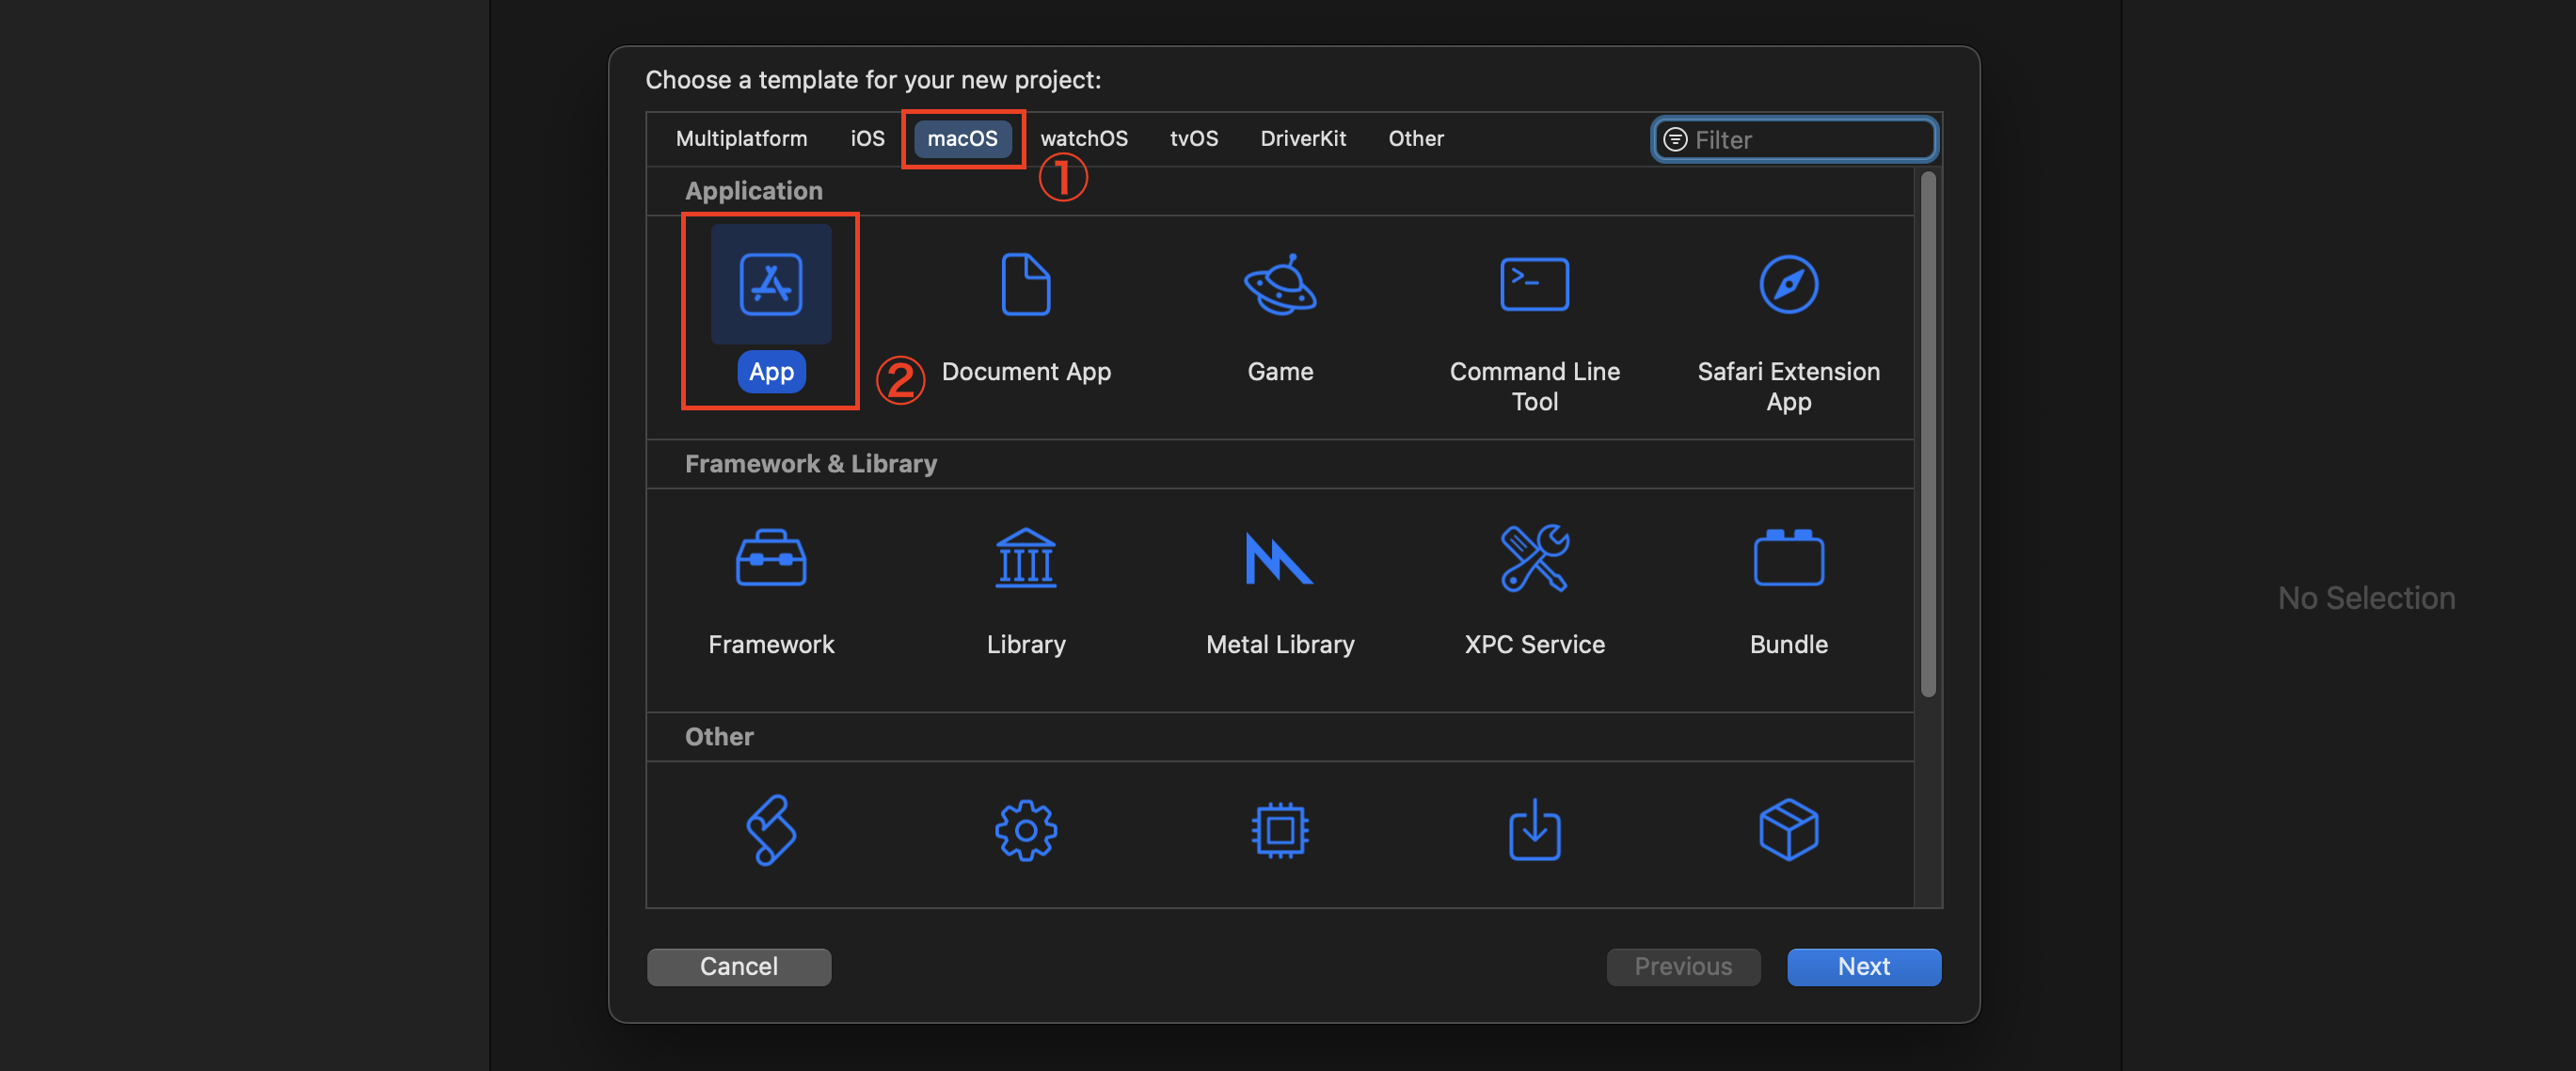
プロジェクト作成
①「macOS」を選択します(Multiplatformでも可)
②「App」を選択します
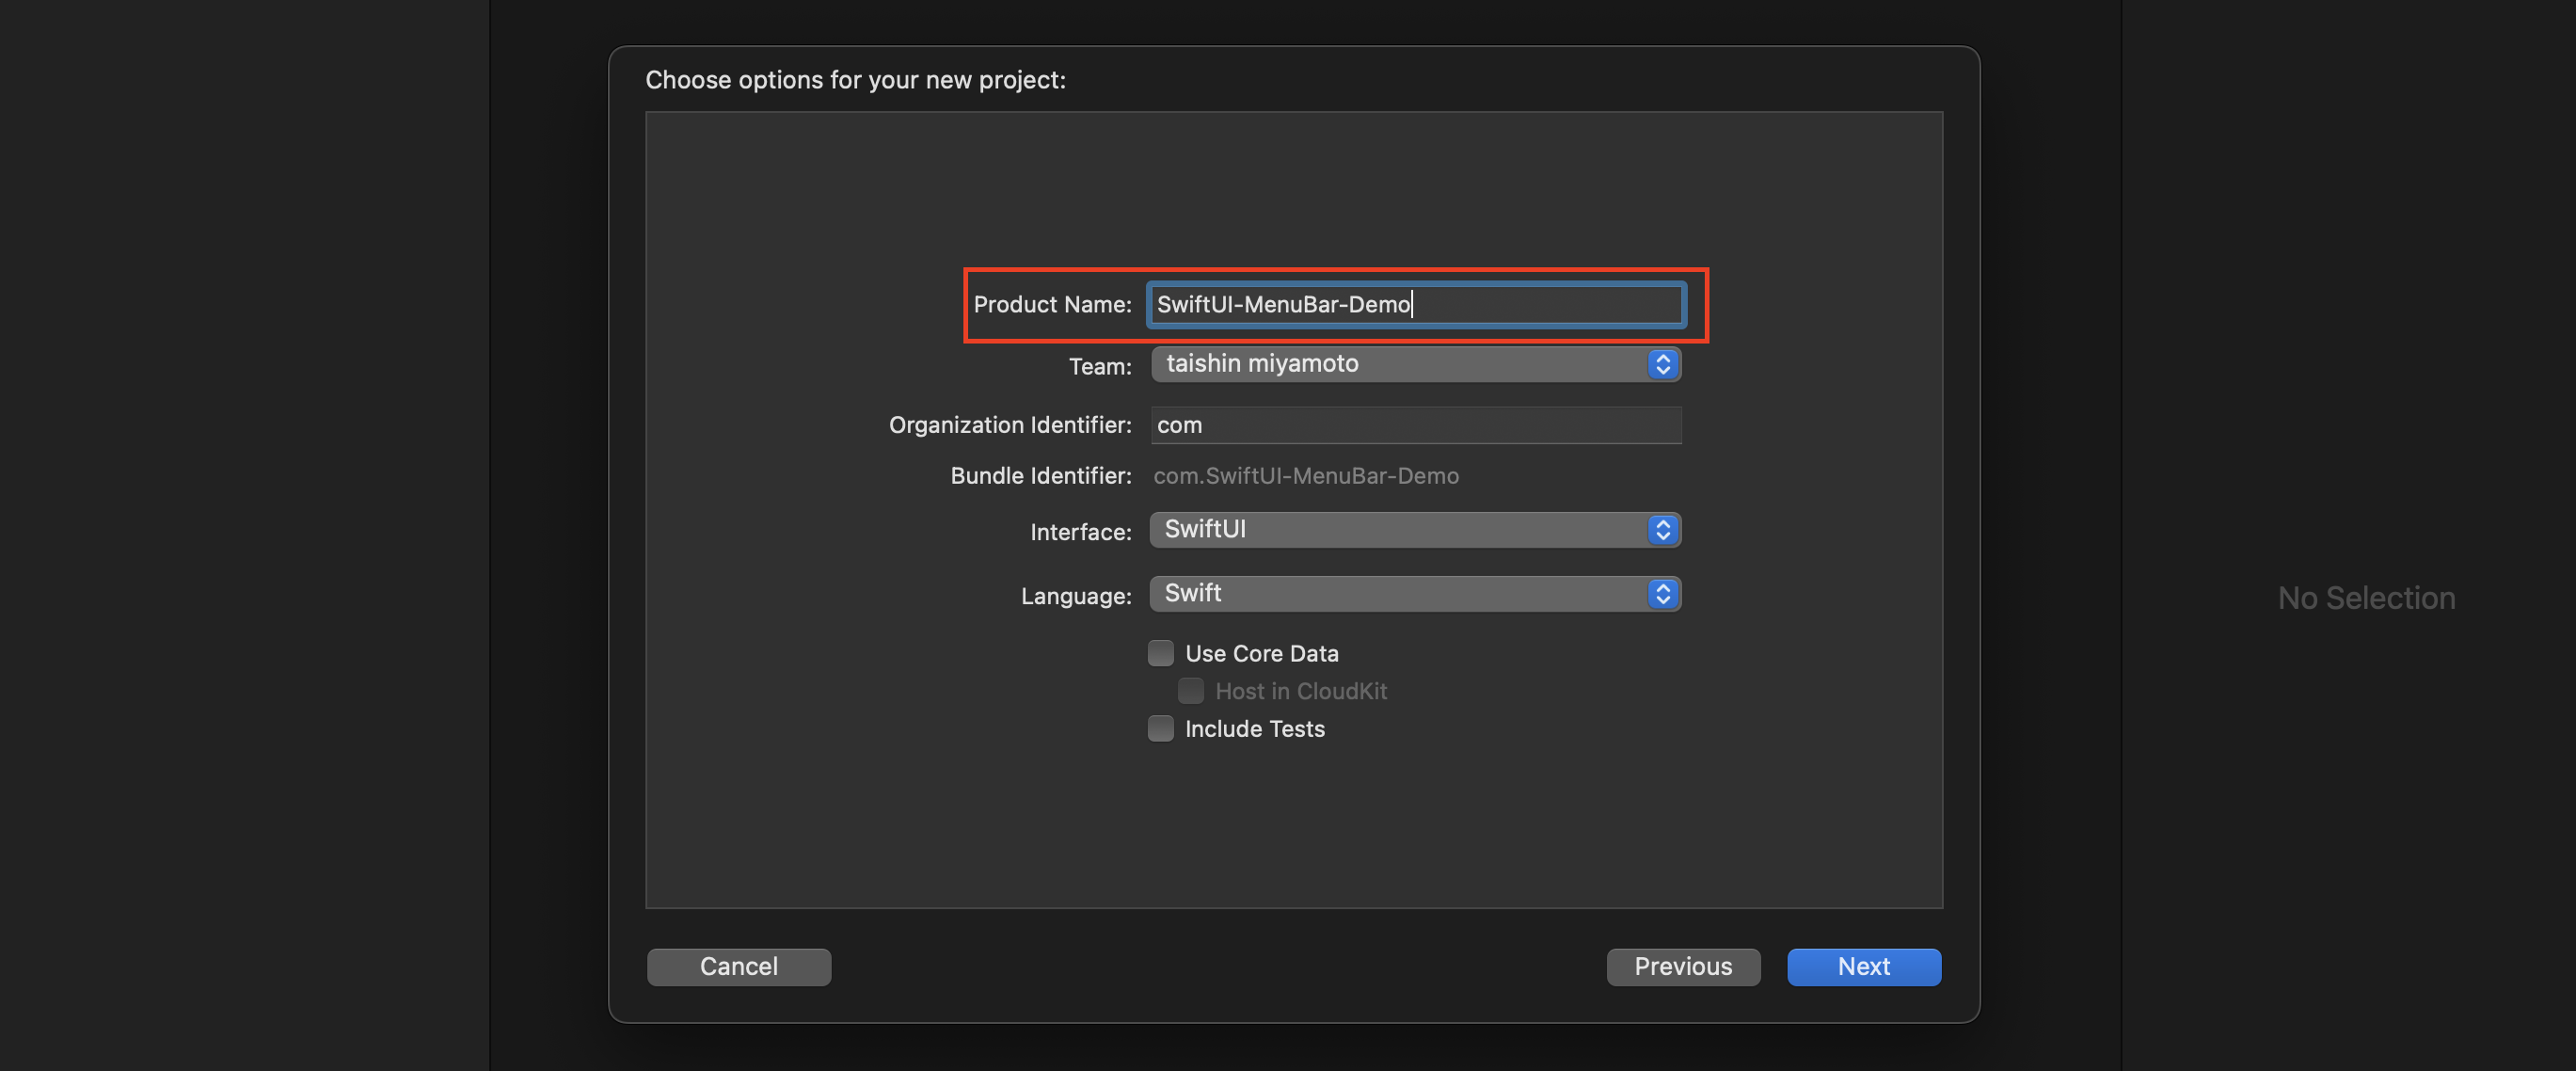
「Product Name」を入力します
今回は「SwiftUI-MenuBar-Demo」というプロジェクト名にしました。
実装
Appの編集
まず、ContentViewが表示されないように変更します。
WindowGroupからSettingsに変更することでViewが表示されなくなります。
import SwiftUI

@main
struct SwiftUI_MenuBar_DemoApp: App {
    var body: some Scene {
-        WindowGroup {
-            ContentView()
-        }
+        Settings { }
    }
}
SwiftUIにはAppDelegateがないので追加します
import SwiftUI

@main
struct SwiftUI_MenuBar_DemoApp: App {
+    @NSApplicationDelegateAdaptor(AppDelegate.self) var delegate
    var body: some Scene {
        Settings { }
    }
}

+class AppDelegate: NSObject, NSApplicationDelegate {
+    var statusBarItem: NSStatusItem!
+    var popover = NSPopover()
+    func applicationDidFinishLaunching(_ notification: Notification) {
+        popover.behavior = .transient
+        popover.contentViewController = NSHostingController(rootView: ContentView())
+        self.statusBarItem = NSStatusBar.system.statusItem(withLength: CGFloat(NSStatusItem.variableLength))
+        guard let button = self.statusBarItem.button else { return }
+        // アイコンの設定
+        button.image = NSImage(systemSymbolName: "camera.macro", accessibilityDescription: nil)
+        // アクションの設定
+        button.action = #selector(menuButtonAction(sender:))
+    }
+    @objc func menuButtonAction(sender: AnyObject) {
+        guard let button = self.statusBarItem.button else { return }
+        if self.popover.isShown {
+            self.popover.performClose(sender)
+        } else {
+            // ポップアップを表示
+            self.popover.show(relativeTo: button.bounds, of: button, preferredEdge: NSRectEdge.minY)
+            // 他の位置をタップすると消える
+            self.popover.contentViewController?.view.window?.makeKey()
+        }
+    }
+}
ポイント
表示されたView以外をタップすると自動で消えるようになります
self.popover.contentViewController?.view.window?.makeKey()
注意
こちらのコードでも同じような事が可能ですが、
2回目以降の表示でおかしな挙動が出るので使わない方が良いです
NSApp.activate(ignoringOtherApps: true)
ContentViewの編集
続いてContentViewにframeを指定します
import SwiftUI

struct ContentView: View {
    var body: some View {
        VStack {
            Text("Hello, world!")
        }
        .frame(width: 200, height: 110)
    }
}
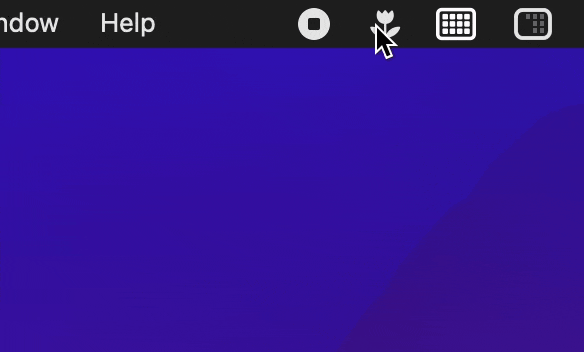
それっぽくなってきましたね
Info.plistの編集
メニューバーに常駐させておく為の設定を行います。
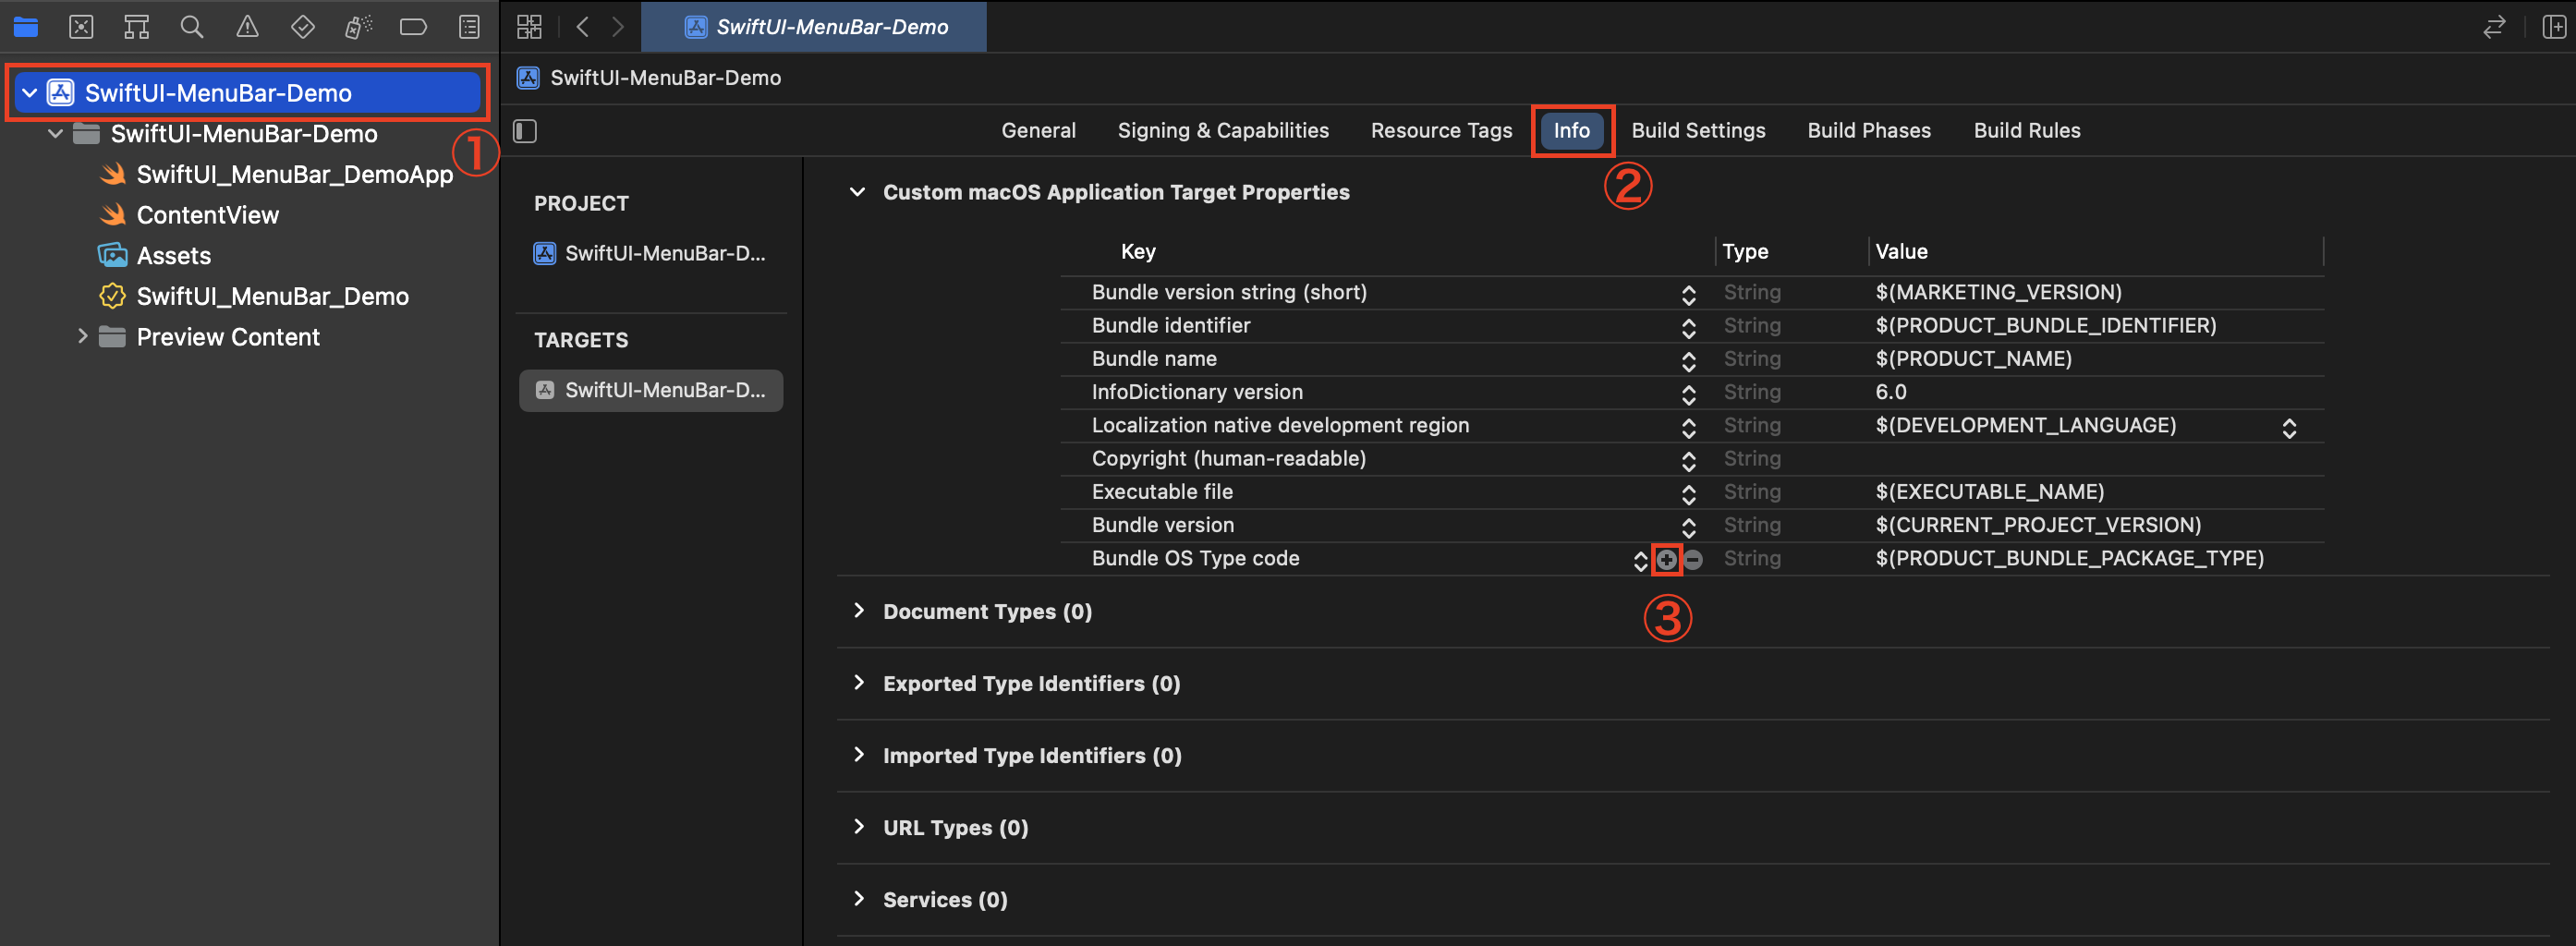
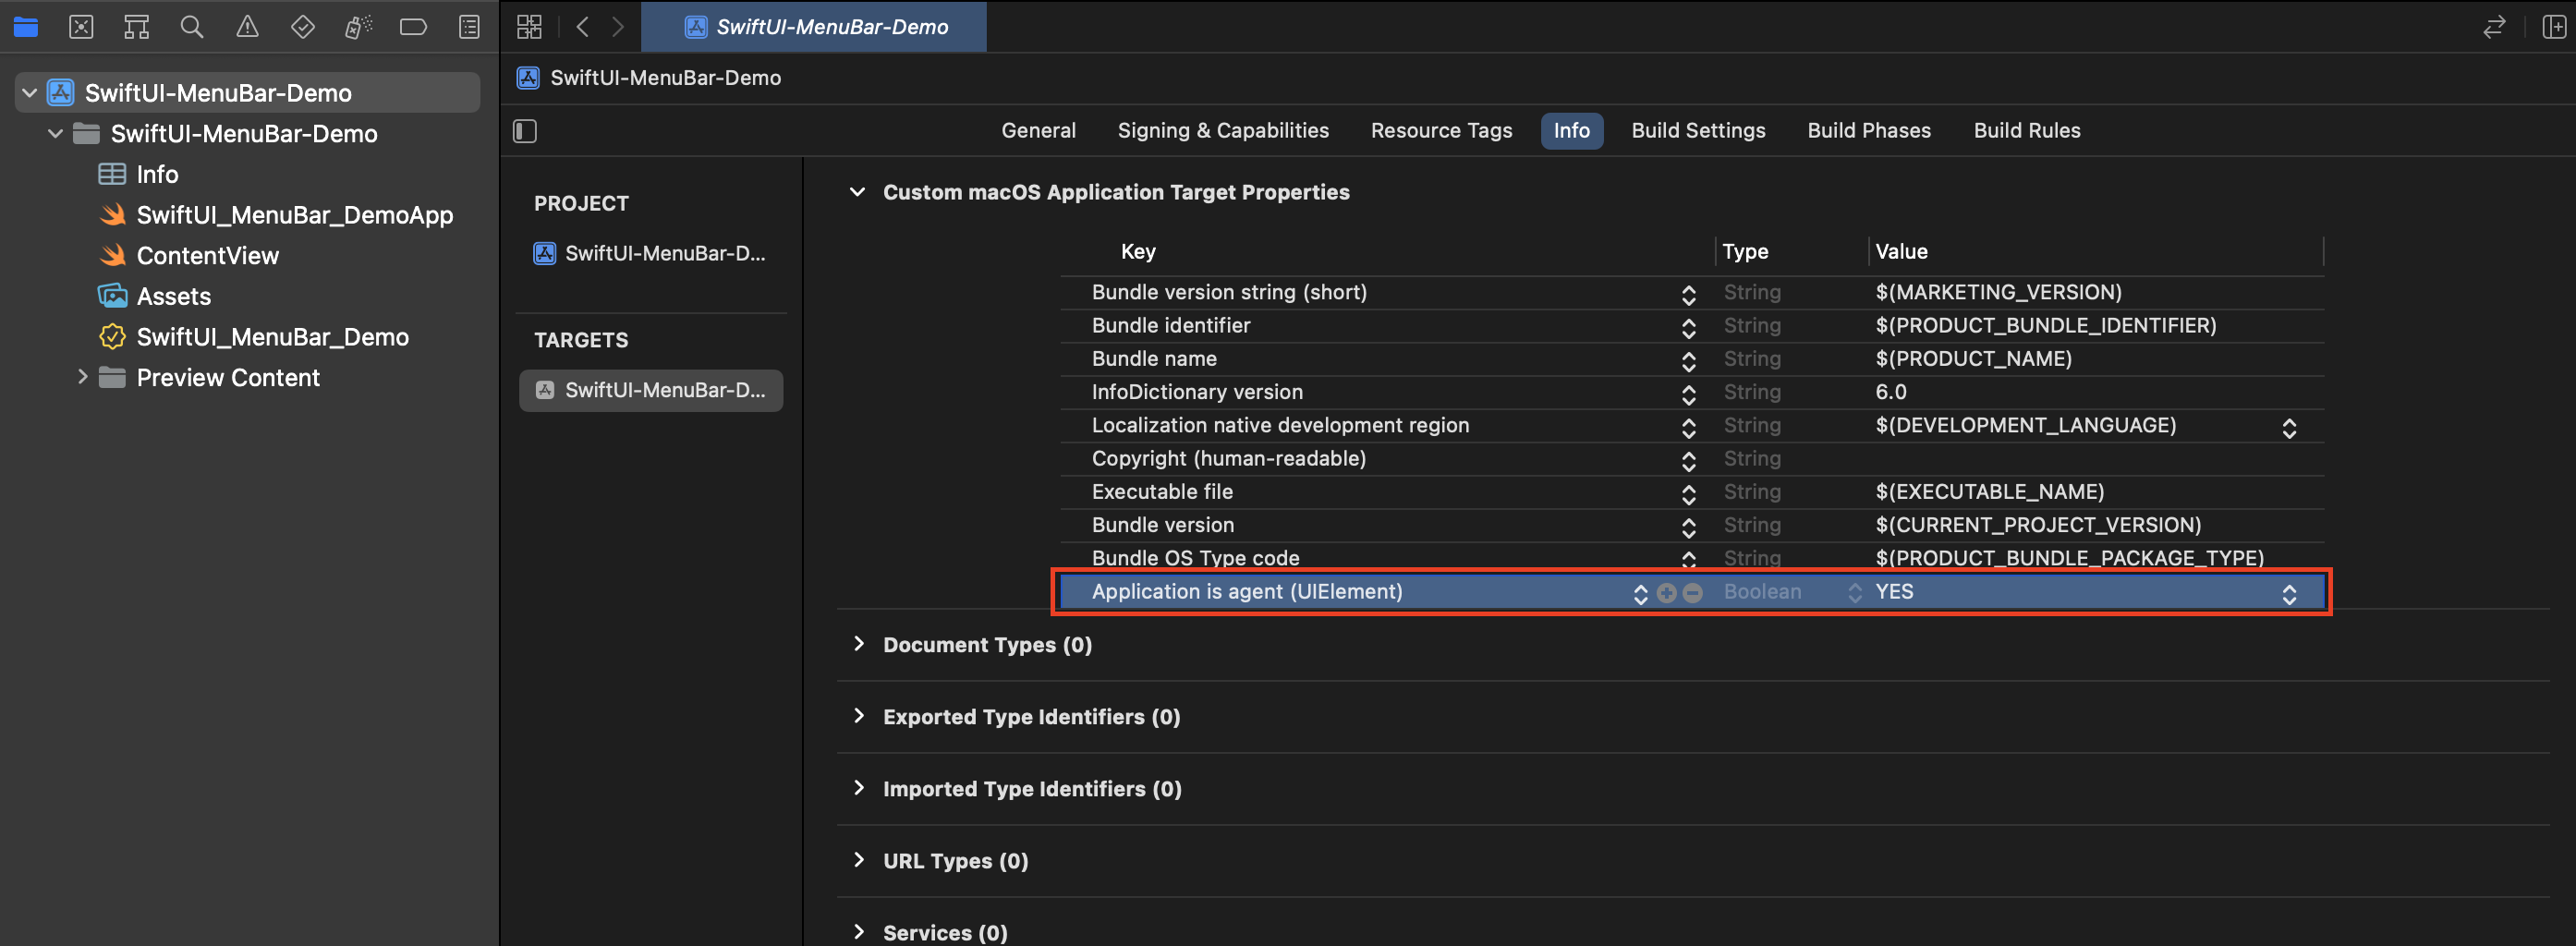
以下の値を設定します。
| Key | Type | Value |
|---|---|---|
| Application is agent (UIElement) | Boolean | Yes |
ソースコードだとこのようになってます
<dict>
	<key>LSUIElement</key>
	<true/>
</dict>
追加機能
- 左クリックではViewを表示
- 右クリックでメニューを表示
上記の仕様にしてみたいと思います。
import SwiftUI

@main
struct SwiftUI_MenuBar_DemoApp: App {
    @NSApplicationDelegateAdaptor(AppDelegate.self) var delegate
    var body: some Scene {
        Settings { }
    }
}

class AppDelegate: NSObject, NSApplicationDelegate {
    var statusBarItem: NSStatusItem!
    var popover = NSPopover()
    func applicationDidFinishLaunching(_ notification: Notification) {
        popover.behavior = .transient
        popover.contentViewController = NSHostingController(rootView: ContentView())
        self.statusBarItem = NSStatusBar.system.statusItem(withLength: CGFloat(NSStatusItem.variableLength))
        guard let button = self.statusBarItem.button else { return }
        // アイコンの設定
        button.image = NSImage(systemSymbolName: "camera.macro", accessibilityDescription: nil)
        // アクションの設定
        button.action = #selector(menuButtonAction(sender:))
+        // 右クリックの設定
+        button.sendAction(on: [.leftMouseUp, .rightMouseUp])
    }
    @objc func menuButtonAction(sender: AnyObject) {
+        guard let event = NSApp.currentEvent else { return }
+        if event.type == NSEvent.EventType.rightMouseUp {
+            let menu = NSMenu()
+            menu.addItem(
+                withTitle: NSLocalizedString("ボタン1", comment: ""),
+                action: #selector(button1),
+                keyEquivalent: ""
+            )
+            menu.addItem(
+                withTitle: NSLocalizedString("ボタン2", comment: ""),
+                action: #selector(button2),
+                keyEquivalent: ""
+            )
+            statusBarItem.menu = menu
+            statusBarItem.button?.performClick(nil)
+            statusBarItem.menu = nil
+            return
+        } else if event.type == NSEvent.EventType.leftMouseUp {
            guard let button = self.statusBarItem.button else { return }
            if self.popover.isShown {
                self.popover.performClose(sender)
            } else {
                // ポップアップを表示
                self.popover.show(relativeTo: button.bounds, of: button, preferredEdge: NSRectEdge.minY)
                // 他の位置をタップすると消える
                self.popover.contentViewController?.view.window?.makeKey()
            }
+        }
    }

+    @objc func button1() {
+        print("ボタン1です")
+    }

+    @objc func button2() {
+        print("ボタン2です")
+    }

}
こんな感じになりました
リリースに向けて
リリースするとなると「アプリを終了ボタン」の実装が必須になります。
私はここで何度もリジェクトされました。
なぜなら、アプリ終了のやり方がわからなかったから!!
こうやるみたいです
Button("Quit") {
    NSApp.terminate(self)
}
ここで注意ポイントがあります
Viewがある場合はView側に「アプリ終了」ボタンを置かないとダメなようです。
Viewがあるのにメニューにアプリ終了ボタンを置くとユーザーを誤解させるUIという理由でリジェクトされます。
おわり
今回作成したプロジェクトです
こちらはリリース済みのGitHubの草を確認できるメニューバーアプリです
こちらも参考にしてみてください