Inputタグのvalue属性の扱いは気をつけろ!
React.js(またはNext.js)で入力フォームといったinputタグを使う機会は数多くあります。
その際に使われる属性の一つにvalue属性の扱いには注意が必要です。
Inputタグにvalue属性を付けると値の更新ができない
普段使うInputタグは、入力制御可能なコンポーネントです。
しかし、React(Next.js)では、属性の使い方を間違えると、制御可能⇒制御不可能へとコンポーネントが変化してしまうという事象が起こてしまいます。
そんな例を下記の2つのサンプルコードを見てみましょう。
①value属性が付いていないInputタグ
☞こちらは、値の更新ができます。
<input type="text" name="sampleText" className="xxxxxx"/>
②value属性が付いているInputタグ
☞これは値の更新ができません。
原因は、React.js(Next.js)側で制御不可能コンポーネントとして扱ってしまうからです。
<input type="text" name="sampleText" value={value} className="xxxxxx"/>
どんな場面で困るのか?事例を紹介
今回、イベント一覧画面から編集したいイベントを選んで編集画面で内容を更新するという事例を考えてみましょう。
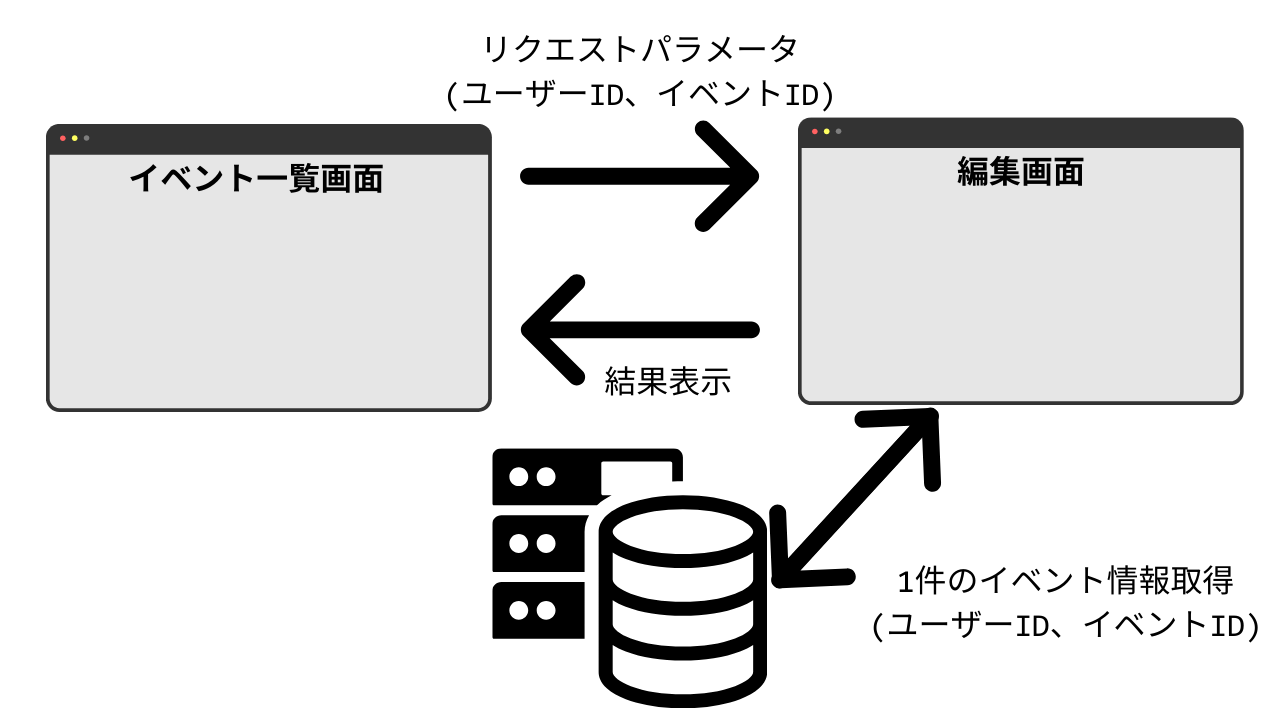
【画面のイメージフロー】
①イベント一覧画面からリクエストパラメータ(ユーザーIDとイベントID)を遷移先の編集画面に送ります。
②リクエストパラメータを受け取った編集画面は、データベースから該当のレコードを1件取得します。
③取得した1件の結果を編集画面に表示します。
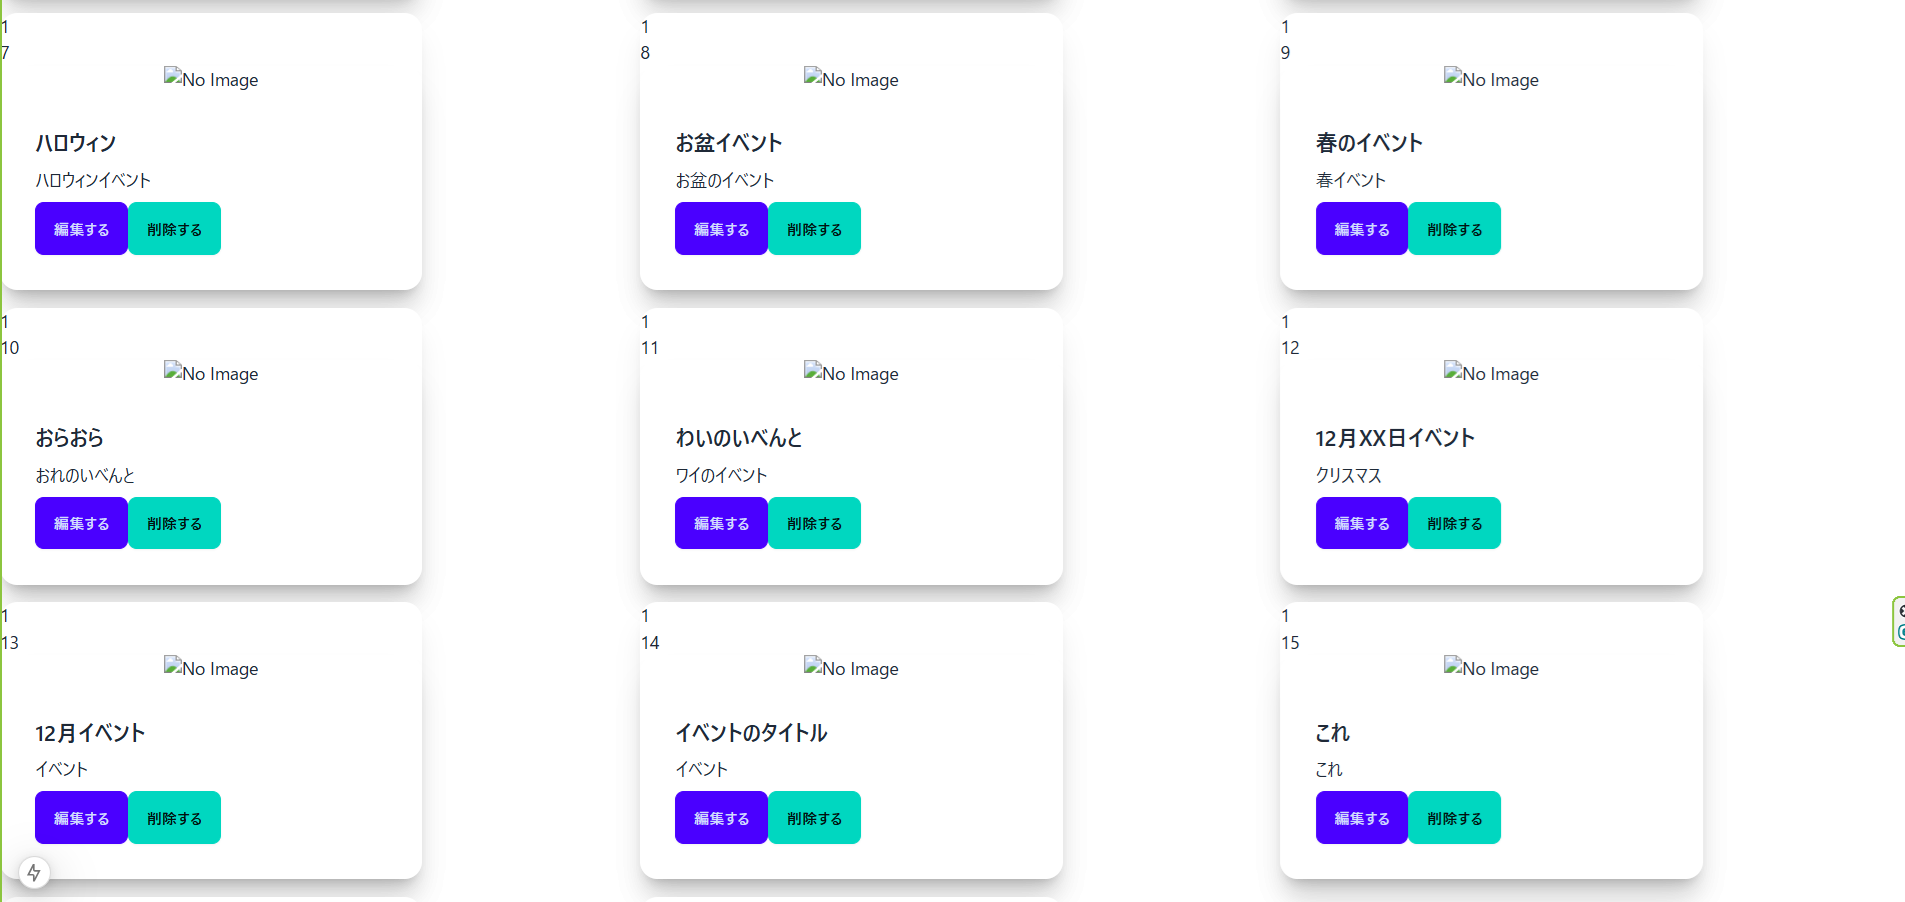
実際の画面差プルです。↓
このイベント一覧画面から編集対象のイベントを選択します。
遷移先の編集画面データベースから値を取得して表示します。

何も考えずInputのvalue属性をつけると入力不可
データベースから取得したデータを画面に表示するためInputタグにvaluse属性を付けてしまうと残念なことに入力ができなくなってしまいます。↓
///何らかの処理
    return (
        <div className="w-full w-96 content-center">
            <div>
                編集画面
            </div>
            <form action="/api/eventEdit" method="POST" className="bg-white shadow-md rounded px-8 pt-6 pb-8 mb-4">
                <div className="userIdArea">
                    <input type="hidden" name="userId" value={targetEvent.userid || ''}/>
                </div>
                <div className="eventIdArea">
                    <input type="hidden" name="eventId" value={targetEvent.eventid || ''}/>
                </div>
                <div className="eventTitleArea">
                    <input
                        type="text"
                        name="eventTitle"
                        value={targetEvent.eventtitle}
                        className="shadow appearance-none border rounded w-full py-2 px-3 text-gray-700 leading-tight"
                    />

                </div>
                <div className="eventDetailArea">
                    <textarea
                        name="eventDetail"
                        value={targetEvent.eventdetail}
                        className="block p-2.5 w-full text-sm text^gray-900 border border-gray-300"
                    ></textarea>
                </div>
                <div className="eventThumbnailArea">
                    <input type="file"
                        name="eventImage"
                        value={targetEvent.eventthumbnailpath}
                        className="file-input file-input-bordered file-input-primary w-full"
                        />
                </div>
            </form>
            <div className="eventEditArea">
                <button className="btn btn-primary">編集する</button>
                <button className="btn btn-accent">クリアする</button>
                <button className="btn btn-secondary" onClick={backToMyDashboard}>戻る</button>
            </div>

        </div>
    )
これでは、イベント情報が全く更新できませんね...
では、どうしたらよいでしょうか...?
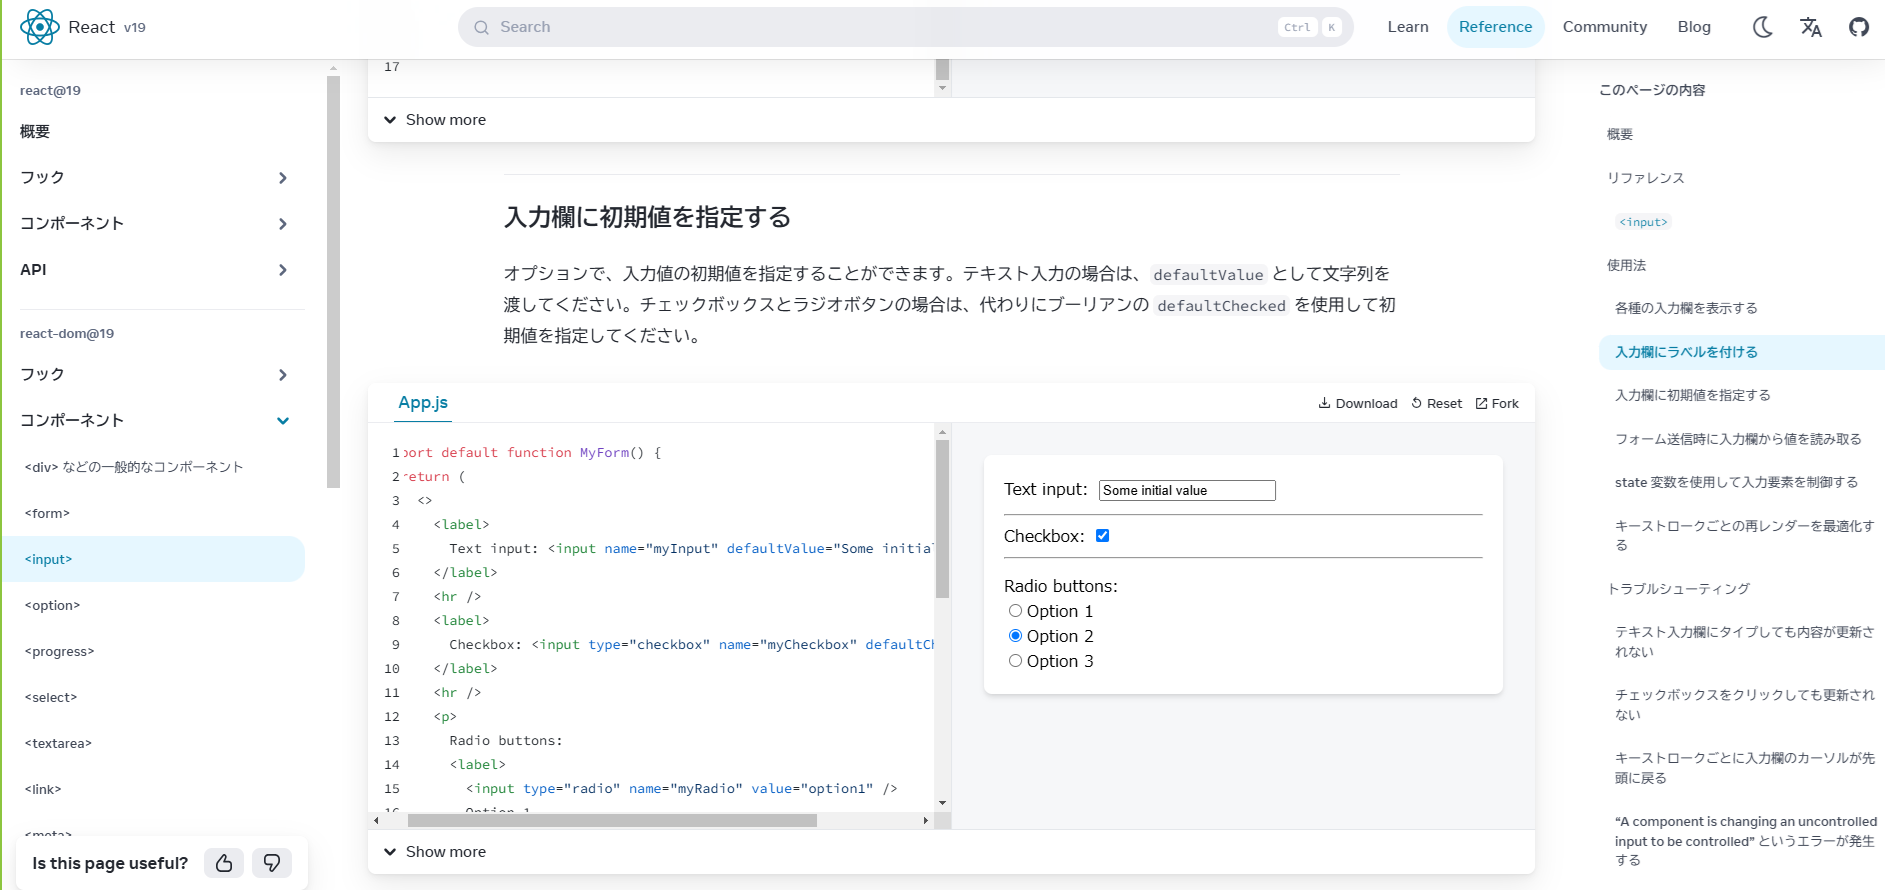
valueではなくdefaultValue属性を付ける
もっともシンプルな方法は、defaultValue属性を付けることです。
使い方はカンタンで、さっきのvalue属性をdefaultValue属性に変えてあげるだけです。
【React公式サイト】
<div className="eventTitleArea">
    <input
        type="text"
        name="eventTitle"
        value={targetEvent.eventtitle}
        className="shadow appearance-none border rounded w-full py-2 px-3 text-gray-700 leading-tight"
    />

</div>
以上を踏まえた全体のソースコードはこちらです↓
'use client'

import { useRouter, useSearchParams } from "next/navigation"
import { useEffect,useState } from "react";
import SelectEvent from "@/app/pages/api/selectEvent";
//import { GETQueryParams } from "@/app/pages/api/urlQueryParameters";

export default function EventEdit(){
    //ルーティングの設定
    const router = useRouter();
    //クライアントコンポーネントフックであるuseSearchParamsを使用する
    const searchParams = useSearchParams();
    //const [targetUserId,settargetUserId] = useState(0);

    //URL Query Paramsからパラメータを取得する
    const userId = searchParams.get('userId');
    const eventId = searchParams.get('eventId');

    console.log("GETパラメータから受け取ったユーザーIDは、" + userId);
    console.log("GETパラメータから受け取ったイベントIDは、" + eventId);

    //ダッシュボードに戻るボタン押下時の処理
    const backToMyDashboard = ()=>{
        router.push("/auth/login/dashboard");
    }
    //状態でイベント情報を管理する
    const [targetEvent,settargetEvent] = useState<any[]>([]);//useState<any>(null);

    //let event:any;
    useEffect(()=>{
        const fetchEvent = async ()=>{
            try{
                console.log("内部のユーザーIDは、" +userId);
                const event = await SelectEvent(Number(userId),Number(eventId));
                console.log("サーバから取得してきた編集対象イベントは、" + event[0]);
                console.log("サーバから取得してきた編集対象イベントは、" + event[0].userid);
                settargetEvent(event[0]);

                console.log("useeffectの編集対象のイベントは、" + JSON.stringify(event[0]));
            }catch(error){
                console.error("イベントの取得中にエラーが発生しました:", error);
            }
        };
        fetchEvent();
    },[userId,eventId]);//[userId,eventId]

    let jsonEvent = JSON.stringify(targetEvent);
    console.log("外の編集対象のイベントは、" + jsonEvent);
    console.log("useEffect外の編集対象のユーザIDは、" + targetEvent.userid);
    console.log("useEffect外の編集対象のイベントタイトルは、" + targetEvent.eventtitle);

    console.log("useEffect外の編集対象のイベントタイトル(targetEventtitle)は、" + targetEvent.eventtitle);

    return (
        <div className="w-full w-96 content-center">
            <div>
                編集画面
            </div>
            <form action="/api/eventEdit" method="POST" className="bg-white shadow-md rounded px-8 pt-6 pb-8 mb-4">
                <div className="userIdArea">
                    <input type="hidden" name="userId" value={targetEvent.userid || ''}/>
                </div>
                <div className="eventIdArea">
                    <input type="hidden" name="eventId" value={targetEvent.eventid || ''}/>
                </div>
                <div className="eventTitleArea">
                    <input
                        type="text"
                        name="eventTitle"
                        defaultValue={targetEvent.eventtitle}
                        className="shadow appearance-none border rounded w-full py-2 px-3 text-gray-700 leading-tight"
                    />

                </div>
                <div className="eventDetailArea">
                    <textarea
                        name="eventDetail"
                        defaultValue={targetEvent.eventdetail}
                        className="block p-2.5 w-full text-sm text^gray-900 border border-gray-300"
                    ></textarea>
                </div>
                <div className="eventThumbnailArea">
                    <input type="file"
                        name="eventImage"
                        defaultValue={targetEvent.eventthumbnailpath}
                        className="file-input file-input-bordered file-input-primary w-full"
                        />
                </div>
            </form>
            <div className="eventEditArea">
                <button className="btn btn-primary">編集する</button>
                <button className="btn btn-accent">クリアする</button>
                <button className="btn btn-secondary" onClick={backToMyDashboard}>戻る</button>
            </div>

        </div>
    )
}
サーバ側で対象のイベント情報を1件取得するコードはこちらです↓
'use server'

import { getDB } from "@/app/lib/db"

export default async function SelectEvent(userId:Number,eventId:Number){
    //データベースに接続する
    const connection = await getDB();
    //let targetEvent:any;
    try{
        const [event] = await connection.query(`SELECT * FROM eventinfo WHERE userid= ? AND eventid= ?`,[userId,eventId]);
        console.log(event);
        const targetEvent = [event][0]; //[event][0]
        console.log("取得したイベントは、" + targetEvent);
        console.log("取得したイベントは、" + JSON.stringify(targetEvent));
        return targetEvent;
    }catch(error){
        console.log(error);
    }finally{
        await connection.end();
    }

}
以上です。
スペシャルサンクス