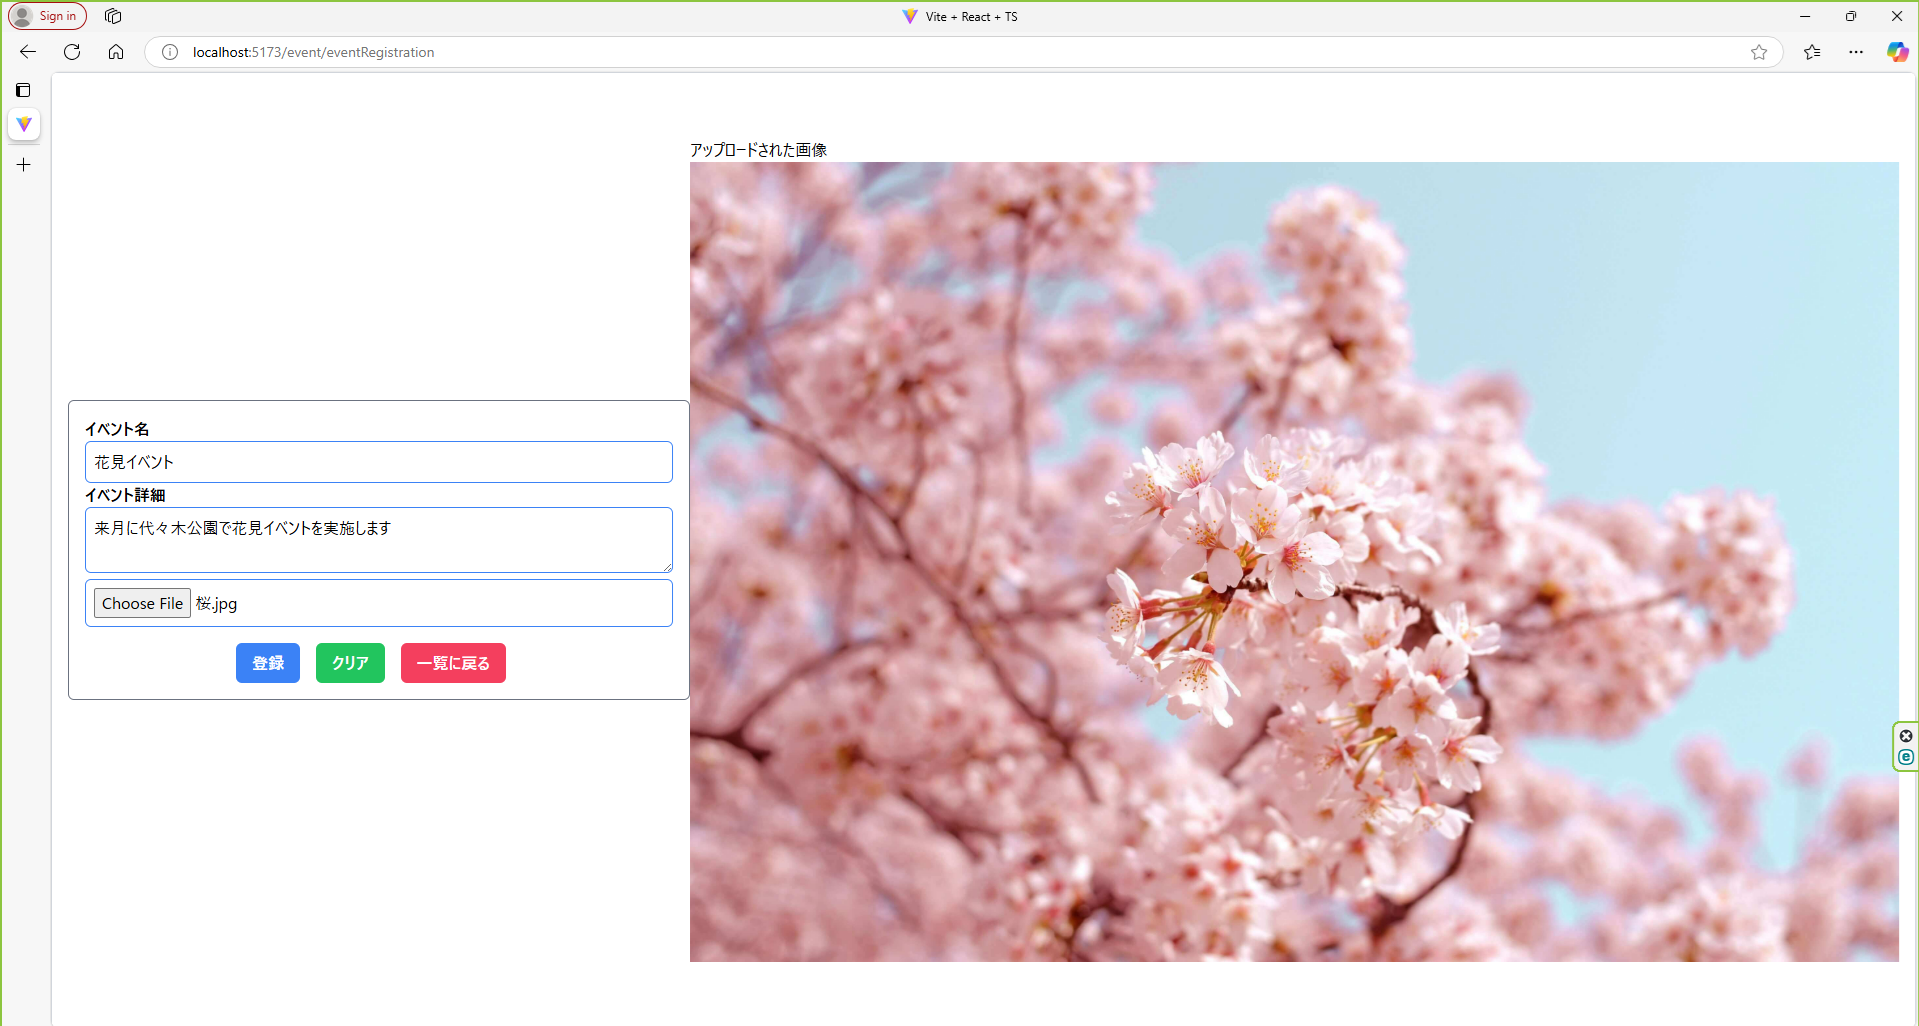
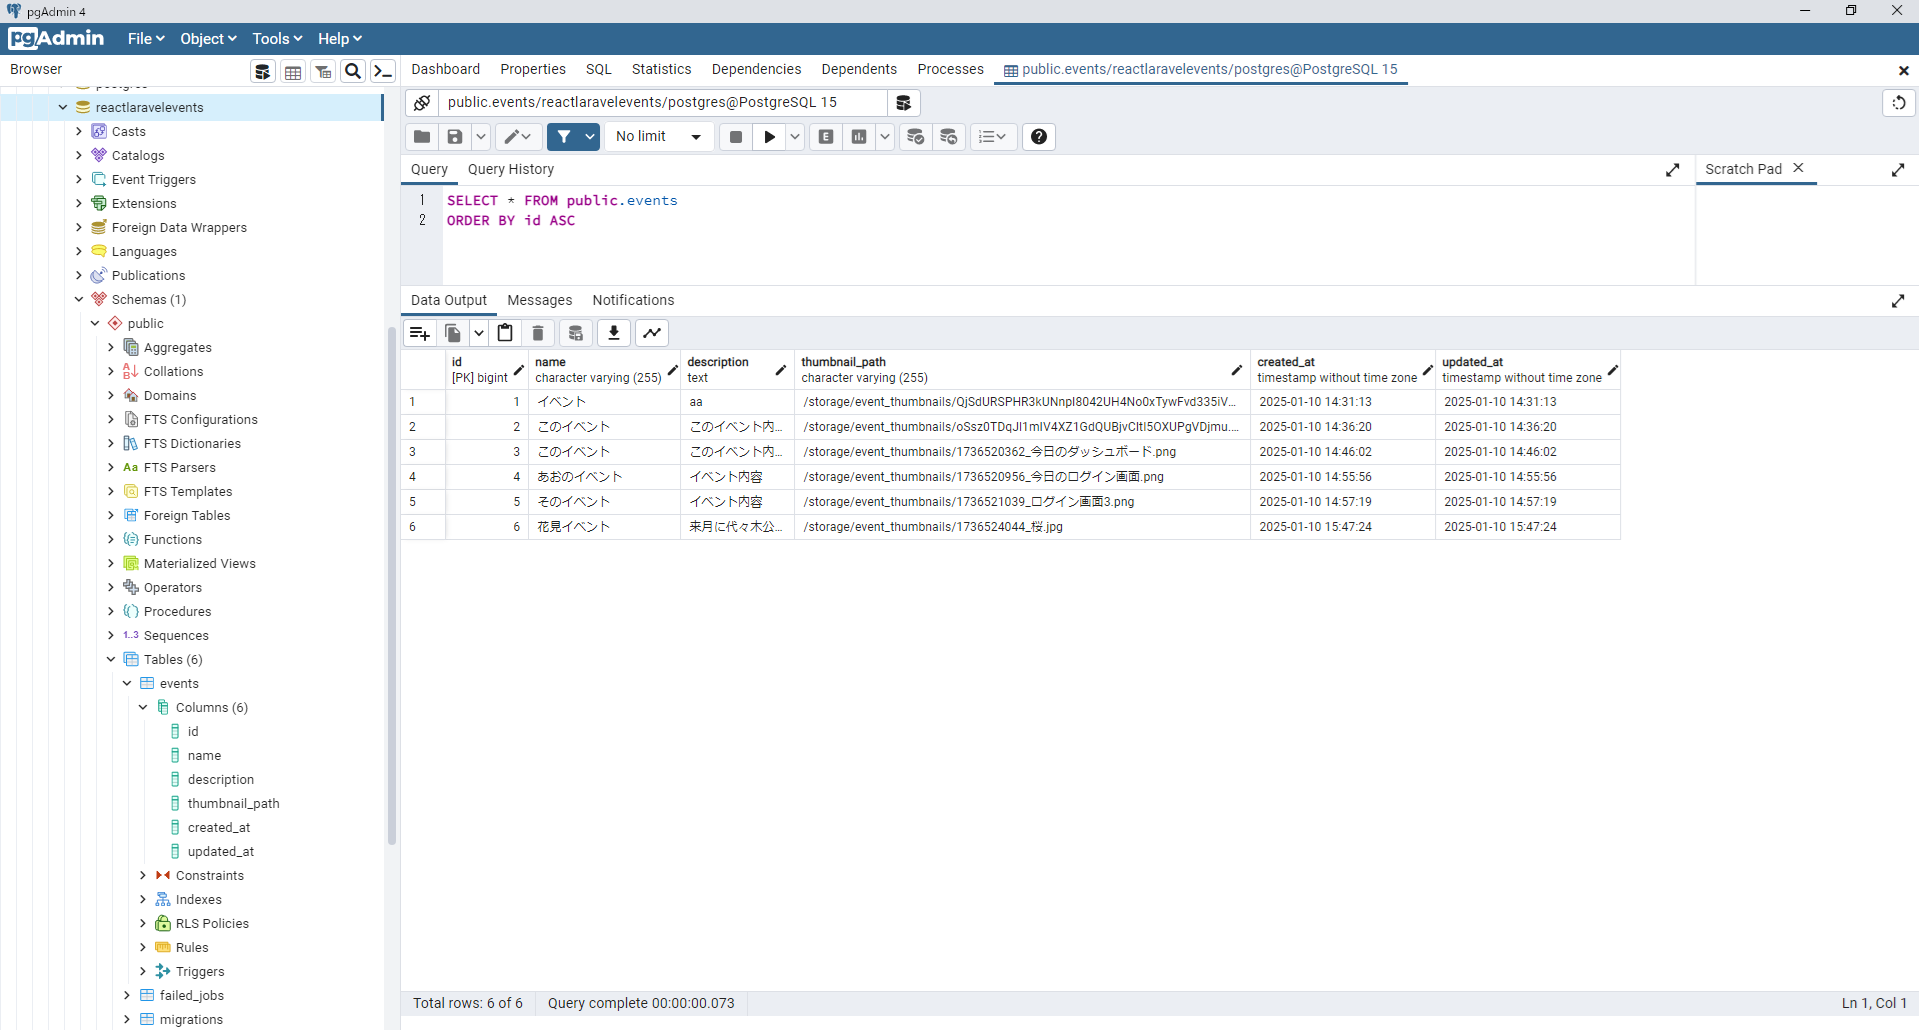
サンプルイメージ
今回作るサンプルは下記のとおりです。
プログラムのロジックは、下記の通りになります。
①画像ファイルの送信
現在、eventThumbnailにe.target.valueを設定していますが、画像ファイルはFileオブジェクトであるため、e.target.files[0]を使う必要があります。
②handleSubmit関数の非同期処理
非同期関数にはasyncをつける必要があります。また、レスポンスを正しく処理します。
③APIへのデータ送信
送信時、FormDataに各データを追加して送信します。
④バックエンド側の処理(Laravel)
Laravel側で受け取り、画像を保存し、データをPostgreSQLに登録するロジックを記載します。
ディレクトリ構成
準備中...
まずはフロント(React)側を実装する
ナビゲーションバーを作成する
ナビゲーションバーには、①イベント登録と②ログアウトボタンを設置しています。
また、画面間を行き来するためにuseNavigateを追加しています。
import { useNavigate } from "react-router-dom"

export default function Navbar(){
    //ルーティング設定
    const navigate = useNavigate();
    //イベント登録ボタンクリック時の処理
    const goToEventRagistration = ()=>{
        navigate('/event/eventRegistration');
    }
    //ログアウトボタンをクリックしたときの処理
    const backToLogin = ()=>{
        navigate('/');
    }

    return (
        <nav className="shadow-md relative flex w-full">
            <div className="ml-4 mt-4 mb-4 mr-4">
                <div className="flex items-center">
                    <button
                        type="button"
                        className="bg-blue-500 text-white font-bold rounded-lg px-4 py-2 me-3 inline-block"
                        onClick={goToEventRagistration}
                        >
                        イベント登録
                    </button>
                    <button
                        type="button"
                        className="bg-pink-500 text-white font-bold rouded-lg px-4 py-2"
                        onClick={backToLogin}>
                        ログアウト
                    </button>
                </div>
            </div>
        </nav>
    )
}
イベント登録画面を実装する
この画面で、サーバ通信をするためHTTP通信ライブライAxiosを使います。
また、AxiosでPOST通信するにあたり、Content-Typeをmultipart/form-dataに設定している場合、リクエストデータはFormDataオブジェクトとして送信する必要があります。
const formData = new FormData();
formData.append("eventName", eventName);
formData.append("eventDescription", eventDescription);
formData.append("eventThumbnail", eventThumbnail);

const response = await axios.post("http://localhost:8000/api/eventRegistration", formData, {
    headers: {
        "Content-Type": "multipart/form-data",
    },
});

//登録処理...
全体のコードはこちら↓
import { useNavigate } from "react-router-dom"
import { useState } from "react";
import axios from "axios";

export default function RegisterEvent(){
    //ルーティングの設定
    const navigate = useNavigate();

    const [eventName,setEventName] = useState("");
    const [eventDescription,setEventDescription] = useState("");
    const [eventThumbnail,setEventThumbnail] = useState<File | null>(null);
    //データベース登録後の画像パス
    const [uploadedImageUrl, setUploadedImageUrl] = useState<string>("");

    //登録ボタン押下時の処理
    const handleSubmit = async(e:React.FormEvent)=>{
        // POST送信するため、かつデフォルト動作を防止
        e.preventDefault();
        //イベント名、イベント内容が空の場合はデータベース登録しない
        if(!eventName || !eventDescription){
            alert("イベント名とイベント内容を入力してください。");
            return
        }
        //イベント画像が空文字列の場合はデータベース登録しない。
        if(!eventThumbnail){
            alert('画像を選択してください。');
            //リターンして処理終了
            return
        }

        const formData = new FormData();
        formData.append("eventName",eventName);
        formData.append("eventDescription",eventDescription);
        formData.append("eventThumbnail",eventThumbnail);
        console.log("フォームデータは、" + formData);

        formData.forEach((value, key) => {
            console.log(key, value);
          });

        try{
            const response = await axios.post("http://localhost:8000/api/eventRegistration",formData,{
                headers:{
                    "Content-Type":"multipart/form-data",
                }
            });
            if(response.request.status === 200){
                const { eventName,eventDescription,eventThumbnail } = response.data;
                alert(`登録成功:${eventName},${eventDescription},${eventThumbnail}`);
                //データベースに登録された画像をセットする
                setUploadedImageUrl(eventThumbnail);
                //navigate('/dashboard'); ※アップローされた画像を画面で確認するためいったんコメントアウト
            }
        }catch(error){
            console.error(error);
            alert("登録に失敗しました");
        }

    }

   const backToDashboard = ()=>{
        navigate('/dashboard');
   }

    return (
        <div className="w-svw h-svh flex items-center justify-center min-h-screen border border-gray-300 px-4 py-4">
            <form onSubmit={handleSubmit} className="border border-gray-500 px-4 py-4 rounded-md w-full">
                <div>
                    <label className="font-bold">イベント名</label>
                    <input
                        type="text"
                        name="eventName"
                        maxLength={10}
                        onChange={(e)=>setEventName(e.target.value)}
                        className="w-full border border-blue-500 px-2 py-2 rounded-md hover:bg-blue-100"
                        placeholder="花見イベント"
                        required/>
                </div>
                <div>
                    <label className="font-bold">イベント詳細</label>
                    <textarea
                        name="eventDescription"
                        maxLength={30}
                        onChange={(e)=>setEventDescription(e.target.value)}
                        className="w-full border border-blue-500 px-2 py-2 rounded-md hover:bg-blue-100"
                        placeholder="花見のイベント詳細"
                        required
                        ></textarea>
                </div>
                <div>
                    <input
                        type="file"
                        name="eventThumbnail"
                        accept="image/*"
                        className="w-full border border-blue-500 px-2 py-2 rounded-md hover:bg-blue-100"
                        onChange={(e)=>setEventThumbnail(e.target.files?.[0] || null)}
                        />
                </div>
                <div className="flex items-center justify-center">
                    <button
                        type="submit"
                        name="eventRegistration"
                        className="bg-blue-500 text-white font-bold px-4 py-2 rounded-md mt-4 mr-4"
                        >
                            登録
                    </button>
                    <button
                        type="button"
                        className="bg-green-500 text-white font-bold rounded-md px-4 py-2 mt-4 mr-4">
                            クリア
                    </button>
                    <button
                        type="button"
                        className="bg-rose-500 text-white font-bold rounded-md px-4 py-2 mt-4 mr-4"
                        onClick={backToDashboard}
                        >
                    一覧に戻る
                </button>
                </div>
            </form>
            <div>
                {uploadedImageUrl && (
                    <div>
                        <h2>アップロードされた画像</h2>
                        <img src={`http://localhost:8000${uploadedImageUrl}`} alt="イベント画像"/>
                    </div>
                )}
            </div>
        </div>

    )
}
【★重要★】React Routerを設定する
新しく登録画面を作成したので、このパスを読み込ませる必要があります。
なので、index.tsxにルートパスを追加しておきましょう。
import ReactDOM from "react-dom/client";
import { BrowserRouter, Routes, Route } from "react-router-dom";
import App from "./App";
import Dashboard from "./dashboard/page";
import RegisterEvent from "./event/eventRegistration/page";
import "./index.css"; // Tailwind CSSをインポート

const Root = () => (
  <BrowserRouter>
    <Routes>
      {/* ルート設定 */}
      <Route path="/" element={<App />} />
      <Route path="/dashboard" element={<Dashboard />} />
      <Route path="/event/eventRegistration" element={<RegisterEvent/>}/>
    </Routes>
  </BrowserRouter>
);

const rootElement = document.getElementById("root");
if (rootElement) {
  const root = ReactDOM.createRoot(rootElement);
  root.render(<Root />);
} else {
  console.error("Root element not found");
}
サーバ側(Laravel)を実装する。
つづいて、Laravel側を作成していきます。
Controllerクラスの作成
EventController.phpを作成するため、下記のコマンドを実行します。
php artisan make:controller EventController
EventController.phpを下記のように修正します。
<?php

namespace App\Http\Controllers;

use Illuminate\Http\Request;
use Illuminate\Support\Facades\Storage;//20250110追加
use App\Models\Event;//2025.01.10追加

class EventController extends Controller
{
    public function registerEvent(Request $request)
    {
        \Log::info('リクエストデータ:', $request->all());
        $request->validate([
            'eventName' => 'required|string|max:255',
            'eventDescription' => 'required|string|max:1000',
            'eventThumbnail' => 'required|image|mimes:jpeg,png,jpg,gif|max:2048',
        ]);

        //元のファイル名を取得する
        $originalFileName = $request->file('eventThumbnail')->getClientOriginalName();
        //ファイル名が重複しないようにタイムスタンプを追加する。
        $fileName = time().'_'.$originalFileName;

        //カスタムファイル名で画像を保存する
        $imagePath = $request->file('eventThumbnail')->storeAs('public/event_thumbnails',$fileName);
        //公開URLを生成する
        $imageUrl = Storage::url($imagePath);

        //データベースに保存する
        $event = new Event();
        $event->name = $request->eventName;
        $event->description = $request->eventDescription;
        $event->thumbnail_path = $imageUrl;
        $event->save();

        return response()->json([
            'eventName' => $event->name,
            'eventDescription' => $event->description,
            'eventThumbnail' => $imageUrl,
        ],200);
    }
}
ルートの設定
フロントからのAPI連携するためにルートを設定します。
<?php

use Illuminate\Http\Request;
use Illuminate\Support\Facades\Route;
use App\Http\Controllers\RegisterController;//2025.01.08追加
use App\Http\Controllers\EventController;//2025.01.10追加

/*
|--------------------------------------------------------------------------
| API Routes
|--------------------------------------------------------------------------
|
| Here is where you can register API routes for your application. These
| routes are loaded by the RouteServiceProvider and all of them will
| be assigned to the "api" middleware group. Make something great!
|
*/

Route::middleware('auth:sanctum')->get('/user', function (Request $request) {
    return $request->user();
});

Route::post('/login',[RegisterController::class,'login']);//2025.01.08追加
Route::post('/eventRegistration',[EventController::class, 'registerEvent']);//2025.01.10追加
Modelクラスの作成
ブラウザから取得してきたデータを保持するためのEvent.phpを作成します。
php artisan make:model Event
Event.phpを下記のように修正します。
<?php

namespace App\Models;

use Illuminate\Database\Eloquent\Factories\HasFactory;
use Illuminate\Database\Eloquent\Model;

class Event extends Model
{
    use HasFactory;
    //20250110追加
    protected $fillable = ['name','description','thumbnail_path'];
}
Migrationクラスの作成
LaravelとPostgreSQLでのデータマッピングをするためにcreate_events_table.phpを作成します。
php artisan make:migration create_events_table.php
create_events_table.phpを下記のように修正します。
<?php

use Illuminate\Database\Migrations\Migration;
use Illuminate\Database\Schema\Blueprint;
use Illuminate\Support\Facades\Schema;

return new class extends Migration
{
    /**
     * Run the migrations.
     */
    public function up(): void
    {
        Schema::create('events', function (Blueprint $table) {
            $table->id();
            $table->string('name');
            $table->text('description');
            $table->string('thumbnail_path');
            $table->timestamps();
        });
    }

    /**
     * Reverse the migrations.
     */
    public function down(): void
    {
        Schema::dropIfExists('events');
    }
};
マイグレーションを設定して、データ接続は完了です。
php artisan migrate
【重要』シンボリックリンクを作成する
サーバ側(Laravel)で保存した画像をブラウザで表示したいのでシンボリックリンクを設定する必要があります。
storageディレクトリの公開設定は、忘れがちなので覚えておいてください
そのため、下記のPHPコマンドを入力・実行しましょう。
php artisan storage:link
CORS設定
フロントエンド(React)とバックエンド(Laravel)が異なるドメインやポートで動作している場合、CORS (Cross-Origin Resource Sharing) の設定が必要です。
Laravelのapp/Http/Middleware/VerifyCsrfToken.phpに以下を追加して、APIエンドポイントでCSRFトークンを無視させます。
protected $except = [
    'api/eventRegistration',
];
トラブルシューティング
作成にあたり、注意すべきポイントをまとめました。
axios.postなのにネットワークはGETになっている場合
1. onSubmitでリロードが発生している
のonSubmitイベントはデフォルトでページをリロードします。その結果、意図せずGETリクエストが送信されることがあります。解決策: e.preventDefault()を追加 handleSubmit関数の最初に以下のコードを追加してください。
const handleSubmit = async (e: React.FormEvent) => {
  e.preventDefault(); // デフォルト動作を防止
2. awaitとasyncが一致していない
非同期処理の関数をasyncで宣言していない場合、関数が中断され、フォームのデフォルト動作(リロード)が発生します。
解決策: 確認 handleSubmitがasyncであることを確認してください
3. action属性が指定されている場合
タグにaction属性が指定されていると、それが優先される可能性があります。解決策: 確認して削除
タグにactionが設定されていないことを確認してください。<form onSubmit={handleSubmit}>
4. buttonタグのtype属性が適切でない
タグのtype属性がbuttonでない場合、デフォルトでsubmitとして扱われます。これが原因で、意図しないリクエストが送信されることがあります。
解決策: 確認 送信ボタンにはtype="submit"を、他のボタンにはtype="button"を指定します。
<button type="submit" name="eventRegistration">登録</button>
5. フォームのデータが正しく送信されていない
axios.postのformDataが正しく設定されていない可能性があります。FormDataオブジェクトの中身を確認してください。
デバッグ方法: console.logで確認 以下のコードを追加して、送信データを確認します。
formData.forEach((value, key) => {
  console.log(key, value);
});
HTTPステータスが500になっているとき
Laravelのルート設定を確認
ルートが正しく設定されていないと、リクエストがコントローラに到達しません。
APIルートの確認 (routes/api.php) 以下のようにregisterEventが登録されているか確認します。
Controllerクラスのインポートは忘れやすいので注意しましょう!
use App\Http\Controllers\EventController; ※この部分をわすれないこと!

Route::post('/eventRegistration', [EventController::class, 'registerEvent']);
(役立ちメモ)Laravelのstoreで画像パスがハッシュ化される
Laravelで画像保存時に元のファイル名を保持するには、保存プロセスでファイル名をカスタマイズする必要があります。
デフォルトでは、Laravelのstoreメソッドはファイル名をハッシュ化して保存しますが、storeAsメソッドを使うと任意の名前で保存できます。
以下のようにコードを修正してください。
public function registerEvent(Request $request)
{
    \Log::info('リクエストデータ:', $request->all());

    $request->validate([
        'eventName' => 'required|string|max:255',
        'eventDescription' => 'required|string|max:1000',
        'eventThumbnail' => 'required|image|mimes:jpeg,png,jpg,gif|max:2048',
    ]);

    // 元のファイル名を取得
    $originalFileName = $request->file('eventThumbnail')->getClientOriginalName();

    // ファイル名が重複しないようにタイムスタンプを追加
    $fileName = time() . '_' . $originalFileName;

    // カスタムファイル名で画像を保存する
    $imagePath = $request->file('eventThumbnail')->storeAs('public/event_thumbnails', $fileName);

    // 公開URLを生成
    $imageUrl = Storage::url($imagePath);

    // データベースに保存する
    $event = new Event();
    $event->name = $request->eventName;
    $event->description = $request->eventDescription;
    $event->thumbnail_path = $imageUrl; // カスタムファイル名のパス
    $event->save();

    return response()->json([
        'eventName' => $event->name,
        'eventDescription' => $event->description,
        'eventThumbnail' => $imageUrl,
    ], 200);
}
ポイント
元のファイル名を取得
$request->file('eventThumbnail')->getClientOriginalName()でアップロードされたファイルの元の名前を取得します。
重複回避のための工夫
元のファイル名が重複しないように、タイムスタンプ(time())を追加しています。
storeAsメソッドを使用
storeAs('ディレクトリ名', 'カスタムファイル名')で、任意の名前でファイルを保存します。
データベースへの保存
元のファイル名を含むURLを保存します。
(役立ちメモ)画像URLをReactに渡す
画像をアップロードした際に生成されるURL(例:/storage/event_thumbnails/)をLaravelのAPIレスポンスとしてReactに返します。
//何らかの処理...

return response()->json([
    'eventName' => $event->name,
    'eventDescription' => $event->description,
    'eventThumbnail' => $imageUrl, // 画像のURLを含む
], 200);
$imageUrlには、Storage::url($imagePath)で生成されたURLが含まれています。このURLは、Reactから画像を表示する際に使用します。
Reactで画像を表示
Laravelから返されたURLをReactで受け取り、そのURLを使って画像を表示します。
例:Reactコードの修正
以下は、登録後に画像を表示する例です。
import { useState } from "react";
import axios from "axios";

export default function RegisterEvent() {
    const [eventName, setEventName] = useState("");
    const [eventDescription, setEventDescription] = useState("");
    const [eventThumbnail, setEventThumbnail] = useState<File | null>(null);
    const [uploadedImageUrl, setUploadedImageUrl] = useState<string>("");

    const handleSubmit = async (e: React.FormEvent) => {
        e.preventDefault();

        if (!eventThumbnail) {
            alert("画像を選択してください。");
            return;
        }

        const formData = new FormData();
        formData.append("eventName", eventName);
        formData.append("eventDescription", eventDescription);
        formData.append("eventThumbnail", eventThumbnail);

        try {
            const response = await axios.post(
                "http://localhost:8000/api/eventRegistration",
                formData,
                {
                    headers: {
                        "Content-Type": "multipart/form-data",
                    },
                }
            );

            if (response.status === 200) {
                const { eventThumbnail } = response.data;
                setUploadedImageUrl(eventThumbnail); // 画像のURLを保存
                alert("登録成功!");
            }
        } catch (error) {
            console.error(error);
            alert("登録に失敗しました");
        }
    };

    return (
        <div>
            <form onSubmit={handleSubmit}>
                <div>
                    <label>イベント名</label>
                    <input
                        type="text"
                        name="eventName"
                        maxLength={10}
                        onChange={(e) => setEventName(e.target.value)}
                        required
                    />
                </div>
                <div>
                    <label>イベント内容</label>
                    <textarea
                        name="eventDescription"
                        maxLength={30}
                        onChange={(e) => setEventDescription(e.target.value)}
                    ></textarea>
                </div>
                <div>
                    <input
                        type="file"
                        name="eventThumbnail"
                        accept="image/*"
                        onChange={(e) => setEventThumbnail(e.target.files?.[0] || null)}
                    />
                </div>
                <button
                    type="submit"
                    name="eventRegistration"
                    className="bg-blue-500 text-white font-bold px-4 py-2 rounded-sm"
                >
                    登録
                </button>
            </form>

            {uploadedImageUrl && (
                <div>
                    <h3>アップロードされた画像:</h3>
                    <img src={`http://localhost:8000${uploadedImageUrl}`} alt="イベント画像" />
                </div>
            )}
        </div>
    );
}
↑コード解説
APIレスポンスを使用
Laravelから返されるeventThumbnail(画像のURL)をReact側でuploadedImageUrlとして保存します。
画像を表示
タグのsrc属性に、http://localhost:8000(アプリのURL)と画像のURLを組み合わせて表示します。


